
Intermediate
Intermediate
- Understand how to work different rhythmic subdivisions into a rock groove.
- Combine related arpeggios all over the fretboard.
- Learn how to combine pentatonic sounds with arpeggio-based lines.
In my experience, constructing lines has always been about texture and structure. Developing ideas for soloing and writing melodies takes a keen sense of harmonic and rhythmic context. It’s about seducing the listener and delivering a ride that’s hard to forget—a ride that caters to the listener. Of course, it’s important to write for yourself and from the heart, but also remember that if your heart’s intent is to inspire others, then you’re on the right track for the long haul. And this is where melody comes in.
Melody deserves a certain level of priority in relation to harmony and rhythm. In this lesson, I’m going to show you a quick way to start improving your lines. The good news is music knows no bounds and music doesn’t care what level you’re at. Harmony and rhythm need to help each other tell your story.
In Ex. 1 we’ll be playing the Em7 arpeggio (E–G–B–D) in two positions. Don’t worry, we won’t get into too much theory, just remember these shapes can be transposed into any key. The top one starts in 10th position and shifts up the neck, while the bottom one starts in 5th position. Getting these under your fingers will help map out quite a bit of the fretboard. I try to only visualize one octave at a time, and then take that shape and move it wherever I need to chase the melodic and rhythmic ideas that inspire me.

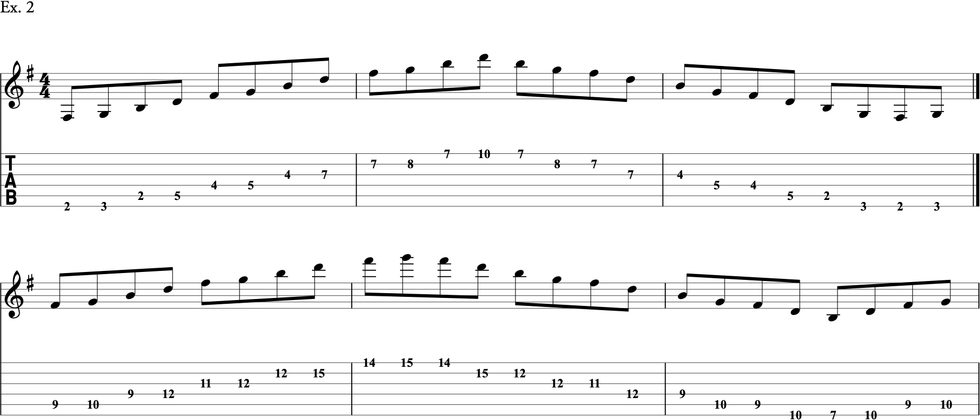
Ex. 2 follows the same idea, but this time using a Gmaj7 arpeggio (G–B–D–F#). I’ve chosen E minor and G major because they are closely related key centers. When learning these arpeggios, focus on the string pairs that occur in each octave. In the extended arpeggio that ascends from the 2nd fret, notice how the patterns recur in each octave. That’s not always the case, as you’ll see in the second arpeggio that ascends from the 9th fret.
Next, we’re going to use the first Gmaj7 arpeggio—the one with the recurring pattern—to practice running through a sequence. Think of Ex. 3 in groups of five. When practicing such lines, I like to use drum grooves instead of a metronome. Now here’s the twist: To progressively challenge my technique, I keep changing the subdivision of the meter I’m using. For example, we’re in 4/4 time here. As I develop the sequence, I’ll increase the subdivision from quarter-notes, to quarter-note triplets, to eighth-notes, to eighth-note triplets, then 16th-notes, and finally 16th-note triplets. That not only increases my speed but it also forces me to be rhythmically aware, thus giving me both speed and accuracy. It gives me full control. Take your time with this example because we’ll apply the same shifting-subdivision concept to the next one.
We revisit the Em7 arpeggio pattern at the 12th fret for Ex. 4. Let’s take a moment to talk about picking. Please use whatever technique you feel most comfortable with, but if you must know, in the corresponding audio clip I’m using as much legato technique as I can. For those not familiar with this term, it means I’m using hammer-ons and pull-offs to sound many of the notes, as indicated in the notation and tab. But there’s no need to get hung up in the picking technique. If you want to pick every note using alternate or economy picking, then do so with style. If you want to hybrid pick, go for it. The point is to increase your rhythmic knowledge and execute some creative ideas.
Now it’s time to step up the subdivisions. In Ex. 5 and Ex. 6, we’re using the same arpeggios we mapped out earlier, only this time we’re playing 16th-notes. If this is something you haven’t done before, don’t be alarmed. Just think of it as a slight increase in speed. Learning to shift subdivisions with seamless control is a great way to expand your ability to develop lines.
Enough with the exercises—let’s make some music. Ex. 7 starts out by traversing the Em7 arpeggio with 16th-notes, then transitions into the next octave using 16th-note triplets. Then for variety, we mix in some pentatonic lyricism. That brings me to a side note: Always step away for a moment from using only arpeggios by mixing in some pentatonic or scalar lyricism to your lines. A line composed of only arpeggios can sound stiff and redundant. One way to avoid this is to sprinkle some scale tones into the phrase.
In Ex. 8, we’re using Em7 arpeggios again, but the position conveniently gives us a full three octaves to work with. Instead of sticking exclusively to the basic shape, I also included some pentatonic moves. Notice how mixing 16th-notes and 16th-note triplets add color to the line. The key to sounding like a professional player is to make sure your playing offers the listener variety in rhythm and note choice.
We head back to the Gmaj7 shape for Ex. 9. It starts out in the lowest octave, which is at the 2nd fret, and once again mixes in that good ol’ E minor pentatonic (E–G–A–B–D) tonality. We repeat the same thing an octave higher, but because we run out of real estate, we need to slide up before finishing off the line in a G major tonality.
In our final example (Ex. 10), we return to the Gmaj7 arpeggio in its higher position, though we’re treating it a bit more lyrically this time around. No sequences, just playing bits and pieces of the arpeggio.