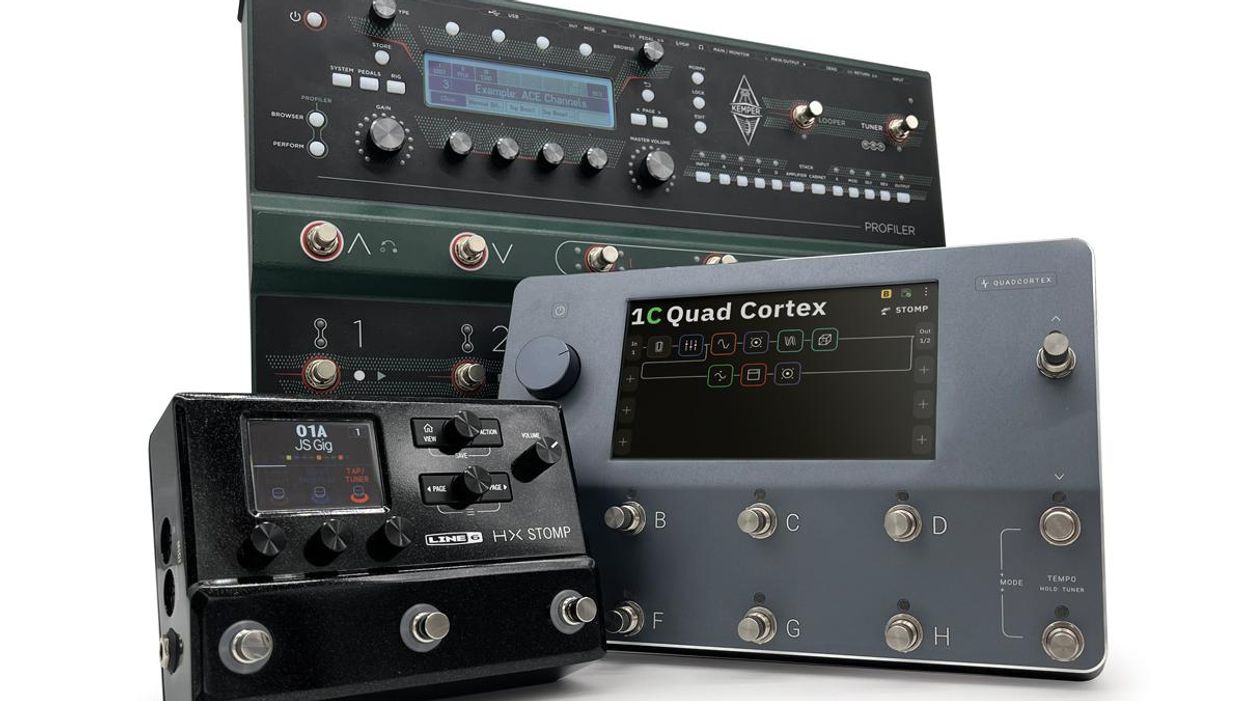
Kemper Profiler Stage, Nueral DSP Quad Cortex & Line 6 HX Stomp (clockwise from top)
A deep dive into faux amps, futuristic setups, and how to use modern technology’s powers for good.
The jump between analog and digital gear has never been more manageable. It no longer takes a rack full of outboard gear with a six-figure price tag to help realize not only the tone you have in your head, but the expansive workflows that started to pop up in the early ’80s. We’re now about a decade into the modern era of digital modelers and profilers and it seems like the technology has finally come into its own. “This is really the first time in a while where you can have bar bands playing the exactsame gear as stadium acts,” says Cooper Carter, a Fractal Audio Systems production consultant who has done sound design and rig building for Neal Schon, James Valentine, John Petrucci, and others.
That democratization of pro-level workflows has opened new and exciting paths for guitarists to explore. Barry O’ Neal, who is the chief puzzle solver for Xact Tone Solutions in Nashville, has built rigs for some of the biggest acts in the world, including Taylor Swift, Bon Iver, and Peter Frampton. “In the beginning, all gear was pro gear, to an extent,” he says. “There is a line of demarcation between pro-grade gear and consumer gear. And there used to be a lot clustered around that line. Now, they are all either way above or way below.”
At this point, the difference between modeling technology mainly has to do with features. Do you need more inputs and outputs? Is direct recording via USB a priority? Are there certain one-off effects or sounds you need on a gig? All the top-level units have a somewhat similar set of core features, but each one also branches off into more specialized realms. Let’s dig in and discuss choosing a modeler, break down some myths that surround these units, and help novice users get just a little bit more out of their chosen processor.
Which One is For You?
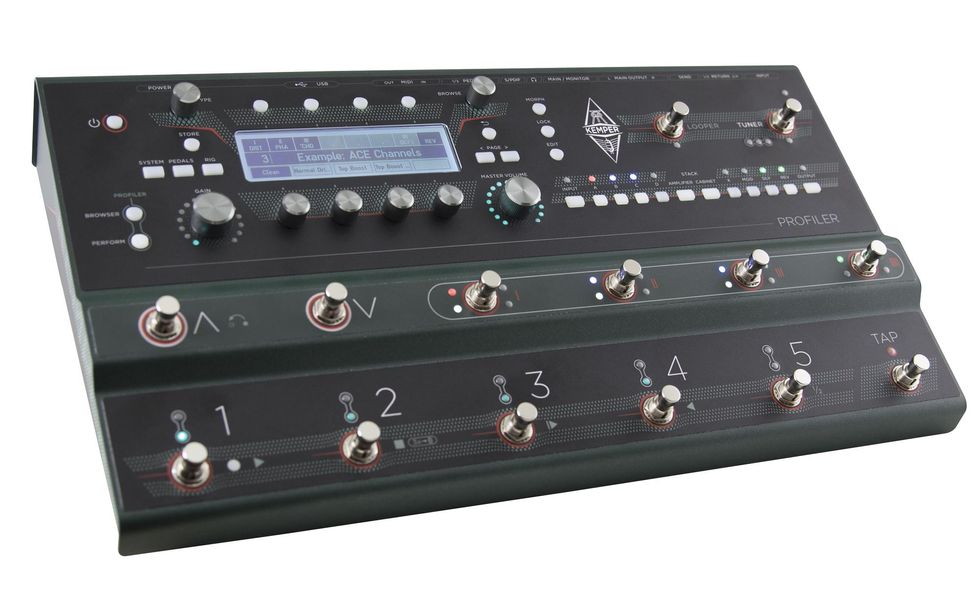
Kemper Profiler Stage
Ah, the eternal question—as a guitar journalist, this might be one of the most frequent questions I get asked. There are many ways to tackle this. One element of this puzzle that I’ll leave for others to debate is how these different units compare in terms of tone. From my perspective, you need to figure out what you’re missing in your current setup and how a digital rig would make your life easier. As we’ve seen in literally hundreds of Rig Rundowns over the years, these units have passed the test both onstage and in the studio. Even when you have Dumbles and vintage high-powered tweed Twins at your disposal, having a modeler in the rack can still be useful. (Hi, Keith Urban!) “Go online and watch videos on how you program and use the unit. If those don't make immediate and visceral sense to you, bail,” says O’Neal.
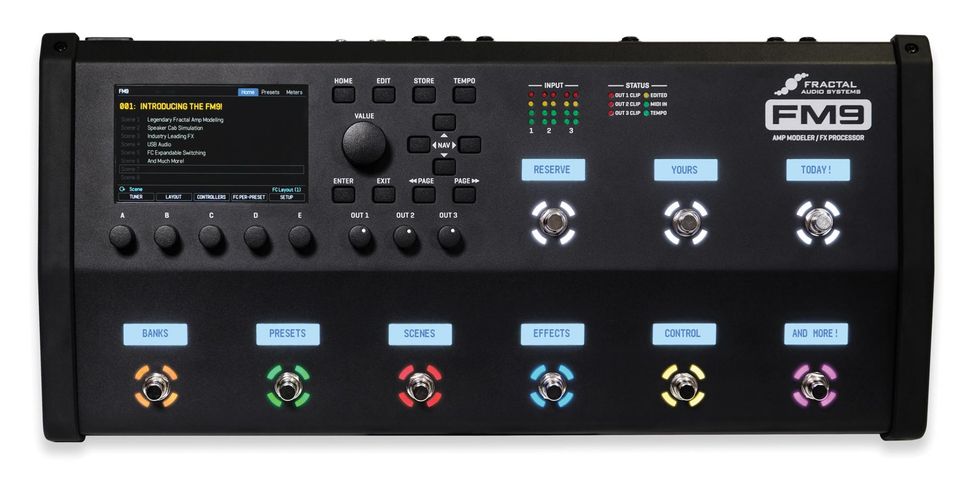
Fractal Audio FM9
I usually point people to two different camps: the all-in-one units (Line 6 Helix, Fractal Axe-Fx, Neural DSP Quad Cortex, Kemper, etc.) or the smaller stomp-sized boxes that have a narrower focus on amp, cab, and mic emulation (Strymon Iridium, Walrus ACS1, or the Boss IR-200). This is an important fork in the road because both types of units offer their own solutions. Plus, price can vary widely. Although there will be some overlap, this article will focus mostly on the all-in-one units. However, the stomp-sized amp emulators have their place. Simply place one at the end of your board for an easy analog-digital hybrid setup or keep one within arm’s reach in case a tube goes out on the gig.
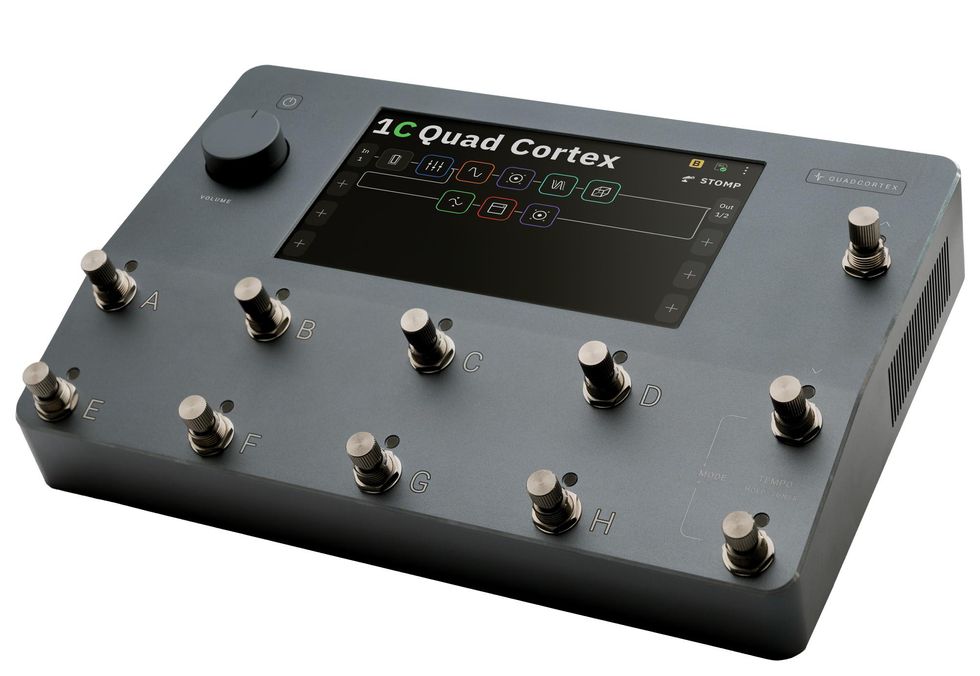
Neural DSP Quad Cortex
One of the bigger conceptual things to think about when choosing a modeler is the difference between an open ecosystem and a closed one. The Line 6 Helix and Fractal Axe-Fx units (and their various spinoffs) are what I consider closed systems, because you can’t create an entirely new amp model within their space. (The Axe-Fx III has an incredibly powerful ToneMatch feature, but that’s more based on deep customization of a pre-existing amp.) Both offer regular firmware updates with new amps, cabs, effects, and features. On the other side of things, you have Kemper and Neural’s Quad Cortex, which allow you to “profile” or“capture” digital versions of your amps and effects. This is really the defining feature of these units. With a simple recording setup, you can get extremely accurate versions of your prized—and fragile—tube amp and leave the original at home. The one caveat is that the quality of the result is only as good as your engineering skills, which is why a cottage industry of purchasable, professionally made profiles has popped up.
Start With What You Know
A piece of advice that I always recommend to anyone getting into modeling is to create your own presets. Yeah, it might take more time than just tweaking a factory or purchased preset, but in the end, you will learn much more about the features of your unit, as well as how the various elements of your signal chain interact with each other. For example, let’s say you’re a country-rock player who prefers a Vox-style amp.
With a simple recording setup, you can get extremely accurate versions your prized—and fragile—tube amp and leave the original at home.
Put aside the bells and whistles for the moment and focus on how to create a good base tone. Carter suggests a similar route: “Start simple with just an amp and cab. Get used to the interface and GUI [graphical user interface]. If you’re a Bassman player, it doesn’t make sense to just jump in and start tweaking a Mesa/Boogie.” Depending on your modeler, the various parameters for amps and effects might be different—or nonexistent—but at least you will have a point of reference before jumping into the deep end with experimentation.
Once you have the basics down, a prime place to start branching out is in routing. Gone are the days of needing a huge amount of rack gear to experiment with pre- and post-effects, parallel solutions, and MIDI. With a virtual playground, you can emulate nearly any imaginable signal flow and even design some that would be impossible in the analog realm.
Fig. 1
Most of the digital “boards” that guitarist and PG contributor Joe Gore designs are subversive, inspiring, and far from the mainstream. (He offers 13 different meticulously crafted Helix presets through the Line 6 marketplace.) Gore’s presets taught me invaluable lessons about using expression pedals when I tried to reverse-engineer them. Each scene or snapshot change has up to 60 different parameter changes, which alone is quite the feat. I would highly recommend his Blood & Pasta and Psych presets—they are simply mind-blowingly creative. In Fig. 1 you can see an example of how extensive this can get. Don’t be afraid to push the limits and reverse-engineer something from a more complicated setup.
“This is really the first time in a while where you can have bar bands playing the exact same gear as stadium acts.” —Cooper Carter
If you’re at least considering a digital unit, you likely don’t get the cold sweats when you think about learning your way around various menus and options. Each of us has our own specific tolerance of those, but in my experience the better you learn the ins and outs of your gear, the better you will sound. Although these are very, very tech-heavy units, you can get incredible results with simple setups. Going “digital” isn’t an all-or-nothing proposal. If you really dig your amp or pedals you can easily integrate those with any digital modeler. Let’s look at a few options that allow you to hold on to a bit of the analog.
4 Cables or 7?
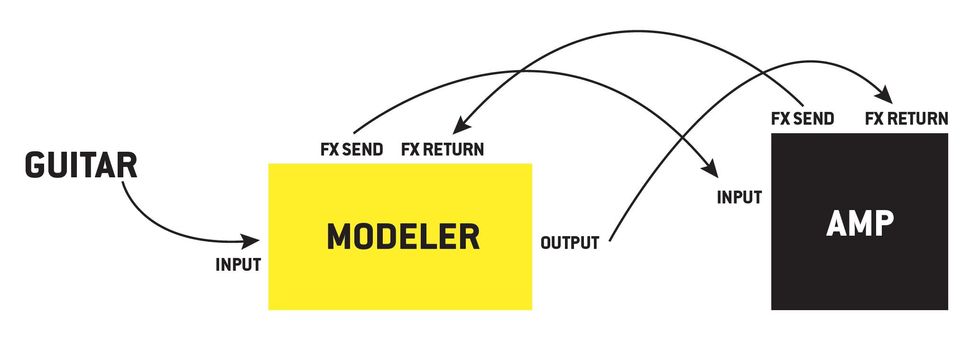
Fig. 2
The easiest way to combine digital control with analog pedals is to take advantage of the effects loop. Here’s a scenario: You want to use your modeler simply for effects alongside your trusty tube amp, but you don’t want to run everything in front. This is where the “4-Cable Method” comes in. In this arrangement, you’re able to run all your compression and drive pedals directly into the preamp and move all your modulation and time-based effects to after the preamp. In Fig. 2 you can see a diagram of how to hook everything up. Here are the steps:
- Arrange you signal chain in your modeler so that the effects loop insert is at the point where everything before it will go in front of your amp and everything after will go directly to the power amp.
- Connect your guitar to the input of your modeler (cable 1).
- Connect the effects send of your modeler to the input of your amp (cable 2).
- Connect the effects send of your amp to the effects return of your modeler (cable 3).
- Connect the output of your modeler to the effects return of your amp (cable 4).
This results in a hybrid setup that allows an incredible amount of flexibility with routing your digital effects within a traditional tube amp. (One tip: Check the global settings on your unit and make sure the effects loop is set to instrument level rather than line level.) Not sure if a certain effect works better before or after the preamp? Simply move them around in your modeler.
In Clip 1 you can hear what it sounds like with distortion, delay, and reverb running directly into the front of the amp.
And in Clip 2 I used the 4-cable method to clean things up.
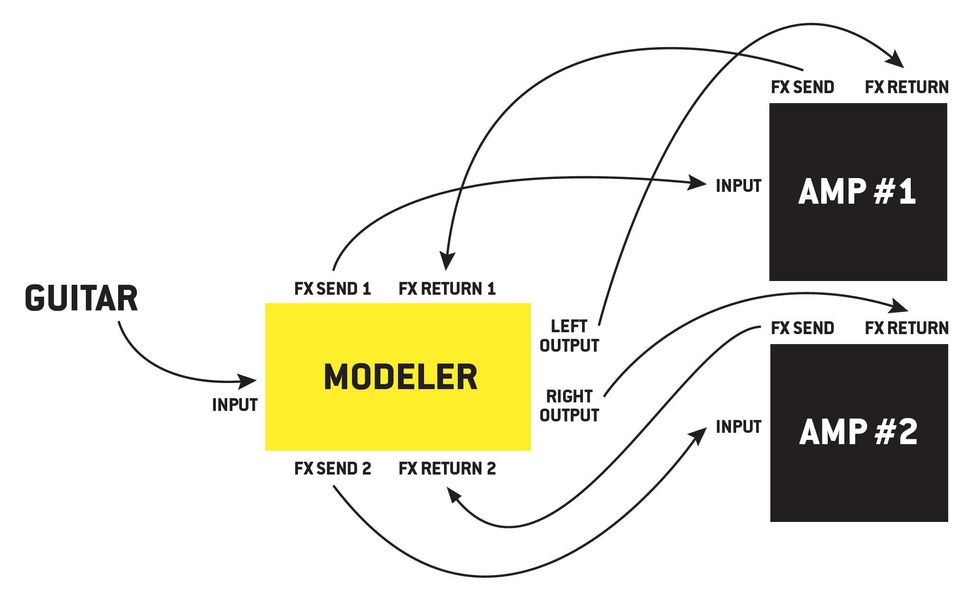
Fig. 3
But what if you’re running a stereo rig? That’s where the 7-cable method comes in. There are a few more things you’ll need (other than cables) to pull this off. First, your modeler must have two effects loops and dual outputs. Let’s pretend that the 4-cable setup described above is for amp #1 via output 1 of your modeler (Fig. 3). Now, follow the steps below for the second amp:
- Connect effects send 2 from your modeler to the input of amp #2 (cable 5).
- Connect the effects send from amp #2 to effects return 2 of the modeler (cable 6).
- Connect the main right output of the modeler to the effects return of amp #2 (cable 7).
It always helps me to sketch out how I envision everything working before diving into editing a patch.
The signal flow in the modeler will also become a bit more complicated. It always helps me to sketch out how I envision everything working before diving into editing a patch. If you think of these two as simply two parallel signal paths that come from a single source, it helps to keep everything straight.
Monitor This!
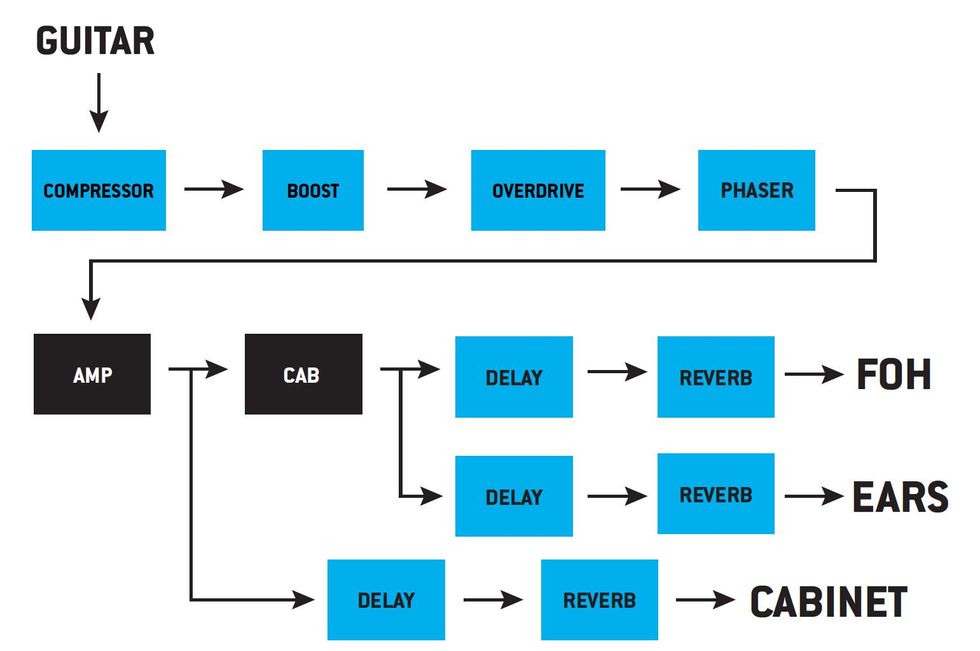
Fig. 4
On major tours, there’s an army of talented engineers that help craft the best sound possible, both onstage and out front. For most of us, that’s a real luxury. One routing setup that Carter suggests helps with both your monitor mix and getting a bit of that amp-in-the-room feel onstage. “The most practical application would be to run your fully processed signal to FOH and then a separate signal to a powered cabinet on stage,” he says. “From there, you can insert a split before the delay and reverb and feed that to your monitor or in-ears.” In Fig. 4 you can see an example of how to feed FOH, an onstage cabinet, and your in-ears. Tweaking the level of delay and reverb in your ears separately from FOH will allow you to better shape the reverb for the room without affecting what you’re hearing. “Whatever sounds best to you will make you play better,” says Carter.
Impulses Galore
One of the easiest ways to level up the realism of a preset is to use an impulse response (IR). This is where the all-in-one units and smaller stomp-sized modelers cross paths. Remember, the speaker and cab configuration in a traditional setup is basically an EQ—different cabinets and speakers treat the signal differently and therefore match better with certain amps and guitars. An impulse response is a digital version of everything after the amp, which would include the mic pre, mic, cab, and speaker. With a digital modeler, these would run in place of a cabinet block and before any time-based effects or reverbs.
Creating an impulse response isn’t too complicated. There is a wealth of tutorial videos on YouTube detailing the process, and some DAWs come with a built-in IR creator. In short, you sample ambient sound around a core tone and then the modeler uses that to treat your guitar tone.
In Clip 3 you can hear a Vox-style amp with a closed 2x12 cab IR.
And in Clip 4 you can hear that exact same tone with a larger 4x12 cab IR.
There are a host of ways to use IRs in your signal chain, but often it can be a somewhat paralyzing notion to try and wade through dozens of options to find the right one. Most IR packs come with loads of different WAV files that that can be separated by either cab, mic, or, for acoustic settings, guitar type. One way to quickly parse through them would be to set up a simple template with your preferred signal chain and then insert a split after the amp block to two separate IR blocks. Then map those IR blocks to different footswitches. This allows you to A/B a pair of IRs without taking your hands off the guitar.
Acoustic amplification can be a tougher road. Brian Wahl and Bradford Mitchell are behind Worship Tutorials, a website that offers various presets and IRs for many types of modelers including Helix, Kemper, and Axe-Fx. A few years ago, Wahl purchased a few acoustic IRs but never really connected with them. So, he decided to make his own. “One of the big myths I see is that people think you need to get an IR pack that closely matches their guitar type. That’s not true,” he says. “It’s like thinking you can’t put Telecaster pickups in a different guitar,” adds Mitchell. The purpose of the IR is to help shape the tone of your instrument in ways that EQ can’t quite reach since there’s a bit of reverb and possibly delay packed into each one. Another myth that Wahl hears is that if you have a really good pickup system, you don’t need an IR. “My response to that is we’ve found that guitars with higher-end pickup systems actually benefit more by using an IR,” he says.
“One of the big myths I see is that people think you need to get an IR pack that closely matches their guitar type. That’s not true.” —Brian Wahl
The process for Wahl and Mitchell starts with making a high-quality recording of the miked acoustic. Then, they will match the recording across six different pickup systems and 10 different mic options. Once you factor in different sample rates and WAV lengths, the process can become quite intense. “When deciding which IR is for you, I typically recommend staring with a mic you’re familiar with and cycle through the different pickup options,” says Wahl. Trust your ears at this point in the process above all else. “Most of them actually might sound bad,” he adds, “but once the correct IR clicks, you’ll know it.”
Talking with Wahl and Mitchell inspired me to dig up a few acoustic IRs and test his theory. I plugged my Córdoba Acero straight into my HX Stomp and recorded into Logic Pro X via USB.
In Clip 5 you can hear my completely unaffected signal. The Acero’s pickup system combines a piezo and under-saddle mic, so I kept the blend at noon. It’s not a bad tone, but enough of the piezo quack is coming through to warrant a better solution.
For Clip 6 I loaded up an AKG C12 dreadnought IR. The result sounds better. There’s more air around the sound, but the high end is a bit thin.
Clip 7 is an IR from the same mic, but I chose a different pickup option. It’s not as good as Clip 6, but still has that ambience that I dig.
Finally, we have Clip 8, which is a combo of a piezo pickup and a Neumann U67-style microphone. It’s kind of gross and thin but could serve a purpose in the right mix. I think recording examples like this is essential to finding the right IR match. Taking an objective listen will help you decide between options that could be quite subtle.
State of Expression
One of the most fun—and interactive—parts of using a modeler is exploring the absolutely endless options that expression pedals can offer. In most units, nearly any parameter you can think of can be assigned to an expression pedal for real-time tweaking. One player who really opened my eyes to what’s possible with expression pedals is John Nathan Cordy, a British guitarist who specializes in jazz-fusion styles and has a YouTube channel that explores most of the modern modelers. One of his favorite expression pedal tricks was inspired by the ambient pads Eric Johnson would play on the intro to live versions of “Cliffs of Dover.”
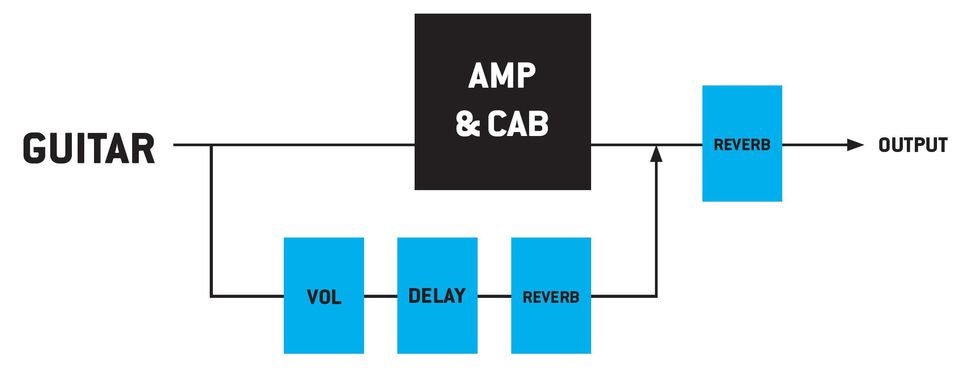
Fig. 5 shows the diagram, but here’s how you set it up:
- Arrange a basic signal path and then add a parallel path.
- Place a digital delay on the parallel path. Digital works better because with analog emulations you can dip into self-oscillation, and we don’t want that.
- Within the delay, assign your expression pedal to the feedback control so that when the heel is down you’re at about 10 percent and toe down is 100 percent.
- Put a volume pedal block before the delay and assign the expression pedal so when the toe is down it mutes the input.
- Add reverb to taste after the delay.
- Connect the parallel path back to the main path after the amp and cab block.
I’d recommend saving this as a template and then experimenting with loopers, compression, multiple outputs, and more.
Next Steps
Ultimately, the better you know any piece of gear, the better it will sound. Once you find a modeler that you connect with, invest the time to learn and explore the features and effects that you can put into practice. Understand its strengths and weaknesses and make sure those align with the goals you have for your rig. And don’t be too bashful to ask questions online—each of these units has a robust community of users, which means there’s a ton of info out there. Chances are if you run into a roadblock, someone else has too.
Finally, do what inspires you. Don’t overthink things or get distracted from the big picture, which is to enjoy making music.
- First Look: Fender Tone Master Deluxe Reverb - Premier Guitar ›
- Tone Tips: Modelers vs. Traditional Rigs - Premier Guitar ›
- Even If You Hate Modelers, You Probably Owe 'Em a Debt of ... ›
- Journey Guitar Legend Neal Schon Talks Vintage Instruments - Premier Guitar ›
- Legacy Amp Makers Face the Digital Challenge - Premier Guitar ›
Vox’s Valvenergy Tone Sculptor
Two new pedals from the Valvenergy series use a Nutube valve to generate unique dynamics and tone ranges that can be used to radical ends.
When tracking in a studio or DAW, you’re likely to use compression and EQ on most things. Many enduringly amazing and powerful records were made using little else. And though many musicians regard both effects as a bit unglamorous and utilitarian, EQs and comps are as capable of radical sounds as more overtly “weird” effects—particularly when they are used in tandem.
I spent a day workshopping ideas in my studio using just the Vox Valvenergy Smooth Impact compressor and Tone Sculptor EQ, and a dash of amp tremolo and reverb to taste. In the process, I produced more arresting sounds than I had heard from my guitars in many days. There were radical direct-to-desk-style Jimmy Page/Beatles distortion tones, sun-sized, cosmic electric 12-string, Bakersfield twang that could burn through crude, and many other sweet and nasty colors. Most decent EQ and compressor combinations can achieve variations on all those themes. But the Smooth Impact and Tone Sculptor also reveal interesting personalities in unexpected places.
The individuality and energy in the Vox Valvenergy pedals is attributable, in part, to the Nutube vacuum tube used in the circuit. Though it looks little like a vacuum tube as most guitarists know them, the thin, wafer-like Nutube is, in fact, a real vacuum tube like those used in fluorescent displays. Fluorescent display tubes have limitations. A maximum operating voltage of around 40 volts means they aren’t useful for bigger power tube applications like a 6L6, which has an operating voltage of about 400 volts. But it can work quite well as a preamp tube in concert with an op amp power section, which is how the Nutube is used in the new Valvenergy pedals, as well as older Vox products like the Vox MV50 and Superbeetle amps.
Valvenergy Tone Sculptor
When you think about “cinematic” effects, you likely imagine big reverb or modulation sounds that create a vivid picture and feeling of space or motion. But narrow, hyper-focused EQ profiles can evoke very different and equally powerful images. Radical EQ settings can add aggression, claustrophobic intimacy, and stark, explosive dark-and-light contrasts more evocative of Hitchcock’s Psycho than Ridley Scott’s Blade Runner.
Any of these moods can be summoned from the Valvenergy Tone Sculptor. Six sliders cut or boost 10 dB frequency bands spanning 100 Hz to 5.6 kHz. A seventh slider cuts or boosts the master output by 12 dB. This platter of options might not sound like much. But you can use these seven controls together to very specific ends.
“Radical EQ settings can add aggression, near-claustrophobic intimacy, and stark, explosive dark-and-light contrasts.”
For example, bumping the high-midrange and the master output produces narrow cocked-wah-like filter sounds with enough push to produce extra amp overdrive—effectively turning the Tone Sculptor into a buzzy, almost fuzz-like filter effect. But unlike a wah, you can carefully scoop high end or add a spoonful of bass to blunt harsh frequencies or give the tone a bit more weight. You can also broaden the palette of an amp/guitar pairing. I matched a particularly trebly Jazzmaster bridge pickup with a very hot and toppy Vox AC15-flavored amp for this test—a recipe that can be spiky on the best days. But with the Tone Sculptor in the line, I could utilize the same sharp, fuzzy, and filtered Mick Ronson wah tones while shaving some of the most piercing frequencies.
EQ pedals exist on many points along the cost spectrum. And at $219, the Tone Sculptor lives on the high side of the affordable range. Does it offer something less expensive models can’t deliver? Well, for one thing, I found it relatively quiet, which is nice whether you’re shaping toppy high-contrast effects or performing more surgical adjustments. And the sliders feel nuanced and nicely tapered rather than like a dull axe with a few basic frequency notches. But in many situations I also liked the color imparted by the circuit—generated, presumably, by the Nutube. “Color,” in audio terms, is a broad and subjective thing, and one should not necessarily expect the warm, tube-y glow of a vintage tube Pultec. Still, the Tone Sculptor has many forgiving, flattering qualities—typical of studio EQs—that enable fine tuning and experimentation with more radical and creative applications of the effect.
Valvenergy Smooth Impact
As with the Tone Sculptor, the Smooth Impact’s use of Nutube engenders certain expectations. It’s easy to surmise that because Smooth Impact has a vacuum tube in the circuit that it will behave like a little Teletronix LA-2A leveling amplifier. That’s a big ask for a $219 stompbox. On the other hand, the Smooth Impact exhibits some appealing characteristics of studio tube compression. At lower compression levels, it works well as a thickening agent—adding mass without much additional noise. And at higher compression levels it can sound snappy, crisp, and tight without feeling like you’ve bled every trace of overtone from your signal.
The Smooth Impact’s controls aren’t totally atypical. But because it lacks some familiar features like variable attack and release, yet is more complicated than a 1-knob DynaComp, you have to trust your ear to navigate interactions among the controls. The most unfamiliar of these is the 3-way vintage/natural/sag toggle. The first two are defined by preset attack and release settings: Vintage is slow attack and long release, and natural is the opposite. The sag mode’s compression is more like what you get from tube saturation, and it’s useful for adding thickness and complexity to a thin amp tone at modest compression levels.
Though the vintage and natural modes certainly have a different feel, they don’t always sound worlds apart. And like the sag mode, the thing they have in common is the way they enrich lifeless amp output at low to medium compression, with a bit of grind from the tube gain and a little extra makeup gain from the output. At the most aggressive settings, the tube gain can get a little crispy. And really crushing the compression can flatline your tone without adding much in the way of extra sustain. These are limitations common to many compressors with similar features. But unless I was chasing very ultra-snappy Prince and Nile Rodgers fast-funk caricatures, I enjoyed the Smooth Impact most in its in-between ranges, where mass, mild, harmonious drive, and low noise showcase the pedal’s sometimes studio-like personality.
IK Multimedia is pleased to announce the release of new premium content for all TONEX users, available today through the IK Product Manager.
The latest TONEX Factory Content v2 expands the creative arsenal with a brand-new collection of Tone Models captured at the highest quality and presets optimized for live performance. TONEX Tone Models are unique captures of rigs dialed into a specific sweet spot. TONEX presets are used for performance and recording, combining Tone Models with added TONEX FX, EQ, and compression.
Who Gets What:
TONEX Pedal
- 150 crafted presets matched to 150 Premium Tone Models
- A/B/C layout for instant access to clean, drive, and lead tones
- 30 Banks: Amp & cab presets from classic cleans to crushing high-gain
- 5 Banks: FX-driven presets featuring the 8 new TONEX FX
- 5 Banks: Amp-only presets for integrating external IRs, VIR™, or amps
- 5 Banks: Stompbox presets of new overdrive/distortion pedals
- 5 Banks: Bass amp & pedal presets to cover and bass style
TONEX Mac/PC
- 106 new Premium Tone Models + 9 refined classics for TONEX MAX
- 20 new Premium Tone Models for TONEX and TONEX SE
TONEX ONE
- A selection of 20 expertly crafted presets from the list above
- Easy to explore and customize with the new TONEX Editor
Gig-ready Tones
For the TONEX Pedal, the first 30 banks deliver an expansive range of amp & cab tones, covering everything from dynamic cleans to brutal high-gain distortion. Each bank features legendary amplifiers paired with cabs such as a Marshall 1960, ENGL E412V, EVH 412ST and MESA Boogie 4x12 4FB, ensuring a diverse tonal palette. For some extremely high-gain tones, these amps have been boosted with classic pedals like the Ibanez TS9, MXR Timmy, ProCo RAT, and more, pushing them into new sonic territories.
Combined with New FX
The following 5 banks of 15 presets explore the depth of TONEX's latest effects. There's everything from the rich tremolo on a tweed amp to the surf tones of the new Spring 4 reverb. Users can also enjoy warm tape slapback with dotted 8th delays or push boundaries with LCR delay configurations for immersive, stereo-spanning echoes. Further, presets include iconic flanger sweeps, dynamic modulation, expansive chorus, stereo panning, and ambient reverbs to create cinematic soundscapes.
Versatile Control
The TONEX Pedal's A, B, and C footswitches make navigating these presets easy. Slot A delivers clean, smooth tones, Slot B adds crunch and drive, and Slot C pushes into high-gain or lead territory. Five dedicated amp-only banks provide a rich foundation of tones for players looking to integrate external IRs or run directly into a power amp. These amp-only captures span clean, drive, and high-gain categories, offering flexibility to sculpt the sound further with IRs or a real cab.
Must-have Stompboxes
TONEX Pedals are ideal for adding classic effects to any pedalboard. The next 5 banks focus on stompbox captures, showcasing 15 legendary overdrive, distortion, and fuzz pedals. This collection includes iconic models based on the Fulltone Full-Drive 2, Marshall DriveMaster, Maxon OD808, Klon Centaur, ProCo RAT, and more.
For Bass Players, Too
The last 5 banks are reserved for bass players, including a selection of amp & cab Tone Models alongside a few iconic pedals. Specifically, there are Tone Models based on the Ampeg SVT-2 PRO, Gallien-Krueger 800RB, and Aguilar DB750, alongside essential bass pedals based on the Tech21 SansAmp, Darkglass B7K and EHX Big Muff. Whether it's warm vintage thump, modern punch, or extreme grit, these presets ensure that bassists have the depth, clarity and power they need for any playing style.For more information and instructions on how to get the new Factory
Content v2 for TONEX, please visit:
www.ikmultimedia.com/products/tonex
Alongside Nicolas Jaar’s electronics, Harrington creates epic sagas of sound with a team of fine-tuned pedalboards.
Guitarist Dave Harrington concedes that while there are a few mile markers in the music that he and musician Nicolas Jaar create as Darkside, improvisation has been the rule from day one. The experimental electronic trio’s latest record, Nothing, which released in February on Matador, was the first to feature new percussionist Tlacael Esparza.
Taking the record on tour this year, Darkside stopped in at Nashville’s Brooklyn Bowl, where Harrington broke down his complex signal chains for PG’s Chris Kies.
Brought to you by D’Addario.
Express Yourself
Harrington bought this mid-2000s Gibson SG at 30th Street Guitars in New York, a shop he used to visit as a kid. The headstock had already been broken and repaired, and Harrington switched the neck pickup to a Seymour Duncan model used by Derek Trucks. Harrington runs it with D’Addario NYXL .010s, which he prefers for their stretch and stability.
The standout feature is a round knob installed by his tech behind the bridge, which operates like an expression pedal for the Line 6 DL4. Harrington has extras on hand in case one breaks.
Triple Threat
Harrington’s backline setup in Nashville included two Fender Twin Reverbs and one Fender Hot Rod DeVille. He likes the reissue Fender amps for their reliability and clean headroom. Each amp handles an individual signal, including loops that Harrington creates and plays over; with each amp handling just one signal rather than one handling all loops and live playing, there’s less loss of definition and competition for frequency space.
Dave Harrington’s Pedalboards
Harrington says he never gives up on a pedal, which could explain why he’s got so many. You’re going to have to tune in to the full Rundown to get the proper scoop on how Harrington conducts his three-section orchestra of stomps, but at his feet, he runs a board with a Chase Bliss Habit, Mu-Tron Micro-Tron IV, Eventide PitchFactor, Eventide H90, Hologram Microcosm, Hologram Chroma Console, Walrus Monument, Chase Bliss Thermae, Chase Bliss Brothers AM, JHS NOTAKLÖN, two HexeFX reVOLVERs, and an Amped Innovations JJJ Special Harmonics Extender. A Strymon Ojai provides power.
At hip-level sits a board with a ZVEX Mastotron, Electro-Harmonix Cathedral, EHX Pitch Fork, Xotic EP Booster, two EHX 45000 multi-track looping recorders, Walrus Slöer, Expedition Electronics 60 Second Deluxe, and another Hologram Microcosm. A Live Wire Solutions ABY Box and MXR DC Brick are among the utility tools on deck.
Under that board rest Harrington’s beloved Line 6 DL4—his desert-island, must-have pedal—along with a controller for the EHX 45000, Boss FV-50H volume pedal, Dunlop expression pedal, Boss RT-20, a Radial ProD2, and another MXR DC Brick.
This story’s author played this Belltone B-Classic 3 and found its neck instantly appealing, the tremolo capable of taking abuse and staying in tune, and the Filter’Tron pickups possessed of hi-fi clarity. Also, the sky burst metallic finish is pure eye candy.
Custom designing an instrument and its appointments from a menu of options makes ordering a new axe easy. Four manufacturers share their process.
It’s never been easier for any player to get a guitar made to their liking, and without being an expert, or even an educated amateur in wood, wiring, and other aspects of lutherie. Sure, you can find a builder who will spec out a guitar for you from tree to neck radius to electronics, but for most of us, we’re looking for something easier, less costly, and, often, more familiar.
That’s where guitar-by-menu comes in. Think of it as Build–A-Bear for guitar players, but louder and with cooler options, like a coral pink sparkle finish or a trapeze tailpiece. A coterie of manufacturers offers such services, some with online pull-down menus that cover everything from pickups to, well, all that goes into a guitar. And the advantage here is that no particular expertise other than knowing what you love to play and why you love to play it is required. You dig a Tele or a Jazzmaster or an SG or a Firebird from a certain era, but want a specific bridge or pickup combination, a ’50s or late-’60s neck, a finish not available in production models? No problem. Or maybe you crave something a tad more distinctive, with a non-traditional body shape, no headstock, and a finish that draws from the color palette of Van Gogh’s The Starry Night. All you gotta do is ask … or, rather, pick, click, order, or email, perhaps with a phone call to confirm the details.
We spoke to a clutch of large and smaller guitar companies—Belltone, Kiesel, Fender, and Gibson—to see how they do it.
The Belltone Way
“I was always the guy who had to tweak the guitar no matter what it was,” says Belltone founder Steve Harriman. “I changed out the pickups, I changed the pickguards, tuners, whatever.”
Like former Gibson CEO James Curleigh, Belltone Guitars founder Stephen King Harriman was an apparel executive with Perry Ellis before starting the Florida-based company in 2016. But the gig he’s had since junior high school is guitarist.
“I was always the guy who had to tweak the guitar no matter what it was,” Harriman says. “I changed out the pickups, I changed the pickguards, tuners, whatever. I always had to make what I was playing, whether it was a Les Paul or a Tele, unique, so it would be personally mine.”
Initially, Belltone offered modded versions of Les Paul- and Telecaster-style guitars, but in 2019 he reframed his business, designing an ergonomically contoured pear-shaped body and distinctive 6-on-a-side headstock as a foundation, and establishing a group of craftspeople to bring his solidbody B-Classic One, B-Classic Two, and B-Classic Three variations to life.
Today, Belltone guitars are made for players looking for a similar mix of the fresh and the familiar, at $2,680 to $3,129, depending on appointments. And the range of appointments is impressive. Let’s start with the templates. The Classic One has a flat top with edge binding, an alder body, a rounded tapered neck pocket, the company’s signature Devil’s Tail bridge and angled switch-control plate, reverse-dome tall-boy knobs, and a 12" compound-radius neck (held on by four bolts), with 22 medium-jumbo frets. In contrast, the Classic Two has all of the above, except there are arm and body contours with no binding, and the Classic Three offers the same plus Belltone’s patented Back-Lip Tremolo System and top hat controls.
“I’m inspired by a lot of ’50s and ’60 car designs for the elements of my guitars.”—Belltone’s Steve Harriman
Then, there’s a rabbit hole of options. There are 36 finish choices, with 10 ’bursts—including gorgeous black cherry burst, sky burst metallic, and lemon burst shades—requiring an upcharge of $40. There are varied pickguards to choose from within Belltone’s distinctive “Deco” version, which comes in black, white, and brown tortoise. There are four neck combinations (standard C and ’59 roundback profiles, with maple or rosewood fretboards), four tuner options (locking tuners from Belltone, Sperzel, and Kluson, plus ratio tuners), and a set of any-gauge Stringjoys. And the selection of pickups is truly impressive—36 in all, from TV Jones, Benson, Rio Grande, Mojo, Lindy Fralin, Porter, McNelly, Righteous Sound, Gabojo, and the newly added Brickhouse Tone Works. And within those selections are standard and hum-cancelling P-90s, stacked humbuckers, PAF humbuckers, regular and noiseless single-coils, multiple Filter’Tron variations, and more. Further, via Belltone’s Tone-Sure program, if a customer feels they’ve made the wrong call on pickups after playing their guitar a while, Belltone will swap them out at no charge save for covering shipping and the additional cost of pricier units.
“I’m inspired by a lot of ’50s and ’60 car designs for the elements of my guitars,” Harriman attests. “If you look at my bridge, for example, it’s got kind of a tailfin look to it. For me, guitars need to not only play well and sound great, but look cool. Also, everything is designed by me and is machine-tooled. My bridge is machine-tooled aluminum with rounded contours, as your palm can get roughed up on the old-style stamped ashtray bridges. I take all the things that make players happy into consideration.” Including sturdy and handsome faux-alligator-skin cases.
A deliberative buyer could spend weeks contemplating all of Belltone’s options before pushing the “submit” button, and then, instead of being invoiced, they are contacted directly by Harriman to review it all again before his luthiers get to work.
Gibson’s Made to Measure
One of Gibson’s Made to Measure fantasies: an SG with three humbuckers in a crimson sparkle finish.
The 131-year-old Gibson company’s Made to Measure (MTM) program is a bit more conservative … but only if you’d call a hot-crimson-sparkle SG with three humbuckers, a burgundy Les Paul Standard with a full-fretboard vine inlay, a champagne-pink-sparkle Les Paul, or a 3-pickup Firebird with a P-90 in the middle conservative.
There are two ways to initiate an order for an MTM guitar. You can fill out the online questionnaire on the Gibson Custom Shop’s Made to Measure page or stop by the Nashville or London locations of the Gibson Garage in person. I visited the Nashville Garage for this story, where I spoke with Dustin Wainscott, director of the Made to Measure program, and Matt Boyer, the sales associate you’d likely encounter if you walked into the Music City shop. They brought a clutch of recent MTM examples. And a wall of the MTM room was covered in slabs of wood, available for the choosing, and various bridges, tuners, pickups, and other parts for inspection and selection. Of course, some of the on-location fun is speaking with MTM program leaders like Boyer and Wainscott, who love guitars as much as you do and are happy to swap stories.
Whether by email, which will likely be followed up by a call from Boyer, or in person, the conversation that starts a MTM order begins with questions about body style, neck preference, electronics configuration, and the finish type and treatment.
“On the cosmetic side, we can go as far as you want to, with any color or finish you want.”—Gibson’s Dustin Wainscott
At the Gibson Garage Nashville, Dustin Wainscott, director of the Made to Measure program, and Matt Boyer, the sales associate in charge of MTM at that location, brandish a pair of custom-ordered instruments.
Photo by Ted Drozdowski
Essentially, any Gibson body currently in production and most historic appointments from that model’s history—and some from other compatible Gibson models—can be used for an MTM order. After selecting the white wood, as slabs are called in lutherie, “figuring out the pickup layout, the neck profile, and the tailpiece you want is the next step,” says Wainscott. “Then you get into the electronics and the look of the guitar: pickup selection, coil-splitting, what color or finish hardware, a glossy or flat finish, any Murphy Lab aging.
“Non-proprietary parts can sometimes be a roadblock. Typically, we’d use our pickups, for example, so if somebody makes a request for a pickup outside of Gibson’s, I try to steer them toward something we have that’s similar. You’ve got to play in the Gibson sandbox.” Stepping outside of historic model-design parameters, which would require re-engineering, is also a no-fly. That means don’t ask for a Les Paul with a Firebird neck, or an Explorer with a 3-on-a-side headstock. That said, there is a lot of wiggle room within the company’s catalog, and “on the cosmetic side, we can go as far as you want to, with any color or finish you want,” adds Wainscott. Personalized headstocks are also a popular option.
A Made to Measure order’s price starts with a $500 charge on top of a model’s current tag, and can increase depending on the complexity of wiring, finish, inlays, etc. Wainscott notes that about 30 percent of the Custom Shop’s business is Made to Measure.
“We also do a lot of recreating of models you’ve seen in the past that aren’t available now,” adds Boyer. “So, we can’t make a Jimmy Page Les Paul with his name on it, per se, but if you want a Les Paul Custom with three pickups, a Bigsby, a 6-position switch, and all that, we can do it for you.”
Kiesel’s Family Style
Kiesel can get as rad as you wanna be, including characterful flourishes like this naturally figured wood with pools of radiant blue finish and an organically striking neck.
Kiesel Guitars has essentially always been a custom-order builder, even if its name and line of business has evolved. The L.C. Kiesel Company was founded in 1946 by Lowell Kiesel as a manufacturer of pickups he sold from the back pages of magazines. As it grew, he renamed it after two of his sons, Carson and Gavin, as the well-known brand Carvin, which became famous as a maker of quality guitars, amps, and instrument parts. In 2015, the company split, Lowell’s son Mark and his son Jeff established the guitar-building operation under the Kiesel name. Today, thanks to their high-caliber construction and endorsees like Allan Holdsworth, Devin Townsend, Craig Chaquico, Jason Becker, and Johnny Hiland, the company makes more than 4,000 custom-order guitars a year.
“We have four types of construction: bolt-on, set-neck, set-through, and neck-through,” explains VP Jeff Kiesel. The company also offers the unusual choice of nine different headstocks, which most manufacturers limit to one style as part of branding, and sans-headstock models, which Kiesel began making in 2012 with the debut of its Allan Holdsworth model. All Kiesel headstocks have an 8 1/2-degree tilt, to create a steeper string angle over the nut, which can potentially improve tone and sustain.
At work on a body in the Kiesel factory, which produces about 4,000 custom-order guitars annually.
“We’re appealing to everybody because we do so many different things.”—Jeff Kiesel
“We never build the headstock separate from the neck and then scarf joint them in—it’s all one piece,” Kiesel adds. Necks are also quarter-sawn, with a two-way truss rod, dual carbon-fiber reinforcement rods, stainless steel frets, and Luminlay side dots.
After that, ordering a Kiesel is all about options. There are 56 models, including signatures, to choose from. Once you select a model on the company’s website, you’re taken to a page that includes a builder menu. Kiesel’s lowest-priced models, including the Delos, start at $1,649, while the top-priced, flagship K-Series model starts at $4,399.
The Aries, one of Kiesel’s most popular guitars, starts at a base of $1,699 with a bolt-on neck and has a menu that includes, under general options, right- or left-hand orientation; the choice of 6, 7, 8, or 9 strings; multiscale necks; and 25 1/2", 26 1/2", or 27" scale lengths. Under body options, you can select beveled or unbeveled edges, and eight different body and 16 different top woods. There are more than 80 finishes to choose from, and 14 variations on the Kiesel logo. The neck options are equally rich, with five fretboard radius selections plus choices for neck wood, three neck profiles, inlays, truss rod covers, and more. The electronic options boast four pickup configurations, five different Kiesel neck and bridge pickup models, and additional alternatives. It’s easy to get lost in the woods, but when you emerge, an image of your guitar with all its appointments, generated as you make your choices, is waiting for you.
“Our lead time is seven to 12 weeks,” Kiesel says, “and we offer a 10-day trial period unless somebody gets too wild on their options.” Anyone ordering a guitar is welcome to phone the company to talk over their order, and Kiesel highly recommends that first-time buyers call.
While Kiesel Guitars once had a reputation as a shredder-axe factory, Jeff Kiesel explains that’s changed over the past decade. “Our demographic is not set anymore,” he shares. “We’re appealing to everybody because we do so many different things. We can build a very classy jazz-style neck pickup on a semi-hollow guitar that you can play some amazing Frank Gambale licks on. And then we can turn around and build a guitar that will do some really technical modern metal, like Marc Okubo. We can build really wild or really classy, and that’s created so much growth within our company.”
Fender’s Mod Shop
Ted created this “dream Strat” with a silverburst finish, noiseless single-coils, and a 2-Point Deluxe Synchronized Tremolo Bridge using Fender’s Mod Shop online tool.
Like Gibson, Fender’s Mod Shop is about personalizing classic templates—in this case, the Strat, Tele, Jaguar, Jazzmaster, P and J basses, and Acoustasonic Telecasters and Jazzmasters. And while the program was birthed in 2014 as the American Design Experience, it evolved into the Mod Shop and has continued to improve, most recently with an update this April that made the online menu easier to use and added more options.
“We know that 80 percent of customers will be loyal to brands where they can personalize and customize,” says Shannon Stokes, Fender’s VP of eCommerce. “So the whole online user experience has been finessed. It’s much easier to navigate on both desktop and mobile. You move through it choosing the orientation of the guitar, the finish … everything through the pickguard, the hardware.”
Justin Norvell, Fender’s VP of product, observes, “This is a playground, and you’re able to just mess around and see what appeals to you. We allow people to save their configurations to PDFs, and they can share them and send them out,” akin to trading cards. “There’s an exponential number of people that might sit on their favorite design for a year before they actually place an order.” Some hardcore fans buy multiple variations of a favorite-style guitar over time, “because you can engrave the neck plate, collect multiple finishes, and other cool stuff. This is an area where selection runs wild for lefties, too,” he adds.
Fender’s Justin Norvell with his own dream machine: an American Professional Jazzmaster in mystic seafoam.
“This is an area where selection runs wild for lefties, too.”—Fender’s Justin Norvell
“What’s amazing to me,” says Shannon Stokes, Fender’s VP of eCommerce, “is the number of people ordering black, white, and sunburst. I would think the rarer colors would be the thing.”
The cost of a Mod Shop guitar is an upcharge of several hundred dollars, with certain customizations increasing the tab. I decided to jump in and outfit a Strat, with a base price of $2,085, to my taste. After selecting the right-hand player’s orientation, I chose an alder body with a silverburst finish from a palette of nearly 50 colors and wood offerings that also included chambered ash, mahogany, and roasted pine. For the neck, I went with solid rosewood with Fender’s deep-C profile. Eight maple variations were also available. That neck option automatically led me to a rosewood fretboard, and then I hunted through 16 pickup configurations before stopping at the Generation 4 Noiseless Stratocaster set. I opted for a 4-ply black pearl pickguard, and aged white plastic controls and pickup frames. Next, from three bridge choices I tapped a 2-Point Deluxe Synchronized Tremolo Bridge. Chrome Fender strap lock buttons would do the job, since I’ve had un-strap-locked guitars fall to the stage at gigs in years past. For strings, a set for .010s, and the only case option is deluxe molded plastic with a fuzzy interior. Total cost: $2,175, which is not bad for those modest-but-swell appointments. I also downloaded a PDF, so you can see what I designed. Unhappy with the purchase? It can be returned within 30 days for a refund or exchange, plus shipping.
There’s about a half-dozen builders in the Mod Shop, but workers from the normal production line can be called in when there is an uptick in commissions, Norvell explains.
“What’s amazing to me,” says Stokes, “is the number of people ordering black, white, and sunburst. I love the satin orange because it’s vibrant, different. I would think the rarer colors would be the thing.” But players often look for instruments that are evocative of classic guitars they’ve seen. And 6-string dreams do come in all shades.