
How to convert a half-unused tube into a gain stage.
Dear Amp Man,
I am unable to find anything on cascading the half-unused tube in an AA371 Bassman. I have converted the amp to a Marshall tone stack and other suggestions you've made very successfully, but found nothing on tapping into the unused gain stage for the bass side. I've left the normal channel mostly stock and really want more gain on the modded side. The article you wrote on the Supro (āModding a Supro 6420 Thunderbolt") got me inspired to try this. I've been looking for a layout over a schematic; I'd feel much safer with a layout so I don't damage anything. I'd love a little more gain and to make full use of that tube. Help or a link would be greatly appreciated.
Thanks,
Kevin
Hi Kevin,
It's nice to hear you've successfully incorporated some of my suggestions. Bassman amps have always been a great platform for modsāthey're easy to work on and there are quite a few fun things you can do. Because I currently don't have a Bassman to mod and then photograph, I've tried to do the next best thing and draw the modification layout and connections directly on the Fender factory drawing of the physical layout. I'll also give you a list of necessary parts and a step-by-step procedure. Let's go!
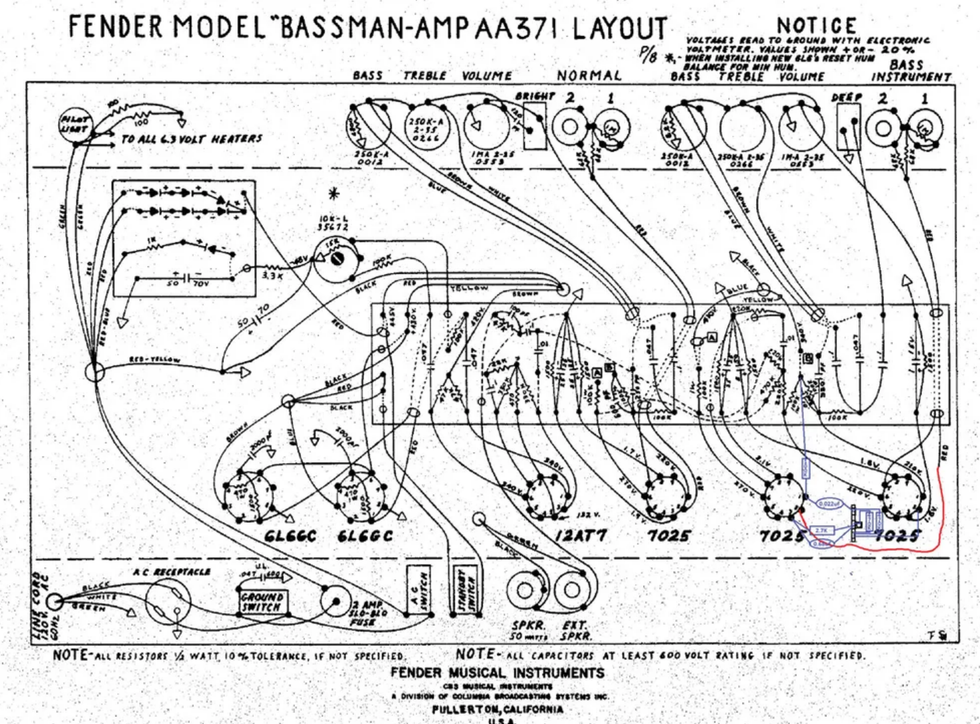
This illustration shows the gain stage mod, breaking out the area around tube positions V1 and V2 from a schematic drawing of an AA371 Bassman amp.
This mod is not very extensive, and you'll only need a few parts and a couple of pieces of wire:
- one 3-lug terminal strip (the kind typically manufactured by Keystone)
- two 470k resistors (1/2 watt is sufficient, but I typically use 1 watt for almost everything)
- one 100k resistor
- one 2.7k resistor
- one 0.022 µF 600V capacitor (poly or foil)
- one 0.68 µF 25V or greater capacitor
- two small pieces of shrink tubing or electrical tape
- one ¼" 4-40 screw and nut
- less than a foot of 20- or 22-gauge wire
Before beginning, be sure the filter caps are discharged. If you don't know how to do this, find someone who does. Then:
1. Install the terminal strip in a comfortable location between tube positions V1 and V2. You'll need to drill a small hole in the chassis and mount it using the 4-40 screw and nut. Be sure the screw and nut are very tight. This point will act as a ground connection.
2. Unsolder the wire coming from the bass channel input jacks (red, according to the schematic) that is connected to pin 2 of V1. Connect an additional piece of wire to this and insulate the connection with a piece of shrink tubing or tape. Cut to length and connect the other end to pin 2 of V2 (the input to the unused half of V2).
3. Connect one end of the 100k resistor to pin 1 of V2, but do not solder yet. Connect the other end to the eyelet where the two 100k V1 plate resistors are connected. You may need an additional piece of wire to connect to the resistor, so solder and insulate as necessary.
Warning:
All tube amplifiers contain lethal voltages. The most dangerous voltages are stored in electrolytic capacitors, even after the amp has been unplugged from the wall. Before you touch anything inside the amp chassis, it's imperative that these capacitors are discharged. If you are unsure of this procedure, consult your local amp tech.
4. Connect the 0.022 µF capacitor to pin 1 of V2. You may now solder the connection. Connect the other end of the capacitor to the top terminal strip in the drawing. Do not solder this end yet.
5. Connect one end of the 2.7k resistor and the 0.68 µF capacitor to terminal 3 of V2. Connect the other end of the resistor and capacitor to the center terminal of the terminal strip. You can now solder pin 3 of V2.
6. Connect one end of a 470k resistor to the bottom terminal and the other end to the center terminal of the terminal strip. You may now solder the center terminal.
7. Connect one end of the other 470k resistor to the bottom terminal and the other end to the top terminal. You may now solder the top terminal.
8. Connect another short wire to the bottom terminal of the terminal strip. Cut to length and connect the other end to pin 2 of V1. You may now solder both connections.
And that's it. This modification is based on the typical front end of a Marshall 2204-style head and approximates its gain control set to about 60 percent. The gain can be increased or decreased depending on the relative values of the 470k resistors. If you'd like to make the gain easily variable, you can replace the two 470k resistors with a 1 mA pot. Simply remove the 470k resistors, connect the CW terminal of the pot to the top terminal on the strip, the CCW terminal to the center ground terminal, and the wiper to the bottom terminal. This is now your front-end gain control. If you need more top end, simply connect a small value cap (start with a 100 pF ceramic cap) between the CW and wiper terminal. As with most tube amp modifications like this, feel free to experiment with slightly larger or smaller resistor or capacitor values for your own custom version.
Now break out some humbuckers and a 4x12, and rock on!
[Updated 8/17/21]
- Ask Amp Man: Modding a Supro 6420 Thunderbolt - Premier Guitar āŗ
- Axes & Artifacts - Fender Bassman Shoot Out (1958, 1959 & 1960 ... āŗ
- All the Worldās a Gain Stage - Premier Guitar āŗ
- How to Bias Your Tubes - Premier Guitar āŗ
- How to Turn Your Fender Guitar Amps into Bass Amps - Premier Guitar āŗ
- A Deep-Dive on the Elusive Fender Marauder āŗ
- Limited Edition Amp to Commemorate Celestion's 100th Year - Premier Guitar āŗ
Xotic revamps a classic Vox-boost-in-a-box pedal, creating a new one in the process.
Smart, feature-packed update on a classic. Nice size and price.
Small boost knob.
$180
Xotic Effects AC Booster V2
Xotic Effects newest version of the Vox-flavored AC Booster, the AC Booster V2, adds a second, footswitchable boost circuit (tweakable via a small, clear knob tucked among the four main-channel controls), plus a set of four dip switches on the boxās righthand side which engage compression, modern or classic voicing, low-mid boost, and high-mid boost.
This new suite of features packs significant extra functionality into V2ās still-diminutive enclosure. The Vox sounds are all there, and with the high-mids juiced and treble nudged, youāre squarely in clanging Top Boost territory. The modern voicing trades some furry mid-range chunk for a bit more aggression and clarity, while the compression is useful for leveling leads and smoothing out unruly playing.
The boost knob is a little difficult to access, situated as it is in the center of the primary four-knob array. I donāt have particularly big fingers, but even I had trouble twiddling it. Thatāll annoy some. But itās a small price to pay for such a pedalboard-friendly footprint. The boost doses you with a healthy bump in level and gain thatās great for stand-out leads and solos. And speaking of standing out, the upper-mid boost switch is a treat. I found that creating a greater disparity between the high mids from the low mids made for a more precise and satisfying tone-shaping experience than I would experience using a standard mids knob.
There are no shortage of pedals that ape Vox AC30 mojo, but I havenāt seen many that will give you the range of utility that the AC Booster V2 will, for less for $200. Xotic nailed a smart and versatile redesign here.
Nashville luthier and guitar tech Dave Johnson shows us the baker's dozen of tools he thinks any guitar picker requires to be a guitar fixer.
3. Guitar Tech Screwdriver Set - 3000
4. Nut File Set (for medium guitar strings) - 0882
8. String Spacing Ruler - 0673
9. Nut and Saddle Files - 4556
The Ultimate Guitarist's Tool Chest Giveaway
Whether you're setting up your first guitar or fine-tuning a custom build, these are the 13 tools every guitarist needs. Now you can win them all. We've partnered with our friends at StewMac to give away a complete pro-level toolkit valued at over $750.
Click here to enter
Paul Reed Smith cradles one of his companyās Charcoal Phoenix limited-edition guitars in front of a PRS Sonzera amp.
The storied guitar builder reflects on his dozen months sharing his experience, knowledge, and perspective with PGās readers.
Over the past year, Iāve written a series of articles in Premier Guitar going over some of my, and our industryās, views of guitar making. You can find all of them all online (and for those reading this online, the articles are collected here). What I am going to attempt to do for this final piece is boil down each of these articles to a āsort ofā conclusion. I have enjoyed the process of writing and editing each one. For the most part, itās been a lot of fun. So:
Tonewood Doesnāt Matter. Wood Does (August 2024)
We donāt use the word tonewood in conversation at PRS. It doesnāt capture a lot of my experience of which combinations of wood make good instruments. First and foremost, we are looking for qualities of wood over species, and we make sure we dry and treat each one appropriately.
What Makes a Guitar Worth the Price? (September 2024)
Very often, the price of a guitar does reflect how good an instrument isāand very often the price of the guitar has nothing to do with how good an instrument is.
What You Can and Canāt See When Buying a Guitar (October 2024)
This oneās a pet peeve. When making a purchase, you can clearly see the color of a guitar and how beautiful it is, but you have no idea if the neck is going to warp over time because of many factors, including wood drying and truss rod installment design. Trust your experience.
Does Where a Guitar Is Made Really Matter? (November 2024)
There are really good, really smart, really talented people all over the world. While I wonāt deny itās helped our career here at PRS being in the United States, I do not believe it is a truly defining factor of our quality. A good example would be the PRS SE Series.
The Complicated Beauty of Electric Guitar Pickups (December 2024)
Weāve taken so many good stabs at humbucking design, and Iām getting incredibly good feedback on our new McCarty IIIs. But making pickups is a complicated art. There are a lot of ingredients in the recipe.
āI hope these articles have had some positive impact on you as a group.ā
In Guitar Making, Itās the Details that Matter (January 2025)
Well, that title says it. Whatās interesting for me is that all guitar makers believe that different types of details matter more than others. At PRS, we have our own beliefs.
When Building GuitarsāOr Pursuing AnythingāGo Down All the Rabbit Holes (February 2025)
This oneās about learning. Itās a process I really enjoy. Whether your passion is guitar making, guitar playing, or something else entirely, there is always more to keep discovering.
Paul Reed Smith on Buying Gear (March 2025)
Very often at a clinic, the people who donāt play guitar have a less calcified view of the sound of the instruments being demonstrated than those players who have already developed strong ideas. On the other hand, one time a very experienced player was at one of my clinics and heard something heād been looking for for a long time and did not expect it out of the guitar he got it from. Trust your experienceānot your predetermined views.
Learning from the Mistakes of Guitar Buildingās Past (April 2025)
I think my beginnings as a repairman gave me a lot of insight on this one. Even still, just the process of defining a past guitar-making mistake is its own art.
Paul Reed Smith on Where Amp Historyāand ToneāBegins (May 2025)
This one I love. Itās a greatly exaggerated version of mods you could do to a TS808 Tube Screamer, which has a history on the web. Amplifiers are āmodulated power suppliesā and can have so much impact on your tone.
The Lifelong Rhythm of Learning (June 2025)
In some periods of time, thereās a lot to be learned, and in some periods of time, you can barely hold what you had before. Itās different for everyone, and for me, itās been up and down. No matter where you are in the process, thereās always good work to do.
I hope these articles have had some positive impact on you as a group. I know some things resonate with some people and not others, and the opposite as well. I havenāt gotten a lot of feedback from these articles except that thereās not an overwhelming chorus saying āwhat an idiot,ā which I assume means thereās been some meat on the bone of some of the views shared. Itās been a joy. Thanks for listening.
Kemper updated the entire product range introducing the all-new Kemper Profiler MK 2 Series. More Power. More Flexibility.
KEMPER PROFILER - The all-new PROFILER MK 2 Series
Kemper today announces the immediate availability of the all-new KEMPER PROFILER MK 2 Series. Kemper continues to raise the bar with the upcoming Profiler MK 2 Series ā a bold evolution of the Profiler lineup (All PROFILERs: Head, Rack, Stage, the Player, and the powered versions), delivering more power, more flexibility, and more creative potential than ever before.
At the heart of the PROFILER MK 2 Series works an upgraded processing engine, unlocking faster performance, with boot times clocking in around 20 seconds, and a host of new features that expand the boundaries of what a modern guitar or bass rig can do.
A New Era of Effects:
20 Blocks in Series, the most powerful effects architecture ever found in a Kemper unit - The PROFILER MK 2 Series now offers seven additional effect blocks, raising the total number of simultaneous audio effect blocks to an incredible 20 ā all running with zero added signal latency. Itās like having an entire, fully integrated pedalboard with pedal essentials at your feet ā but one that boots in seconds, never needs rewiring, and always remembers your settings.
A new Era of Profiling:
Kemper announces a new profiling technology for the MK 2 series. Availabilty is expected during Summer. Currently in extended testing with some selected third-party profile vendors the new profiling offers:
- More than 100,000 individual frequency points meticulously analyzed for the most precise amp recreation ever achieved.
- Next-Level Speaker & Dynamically adjustable Cabinet Resonance ā Capturing the true dynamics of your setup with the longest and most complex impulse responses in the industry.
- Liquid Profiling Technology ā Seamlessly integrate the original ampās gain and tone controls, transforming a single profile into a fully dynamic, living amplifier.
- Unparalleled Precision & Feel ā A cutting-edge hybrid approach combining precise, deterministic analog measurement with Kemperās industry-leading profiling intelligence.
Overview - All thatās new in the PROFILER MK 2 in more Detail:
All-New FX Section ā 7 Additional FX Slots - ThePROFILER MK 2-Series introduces an expanded FX section with seven dedicated āpedalboard essentialā FX slots, featuring: A new second Noise Gate (Palm Ninja), Compressor, Pure Booster, WahWah, Vintage Chorus, Air Chorus, and Double Tracker.
Adding these to the pre-existing 10 audio blocks, Spectral Noise Gate, Transpose Effect, and Volume Pedal - in total this provides users with 20 simultaneous audio effect blocks, setup gig-ready right out of the box while maintaining full flexibility for customization.
This new layout makes it convenient to cover all the bases and offers 8 flexible FX blocks available for the acclaimed tone shapers and studio-grade unique FX the KEMPER PROFILER is famous for.
Performance Meets Portability - With a smarter internal design and new lightweight aluminum components, the Profiler Stage Mk 2 has shed excess weight ā making it even more gig-friendly without sacrificing the tank-like build quality musicians rely on. Whether for touring the world or heading to a local session, this is the most travel-ready full-featured Profiler yet.
Mk 2-ready Player! - For all guitarists and bassists already rocking the compact PROFILER Player, there is good news: itās been āMK 2ā-ready from day one, meaning itās fully aligned with the power and potential of the new series, and now, on LVL 1 already, it features 16 simultaneous FX in total. This new extended signal flow becomes available for all Player owners as a free update, and yes, it will get Profiling, too. Making the PROFILER Player out of the box the features richest and most professional performance and recording solution - with its travel-friendly footprint and convenient price point!
8-Channel USB Audio Support for the new Mk 2-Series - Native 8-channel USB audio support to all KEMPER PROFILER MK 2 Series units, enabling seamless multitrack recording and reamping directly into your DAW ā no external interface required.
Loop Longer, Play Harder - The integrated Looper also gets a serious upgrade. With up to two full minutes of recording time, the MK 2 Series lets you capture extended phrases, build layered soundscapes, or craft entire performances ā all on the fly. (Looper available from LVL 3 for the Player)
Speed and Responsiveness Upgrades - Major improvements under the hood. Boot times, preset switching, and UI responsiveness are noticeably faster and smoother, especially in Performance Mode.
Christoph Kemper, Founder & CEO:
āThe new PROFILER MK 2-Series makes the PROFILERs feel more like a complete rig than ever before. With instant access to essential FX, full USB audio integration, and improved playability, weāre giving our users a platform that adapts and grows with them.ā
Pricing & Availability:
The new KEMPER PROFILER MK 2 Series models are available now from dealers worldwide and directly from the Kemper Online Store. All the new features require a KEMPER PROFILER MK 2 Series device. Visit www.kemper-amps.com for downloads and release notes.
PROFILER Head $1,348.00
PROFILER Rack $1,398.00
PROFILER Stage $1,498.00
PROFILER Player $ 699.00
PROFILER PowerHead $1,798.00
PROFILER PowerRack $1,798.00
PROFILER Remote $ 469.00
At a glance!
The Kemper Profiler MK 2 Series isnāt just about doing more. Itās about doing it better, faster, and without compromise. With unmatched tonal power, surgical precision, and effortless usability, this is the most complete and forward-thinking Profiler platform yet.