
Replacing a stripped truss-rod nut can be an inexpensive DIY repair—if you know how to approach it.
Recently a client brought a fairly new American Fender Strat into the shop. The neck had too much relief, but otherwise the guitar was in great shape. No problem, I thought. Tighten up the truss rod a bit and we’ll be good to go.
I unwrapped a new Fender hex key (more about the condition of your tools in a moment) and inserted it into the truss rod nut. But instead of finding a secure grip, I felt the tool spin around inside the nut. Oh, that sinking feeling: I realized the nut’s socket was stripped, which is very bad news for this particular Strat.
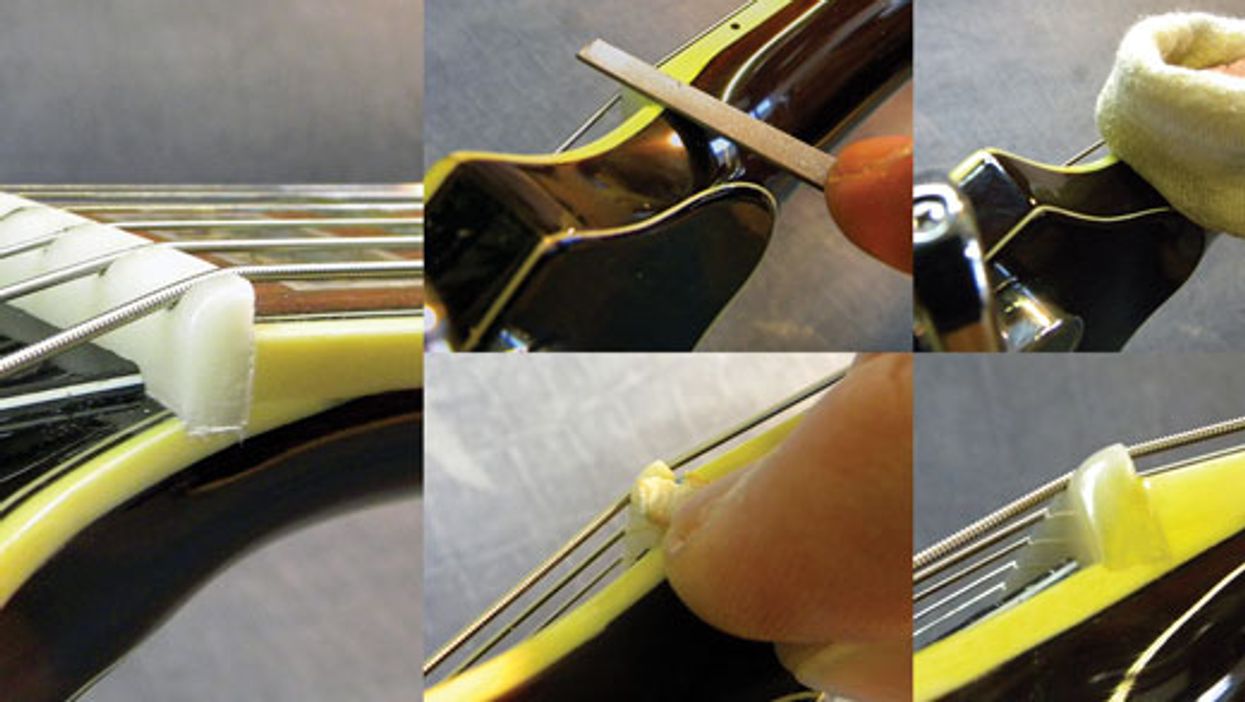
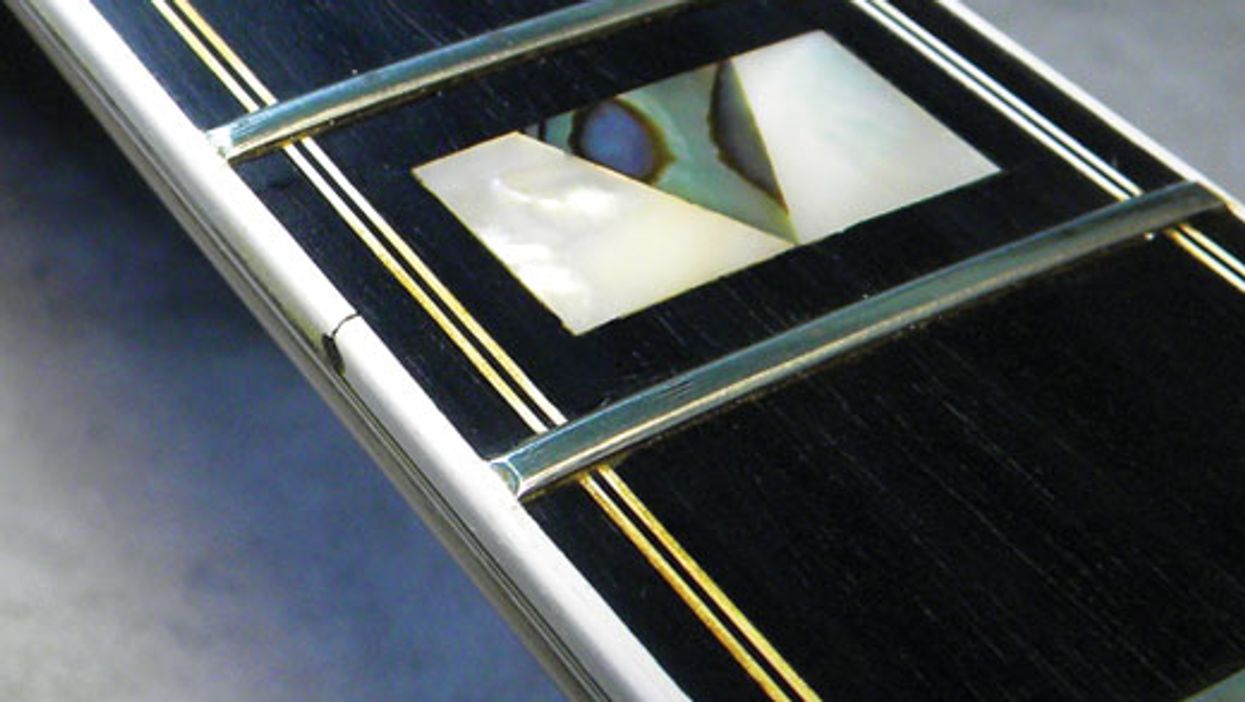
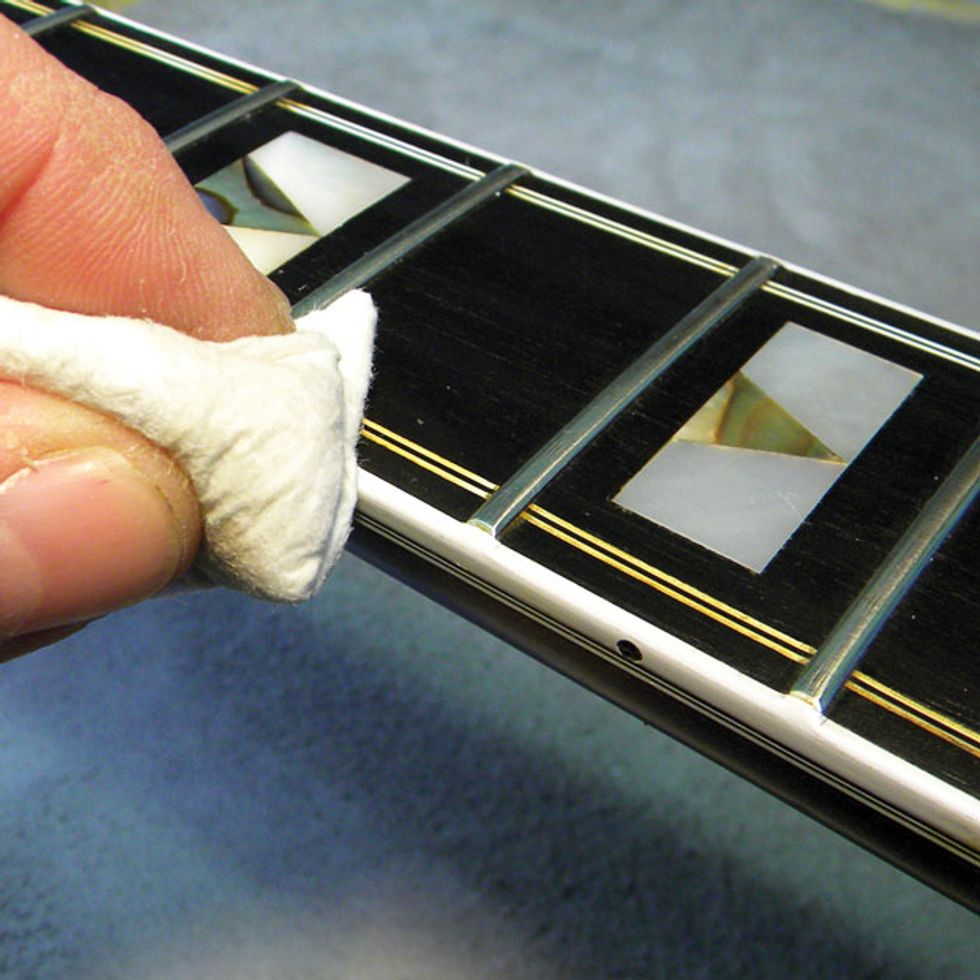
Why? The truss rod nut on this type of Strat is recessed into the neck and surrounded by wood (Photo 1), so when the socket that holds the truss rod tool is stripped out, you only have two options: perform major surgery to remove the stripped nut and replace it with a new one, or buy a replacement neck. Realistically, it would cost more to perform the extraction, so I advised my client to contact Fender about getting a new neck.
Fortunately, not all Fender guitars have a recessed truss rod nut—in fact, many guitars don’t. You can often replace a stripped truss rod nut, and it’s not a tricky repair if you know what you’re doing. Inexpensive replacement nuts are available from such suppliers as Stewart-MacDonald, Luthiers Mercantile, and Allparts.
Different types of truss rod nuts.
Before we discuss why a truss rod nut might fail and how to fix it, let’s explore several common types of nuts used on guitars. You adjust some nuts by inserting a tool into them, others by enclosing them with a nut driver or special socket wrench.
Using the wrong tool to adjust a nut is the most common cause of truss rod problems.
The nut placement varies too: On Taylor and Gibson instruments, for example, the truss rod nut is typically located at the headstock, under a plastic or wood cover. These are among the easiest to remove. Some Fender guitars have a “bullet” truss rod nut at the headstock; these are not recessed and can be removed without surgery. Older Fender guitars have a truss rod nut at the heel of the fretboard, and these are very easy to remove, once you take off the neck. Some modern electrics have an exposed “wheel” nut located at the heel, and these can be adjusted without removing the neck.
Some acoustics, such as Takamine and modern Martins, have a truss rod nut that you access through the soundhole by inserting the tool through a small hole in the upper top brace (located between the soundhole and neck block). In some cases, this hole is just big enough for a wrench to poke through, but not big enough to accommodate the nut. The brace can be removed, but that is considered a surgical procedure, which is why some luthiers opt to simply enlarge the hole to remove the nut.
Truss rod tools vary, as well.
Some require a hex key (Allen wrench), while others take a flathead or Philips screwdriver, a nut driver, a mini socket wrench, or a small metal rod. To learn more, read “Demystifying Truss-Rod Tools.”
Why truss rod nuts fail.
There are three main reasons why you might have a problem with a truss rod nut:
- Hardware defect.
- The wrong size tool was used in an attempted adjustment.
- The correct tool was used, but it was worn.
A manufacturing defect is pretty rare, but they happen. When you think about how many guitars are built (probably millions each year), there’s a good chance a few lemons are going to squeeze through. It usually comes down to poor quality metal or slight discrepancies in manufacturing tolerances.
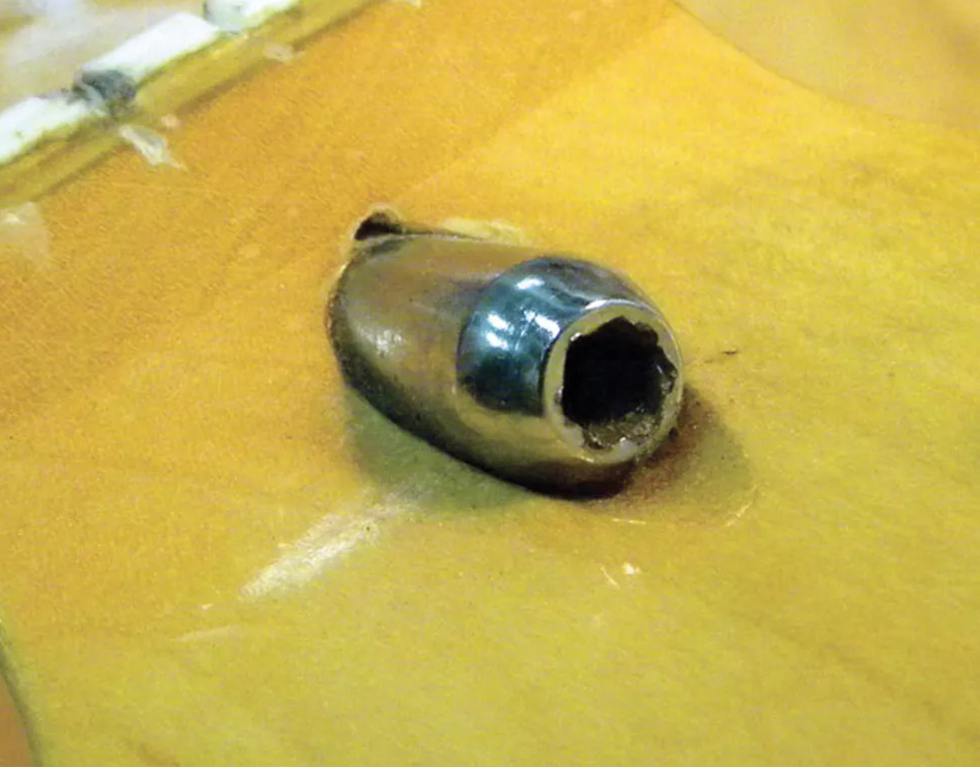
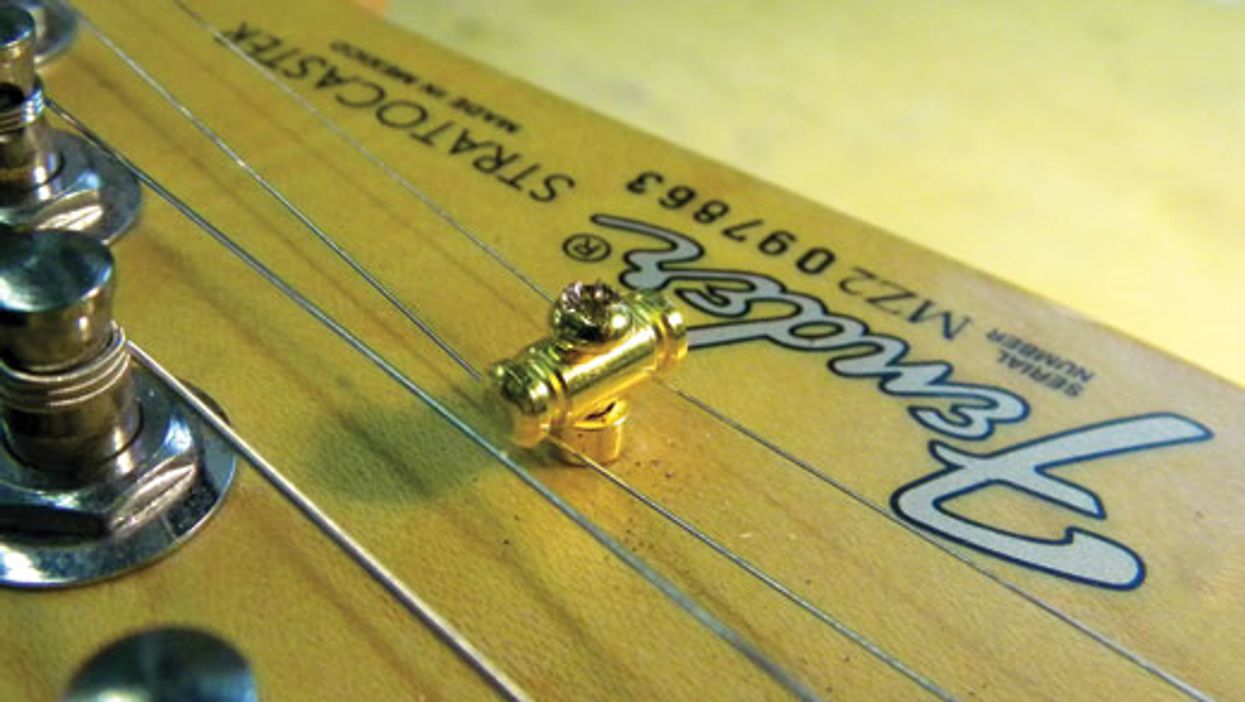
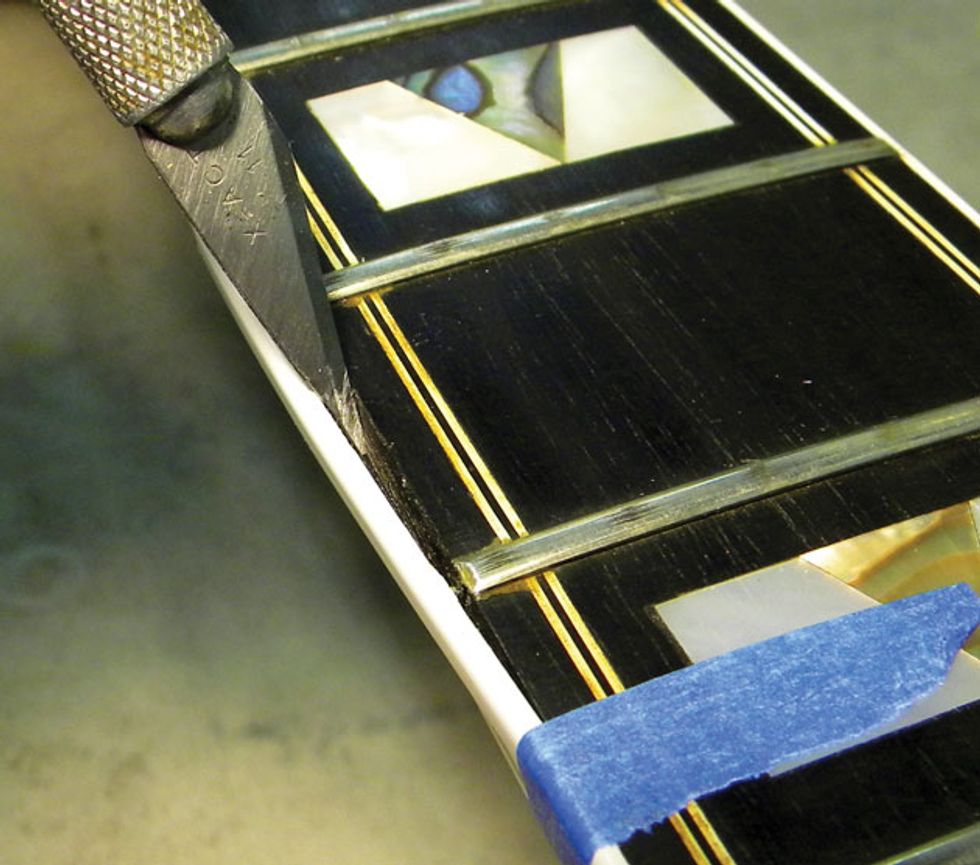
Photo 2
Using the wrong tool to adjust a nut is the most common cause of truss rod problems. I’ve seen many nuts that were ruined because someone decided to force the wrong tool around or into them. Photo 2 shows a Fender bullet nut that suffered this fate. Once a socket’s edges have been rounded like this, the hex key can’t grip the nut to turn it.
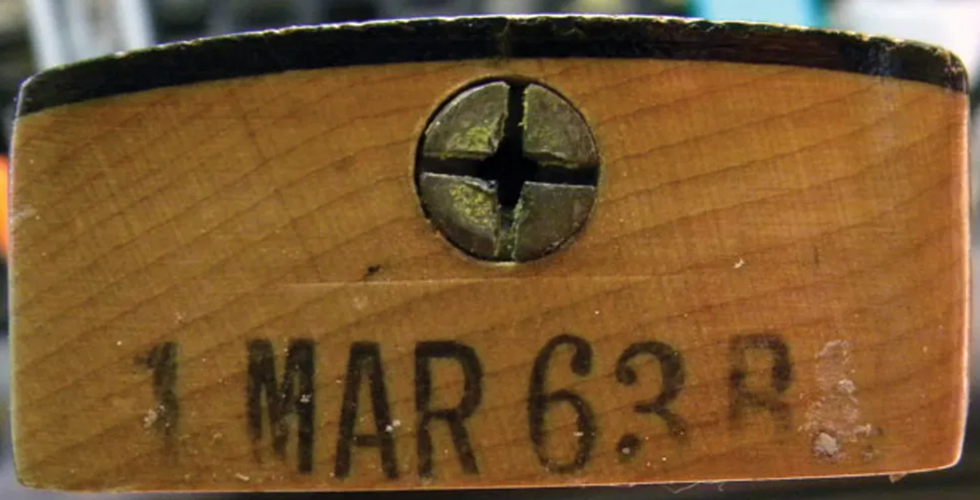
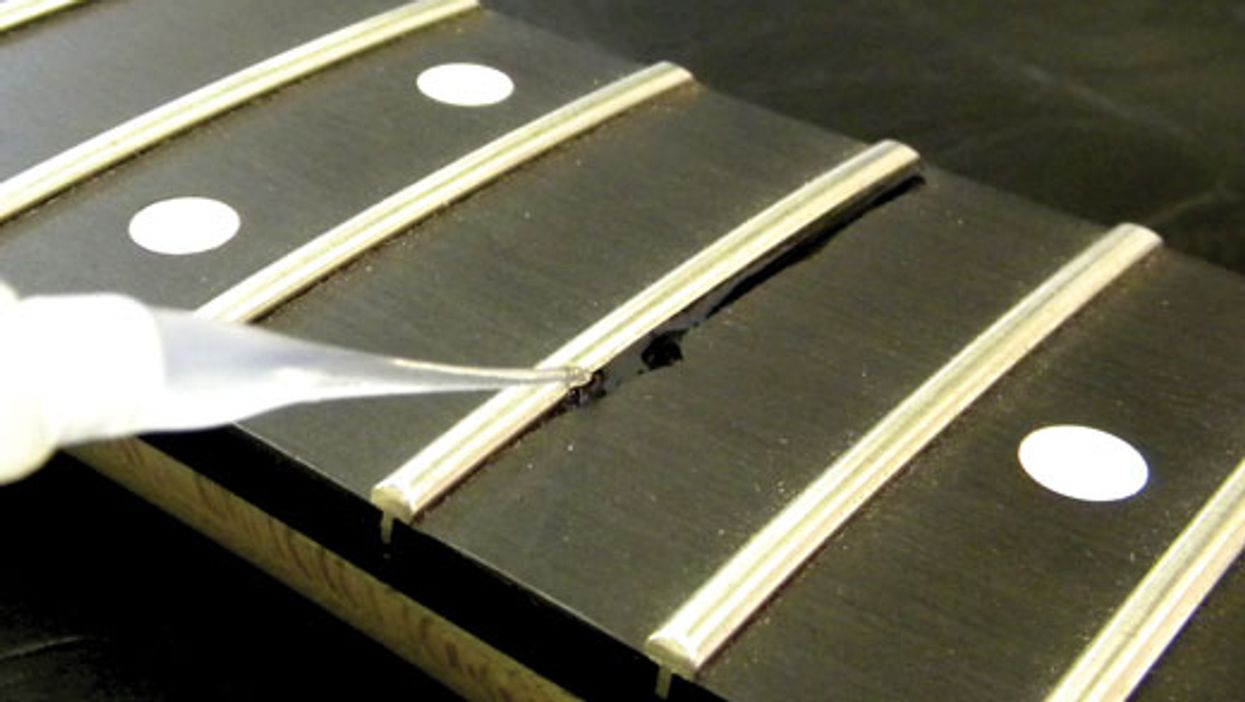
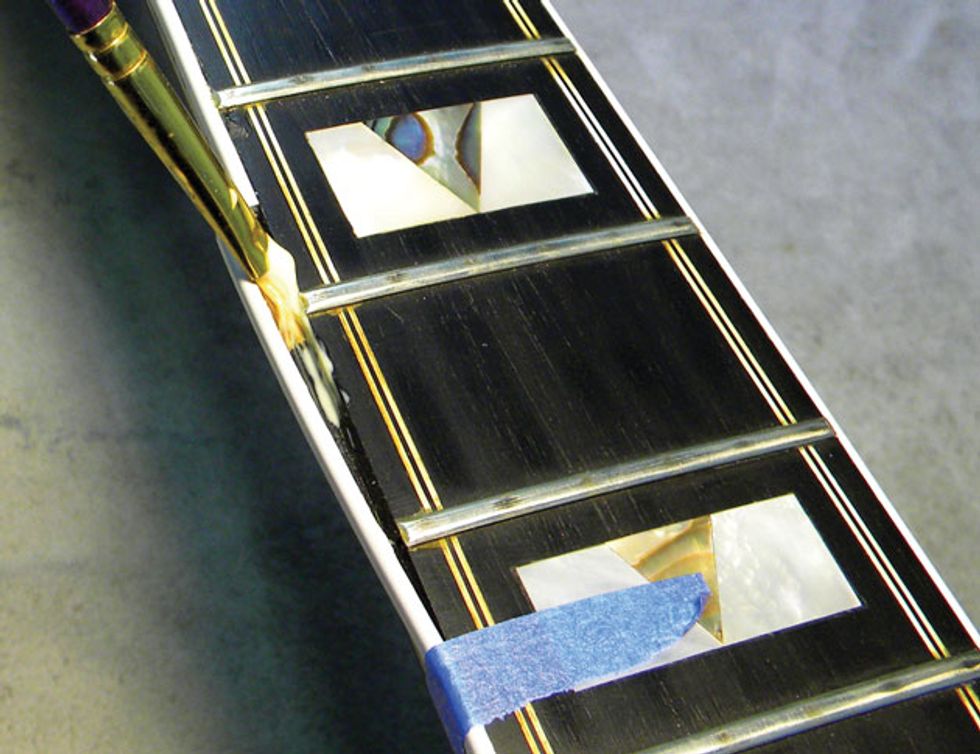
Photo 3
Recently I removed the neck on a client’s vintage Tele to adjust the truss rod. The nut looked like Photo 3, which illustrates what happens when someone uses a screwdriver that’s the wrong size. The slots get deformed, and this makes truss rod adjustments difficult. The good news is these nuts are easy to remove, even when they’re butchered like this, but unfortunately it’s nearly impossible to find a “period correct” replacement. Sure, there are plenty of aftermarket parts available, but for a vintage guitar, it’s imperative to use period-correct parts to maintain its value. I mention this simply to drive home the importance of using the correct truss rod tool—one that fits snugly.
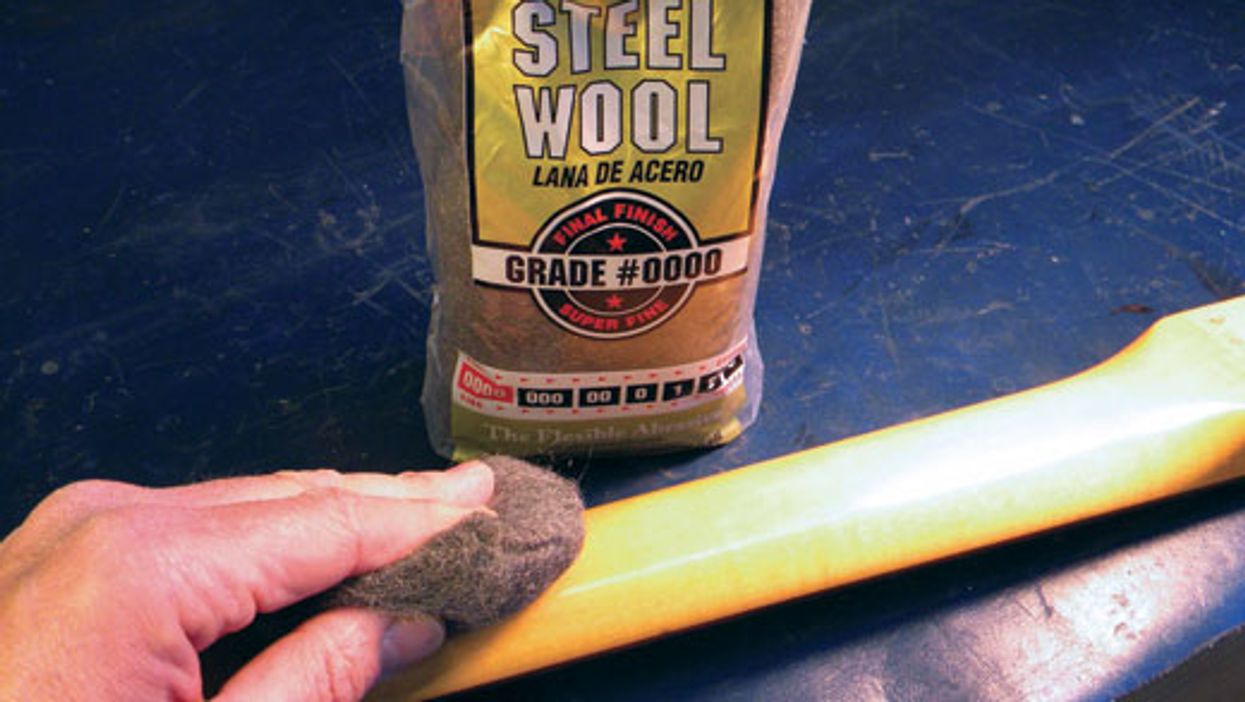
Worn-out tools will also damage a truss rod nut. For example, if the truss rod requires a hex key and its edges have become worn and rounded, it can in turn round out the inside of the nut. It’s important to check your tools to ensure they won’t damage your guitar.
A basic guitar tech principle: Replacing worn tools is much cheaper than fixing the damage they can cause.
Tools for removing a stripped nut.
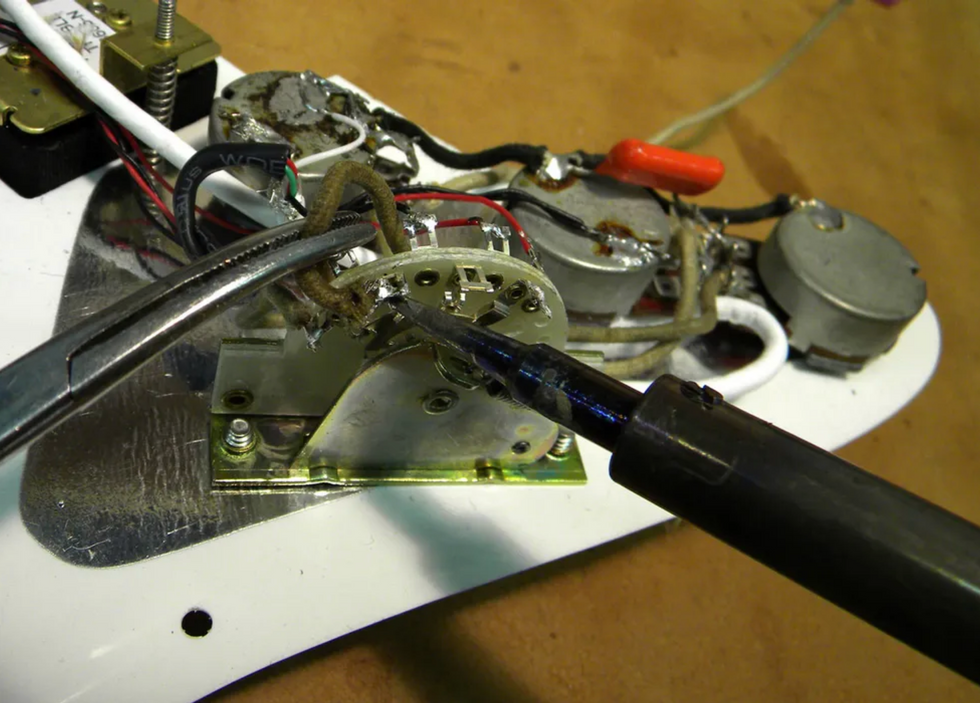
There are times when you can use the specified tool to remove the nut, but often you have to be creative. Once when working on a Gibson electric, I had to remove a hex nut that was so stripped that a nut driver wouldn’t grip it. Fortunately, a pair of needle-nose pliers did the job, but you must be careful to avoid stripping the nut more than it already is as you remove it. An improvised tool can easily damage the headstock, so proceed with caution.
Important: Always slacken the strings before you remove the truss rod nut.
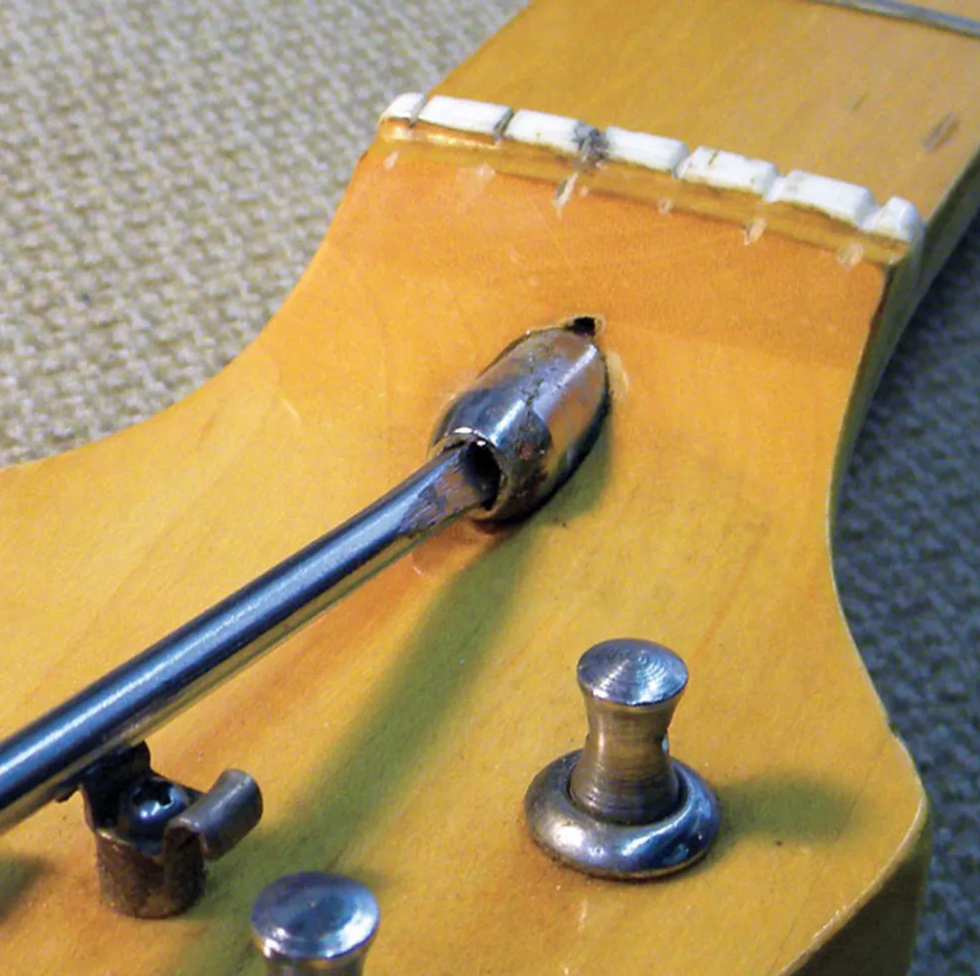
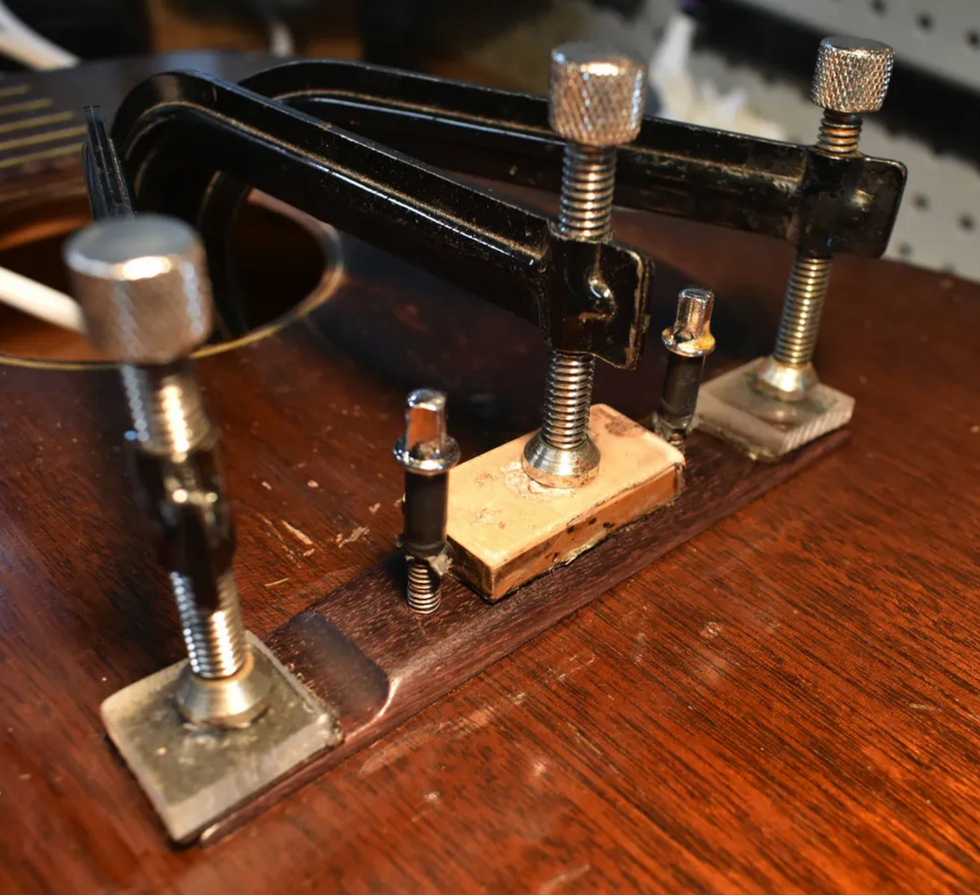
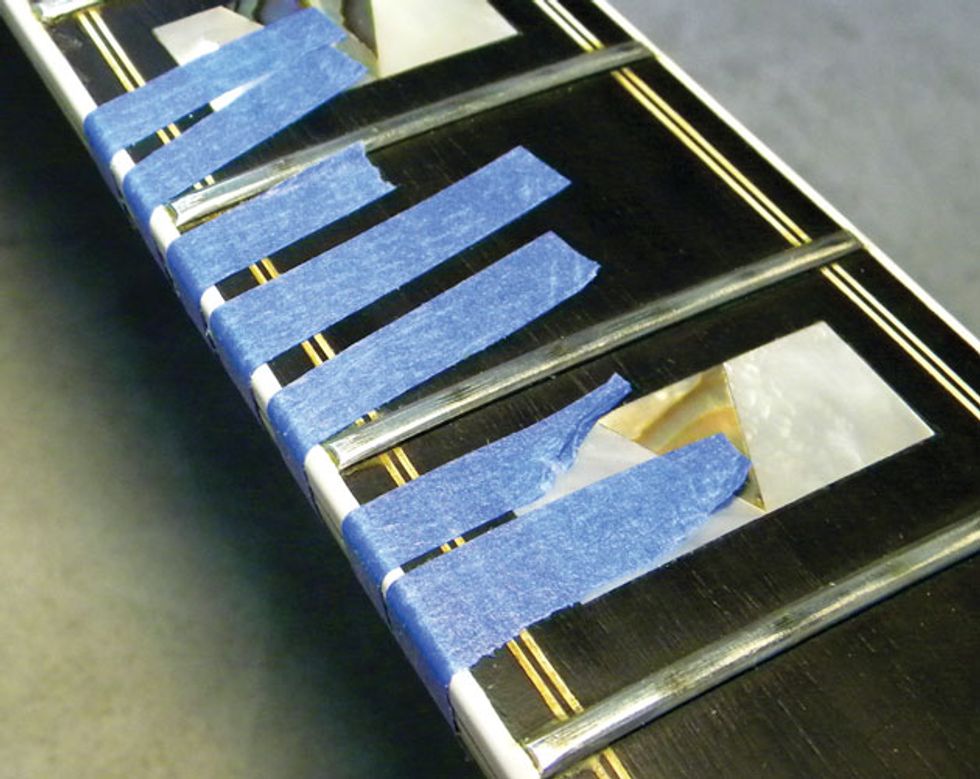
Photo 4
In other cases, I’ve used a small flathead screwdriver to extract a nut when a hex key wouldn’t work. For example, by gently tapping the screwdriver into this stripped bullet nut (Photo 4), I was able to get it to catch hold. I turned the screwdriver counter-clockwise and voilà, the nut came off.
I’ve also used a screw extractor, a tool that looks like a drill bit, but with a twist: Screw extractors have tapered, reversed cutting threads designed to dig into a damaged screw and grip it tighter as you turn the extractor counter-clockwise while carefully applying pressure. The counter-clockwise movement backs out the damaged screw—typically its head is mangled or broken off—even as the extractor bores deeper into the screw shaft. I do this manually using a T-handle, but you can also use vice-grips with a screw extractor. I’d advise against using a power drill for extraction, but some techs do, running the drill at slow speeds. Using an extractor to remove a stripped truss rod nut takes a lot of patience, but it’s doable. The trick is to be gentle but firm.
Installing the new truss rod nut.
This is the easy part. Just slide the nut onto the truss rod threads and turn it clockwise. Tighten the nut until it’s just a little snug. Tune the guitar up to pitch and check the relief in the neck. Depending on your playing style, .010" to .012" should be plenty of relief. Check out “Time for a Neck Adjustment?” if you’re not sure how to adjust the truss rod.
Averting disaster.
A stripped truss rod nut is bad news, but it can usually be replaced inexpensively. However, if you strip the threads or nut at the other end of the truss rod—where it screws into hardware embedded within the neck itself—that’s a different story. Also, if the exposed threads on a truss rod are stripped, a replacement nut will not help. In either case, the truss rod itself would need to be replaced—a very invasive and expensive repair. At that point you have to decide whether replacing the neck makes more sense than spending a fortune on major surgery. The bottom line is simple: When adjusting your truss rod, don’t over-tighten the nut.
If you’re not comfortable working with your truss rod nut, consult a qualified repair technician. Guitar techs and luthiers deal with these issues all the time, and paying them for their expertise can be a wise investment.
[Updated 1/25/22]
- Guitar Shop 101: Tips for Buying a Used Electric - Premier Guitar ›
- Guitar Shop 101: “Decking” a Stratocaster Trem - Premier Guitar ›
- DIY: How to Adjust a Truss Rod - Premier Guitar ›
- New Giveaway: Win the Yamaha Pacifica Standard Plus! - Premier Guitar ›
A dose of magic gain potion.
Works like a little vial of magic gain potion. Fattens without obscuring individual frequency bands.
None.
$129
Solodallas SVDS Boost
solodallas.com
The Schaeffer-Vega Diversity System—an early and very successful wireless system—excelled at the tasks it was designed for. But there was more magic than met the eye. Though designed to sound as transparent as possible, it nonetheless colored the signal in a way that people like Angus Young and Eddie Van Halen found essential.
SoloDallas explored the possibilities of this circuit before in pedals like theSchaeffer Replica, but the new SVDS Boost strips the formula to essentials. Minimalist controls—one knob, that’s it—make this boost no less delicious. I’m not surprised Angus Young was smitten with the original SVDS. An SG and Marshall 18-watt amp sound fantastic naked, but the SVDS Boost has the rare talent for fattening everything without seeming to favor or obscure any frequency band too much. And as zest to the PAF/Marshall style formula, it makes the kind of rowdy, organic, airy, large, and punch-packing Marshall sound you would dream of getting in a studio or hearing on the radio. There are many shades of this basic awesome color in spite of the single knob. Unity gain lives in the earliest third of its range. From there you certainly get more volume, but mostly you bathe in various hues of compressed, saturated, thick, and dynamite growl. You don’t need a Gibson and a Marshall to use it to devastating effect, either. A Telecaster and Vibrolux snap with attitude and whip-crack energy with the SVDS in the line. And with both guitar/amp combos, the SVDS’ wide dynamic responsiveness to volume and tone attenuation assures that things stay cracking when you need more control.
Join PG contributor Tom Butwin as he explores all-new versions of the Framus Hootenanny 12-string and 6-string acoustics—made famous by John Lennon and now available with modern upgrades. From vintage-inspired tone to unique features, these guitars are built to spark creativity.
Positive Grid's Spark NEO offers guitarists a wireless guitar rig built into premium headphones, with AI-powered tone customization, exceptional sound quality, and versatile connectivity.
Positive Grid announces Spark NEO, a groundbreaking wireless guitar rig built directly into premium over-ear headphones. Designed to deliver a seamless, personal guitar experience, Spark NEO combines Positive Grid’s award-winning guitar amp technology with true wireless connectivity and AI-powered guitar tone customization.
Spark NEO offers a seamless solution for guitarists seeking exceptional sound quality, advanced tone-shaping tools, and the freedom to play anywhere. Built with custom-designed 40mm drivers and an ultra-lightweight bio-fiber diaphragm, Spark NEO ensures rich, balanced sound for every style of music. The included wireless transmitter instantly pairs any guitar with the headphones for plug-and-play convenience, while Spark NEO’s built-in 1/4" input can also support traditional guitar cables, for added versatility.
With four onboard, customizable guitar presets, Spark NEO enables private playing anywhere, free from space limitations or noise constraints. For even more variety, connecting to the free Spark app unlocks additional presets, amps & effects, and advanced tone controls. Spark NEO also doubles as premium Bluetooth® headphones, offering exceptional clarity for music, podcasts, and more.
Key Features:
- Optimized for Guitarists: Spark NEO integrates Positive Grid’s renowned tone engine, delivering precise sound tailored to electric, acoustic, and bass guitars.
- True Wireless Freedom: A proprietary 2.4GHz system provides reliable, ultra-low latency connectivity between Spark NEO and the user’s guitar, for a smooth and stable playing experience.
- AI-Powered Guitar Tone Customization: Create and refine tones effortlessly with AI-driven tools that adapt to every playing style.
- Exceptional Sound Quality: Precision-engineered drivers deliver clarity and balance for both guitar playing and music listening.
- Portable Design: Spark NEO’s compact, foldable build and rechargeable battery with up to six hours of play time make it easy to take anywhere.
Built for Guitarists
Spark NEO bridges the gap between traditional guitar setups and modern technology. Unlike using generic headphones with a guitar amp, Spark NEO’s integrated design ensures every element—from app to drivers—delivers unparalleled performance.
Noise Isolating Design
Spark NEO’s ultra-soft, durable ear cups ensure a comfortable fit. With advanced damping materials, tuned venting, and precise port adjustments, Spark NEO provides passive noise isolation, letting every musical detail shine without external interference. Jam with backing tracks or favorite songs without disturbing a soul.
Enhanced Creativity with Spark App
The Spark App expands Spark NEO’s capabilities with access to 33 amps and 43 effects, plus over 100,000 tones on Positive Grid's online ToneCloud. Auto Chords helps players learn and jam along with any song by displaying its chords in real time as the song plays, while customizable presets offer endless creative possibilities. Play with backing tracks or along with favorite songs. Whether practicing, playing, or experimenting, Spark NEO delivers unmatched flexibility for guitar players at every level.
Availability and Pricing
Spark NEO is priced at USD $199, including the headphones, wireless transmitter, and full access to the Spark App. It will be available soon on Positive Grid’s website, Amazon, and select retailers.
For more info, please visit positivegrid.com.
This Japan-made Guyatone brings back memories of hitchin’ rides around the U.S.
This oddball vintage Guyatone has a streak of Jack Kerouac’s adventurous, thumbing spirit.
The other day, I saw something I hadn’t noticed in quite some time. Driving home from work, I saw an interesting-looking fellow hitchhiking. When I was a kid, “hitchers” seemed much more common, but, then again, the world didn’t seem as dangerous as today. Heck, I can remember hitching to my uncle’s cabin in Bradford, Pennsylvania—home of Zippo lighters—and riding almost 200 miles while I sat in a spare tire in the open bed of a pickup truck! Yes, safety wasn’t a big concern for kids back in the day.
So, as I’m prone to do, I started digging around hitchhiking culture and stories. Surprisingly, there are organized groups that embrace the hitching life, but the practice remains on the fringe in the U.S. Back in the 1950s, writer Jack Kerouac wrote the novel On the Road, which celebrated hitchhiking and exposed readers to the thrill of maverick travel. Heck, even Mike Dugan (the guitarist in all my videos) hitched his way to California in the 1960s. But seeing that fellow on the side of the road also sparked another image in my brain: Yep, it always comes back to guitars.
Let me present to you a guitar that’s ready to go hitching: the Guyatone LG-180T, hailing from 1966. The “thumbs-up” headstock and the big “thumb” on the upper bout always made me think of thumbing a ride, and I bought and sold this guitar so long ago that I had forgotten about it, until I saw that hitchhiking dude. Guyatone was an interesting Japanese company because they were primarily an electronics company, and most of their guitars had their wooden parts produced by other factories. In the case of the LG-180T, the bodies were made by Yamaha in Hamamatsu, Japan. At that time, Yamaha was arguably making the finest Japanese guitars, and the wood on this Guyatone model is outstanding. We don’t often see Guyatone-branded guitars here in the U.S., but a lot of players recognize the early ’60s label Kent—a brand name used by an American importer for Guyatone guitars.
With a bit of imagination, the LG-180T’s “thumbs up” headstock seems to be looking for a roadside ride.
Kent guitars were extremely popular from the early ’60s until around 1966. The U.S. importer B&J fed the American need for electric guitars with several nice Kent models, but when the Guyatone contract ended, so did most of the Kent guitars. After that, Guyatone primarily sold guitars in Japan, so this example is a rare model in the U.S.
“Unless you are a master at guitar setups, this would be a difficult player.”
This headstock is either the ugliest or the coolest of the Guyatone designs. I can’t decide which. I will say, no other Japanese guitar company ever put out anything like this. You have to give the Guyatone designers a thumbs up for trying to stand out in the crowd! Guyatone decided to forgo an adjustable truss rod in this model, opting instead for a light alloy non-adjustable core to reinforce the neck. Speaking of the neck, this instrument features the most odd-feeling neck. It’s very thin but has a deep shoulder (if that makes any sense). Totally strange!
Another strange feature is the bridge, which offers very little adjustment because of the three large saddles, which sort of rock back and forth with the tremolo. It’s a shame because these pickups sound great! They’re very crisp and have plenty of zing, but unless you are a master at guitar set-ups, this would be a difficult player.
This could be why the LG-180T only appeared in the 1966 and 1967 catalogs. After that, it disappeared along with all the other Yamaha-made Guyatone electrics. By 1969, Guyatone had gone bankrupt for the first time, and thus ended guitar production for a few decades. At least we were blessed with some wacky guitar designs we can marvel at while remembering the days when you could play in the back end of an explosive 1973 AMC Gremlin while your mom raced around town. Two thumbs up for surviving our childhoods! PG