Replacing a stripped truss-rod nut can be an inexpensive DIY repair—if you know how to approach it.
Recently a client brought a fairly new American Fender Strat into the shop. The neck had too much relief, but otherwise the guitar was in great shape. No problem, I thought. Tighten up the truss rod a bit and we’ll be good to go.
I unwrapped a new Fender hex key (more about the condition of your tools in a moment) and inserted it into the truss rod nut. But instead of finding a secure grip, I felt the tool spin around inside the nut. Oh, that sinking feeling: I realized the nut’s socket was stripped, which is very bad news for this particular Strat.
Why? The truss rod nut on this type of Strat is recessed into the neck and surrounded by wood (Photo 1), so when the socket that holds the truss rod tool is stripped out, you only have two options: perform major surgery to remove the stripped nut and replace it with a new one, or buy a replacement neck. Realistically, it would cost more to perform the extraction, so I advised my client to contact Fender about getting a new neck.
Fortunately, not all Fender guitars have a recessed truss rod nut—in fact, many guitars don’t. You can often replace a stripped truss rod nut, and it’s not a tricky repair if you know what you’re doing. Inexpensive replacement nuts are available from such suppliers as Stewart-MacDonald, Luthiers Mercantile, and Allparts.
Different types of truss rod nuts.
Before we discuss why a truss rod nut might fail and how to fix it, let’s explore several common types of nuts used on guitars. You adjust some nuts by inserting a tool into them, others by enclosing them with a nut driver or special socket wrench.
Using the wrong tool to adjust a nut is the most common cause of truss rod problems.
The nut placement varies too: On Taylor and Gibson instruments, for example, the truss rod nut is typically located at the headstock, under a plastic or wood cover. These are among the easiest to remove. Some Fender guitars have a “bullet” truss rod nut at the headstock; these are not recessed and can be removed without surgery. Older Fender guitars have a truss rod nut at the heel of the fretboard, and these are very easy to remove, once you take off the neck. Some modern electrics have an exposed “wheel” nut located at the heel, and these can be adjusted without removing the neck.
Some acoustics, such as Takamine and modern Martins, have a truss rod nut that you access through the soundhole by inserting the tool through a small hole in the upper top brace (located between the soundhole and neck block). In some cases, this hole is just big enough for a wrench to poke through, but not big enough to accommodate the nut. The brace can be removed, but that is considered a surgical procedure, which is why some luthiers opt to simply enlarge the hole to remove the nut.
Truss rod tools vary, as well.
Some require a hex key (Allen wrench), while others take a flathead or Philips screwdriver, a nut driver, a mini socket wrench, or a small metal rod. To learn more, read “Demystifying Truss-Rod Tools.”
Why truss rod nuts fail.
There are three main reasons why you might have a problem with a truss rod nut:
- Hardware defect.
- The wrong size tool was used in an attempted adjustment.
- The correct tool was used, but it was worn.
A manufacturing defect is pretty rare, but they happen. When you think about how many guitars are built (probably millions each year), there’s a good chance a few lemons are going to squeeze through. It usually comes down to poor quality metal or slight discrepancies in manufacturing tolerances.
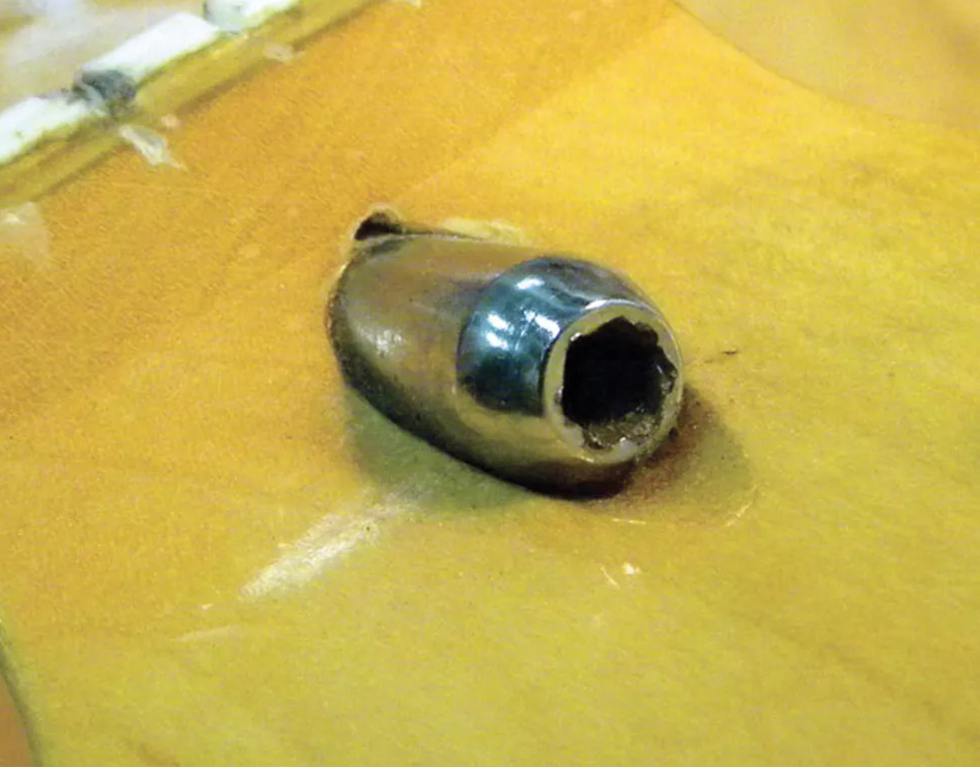
Photo 2
Using the wrong tool to adjust a nut is the most common cause of truss rod problems. I’ve seen many nuts that were ruined because someone decided to force the wrong tool around or into them. Photo 2 shows a Fender bullet nut that suffered this fate. Once a socket’s edges have been rounded like this, the hex key can’t grip the nut to turn it.
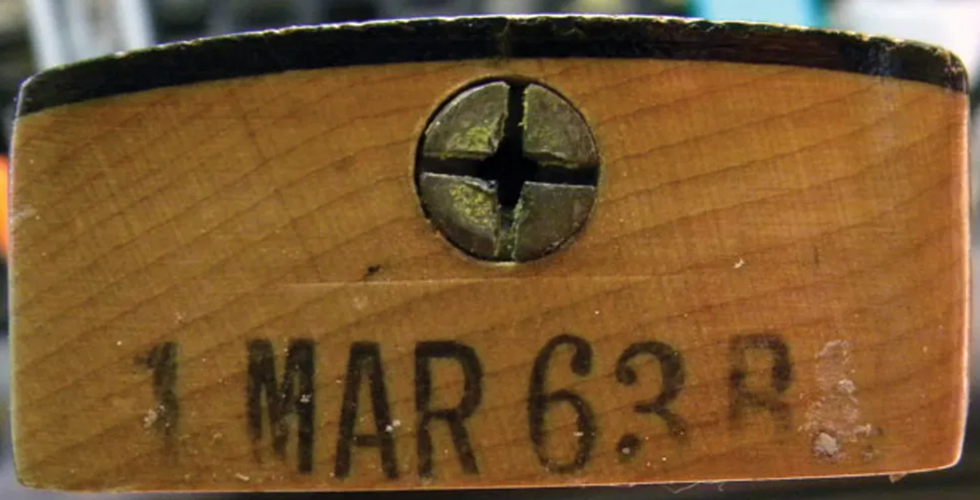
Photo 3
Recently I removed the neck on a client’s vintage Tele to adjust the truss rod. The nut looked like Photo 3, which illustrates what happens when someone uses a screwdriver that’s the wrong size. The slots get deformed, and this makes truss rod adjustments difficult. The good news is these nuts are easy to remove, even when they’re butchered like this, but unfortunately it’s nearly impossible to find a “period correct” replacement. Sure, there are plenty of aftermarket parts available, but for a vintage guitar, it’s imperative to use period-correct parts to maintain its value. I mention this simply to drive home the importance of using the correct truss rod tool—one that fits snugly.
Worn-out tools will also damage a truss rod nut. For example, if the truss rod requires a hex key and its edges have become worn and rounded, it can in turn round out the inside of the nut. It’s important to check your tools to ensure they won’t damage your guitar.
A basic guitar tech principle: Replacing worn tools is much cheaper than fixing the damage they can cause.
Tools for removing a stripped nut.
There are times when you can use the specified tool to remove the nut, but often you have to be creative. Once when working on a Gibson electric, I had to remove a hex nut that was so stripped that a nut driver wouldn’t grip it. Fortunately, a pair of needle-nose pliers did the job, but you must be careful to avoid stripping the nut more than it already is as you remove it. An improvised tool can easily damage the headstock, so proceed with caution.
Important: Always slacken the strings before you remove the truss rod nut.
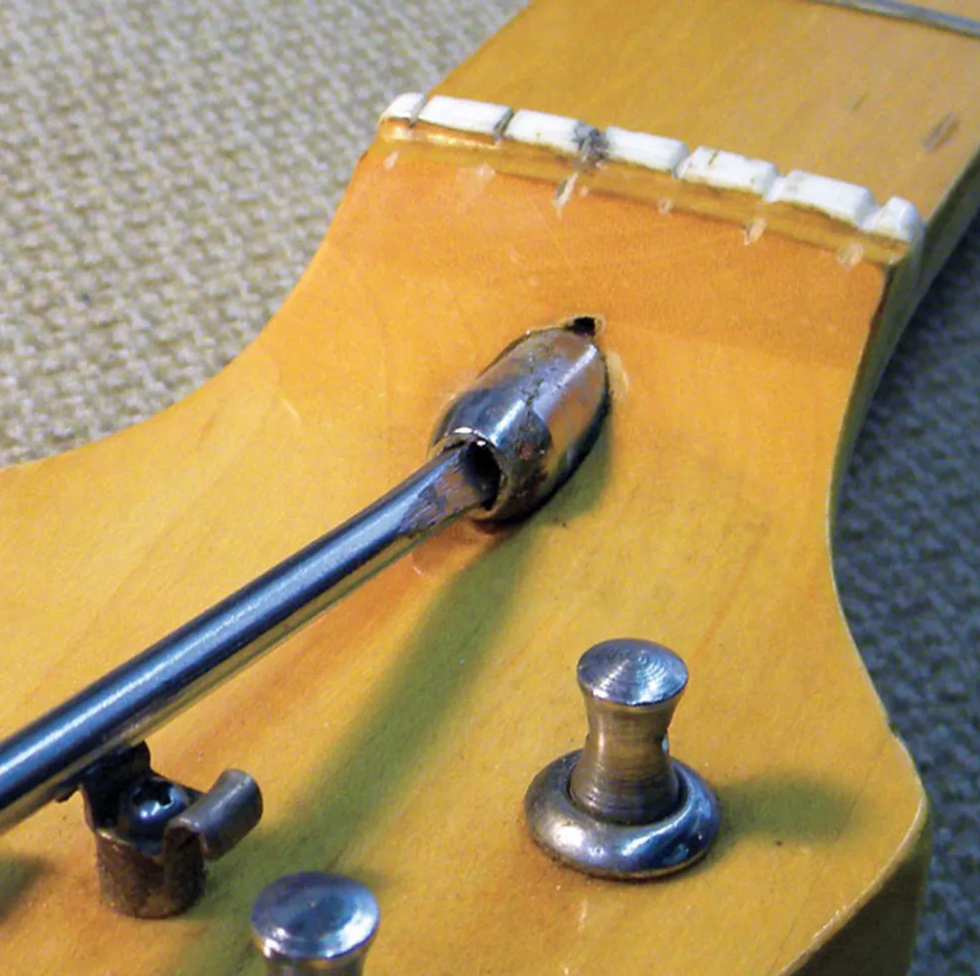
Photo 4
In other cases, I’ve used a small flathead screwdriver to extract a nut when a hex key wouldn’t work. For example, by gently tapping the screwdriver into this stripped bullet nut (Photo 4), I was able to get it to catch hold. I turned the screwdriver counter-clockwise and voilà, the nut came off.
I’ve also used a screw extractor, a tool that looks like a drill bit, but with a twist: Screw extractors have tapered, reversed cutting threads designed to dig into a damaged screw and grip it tighter as you turn the extractor counter-clockwise while carefully applying pressure. The counter-clockwise movement backs out the damaged screw—typically its head is mangled or broken off—even as the extractor bores deeper into the screw shaft. I do this manually using a T-handle, but you can also use vice-grips with a screw extractor. I’d advise against using a power drill for extraction, but some techs do, running the drill at slow speeds. Using an extractor to remove a stripped truss rod nut takes a lot of patience, but it’s doable. The trick is to be gentle but firm.
Installing the new truss rod nut.
This is the easy part. Just slide the nut onto the truss rod threads and turn it clockwise. Tighten the nut until it’s just a little snug. Tune the guitar up to pitch and check the relief in the neck. Depending on your playing style, .010" to .012" should be plenty of relief. Check out “Time for a Neck Adjustment?” if you’re not sure how to adjust the truss rod.
Averting disaster.
A stripped truss rod nut is bad news, but it can usually be replaced inexpensively. However, if you strip the threads or nut at the other end of the truss rod—where it screws into hardware embedded within the neck itself—that’s a different story. Also, if the exposed threads on a truss rod are stripped, a replacement nut will not help. In either case, the truss rod itself would need to be replaced—a very invasive and expensive repair. At that point you have to decide whether replacing the neck makes more sense than spending a fortune on major surgery. The bottom line is simple: When adjusting your truss rod, don’t over-tighten the nut.
If you’re not comfortable working with your truss rod nut, consult a qualified repair technician. Guitar techs and luthiers deal with these issues all the time, and paying them for their expertise can be a wise investment.
[Updated 1/25/22]
- Guitar Shop 101: Tips for Buying a Used Electric - Premier Guitar ›
- Guitar Shop 101: “Decking” a Stratocaster Trem - Premier Guitar ›
- DIY: How to Adjust a Truss Rod - Premier Guitar ›
Day 4 of Stompboxtober brings a chance to win a pedal from TWA: The Chemical-Z! Don’t miss out—enter now and return tomorrow for more!
TWA CHEMICAL-Z
Roy Z signature overdrive pedal designed by TubeScreamer creator Susumu Tamura. Inspired by Maxon OD808, OD808X, and APEX808 circuits, Chemical-Z features the "Magic" IC used in APEX808 for less compression & more even frequency response than a standard 808. Increased output level. Two footswitch-selectable clipping modes - normal & hot.
Cort Guitars introduces the GB-Fusion Bass Series, featuring innovative design and affordable pricing.
Cort Guitars have long been synonymous with creating instruments that are innovative yet affordably priced. Cort has done it again with the GB-Fusion Bass series. The GB-Fusion builds upon Cort’s illustrious GB-Modern series and infuses it with its own distinctive style and sound.
It starts with the J-style bass design. The GB-Fusion features a solid alder body – the most balanced of all the tonewoods – providing a fantastic balance of low, mid, and high frequencies. The visually stunning Spalted maple top extends the dynamic range of the bass. A see-through pickguard allows for its spalted beauty to show through. The four-string version of the GB-Fusion is lacquered in a supreme Blue Burst stained finish to show off its natural wood grain. The five-string version features a classic Antique Brown Burst stained finish. A bolt-on Hard maple neck allows for a punchier mid-range. An Indian rosewood fretboard with white dot inlays adorns the 4-string Blue Burst version of the GB-Fusion with an overall width of 1 ½” (38mm) at the nut, while the GB-Fusion 5 Antique Brown Burst features a Birdseye Maple fretboard with black dot inlays and an overall width of 1 7/8” (47.6mm) at the nut. Both come with glow in the dark side dot position markers to help musicians see their fretboard in the dark. The headstock features Hipshot® Ultralite Tuners in classic 20:1 ratio. They are cast of zinc with aluminum string posts making them 30% lighter than regular tuners providing better balance and tuning accuracy.
Cort’s brand-new Voiced Tone VTB-ST pickups are the perfect J-style single coil with clear and robust bass sounds and classic warmth. The GB-Fusion comes with a 9-volt battery-powered active preamp to dial in the sound. With push/pull volume, blend knob, and 3-band active electronics, players can access a wide array of tones. The MetalCraft M Bridge is a solid, high-mass bridge. It provides better tone transfer and makes string changes easy. Strings can be loaded through the body or from the top giving players their choice of best string tension. The MetalCraft M4 for 4-string has a string spacing of 19mm (0.748”) while the MetalCraft M5 is 18mm (0.708”). Speaking of strings, D’Addario® EXL 165 strings complete the GB-Fusion 4. D’Addario EXL 170-5SL strings complete the GB-Fusion 5.
Cort Guitars prides itself on creating inventive instruments musicians love to play. The GB-Fusion Bass Series is the latest and greatest for musicians looking for a stellar bass guitar that is not only economical, but has the reliable robust sound needed to hold up the back end in any playing situation.
GB-Fusion 4 Street Price: $699.99
GB-Fusion 5 Street Price: $849.99
For more information, please visit cortguitars.com.
Here’s a look under the hood of the funky rhythm-guitar master’s signature 6-string.
Hello and welcome back to Mod Garage. Since we’re still celebrating the 70th birthday of the Stratocaster, this month we will have a look under the hood of the Fender Cory Wong model to see just what’s so special about it. (I can tell you—it’s special!)
Guitarist, songwriter, and producer Cory Wong is renowned for his solo work, his band Fearless Flyers (with Mark Lettieri, Joe Dart, and Nate Smith), and collaborations with artists such as Vulfpeck, Jon Batiste, and Dave Koz. His playing style is deeply rooted in funk rhythm guitar, with a heavy dose of rock and jazz. Well-known for playing a Stratocaster, his signature model was released in 2021, and it’s a unique offering. If you want to build your personal Cory Wong Strat, here is your shopping list, starting with the primary structure:
• Alder body, scaled down to slightly smaller than a regular Stratocaster, with Fender American Ultra body contours
• Maple neck with a rosewood fretboard with rolled edges, modern Fender American Ultra D neck profile, slightly larger headstock, 25.5" scale, 10" to 14" compound radius, 22 medium jumbo frets
• Locking tuners with all short posts, a bone nut, and two roller string trees
• Vintage-style 6-screw synchronized tremolo
• Hair tie around the tremolo springs (which mutes them to enhance the rhythm tone)
• .010–.046 strings (nickel-plated steel)
“While these are all interesting features, resulting in a very comfortable guitar, you don’t need to copy every detail to transform one of your Stratocasters into a Cory Wong-style Strat.”
For the physical build, as you can see, Wong and Fender created a real signature instrument to his specs and wishes. While these are all interesting features, resulting in a very comfortable guitar, you don’t need to copy every detail to transform one of your Stratocasters into a Cory Wong-style Strat. My personal favorite of these is the hair tie for muting the tremolo springs. A lot of my funk-playing customers are doing similar things on their Strats to get a dry sound, and they’re using all kinds of funny things in there, like foam, rubber bands, and pieces of cotton, as well as hair ties.
Now, let’s have a look at the electronics:
• Seymour Duncan Cory Wong Clean Machine SSS pickup set
• Standard 5-way pickup-selector switch with classic Strat switching matrix
• 250k master volume pot with a 90/10 audio taper and Fender treble-bleed circuit PCB
• 250k tone pot with a 90/10 audio taper and Fender Greasebucket tone control PCB for only the neck pickup
• 250k audio push-push tone pot with Fender Greasebucket tone control PCB for only the bridge pickup; the push-push switch overrides the 5-way switch and defaults to middle + neck pickup (in parallel) as a preset
• Middle pickup is without tone control
Let’s break this down piece-by-piece to decode it:
Pickups
The pickup set is a custom SSS set from the Seymour Duncan company with the following specs:
• Overwound hum-canceling stacked bridge pickup with a 3-conductor wire and shield in permanent hum-canceling mode (red wire taped off), bevelled alnico 5 magnets, approximately 14.5k-ohm DCR
• Overwound middle single-coil, RWRP, beveled alnico 4 magnets, approximately 7.1k-ohm DCR
• Overwound neck single-coil, bevelled alnico 4 magnets, approx. 7.0k-ohm DCR
The pickups are voiced for clear highs, which perfectly suits Wong’s funky playing style and tone. While a lot of pickup companies will have pickups in that ballpark, it will be difficult to put together a full set that really works as intended. The Duncans in the Cory Wong Strat are available as a balanced set, so if you want to get as close as possible, I think this is your best bet.
5-Way Pickup Selector Switch
Nothing special here, just the standard 5-way switch with two switching stages that is wired like a classic Stratocaster:
bridge
bridge + middle in parallel
middle
middle + neck in parallel
neck
The upper tone pot is assigned to the neck pickup, while the lower tone pot is connected to the bridge pickup, leaving the middle pickup without tone control.
Master volume pot and treble-bleed circuit.
The 250k master volume pot is a standard CTS pot with a 90/10 audio taper found in all U.S.-made Fender guitars. The volume pot has the treble-bleed circuit from the Fender American Pro series, but uses a ready-to-solder PCB from Fender instead of individual electronic parts. The PCB is available from Fender individually (part #7711092000), but I have some thoughts about it. While using a PCB makes a lot of sense for mass production, it has some downsides for us mortal human beings:
• Soldering on PCBs requires some training and also special soldering tools.
• The PCB is quite expensive, while the individual electronic parts are only a few cents.
• The PCB uses ultra-tiny surface-mount parts, so it’s very difficult to repair or mod it to your personal taste.
I don’t think we need a PCB for adding a treble-bleed circuit, so let’s do this project using conventional electronic parts. The treble-bleed PCB contains a 1200 pF capacitor with a 150k-ohm resistor in parallel, plus another 20k-ohm resistor in series. Using individual parts, it looks like this:
Courtesy of single-coil.com
In general, a treble-bleed circuit will help you to combat the “volume vs. tone problem” when using passive single-coil pickups. When you turn down the volume (even just a bit), the high end or treble loss is not proportionate. In other words, a small cut in volume creates a far greater loss in your guitar’s treble response. Using a treble-bleed circuit is an easy way to get rid of this problem, as long as it is calculated carefully.
ONLINE ONLY: If you want to find out more about treble bleed circuits please have a look here: https://www.premierguitar.com/diy/mod-garage/treble-bleed-mod
Next month, we will continue with part two of the Cory Wong Stratocaster wiring, bringing it all together, so stay tuned!
Until then ... keep on modding!
This four-in-one effects box is a one-stop shop for Frusciante fans, but it’s also loaded with classic-rock swagger.
Great, lively preamp sounds. Combines two modulation flavors with big personalities. One-stop shop for classic-rock tones. Good value.
Big. Preamp can’t be disengaged. At some settings, flanger effect leaves a little to be desired.
$440
JFX Deluxe Modulation Ensemble
jfxpedals.com
When I think of guitarists with iconic, difficult-to-replicate guitar tones, I don’t think of John Frusciante. I always figured it was easy to get close enough to his clean tones with a Strat and any garden-variety tube amp, and in some ways, it is. (To me, anyway.) But to really nail his tone is a trickier thing.
That’s a task that Jordan Fresque—the namesake builder behind Sault Ste. Marie, Ontario’s JFX Pedals—has committed significant time and energy into tackling. His Empyrean is a five-in-one box dedicated to Frusciante’s drive and dirt tones, encompassing fuzz, boost, and preamp effects. And his four-in-one, all-analog Deluxe Modulation Ensemble reviewed here is another instant Frusciante machine.
The Frusciante Formula
Half of the pedal is based off of the Boss CE-1, the first chorus pedal created. The CE-1 is renowned as much for its modulation as for its preamp circuit, which Boss recently treated to its own pedal in the BP-1W. The other half—and the pedal’s obvious aesthetic inspiration—is the Electro-Harmonix Deluxe Electric Mistress, an analog flanger introduced in the late ’70s. Frusciante fans have clamored over the guitarist’s use of the CE-1 for decades. The Chili Peppers 6-stringer reportedly began using one in the early ’90s for his chorus and vibrato tones, and the preamp naturally warmed his Strat’s profile. Various forum heads claim John dug into the Electric Mistress on tracks like “This Is the Place” off of 2002’s By the Way. The Deluxe Modulation Ensemble aims to give you the keys to these sounds in one stomp.
JFX describes the DME as “compact,” which is a bit of a stretch. Compared to the sizes of the original pedals its based on? Sure, it’s smaller. But it’s wider and deeper than two standard-sized pedals on a board, even accounting for cabling. But quibbles around space aside, the DME is a nice-looking box that’s instantly recognizable as an Electric Mistress homage. (Though I wish it kept that pedal’s brushed-aluminum finish). The knobs for the Mistress-style as well as the authentic Boss and EHX graphics are great touches.
The flanger side features a footswitch, knobs for range, rate, and color, and a toggle to flip between normal function and EHX’s filter matrix mode, which freezes the flange effect in one spot along its sweep. The CE-1-inspired side sports two footswitches—one to engage the effect, and one to flip between chorus and vibrato—plus an intensity knob for the chorus, depth and rate knobs for the vibrato, and gain knob for the always-on preamp section. The DME can be set to high- or low-input mode by a small toggle switch, and high boosts the gain and volume significantly. A suite of three LED lights tell you what’s on and what’s not, and Fresque even added the CE-1’s red peak level LED to let you know when you’re getting into drive territory.
The effects are wired in series, but they’re independent circuits, and Fresque built an effects loop between them. The DME can run in stereo, too, if you really want to blast off.
I Like Dirt
The DME’s preamp is faithful to the original in that it requires a buffered unit before it in the chain to maintain its treble and clarity. With that need satisfied, the DME’s preamp boots into action without any engaging—it’s a literal always-on effect. To be honest, after I set it to low input and cranked it, I forgot all about Frusciante and went to town on classic-rock riffs. It souped up my Vox AC10 with groove and breadth, smoothing out tinny overtones and thickening lead lines, though higher-gain settings lost some low-end character and overall mojo.
The chorus nails the wonky Frusciante wobble on “Aquatic Moth Dance” and the watery outro on “Under the Bridge,” and the vibrato mode took me right through his chording on 2022’s “Black Summer.” On the flanger side, I had the most fun in the filter matrix mode, tweaking the color knob for slightly different metallic, clanging tones, each with lots of character.
The Verdict
If you’re a Frusciante freak, the Deluxe Modulation Ensemble will get you within spitting distance of many of his most revered tonal combinations. If you’re not, it’s still a wickedly versatile modulation multitool with a sweet preamp that’ll give your rig instant charisma. It ain’t cheap, and it ain’t small, but JFX has squeezed an impressive amount of value into this stomp