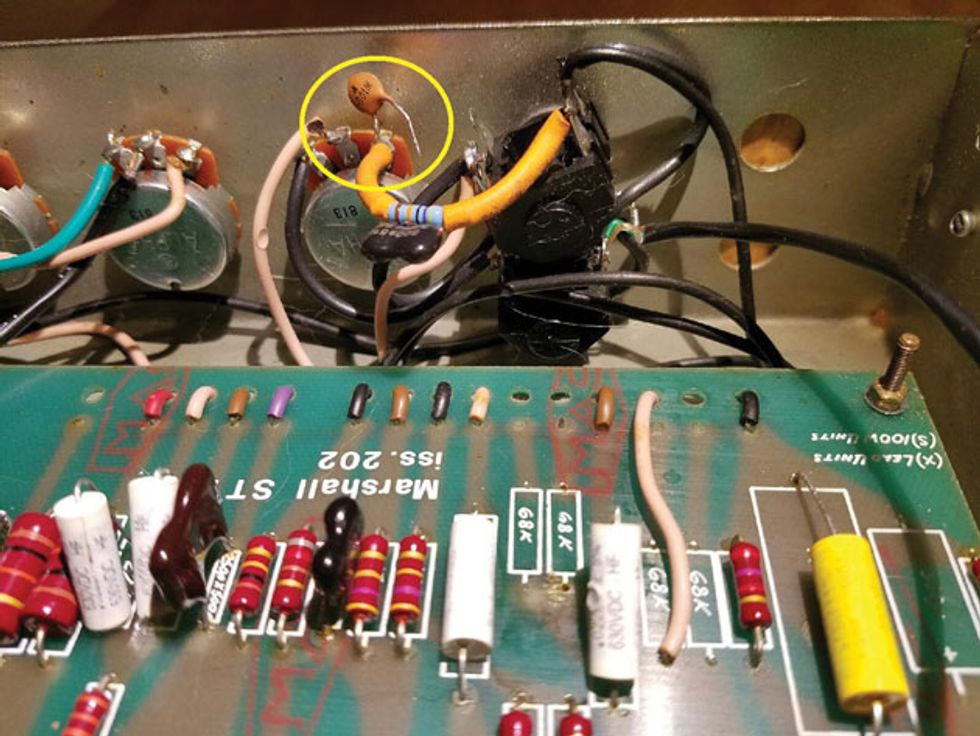
Fig. 1
Hey Jeff,
Short story: I have a 1978 Marshall 50 Master Volume head that I bought in 1978. Yep, I bought it new. The amp sounds great with my old 1970 Les Paul Custom loaded with a Gibson 500T.
A few years ago I switched to Strats with Floyds, and now I want to get back to my favorite all-time pickup—a Duncan Custom. Problem: While the Duncan Custom always sounded great with the shorter Gibson scale in a LP and responds perfectly to the Marshall’s gain and breakup, that same pickup is crazy bright in a Strat with a Floyd. Even with the treble, middle, and presence at zero, the amp is still too bright to use. Yes, I could switch pickups or use the guitar’s tone pot, but I want to be able to work my amp’s controls with the Duncan Custom. Is there a relatively easy mod to take the amp’s treble down a notch?
Jimmy Saviano
Hi Jimmy,
Marshalls and Les Pauls, Marshalls and Strats—these pairings make iconic sounds for sure! But as with most things in the gear world, it takes the right combination of elements for the best results. While I can and will give you some small modification suggestions for your amp, I think you first need to make sure that you’re comparing apples to apples, as much as possible, of course, when it comes to comparing the two guitars.
WARNING:
All tube amplifiers contain lethal voltages. The most dangerous voltages are stored in electrolytic capacitors, even after the amp has been unplugged from the wall. Before you touch anything inside the amp chassis, it’s imperative that these capacitors are discharged. If you are unsure of this procedure, consult your local amp tech.Here’s what I mean: The pickup is far from the only thing that determines a guitar’s electric sound. Have you thought about the rest of the electronics? Your Gibson could quite possibly have 300k volume pots, and they may be a great match for the Custom pickup in that guitar. But if you take the same pickup and install it in a guitar that may have 500k pots, the results will definitely be different. Then there’s the value of the tone pot, how it’s wired to the volume control, what the value of the tone cap is, and even the possibility of the Strat having a “no load” pot. Any one of these variables can make a difference. And if they’re all added together … wow! Then there’s the guitar’s wood. And the pickup mounting method (pickup ring verses cavity mount). All these things can make a huge difference when they become additive. Many things to think about, if you haven’t already. Be that as it may, let’s see if we can tame your amp a bit, as some of these can be notoriously bright anyway.
Head ’em off at the high pass. First, let’s start with one of the quickest tricks that many players do to these and similar amps. There is a high-pass cap (C103) connected to the preamp control between the wiper and clockwise terminals (Fig. 1). The value of this cap can be traditionally high in these amps, as the schematic calls for a 1 nF (.001 µF) cap. This value will pass a great deal of high end and is generally the first thing players and techs remove from these amps when they’re simply too bright. This, in essence, is the same cap that would be switched in and out by the bright switch on most older Fender amps. The difference is that most Fenders will use a much smaller value cap to pass less highs. If you remove this cap and there is now not enough high end, you could certainly experiment with multiple smaller values. I would start with a 47 pF and work up to a 100 pF, a 220 pF, or even a 470 pF to see what suits you best. Of course, if you play with the preamp volume on 10, this is all moot, since the capacitor is electrically out of the circuit at that point. A nice feature here might be to have this cap switchable using a push-pull pot for the preamp control. This way you could tailor the amp depending on your guitar choice.
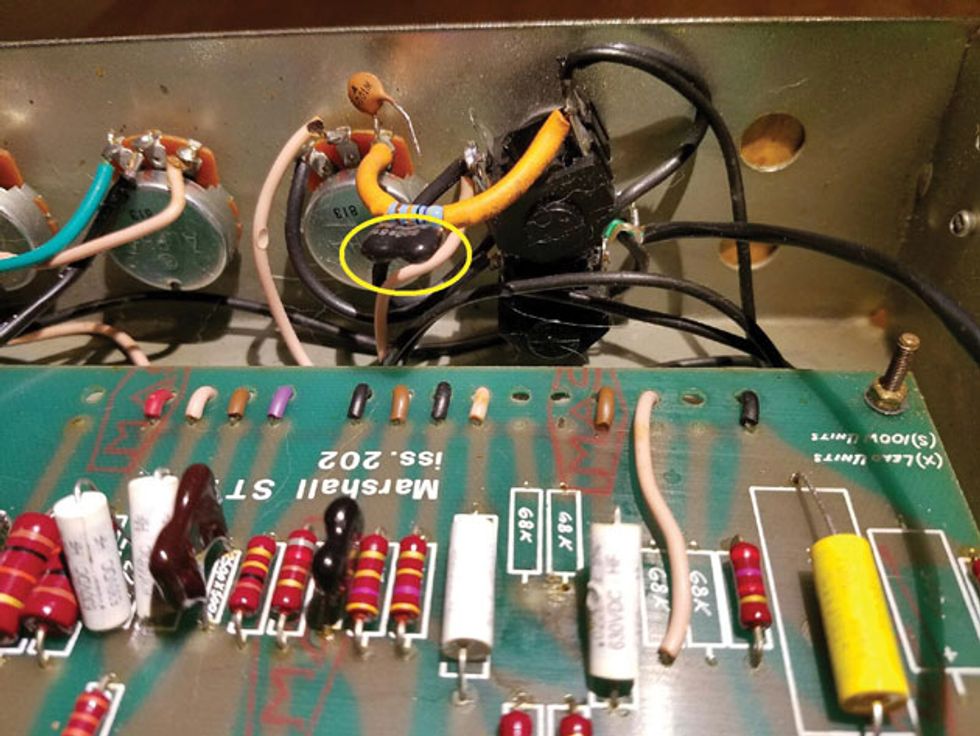
Fig. 2
If the amp is still too bright, the next place I would go would be the high-pass cap (C102) across the 470k resistor that feeds the signal to the preamp control (Fig. 2). This is typically a 470 pF cap and can simply be lifted from one side of this resistor. If you then like the amp, you can either completely remove the cap or install a push-pull pot for the master volume control and make this capacitor switchable as well. It’s always good to have choices.
Less gain, more pain? The above two modifications deal with components that are typically not board mounted. In these early amps, they are usually connected directly to the input jack or preamp volume pot, making for easy access and modification.
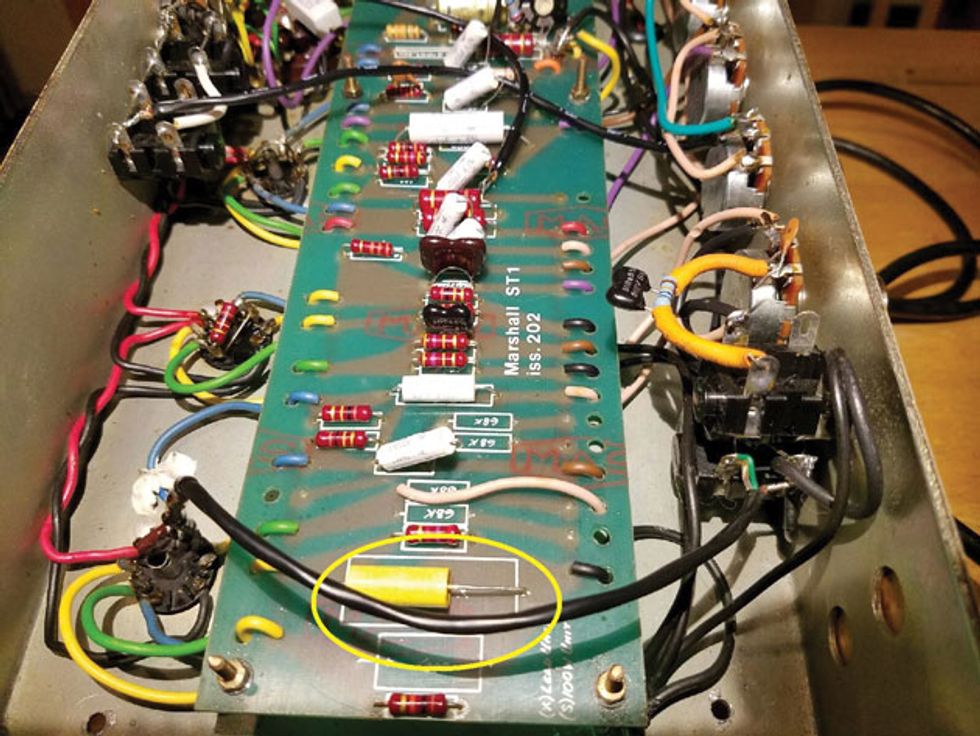
Fig. 3
There is one more component that you may want to consider experimenting with. It is the cathode bypass cap (C2) in the first gain stage (Fig. 3). The value of this cap is typically 0.68 µF and is connected across the 2.7k cathode resistor of V1. This helps the tube amplify more of the higher frequencies, but removing this, however, removes some gain and tends to leave the amp a bit lifeless.
My suggestion would be to parallel this with a larger cap. This won’t decrease the high-frequency amplification, but rather raise the full-frequency amplification. It will give you the relative effect of less treble, while increasing the gain a bit overall. I would start with maybe a 4.7 µF 25V DC cap and see how you like it. You can use a pair of alligator leads here. Just be sure that the positive (+) side of the capacitor is toward the tube. You can go up in value from there to, say, a 10 µF, 25 µF, 50 µF, even a 100 µF to see if any of these are to your liking. If so, simply solder it across the 0.68 µF cap, being aware of the polarity.
Well, there you have it. One or more of those modifications should get your amp to where you have a useable combination again. Glad I could help with the Taming of the Shrill.