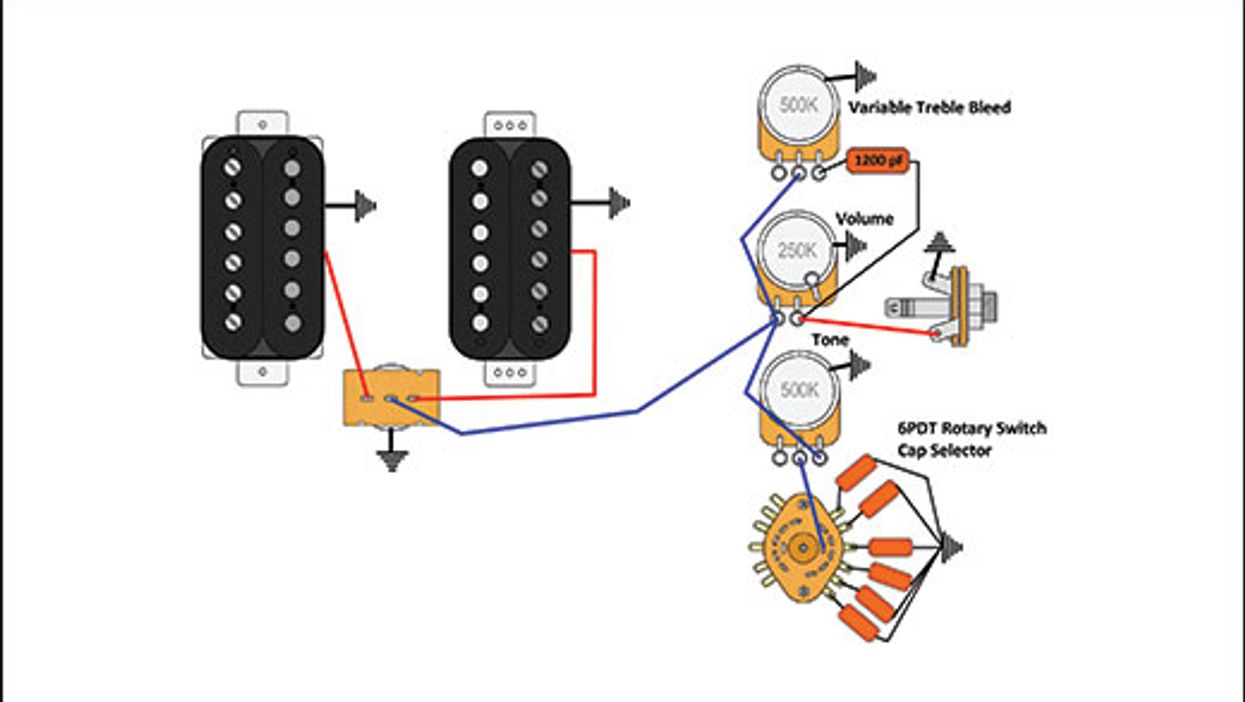

Visions of Varitone. Okay, what do we do with the two unpopulated holes in the guitar after converting it to master volume plus master tone? For starters, we'll install a rotary switch for selecting tone caps. This is inspired by Gibson's Varitone, but without the Varitone's inductor. By putting different tone caps on a rotary switch, you can dial in whatever one you need for a given sound. There are two ways to configure this type of switch: You can switch different capacitor values or different types of tone caps with identical values. My PG colleague Joe Gore and I described this tone cap selector switch in “Varitone Wiring, Reloaded and Extended."
For this mod, I wired a 6PDT rotary switch loaded with six tone caps with different capacitance values and no bypass position. (I'll explain the latter in a moment.) You can choose whatever capacitor types and values you like, assuming you can place them on the switch and inside the guitar. Remember, limited space inside the control cavity is often an issue.
Here are my capacitance recommendations for installing this wiring in a dual-humbucker guitar:
• 3300 pF. Think of this as a “warmth control." It produces a very subtle effect and only cuts the top frequencies.
• 6800 pF. We're still in the warmth control ballpark, but the effect is more pronounced than with the 3300 pF cap.
• 0.01 µF. Now we're entering the tone-control zone we're all familiar with, but with less wooliness compared to typical production guitars.
• 0.022 µF. This is the standard value found in most of our guitars.
• 0.033 µF. Use this to produce a warm, creamy tone that plays well with distortion.
• 0.047 µF. This value delivers dark and smoky tones—great for traditional jazz and bebop.
Of course, you can choose a rotary switch with more positions to hold even more caps, but with these six caps you'll have plenty of tonal options. A common problem when switching capacitance is described in the article I referenced above, so it's always a good idea to have some 10M-ohm resistors at the ready when setting up this wiring.
You may be wondering why I chose a 6-way switch without adding a bypass setting. Check it out: In this wiring, the 6-way switch acts like a preset selector. The now-master-tone-control is placed immediately after the rotary switch, so we now have a tone control that comprises two stages. Stage 1 is the rotary switch that dials in the tone cap of your choice. Stage 2 fine-tunes the selected cap's sound using a potentiometer. The tone cap is no longer directly connected to the tone pot, but to the rotary switch, which in turn is connected to the master tone. With this flexible two-stage system, you can dial in virtually any tonal shade you want.
The variable treble bleed control. So far, we've filled one of the two empty control holes with the 6-way tone cap selector. To fill the second free hole, we'll convert one of the unused old pots into a variable treble bleed system.
I'm sure you're familiar with the inherent idiosyncrasies of passive pickup systems. When you turn down the volume—even just a bit—the high end or treble loss is not proportional to the volume reduction. A small cut in volume creates a far greater loss in your guitar's treble response. You can eliminate this problem by installing a treble bleed network on your volume pot.
Typically, a treble bleed network combines a small capacitor and a resistor wired in parallel. Techies like to call this a “R + C network." Such networks are sometimes dubbed a treble bypass filter, and some variations consist of a cap only or a resistor in series with the cap. The theory behind this little device is much more complicated than it looks, but let's keep it simple and stick to its practical application. As a rule of thumb, brightness is determined by the resistor's value (fewer ohms equals brighter), but the frequencies we hear are determined by the cap's value: The lower the value, the higher the frequencies, and the higher the value, the lower the frequencies. This description allows us to perform the mod without getting lost in a lot of theory.
There are no general values to use—only starting points for experimentation. Sound is always a matter of personal preference, and your pickups, electronics, effects, cables, and amps are factors to consider as well. Some guitarists prefer more high end, and they often pair this with a darker sounding amp, while others rely on more midrange to get a punchy sound. It's worth the time to try several combinations of resistor and capacitor values, because a well-tuned treble bleed network can rescue a muddy guitar, even when it is running through tons of distortion.
Here's what happens when you roll down the volume: The treble bleed network starts to filter out some bass frequencies, making the highs more prominent. But it won't boost anything—high end, in this case—because a passive device can't boost, it can only cut.
To ensure this mod will suit your personal taste and work with any compatible guitars you might own, we'll wire it so you can dial in the amount of treble bleed it delivers, ranging from none to full. I've intentionally chosen a cap value that allows what I call “over treble bleeding"—an effect with a lot of high end, a scooped midrange, and almost no bass frequencies that's great for playing reggae rhythm, ska, or surf. It's a lot of fun to experiment with this control, so give it a try. And if you don't like it, simply turn the pot down to zero for no treble bleed effect at all.
Roll call. This mod requires only a few parts. You'll need a 6PDT rotary switch for the tone cap selector (if you want more than six tone caps, use a 12PDT switch), six tone caps with your selected values, and six 10M-ohm resistors.
For the variable treble bleed control, use a 500k audio pot and a 0.0012 µF (1200 pF) cap—preferably a silver mica cap, which sound best for this purpose. If you want to be able to completely remove the treble bleed system from your wiring, you'll need a 500k blender pot. (Alternatively, you can cut the corresponding trace inside your regular 500k pot to create a kind of reverse no-load pot.)
For the lowdown on how to connect everything, check out the schematic.
On a guitar with humbuckers, I recommend using 500k audio pots for the treble bleed system and the tone control, but a 250k audio pot for the master volume. This combo will work best with the treble bleed system. For a guitar with single-coil pickups, use a 250k value for each of the three pots.
That's it! Next month, I'll share some shop tips, fresh from my workbench. We'll start with how to shield single-coil pickups the right way, so you don't lose any high end. Until then ... keep on modding!