Whether electric bass is your main instrument or you're a guitarist who doubles on 4-string, it's important to keep your axe in tip-top shape. In this handy guide, Nashville guitar tech and luthier Tony Nagy explains how the pros do a bass setup.
As you'll soon discover, it's not hard to make your bass play and sound great. In this step-by-step tutorial, Nagy walks you through the entire process. With a few tools and some patience, you'll get the job done right and—best of all—have the satisfaction of knowing you did it yourself.
I've read many articles and repair manuals on bass setup, and I've personally set up thousands of basses as a professional. So when PG asked me to write a DIY piece on the subject, I thought, "What can I bring to this discussion that's truly helpful? Is there a little something I can describe that you don't already know?"
In this article, we'll cover the essentials with the goal of helping you decide what you can handle yourself and what you should leave to your local repair technician. Even if there are aspects of the job you're not prepared to attempt on your own, it's good to understand what's involved with a bass setup. Knowing the steps and terminology will let you communicate more confidently and effectively with your repair guy or gal.
More than likely you're thinking about setup because in some way, your instrument is not performing the way you'd like. To pinpoint any problems, we need to look at all the factors that affect your instrument's overall playability, sound, and function.
Preliminary Inspection
Photo 1: A setup begins with a preliminary, hands-on inspection of your bass. Check playability and listen for issues like buzzing frets and hardware rattles. List any problems you find.
Our journey begins with a general inspection (Photo 1), which consists of playing the instrument while asking yourself these questions: Is the action too high? Too low? Are there buzzing frets? If so, that indicates a need for adjustment.
While you're at it, work the volume and tone controls, checking for noise. Gently jiggle the 1/4" plug at the output jack to check it for noise. Are there any hardware-related rattles? Take notes on all your observations and list any issues you need to address.
After you've given your bass a hands-on evaluation, you're ready to get to work on the setup.
Tip: Because the adjustments that control playability are affected by string gauge and tension, be sure your bass sports the type of strings you plan to use. If you change string gauge, you'll need to do a fresh setup to accommodate the new strings.
Step 1: Measure the Neck Relief
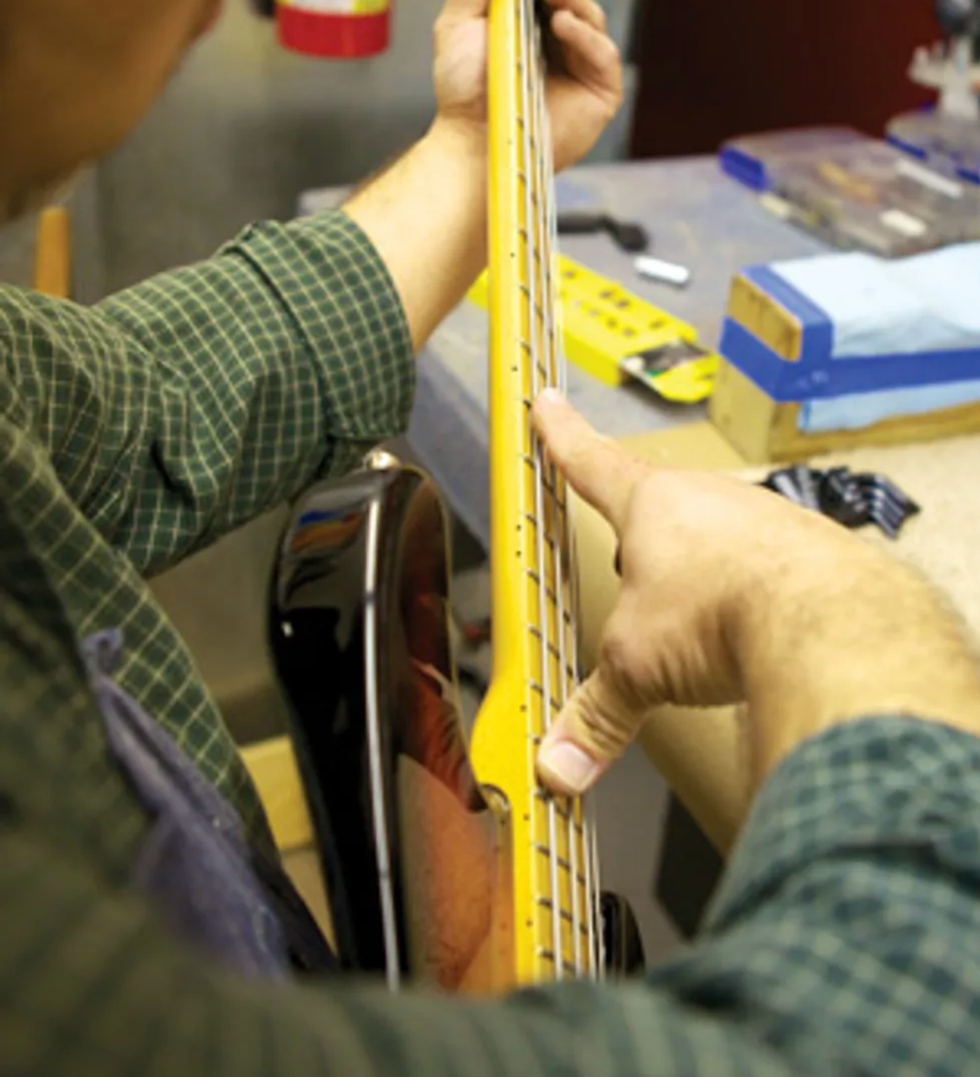
Photo 2: To gauge the amount of relief in your neck, use both hands to simultaneously fret the 4th string at the 1st fret and somewhere between the 14th and 16th frets. At the mid point between these two fretted notes, look at the gap between the bottom of the string and the top of the frets. To get another perspective on this gap, bounce the string against the frets with your picking-hand index finger.
We start with checking the "relief" or amount of bend in the neck. I often see people sighting down the neck from all angles and making some very ballpark assessments about neck relief. But the precise and accurate way to measure relief is to use the strings as a straightedge. Here's how to measure neck relief:
- Tune your bass to pitch. Use the primary tuning you put this instrument in when performing or recording.
- With your fretting hand, hold your lowest string against the 1st fret as if you were playing that note.
- Stretch your picking hand across the fretboard with your thumb aiming towards the bridge and index finger extended toward the nut (Photo 2). Open your hand as far as you can comfortably stretch and fret the lowest string with your thumb. The object is to move your thumb as close to the bridge as you can, while allowing your index finger to touch the lowest string approximately halfway between your fretting finger at the 1st fret and picking hand thumb. (Depending on the fretboard scale length, my picking hand thumb lands on the 14th, 15th, or 16th fret.) Now the lowest string is fretted at two points with two hands. With the lowest string secured at the 1st and, say, 15th fret, you can now use it as a straightedge.
- With your picking-hand index finger, tap the string against the middle frets. By repeatedly tapping and releasing, you'll be able to gauge how much space lies between the bottom of the string and the top of those frets. The gap (if any) is the amount of relief. How much of a gap you need depends very much on your playing style, but to get started, I adjust an instrument to have a gap that's equivalent to the thickness of one or two business cards.
Tip: Make sure you continually check the tuning of your bass so it stays at pitch. This is crucial for making accurate measurements and adjustments.
Step 2: Adjust the Truss Rod
This is very important: If you don't feel comfortable adjusting your truss rod or don't have the proper tool, take this to your local qualified repair technician. You can really mess up your instrument by stripping the threads on your truss rod or over tightening and breaking this critical part of the neck. Whether the truss rod is adjusted via a male hex nut, a female socket, or a Phillips nut at the neck heel, make sure your tool has a snug fit so you don't strip out this vital part.
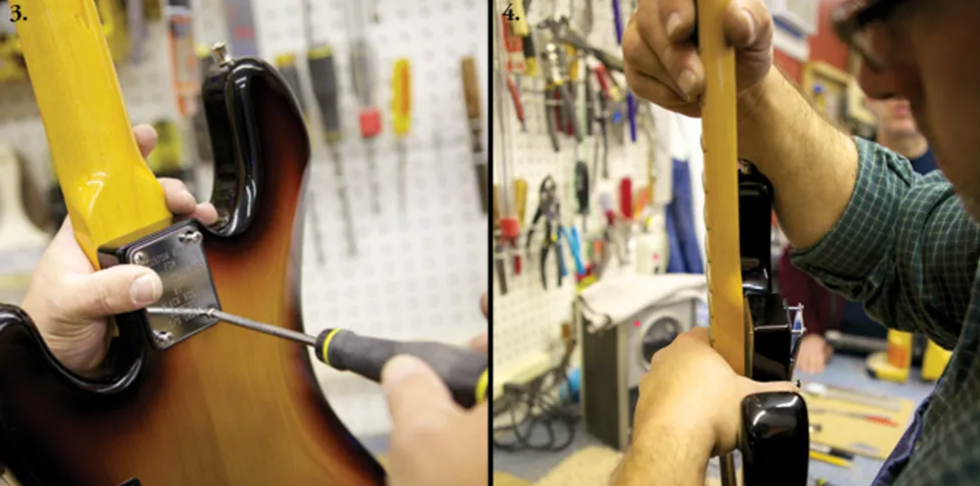
Photo 3: To remove the neck to expose a truss rod that's installed at the heel, take off the strings and back out the screws at the neck plate. Photo 4: Once the screws have released the neck, gently pull it free from the body being careful not to scratch the neck on the exposed screw tips.
The vast majority of truss rods adjust clockwise to tighten and counter-clockwise to loosen. If your truss rod is located at the headstock, look down the neck from headstock to body to determine clockwise and counter-clockwise direction. If your truss rod adjustment is at the heel of the neck, you'll need to remove it (Photos 3 and 4). The movements will be the same when you look from the heel down.
Tip: If you have any doubts about how to adjust a truss rod, get a guitar repair book or study the manual that came with your instrument. Many manufacturers offer free online instructions for adjusting the truss rods on their guitars.
If you decide you want to change the gap between the string and fret, here's the process:
- To reduce the gap between string and fret, tighten the truss rod. Conversely, to increase the space between string and fret, loosen it. Move the truss rod in quarter-turn increments.
- Retune and recheck relief each time you move the rod.
Continue the process until you get the desired gap between the string and fret. Again, unless you have a specific gap in mind, shoot for the thickness of one or two business cards.
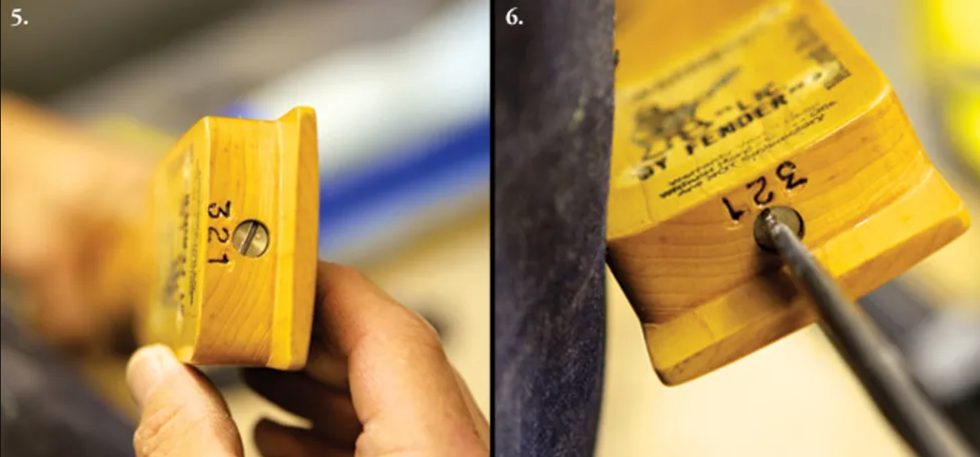
Photo 5: Truss rods accessed at the neck heel are often adjusted with a screwdriver. Photo 6: Whether the truss rod is installed at the headstock or neck heel, the vast majority adjust clockwise to tighten and counterclockwise to loosen.
If your bass requires adjustments at the neck heel (Photos 5 and 6), rather than the headstock, you'll face the tedious prospect of reinstalling the neck and restringing to check each adjustment.
Tip: If your truss rod seems very difficult to adjust, or stops moving, or makes a loud noise, see a local repair tech. Although adjusting a truss rod may be foreign to you, all qualified technicians understand how it functions. It's definitely worth paying the price to have this done right.
There are several adjustments that affect action, but they need to be done in the correct order. Because your decisions about all the other action-related adjustments are based on neck relief, it's important to deal with the truss rod first. Once you've made any necessary truss-rod adjustments, you're ready to move on to the other factors that control playability.
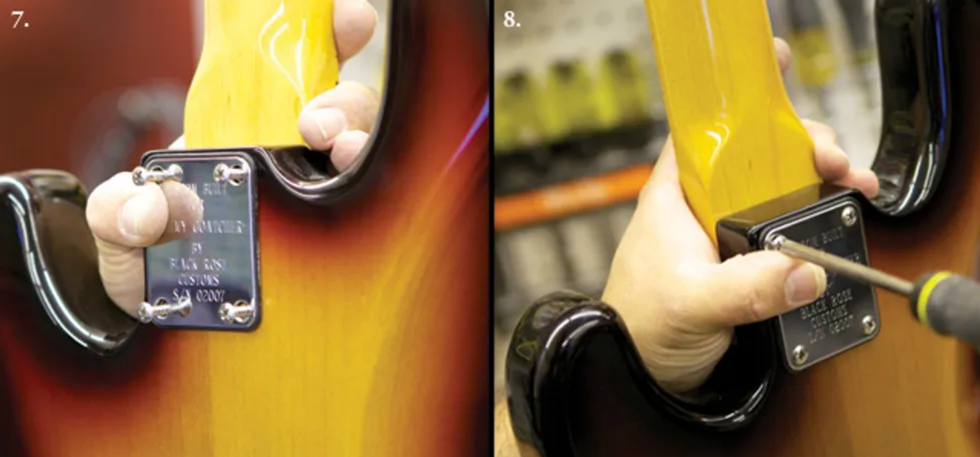
Photo 7: To reattach the neck, carefully place the heel into the neck pocket and then insert the screws by hand, slipping them through the body and seating the tips into their respective holes. Photo 8: Tighten the neck screws securely. As you do this, use your free hand to control the screwdriver tip so it doesn't slip out and mar the body.
If you've removed the neck to make truss rod adjustments, reattach it now (Photos 7 and 8), restring, and retune.
Step 3: Inspect the Nut Slots
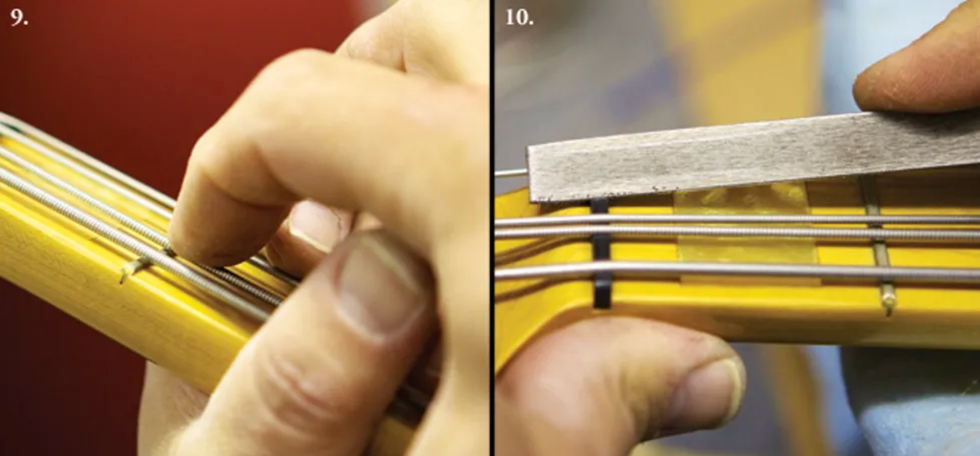
Photo 9: Checking action at the 1st fret while holding the string against the 2nd fret. In addition to eyeballing the clearance, tap the string against the fret to determine the distance between them. Photo 10: Deepening the 2nd-string nut slot.
Next, we check the nut slots and the string height at this end of the neck.
- Tune up.
- Hold each string down on the 2nd fret and look at the space between the bottom of the string and the top of the 1st fret (Photo 9). We want this clearance to be as small as possible, yet when you play the open string, you don't want to hear it buzz against the 1st fret. If the clearance is insufficient, you'll get a buzz.
For bass guitar, a good middle-of-the-road clearance over the 1st fret (with the string still pressed against the 2nd fret) would be the thickness of one business card. If the string has more than that amount of space, the respective nut slot may need to be deepened (Photo 10) so the action at the 1st and 2nd frets is low enough to play comfortably and you don't pull the strings sharp trying to press them against the frets.
Anyone can get nut files from Stewart-MacDonald (stewmac.com) or Luthiers Mercantile (lmii.com), but there is more to cutting a proper nut slot than just making a groove. It needs to be exactly the proper size for each string. The slot must hold a string firmly in place so it can't move around or sympathetically vibrate against the sides of the nut slot, but not be so tight that the string binds and hangs in the slot and then goes out of tune when it's stretched or played.
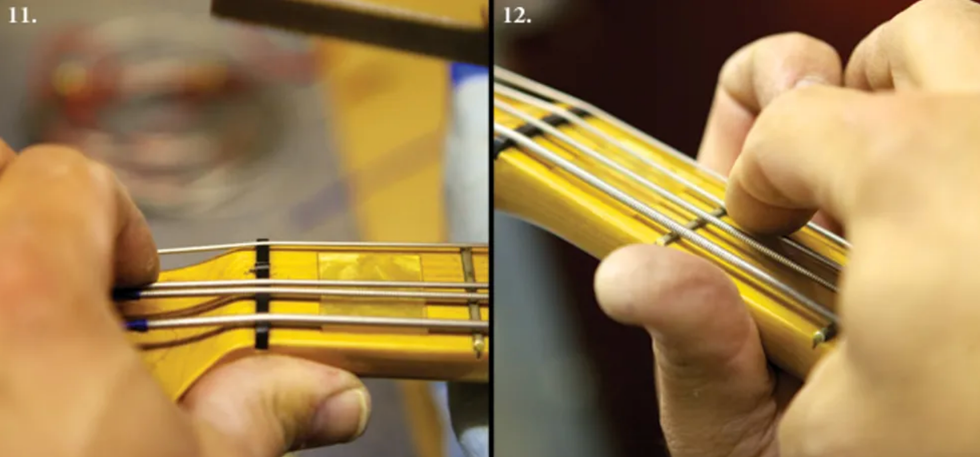
Photo 11: A slot needs to be gently angled downward as it points back toward the headstock and the string must "speak" from the nut's front edge—right where the nut touches the fretboard. Photo 12: When deepening a nut slot, recheck the 1st-fret action after a few light strokes with the file.
Also, the slot needs to be gently angled downward as it points back toward the headstock (Photo 11). The string must "speak" from the nut's front edge—right where the nut touches the fretboard and not somewhere inside the nut slot. (If a string rests on a point inside the slot, rather than at the leading edge, this can create a "sitar" effect or cause a string to play out-of-tune along the fretboard.)
If you deepen a nut slot, work very slowly and frequently recheck the action at the 1st fret after a stroke or two of the nut file (Photo 12).
If a string touches the 1st fret when you press it against the 2nd fret, then the nut slot is too low. The offending slot will have to be filled and then fine-tuned with a nut file, or the nut itself shimmed to gain more height, or you need to fabricate a new nut. Sonically and mechanically, the latter is the best option. If you're not comfortable tackling this project, see your repair tech. [For detailed explanations on cutting a bone nut, visit premierguitar.com and read "How to Convert Your Axe to a Baritone," "How to Intonate a Flattop Guitar," and "How to Convert a Flattop to Nashville Tuning" in the March, April, and September 2012 issues.]
Step 4: Adjust Saddle Height
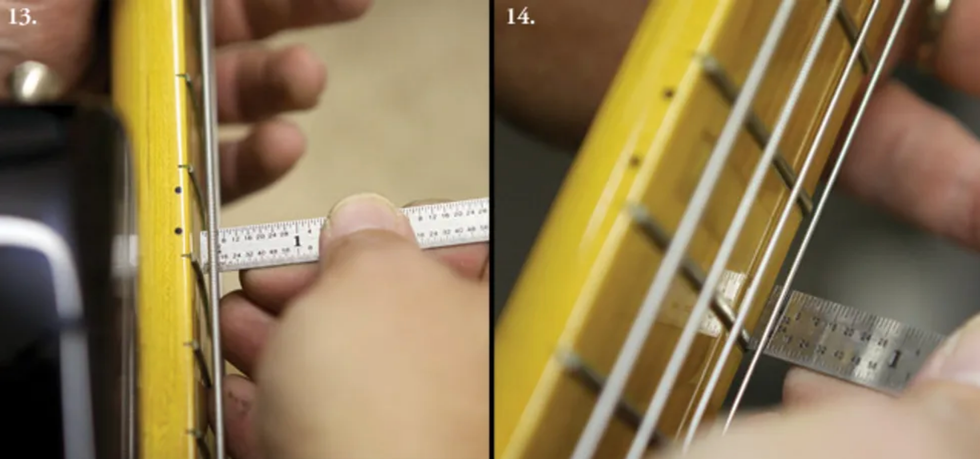
Photo 13: Measuring the distance between the 4th string and 12th fret with a precision metal ruler. Photo 14: Measuring the distance between the 1st string and 12th fret.
Now we're ready to check and adjust string height at the bridge:
- Tune up. (This is automatic by now, right?)
- At the 12th fret, measure the distance between the bottom of each string and the top of the fret (Photos 13 and 14 )
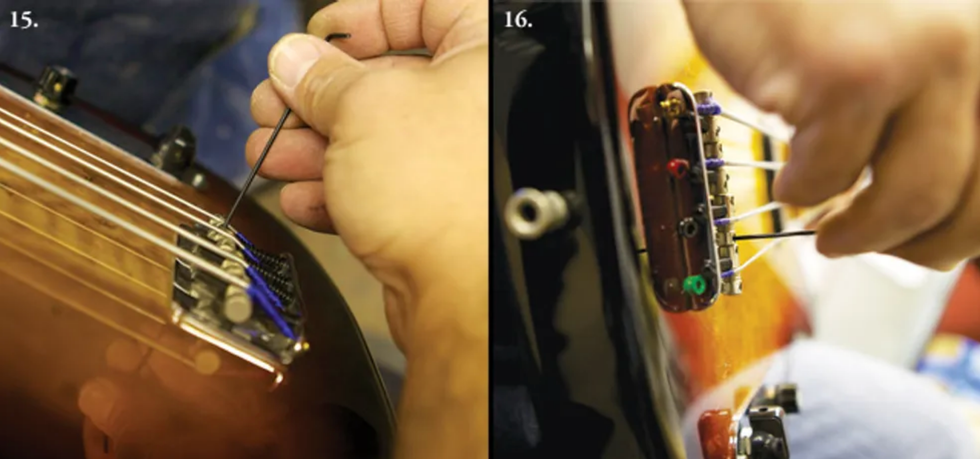
Photo 15: Adjusting saddle height for the 1st string. Photo 16: Another view of saddle-height adjustment. Here, the 2nd string is being raised.
- Using the appropriate wrench, adjust each saddle up or down to the desired height (Photos 15 and 16).
- Naturally, string action has to be adjusted for an individual's playing style. If you have a light touch and play very technically, you can get away with slightly lower action. However, you'll want a somewhat higher action if you love to dig into the strings and produce big, clear, sustaining tones. By experimenting, you'll eventually determine the ideal action for your music—and that's the beauty of learning how to do a setup yourself.
- For a middle-of-theroad action, I set the bass side of a 4-string (the E string in standard tuning) to 7/64", and then set the treble side (G string) to 5/64". I then graduate the heights as I go across the fretboard, making it 6+/64" on the A string and 6-/64" on the D string.
The goal is to gradually make the strings go from higher to lower as they cross the fretboard from the bass to treble side. With multi-string basses (5, 6, and more), continue this concept across the strings by adding some height for lower strings and shaving a little off for higher ones.
Step 5: Evaluate Your Frets
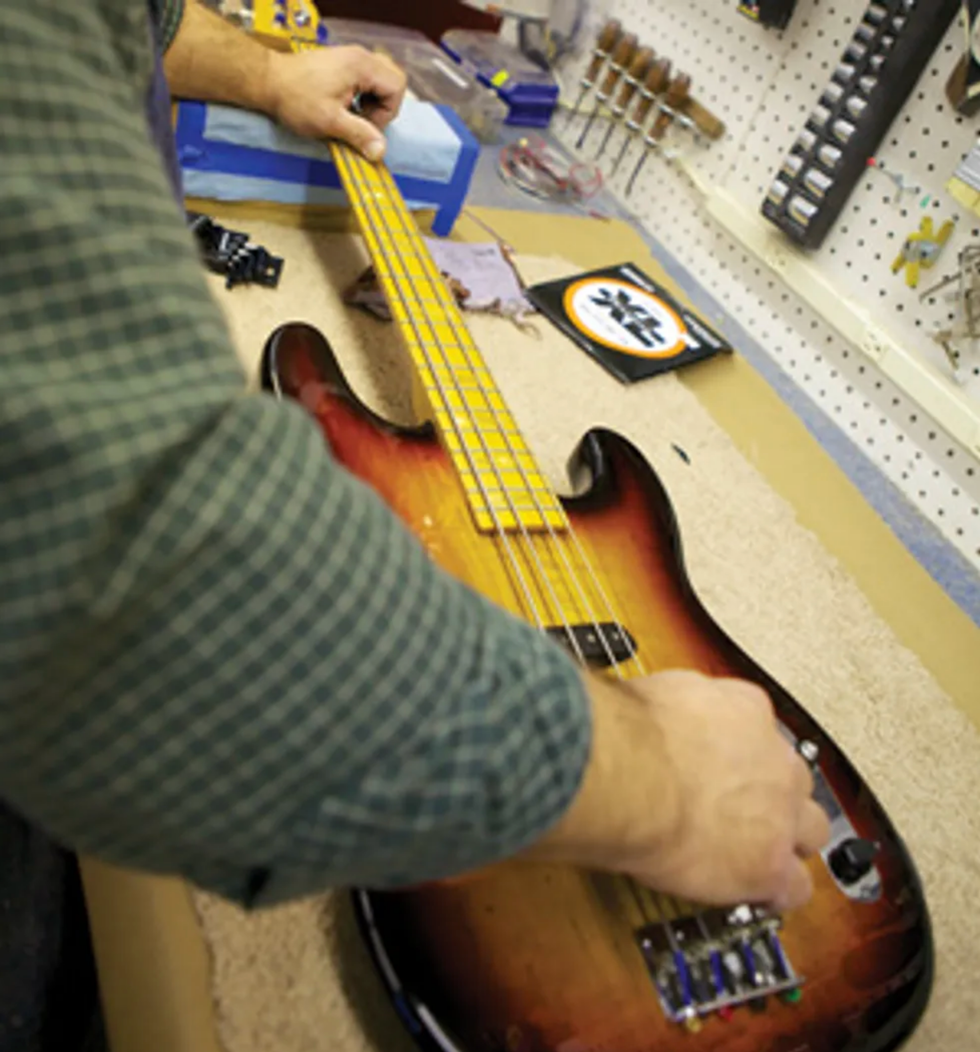
Photo 17: Once the neck relief, nut slots, and basic saddle height have all been adjusted, it's a good time to check fret condition.
Once you have the strings close to their proper height with the instrument at pitch and the previous adjustments dialed in, you can really see if the frets are level all the way along the fretboard. We're now at the stage in the setup where fret problems will be revealed (Photo 17).
High or low frets, loose frets, and even dead spots from the buildup of gunk and funk that gradually seeps between the frets and fretboard over the years can create inconsistent string vibration, so be on the lookout for these problems.
Speaking of fret condition, if you notice that even after being tuned to pitch and intonated (which we will get to in a moment), your bass does not play in tune with itself on some notes, check to see whether your frets have a nice round crown on top or if they're flat. Frets that are worn flat will allow the string to read from either the front edge of the fret and play sharp, or read from the back side of the fret and create a sitar-like sound. Having your frets in level, crowned, tip-top condition is essential for optimal playability, focused sound, and spot-on intonation. Fretwork is definitely the domain of a trusted repair technician.
Step 6: Adjust Intonation
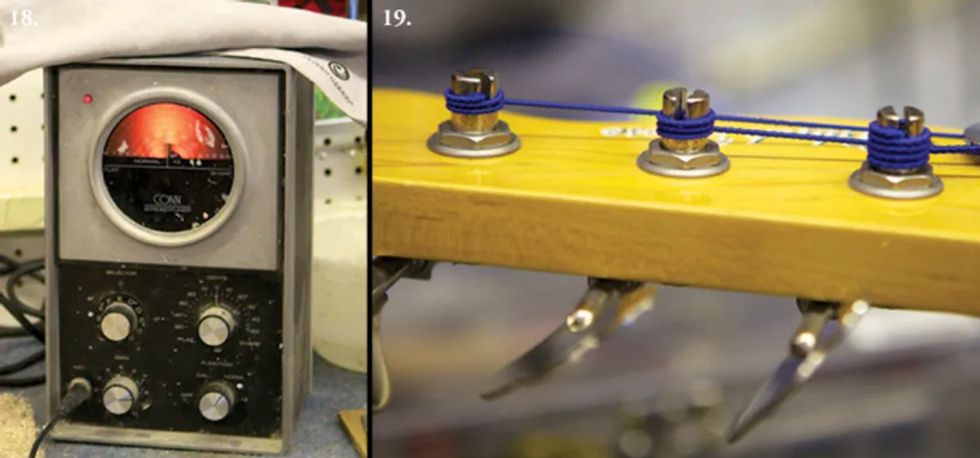
Photo 18: A strobe tuner or pedal with strobe functions provides superior visual feedback for setting intonation. Photo 19: Properly wound strings wrap from the top of the post to its bottom. The wraps should lie tight against one another and not overlap.
Now we're ready to check and adjust intonation. Unless the strings are fresh, install a new set before going any further.
Intonating your instrument involves individually adjusting the length of each string so its notes are in tune along the entire fretboard. To do this, it's best to use a strobe tuner (Photo 18) because it lets you visually track incremental pitch changes in both a note's fundamental vibration and its overtones.
Before we start, here are some tuning tips to consider. In my experience, you'll end up with a more stable tuning if you come up to pitch from below. By tuning up, you reduce the possibility of slack being in the string that could release while you're playing.
Also, be sure the windings progress around the post sequentially from top to bottom—with no overlapping—and that these winds are snug or butted up against each other so they can't move around (Photo 19).
Stretching is important too. I spend time stretching strings when they're new. Usually tuning up to pitch and stretching a string six to eight times will get it stable. There's no need to really yank— applying a firm upward pull as you move along the string's entire playing length is sufficient.

Photo 20: Using a Phillips screwdriver to shift the 2nd-string saddle backward. Photo 21: Checking the low-E's second-octave fifth interval—that's B at the 19th fret—with a tuner to see how it's intonating after the octave has been adjusted.
- After your strings are properly installed, stretched, and all tuned to pitch, start with the lowest string and make sure it's in tune while you play it open. Then, on the same string, play the note at the 12th fret. The open string is your reference, and the 12th-fret note—which is an octave higher—should also be in tune without you touching the string's tuning machine. If the 12th-fret tone isn't in tune, you'll make adjustments at the saddle to raise or lower the fretted note's pitch until that note is in tune with the open string.With that in mind, also take care to play the 12th-fret note as if you were performing it—not with less or more pressure than you'd use to play the note while you're onstage.
- If the high octave—the fretted note—is sharper than the open pitch, this means the speaking length of your string is too short. That is, the distance between the fretted octave and the saddle is too small. If that's the case, you need to make the string slightly longer by moving the saddle away from the neck.Conversely, if the fretted octave is flatter than the open string, the vibrating section of the string between the 12th fret and saddle is too long and needs to be shortened a tad. To do this, move the saddle toward the neck.Different basses have different processes for shifting the saddle backward or forward (Photo 20). This can include loosening setscrews to allow the saddles to have forward and backward motion. If you're not sure how your saddles operate, consult the owner's manual that came with your bass or go online to research the particular bridge.
- After the bottom string is intonated, move to the 3rd string, then the 2nd, and finally the 1st.
Tip: Make small adjustments and always retune before making another adjustment. Be patient— it's a painstaking process, but well worth the time investment.
Once I get the 12-fret octaves in tune with their respective open strings, I like to check if the fifth of each open string is in tune. For example, assuming my 4th string is tuned to E— standard tuning—the fifth is B, which occurs at the 7th fret and also one octave higher at the 19th fret (Photo 21).
There are articles and books that explain the math behind the 12-tone, equal-tempered tuning system that Western instruments—including the bass guitar—are designed around. It's beyond the scope of this DIY tutorial to delve into the details of equal temperament, but in a nutshell, the system presumes that your octaves are perfectly in tune. All other intervals are fudged by a few cents from their pure harmonic form to allow the octave to be evenly divided into 12 notes, or half-steps. (Each half-step consists of 100 cents.)
In practical terms, once you've intonated each string so the octave is in tune with its corresponding open string, you may find that the fifth—a crucial note for bassists—is disagreeably out of tune. This can be a result of equal-temperament "fudging" and how it affects fret placement, but also the thickness and material of a given string can contribute to the issue. We are, after all, simply stretching wire into different vibrating lengths to make music—a primitive scheme when you think about it.
If it happens, let's say, that the 19th-fret B on the 4th string is a little sharp, but the octave is dead on, I may fudge the intonation a little bit to favor the B note. This entails moving the saddle back slightly to reduce the sharpness of the B. It's a tricky and imperfect game—you don't want to put your octave noticeably out of tune because then the whole equal-tempered tuning system collapses.
If you find large discrepancies between the correctly tuned open string and its octave relative to other intervals, seek out an experienced repair technician who can help you diagnose and remedy such intonation troubles. There are a lot of techniques available to address this particular dilemma.
Step 7: Check Electronics
As a part of my setups, I also include a thorough electronics check. Dirty pots, loose pots or jacks, and loose knobs can all interrupt the seamless connection between performer and instrument. Often the scratchy sound from a dirty pot can be remedied with a squirt of contact cleaner. This requires disassembly, and depending on your instrument, you may want to have your tech handle it.
As you troubleshoot and adjust your instrument, remember that the aim is to remove everything that can distract or hinder you from playing music. Between you and an experienced repair technician, you should be able to achieve this goal. Good luck!
[Updated 11/17/21]

- Rig Rundown: Greta Van Fleet [2021] - Premier Guitar ›
- DIY: How to Set Up a 5-String Bass - Premier Guitar ›
- Top 5 Bass Rig Rundowns - Premier Guitar ›
- The Big 5: Adeline - Premier Guitar ›
- Flashy Is Fun, but the Bass Has a Deeper Function - Premier Guitar ›
- Squier Paranormal Rascal HH Review - Premier Guitar ›
- Epiphone Newport Bass Review - Premier Guitar ›
- Unlock Your Guitar's Potential with this Easy 4-Step Setup Guide ›
- Bassist Ciara Moser and Her Groundbreaking Debut Album ›
- How to Find Your Sound on Bass, with Thanks to P-Funk - Premier Guitar ›
- How Playing Bass in an Orchestra Can Improve Your Musicality - Premier Guitar ›
Submarine Pickups boss Pete Roe at his workstation.
Single-coils and humbuckers aren’t the only game in town anymore. From hybrid to hexaphonic, Joe Naylor, Pete Roe, and Chris Mills are thinking outside the bobbin to bring guitarists new sonic possibilities.
Electric guitar pickups weren’t necessarily supposed to turn out the way they did. We know the dominant models of single-coils and humbuckers—from P-90s to PAFs—as the natural and correct forms of the technology. But the history of the 6-string pickup tells a different story. They were mostly experiments gone right, executed with whatever materials were cheapest and closest at hand. Wartime embargos had as much influence on the development of the electric guitar pickup as did any ideas of function, tone, or sonic quality—maybe more so.
Still, we think we know what pickups should sound and look like. Lucky for us, there have always been plenty of pickup builders who aren’t so convinced. These are the makers who devised the ceramic-magnet pickup, gold-foils, and active, high-gain pickups. In 2025, nearly 100 years after the first pickup bestowed upon a humble lap-steel guitar the power to blast our ears with soundwaves, there’s no shortage of free-thinking, independent wire-winders coming up with new ways to translate vibrating steel strings into thrilling music.
Joe Naylor, Chris Mills, and Pete Roe are three of them. As the creative mind behind Reverend Guitars, Naylor developed the Railhammer pickup, which combines both rail and pole-piece design. Mills, in Pennsylvania, builds his own ZUZU guitars with wildly shaped, custom-designed pickups. And in the U.K., Roe developed his own line of hexaphonic pickups to achieve the ultimate in string separation and note definition. All three of them told us how they created their novel noisemakers.
Joe Naylor - Railhammer Pickups
Joe Naylor, pictured here, started designing Railhammers out of personal necessity: He needed a pickup that could handle both pristine cleans and crushing distortion back to back.
Like virtually all guitar players, Joe Naylor was on a personal tone quest. Based in Troy, Michigan, Naylor helped launch Reverend Guitars in 1996, and in the late ’90s, he was writing and playing music that involved both clean and distorted movements in one song. He liked his neck pickup for the clean parts, but it was too muddy for high-gain playing. He didn’t want to switch pickups, which would change the sound altogether.
He set out to design a neck pickup that could represent both ends of the spectrum with even fidelity. That led him to a unique design concept: a thin, steel rail under the three thicker, low-end strings, and three traditional pole pieces for the higher strings, both working with a bar magnet underneath. At just about a millimeter thick, rails, Naylor explains, only interact with a narrow section of the thicker strings, eliminating excess low-end information. Pole pieces, at about six millimeters in diameter, pick up a much wider and less focused window of the higher strings, which works to keep them fat and full. “If you go back and look at some of the early rail pickups—Bill Lawrence’s and things like that—the low end is very tight,” says Naylor. “It’s almost like your tone is being EQ’d perfectly, but it’s being done by the pickup itself.”
That idea formed the basis for Railhammer Pickups, which began official operations in 2012. Naylor built the first prototype in his basement, and it sounded great from the start, so he expanded the format to a bridge pickup. That worked out, too. “I decided, ‘Maybe I’m onto something here,’” says Naylor. Despite the additional engineering, Railhammers have remained passive pickups, with fairly conventional magnets—including alnico 5s and ceramics—wires, and structures. Naylor says this combines the clarity of active pickups with the “thick, organic tone” of passive pickups.
“It’s almost like your tone is being EQ’d perfectly, but it’s being done by the pickup itself.” —Joe Naylor
The biggest difficulty Naylor faced was in the physical construction of the pickups. He designed and ordered custom molds for the pickup’s bobbins, which cost a good chunk of money. But once those were in hand, the Railhammers didn’t need much fiddling. Despite their size differences, the rail and pole pieces produce level volume outputs for balanced response across all six strings.
Naylor’s formula has built a significant following among heavy-music players. Smashing Pumpkins’ Billy Corgan is a Railhammer player with several signature models; ditto Reeves Gabrels, the Cure guitarist and David Bowie collaborator. Bob Balch from Fu Manchu and Kyle Shutt from the Sword have signatures, too, and other players include Code Orange’s Reba Meyers, Gogol Bordello’s Boris Pelekh, and Voivod’s Dan “Chewy” Mongrain.
Chris Mills - ZUZU Pickups
When Chris Mills started building his own electric guitars, he decided to build his own components for them, too. He suspected that in the course of the market’s natural thinning of the product herd, plenty of exciting options had been left unrealized. He started working with non-traditional components and winding in non-traditional ways, which turned him on to the idea that things could be done differently. “I learned early on that there are all kinds of sonic worlds out there to be discovered,” says Mills.
Eventually, he zeroed in on the particular sound of a 5-way-switch Stratocaster in positions two and four: Something glassy and clear, but fatter and more dimensional. In Mills’ practice, “dimensional” refers to the varying and sometimes simultaneous sound qualities attained from, say, a finger pad versus a fingernail. “I didn’t want just one thing,” says Mills. “I wanted multiple things happening at once.”
Mills wanted something that split the difference between a humbucker’s fullness and the Strat’s plucky verve, all in clean contexts. But he didn’t want an active pickup; he wanted a passive, drop-in solution to maximize appeal. To achieve the end tone, Mills wired his bobbins in parallel to create “interposed signal processing,” a key piece of his patented design. “I found that when I [signal processed] both of them, I got too much of one particular quality, and I wanted that dimensionality that comes with two qualities simultaneously, so that was essential,” explains Mills.
Mills loved the sound of alnico 5 blade magnets, so he worked with a 3D modeling engineer to design plastic bobbins that could accommodate both the blades and the number of turns of wire he desired. This got granular—a millimeter taller, a millimeter wider—until they came out exactly right. Then came the struggle of fitting them into a humbucker cover. Some key advice from experts helped Mills save on space to make the squeeze happen.
Mills’ ZUZUbuckers don’t have the traditional pole pieces and screws of most humbuckers, so he uses the screw holes on the cover as “portholes” looking in on a luxe abalone design. And his patented “curved-coil” pickups feature a unique winding method to mix up the tonal profile while maintaining presence across all frequencies.
“I learned early on that there are all kinds of sonic worlds out there to be discovered.” —Chris Mills
Mills has also patented a single-coil pickup with a curved coil, which he developed to get a different tonal quality by changing the relative location of the poles to one another and to the bridge. Within that design is another patented design feature: reducing the number of turns at the bass end of the coil. “Pretty much every pickup maker suggests that you lower the bass end [of the pickup] to compensate for the fact that it's louder than the treble end,” says Mills. “That'll work, but doing so alters the quality and clarity of the bass end. My innovation enables you to keep the bass end up high toward the strings.”
Even Mills’ drop-in pickups tend to look fairly distinct, but his more custom designs, like his curved-coil pickup, are downright baroque. Because his designs don’t rely on typical pickup construction, there aren’t the usual visual cues, like screws popping out of a humbucker cover, or pole pieces on a single-coil pickup. (Mills does preserve a whiff of these ideals with “portholes” on his pickup covers that reveal that pickup below.) Currently, he’s excited by the abalone-shell finish inserts he’s loading on top of his ZUZUbuckers, which peek through the aforementioned portholes.
“It all comes down to the challenge that we face in this industry of having something that’s original and distinctive, and also knowing that with every choice you make, you risk alienating those who prefer a more traditional and familiar look,” says Mills.
Pete Roe - Submarine Pickups
Roe’s stick-on Submarine pickups give individual strings their own miniature pickup, each with discrete, siloed signals that can be manipulated on their own. Ever wanted to have a fuzz only on the treble strings, or an echo applied just to the low-register strings? Submarine can achieve that.
Pete Roe says that at the start, his limited amount of knowledge about guitar pickups was a kind of superpower. If he had known how hard it would be to get to where he is now, he likely wouldn’t have started. He also would’ve worked in a totally different way. But hindsight is 20/20.
Roe was working in singer-songwriter territory and looking to add some bass to his sound. He didn’t want to go down the looping path, so he stuck with octave pedals, but even these weren’t satisfactory for him. He started winding his own basic pickups, using drills, spools of wire, and magnets he’d bought off the internet. Like most other builders, he wanted to make passive pickups—he played lots of acoustic guitar, and his experiences trying to find last-minute replacement batteries for most acoustic pickups left him scarred.
Roe started building a multiphonic pickup: a unit with multiple discrete “pickups” within one housing. In traditional pickups, the vibration from the strings is converted into a voltage in the 6-string-wide coils of wire within the pickup. In multiphonic pickups, there are individual coils beneath each string. That means they’re quite tiny—Roe likens each coil to the size of a Tylenol pill. “Because you’re making stuff small, it actually works better because it’s not picking up signals from adjacent strings,” says Roe. “If you’ve got it set up correctly, there’s very, very little crosstalk.”
With his Submarine Pickups, Roe began by creating the flagship Submarine: a quick-stick pickup designed to isolate and enhance the signals of two strings. The SubPro and SubSix expanded the concept to true hexaphonic capability. Each string has a designated coil, which on the SubPro combine into four separate switchable outputs; the SubSix counts six outputs. The pickups use two mini output jacks, with triple-band male connectors to carry three signals each. Explains Roe: “If you had a two-channel output setup, you could have E, A, and D strings going to one side, and G, B, and E to the other. Or you could have E and A going to one, the middle two strings muted, and the B and E going to a different channel.” Each output has a 3-position switch, which toggles between one of two channels, or mute.
“I’m just saying there’s some unexplored territory at the beginning of the signal chain. If you start looking inside your guitar, then it opens up a world of opportunities.” —Pete Roe
This all might seem a little overly complicated, but Roe sees it as a simplification. He says when most people think about their sound, they see its origin in the guitar as fixed, only manipulatable later in the chain via pedals, amp settings, or speaker decisions. “I’m not saying that’s wrong,” says Roe. “I’m just saying there’s some unexplored territory at the beginning of the signal chain. If you start looking inside your guitar, then it opens up a world of opportunities which may or may not be useful to you. Our customers tend to be the ones who are curious and looking for something new that they can’t achieve in a different way.
“If each string has its own channel, you can start to get some really surprising effects by using those six channels as a group,” continues Roe. “You could pan the strings across the stereo field, which as an effect is really powerful. You suddenly have this really wide, panoramic guitar sound. But then when you start applying familiar effects to the strings in isolation, you can end up with some really surprising textural sounds that you just can’t achieve in any other way. You can get some very different sounds if you’re applying these distortions to strings in isolation. You can get that kind of lead guitar sound that sort of cuts through everything, this really pure, monophonic sound. That sounds very different because what you don’t get is this thing called intermodulation distortion, which is the muddiness, essentially, that you get from playing chords that are more complex than roots and fifths with a load of distortion.” And despite the powerful hardware, the pickups don’t require any soldering or labor. Using a “nanosuction” technology similar to what geckos possess, the pickups simply adhere to the guitar’s body. Submarine’s manuals provide clear instruction on how to rig up the pickups.
“An analogy I like to use is: Say you’re remixing a track,” explains Roe. “If you get the stems, you can actually do a much better job, because you can dig inside and see how the thing is put together. Essentially, Submarine is doing that to guitars. It’s allowing guitarists and producers to look inside the instrument and rebuild it from its constituent parts in new and exciting ways.”
Pearl Jam announces U.S. tour dates for April and May 2025 in support of their album Dark Matter.
In continued support of their 3x GRAMMY-nominated album Dark Matter, Pearl Jam will be touring select U.S. cities in April and May 2025.
Pearl Jam’s live dates will start in Hollywood, FL on April 24 and 26 and wrap with performances in Pittsburgh, PA on May 16 and 18. Full tour dates are listed below.
Support acts for these dates will be announced in the coming weeks.
Tickets for these concerts will be available two ways:
- A Ten Club members-only presale for all dates begins today. Only paid Ten Club members active as of 11:59 PM PT on December 4, 2024 are eligible to participate in this presale. More info at pearljam.com.
- Public tickets will be available through an Artist Presale hosted by Ticketmaster. Fans can sign up for presale access for up to five concert dates now through Tuesday, December 10 at 10 AM PT. The presale starts Friday, December 13 at 10 AM local time.
earl Jam strives to protect access to fairly priced tickets by providing the majority of tickets to Ten Club members, making tickets non-transferable as permitted, and selling approximately 10% of tickets through PJ Premium to offset increased costs. Pearl Jam continues to use all-in pricing and the ticket price shown includes service fees. Any applicable taxes will be added at checkout.
For fans unable to use their purchased tickets, Pearl Jam and Ticketmaster will offer a Fan-to-Fan Face Value Ticket Exchange for every city, starting at a later date. To sell tickets through this exchange, you must have a valid bank account or debit card in the United States. Tickets listed above face value on secondary marketplaces will be canceled. To help protect the Exchange, Pearl Jam has also chosen to make tickets for this tour mobile only and restricted from transfer. For more information about the policy issues in ticketing, visit fairticketing.com.
For more information, please visit pearljam.com.
The legendary German hard-rock guitarist deconstructs his expressive playing approach and recounts critical moments from his historic career.
This episode has three main ingredients: Shifty, Schenker, and shredding. What more do you need?
Chris Shiflett sits down with Michael Schenker, the German rock-guitar icon who helped launch his older brother Rudolf Schenker’s now-legendary band, Scorpions. Schenker was just 11 when he played his first gig with the band, and recorded on their debut LP, Lonesome Crow, when he was 16. He’s been playing a Gibson Flying V since those early days, so its only natural that both he and Shifty bust out the Vs for this occasion.
While gigging with Scorpions in Germany, Schenker met and was poached by British rockers UFO, with whom he recorded five studio records and one live release. (Schenker’s new record, released on September 20, celebrates this pivotal era with reworkings of the material from these albums with a cavalcade of high-profile guests like Axl Rose, Slash, Dee Snider, Adrian Vandenberg, and more.) On 1978’s Obsession, his last studio full-length with the band, Schenker cut the solo on “Only You Can Rock Me,” which Shifty thinks carries some of the greatest rock guitar tone of all time. Schenker details his approach to his other solos, but note-for-note recall isn’t always in the cards—he plays from a place of deep expression, which he says makes it difficult to replicate his leads.
Tune in to learn how the Flying V impacted Schenker’s vibrato, the German parallel to Page, Beck, and Clapton, and the twists and turns of his career from Scorpions, UFO, and MSG to brushes with the Rolling Stones.
Credits
Producer: Jason Shadrick
Executive Producers: Brady Sadler and Jake Brennan for Double Elvis
Engineering Support by Matt Tahaney and Matt Beaudion
Video Editor: Addison Sauvan
Graphic Design: Megan Pralle
Special thanks to Chris Peterson, Greg Nacron, and the entire Volume.com crew.
Katana-Mini X is designed to deliver acclaimed Katana tones in a fun and inspiring amp for daily practice and jamming.
Evolving on the features of the popular Katana-Mini model, it offers six versatile analog sound options, two simultaneous effects, and a robust cabinet for a bigger and fuller guitar experience. Katana-Mini X also provides many enhancements to energize playing sessions, including an onboard tuner, front-facing panel controls, an internal rechargeable battery, and onboard Bluetooth for streaming music from a smartphone.
While its footprint is small, the Katana-Mini X sound is anything but. The multi-stage analog gain circuit features a sophisticated, detailed design that produces highly expressive tones with immersive depth and dimension, supported by a sturdy wood cabinet and custom 5-inch speaker for a satisfying feel and rich low-end response. The no-compromise BOSS Tube Logic design approach offers full-bodied sounds for every genre, including searing high-gain solo sounds and tight metal rhythm tones dripping with saturation and harmonic complexity.
Katana-Mini X features versatile amp characters derived from the stage-class Katana amp series. Clean, Crunch, and Brown amp types are available, each with a tonal variation accessible with a panel switch. One variation is an uncolored clean sound for using Katana-Mini X with an acoustic-electric guitar or bass. Katana-Mini X comes packed with powerful tools to take music sessions to the next level. The onboard rechargeable battery provides easy mobility, while built-in Bluetooth lets users jam with music from a mobile device and use the amp as a portable speaker for casual music playback.
For quiet playing, it’s possible to plug in headphones and enjoy high-quality tones with built-in cabinet simulation and stereo effects. Katana-Mini X features a traditional analog tone stack for natural sound shaping using familiar bass, mid, and treble controls. MOD/FX and REV/DLY sections are also on hand, each with a diverse range of Boss effects and fast sound tweaks via single-knob controls that adjust multiple parameters at once. Both sections can be used simultaneously, letting players create combinations such as tremolo and spring reverb, phaser and delay, and many others.
Availability & Pricing The new BOSS Katana-Mini X will be available for purchase at authorized U.S. Boss retailers in December for $149.99. For the full press kit, including hi-res images, specs, and more, click here. To learn more about the Katana-Mini X Guitar Amplifier, visit www.boss.info.