As you'll soon discover, it's not hard to make your bass play and sound great. In this step-by-step tutorial, Nagy walks you through the entire process. With a few tools and some patience, you'll get the job done right and—best of all—have the satisfaction of knowing you did it yourself.
I've read many articles and repair manuals on bass setup, and I've personally set up thousands of basses as a professional. So when PG asked me to write a DIY piece on the subject, I thought, "What can I bring to this discussion that's truly helpful? Is there a little something I can describe that you don't already know?"
In this article, we'll cover the essentials with the goal of helping you decide what you can handle yourself and what you should leave to your local repair technician. Even if there are aspects of the job you're not prepared to attempt on your own, it's good to understand what's involved with a bass setup. Knowing the steps and terminology will let you communicate more confidently and effectively with your repair guy or gal.
More than likely you're thinking about setup because in some way, your instrument is not performing the way you'd like. To pinpoint any problems, we need to look at all the factors that affect your instrument's overall playability, sound, and function.
Preliminary Inspection

Photo 1: A setup begins with a preliminary, hands-on inspection of your bass. Check playability and listen for issues like buzzing frets and hardware rattles. List any problems you find.
Our journey begins with a general inspection (Photo 1), which consists of playing the instrument while asking yourself these questions: Is the action too high? Too low? Are there buzzing frets? If so, that indicates a need for adjustment.
While you're at it, work the volume and tone controls, checking for noise. Gently jiggle the 1/4" plug at the output jack to check it for noise. Are there any hardware-related rattles? Take notes on all your observations and list any issues you need to address.
After you've given your bass a hands-on evaluation, you're ready to get to work on the setup.
Tip: Because the adjustments that control playability are affected by string gauge and tension, be sure your bass sports the type of strings you plan to use. If you change string gauge, you'll need to do a fresh setup to accommodate the new strings.
Step 1: Measure the Neck Relief
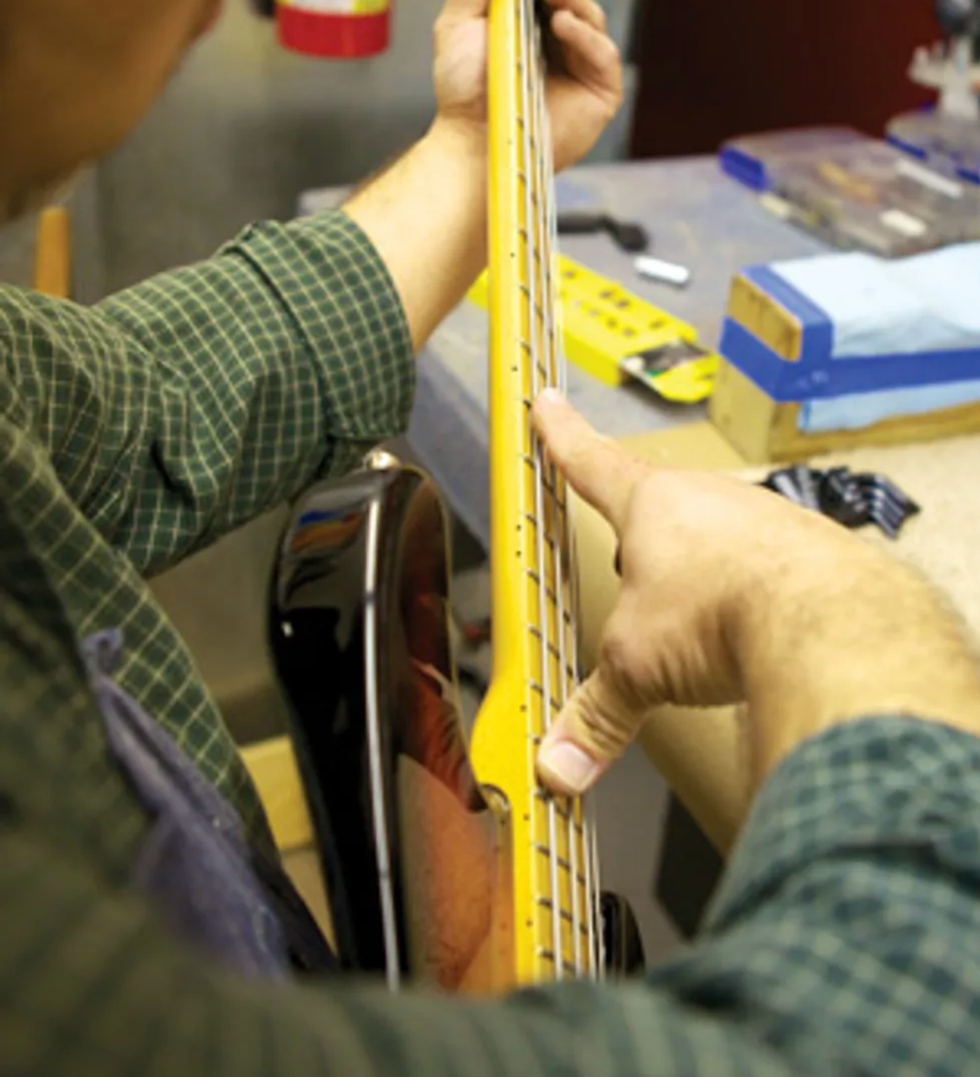
Photo 2: To gauge the amount of relief in your neck, use both hands to simultaneously fret the 4th string at the 1st fret and somewhere between the 14th and 16th frets. At the mid point between these two fretted notes, look at the gap between the bottom of the string and the top of the frets. To get another perspective on this gap, bounce the string against the frets with your picking-hand index finger.
We start with checking the "relief" or amount of bend in the neck. I often see people sighting down the neck from all angles and making some very ballpark assessments about neck relief. But the precise and accurate way to measure relief is to use the strings as a straightedge. Here's how to measure neck relief:
- Tune your bass to pitch. Use the primary tuning you put this instrument in when performing or recording.
- With your fretting hand, hold your lowest string against the 1st fret as if you were playing that note.
- Stretch your picking hand across the fretboard with your thumb aiming towards the bridge and index finger extended toward the nut (Photo 2). Open your hand as far as you can comfortably stretch and fret the lowest string with your thumb. The object is to move your thumb as close to the bridge as you can, while allowing your index finger to touch the lowest string approximately halfway between your fretting finger at the 1st fret and picking hand thumb. (Depending on the fretboard scale length, my picking hand thumb lands on the 14th, 15th, or 16th fret.) Now the lowest string is fretted at two points with two hands. With the lowest string secured at the 1st and, say, 15th fret, you can now use it as a straightedge.
- With your picking-hand index finger, tap the string against the middle frets. By repeatedly tapping and releasing, you'll be able to gauge how much space lies between the bottom of the string and the top of those frets. The gap (if any) is the amount of relief. How much of a gap you need depends very much on your playing style, but to get started, I adjust an instrument to have a gap that's equivalent to the thickness of one or two business cards.
Tip: Make sure you continually check the tuning of your bass so it stays at pitch. This is crucial for making accurate measurements and adjustments.
Step 2: Adjust the Truss Rod
This is very important: If you don't feel comfortable adjusting your truss rod or don't have the proper tool, take this to your local qualified repair technician. You can really mess up your instrument by stripping the threads on your truss rod or over tightening and breaking this critical part of the neck. Whether the truss rod is adjusted via a male hex nut, a female socket, or a Phillips nut at the neck heel, make sure your tool has a snug fit so you don't strip out this vital part.
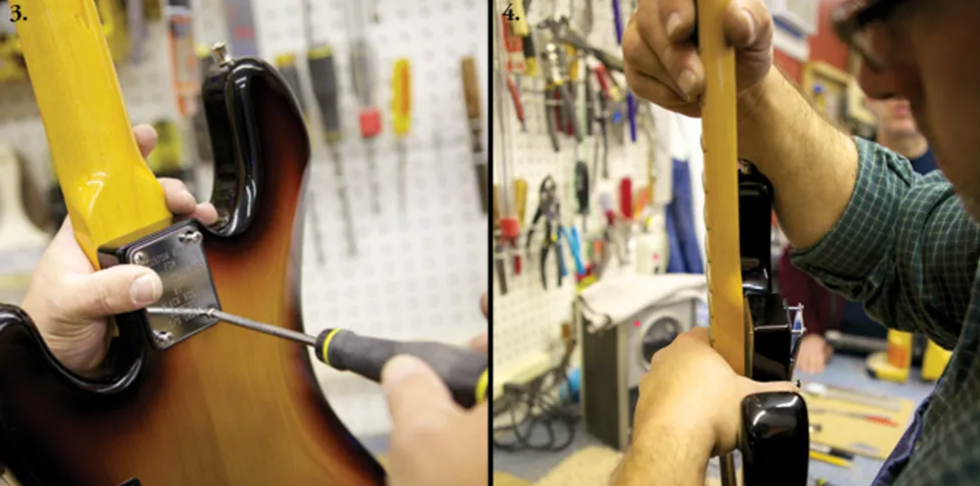
Photo 3: To remove the neck to expose a truss rod that's installed at the heel, take off the strings and back out the screws at the neck plate. Photo 4: Once the screws have released the neck, gently pull it free from the body being careful not to scratch the neck on the exposed screw tips.
The vast majority of truss rods adjust clockwise to tighten and counter-clockwise to loosen. If your truss rod is located at the headstock, look down the neck from headstock to body to determine clockwise and counter-clockwise direction. If your truss rod adjustment is at the heel of the neck, you'll need to remove it (Photos 3 and 4). The movements will be the same when you look from the heel down.
Tip: If you have any doubts about how to adjust a truss rod, get a guitar repair book or study the manual that came with your instrument. Many manufacturers offer free online instructions for adjusting the truss rods on their guitars.
If you decide you want to change the gap between the string and fret, here's the process:
- To reduce the gap between string and fret, tighten the truss rod. Conversely, to increase the space between string and fret, loosen it. Move the truss rod in quarter-turn increments.
- Retune and recheck relief each time you move the rod.
Continue the process until you get the desired gap between the string and fret. Again, unless you have a specific gap in mind, shoot for the thickness of one or two business cards.
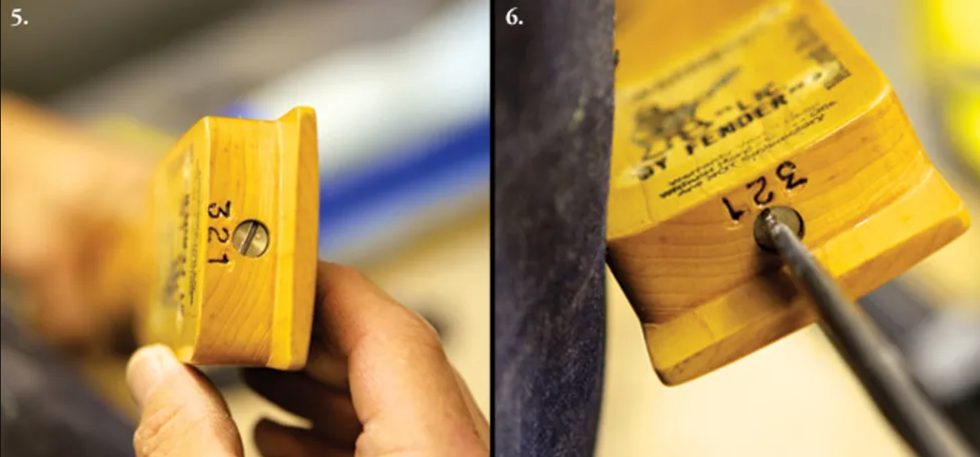
Photo 5: Truss rods accessed at the neck heel are often adjusted with a screwdriver. Photo 6: Whether the truss rod is installed at the headstock or neck heel, the vast majority adjust clockwise to tighten and counterclockwise to loosen.
If your bass requires adjustments at the neck heel (Photos 5 and 6), rather than the headstock, you'll face the tedious prospect of reinstalling the neck and restringing to check each adjustment.
Tip: If your truss rod seems very difficult to adjust, or stops moving, or makes a loud noise, see a local repair tech. Although adjusting a truss rod may be foreign to you, all qualified technicians understand how it functions. It's definitely worth paying the price to have this done right.
There are several adjustments that affect action, but they need to be done in the correct order. Because your decisions about all the other action-related adjustments are based on neck relief, it's important to deal with the truss rod first. Once you've made any necessary truss-rod adjustments, you're ready to move on to the other factors that control playability.
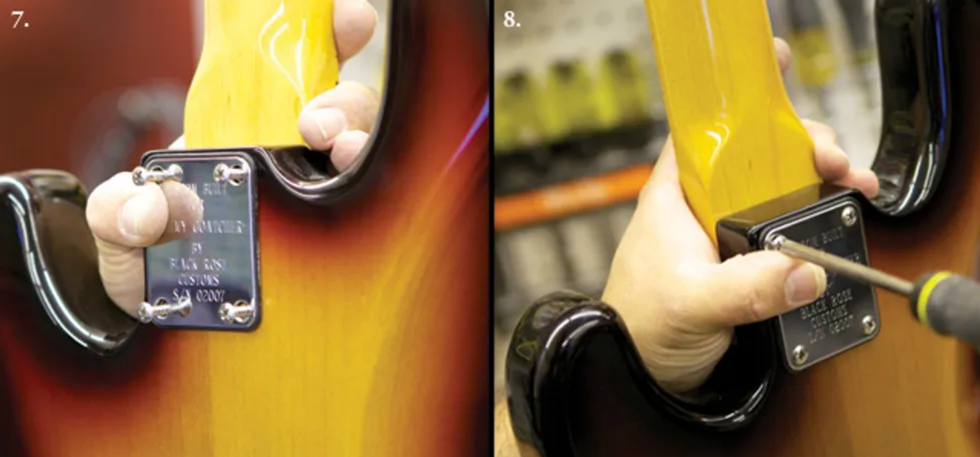
Photo 7: To reattach the neck, carefully place the heel into the neck pocket and then insert the screws by hand, slipping them through the body and seating the tips into their respective holes. Photo 8: Tighten the neck screws securely. As you do this, use your free hand to control the screwdriver tip so it doesn't slip out and mar the body.
If you've removed the neck to make truss rod adjustments, reattach it now (Photos 7 and 8), restring, and retune.
Step 3: Inspect the Nut Slots
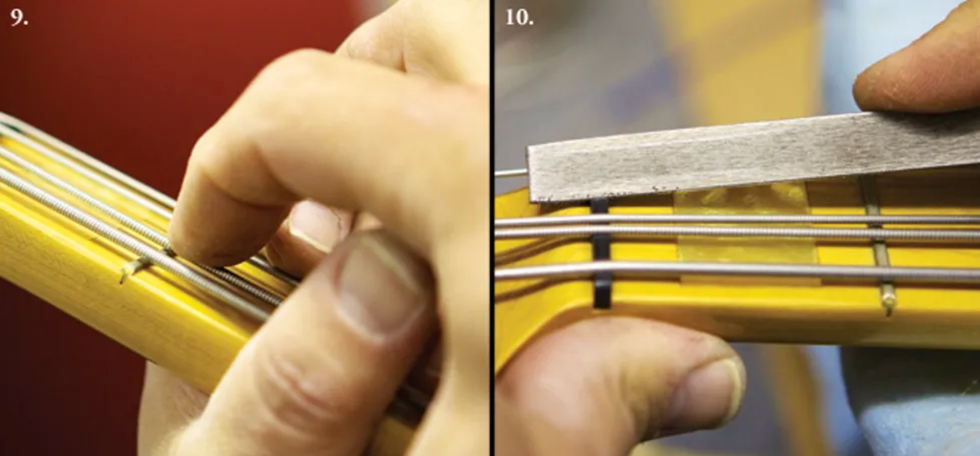
Photo 9: Checking action at the 1st fret while holding the string against the 2nd fret. In addition to eyeballing the clearance, tap the string against the fret to determine the distance between them. Photo 10: Deepening the 2nd-string nut slot.
Next, we check the nut slots and the string height at this end of the neck.
- Tune up.
- Hold each string down on the 2nd fret and look at the space between the bottom of the string and the top of the 1st fret (Photo 9). We want this clearance to be as small as possible, yet when you play the open string, you don't want to hear it buzz against the 1st fret. If the clearance is insufficient, you'll get a buzz.
For bass guitar, a good middle-of-the-road clearance over the 1st fret (with the string still pressed against the 2nd fret) would be the thickness of one business card. If the string has more than that amount of space, the respective nut slot may need to be deepened (Photo 10) so the action at the 1st and 2nd frets is low enough to play comfortably and you don't pull the strings sharp trying to press them against the frets.
Anyone can get nut files from Stewart-MacDonald (stewmac.com) or Luthiers Mercantile (lmii.com), but there is more to cutting a proper nut slot than just making a groove. It needs to be exactly the proper size for each string. The slot must hold a string firmly in place so it can't move around or sympathetically vibrate against the sides of the nut slot, but not be so tight that the string binds and hangs in the slot and then goes out of tune when it's stretched or played.
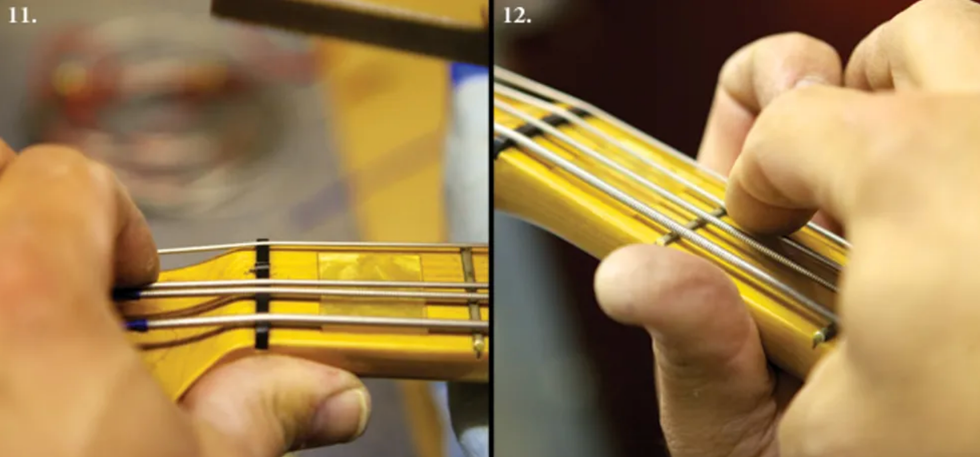
Photo 11: A slot needs to be gently angled downward as it points back toward the headstock and the string must "speak" from the nut's front edge—right where the nut touches the fretboard. Photo 12: When deepening a nut slot, recheck the 1st-fret action after a few light strokes with the file.
Also, the slot needs to be gently angled downward as it points back toward the headstock (Photo 11). The string must "speak" from the nut's front edge—right where the nut touches the fretboard and not somewhere inside the nut slot. (If a string rests on a point inside the slot, rather than at the leading edge, this can create a "sitar" effect or cause a string to play out-of-tune along the fretboard.)
If you deepen a nut slot, work very slowly and frequently recheck the action at the 1st fret after a stroke or two of the nut file (Photo 12).
If a string touches the 1st fret when you press it against the 2nd fret, then the nut slot is too low. The offending slot will have to be filled and then fine-tuned with a nut file, or the nut itself shimmed to gain more height, or you need to fabricate a new nut. Sonically and mechanically, the latter is the best option. If you're not comfortable tackling this project, see your repair tech. [For detailed explanations on cutting a bone nut, visit premierguitar.com and read "How to Convert Your Axe to a Baritone," "How to Intonate a Flattop Guitar," and "How to Convert a Flattop to Nashville Tuning" in the March, April, and September 2012 issues.]
Step 4: Adjust Saddle Height
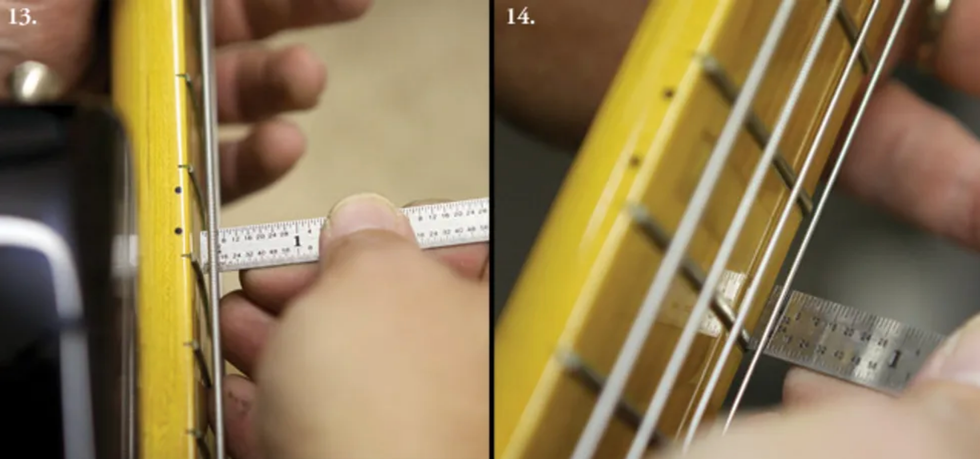
Photo 13: Measuring the distance between the 4th string and 12th fret with a precision metal ruler. Photo 14: Measuring the distance between the 1st string and 12th fret.
Now we're ready to check and adjust string height at the bridge:
- Tune up. (This is automatic by now, right?)
- At the 12th fret, measure the distance between the bottom of each string and the top of the fret (Photos 13 and 14 )
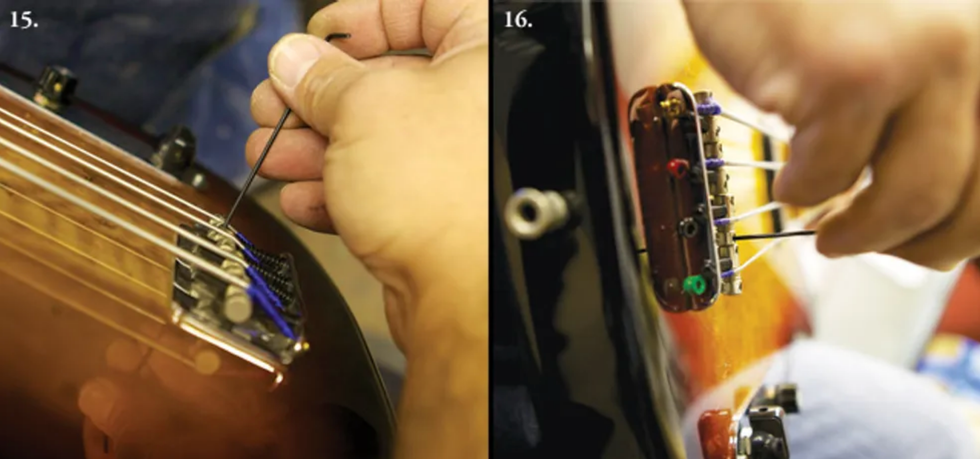
Photo 15: Adjusting saddle height for the 1st string. Photo 16: Another view of saddle-height adjustment. Here, the 2nd string is being raised.
- Using the appropriate wrench, adjust each saddle up or down to the desired height (Photos 15 and 16).
- Naturally, string action has to be adjusted for an individual's playing style. If you have a light touch and play very technically, you can get away with slightly lower action. However, you'll want a somewhat higher action if you love to dig into the strings and produce big, clear, sustaining tones. By experimenting, you'll eventually determine the ideal action for your music—and that's the beauty of learning how to do a setup yourself.
- For a middle-of-theroad action, I set the bass side of a 4-string (the E string in standard tuning) to 7/64", and then set the treble side (G string) to 5/64". I then graduate the heights as I go across the fretboard, making it 6+/64" on the A string and 6-/64" on the D string.
The goal is to gradually make the strings go from higher to lower as they cross the fretboard from the bass to treble side. With multi-string basses (5, 6, and more), continue this concept across the strings by adding some height for lower strings and shaving a little off for higher ones.
Step 5: Evaluate Your Frets
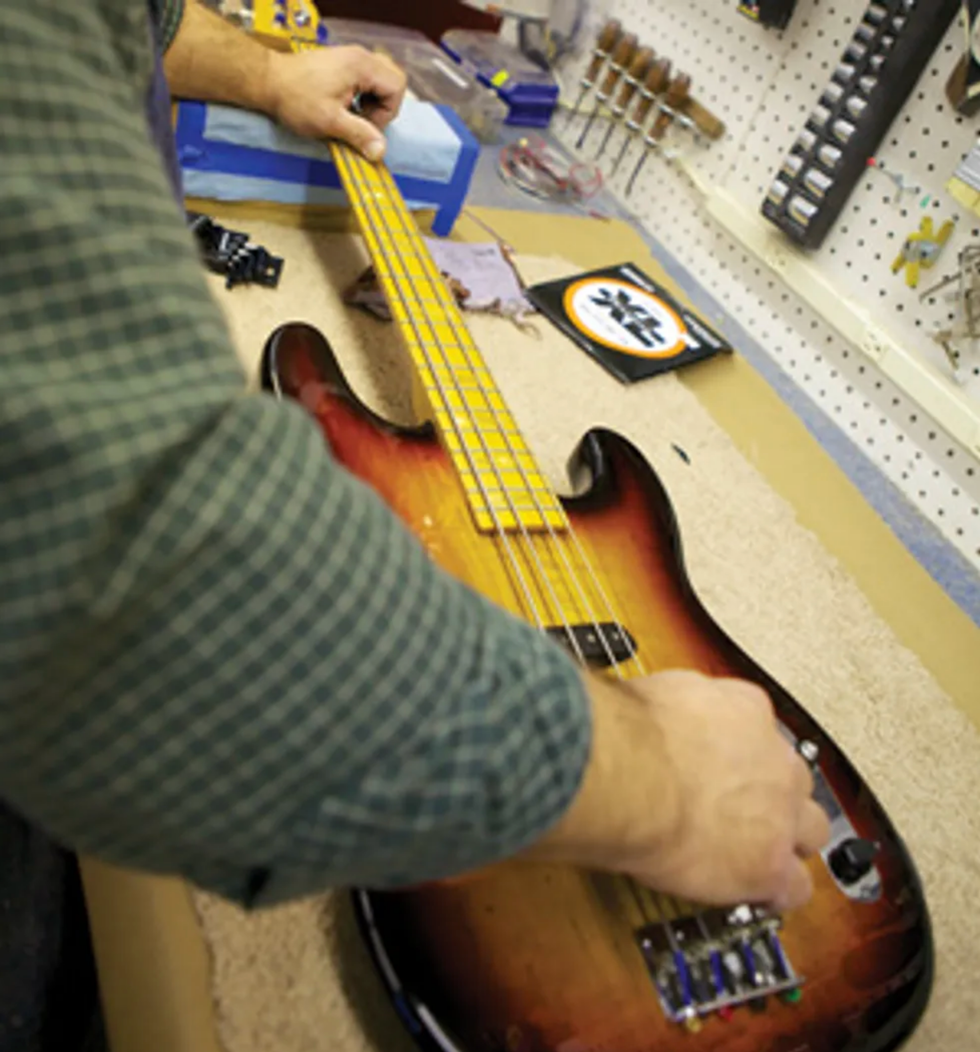
Photo 17: Once the neck relief, nut slots, and basic saddle height have all been adjusted, it's a good time to check fret condition.
Once you have the strings close to their proper height with the instrument at pitch and the previous adjustments dialed in, you can really see if the frets are level all the way along the fretboard. We're now at the stage in the setup where fret problems will be revealed (Photo 17).
High or low frets, loose frets, and even dead spots from the buildup of gunk and funk that gradually seeps between the frets and fretboard over the years can create inconsistent string vibration, so be on the lookout for these problems.
Speaking of fret condition, if you notice that even after being tuned to pitch and intonated (which we will get to in a moment), your bass does not play in tune with itself on some notes, check to see whether your frets have a nice round crown on top or if they're flat. Frets that are worn flat will allow the string to read from either the front edge of the fret and play sharp, or read from the back side of the fret and create a sitar-like sound. Having your frets in level, crowned, tip-top condition is essential for optimal playability, focused sound, and spot-on intonation. Fretwork is definitely the domain of a trusted repair technician.
Step 6: Adjust Intonation
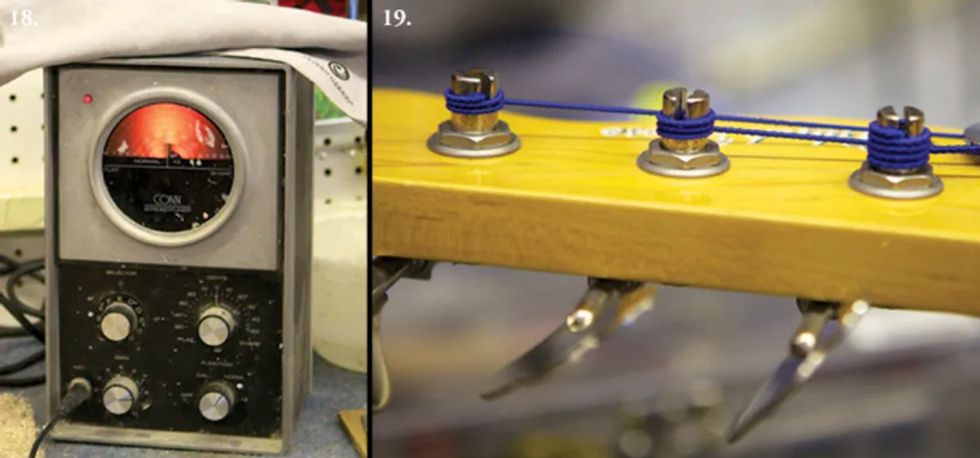
Photo 18: A strobe tuner or pedal with strobe functions provides superior visual feedback for setting intonation. Photo 19: Properly wound strings wrap from the top of the post to its bottom. The wraps should lie tight against one another and not overlap.
Now we're ready to check and adjust intonation. Unless the strings are fresh, install a new set before going any further.
Intonating your instrument involves individually adjusting the length of each string so its notes are in tune along the entire fretboard. To do this, it's best to use a strobe tuner (Photo 18) because it lets you visually track incremental pitch changes in both a note's fundamental vibration and its overtones.
Before we start, here are some tuning tips to consider. In my experience, you'll end up with a more stable tuning if you come up to pitch from below. By tuning up, you reduce the possibility of slack being in the string that could release while you're playing.
Also, be sure the windings progress around the post sequentially from top to bottom—with no overlapping—and that these winds are snug or butted up against each other so they can't move around (Photo 19).
Stretching is important too. I spend time stretching strings when they're new. Usually tuning up to pitch and stretching a string six to eight times will get it stable. There's no need to really yank— applying a firm upward pull as you move along the string's entire playing length is sufficient.
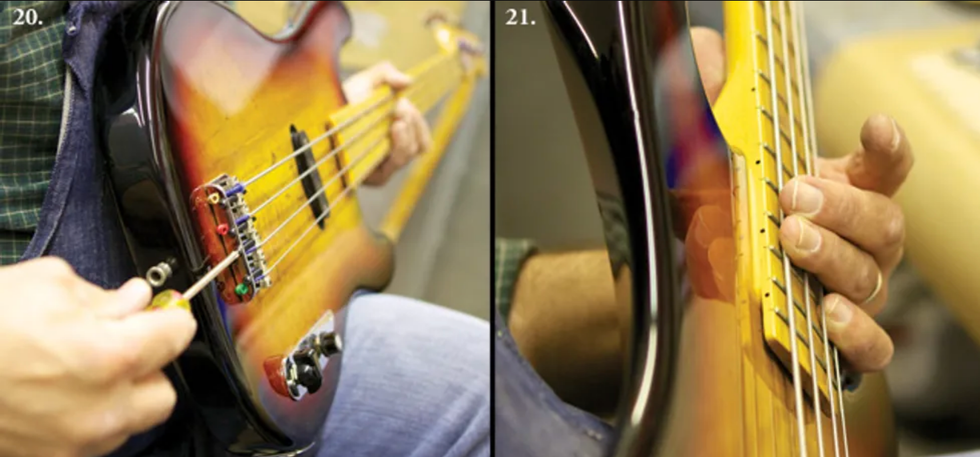
Photo 20: Using a Phillips screwdriver to shift the 2nd-string saddle backward. Photo 21: Checking the low-E's second-octave fifth interval—that's B at the 19th fret—with a tuner to see how it's intonating after the octave has been adjusted.
- After your strings are properly installed, stretched, and all tuned to pitch, start with the lowest string and make sure it's in tune while you play it open. Then, on the same string, play the note at the 12th fret. The open string is your reference, and the 12th-fret note—which is an octave higher—should also be in tune without you touching the string's tuning machine. If the 12th-fret tone isn't in tune, you'll make adjustments at the saddle to raise or lower the fretted note's pitch until that note is in tune with the open string.With that in mind, also take care to play the 12th-fret note as if you were performing it—not with less or more pressure than you'd use to play the note while you're onstage.
- If the high octave—the fretted note—is sharper than the open pitch, this means the speaking length of your string is too short. That is, the distance between the fretted octave and the saddle is too small. If that's the case, you need to make the string slightly longer by moving the saddle away from the neck.Conversely, if the fretted octave is flatter than the open string, the vibrating section of the string between the 12th fret and saddle is too long and needs to be shortened a tad. To do this, move the saddle toward the neck.Different basses have different processes for shifting the saddle backward or forward (Photo 20). This can include loosening setscrews to allow the saddles to have forward and backward motion. If you're not sure how your saddles operate, consult the owner's manual that came with your bass or go online to research the particular bridge.
- After the bottom string is intonated, move to the 3rd string, then the 2nd, and finally the 1st.
Tip: Make small adjustments and always retune before making another adjustment. Be patient— it's a painstaking process, but well worth the time investment.
Once I get the 12-fret octaves in tune with their respective open strings, I like to check if the fifth of each open string is in tune. For example, assuming my 4th string is tuned to E— standard tuning—the fifth is B, which occurs at the 7th fret and also one octave higher at the 19th fret (Photo 21).
There are articles and books that explain the math behind the 12-tone, equal-tempered tuning system that Western instruments—including the bass guitar—are designed around. It's beyond the scope of this DIY tutorial to delve into the details of equal temperament, but in a nutshell, the system presumes that your octaves are perfectly in tune. All other intervals are fudged by a few cents from their pure harmonic form to allow the octave to be evenly divided into 12 notes, or half-steps. (Each half-step consists of 100 cents.)
In practical terms, once you've intonated each string so the octave is in tune with its corresponding open string, you may find that the fifth—a crucial note for bassists—is disagreeably out of tune. This can be a result of equal-temperament "fudging" and how it affects fret placement, but also the thickness and material of a given string can contribute to the issue. We are, after all, simply stretching wire into different vibrating lengths to make music—a primitive scheme when you think about it.
If it happens, let's say, that the 19th-fret B on the 4th string is a little sharp, but the octave is dead on, I may fudge the intonation a little bit to favor the B note. This entails moving the saddle back slightly to reduce the sharpness of the B. It's a tricky and imperfect game—you don't want to put your octave noticeably out of tune because then the whole equal-tempered tuning system collapses.
If you find large discrepancies between the correctly tuned open string and its octave relative to other intervals, seek out an experienced repair technician who can help you diagnose and remedy such intonation troubles. There are a lot of techniques available to address this particular dilemma.
Step 7: Check Electronics
As a part of my setups, I also include a thorough electronics check. Dirty pots, loose pots or jacks, and loose knobs can all interrupt the seamless connection between performer and instrument. Often the scratchy sound from a dirty pot can be remedied with a squirt of contact cleaner. This requires disassembly, and depending on your instrument, you may want to have your tech handle it.
As you troubleshoot and adjust your instrument, remember that the aim is to remove everything that can distract or hinder you from playing music. Between you and an experienced repair technician, you should be able to achieve this goal. Good luck!
[Updated 11/17/21]





![Rig Rundown: Russian Circles’ Mike Sullivan [2025]](https://www.premierguitar.com/media-library/youtube.jpg?id=62303631&width=1245&height=700&quality=70&coordinates=0%2C0%2C0%2C0)


