Luthier Dave Helmer shows you how to cure buzzy strings, bad intonation, gnarly frets, high action, and other common troubles with off-the-shelf axes.
Guitars are the best. We love them. It’s fun to fall in love with a guitar at a store, buy it, and proudly bring it home. But we’ve all been there … where after a month that new guitar is just not playing as good as it was before. As guitar players, we know what feels good and what feels bad when it comes to playability. Maybe you have setup preferences that you like on all your guitars, or maybe you want to experiment with changes to your setup?
With a few tools, you can perform a handful of tasks that will make your new axe play better and stay in tune. This article is for folks who already know how to tighten loose parts, raise and lower string saddles or bridges, and adjust their truss rods—though I’ll share a tip on how to check it with even more accuracy.
Is that big bulky stock nut uncomfortable on your hand? Let’s trim it down and reshape it. If the action feels high and the neck looks straight, I’ll show you how to lower the action. And haven’t we all swapped out pickups and wondered, “Do they really sound better, or do I think that just because they’re new?” Before you swap your pickups, I’ll share some pickup-height measurements that might make you change your mind.
But wait! There’s more. With everything feeling and playing great, does moving into the upper register start to sound out of tune? Intonation is very easy to check and adjust. When you go to vibrato or hold a note, do the frets feel “sandy”? Are the fret ends rubbing against your hand while you play? Let’s flush and polish those up.
To be clear, we’re not swapping out anything on your new guitar: We’re simply refining the setup. Be sure to go online to see eight videos I made showing various processes covered in this story.
Begin the Beguine
There is an order of operations for best results. Neck relief is the first item to dial in, followed by getting the nut slots cut to the proper depth. After that, setting your string and pickup heights is in order. The final step is setting intonation.
Fret polishing is its own event and can happen anytime between string changes. Getting the frets feeling comfortable and well-polished will take some time and attention. You’ll also need some specialized tools as well as some that can be found in most households. Check the box for my list.
Tools You’ll Need
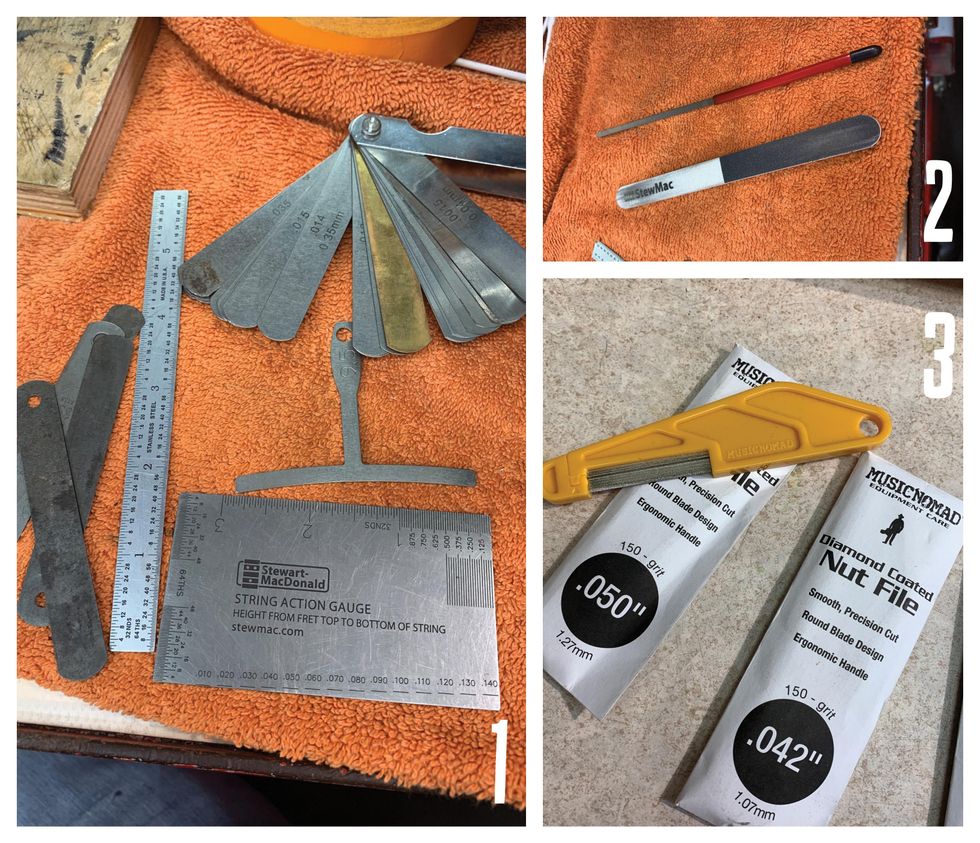
All of the specialized tools in this list are available through online suppliers, including StewMac and Amazon.
- 6" Ruler with measures in 64ths
- String action gauge [Photo 1]
- Miscellaneous screwdrivers
- Allen wrenches
- Radius blocks
- Understring radius gauges (with the radius on the bottom and the top)
- Fret-end dressing file
- Micro-Mesh sticks [Photo 2]
- Tape (low tack)
- Cotton swabs
- Paper towels (blue shop towels preferred)
- Clean cotton rags
- Nut files [Photo 3]
- Stikit sandpaper
- Tri-Flow lubricant
- Capo
- Feeler gauges
- Simichrome polish
Polishing the Frets
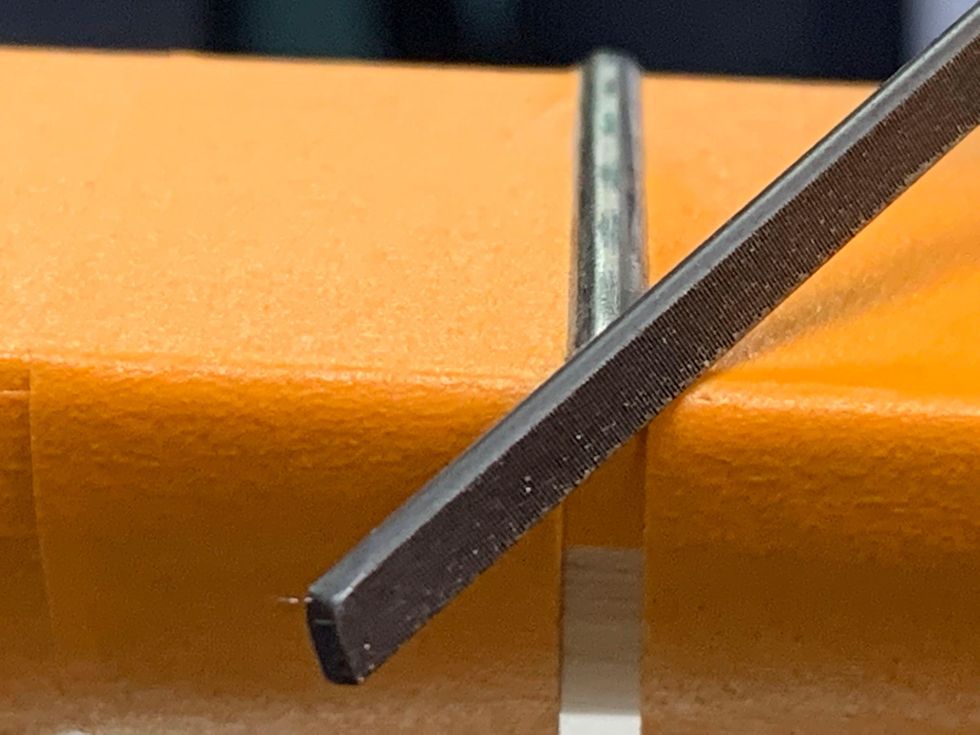
Photo 4
Let’s start with the most Zen of these tasks: fret polishing.
Tape off the fretboard using low-tack tape, exposing only the frets. De-tack each piece of tape on your clothing or maybe a rag—I use my jeans or my sweatshirt. Making it less sticky helps prevent pulling finish off a maple fretboard or the neck. Taping the fretboard also prevents putting any cross-grain scratches into it while you file and polish. You can choose to tape off the entire fretboard or work your way down one fret at a time. Dealer’s choice.
One thing to note about tape, any tape: Even when you de-tack it, you do not want to leave it on overnight. If that happens, rub the tape with your finger, which will break the surface tension. Then carefully pull the tape off from a corner, making sure you’re pulling it off at an angle and not at a straight line with the fretboard edge.
Every fret end has a small burr on the corner from the initial fret job. The fret-end dressing file has a non-marring smooth side for rounding the fret end, and a safe square edge for getting into the corner of the fret end. So, take the fret-end dressing file, use the squared off-side, and file both corners of the fret end [Photo 4].
How to Polish Frets
Here’s how easy it is to polish and smooth frets.
One or two strokes is all you’ll need. Then, using the non-marring side of the file, slightly round off the fret ends.
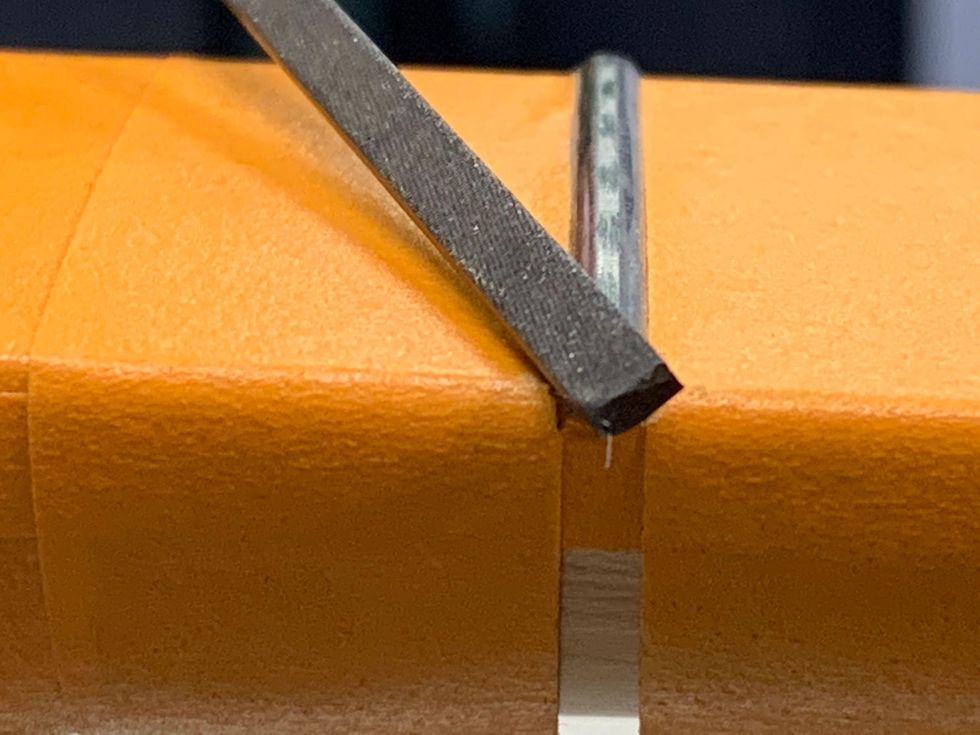
Photo 5
With the file positioned vertically, file downward to make the fret end flush with the edge of the fretboard.
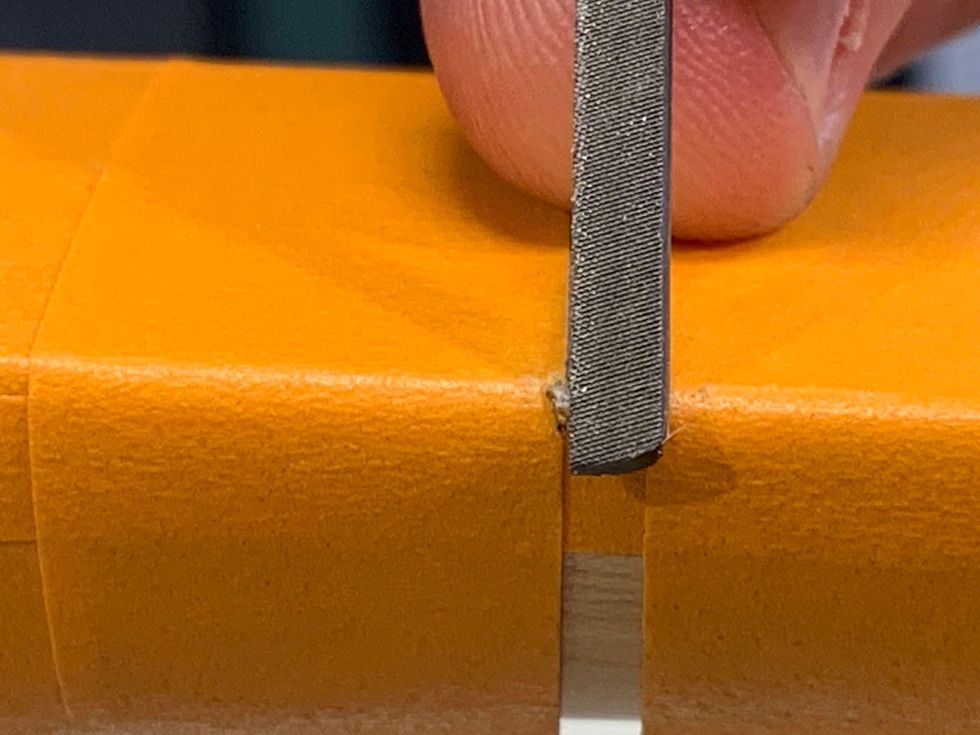
Photo 6
For a nice, rounded-off look, polish the frets using the same rounding motion from the previous step, working through all three grits of the Micro-Mesh stick.
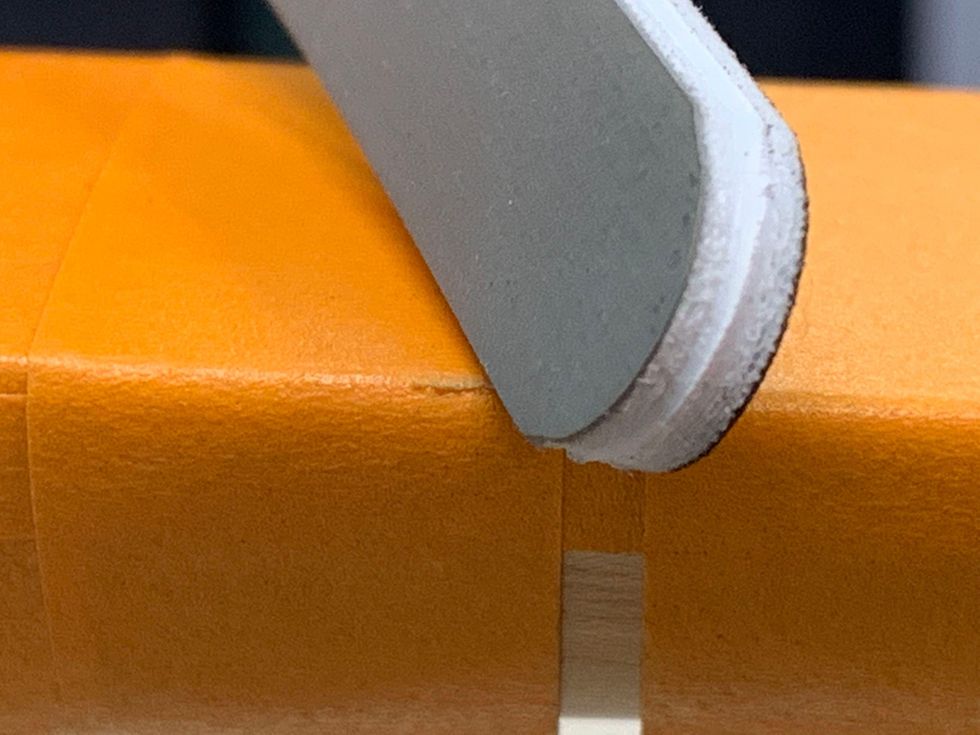
Photo 7
Then, polish both the sides and the top of the frets.
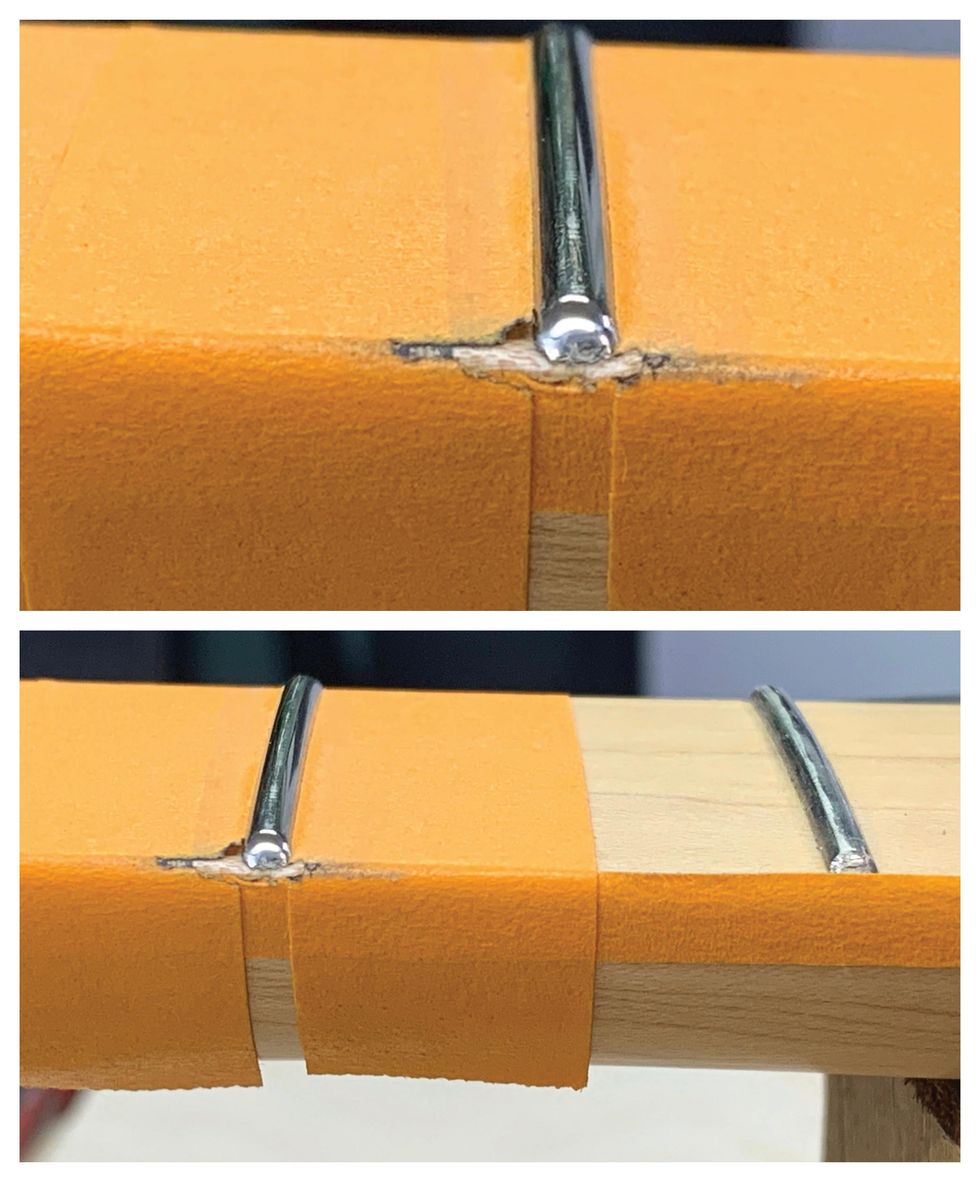
Photos 8 (top) & 9 (bottom)
Using a soft cloth and Simichrome, buff every fret. This will give you a great shine and help prevent oxidation. Now it’s time to remove the tape and condition the fingerboard if it needs it.
Note: Every fret has two fret ends to clean up and polish along with the fret itself. This is a fair amount of handwork. If you’ve never done it, you will get tired and need a break. Take that break. Take multiple breaks. Let the process take however long it requires without rushing. If you’re new, do all the fret polishing over a weekend or a few days. It should be fun, not painful. If it is difficult, call your local luthier and hire them to do it for you.
Adjusting Neck Relief
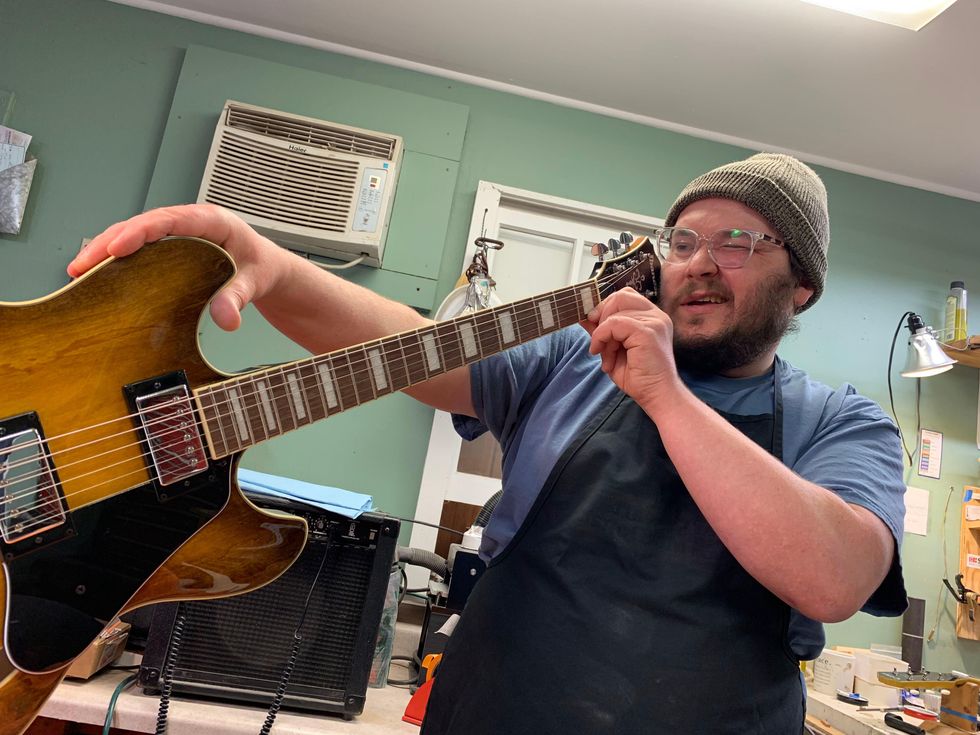
Photo 10
Neck relief refers to the slight amount of concave bowing intentionally created in the neck of a guitar or bass by adjusting the truss rod. For the safety of the guitar, be sure to slack the strings before doing any adjustments to the truss rod. Neither you nor your guitar needs to be tense during this process.
Before whipping out an Allen wrench for the truss rod, start by sight-checking the neck’s straightness. You can sight the neck with the guitar on its back, but I like to put it on edge and look at it that way. It’s easier to see how much curve there is when the guitar is on its side. I feel like gravity plays tricks on my eyes when I sight the neck with the guitar on its back. When I play the guitar, it’s on its side anyway, so looking at it from this vantage point is best.
Tune the guitar to pitch, put a capo on the first fret, and press fret 15 with your left hand.
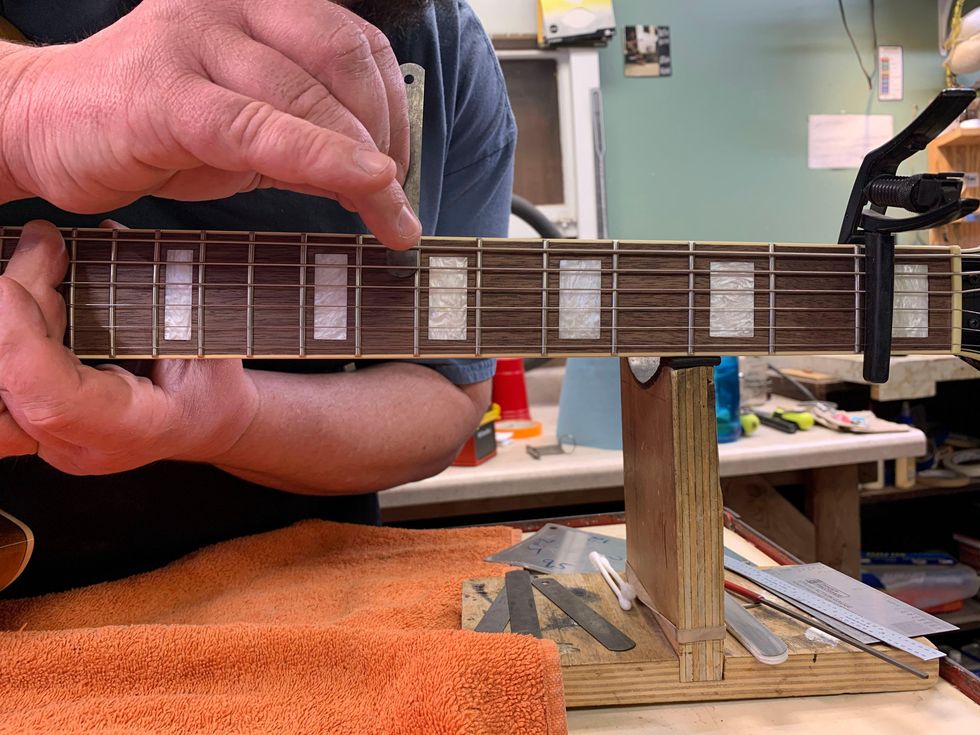
Photo 11
With your right hand, take a feeler gauge and check the gap at frets 7 through 9 (left-handed players, flip your hands around) [Photo 11].
From the top of the fret to the bottom of the string, the gap is usually anywhere from .003" to .012", depending on the feel you are going for. The feeler gauge should fit just between the top of the fret and the bottom of the string. The string shouldn’t move. This will tell you how much “relief” is in the neck. If you find this challenging, keep going—this will take some practice.
When dialing in the relief, I go back and forth between adjusting the truss rod and the string action. Getting the strings low and playing clean on a budget axe can be a challenge. Usually the fretwork isn’t that great, and in the upper register the frets can be unlevel, causing buzzes and clanks. If you need to raise the string action to get the notes to play clean, some fret leveling may be in order. (For more on fret leveling, go online to our article “About Fret Leveling,” from the December 2007 issue.) For good energy transfer, the neck should be as straight as possible. If the neck is straight and the frets are not level, the strings will buzz with low action.
In general, the flatter the radius on the fretboard, the straighter you can get the neck with the truss rod adjustment. On a fretboard with a 12" radius, you should be able to get .005" relief, and on a vintage 7.25" radius board you may need as much as .014" relief. The only way to get better at checking and setting relief is practice.
Refining the Nut
String buzzes, pinging noises when you tune, strings sticking in the slots, and too much string motion in the nut slots are all indicators of trouble. Before getting out the sandpaper and Micro-Mesh sticks, be sure you know if your guitar’s nut is TUSQ or bone. TUSQ is softer, so you should leave TUSQ nut slots a little higher. This leaves room for the TUSQ to wear without causing buzzing on the first fret. With bone, you can cut the slots lower, because it holds up to string wear.
How to Shape Your Guitar's Nut
Watch as Dave Helmer sands down the back half of a nut and creates a smooth finish.
The back side of the nut is usually very bulky and could often stand to lose some material to be more comfortable on your hand. So, let’s start there. Tape off the neck and headstock around the nut using a few layers of tape to protect the headstock face and fretboard. Then, slack the strings and pull them to either side of the nut.
Sand a bevel into the backside—the side closest to the headstock—of the nut using P320 and P400 grit Stikit sandpaper on a flat sanding stick.
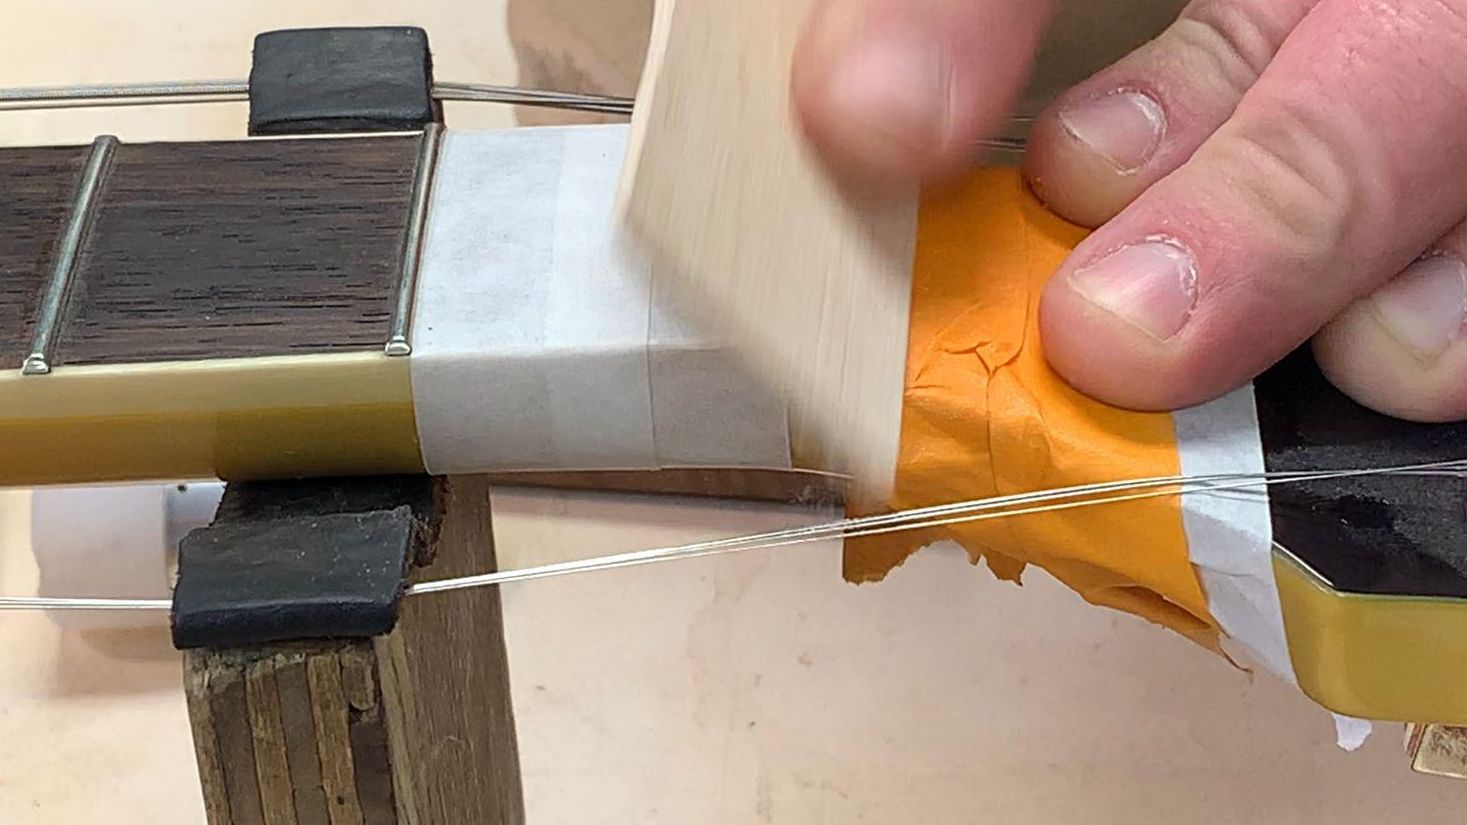
Photo 12
The bevel should start at the back of the nut and come forward about one-third to one-half the thickness of the nut [Photo 12]. Use P320 for most of the sanding and switch to P400 for the last 5 to 10 strokes.
Next, take a fresh Micro-Mesh stick and work through the various grits to buff/round over the bevel you’ve sanded into back of the nut, so it looks and feels good.
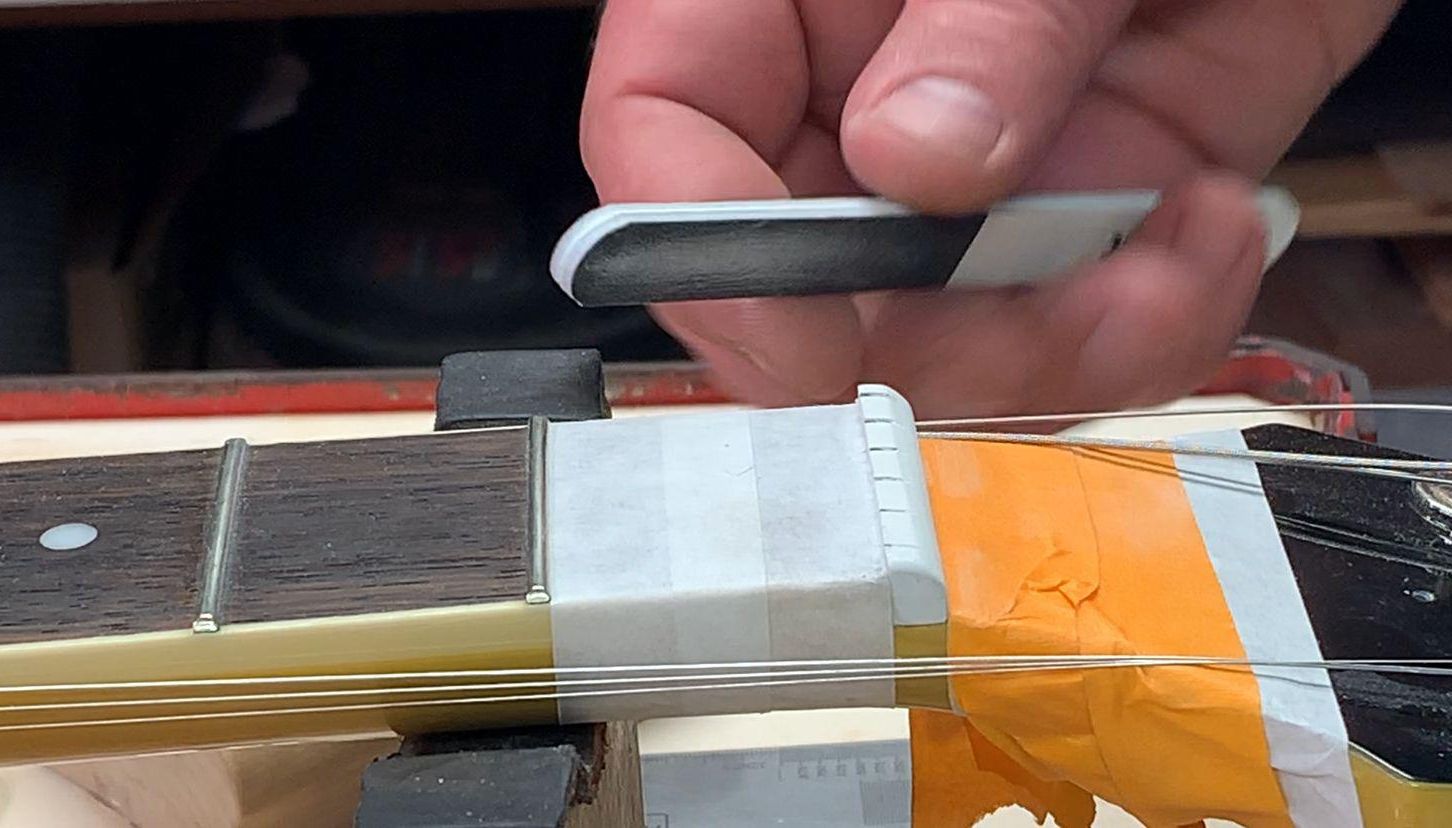
Photo 13
TUSQ nuts are often tall, and the strings sit deep in the slots.
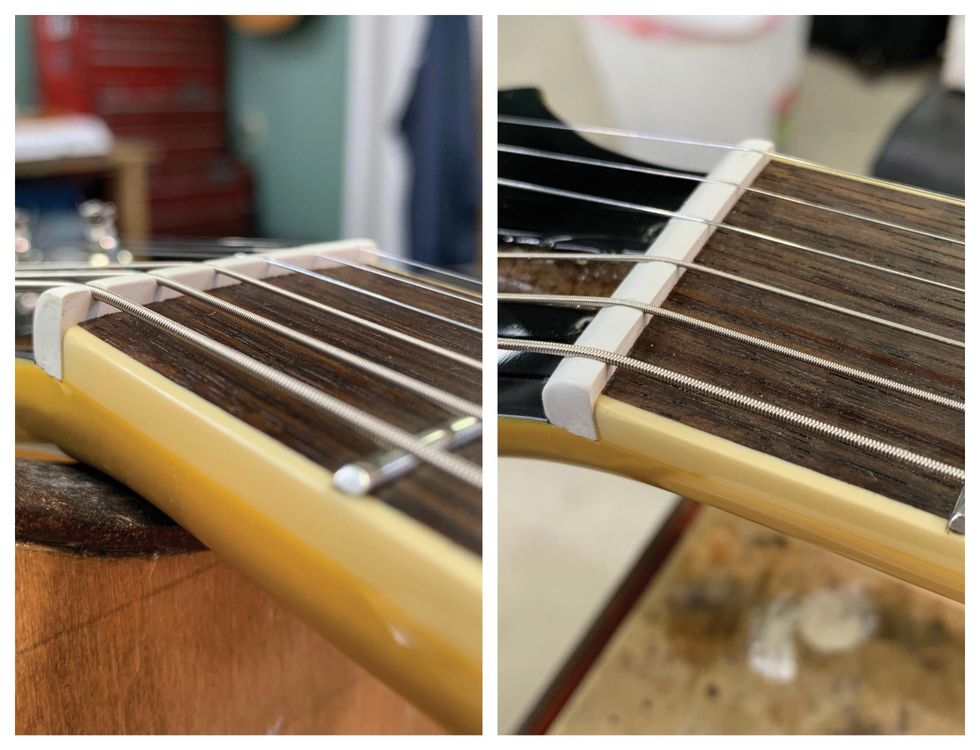
Photos 14 (left) & 15 (right)
Wound strings require 50 percent of the diameter of the string to sit in the nut slot, with the other 50 percent above the top of the nut surface. The plain strings should be flush with the top of the nut. Take a look at the wrong appearance [Photo 14] and the correct look [Photo 15] for properly seated strings.
How to Sand Your Guitar's Nut
Our luthier shows you how to use a radius block and sand down a nut.
Use a radius block that matches the radius of your fretboard.
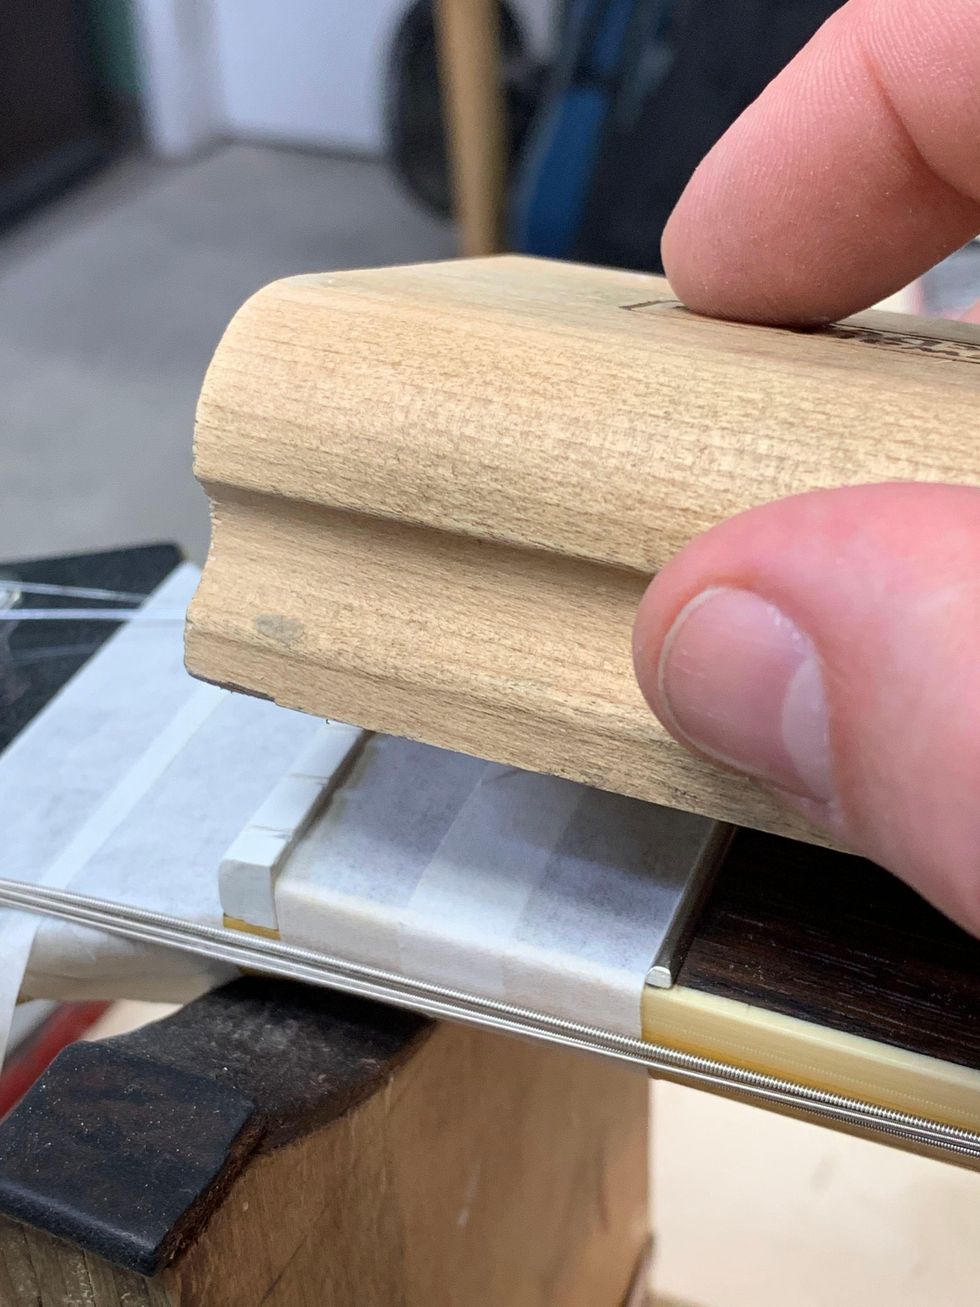
Photo 16
With P320 and P400 grit Stikit sandpapers, use mild pressure to sand down the top of the nut. Sand a bit and check your progress by setting the strings in the slots and putting a little tension on them. Tuning to pitch isn’t necessary. Use the P320 for most of the sanding, and switch to P400 when you are close to the 50/50 height for the wound strings. The radius block sanding will leave a flat, sharp edge on each side of the TUSQ nut [Photo 16]. To round over the sharp edge, use the sanding block and Micro-Mesh stick.
Use the coarse grit of a Micro-Mesh stick to round over and blend the bevel from the back into the top of the nut. Work through the grit gauges until it’s smooth. There is a fine balance between the bevel at the back of the nut and the top radius of the nut. Go back and forth between the two steps to get a nice, finished look and a nut that functions at optimal levels.
… And Refining the Nut Slots
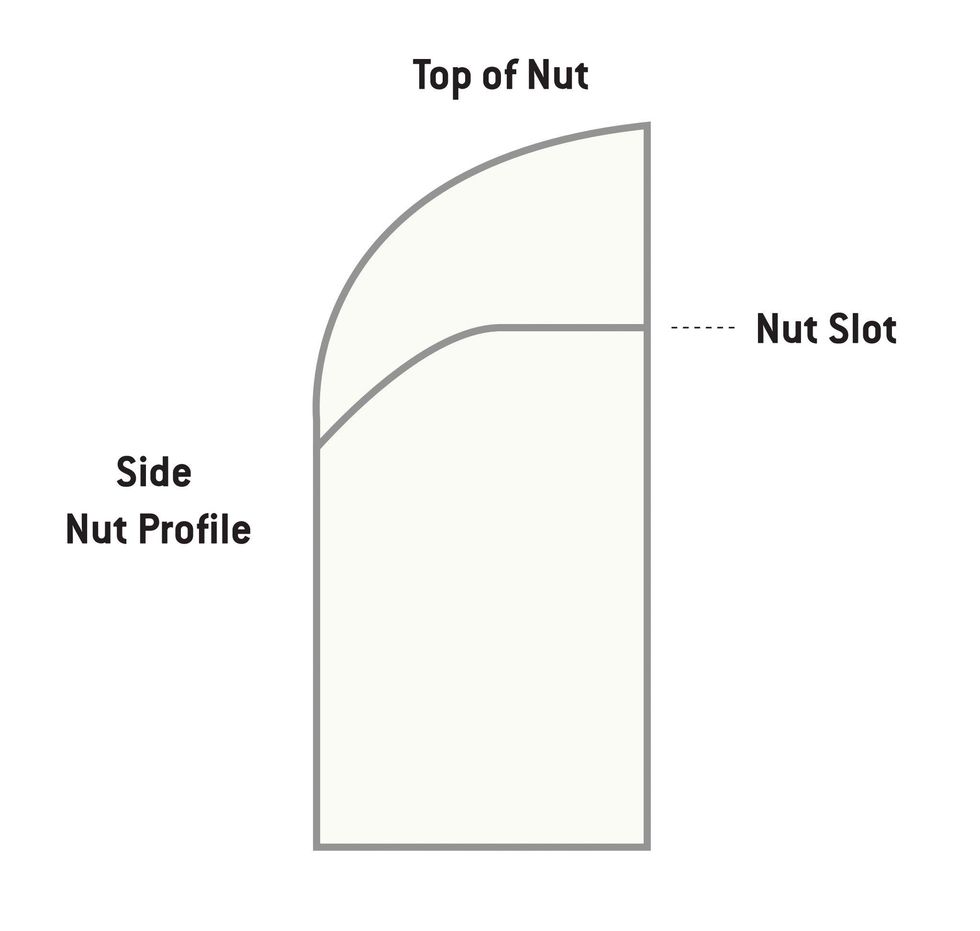
Photo 17
Nut height is the distance from the top of the first fret to the bottom of the string. A good height on the wound strings is about .020", and for the plain strings about .015". Measuring this gap with a feeler gauge can be tricky because of the fretboard radius. Many repair folks do this by eye and feel, based on experience. It takes some practice. A good check: At pitch, fret the third fret and check for a small gap between the string and the top of the first fret.
How to Widen Your Guitar's Nut Slots
A diamond file can make quick work of deepening and widening nut slots.
The bottom of the string should be sitting on the bottom of the front half of the nut slot [Photo 17]. File down each nut slot to its proper depth using the corresponding nut file. There are diamond nut files on the market in multiple sizes to accommodate many string gauges. Make sure to keep your strokes straight. The standard-toothed files have less sizes and usually require rolling them from side to side to get a well-fit string.
Next, using a proper-sized file, round over the bottom back half of the nut slots down, toward the face of the headstock and away from the strings. This will allow the strings to move freely during tuning or bending, while still having support from the front half of the slot.
How to File D and G String Slots on Guitar
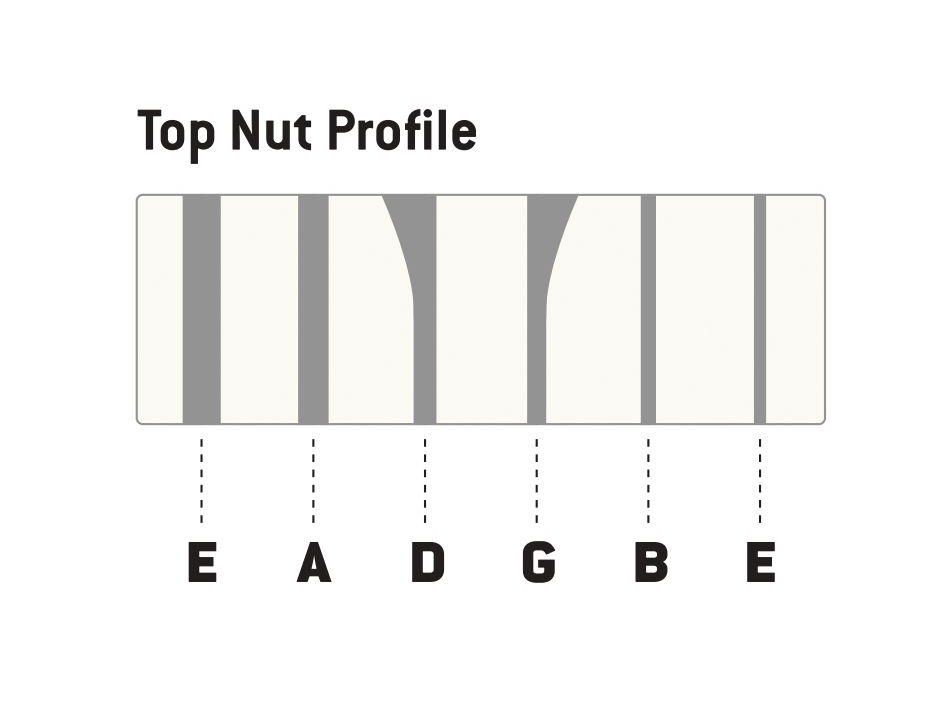
Photo 18
On guitars with 3x3 headstock configurations, the D and G strings need the back half of the slots feathered out away from the center, so the string has a direct path to the tuner post. Using a file that is one size bigger than the string and rolling it side to side on the back of the nut slot will give the string a straight path to the tuner post. Photo 18 is my illustration showing which slots need feathering.
Watch How to File D and G String Slots on Guitar
The D and G nut slots require special attention on 3x3-style headstock configurations.
Additionally, use pencil lead to lubricate the slots. Just get in there with the point of a pencil and mark the slot with its graphite. You might also put a drop of Tri-Flow on the front of the string tree. Tri-Flow will run down the string, so take a cotton swab or cloth to clean up any excess. Tri-Flow has Teflon in it, so you don’t need much.
Adjusting String Action
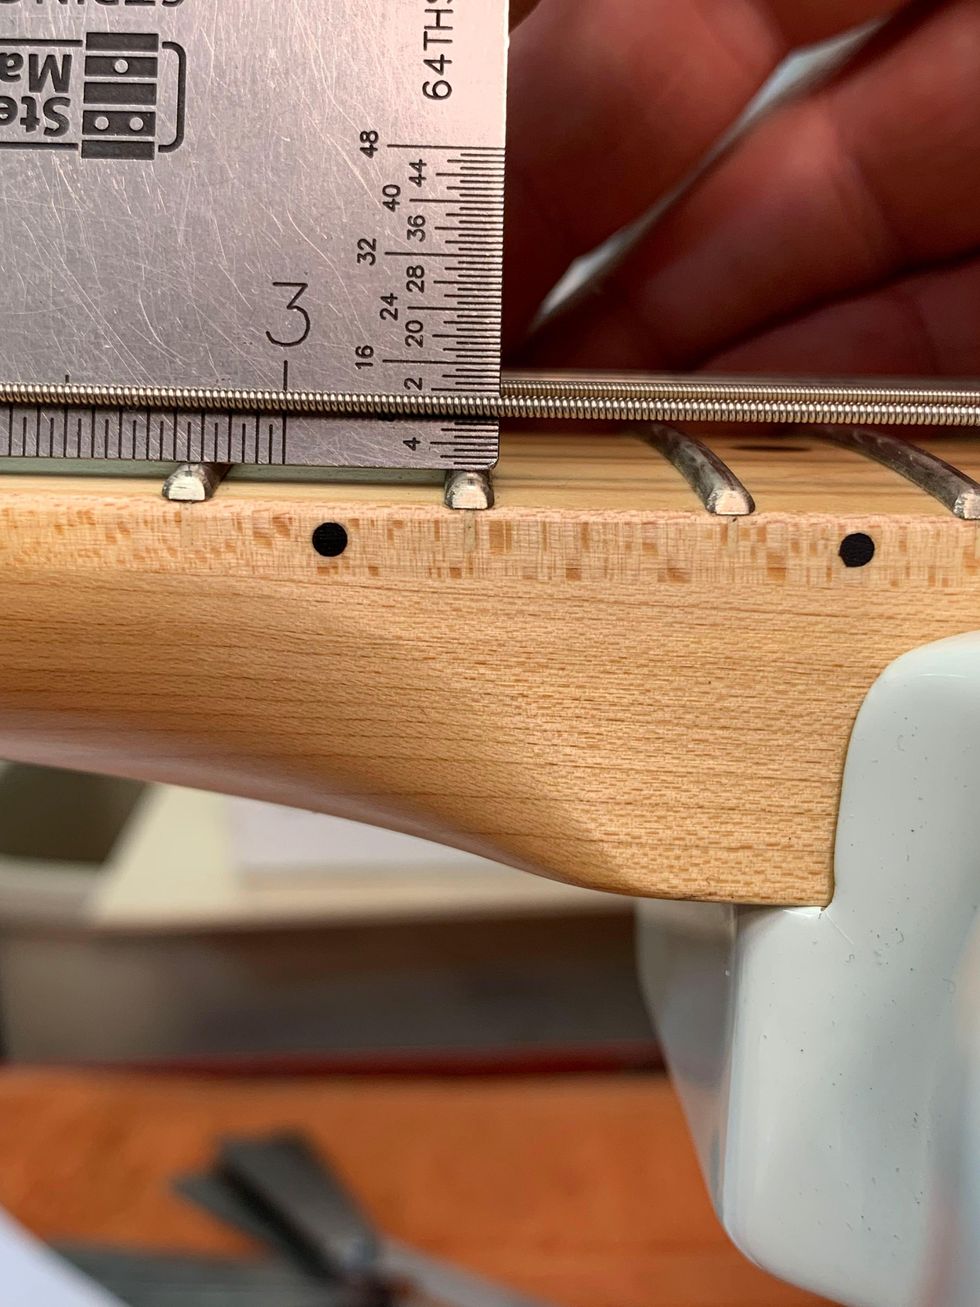
Photo 19
First, find your string height by measuring the string action at the 17th fret on a Fender-style guitar and at the 15th fret on a Gibson-style instrument.On electric guitars, action can range from 3/64" to 3/32", depending on the player’s comfort. My preferences are 1/16" on the treble side and 5/64"on the bass side on both Fender- and Gibson-style guitars measured at the appropriate fret.
How to Adjust Guitar Action
Here’s a look at how our author adjusts the action.
Always loosen the string tension before making action adjustments. This will save wear and tear on the small bridge components. Take either a 6" ruler or a string action gauge and set it on the frets. Measure from the top of the fret to the bottom of the string [Photo 19].
If the action is high, you will lower that string’s saddle or that side of the bridge. If it is low, you will raise it. Make sure the individual saddles are sitting square and upright to the face of the bridge. You do not want them sitting at an angle or leaning over. This will cause buzzing.
The bottom of the strings should match the radius of the fretboard when measured with an understring radius gauge.
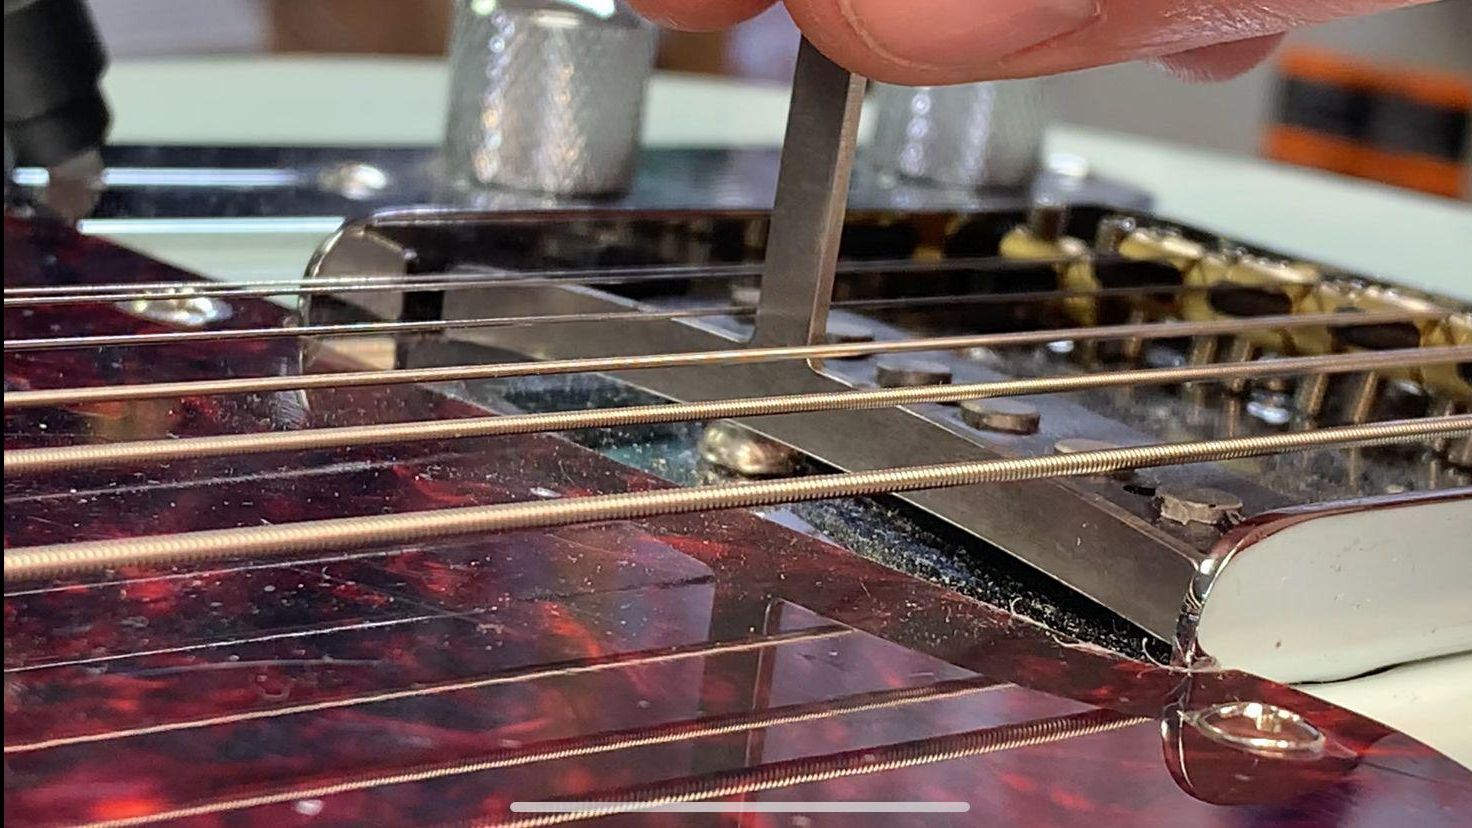
Photo 20
Start your adjustment with the outside strings, working toward the center. On Fender-style guitars, set the two outside strings to the height you want and have the middle four strings a bit higher than that. Bring the gauge up from underneath and just touch the two outside strings. Then, bring the strings down a little at a time until the radius matches.
On a Gibson-style Tune-o-matic, the saddles are not individually adjustable. So, if the radius doesn’t match, the saddles will need to be filed. To do this, I recommend using toothed nut files and a rolling side-to-side motion. Do a little work and check your progress. Remember to slack your strings when adjusting the saddle or bridge up or down.
Changing Pickup Height
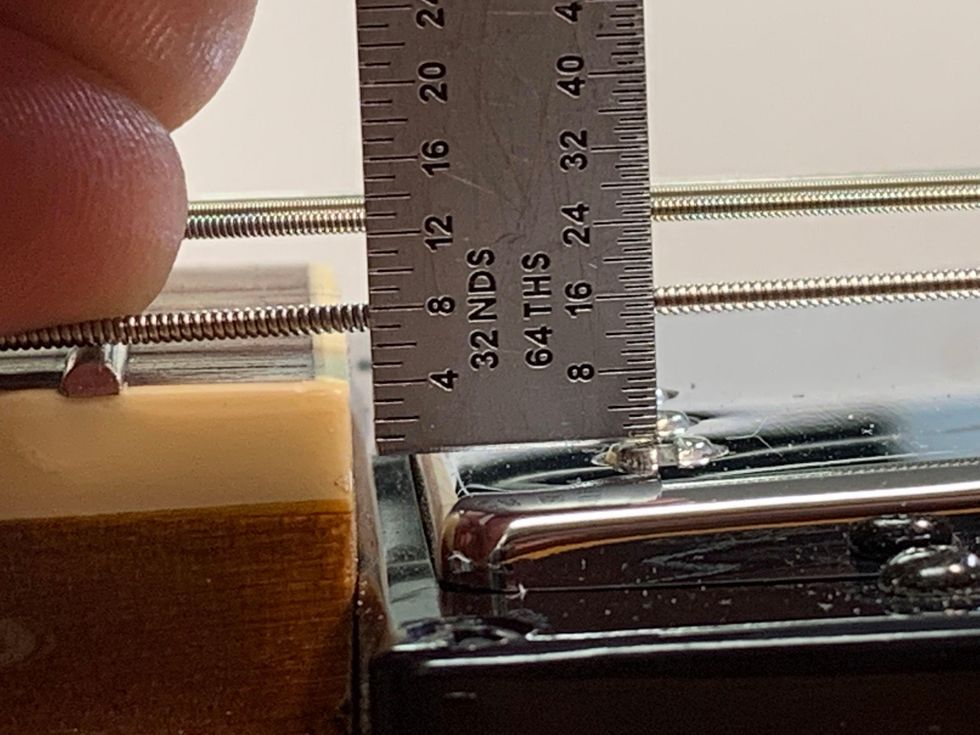
Photo 21
Finally, let’s take a look at pickup-height adjustment. First, to check pickup height, use the two outside strings again. Press the top wound string on the last fret and measure the distance from the top of the pole piece to the bottom of the string [Photo 21]. This distance can range from 3/64" to 1/8". My preferences are 1/16" on the treble side and 5/64" on the bass side.
Adjusting Guitar Pickup Height
Dave Helmer walks you through the process of adjusting the height of your guitar’s pickups.
On most styles of pickups, there are height adjustment screws on either side of the pickup to raise or lower it. The closer the pickup gets to the strings, the more present string frequencies become. If you get too close, the magnetic pull can affect the string’s vibration and you may hear some strange sounds as you go into the upper register.
On Strats, the neck pickup is regularly set too close, and at the 12th fret and above, the low E and A can sound choked, honky, and not clear. Lowering the neck pickup with a screwdriver usually solves this issue.
Setting Intonation
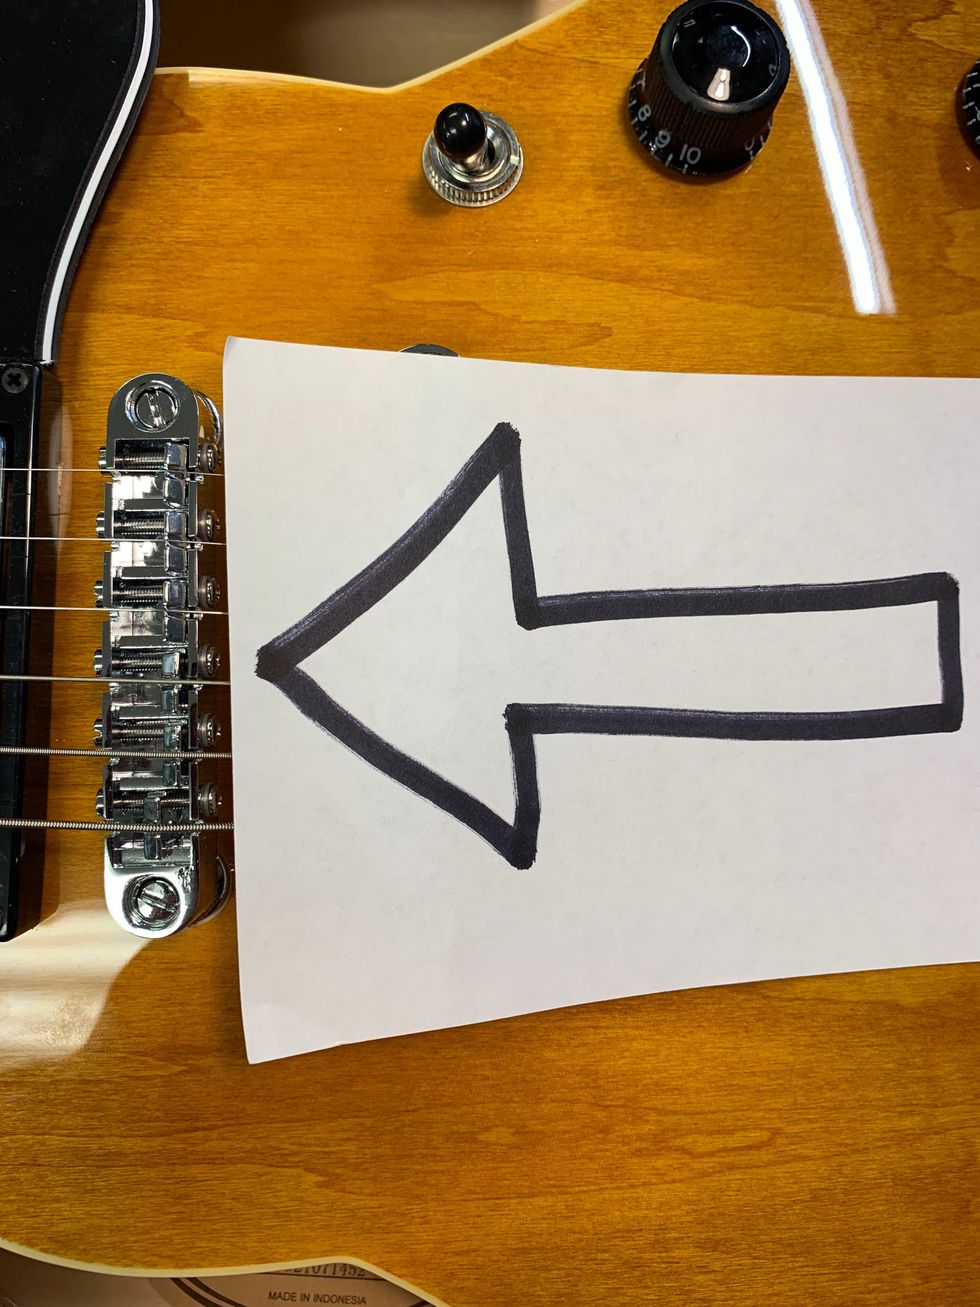
Photo 22
If you can’t get your guitar accurately in tune, you might need to check its intonation. Adjust all saddles as far back as possible so every string will play flat at the 12th fret. You will adjust the saddles forward, gradually making the octave play sharper until it’s in tune with the open string [Photo 22].
Adjust Your Guitar's Intonation
With a tuner and a screwdriver, Dave Helmer shows you how to adjust your guitar’s intonation.
Depending on your vibrato style, experiment with intonating the plain strings slightly flat. Use your ear and do what sounds good. Sometimes, the plain strings can have perfect intonation, but playing with vibrato can make them sound sharp.
To fine-tune intonation, the individual bridge saddles must be adjustable. Once the intonation is set, recheck the string radius using the understring radius gauge and adjust as needed. The radius can change as the saddles come forward during intonation.
Tri-Flow is great for lubricating saddle parts. Put a small drop on the saddle-height adjustment screws and capillary action will suck it in. Adjust the saddle up and down a few times to coat the threads. Clean up any excess with a cotton swab or cloth. Put a drop or two onto a cotton swab and apply the Tri-Flow to the top of each saddle where the string rests. This will help strings move freely during tuning and after any bends or vibrato.
And that’s it! For a relatively small investment in tools and time, you’re now ready to supercharge your new guitar—and maybe your long-treasured axes, too.
- DIY: How to Set Up a Fender Stratocaster - Premier Guitar ›
- 12-String Setup Secrets - Premier Guitar ›
- DIY: How to Set Up and Intonate an Acoustic Guitar - Premier Guitar ›
- Reader Guitar of the Month—Pickups and Finishes - Premier Guitar ›
- DIY Guitar: 7 Cool Reader Mods - Premier Guitar ›
Guitarist William Tyler, a restless sonic explorer: “I would get bored staying in the same place.”
The expansive instrumental guitarist/composer pushes himself out of his comfort zone, beyond the boundaries of his neo-Americana wheelhouse on Time Indefinite.
Mastering an instrument and an artistic style—and then being recognized and rewarded for it—is a daunting enough accomplishment that one might be forgiven for feeling that, once reached, it’s the be-all to end-all. Guitarist William Tyler, for all the praise and opportunity that have come his way over the past decade and a half, isn’t content to plow the same furrow. With his evolutionary new album, Time Indefinite, this son of the South is pushing further afield, not completely forgoing his virtuosic neo-Americana lyricism but incorporating it into static-friendly, otherworldly studio experimentation.
The disorienting opener of Time Indefinite, “Cabin Six,” begins with a loop of hovering blare that, lasting nearly a minute, might lead listeners to think something is amiss with their turntable stylus; this gradually dissipates into an eddy of railroad-like whine from which a chiming 6-string hook emerges only to finally sink into a murky, detuned drone. The simple, lovely “Anima Motel” and almost naïve “Concern” are eminently approachable, and “Howling at the Second Moon,” with its alternate, Joni Mitchell-inspired tuning, feels like something that could have appeared on one of Tyler’s previous albums (even if it was recorded on his iPhone then texturized via a bump to a cassette recorder and dosed with added effects). But the distressed sonic sculptures of “The Hardest Land to Harvest” and “Electric Lake” or the sampled, distorted church choir laced through “Star of Hope” have a ghostly resonance unlike anything the guitarist has done before.
SoundStream
“I think it’s important for artists to push themselves into new ways of working,” Tyler says. “Most of my favorites, artists I follow over the long trajectory of their careers, have done that, whether it’s in music, film, visual art, novels. Of course, some people have a method or style that they stick to, and it serves them. And I wouldn’t want to put anything out into the world that I wouldn’t myself, as a consumer, enjoy spending time with and taking seriously. That said, I would get bored staying in the same place. The new record is about making something that was a little less chained to certain kinds of guitar music, where I felt like I might be running up against my creative limitations or enthusiasms in that area. I wanted to reinvent myself for myself, to explore fresh possibilities, even with the guitar as my primary tool.”
Tyler, whose parents were hitmaking Nashville songwriters, made his name early on as a young guitar phenom playing in such alternative-minded, country-influenced bands as Lambchop and Silver Jews, before appearing on the fourth volume of the influential Tompkins Square “Imaginational Anthem” series of new-era American Primitive guitar and then making his full-length debut as a solo artist with the 2010 album Behold the Spirit. As a player and composer, he was recognized for subsuming the early influence of John Fahey and the Takoma style into something vibrantly his own.
Tyler keeps his tools simple and his ears open.
Photo by Angelina Castillo
William Tyler’s Gear
Guitars
- Mid-1950s Martin D-18
- 1974 Gibson SG
Pedals
- Hologram Electronics Microcosm
- Strymon El Capistan
- Line 6 DL4 Mark II
Once Tyler signed to the stalwart indie-rock label Merge, the guitarist released a string of warmly received electro-acoustic albums: Impossible Truth (2013), Deseret Canyon (2015) and Modern Country (2016). There was also a marvel of a solo performance at Nashville’s Third Man Records released as an LP in the “Live at Third Man” series. A few years later came the album Goes West, its title alluding to a pre-pandemic move to Los Angeles, and its arrangements flecked with atmospheric swirls and sunny, almost pop-like touches. Tyler also created an aptly rustic score for First Cow, director Kelly Reichardt’s 2019 art house Western, and the guitarist capped his Merge run in 2023 with Secret Stratosphere, a live album of soaring full-band versions of numbers from his back catalog, credited to William Tyler’s Impossible Truth.
“I wanted to reinvent myself for myself, to explore fresh possibilities, even with the guitar as my primary tool.”
Tyler has released covers of such disparate artists as Alex Chilton, Michael Chapman, Fleetwood Mac, Yo La Tengo and Neu!/Harmonia’s Michael Rother, not to mention classical composers Handel and Dvorák. The broad listening palette suggested by these choices always pointed toward a more intrepid path. But the album that most presaged the spirit of Time Indefinite is New Vanitas, a small masterpiece of pandemic creation that found him threading beautiful, involved guitar melodies through hypnagogic soundscapes, often haunted by lo-fi snatches of radio broadcasts and sotto-voce dialogue, as on the evocatively titled “Slow Night’s Static.” New Vanitas even includes a woozy track called “Time Indefinite,” the foreshadowing title a favorite that he borrowed from a film by documentarian Ross McElwee.
On Time Indefinite, Tyler says, “I was drawn to more ambient music, including by guitarists like Christian Fennesz and Norman Westberg, but also groups like Stars of the Lid and Boards of Canada.”
Another signpost on Tyler’s new road was a collaboration with Four Tet’s Kieran Hebden that yielded the folktronica single “Darkness, Darkness.” Then last year brought the standalone track “Flight Final,” Tyler’s first release for the artist-led imprint Psychic Hotline, and a slice of musique concrète that brings to mind Brian Eno’s association with German “kosmische” pioneers Harmonia and Cluster. That recording, the first fruit of an association with collaborator and co-producer Jake Davis, set the stage for their work together on Time Indefinite. Most of the pieces on this album, whether blown-out lullabies or spectral hymns or folk-art abstractions, feel like memories refracted in a dream diary.
“The process of working on this album helped me get better at tempo, just feeling more comfortable playing slower.”
“The new album started out as a series of experiments, without necessarily thinking that they were going to make for a whole record—though, eventually, Jake and I heard a thematic coherence to what we were coming up with,” Tyler explains. “It took a long while to come together, but the roots of the music are in the Covid lockdown. The emotional landscape of that time changed the things I was listening to as well as the music that was coming out of me. I was drawn to more ambient music, including by guitarists like Christian Fennesz and Norman Westberg, but also groups like Stars of the Lid and Boards of Canada. I had gone back to Nashville and was dealing with a problematic mental state. Among other issues, I can tend to approach things too fast, spiritually, emotionally, and physically. Beyond using different recording techniques and learning new ways of creating a piece of music, the process of working on this album helped me get better at tempo, just feeling more comfortable playing slower.”
The guitars Tyler used in the studio for Time Indefinite were his “family heirloom” Martin D-18 and a beloved Gibson SG, both of which are his main live instruments. For effects pedals, he favored a Hologram Electronics Microcosm (“for low-pass filter looping and really weird granular stuff”) and a Strymon El Capistan (“for delays kind of like the old Electro-Harmonix Memory Man”), though Davis also did a lot of processing with an array of his own. One serendipitous piece of gear was a 1959 Webcor Regent reel-to-reel machine deck that Tyler liberated, still new in the box, while helping to clear out his grandfather’s storage space in Mississippi. Davis was inspired to make old-school tape loops with it, including that startling sound that opens the album. Tyler would play arrhythmic, asymmetrical parts that Davis would record and chop up for the loops.
Tyler at this year’s Big Ears Festival with Jake Davis and Cecilia Stair.
Photo by Ross Bustin
Tyler’s recent spate of collaborations, from Davis and Four Tet to pedal-steel guitarist Luke Schneider, “has kept me on my toes, challenged me and recharged me,” he says. “The insularity of being a solo instrumentalist and writing everything by yourself can be freeing at first. And it can be motivating, as when I first started learning how to play fingerstyle guitar, with all the practicing. But I don’t like the isolation of it now. These days, I prefer working with other people. It pushes you into other genres, those different modes of communication.”
Another recent colleague, Marisa Anderson, has credited Tyler for his open, venturesome spirit as a studio partner, with his default attitude of “yes” when they were making their absorbing duo album, Lost Futures. “That was something I really enjoyed about playing with William—he was up for everything,” she said. “I was like, ‘There’s the diving board,’ and he’d say, ‘Let’s go.’”
“These days, I prefer working with other people. It pushes you into other genres, those different modes of communication.”
Tyler is quick to credit artists and albums that have inspired him. Along with the aforementioned players, he namechecks a vast range of others, from Jimmy Page to Jeff Parker, Bill Frisell to Fred Frith, Bruce Langhorne to Nels Cline, William Ackerman to Sandy Bull. Tyler muses about how some of his Nashville session heroes should “have gotten weirder…. I wish Chet Atkins had dropped acid, listened to a Sonny Sharrock LP, and made his own noise record, you know?” Regarding his touchstones for sonic left turns, he points to Wilco’s Yankee Hotel Foxtrot, as well as Talk Talk’s emotive, avant-minded swansongs Spirit of Eden and Laughingstock.
“Those two Talk Talk albums are beyond masterpieces, with some great guitar playing,” Tyler says. “They were in essence made by an artist, Mark Hollis, who did not care about being commercial anymore and certainly not about being able to replicate the stuff live. When Jake and I were recording ‘Howling at the Second Moon,’ that sort of attitude was a reference point, kind of like, ‘Well, instead of trying to get away from the lo-fi weirdness of my original iPhone demo, why don’t we lean into it?’”
Ever thoughtful and candid in conversation, Tyler has been exceptionally transparent about coping with personal loss and midlife crises, as well as going to rehab for the over-indulgence of alcohol. Knowing that, one can hear grief and anxiety in the whorls of Time Indefinite, with the passages of guileless 6-string representing a nostalgia for less complicated times. “It’s a mental landscape record for sure,” he says. “For fans of my previous albums, it might not hit the same way, I realize. But I hope this record says to people that it’s all right to take chances with how you express yourself, with how naked and raw that can be. It has a purposeful arc and is meant to prompt things that aren’t super fashionable in today’s ephemeral, constant-content culture, like deep listening, emotional ambiguity, self-reflection, you know?”YouTube It
This three-song set from last year showcases the expansive cosmic country sound of Tyler and his Impossible Truth band, which includes a Kraftwerk cover.
PG contributor Tom Butwin profiles three versatile - and affordable - acoustic guitars from Cort, Epiphone, and Gold Tone. These classic designs and appointments offer pro-level sound for an accessible price.
Cort Essence Series ES-GA4 Grand Auditorium Cutaway Acoustic Electric Guitar, Natural Semi Gloss (GA4NSG)
Epiphone Slash J-45 Acoustic Guitar - November Burst
The classic J-45 has been the choice of legendary musicians ever since it was first introduced in 1942. Known as The Workhorse, it is Gibson's most famous and most popular acoustic guitar model. Now Epiphone has released a new Inspired by Gibson"' J-45"' with all of the features players want, including all solid wood construction, a comfortable rounded C neck profile, 20 medium jumbo frets, the 60s style Kalamazoo headstock shape and a gorgeous Aged Vintage Sunburst finish. The Fishman® Sonicore under-saddle pickup and Sonitone preamp make this Workhorse stage-ready too. Optional hardshell or Epilite"' case available separately. A battery is not included. To power your pickup, you will need a 9-volt battery.
Gold Tone The Bell Acoustic-electric Guitar - Natural
Gold Tone’s Festival Series: The Bell stands out by blending classic craftsmanship with stage-ready versatility. Its all-solid wood construction—featuring a Sitka spruce top and mahogany back and sides—produces a rich, balanced tone that shines in any setting. The slope-shoulder design offers both comfort and clarity, perfect for fingerstyle or strumming. With a slim "D" neck, Fishman electronics, Grover tuners, and D’Addario strings, The Bell is crafted for players who demand tone, playability, and reliable performance—on stage or in the studio.
Tom Bedell in the Relic Music acoustic room, holding a custom Seed to Song Parlor with a stunning ocean sinker redwood top and milagro Brazilian rosewood back and sides.
As head of Breedlove and Bedell Guitars, he’s championed sustainability and environmental causes—and he wants to tell you about it.
As the owner of the Breedlove and Bedell guitar companies, Tom Bedell has been a passionate advocate for sustainable practices in acoustic guitar manufacturing. Listening to him talk, it’s clear that the preservation of the Earth’s forests are just as important to Bedell as the sound of his guitars. You’ll know just how big of a statement that is if you’ve ever had the opportunity to spend time with one of his excellently crafted high-end acoustics, which are among the finest you’ll find. Over the course of his career, Bedell has championed the use of alternative tonewoods and traveled the world to get a firsthand look at his wood sources and their harvesting practices. When you buy a Bedell, you can rest assured that no clear-cut woods were used.
A born storyteller, Bedell doesn’t keep his passion to himself. On Friday, May 12, at New Jersey boutique guitar outpost Relic Music, Bedell shared some of the stories he’s collected during his life and travels as part of a three-city clinic trip. At Relic—and stops at Crossroads Guitar and Art in Gilbertsville, Pennsylvania, and Chuck Levin’s Washington Music Center in Wheaton, Maryland—he discussed his guitars and what makes them so special, why sustainability is such an important cause, and how he’s putting it into practice.
Before his talk, we sat in Relic’s cozy, plush acoustic room, surrounded by a host of high-end instruments. We took a look at a few of the store’s house-spec’d Bedell parlors while we chatted.
“The story of this guitar is the story of the world,” Bedell explained to me, holding a Seed to Song Parlor. He painted a picture of a milagro tree growing on a hillside in northeastern Brazil some 500 years ago, deprived of water and growing in stressful conditions during its early life. That tree was eventually harvested, and in the 1950s, it was shipped to Spain by a company that specialized in church ornaments. They recognized this unique specimen and set it aside until it was imported to the U.S. and reached Oregon. Now, it makes the back and sides of this unique guitar.
A Bedell Fireside Parlor with a buckskin redwood top and cocobolo back and sides.
As for the ocean sinker redwood top, “I’m gonna make up the story,” Bedell said, as he approximated the life cycle of the tree, which floated in the ocean, soaking up minerals for years and years, and washed ashore on northern Oregon’s Manzanita Beach. The two woods were paired and built into a small run of exquisitely outfitted guitars using the Bedell/Breedlove Sound Optimization process—in which the building team fine-tunes each instrument’s voice by hand-shaping individual braces to target resonant frequencies using acoustic analysis—and Bedell and his team fell in love.
Playing it while we spoke, I was smitten by this guitar’s warm, responsive tone and even articulation and attack across the fretboard; it strikes a perfect tonal balance between a tight low-end and bright top, with a wide dynamic range that made it sympathetic to anything I offered. And as I swapped guitars, whether picking up a Fireside Parlor with a buckskin redwood top and cocobolo back and sides or one with an Adirondack spruce top and Brazilian rosewood back and sides, the character and the elements of each instrument changed, but that perfect balance remained. Each of these acoustics—and of any Bedell I’ve had the pleasure to play—delivers their own experiential thumbprint.
Rosette and inlay detail on an Adirondack spruce top.
Ultimately, that’s what brought Bedell out to the East Coast on this short tour. “We have a totally different philosophy about how we approach guitar-building,” Bedell effused. “There are a lot of individuals who build maybe 12 guitars a year, who do some of the things that we do, but there’s nobody on a production level.” And he wants to spread that gospel.
“We want to reach people who really want something special,” he continued, pointing out that for the Bedell line, the company specifically wants to work with shops like Relic and the other stores he’s visited, “who have a clientele that says I want the best guitar I can possibly have, and they carry enough variety that we can give them that.”
A Fireside Parlor with a Western red cedar top and Brazilian rosewood back and sides.
A beautifully realized mashup of two iconic guitars.
Reader: Ward Powell
Hometown: Ontario, Canada
Guitar: ES-339 Junior
I’ve always liked unusual guitars. I think it started when I got my first guitar way back in 1976. I bought a '73 Telecaster Deluxe for $200 with money I saved from delivering newspapers.
I really got serious about playing in 1978, the same year the first Van Halen album was released. Eddie Van Halen was a huge influence on me, including how he built and modded guitars. Inspired by Eddie, I basically butchered that Tele. But keep in mind, there was once a time when every vintage guitar was just a used guitar—I still have that Tele, by the way.
I never lost that spirit of wanting guitars that were unique, and have built and modded a few dozen guitars since. When I started G.A.S.-ing simultaneously for a Les Paul Junior and a Casino, I came up with this concept. I found an Epiphone ES-339 locally at a great price. It already had upgraded CTS pots, Kluson tuners, and the frets had been PLEK’d. It even came with a hardshell case. It was cheap because it was a right-handed guitar that had been converted to left handed and all the controls had been moved to the opposite side, so it had five additional holes in the top.
Fortunately, I found a Duesenberg wraparound bridge that used the same post spacing as a Tune-o-matic. I used plug cutters to cut plugs out of baltic birch plywood to fill the 12 holes in the laminated top. I also reshaped the old-style Epiphone headstock. Then, I sanded off the original finish, taped the fretboard, and sprayed the finish using cans of nitro lacquer from Oxford Guitar Supply. Lots of wet sanding and buffing later, the finish was done.
I installed threaded insert bushings for the bridge, so it will never pull out. The pickup is a Mojotone Quiet Coil P-90 and I fabricated a shim from a DIY mold and tinted epoxy to raise the P-90 up closer to the strings. The shim also covers the original humbucker opening. I cut a pickguard out of a blank and heated it slightly to bend it to follow the curvature of the top.
All in all, I'm pretty happy how it turned out! It plays great and sounds even better. And I have something that is unique: an ES-339 Junior.