Luthier Dave Helmer shows you how to cure buzzy strings, bad intonation, gnarly frets, high action, and other common troubles with off-the-shelf axes.
Guitars are the best. We love them. It’s fun to fall in love with a guitar at a store, buy it, and proudly bring it home. But we’ve all been there … where after a month that new guitar is just not playing as good as it was before. As guitar players, we know what feels good and what feels bad when it comes to playability. Maybe you have setup preferences that you like on all your guitars, or maybe you want to experiment with changes to your setup?
With a few tools, you can perform a handful of tasks that will make your new axe play better and stay in tune. This article is for folks who already know how to tighten loose parts, raise and lower string saddles or bridges, and adjust their truss rods—though I’ll share a tip on how to check it with even more accuracy.
Is that big bulky stock nut uncomfortable on your hand? Let’s trim it down and reshape it. If the action feels high and the neck looks straight, I’ll show you how to lower the action. And haven’t we all swapped out pickups and wondered, “Do they really sound better, or do I think that just because they’re new?” Before you swap your pickups, I’ll share some pickup-height measurements that might make you change your mind.
But wait! There’s more. With everything feeling and playing great, does moving into the upper register start to sound out of tune? Intonation is very easy to check and adjust. When you go to vibrato or hold a note, do the frets feel “sandy”? Are the fret ends rubbing against your hand while you play? Let’s flush and polish those up.
To be clear, we’re not swapping out anything on your new guitar: We’re simply refining the setup. Be sure to go online to see eight videos I made showing various processes covered in this story.
Begin the Beguine
There is an order of operations for best results. Neck relief is the first item to dial in, followed by getting the nut slots cut to the proper depth. After that, setting your string and pickup heights is in order. The final step is setting intonation.
Fret polishing is its own event and can happen anytime between string changes. Getting the frets feeling comfortable and well-polished will take some time and attention. You’ll also need some specialized tools as well as some that can be found in most households. Check the box for my list.
Tools You’ll Need
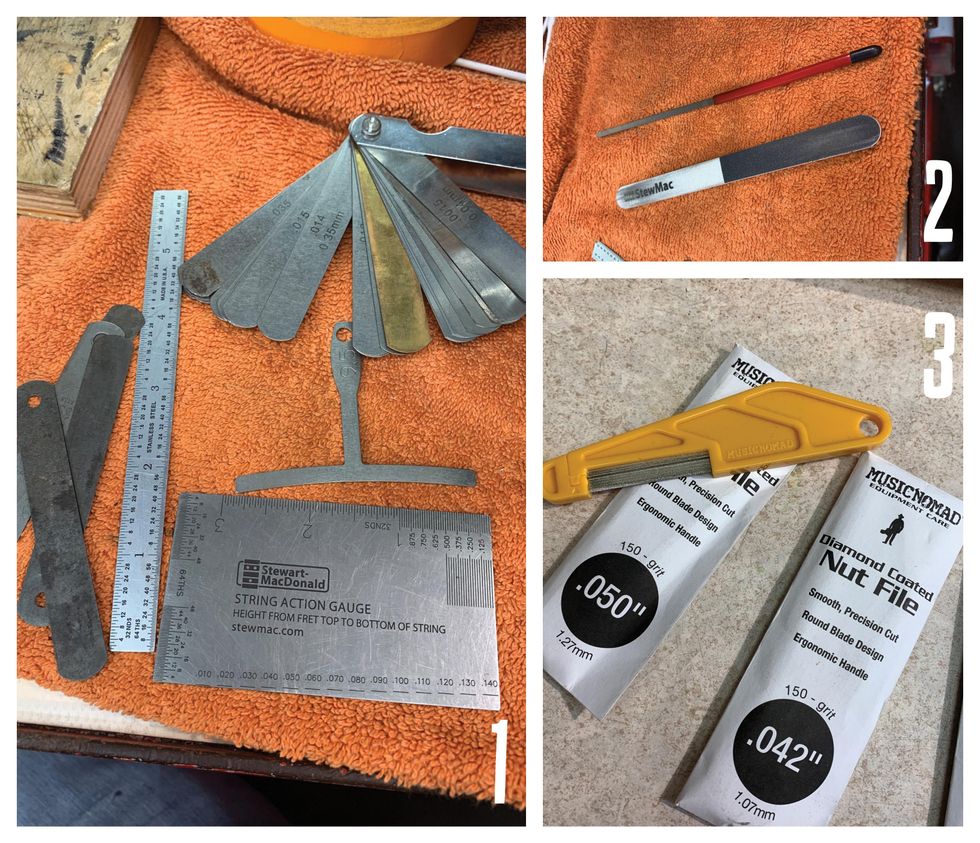
All of the specialized tools in this list are available through online suppliers, including StewMac and Amazon.
- 6" Ruler with measures in 64ths
- String action gauge [Photo 1]
- Miscellaneous screwdrivers
- Allen wrenches
- Radius blocks
- Understring radius gauges (with the radius on the bottom and the top)
- Fret-end dressing file
- Micro-Mesh sticks [Photo 2]
- Tape (low tack)
- Cotton swabs
- Paper towels (blue shop towels preferred)
- Clean cotton rags
- Nut files [Photo 3]
- Stikit sandpaper
- Tri-Flow lubricant
- Capo
- Feeler gauges
- Simichrome polish
Polishing the Frets
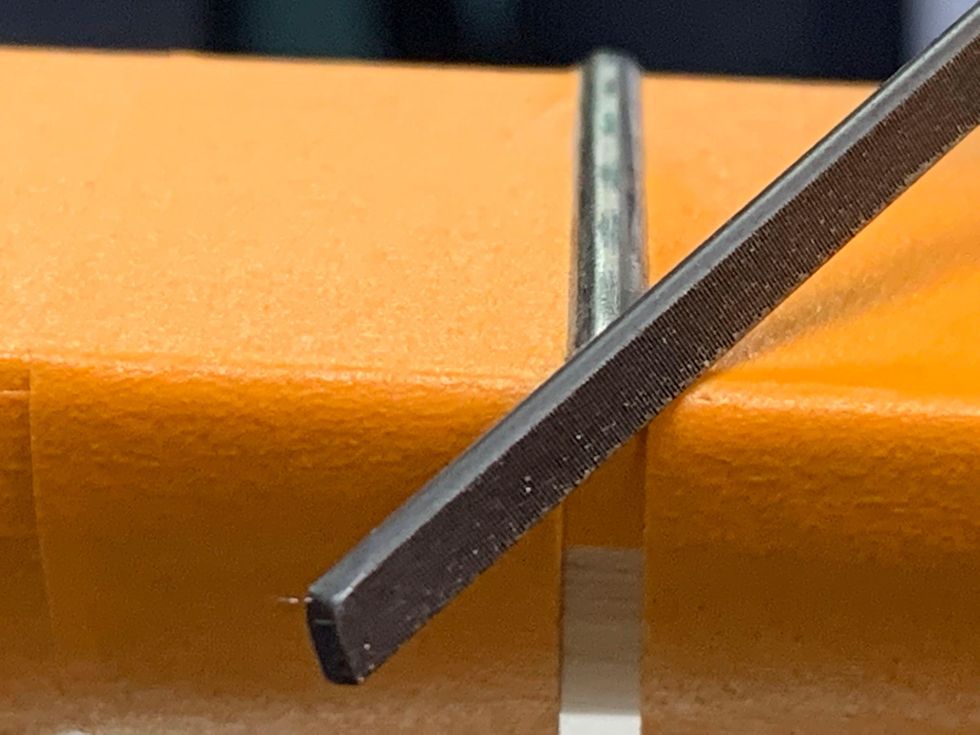
Photo 4
Let’s start with the most Zen of these tasks: fret polishing.
Tape off the fretboard using low-tack tape, exposing only the frets. De-tack each piece of tape on your clothing or maybe a rag—I use my jeans or my sweatshirt. Making it less sticky helps prevent pulling finish off a maple fretboard or the neck. Taping the fretboard also prevents putting any cross-grain scratches into it while you file and polish. You can choose to tape off the entire fretboard or work your way down one fret at a time. Dealer’s choice.
One thing to note about tape, any tape: Even when you de-tack it, you do not want to leave it on overnight. If that happens, rub the tape with your finger, which will break the surface tension. Then carefully pull the tape off from a corner, making sure you’re pulling it off at an angle and not at a straight line with the fretboard edge.
Every fret end has a small burr on the corner from the initial fret job. The fret-end dressing file has a non-marring smooth side for rounding the fret end, and a safe square edge for getting into the corner of the fret end. So, take the fret-end dressing file, use the squared off-side, and file both corners of the fret end [Photo 4].
How to Polish Frets
Here’s how easy it is to polish and smooth frets.
One or two strokes is all you’ll need. Then, using the non-marring side of the file, slightly round off the fret ends.
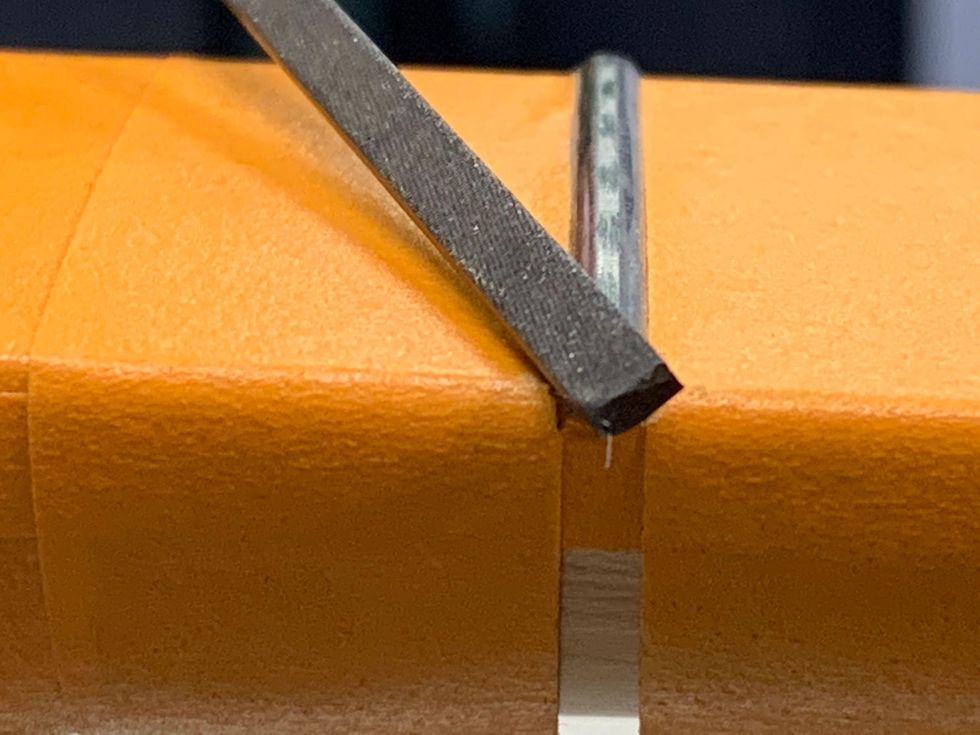
Photo 5
With the file positioned vertically, file downward to make the fret end flush with the edge of the fretboard.
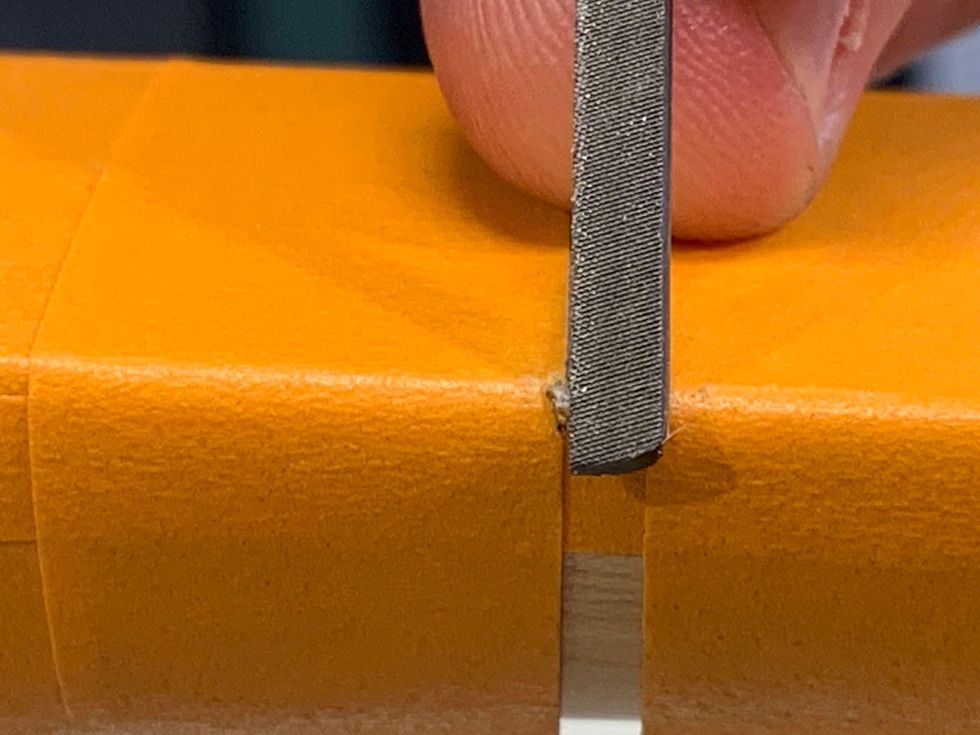
Photo 6
For a nice, rounded-off look, polish the frets using the same rounding motion from the previous step, working through all three grits of the Micro-Mesh stick.
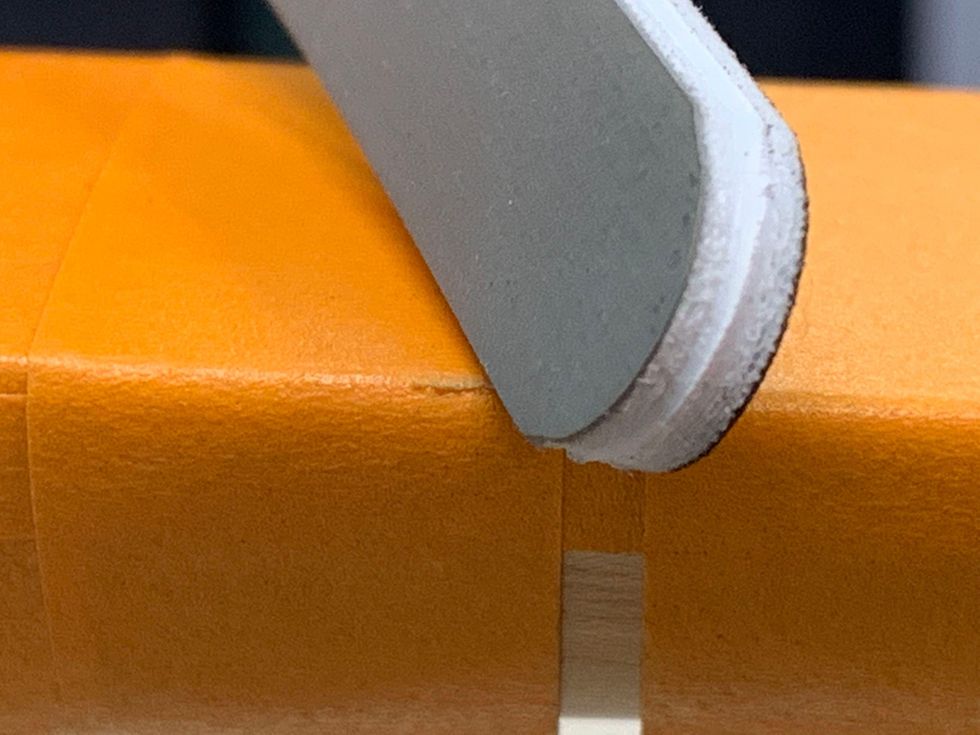
Photo 7
Then, polish both the sides and the top of the frets.
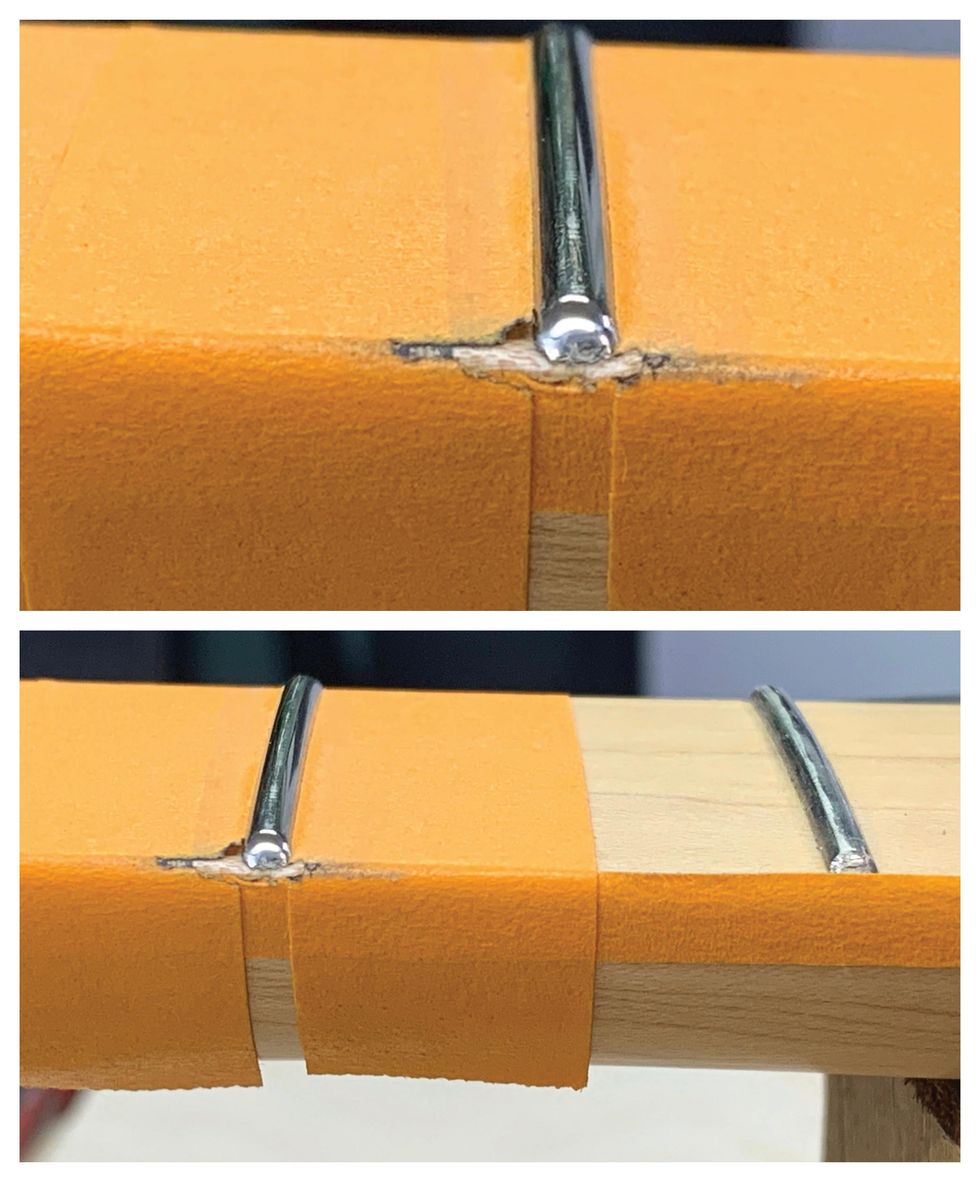
Photos 8 (top) & 9 (bottom)
Using a soft cloth and Simichrome, buff every fret. This will give you a great shine and help prevent oxidation. Now it’s time to remove the tape and condition the fingerboard if it needs it.
Note: Every fret has two fret ends to clean up and polish along with the fret itself. This is a fair amount of handwork. If you’ve never done it, you will get tired and need a break. Take that break. Take multiple breaks. Let the process take however long it requires without rushing. If you’re new, do all the fret polishing over a weekend or a few days. It should be fun, not painful. If it is difficult, call your local luthier and hire them to do it for you.
Adjusting Neck Relief
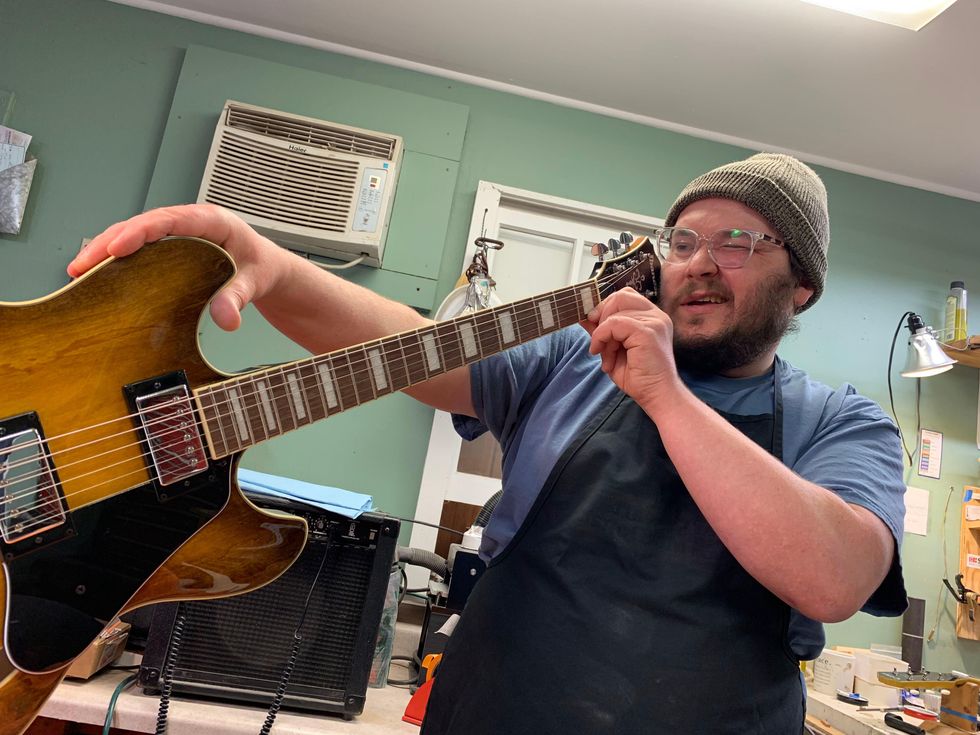
Photo 10
Neck relief refers to the slight amount of concave bowing intentionally created in the neck of a guitar or bass by adjusting the truss rod. For the safety of the guitar, be sure to slack the strings before doing any adjustments to the truss rod. Neither you nor your guitar needs to be tense during this process.
Before whipping out an Allen wrench for the truss rod, start by sight-checking the neck’s straightness. You can sight the neck with the guitar on its back, but I like to put it on edge and look at it that way. It’s easier to see how much curve there is when the guitar is on its side. I feel like gravity plays tricks on my eyes when I sight the neck with the guitar on its back. When I play the guitar, it’s on its side anyway, so looking at it from this vantage point is best.
Tune the guitar to pitch, put a capo on the first fret, and press fret 15 with your left hand.
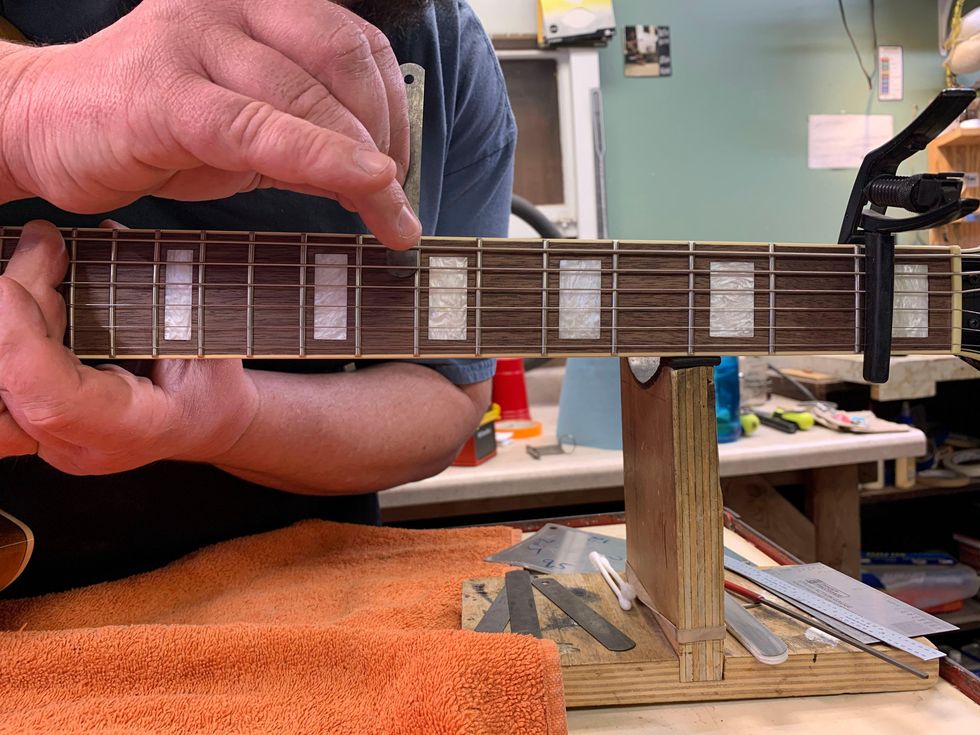
Photo 11
With your right hand, take a feeler gauge and check the gap at frets 7 through 9 (left-handed players, flip your hands around) [Photo 11].
From the top of the fret to the bottom of the string, the gap is usually anywhere from .003" to .012", depending on the feel you are going for. The feeler gauge should fit just between the top of the fret and the bottom of the string. The string shouldn’t move. This will tell you how much “relief” is in the neck. If you find this challenging, keep going—this will take some practice.
When dialing in the relief, I go back and forth between adjusting the truss rod and the string action. Getting the strings low and playing clean on a budget axe can be a challenge. Usually the fretwork isn’t that great, and in the upper register the frets can be unlevel, causing buzzes and clanks. If you need to raise the string action to get the notes to play clean, some fret leveling may be in order. (For more on fret leveling, go online to our article “About Fret Leveling,” from the December 2007 issue.) For good energy transfer, the neck should be as straight as possible. If the neck is straight and the frets are not level, the strings will buzz with low action.
In general, the flatter the radius on the fretboard, the straighter you can get the neck with the truss rod adjustment. On a fretboard with a 12" radius, you should be able to get .005" relief, and on a vintage 7.25" radius board you may need as much as .014" relief. The only way to get better at checking and setting relief is practice.
Refining the Nut
String buzzes, pinging noises when you tune, strings sticking in the slots, and too much string motion in the nut slots are all indicators of trouble. Before getting out the sandpaper and Micro-Mesh sticks, be sure you know if your guitar’s nut is TUSQ or bone. TUSQ is softer, so you should leave TUSQ nut slots a little higher. This leaves room for the TUSQ to wear without causing buzzing on the first fret. With bone, you can cut the slots lower, because it holds up to string wear.
How to Shape Your Guitar's Nut
Watch as Dave Helmer sands down the back half of a nut and creates a smooth finish.
The back side of the nut is usually very bulky and could often stand to lose some material to be more comfortable on your hand. So, let’s start there. Tape off the neck and headstock around the nut using a few layers of tape to protect the headstock face and fretboard. Then, slack the strings and pull them to either side of the nut.
Sand a bevel into the backside—the side closest to the headstock—of the nut using P320 and P400 grit Stikit sandpaper on a flat sanding stick.
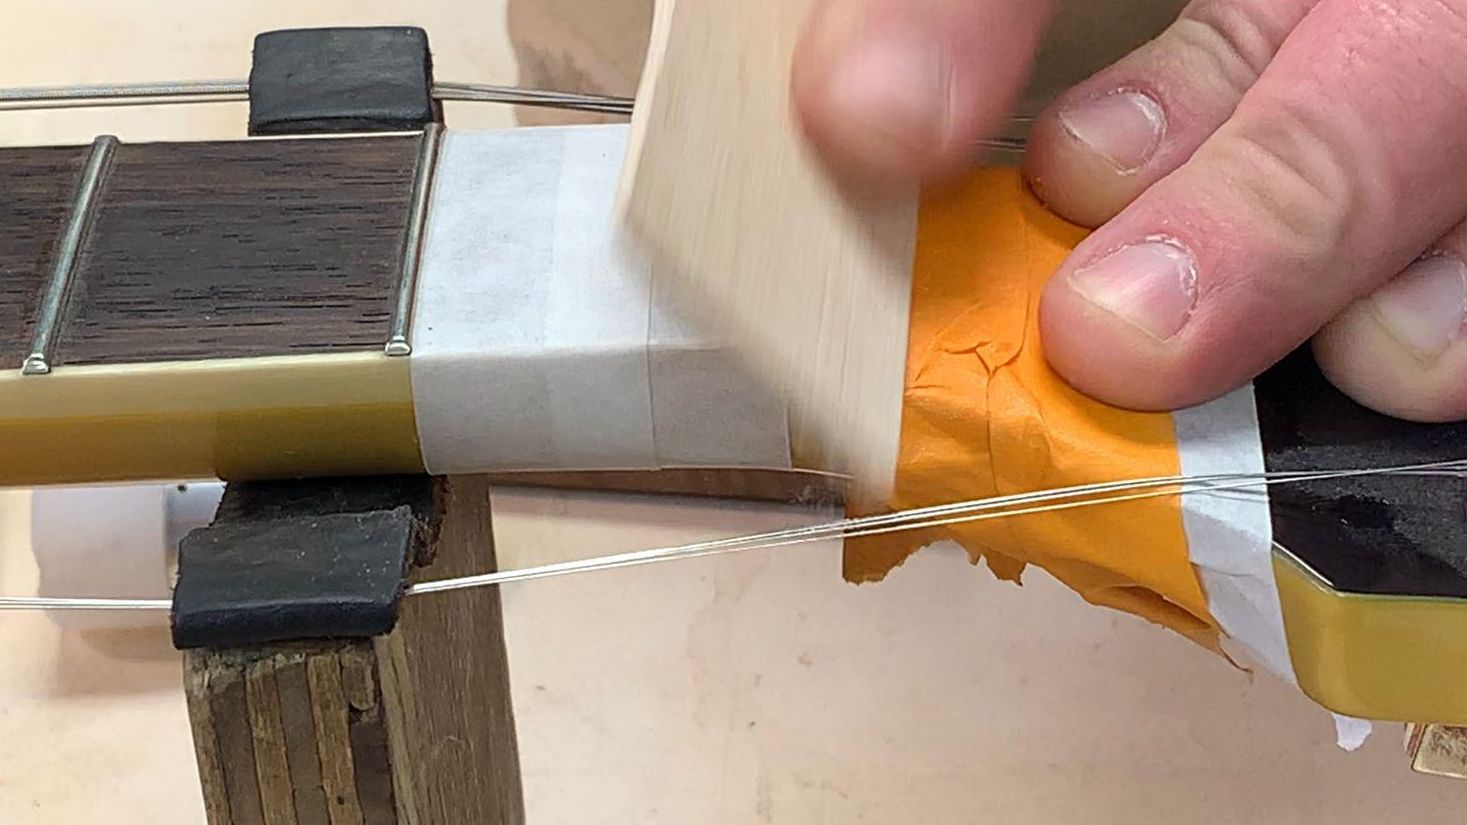
Photo 12
The bevel should start at the back of the nut and come forward about one-third to one-half the thickness of the nut [Photo 12]. Use P320 for most of the sanding and switch to P400 for the last 5 to 10 strokes.
Next, take a fresh Micro-Mesh stick and work through the various grits to buff/round over the bevel you’ve sanded into back of the nut, so it looks and feels good.
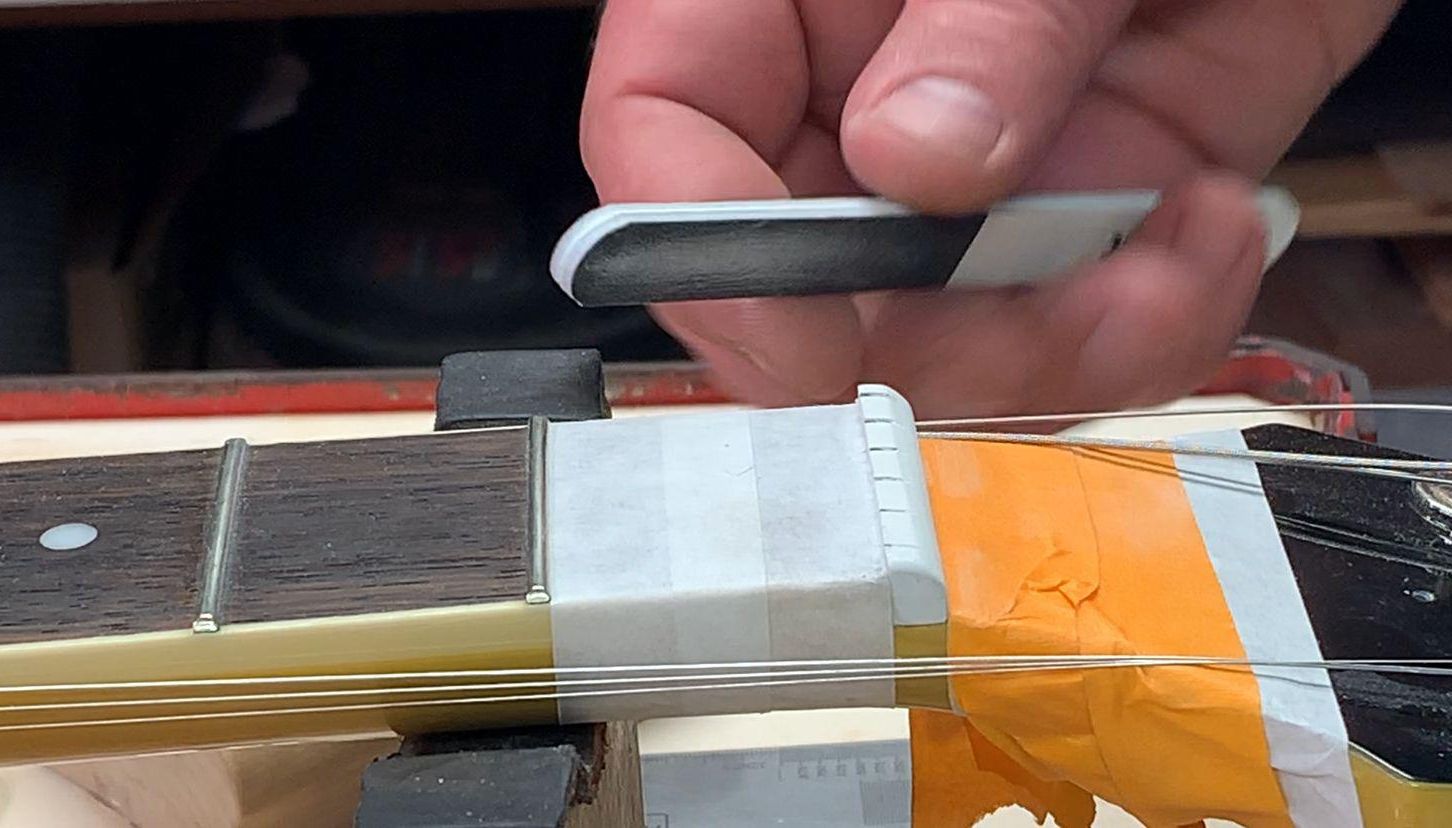
Photo 13
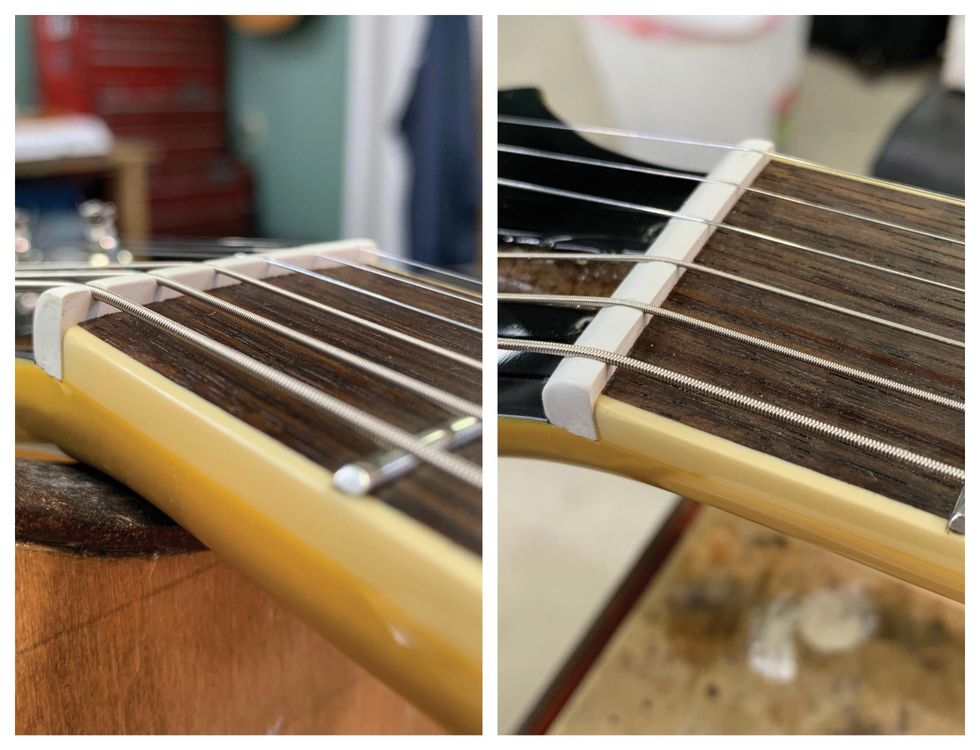
TUSQ nuts are often tall, and the strings sit deep in the slots.
Photos 14 (left) & 15 (right)
Wound strings require 50 percent of the diameter of the string to sit in the nut slot, with the other 50 percent above the top of the nut surface. The plain strings should be flush with the top of the nut. Take a look at the wrong appearance [Photo 14] and the correct look [Photo 15] for properly seated strings.
How to Sand Your Guitar's Nut
Our luthier shows you how to use a radius block and sand down a nut.
Use a radius block that matches the radius of your fretboard.
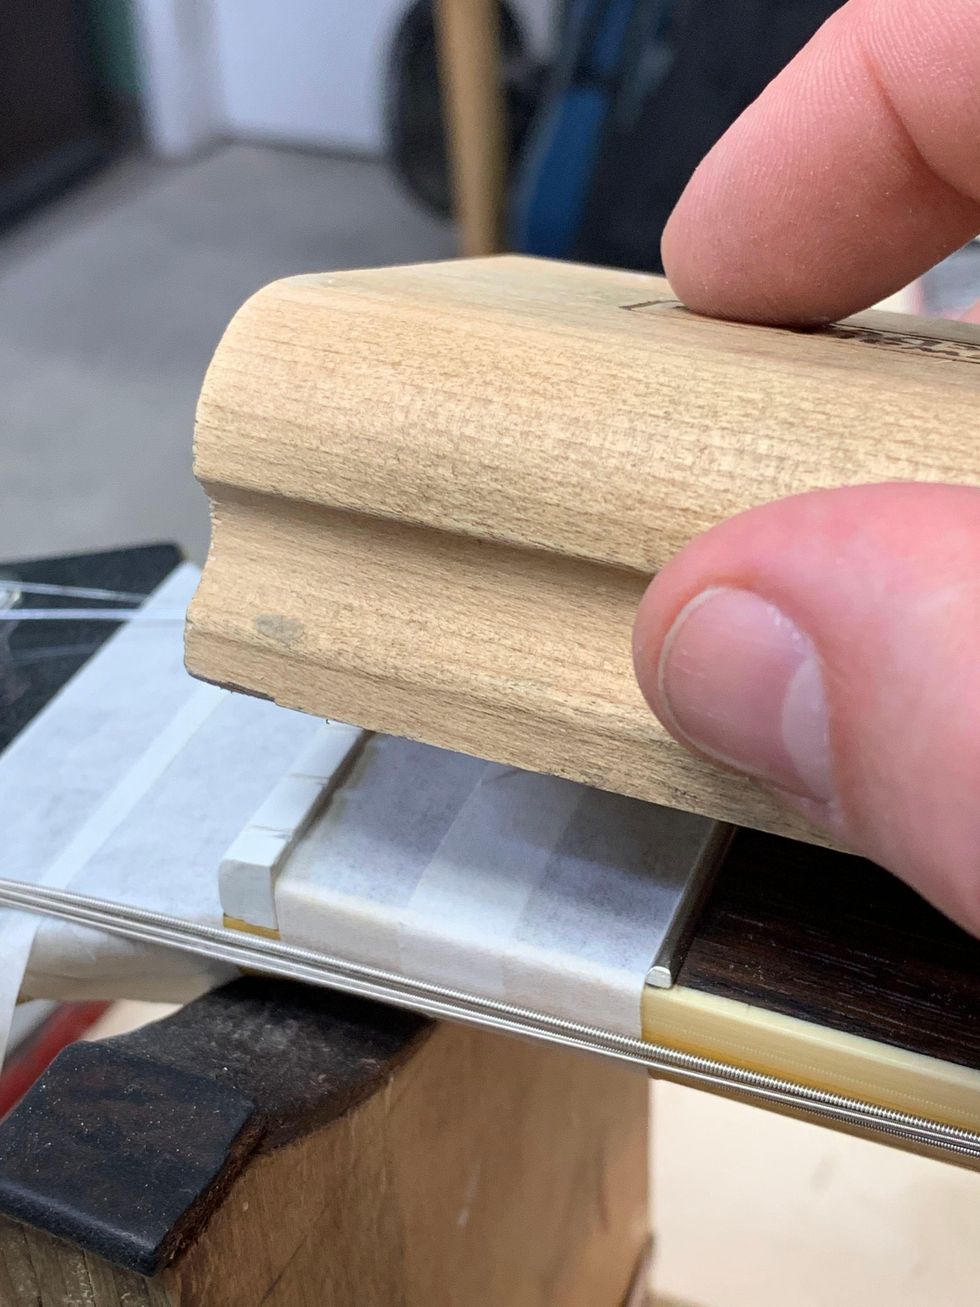
Photo 16
With P320 and P400 grit Stikit sandpapers, use mild pressure to sand down the top of the nut. Sand a bit and check your progress by setting the strings in the slots and putting a little tension on them. Tuning to pitch isn’t necessary. Use the P320 for most of the sanding, and switch to P400 when you are close to the 50/50 height for the wound strings. The radius block sanding will leave a flat, sharp edge on each side of the TUSQ nut [Photo 16]. To round over the sharp edge, use the sanding block and Micro-Mesh stick.
Use the coarse grit of a Micro-Mesh stick to round over and blend the bevel from the back into the top of the nut. Work through the grit gauges until it’s smooth. There is a fine balance between the bevel at the back of the nut and the top radius of the nut. Go back and forth between the two steps to get a nice, finished look and a nut that functions at optimal levels.
… And Refining the Nut Slots
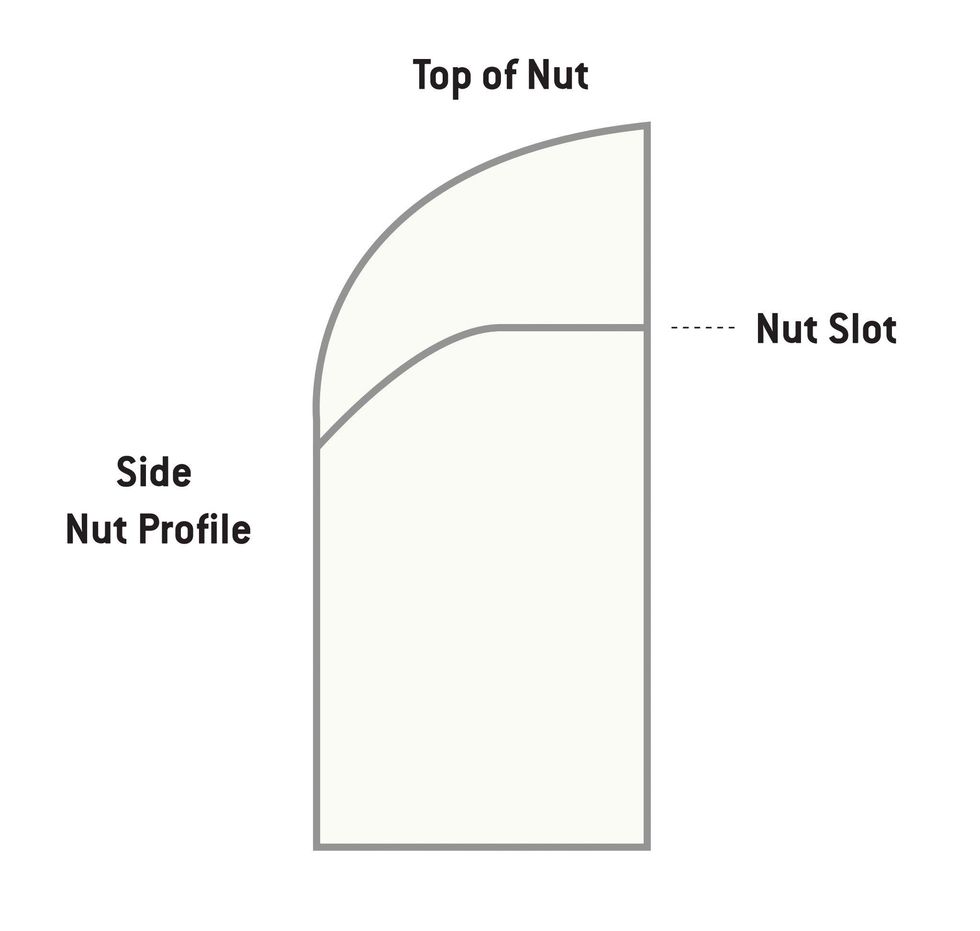
Photo 17
Nut height is the distance from the top of the first fret to the bottom of the string. A good height on the wound strings is about .020", and for the plain strings about .015". Measuring this gap with a feeler gauge can be tricky because of the fretboard radius. Many repair folks do this by eye and feel, based on experience. It takes some practice. A good check: At pitch, fret the third fret and check for a small gap between the string and the top of the first fret.
How to Widen Your Guitar's Nut Slots
A diamond file can make quick work of deepening and widening nut slots.
The bottom of the string should be sitting on the bottom of the front half of the nut slot [Photo 17]. File down each nut slot to its proper depth using the corresponding nut file. There are diamond nut files on the market in multiple sizes to accommodate many string gauges. Make sure to keep your strokes straight. The standard-toothed files have less sizes and usually require rolling them from side to side to get a well-fit string.
Next, using a proper-sized file, round over the bottom back half of the nut slots down, toward the face of the headstock and away from the strings. This will allow the strings to move freely during tuning or bending, while still having support from the front half of the slot.
How to File D and G String Slots on Guitar
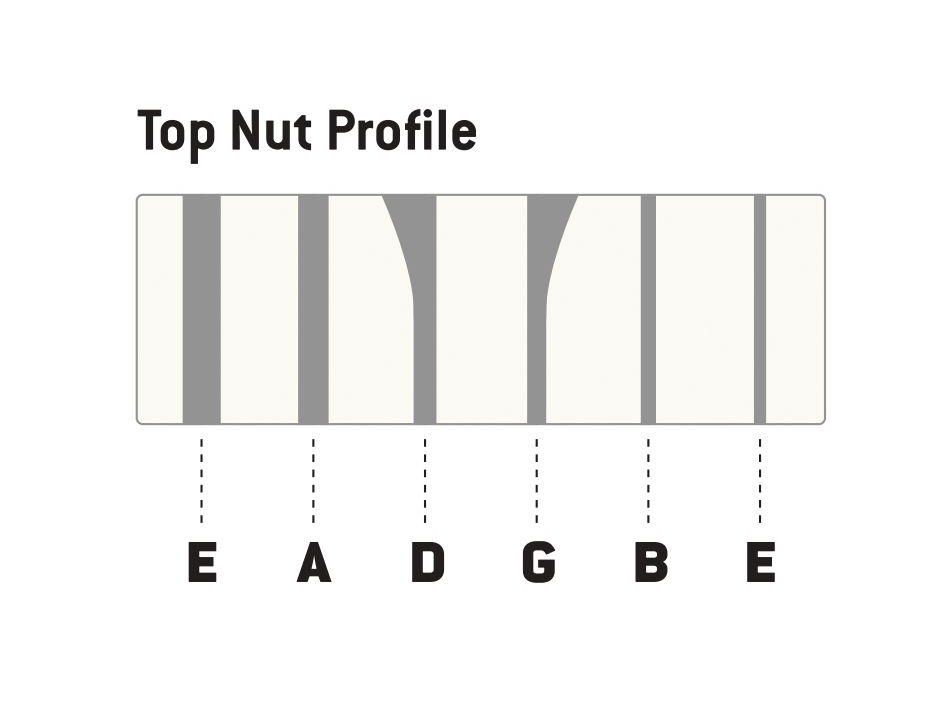
Photo 18
On guitars with 3x3 headstock configurations, the D and G strings need the back half of the slots feathered out away from the center, so the string has a direct path to the tuner post. Using a file that is one size bigger than the string and rolling it side to side on the back of the nut slot will give the string a straight path to the tuner post. Photo 18 is my illustration showing which slots need feathering.
Watch How to File D and G String Slots on Guitar
The D and G nut slots require special attention on 3x3-style headstock configurations.
Additionally, use pencil lead to lubricate the slots. Just get in there with the point of a pencil and mark the slot with its graphite. You might also put a drop of Tri-Flow on the front of the string tree. Tri-Flow will run down the string, so take a cotton swab or cloth to clean up any excess. Tri-Flow has Teflon in it, so you don’t need much.
Adjusting String Action
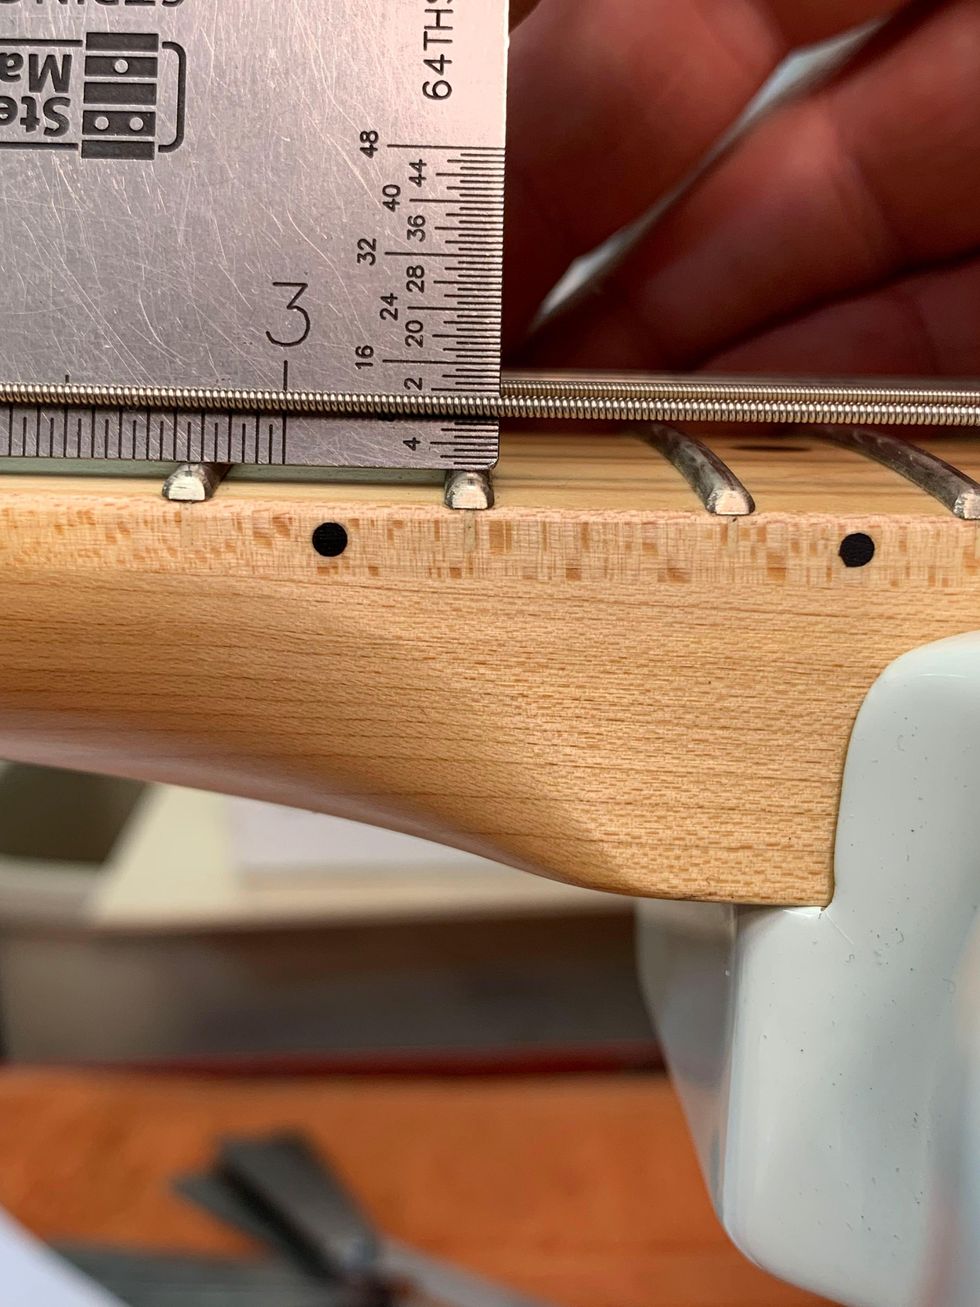
Photo 19
First, find your string height by measuring the string action at the 17th fret on a Fender-style guitar and at the 15th fret on a Gibson-style instrument.On electric guitars, action can range from 3/64" to 3/32", depending on the player’s comfort. My preferences are 1/16" on the treble side and 5/64"on the bass side on both Fender- and Gibson-style guitars measured at the appropriate fret.
How to Adjust Guitar Action
Here’s a look at how our author adjusts the action.
Always loosen the string tension before making action adjustments. This will save wear and tear on the small bridge components. Take either a 6" ruler or a string action gauge and set it on the frets. Measure from the top of the fret to the bottom of the string [Photo 19].
If the action is high, you will lower that string’s saddle or that side of the bridge. If it is low, you will raise it. Make sure the individual saddles are sitting square and upright to the face of the bridge. You do not want them sitting at an angle or leaning over. This will cause buzzing.
The bottom of the strings should match the radius of the fretboard when measured with an understring radius gauge.
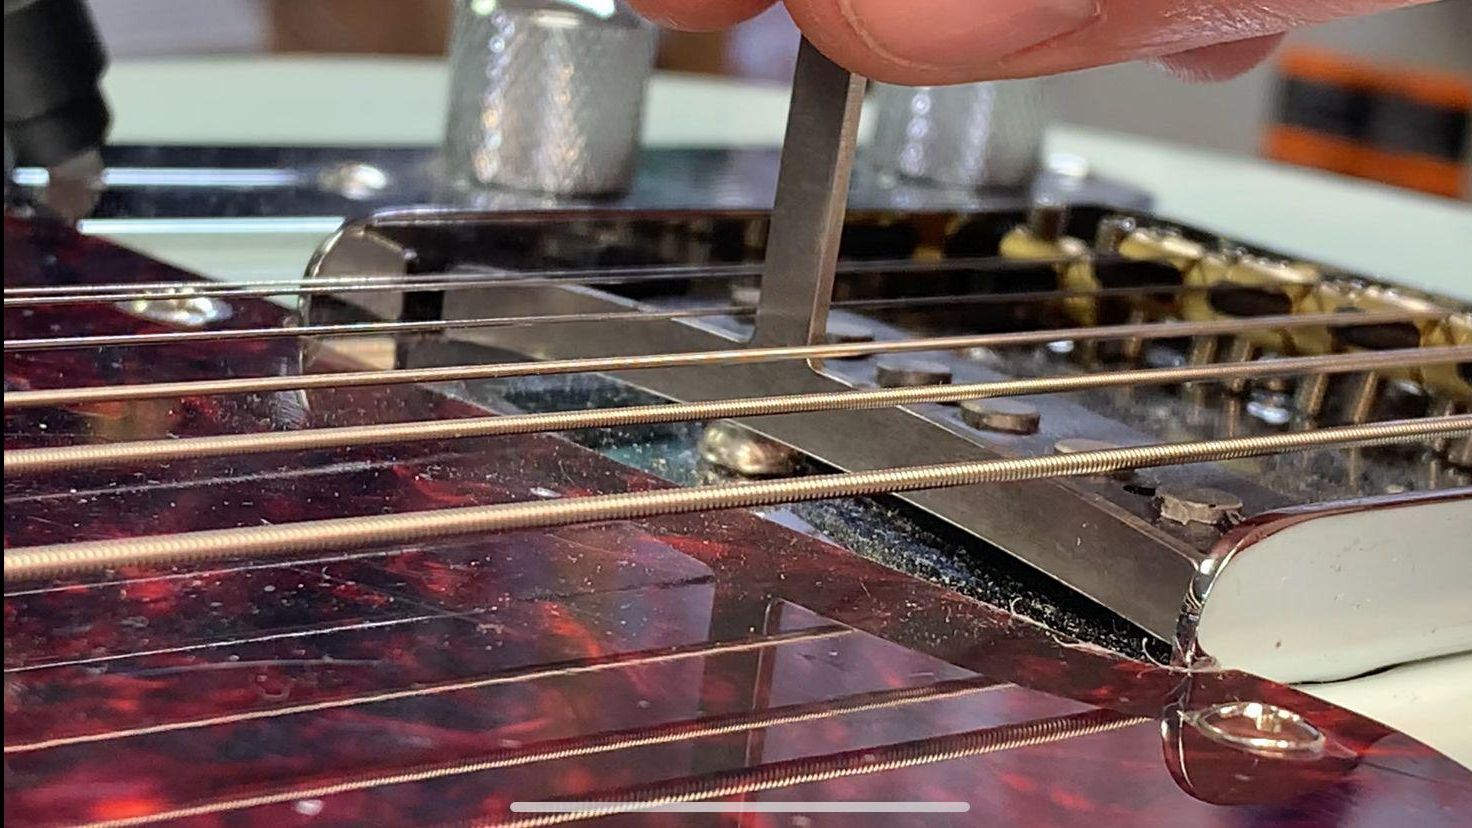
Photo 20
Start your adjustment with the outside strings, working toward the center. On Fender-style guitars, set the two outside strings to the height you want and have the middle four strings a bit higher than that. Bring the gauge up from underneath and just touch the two outside strings. Then, bring the strings down a little at a time until the radius matches.
On a Gibson-style Tune-o-matic, the saddles are not individually adjustable. So, if the radius doesn’t match, the saddles will need to be filed. To do this, I recommend using toothed nut files and a rolling side-to-side motion. Do a little work and check your progress. Remember to slack your strings when adjusting the saddle or bridge up or down.
Changing Pickup Height
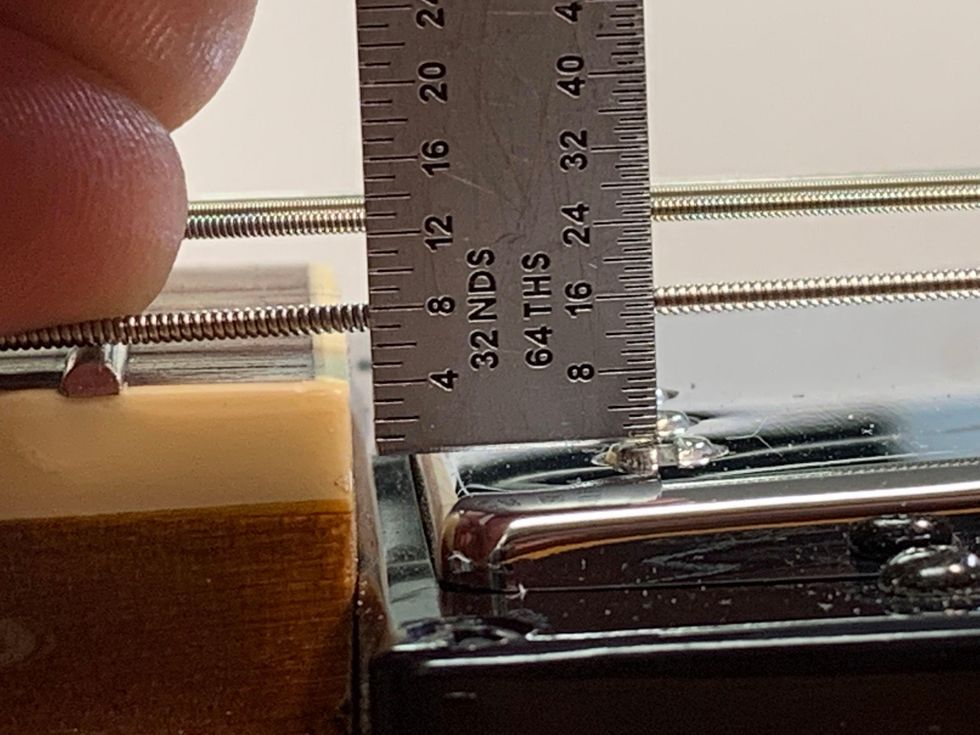
Photo 21
Finally, let’s take a look at pickup-height adjustment. First, to check pickup height, use the two outside strings again. Press the top wound string on the last fret and measure the distance from the top of the pole piece to the bottom of the string [Photo 21]. This distance can range from 3/64" to 1/8". My preferences are 1/16" on the treble side and 5/64" on the bass side.
Adjusting Guitar Pickup Height
Dave Helmer walks you through the process of adjusting the height of your guitar’s pickups.
On most styles of pickups, there are height adjustment screws on either side of the pickup to raise or lower it. The closer the pickup gets to the strings, the more present string frequencies become. If you get too close, the magnetic pull can affect the string’s vibration and you may hear some strange sounds as you go into the upper register.
On Strats, the neck pickup is regularly set too close, and at the 12th fret and above, the low E and A can sound choked, honky, and not clear. Lowering the neck pickup with a screwdriver usually solves this issue.
Setting Intonation
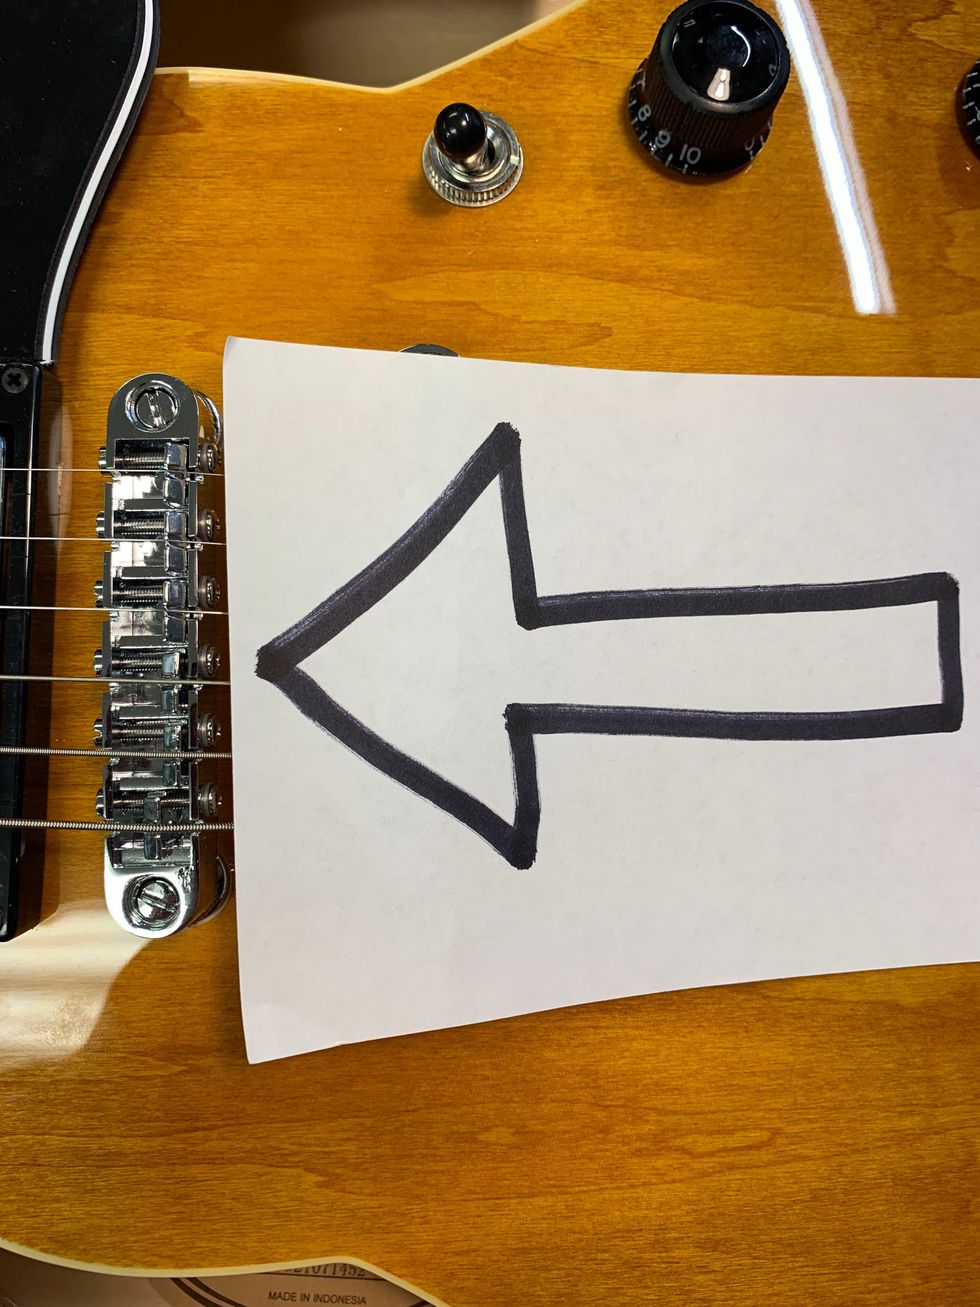
Photo 22
If you can’t get your guitar accurately in tune, you might need to check its intonation. Adjust all saddles as far back as possible so every string will play flat at the 12th fret. You will adjust the saddles forward, gradually making the octave play sharper until it’s in tune with the open string [Photo 22].
Adjust Your Guitar's Intonation
With a tuner and a screwdriver, Dave Helmer shows you how to adjust your guitar’s intonation.
Depending on your vibrato style, experiment with intonating the plain strings slightly flat. Use your ear and do what sounds good. Sometimes, the plain strings can have perfect intonation, but playing with vibrato can make them sound sharp.
To fine-tune intonation, the individual bridge saddles must be adjustable. Once the intonation is set, recheck the string radius using the understring radius gauge and adjust as needed. The radius can change as the saddles come forward during intonation.
Tri-Flow is great for lubricating saddle parts. Put a small drop on the saddle-height adjustment screws and capillary action will suck it in. Adjust the saddle up and down a few times to coat the threads. Clean up any excess with a cotton swab or cloth. Put a drop or two onto a cotton swab and apply the Tri-Flow to the top of each saddle where the string rests. This will help strings move freely during tuning and after any bends or vibrato.
And that’s it! For a relatively small investment in tools and time, you’re now ready to supercharge your new guitar—and maybe your long-treasured axes, too.
- DIY: How to Set Up a Fender Stratocaster - Premier Guitar ›
- 12-String Setup Secrets - Premier Guitar ›
- DIY: How to Set Up and Intonate an Acoustic Guitar - Premier Guitar ›
- Reader Guitar of the Month—Pickups and Finishes - Premier Guitar ›
- DIY Guitar: 7 Cool Reader Mods - Premier Guitar ›
Warm Audio Introduces the WA-C1 Chorus Vibrato & Pedal76 Compressor Pedal
Introducing the WA-C1 Chorus Vibrato and Pedal76 from Warm Audio, faithful recreations of legendary studio gear in pedal form. The WA-C1 offers lush chorus and vibrato tones with modern upgrades, while the Pedal76 delivers professional studio compression for guitar and bass players. Available now at authorized retailers worldwide.
Warm Audio, the leading manufacturer of faithful recreations of legendary recording gear and guitar pedals, today announces the release of two new pedals. Introducing the WA-C1 Chorus Vibrato, a faithful recreation of the most celebrated chorus in guitar pedal history with a 100% analog preamp and additional no-compromise features for exploring legendary modulated tones. Additionally, Warm Audio is releasing the Pedal76, an all-analog, transformer-balanced FET compressor pedal that accurately reproduces one of the fastest and most powerful studio compressors of all time known for ultra-responsive dynamic control with rich analog tone. The WA-C1 Chorus Vibrato (MSRP $189 | 219 € inc.VAT | £189 inc. VAT) and Pedal76 (MSRP $269 | 299 € inc. VAT | £259 inc. VAT) are available at launch at authorized retailers worldwide.
“This launch is exciting and unique for us. We’ve applied the Warm Formula to deliver the OG ofbold chorus sounds and we’re thrilled to authentically bring that tone back to pedalboards. Additionally, we’re leveraging our 10-year expertise in 76-style studio compression to create a compressor pedal that not only delivers premium studio performance but is loaded with additional features & controls to make it a heavy-hitter in its own right,” said Bryce Young, founder & president of Warm Audio. “The WA-C1 Chorus Vibrato not only brings back that iconic, lush chorus sound and rich, three-dimensional vibrato, but the high-quality preamp inside delivers pure, all-analog tone that just can’t be replicated by digital emulations.”
Young continues, “With Pedal76, we’re excited to bring the high-quality circuit and premium components of our WA76 studio compressor to pedalboards for controlling dynamics on stage without squashing character. With the added features and stage-friendly circuit, we’ve ensured that Pedal76 plays nice with both your rig and a live sound mixing board, while providing additional boost as needed. We’ve intentionally designed Pedal76 to be the ultimate all-analog compressor pedal for guitarists and bass players.”
WA-C1 Chorus Vibrato
The WA-C1 is built upon a true-to-original circuit design and a premium, 100% analog preamp that lives up to the demand for ultra-responsiveness on stage. Matched to the renowned original, the all-analog preamp features level control that adds bite, depth, and even some natural compression to guitar tones, even in bypass mode. The chorus setting features separate depth and rate controls to expand beyond the limitations of vintage units while preserving the legendary tone. These separate controls (vs. the vintage “intensity” control) allow for adjusting depth and rate independently to dial in more depth and slower rates for even richer chorus tones. Just like the vintage units, the WA-C1 delivers lush midrange depth and detail associated with proper Bucket Brigade Device analog chorus pedals and has a stereo output. When it’s time to add true wobble, the vibrato section of the WA-C1 is authentic to the original pedal delivering added speed and bounce to the tone. Leveraging a modern BBD chip recreation with other premium components and boutique build quality, the WA-C1 is carefully clocked to match the depth and rate of the original pedal to reproduce the detail expected from the most sought-after vintage pieces.
While maintaining true-to-original tones, the WA-C1 delivers some modern upgrades to the experience. The WA-C1 features a selectable impedance on the back panel to select between the vintage input impedance of 50k ohm and a 1.1M Hi-Z setting that allows players to compensate for higher impedance of guitars vs. keyboards and to add clarity to the high-end on guitars, if desired. This switch also works in bypass mode to maintain clarity. To deliver the appropriate voltage associated with the original, the WA-C1 is supported internally with a dualDC-DC voltage converter to deliver robust power when using a standard external 9V power supply. The WA-C1 adds a flashing LED for effect monitoring, showing which setting is engaged along with the rate of the modulation.
Introducing WA-C1 | Stereo Chorus & Vibrato Pedal With Depth & Rate Controls - YouTube
Pedal76
For over 10 years, Warm Audio has been building a premium, award-winning 76-style studio compressor, the WA76. With expertise in building this circuit and knowing what drives the sought-after tone of the most coveted dynamic control, Warm Audio now delivers truly professional, full-feature compression for the pedalboard. Pedal76 features a custom CineMagtransformer that is spec’d to duplicate the performance and tone of the studio units in a pedalboard-friendly format. Premium capacitors, resistors, and transistors round out a circuit that cuts no corners in delivering an authentic studio experience on stage. The added harmonic depth from the FET circuit and rich tone preservation from the custom transformer blend perfectly to recreate the ultimate compressor for guitar and bass players. Pedal76 features Attack & Release, Ratio, and Input controls, critical for taming unwanted changes in volume on stage. Pedal76 also has added features optimized for live performances including an external switch for true and buffered bypass operation, ensuring the compressor plays nice in your rig. Switches for input sensitivity, ground/lift, pad engagement and high/low gain modes (both for DI operation) provide added utility at gigs or in the studio. The separate balanced (DI) out also sends proper signal to the mixer or live recording rig, with the high gain mode adding grit and rich transformer tone.
For more information, please visit warmaudio.com.
Pedal76 Deep Dive With Founder Bryce Young | All-Analog Transformer-Balance FET Compressor Pedal - YouTube
Whether you’re tired of slinging combos and bigger into your car’s trunk or looking for reliable backup and backline power, these pedal-sized options have plenty to offer.
Here’s a rundown of six amps in a stompbox format. Carry soft, play loud!
Blackstar Amplification AMPED 2
A portable 100-watt pedal amp with onboard effects that’s perfect for the guitar player that wants an all-in-one watt-cranker and an effects processor
blackstaramps.com
NUX Amp Academy (NGS-6)
This compact workhorse offers 18 amp models, seven signal blocks, independent outputs, and a robust IR loader—plus, it functions as a USB audio interface.
nuxaudio.com
MayFly Audio Sunrise Amp Simulator
The MayFly emulates the classic sound of black-panel amps, including their preamp, power amp, speaker cabinet, and spring reverb. It's intended to plug directly into a PA or DAW, and includes a stereo headphone output jack.
mayflyaudio.com
Friedman IR-D
The IR-D dual-channel tube preamp is an entire Friedman rig, inspired by the JTM45, in a compact pedalboard-friendly package.
friedmanamplification.com
Strymon Iridium Amp and IR Cab Pedal
The Iridium offers three iconic tube amplifier models and nine super-high-resolution, 500 ms impulse response speaker cabinets, along with size-adjustable IR-based room ambience.
strymon.net
Revv Anniversary Series G3
The new Anniversary Edition Revv G series pedals feature new aesthetics and even more amp-like feel and tone—modeled after Revv amps’ purple channel.
revvamps.com
Polyphonic pitch shifting, adjustable ramp speed, and three-way tone switch.
Octa Psi Features:
- Instant Effect Order Switching: Solve the classic question "Octave/Pitch before or after fuzz?" with ease –just hold down both foot switches.
- Flexible Output Configuration: Switch between AllWet or Wet/Dry blend with a quick double-tap of Blend.
- Momentary or Latching Octave/Pitch: Switch between latching or momentary octaves for completecreative control, simply hold the Fuzz switch.
Polyphonic Octave and Pitch Shifter:
- Three Modes: Up, Down, and Dual modes for creating nearly every harmonic interval, includingpower chords, stacked fourths, and diminished chords.
- Momentary Mode: Perfect for dive-bombs and wild multi-octave bends.
- Adjustable Ramp Speed: For creatively timed pitch bending, just like having an onboardexpression pedal.
Transfigurating Fuzz Circuit:
- All-Analog, Transistor-Based: Delivers incredible sound with wave after wave of gain staging leading to hard clipping.
- Three-Way Tone Switch: Carve out the perfect fuzz tone with Scoop, Punch, or Psi mode.
- Massive Sound: Makes your guitar pickups sound enormous at any volume.
Stunning Design and Ease of Use:
- High Octane Circuitry – Housed in a proprietary angled aluminum enclosure for simplicity and durability.
Upgrade your sound and explore new sonic possibilities with the Octa Psi Transfigurating Fuzz Pedal.Prepare yourself to experience the ultimate in pitch-shifting, octave generation, and analog fuzz!
Octa Psi Highlights:
- Polyphonic Pitch Shifter:○ +/- Two Octave Range and nearly every harmonic interval.
- Low latency and fast-tracking for great tone in dropped tunings or wild bends.
- Switchable All-Wet ⇆ Wet/Dry Blend by double tapping the Blend control.
- Momentary or Latching Octave and Pitch Shifter by holding down the Fuzz stomp.
- Adjustable Ramp Speed for the pitch shifter by holding Octave down and adjusting Blend.4
- Three pitch-shifting modes (Up/Dual/Down) for multiple octaves, crazy intervals, chords,and even chorus modulation.
- Analog Transistor Fuzz:
- Super thick, analog transistor fuzz and distortion.
- Three-way bass response: Scoop, Punch, or Psi mode for massive undertones.
- Order switching between Fuzz ⇆ Octave (Pitch) by pressing and holding both Octave andFuzz.
Tech Specs:
- Pedal Type: Octave Fuzz and Pitch Shifter
- Switching: Momentary or Latching Pitch Shifter
- Analog/Digital: Mixed, Analog Fuzz & Digital DSP
- Effects: Polyphonic Pitch Shifter, Octave, Fuzz, Distortion
- Inputs/Outputs: TS 1⁄4” jacks
- Bypass: True Bypass or Silent Buffered Bypass, user selectable
- Power Requirements: 9-18 VDC, 150mA (high current power supply sold separately) - No battery
- Height: 2.7”
- Width: 3.9”
- Depth: 5”
Keeley Electronics - Octa Psi Transfigurating Fuzz - Sarah Lipstate Performance - YouTube
Seldom before has an innocent-looking pedal offered such devilish delights.
Combining a ferocious fuzz circuit with remarkably powerful pitch-shifting capabilities, Keeley’s new Octa Psi pedal makes it easy to blow your mind … and have a ton of fun in the process.
It’s capable of creating pleasing and/or demented intervals, subtle harmonizing, expansive octaves up and down, and swooping pitch changes—all turbocharged by one of the gnarliest fuzzes this side of Armageddon.
Simply Psychoactive ... By Intent
If you’ve ever craved a user-friendly freakout, this is it. With just five knobs, two 3-way toggle switches, and a pair of footswitches—as well as an expression pedal input—the Octa Psi presents a comfortable, inviting portal to a universe of crazy sonic exploration.
That’s exactly what Robert Keeley intended from the moment he started designing the Octa Psi.
“The finished pedal is true to the original idea that I had in November 2021,” Keeley says. “I wanted it to have a high-gain vintage Muff, all-analog and all-transistor, going into an octave pitch shifter—something in the neighborhood of a Pitch Fork or POG. And then when I added the expression pedal function, it could resemble a whammy.”
Ah yes, the expression pedal input. Linking the Octa Psi with a standard expression pedal opens the door to a whole new dimension of pitch shifting mayhem. Rest assured, you don’t have to use an expression pedal to derive crazy fun from the Octa Psi. But it sure helps.
With all of the pedal’s deep functionality, Keeley felt that simplicity would be a key factor in broadening its appeal, starting with this elemental item: “From the get-go I wanted it to have order switching, allowing the fuzz feeding the pitch shifter or vice versa, because it gives you two distinctly different sounds if you have pitch going before or after the fuzz. And it had to be pretty effortless for the player to switch the order on the fly. And I wanted it to be easy to switch between using it either as a harmonizer or as an all-wet octave-down thing.” That desire for ease-of-use, even in the middle of a live gig, drove the design of the pedal’s controls and functions.
“I wanted to come up with something that Jack White, Steve Vai, or Frank Zappa would have fun with.”
It Ain't Easy to Create Easiness
The Octa Psi exemplifies an old adage: Sometimes a simple solution can be the most difficult to achieve. “I knew this was going to be a challenging project,” Keeley admits. “It’s very tough to combine a high-gain, full-analog distortion with a DSP [digital signal processing] section in one box. It took a long time to get the switching just right. It was particularly difficult because the Octa Psi’s analog and DSP sections are so intimately entwined. You can’t have gaps in the audio when you’re switching back and forth. Those kinds of complications drove us crazy.
“We also addressed a lot of issues that have raised concerns about other products on the market. The Octa Psi is a true-bypass pitch shifter, and it has our killer buffer system as well. There’s nothing else out there like this, so we had to figure it all out for ourselves.“
An essential challenge: voicing the fuzz so that it would sound great as a standalone effect, while also playing nicely with the Octa Psi’s harmonizer functions. “You would think that the fuzz was easy, but it was actually one of the last things we ironed out,” Keeley notes. “I had to ask myself, ‘Do I want this to be a bass-y fuzz?’ Probably not, since the pitch shifter can add octave down. But it’s got to be an amazing sounding fuzz if I want people to consider buying it. It has to sound great when compared to any Big Muff, and it has to effortlessly pair with a DSP section. So, getting the fuzz just right turned out to be the hardest part!”
The pedal design process also encountered some last-minute wrinkles. “The ramping and momentary switching capability was the last big feature that was added. That ramping function is like having an onboard expression pedal. We talked about it in the beginning of the process with Sarah Lipstate [also known as the artist Noveller], when Aaron Pierce [a key member on the Keeley team] was working on the initial concept. Later, Michael Kaye—the guitar tech for Pete Townsend and Trey Anastasio—asked, ‘Does it have momentary switching?’ and I was like, ‘Oh crap, I forgot about that!’” Keeley laughs.
The How-To Guide for Octa Psi's Hidden Features
For all of its readily accessible capabilities, the Octa Psi boasts several essential features that can only be accessed by using more than a single knob or switch. To unlock these features, it helps to have a few simple, specific instructions. For this reason, Keeley has included a brisk, handy primer on the back of each pedal. The Octa Psi’s key “hidden features” include:
- EFFECT ORDER: You can instantly switch the effect order by simultaneously holding the octave and fuzz footswitches.
- WET/DRY SELECTION: Double-click the blend control knob for switching between wet/dry blending or wet-only.
- MOMENTARY/LATCHING OPTION: Press and hold the fuzz footswitch to choose between momentary or latching operation. This is crucial if you plan on using the Octa Psi’s adventurous pitch shift ramping capability: the output signal begins with the initial note(s) you’re playing, and then veers up or down to the effected pitch. The ramp speed—i.e. how quickly this veering effect lasts—is controlled by….
- RAMP SPEED: If you’re using pitch shifting in the momentary mode, you can adjust the ramp speed by pressing and holding the octave footswitch down, then adjusting the blend knob control.
Part of an Ongoing Evolution
The Octa Psi underscores the continuing evolution of Keeley’s product line. In particular, it benefits from a pair of preceding Keeley devices: the I Get Around Rotary Simulator pedal and California Girls Twelve String Simulator—two pedals that were released in summer 2024 as exclusive offerings for the U.S. retailer Sweetwater, timed to coincide with The Beach Boys documentary on Disney+.
“That Beach Boys project did so much to help the DSP side of the Octa Psi,” says Keeley. “I got audio analyzers in so I could study the signals. We found out that we had to make our power supplies better because of the Beach Boys pedals, and that revolutionized our design. Everything that comes out since the Beach Boys pedals is going to sound even better. Plus, it was a lot of fun working with Sweetwater and JHS Pedals.”
Interestingly, for the Octa Psi project, the Keeley design team did not rely on much input from the company’s long list of affiliated artists. “I didn’t really have an artist that is a pitch/fuzz guru, so I had to keep it pretty much to ourselves. I knew that it had to be very musical—as musical as we could get it. And thankfully we have a team that can make this happen.”
The Keeley product development squad includes electrical engineer Craighton Hale, programmer Aaron Tackett, and Aaron Pierce—the “golden ears” member of the design group who helps analyze the sounds. “I’m just one part of the team of engineers that help make the products come to life,” Keeley notes.
Fun for Everyone
In the end, Keeley hopes that the Octa Psi pedal finds new and unconventional uses in the real world. “I wanted to come up with something that Jack White, Steve Vai, or Frank Zappa would have fun with—something that does all the crazy pitch-shifting with a purpose. And I’m hoping that musicians of all types will be attracted to this. People who want to distort their drums or bass or synth, and then start taking advantage of the pitch shifting. It’s almost like you get a great fuzz with the pitch shifter for free. On the other hand, I wouldn’t be surprised if some people use just the pitch shifter, if they’re not a fuzz maniac. You can get a lot of fun out of it without an expression pedal.”
Whether you’re a brazen sonic adventurer, or simply looking for a great-sounding dual function fuzz/harmonizer pedal, the Octa Psi offers a galaxy of tones for your arsenal.