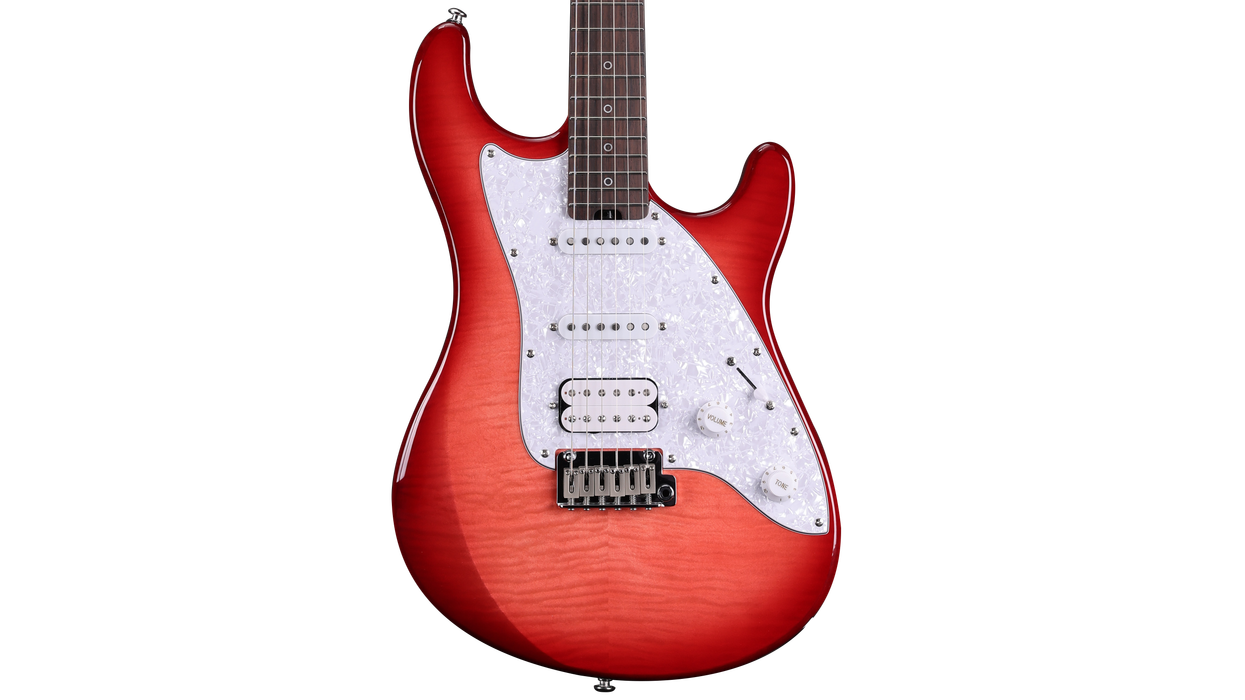
Photo 1
Got a finicky selector on your dual-pickup guitar? No worries—it’s an easy fix.
Given the popularity of Les Pauls, SGs, Explorers, Flying Vs—and the thousands of other two-pickup axes inspired by these iconic models—it's no surprise I've replaced many failing 3-way switches over the years. Switches get used a lot and eventually they can wear out. When this happens, you'll hear loud popping sounds or scratchy noises, and the signal may even cut out when you're switching pickups.
Fortunately, 3-way toggle switches are easy to replace, and you can do it yourself with just a few tools and a bit of patience. It only takes a few minutes to cover the process, so let's get started.
The project.
To illustrate the steps, I'll use a 1983 Ibanez Les Paul copy that has a standard 3-way pickup selector: neck only, neck-plus-bridge, bridge only (Photo 1). Charmingly, Ibanez kept the arcane "Rhythm" and "Treble" designations for the neck and bridge pickups.
This is a cool guitar and it plays great, but the toggle switch is shot. Like many imported guitars, it has a cheap switch. I'm going to upgrade the guitar with a Switchcraft model, one of several options preferred by discerning players and professionals who are willing to pay a bit extra for reliability. Let's take a closer look.
Types of toggle switches.
On most guitars, you'll find one of two different types of 3-way toggle switches: the box style and the open style. In a box toggle switch, the internal parts are enclosed—typically in plastic—and they can fail if the prongs get overheated, especially when the switch has been re-soldered too many times. As a result, box switches tend to have a short life.
The internal parts are exposed on an open toggle switch, but open switches are usually made from better materials. Switchcraft double-pole 3-way switches boast solid construction and last a long time, which explains why they're used on so many high-quality instruments.
Open toggle switches come in three styles: short straight, tall straight, and right-angle. The short and tall straight switches have their switching apparatus below the toggle, while the switching mechanism on the right-angle switch is perpendicular to the toggle. All three are wired identically, they simply differ in depth and width. For example, guitars with shallow electronics cavities, such as the SG and many thin ES-style hollowbodies, use the right-angle switch. Gibson Les Pauls take the tall switch.
Here's an easy way to tell which type of replacement switch you need: Check out the minimum cavity size for all three Switchcraft styles at stewmac.com, and then compare these dimensions to your guitar's switch cavity.
Removing the old switch.
Using a Phillips screwdriver, remove the cover plate on the back of the guitar to access the switch cavity. If you already have an open switch and you're simply replacing it with a new one, draw a diagram of the old switch or label each wire to help you remember the connections.
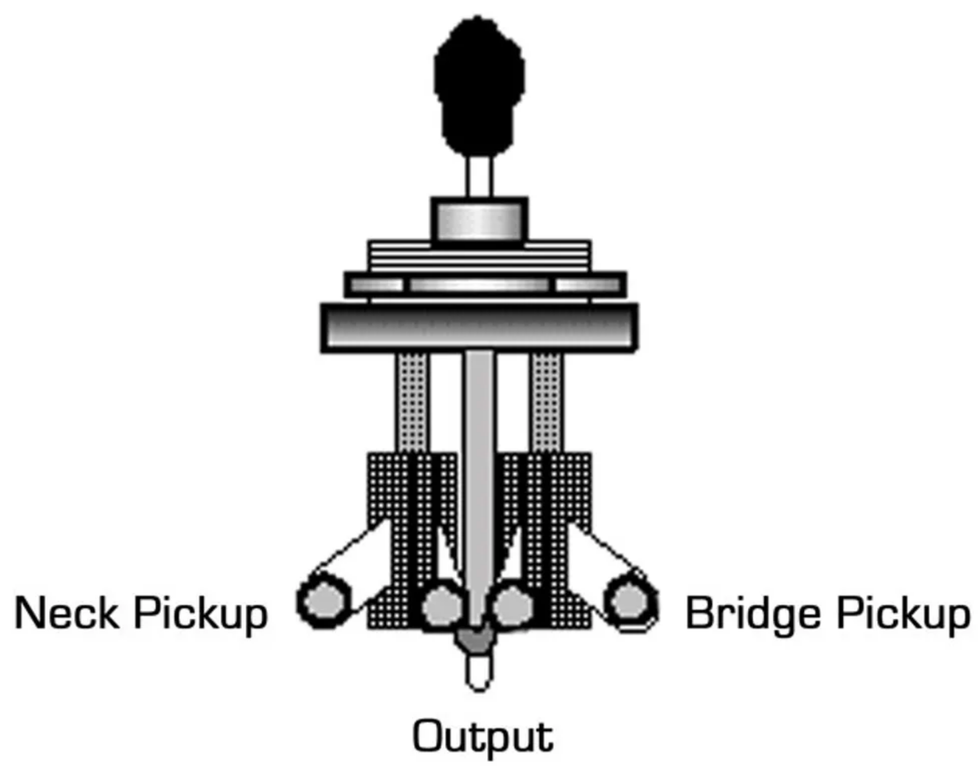
Image 1
If you're replacing a budget box switch with an open toggle switch, you can use the simple diagrams I've provided as a guide. Image 1 (above) shows a common 3-way toggle as seen from the front and Image 2 (below) shows the back view.
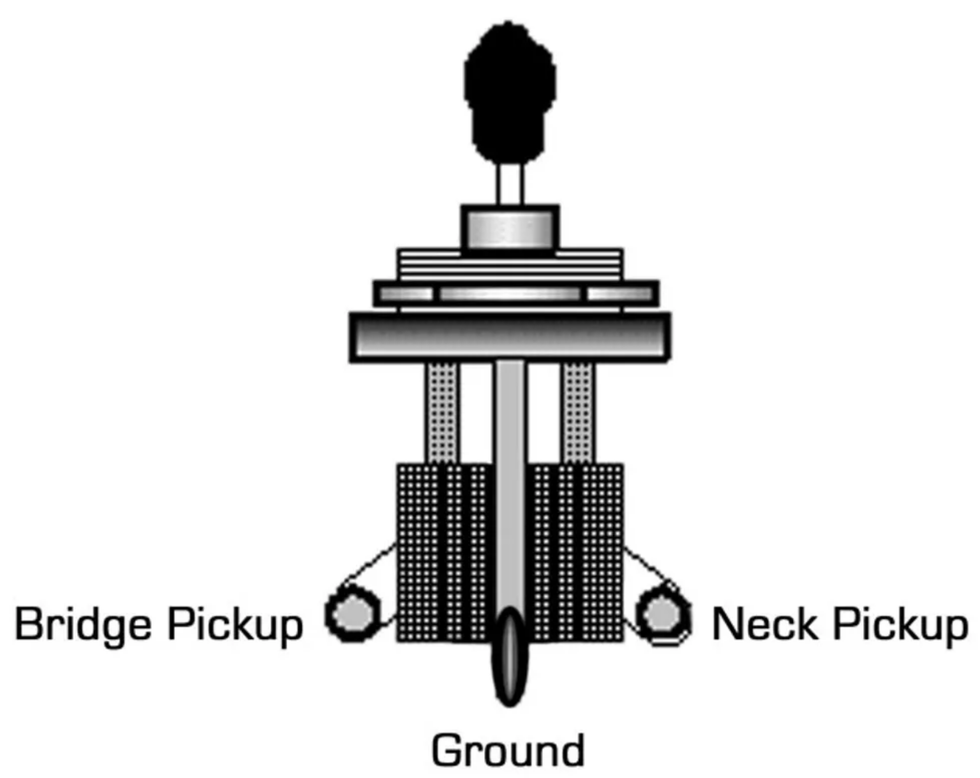
Unsolder each wire and then remove the switch by turning the mounting nut counter-clockwise. Some toggle switches have a hex nut and require a deep well socket wrench, others have a knurled collar nut that can be loosened or tightened using an adjustable toggle switch wrench.
Tip: Don't use a pair of pliers to remove the nut collar! Pliers will mar the knurled nut and if you slip, you'll also damage the top of your guitar.
Installing the new switch.
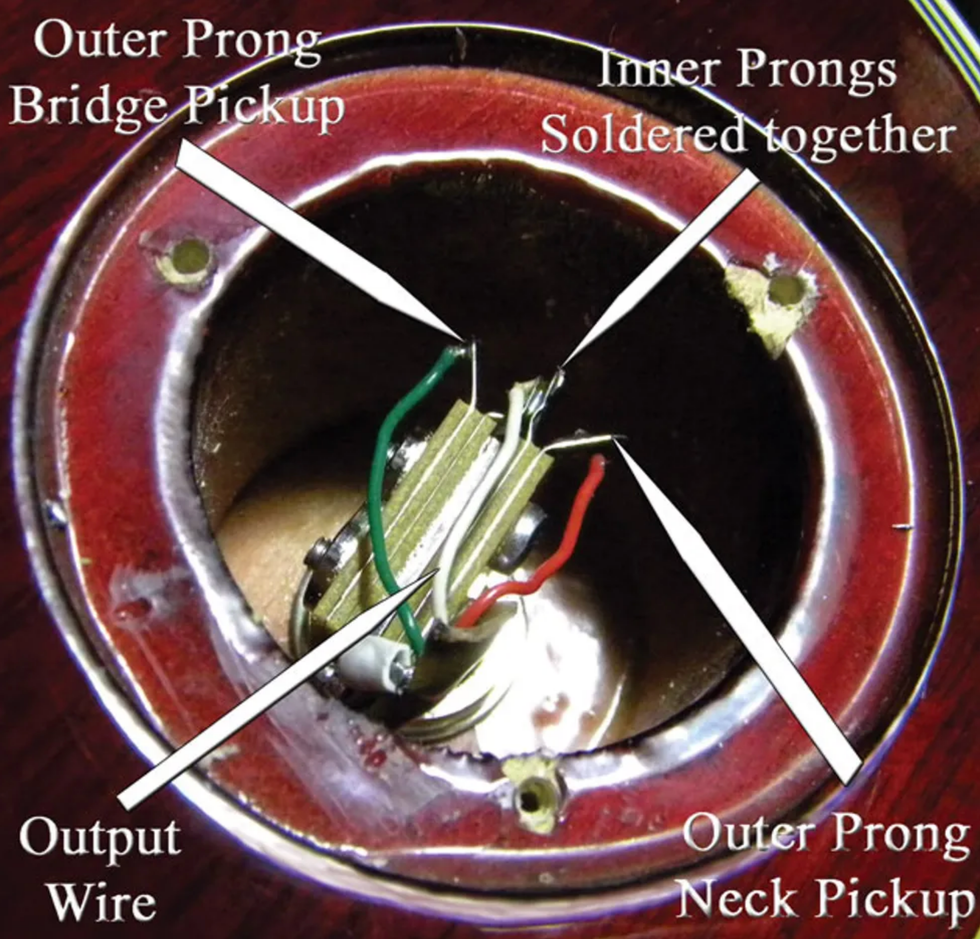
Photo 2
On the open switch I'm installing in this Ibanez, there are four prongs at one end and one prong on the opposite side (Photo 2). The four grouped prongs are the switch's inputs and output, and the single prong on the opposite side is the ground. In the group of four prongs, the two outer prongs are the inputs for the pickups and the two in the center are the outputs.
Before soldering, I use hemostats to gently bend the outer prongs (these connect to the pickups) away from the two output prongs between them. Then I crimp the two inner prongs together, because they'll share one wire from the switch's output to the output jack.
Note: Open 3-way toggles may differ physically. On a right-angle switch, for example, the ground prong and the input and output prongs are stacked vertically, and on some straight switches the ground prong is located between the two inputs, while the outputs are on the opposite side. But regardless of the layout, the principle is the same, and once you understand it you'll be able to confidently wire up your guitar. Study the wiring diagram that came with your new switch to confirm how it's configured, or use a multimeter to test and identify the input and output prongs.
Slide the new switch into the switch cavity, thread on the collar or nut, and then tighten it. Be careful when tightening the collar—it only needs to be "finger tight." If you torque it too much, you'll strip the threads. Also be sure to orient the switch so the toggle throw matches the original.
Switches get used a lot and eventually they can wear out. When this happens, you'll hear loud popping sounds or scratchy noises, and the signal may even cut out when you're switching pickups.
Solder up.
There are typically four wires to solder: the neck pickup, the bridge pickup, the output (this connects to the output lug on the jack), and the ground. Select a wire and clamp it to its respective prong with the hemostats, then briefly touch the tip of your soldering iron to preheat the prong and wire, and finally touch the solder to the connection just long enough to let a small amount of solder flow over the wire and prong. For detailed soldering tips, see "Tips for Replacing a Strat-style 5-way Switch."
Tip: When soldering, be careful not to heat up the prongs too much. Excessive heat can damage the switch.
Once you've soldered the four wires to their prongs, it's time to check your work. Gently tap the pickups with your hemostats for each position of the switch. You should get neck and bridge alone when the toggle is pointed up or down, respectively, as viewed from the playing position, and both when the toggle is in the center position.
If the neck and bridge toggle positions are working in reverse (i.e., the bridge pickup engages when the switch is up), then reverse the leads on the outer prongs. If the pickups are working correctly, reinstall the cover plate and you're done!
[Updated 11/10/21]
- Guitar Shop 101: Tips for Replacing a Tele-Style 3-Way Switch ... ›
- Mod Garage: How to Wire Alternative Tele 3-Way Switches - Premier ... ›
- Mod Garage: Inside the 3-way Telecaster Pickup Switch - Premier ... ›
Bergantino revolutionizes the bass amp scene with the groundbreaking HP Ultra 2000 watts bass amplifier, unlocking unprecedented creative possibilities for artists to redefine the boundaries of sound.
Bergantino Audio Systems, renowned for its innovative and high-performance bass amplification, is proud to announce the release of the HP Ultra 2000W Bass Amplifier. Designed for the professional bassist seeking unparalleled power and tonal flexibility, the HP Ultra combines cutting-edge technology with the signature sound quality that Bergantino is known for.
Operating at 1000W with an 8-ohm load and 2000W with a 4-ohm load, the HPUltra offers exceptional headroom and output, ensuring a commanding presence on stage and in the studio. This powerhouse amplifier is engineered to deliver crystal-clear sound and deep, punchy bass with ease, making it the perfect choice for demanding performances across any genre.
The HP Ultra incorporates the same EQ and feature set as the acclaimedBergantino Forté HP series, offering advanced tonal control and versatility. It includes a highly responsive 4-band EQ, Bergantino’s signature Variable RatioCompressor, Lo-Pass, and Hi-Pass Filters, and a re-imagined firmware that’s optimally tuned for the HP Ultra’s power module. The intuitive user interface allows for quick adjustments and seamless integration with any rig, making it an ideal solution for both seasoned professionals and rising stars.
As compared to previous forte HP iterations (HP, HP2, HP2X), Ultra is truly its own amp. Its behavior, feel, and tonal capabilities will be well noted for bass players seeking the ultimate playing experience. If you’ve been wishing for that extreme lead sled-type heft/force and punch, along with a choice of modern or vintage voicings, on-board parallel compressor, overdrive; high pass and lowpass filters, and more—all in a 6.9 lb., 2ru (8” depth) package...the BergantinoHP Ultra is worth checking out.
Building on the forte’ HP2X’s leading edge platform (including a harmonic enriching output transformer (X) and 3.5db of additional dynamic headroom (2),the HP Ultra’s power focus is not about playing louder...it’s about the ability to play fuller and richer at similar or lower volumes. Many players will be able to achieve a very pleasing bass fill, with less volume, allowing the guitars and vocals to shine thru better in a dense mix. This in turn could easily contribute to a lower stage volume...win-win!
Key Features of the Bergantino HP Ultra 2000W Bass Amplifier:
- Power Output: 1000W @ 8ohms / 2000W @ 4ohms, 1200W RMS @2-Ohms (or 1700W RMS @2.67-Ohms-firmware optimizable via USB
- Dual Voicing Circuits: offer a choice between vintage warmth and modern clarity.
- Custom Cinemag Transformer: elevates harmonic enrichment to new heights
- Variable Low-Pass (VLPF) and Variable High-Pass (VHPF) filters, critical for precise tone shaping and taming of the most challenging gigging environments.
- 4-Band Tone Controls: Bass: +/-10db @40hz, Lo-Mid:+/-10db @250hz,Hi-Mid: +/-10db @ 1khz, Treble: +/-10db @ 3.5khz
- Punch Switch: +4db @110hz
- Bright Switch: +7db @7kHz or +6db @2khz – user selectable● Built-in parallel compression - VRC
- 3.5dB of additional dynamic headroom
- New Drive Circuit featuring our proprietary B.S.D (Bergantino SmartDrive) technology
- Auxiliary Input and Headphone Jack: for personal monitor and practice
- Rack Mountable with optional rack ears
- Effects send and return loop
- Studio quality Direct Output: software selectable Pre or Post EQ
- UPS – Universal power supply 115VAC – 240VAC 50/60Hz
- Weight: 6.9 pounds
- Dimensions: 13.25”W x 8.375”D x 3.75”H
- Street Price: $1895.00
For more information, please visit bergantino.com
The NEW Bergantino Forté HP ULTRA!!! - YouTube
Featuring a 25.5" scale length, mahogany body, gold hardware, and 490R/498T pickups. Stand out with the unique design and comfortable playing experience of the Gibson RD Custom.
Initially released in 1977, the Gibson RD model has been a cult classic for years. It is famous for its unique appearance, which takes inspiration from both the Gibson Explorer and Firebird designs, as well as its functionality and use by several popular guitarists across multiple genres.
Now, the iconic RD Custom joins the Gibson Custom core lineup for the first time. Not only is this the first Custom Shop-built RD model, but it is also the first 25.5” scale length solidbody core model offered by Gibson Custom. Complete with the classic and comfortable RD body shape, including a rear tummy cut for extra comfort, this model also features a mahogany body with multi-ply top binding, Gibson Custom aesthetics, including gold hardware and mother-of-pearl block inlays on the neck, and a mother-of-pearl Custom split diamond headstock inlay. The RD Custom also has a 25.5” scale mahogany neck with a Medium C profile and long neck tenon, a bound ebony fretboard with 22 medium jumbo frets, and a bound headstock with Grover Rotomatic tuners. The updated electronics include 490R and 498T pickups, CTS potentiometers, and a hand-wired harness.
The Gibson RD Custom is designed to help players stand out from the crowd with its longer scale length, curvaceously elegant body, and classic design. Now is your opportunity to experience the unique and comfortable playing experience of the cult-favorite Gibson RD Custom for yourself. A Custom Shop hardshell case is also included.
For more information, please visit gibson.com.
How do you add scores of effects to your pedalboard with a single stompbox?
Big library of effects. Great sounding delays and reverbs. Mature TonePrint library and interface is easy to use.
Can only use one effect at a time. An IR loader and a looper would be welcome additions
$129
TC Electronic Plethora X1
tcelectronic.com
I’m often seduced by convenient solutions when it comes to planning a pedalboard. Time spent arranging a select group of stomps can be a distraction, which is why I tend to stick to pedals that do one or two things well and keep the tinkering to a minimum. After spending time with TC Electronic’s new multi-effects unit, the Plethora X1, I’ve had to rethink how much a single pedal can bring to a pedal board, because the X1 can be many things.
Save for the creation of gain sounds, the Plethora X1 can fill almost any sonic need on any gig. It can play the role of just one effect at a time—this isn’t like the Plethora X3, Plethora X5, or a modeler within which you can create chains of virtual stomps. But with very little effort, I can access TC’s entire TonePrint line, including factory- and artist-created TonePrints from the Hall of Fame 2 Reverb, Flashback 2 Delay, Helix Phaser, Viscous Vibe, Sub ‘N’ Up Octaver, Brainwaves Pitch Shifter, Corona Chorus, Hypergravity Compressor, Mimiq Doubler, Vortex Flanger, Pipeline Tap Tremolo, Quintessence Harmony, Sentry Noise Gate, and Shaker Vibrato. At $129, the Plethora X1’s sounds-per-dollar value is extremely hard to beat.
Making Space
Full-sized Hall of Fame 2 and Flashback 2 pedals are already mainstays on my board, but, curiously, I hadn’t really explored the full capacity of those effects until using them within the X1. One reason, perhaps, is the X1’s handy readout. When you move any one of the three assignable knobs on the unit, the values for the assigned parameter appear on the screen, providing valuable visual feedback and precision. The parameters adjusted via those three knobs aren’t the only things you can tweak. The fourth knob is a rotary control with seven different slots that each store two different effects (when in A/B mode). That means 14 different presets that you can access quickly without having to dive into the deep editing mode.
Scratching the Surface
My favorite TC Electronic effects are the company’s detail-rich reverbs and delays. They did not disappoint here, and right out of the box, the room and shimmer reverbs were very inspiring. The shimmer verb didn’t have the way-too-glossy feel that can make many of these effects sound cheesy. A subtle, tight room reverb, meanwhile, allowed me to sense the effect as much as hear it—a nuance that, to me, is a hallmark of a well-designed algorithm.
Each effect is pre-loaded with a handful of presets that you can cycle through without firing up the app, offering many surprises in effects you may not have encountered before. The Sub ’N’ Up Octaver, for instance, is a real standout. It tracks incredibly well, offers plenty of customization, and sounds thick. Another highlight is the Helix Phaser, which is bubbly and liquid with an analog-like voice that would have appealed to Eddie Van Halen and Bob Marley alike.
There’s an App for That
Though the visual feedback from the X1’s screen is valuable, you have the most control and programming power within the TonePrint app. You can connect with the app three different ways: Bluetooth, USB-C, or using your phone to beam a preset via the pickups on your guitar. Although all three worked, I found Bluetooth and USB-C to be the most reliable and responsive.
As you can imagine, TC has built up a huge library of presets for all the various pedals represented in the X1. (The Tone Print Library has grown continuously since the technology was introduced in late 2010). But as sizable as the library is—and in spite of how many effects are on hand in the X1—the process of switching between them and trying new TonePrints out is still easy and fun. Once the pedal is connected, you scroll through a menu within the app of artist and factory presets. After you find one you like, you can either save it directly to your X1 or pull up the editor to adjust control parameters and other effect-specific functions. It’s an in-depth editor that doesn’t overload you with endless menus. TC deserves kudos for such an accessible design.
The Verdict
As you might guess, I don’t have the space to go in-depth on every effect in the X1. And at $129, the X1’s performance-to-price ratio is off the charts. Although you can only use one effect at a time, the ability to bring in any one of 14 great-sounding effects in a pinch is invaluable. I’ve often wrestled with whether or not to fork out money for a chorus, tremolo, or harmonizer that I might only use one or twice during a gig. That’s a decision the Plethora X1 all but eliminates. Although there’s a minimal learning curve, the X1 doesn’t have the paralyzing effect that other multi-effects units can have. If you’re into streamlining your board but still yearn to try new effects and applications as top artists hear and envision them, the X1 is hard to beat. PG
Gibson partners with Warren Haynes to release the Warren Haynes Les Paul Standard, featuring P-90 DC pickups and a 15 dB boost for modern functionality in a traditional 50s-era Les Paul design.
Grammy Award-winning artist Warren Haynes is a cornerstone of the American music landscape, lauded as one of the most formidable and prolific guitarists, vocalists, songwriters, and producers of the modern era. Gibson is proud to announce its partnership with Warren Haynes for the release of his first signature guitar, the Gibson Warren Haynes Les Paul Standard. The Warren Haynes Les Paul Standard from Gibson is available worldwide now at the Gibson Garage Nashville and London, at authorized Gibson dealers, and on Gibson.com.
“I’ve always been a Gibson guy—I got hooked on that sound as a teenager and have been playing them ever since,” says Warren Haynes. “Needless to say, I’m honored to be partnering with Gibson to release my Signature Les Paul Standard. Being traditionally a humbucker guy, I’m really loving the hum-free P-90s. It’s a really cool tonal change, and the boost offers even more tonal options. I’m really enjoying playing this guitar on stage and looking forward to using it in the studio. I’m equally psyched that other guitar players will now have the opportunity to own and play one as well.”
Warren Haynes effortlessly cross-pollinates genres and unfurls solos that broil with passion in his distinctive, signature playing style. Renowned and highly regarded for his work in rock, blues, and Americana music through his work with the Allman Brothers Band, as a founding member of Gov’t Mule, the leader of The Warren Haynes Band, a solo artist, and as a session guitarist and sideman for numerous famous friends and groups. As one of music’s most treasured storytellers, Haynes and his artistry have led to thousands of memorable performances and millions of album and track sales. A master of multiple styles and genres, Warren has also shared his expertise with other players via multiple instructional videos. A self-described “Gibson man,” Warren has used several Gibson models throughout the years, including his cherished ’61 ES-335™, among others.
The new Warren Haynes Les Paul Standard is another standout, with features tailored specifically to Warren’s preferences, including a mahogany body with a plain maple cap, a 60s Cherry finish, a mahogany neck with a chunky 50s vintage profile like all of Warren’s favorite Les Pauls, a rosewood fretboard with acrylic trapezoid inlays and 22 medium jumbo frets, a pair of P-90 DC pickups that deliver hum-free performance with all the sonic nuances of traditional P-90 DC pickups, and a 15 dB boost that can be activated via a mini toggle switch. The quick-access battery compartment is mounted into the control cover on the rear, and the guitar will still function, even if the battery dies, by simply flipping the mini toggle switch to the off position.
Bearing the traditional looks and feel of a 50s-era Les Paul coupled with modern features like hum-free P-90 DC pickups and an onboard boost, the Warren Haynes Les Paul Standard bridges modern and traditional and is a great choice for players who, like Warren, want both a traditional appearance and modern functionality in one outstanding guitar.
Last fall, Warren Haynes released his fourth solo album, Million Voices Whisper, via Fantasy Records. Haynes sounds as energetic and focused as ever on the self-produced album, powering through an 11-song set of soulful blues-rock, his first solo collection in nearly a decade. Accompanying Warren on the collection are members of his current all-star band, including John Medeski on keyboards, longtime drummer Terence Higgins (of the Dirty Dozen Brass Band), and Gov’t Mule bassist Kevin Scott. Million Voices Whisper also features guest appearances from his Allman Brothers Band compatriot Derek Trucks, whose unmistakable guitar sound toughs up three tracks on the album that were co-produced with Haynes, and his Last Waltz tour co-stars Lukas Nelson and Jamey Johnson, who are featured on the forceful “Day Of Reckoning.” Joining Haynes in the studio for the first time since the final sunset of the ABB, one of the featured tracks with Trucks on guitar is “Real Real Love,” a song initially co-written with Gregg Allman that Warren finished in Allman’s style and methods as if Gregg were singing it to honor his friend.
Buzzing through the chart-topping album is the question of how to make things better—in love, in life, in the world—led by Haynes’s soaring vocals and the poignancy of his six-string mastery. Million Voices Whisper opens with “These Changes,” a co-write with Trucks, leading into “Go Down Swinging,” co-written with Johnson, which features a horn section and a Van Morrison vibe. Then, there’s the soulful power ballad “Till The Sun Comes Shining Through,” driven by Warren’s impassioned vocals and slide guitar skills. The expressive pipes of touring backup singer Saundra Williams are also heard on multiple tracks, including the lead single “This Life As We Know It,” which reached Top 15 on the Americana singles chart and Top 40 at Triple A radio. Among the four bonus tracks on the deluxe CD version is a new version of the Trucks-Haynes composition “Back Where I Started” featuring Warren on lead vocals and slide guitar and the power trio of Haynes, Nelson, and Johnson covering the CSNY classic “Find The Cost Of Freedom” into an extended version of “Day Of Reckoning.” Million Voices Whisper combines the eloquent musicianship of a triple-threat blues-rocker with the glowing spirit of a vital creative artist at the peak of his powers.
For more information, please visit gibson.com.