Photo 1
Got a finicky selector on your dual-pickup guitar? No worries—it’s an easy fix.
Given the popularity of Les Pauls, SGs, Explorers, Flying Vs—and the thousands of other two-pickup axes inspired by these iconic models—it's no surprise I've replaced many failing 3-way switches over the years. Switches get used a lot and eventually they can wear out. When this happens, you'll hear loud popping sounds or scratchy noises, and the signal may even cut out when you're switching pickups.
Fortunately, 3-way toggle switches are easy to replace, and you can do it yourself with just a few tools and a bit of patience. It only takes a few minutes to cover the process, so let's get started.
The project.
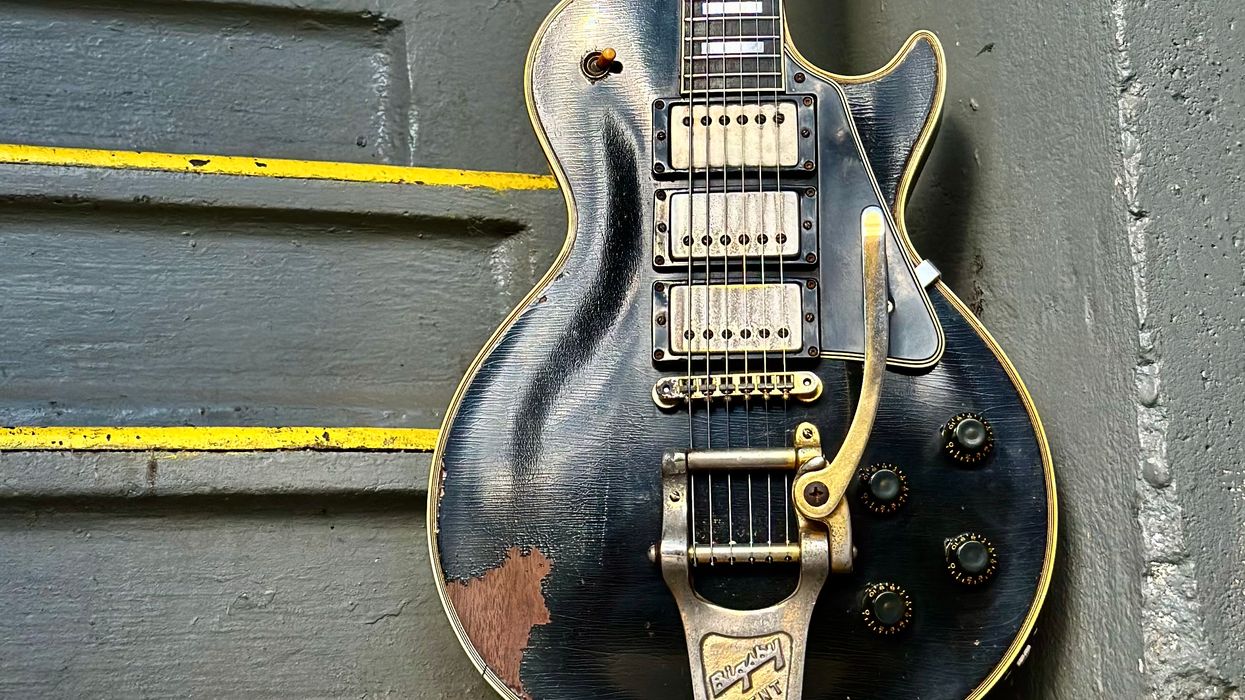
To illustrate the steps, I'll use a 1983 Ibanez Les Paul copy that has a standard 3-way pickup selector: neck only, neck-plus-bridge, bridge only (Photo 1). Charmingly, Ibanez kept the arcane "Rhythm" and "Treble" designations for the neck and bridge pickups.
This is a cool guitar and it plays great, but the toggle switch is shot. Like many imported guitars, it has a cheap switch. I'm going to upgrade the guitar with a Switchcraft model, one of several options preferred by discerning players and professionals who are willing to pay a bit extra for reliability. Let's take a closer look.
Types of toggle switches.
On most guitars, you'll find one of two different types of 3-way toggle switches: the box style and the open style. In a box toggle switch, the internal parts are enclosed—typically in plastic—and they can fail if the prongs get overheated, especially when the switch has been re-soldered too many times. As a result, box switches tend to have a short life.
The internal parts are exposed on an open toggle switch, but open switches are usually made from better materials. Switchcraft double-pole 3-way switches boast solid construction and last a long time, which explains why they're used on so many high-quality instruments.
Open toggle switches come in three styles: short straight, tall straight, and right-angle. The short and tall straight switches have their switching apparatus below the toggle, while the switching mechanism on the right-angle switch is perpendicular to the toggle. All three are wired identically, they simply differ in depth and width. For example, guitars with shallow electronics cavities, such as the SG and many thin ES-style hollowbodies, use the right-angle switch. Gibson Les Pauls take the tall switch.
Here's an easy way to tell which type of replacement switch you need: Check out the minimum cavity size for all three Switchcraft styles at stewmac.com, and then compare these dimensions to your guitar's switch cavity.
Removing the old switch.
Using a Phillips screwdriver, remove the cover plate on the back of the guitar to access the switch cavity. If you already have an open switch and you're simply replacing it with a new one, draw a diagram of the old switch or label each wire to help you remember the connections.
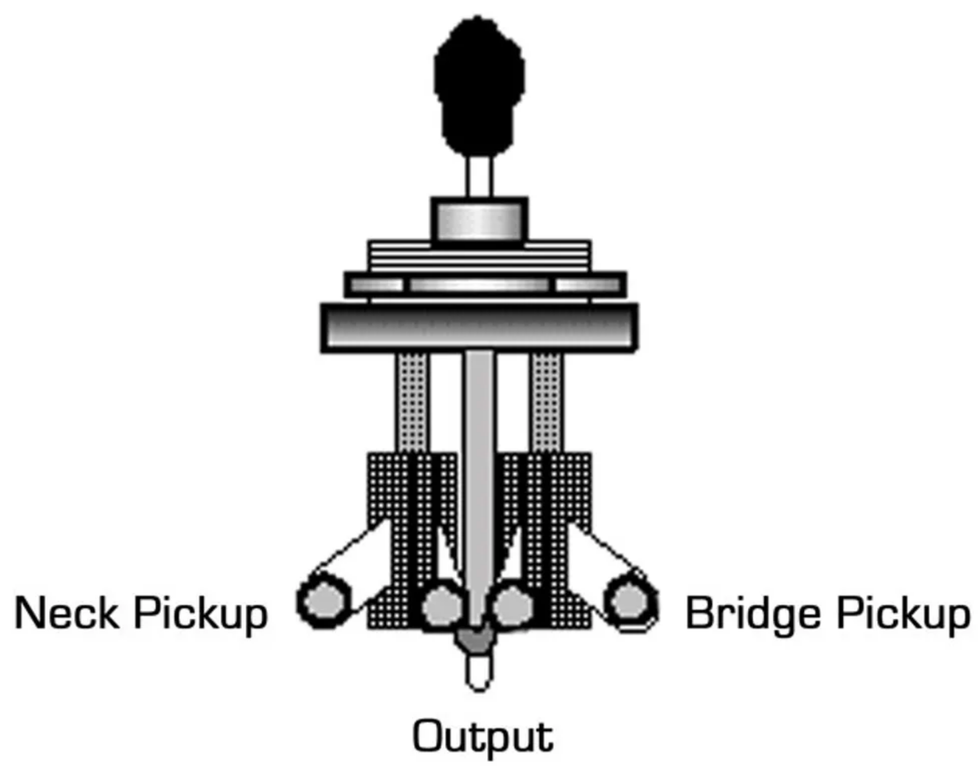
Image 1
If you're replacing a budget box switch with an open toggle switch, you can use the simple diagrams I've provided as a guide. Image 1 (above) shows a common 3-way toggle as seen from the front and Image 2 (below) shows the back view.
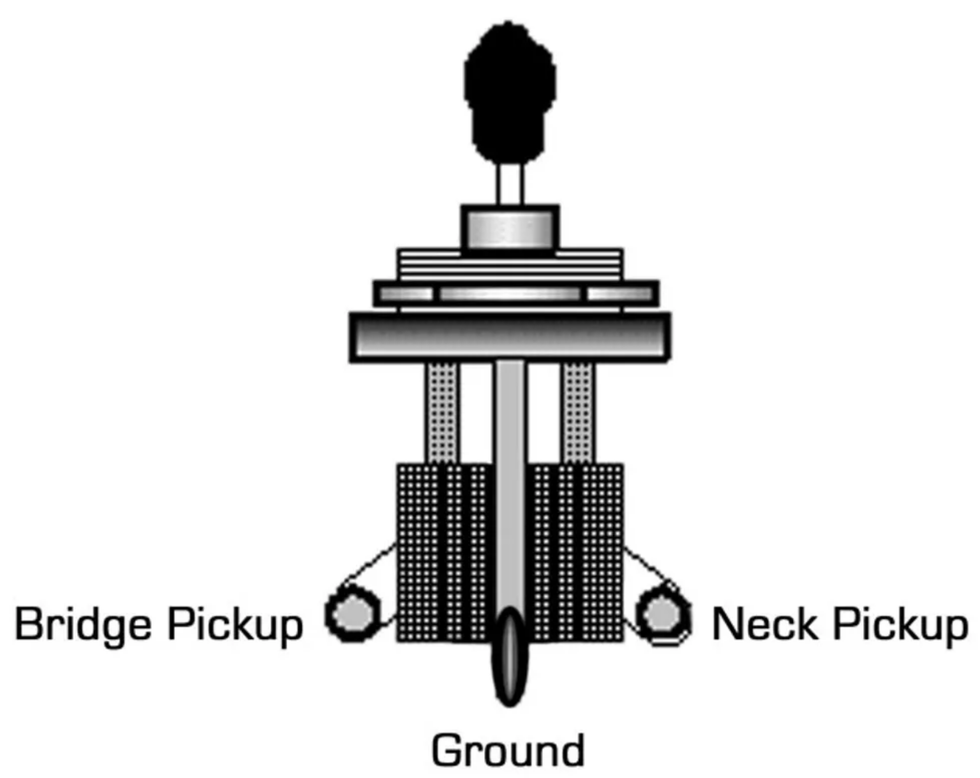
Unsolder each wire and then remove the switch by turning the mounting nut counter-clockwise. Some toggle switches have a hex nut and require a deep well socket wrench, others have a knurled collar nut that can be loosened or tightened using an adjustable toggle switch wrench.
Tip: Don't use a pair of pliers to remove the nut collar! Pliers will mar the knurled nut and if you slip, you'll also damage the top of your guitar.
Installing the new switch.
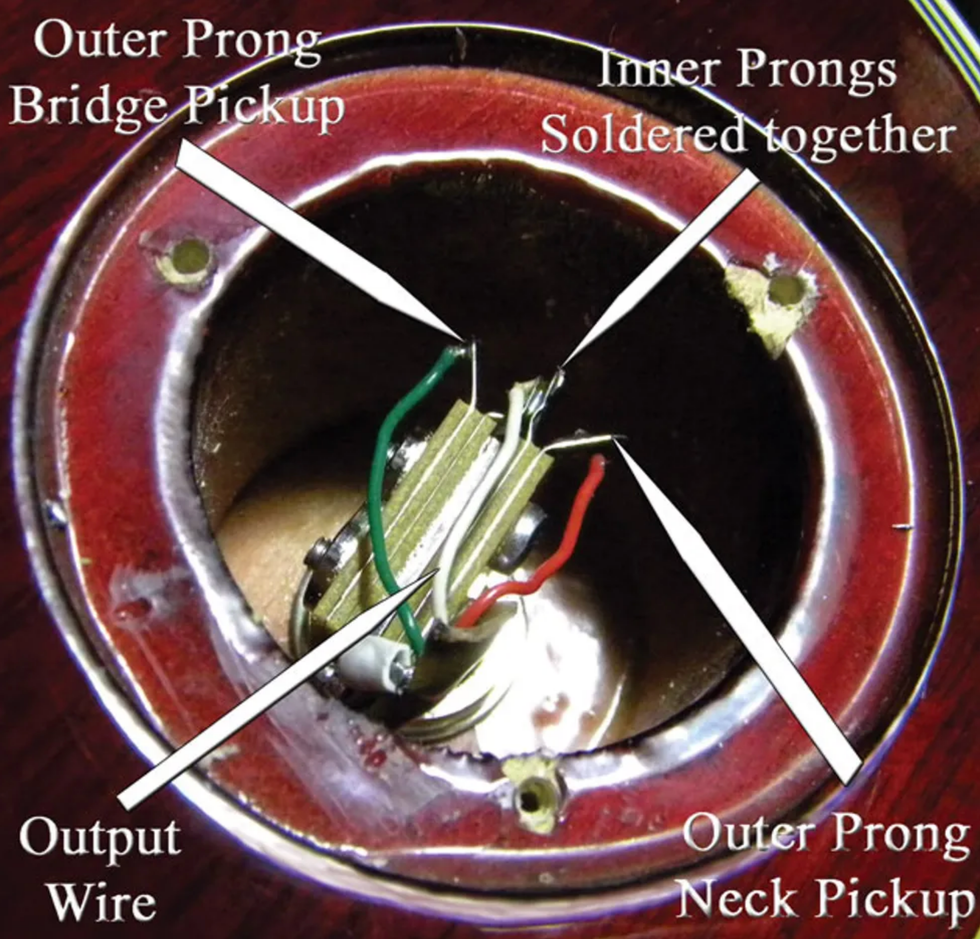
Photo 2
On the open switch I'm installing in this Ibanez, there are four prongs at one end and one prong on the opposite side (Photo 2). The four grouped prongs are the switch's inputs and output, and the single prong on the opposite side is the ground. In the group of four prongs, the two outer prongs are the inputs for the pickups and the two in the center are the outputs.
Before soldering, I use hemostats to gently bend the outer prongs (these connect to the pickups) away from the two output prongs between them. Then I crimp the two inner prongs together, because they'll share one wire from the switch's output to the output jack.
Note: Open 3-way toggles may differ physically. On a right-angle switch, for example, the ground prong and the input and output prongs are stacked vertically, and on some straight switches the ground prong is located between the two inputs, while the outputs are on the opposite side. But regardless of the layout, the principle is the same, and once you understand it you'll be able to confidently wire up your guitar. Study the wiring diagram that came with your new switch to confirm how it's configured, or use a multimeter to test and identify the input and output prongs.
Slide the new switch into the switch cavity, thread on the collar or nut, and then tighten it. Be careful when tightening the collar—it only needs to be "finger tight." If you torque it too much, you'll strip the threads. Also be sure to orient the switch so the toggle throw matches the original.
Switches get used a lot and eventually they can wear out. When this happens, you'll hear loud popping sounds or scratchy noises, and the signal may even cut out when you're switching pickups.
Solder up.
There are typically four wires to solder: the neck pickup, the bridge pickup, the output (this connects to the output lug on the jack), and the ground. Select a wire and clamp it to its respective prong with the hemostats, then briefly touch the tip of your soldering iron to preheat the prong and wire, and finally touch the solder to the connection just long enough to let a small amount of solder flow over the wire and prong. For detailed soldering tips, see "Tips for Replacing a Strat-style 5-way Switch."
Tip: When soldering, be careful not to heat up the prongs too much. Excessive heat can damage the switch.
Once you've soldered the four wires to their prongs, it's time to check your work. Gently tap the pickups with your hemostats for each position of the switch. You should get neck and bridge alone when the toggle is pointed up or down, respectively, as viewed from the playing position, and both when the toggle is in the center position.
If the neck and bridge toggle positions are working in reverse (i.e., the bridge pickup engages when the switch is up), then reverse the leads on the outer prongs. If the pickups are working correctly, reinstall the cover plate and you're done!
[Updated 11/10/21]
- Guitar Shop 101: Tips for Replacing a Tele-Style 3-Way Switch ... ›
- Mod Garage: How to Wire Alternative Tele 3-Way Switches - Premier ... ›
- Mod Garage: Inside the 3-way Telecaster Pickup Switch - Premier ... ›
Very diverse slate of tones. Capable of great focus and power. Potentially killer studio tool.
Sculpting tones in a reliably reproducible way can be challenging. Midrange emphasis may be a deal breaker for some.
$199 street
Bold-voiced, super-tunable distortion that excels in contexts from filtered boost to total belligerence.
Whitman Audio calls the Wave Collapse a fuzz—and what a very cool fuzz it is. But classifying it strictly as such undersells the breadth of its sounds. The Seattle, Washington-built Wave Collapse has personality at low gain levels and super crunchy ones. It’s responsive and sensitive enough to input and touch dynamics to move from light overdrive to low-gain distortion and degenerate fuzz with a change in picking intensity or guitar volume. And from the pedal’s own very interactive controls, one can summon big, ringing, near-clean tones, desert sludge, or snorkel-y wah buzz.
The Wave Collapse speaks many languages, but it has an accent—usually an almost wah-like midrange lilt that shows up as faint or super-pronounced. It’s not everyone’s creamy distortion ideal. But with the right guitar pairings and a dynamic approach, the Wave Collapse’s midrange foundation can still span sparkly and savage extremes that stand tall and distinctive in a mix. There’s much that sounds and feels familiar in the Wave Collapse, but the many surprises it keeps in store are the real fun.
Heavy Surf, Changing Waves
The absence of a single fundamental influence makes it tricky to get your bearings with the Wave Collapse at first. Depending on where you park the controls to start, you might hear traces of RAT in the midrange-forward, growly distortion, or the Boss SD-1 in many heavy overdrive settings. At its fuzziest, it howls and spits like aFuzz Face orTone Bender and can generate compressed, super-focused, direct-to-desk rasp. And in its darker corners, weighty doom tones abound.
The many personalities are intentional. Whitman Dewey-Smith’s design brief was, in his own words, “a wide palette ranging from dirty boost to almost square-wave fuzz and textures that could be smooth or sputtery.” A parallel goal, he says, was to encourage tone discoveries in less-obvious spaces. Many such gems live in the complex interrelationships between the EQ, filter, and bias controls. They also live in the circuit mash-up at the heart of the Wave Collapse. The two most prominent fixtures on the circuit are the BC108 transistor (best known as a go-to in Fuzz Face builds) and twin red LED clipping diodes (associated, in the minds of many, with clipping in the Turbo RAT and Marshall Jubilee amplifier). That’s not exactly a classic combination of amplifier and clipping section components, but it’s a big part of the Wave Collapse’s sonic identity.
The BC108 drives one of two core gain stages in the Wave Collapse. The first stage takes inspiration from early, simple fuzz topologies like the Tone Bender and Fuzz Face, but with a focus on what Dewey-Smith calls “exploiting the odd edges and interactivity in a two-transistor gain stage.” The BC108 contributes significant character to this stage. The second, post-EQ gain stage is JFET-based. It’s set up to interact like a tube guitar amp input stage and is followed by the clipping LEDs. Dewey-Smith says you can think of the whole as a “fairly” symmetric hard-clipping scheme.
“The magic of the circuit is that those gain stages are very complimentary. When stage one is running clean, it still passes a large, unclipped signal that hits the second stage, making those classic early distortion sounds. Conversely, when the first stage is running hot, it clips hard and the second stage takes a back seat—mostly smoothing out the rough edges of the first stage.” Factor in the modified Jack Orman pickup simulator-style section in the front end, and you start to understand the pedal’s propensity for surprise and expressive latitude.
Searchin’ Safari
The Wave Collapse’s many identities aren’t always easy to wrangle at the granular-detail level. The control set—knobs for bias, filter color, input level, and output level, plus switches for “mass” (gain,) “range”(bass content at the input), and “center” (shifts the filter’s mid emphasis from flat)—are interdependent in such a way that small adjustments can shift a tone’s character significantly, and it can be challenging to find your way back to a tone that sounded just right five minutes ago. Practice goes a long way toward mastering these sensitivities. One path to reliably reproducible sounds is to establish a ballpark tone focus with the filter first, dial in the input gain to an appropriately energetic zone, then shape the distortion color and response more specifically with the bias.
As you get a feel for these interactions, you’ll be knocked out by the sounds and ideas you bump into along the way. In addition to obvious vintage fuzz and distortion touchstones I crafted evocations of blistering, compressed tweed amps, jangly Marshalls, and many shades of recording console preamp overdrive. The Wave Collapse responds in cool ways to just about any instrument you situate out front. But while your results may vary, I preferred the greater headroom and detail that comes with single-coil pickup pairings. Humbuckers, predictably conjure a more compressed and, to my ears, less varied set of sounds. I also found black-panel Fender amps a more adaptable pairing than Vox- and Marshall-style voices. But just about any guitar or pickup type can yield magnificent results.
The Verdict
Though it’s hard to avoid its filtered midrange signature entirely, the Wave Collapse is a pedal of many masks. Once you master the twitchy interactivity between its controls, you can tailor the pedal to weave innocuously but energetically into a mix or completely dominate it. These capabilities are invaluable in ensemble performances, but it’s super enticing to consider how the Wave Collapse would work in a studio situation, where its focus and potency can fill gaps and nooks in color and vitality or turn a tune on its head. Pedals that stimulate the inner arranger, producer, and punk simultaneously are valuable tools. And while the Wave Collapse won’t suit every taste, when you factor together the pedal’s sub-$200 cost, thoughtful design, high-quality execution, and malleability, it adds up to a lot of utility for a very fair price.
PG contributor Tom Butwin demos seven direct boxes — active and passive — showing off sound samples, features, and real-world advice. Options from Radial, Telefunken, Hosa, Grace Design, and Palmer offer solutions for any input, setting, and budget.
Grace Design m303 Active Truly Isolated Direct Box
The Grace Design m303 is an active, fully isolated DI box, delivering gorgeous audio performance for the stage and studio. Our advanced power supply design provides unbeatable headroom and dynamic range, while the premium Lundahl transformer delivers amazing low-end clarity and high frequency detail. True elegance, built to last.
Rupert Neve Designs RNDI-M Active Transformer Direct Interface
Compact design, giant tone. The RNDI-M brings the stunning tone & clarity of its award-winning counterparts to an even more compact and pedalboard-friendly format, with the exact same custom Rupert Neve Designs transformers and discrete FET input stage as the best-selling RNDI, RNDI-S and RNDI-8.
Telefunken TDA-1 1-channel Active Instrument Direct Box
The TDA-1 phantom powered direct box uses high-quality components and classic circuitry for rich, natural sound. With discrete Class-A FET, a European-made transformer, and a rugged metal enclosure, it delivers low distortion and a broad frequency response. Assembled and tested in Connecticut, USA, for reliable performance and superior sound.
Hosa SideKick Active Direct Box
The Hosa SideKick DIB-445 Active DI delivers clear, strong signals for live and studio use. Ideal for guitars, basses, and keyboards, it minimizes interference over long runs. Features include a pad switch, ground lift, and polarity flip. With a flat frequency response and low noise, it ensures pristine audio.
Radial JDI Jensen-equipped 1-channel Passive Instrument Direct Box
The Radial JDI preserves your instrument’s natural tone with absolute clarity and zero distortion. Its Jensen transformer delivers warm, vintage sound, while its passive design eliminates hum and buzz. With a ruler-flat response (10Hz–40kHz) and no phase shift, the JDI ensures pristine sound in any setup.
Radial J48 1-channel Active 48v Direct Box
The Radial J48 delivers exceptional clarity and dynamic range, making it the go-to active DI for professionals. Its 48V phantom-powered design ensures clean, powerful signal handling without distortion. With high headroom, low noise, and innovative power optimization, the J48 captures your instrument’s true tone—perfect for studio and stage.
Palmer River Series - Ilm
The Palmer ilm, an upgraded version of the legendary Palmer The Junction, delivers studio-quality, consistent guitar tones anywhere. This passive DI box features three analog speaker simulations, ensuring authentic sound reproduction. Its advanced filter switching mimics real guitar speaker behavior, making it perfect for stage, home, or studio recording sessions.
Learn more from these brands!
PRS Guitars launches the CE 22 Limited Edition, featuring a 22-fret, 25” scale length, mahogany body, maple top, and vintage-inspired 58/15 LT pickups. With only 1,000 made, this model offers classic PRS aesthetics and a blend of warmth and bolt-on articulation for vintage-inspired tone and modern versatility.
PRS Guitars today announced the launch of the CE 22 Limited Edition. Only 1,000 will be made, marking the brief return of a 22-fret version of this bolt-on mainstay. The 22-fret, 25” scale length CE 22 Limited Edition combines a mahogany body and maple top with a bolt-on maple neck. The guitar is outfitted with PRS’s vintage-inspired 58/15 LT pickups, push/pull tone control, three-way toggle switch, and PRS locking tuners with wing buttons.
“This limited-edition, 22-fret model in our CE line offers classic PRS aesthetics and a voice that blends warmth with bolt-on articulation for vintage-inspired tone and modern versatility,” said PRS Guitars Director of Manufacturing, Paul Miles.
The original CE, with 24 frets, first appeared in stores in 1988 and offered players PRS design and quality with the added snap and response of traditional bolt-on guitars. It wasn’t until 1994 that a 22-fret version debuted, just a few months after the release of the Custom 22. Last in stores in 2008, this refreshed CE 22 Limited Edition marks the model’s return to the market.
With a unique combination of specs, the CE 22 Limited Edition is a different animal from the CE 24. These differences include the model of pickups, placement of pickups, and, of course, the number of frets. That is all while retaining the CE family’s combination of maple and mahogany, nitro finish, PRS Patented Tremolo and Phase III Locking Tuners.
The limited-edition model comes in Black Amber, Carroll Blue, Faded Blue Smokeburst, Faded Gray Black and McCarty Sunburst.
For more information, please visit prsguitars.com.
CE 22 Limited Edition | Demo | PRS Guitars - YouTube
Enjoy the videos and music you love, upload original content, and share it all with friends, family, and the world on YouTube.Billy Strings' signature dreads are distinguished by a 25" scale and wider nut width.