Magnetic soundhole pickups have come a long way since they were introduced many decades ago. If you’re considering getting one, here’s how to install it the right way.
A magnetic soundhole pickup makes a nice alternative to installing an under-saddle pickup in your acoustic guitar. Today’s soundhole pickups perform and sound much better than in decades past, so if you’ve written them off based on their old rep, it’s worth keeping an open mind and doing some research on modern options.
One of my clients wanted a pickup installed in his 2004 Martin D-28 that would not acoustically change its tone. Since under-saddle pickups can and do affect a guitar’s acoustic properties, I suggested a soundhole pickup.
After discussing different models, we decided on a L.R. Baggs M1 Active pickup (Fig. 1). Because the M1 has a built-in preamp, you can plug your guitar directly into a P.A. or acoustic amp and control your level with an onboard volume dial. Powered by a lithium watch battery, the M1 Active is a dual-coil humbucker designed so that one coil senses the strings and the other responds to the guitar’s physical resonance. Six adjustable pole pieces let you balance the output of each string—a handy feature that’s lacking in many older soundhole pickups.
Tip: Before you purchase a pickup, measure your guitar’s soundhole and check the manufacturer’s specs to confirm that the pickup fits your guitar. Soundholes are typically 4" in diameter, but they can vary.
My client wanted to use an endpin jack. To install it, I knew I’d first need to bore out the endpin hole. This operation has to be done carefully, so let’s look at each step. (While these instructions specifically reference the Baggs pickup, the procedure for installing other soundhole pickups is essentially the same.)
Removing the endpin.
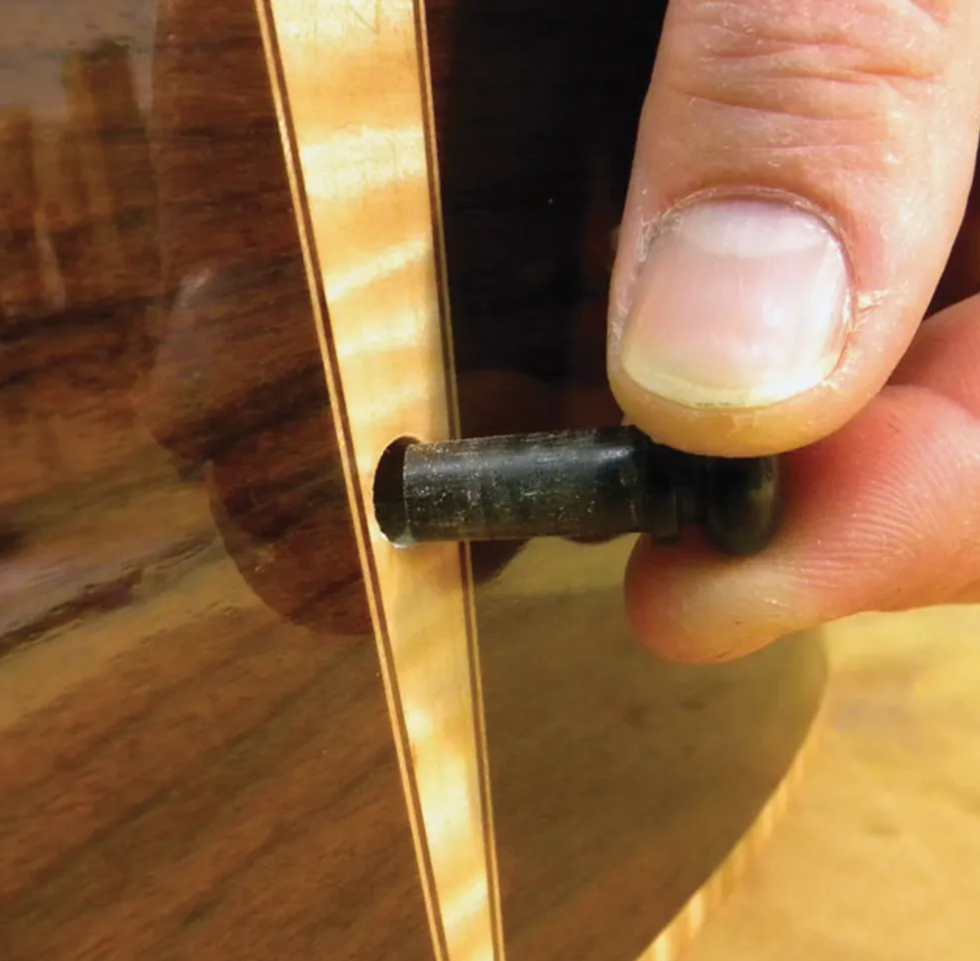
Fig. 2
Because this D-28 had its original endpin, I began by removing it from the body. In most cases, you can simply twist the endpin out with your fingers (Fig. 2). But if the endpin is glued in, you may have to carefully use a pair of pliers to remove it. In extreme cases, you might have to cut off the endpin flush to the body and use a drill bit to remove the remaining section. Luckily, the endpin on this D-28 came out easily, so I didn’t have to use pliers or a drill.
Reaming the endpin hole.
Now I was ready to bore out the hole to accommodate the endpin jack that comes prewired to the M1 Active harness. I used an endpin jack reamer from Stewart-MacDonald (stewmac.com). This tapered tool attaches to a drill and has a stepped ream configuration that provides a very clean, precise bore. It will bore a hole from 15/32" up to 1/2" in diameter.
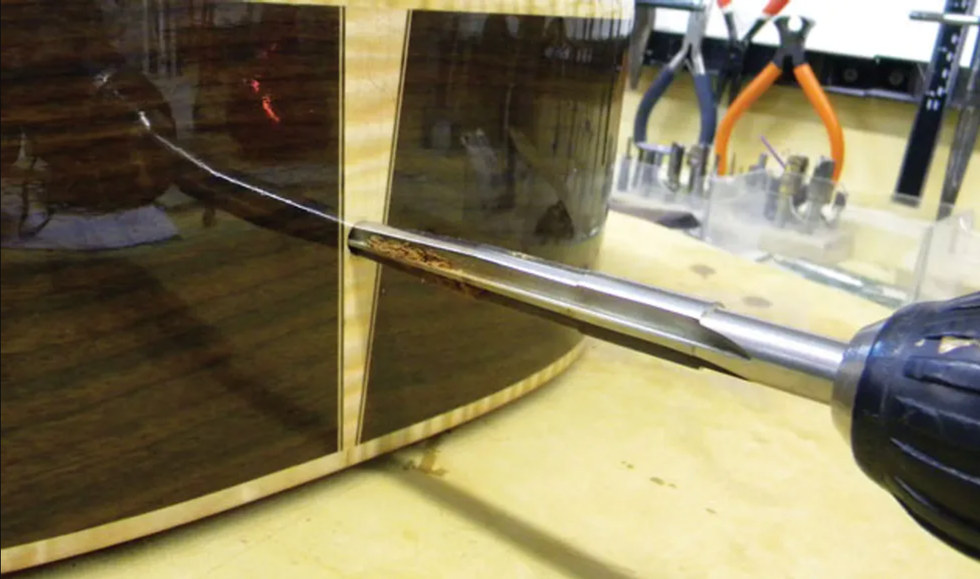
Fig. 3 — Using an endpin jack reamer from Stewart-MacDonald (stewmac.com) to enlarge the endpin hole.
In the past, guitar techs would use a spade bit and hope the hole was symmetrical and didn’t tear up the finish. Spade bits can slip and cause damage, and it’s difficult to keep them perfectly straight as you drill, so the endpin hole can end up crooked. With this reamer, you don’t have to worry about damaging the finish or tearing up wood around the hole. Also it’s easy to keep the reamer straight as you slowly drill (Fig. 3), so the hole ends up clean and accurate. This is the best tool I’ve found for this type of project.
After reaming the endpin hole, vacuum out any sawdust and debris from inside the guitar. It’s always good to keep the guitar’s interior clean.
Installing the endpin jack.
Before you install an endpin jack like this one, be sure to test the hole to be sure the jack fits correctly. The jack should be snug, but not so tight that you have to force it into the hole. If the hole feels too small, ream it out a bit more. Be patient and go slowly—never be in a hurry when drilling holes into a guitar!
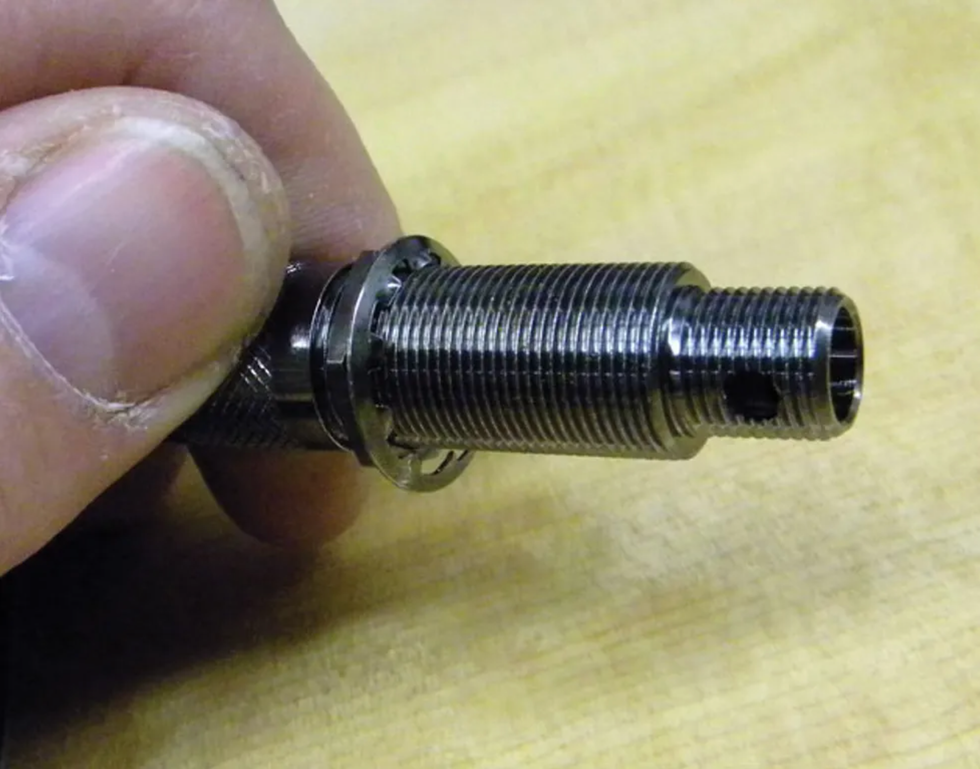
Fig. 4 — Install the rear nut and lock washer before mounting the jack from inside the body.
The next step is to install the rear nut and lock washer (Fig. 4) before mounting the jack into the hole from inside the body. To help with this tricky operation, insert a Phillip’s head screwdriver through the hole from the outside to help guide the jack into place. Slide the jack along the screwdriver shank until you can grab the jack from the outside and pull it into place.
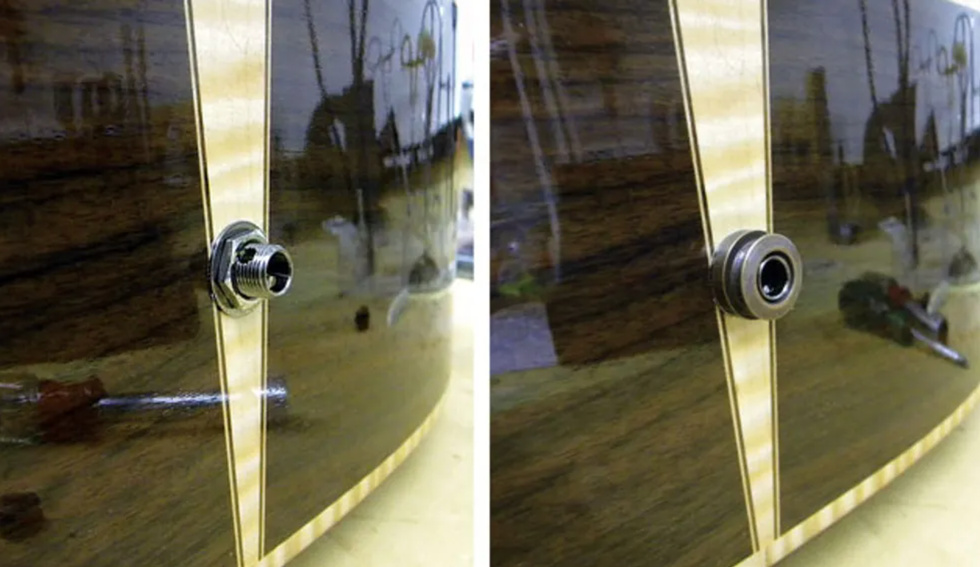
Fig. 5 — (left) After adding the external washer and nut, check the available threads as the jack protrudes out of the endpin hole. Will they accommodate the screw-on strap-button collar? Fig. 6. (right) The strap-button collar should be flush with the end of the jack.
Once it’s in place, check how much of the jack protrudes from the hole. Add the external washer and nut (Fig. 5), and then make sure there are enough accessible threads to grip the screw-on strap-button collar. It should be flush with the end of the jack (Fig. 6).
With the external washer, nut, and strap-button collar installed, the jack should be tight and not wiggle. If the jack is still loose, reach inside the guitar, remove the jack, and add a few turns to the interior nut and lock washer. Once the jack lines up correctly and is flush to the strap-button collar, remove the collar and tighten the outer nut. Finally, reinstall the collar.
I don’t recommend adding any glue or adhesive to the threads. This can cause a lot of damage and aggravation if you need to replace the endpin jack. This type of jack is designed to be tightened and loosened from the outside of the guitar. Adding adhesive interferes with the process and can cause problems down the road.
Installing the soundhole pickup.
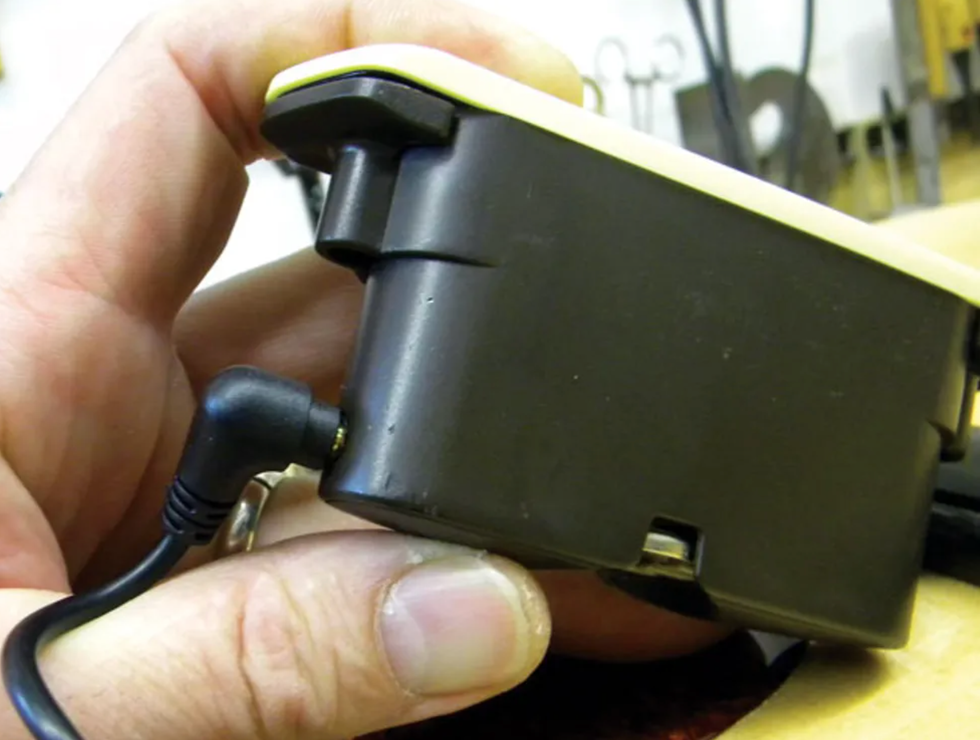
Fig. 7 — The endpin jack comes prewired to a harness that plugs into the M1-Active.
Before mounting the M1 Active, I inserted the 3.5mm plug at the other end of the endpin jack harness into the pickup’s output jack (Fig. 7).
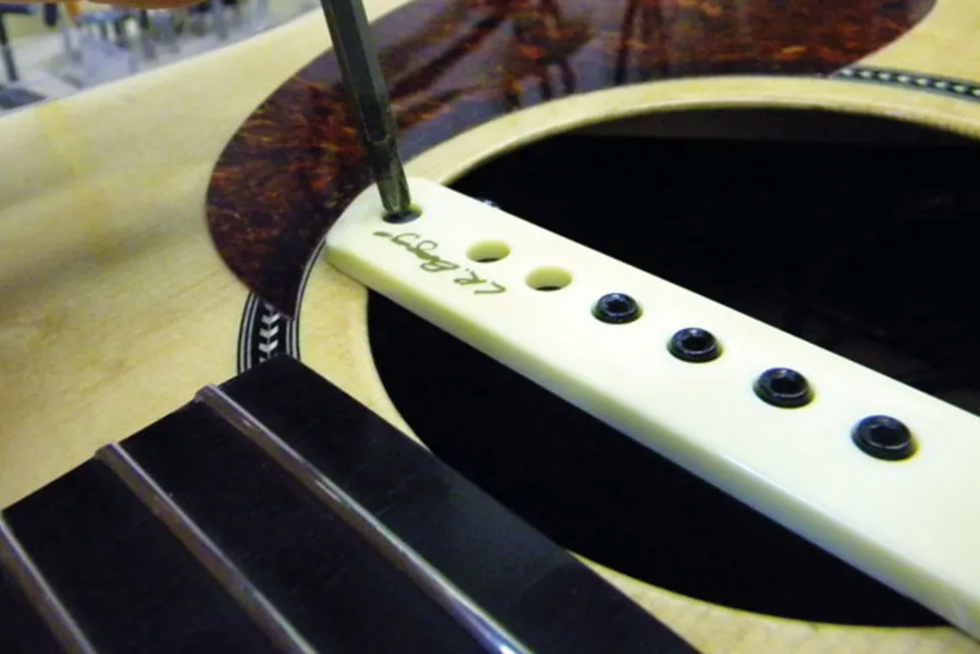
Fig. 8 — Gently tighten the pickup mounting brackets until they’re snug. Don’t overdo it!
Two brackets on either side of the pickup secure it in the soundhole. To make it easier to slide the pickup into the soundhole without damaging the finish, I loosened these brackets by turning their screws counterclockwise. After positioning the pickup in the soundhole—advanced slightly toward the neck—I gently tightened the brackets until they were snug (Fig. 8).
Tip: When you install a magnetic soundhole pickup, double-check that it’s truly secure. You don’t want it to fall into the body while you’re performing. That said, to avoid marring the finish or crushing the soundhole wood, don’t overtighten the mounting brackets.
Adjusting the pole pieces.
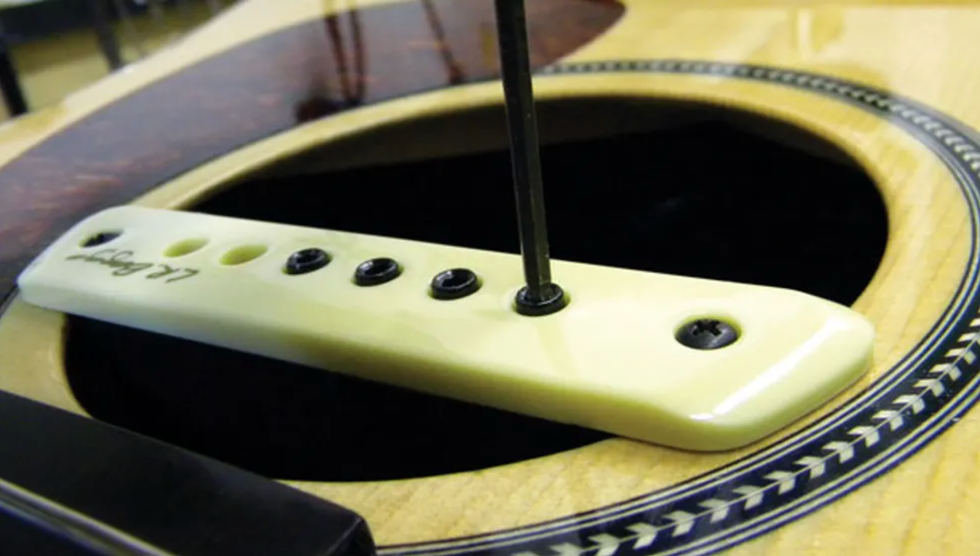
Fig. 9 — Adjusting the pole pieces with a hex wrench.
This is the last step, one that lets you tweak a modern mag pickup to your playing style—something you can’t really do with an under-saddle pickup.
The M1 Active typically ships with the 2nd-string pole piece removed, but included in the packaging. (This is because the B string tends to be much louder than the rest.) I recommend not installing it unless you really need it to balance the volume. The rest of the pole pieces are easy to adjust using the included 3/32" hex key.
First, make sure that the volume control is turned up all the way. To adjust the volume for each string, simply turn your hex key clockwise to lower the pole piece or turn your hex key counter-clockwise to raise it. Only raise the pole pieces a little at a time, and then test the volume by playing through an amplifier. It’s not necessary to raise them a lot—only about one full turn.
I usually lower the 6th-string pole piece flush to the top of the pickup, then adjust the rest of them to match sonically (not physically). You’ll probably find that the pole piece for the 3rd string is closest to the strings. Once all the strings have equal volume, you’re ready to perform or record with your new soundhole pickup.
[Updated 2/16/22]
- Acoustic Amplification: The Newbie's Guide - Premier Guitar ›
- Tools for the Task: Soundhole Pickups - Premier Guitar ›
- The 411 on Acoustic Guitar DIs - Premier Guitar ›
- Guitar Shop 101: How to Install Standard and Locking Strap Buttons - Premier Guitar ›
- 10 Guitar Soundhole Pickups for All Styles ›
- Get Your Perfect Acoustic Tone: Which Pickup Type Is Right For You? - Premier Guitar ›
Nineties-style high-gain heaviness that can be surgically tailored with a powerful EQ.
Excellent variations on high-gain modern distortion tones. Powerful EQ.
Not many low- or mid-gain sounds here.
$199
JHS Hard Drive
jhspedals.com
JHS makes many great and varied overdrive stomps. Their Pack Rat is a staple on one of my boards, and I can personally attest to the quality of their builds. The new Hard Drive has been in the works since as far back as 2016, when Josh Scott and his staff were finishing off workdays by jamming on ’90s hard rock riffs.
During these sessions, Scott’s go-to pedal was the Ibanez SM7 Smash Box. He realized that JHS had never offered anything along those lines, conferred with his then lead engineer, Cliff Smith, and the wheels were set in motion. Over several years of design, the Hard Drive evolved from an SM7 homage to a unique, original circuit.
JHS’ Hardest to Date
The Hard Drive’s control panel is streamlined, consisting of knobs for volume, mid frequency, drive, bass, middle, and treble. Driven by cascading gain stages, the Hard Drive can cop a wide range of modern distorted tones. Even at the lowest drive settings, the Hard Drive simmers, delivering massive bottom end on muted power chords. Nudging the drive up very slightly transforms the Hard Drive into a roaring Marshall JCM 900. And if you bring the drive all the way up, you’re in for all out chaos. Even with an amp set just louder than bedroom levels, the Hard Drive, with its volume at just 11 o’clock, is very loud and in-your-face. You don’t have to work hard to imagine how this could sound and feel like multiple stacks raging at Madison Square Garden in the context of a recorded track.
Even at the lowest drive settings, the Hard Drive simmers, delivering massive bottom end.
Zoning the Frequencies
Unlike some heavy pedals that concern themselves with mega-gain and little else, the Hard Drive’s EQ controls are very effective and powerful. Moving the treble knob from 11 o’clock to 1 o’clock changes the pedal’s tone and response characteristics completely, opening up and transforming the naturally relatively dark sound of my Fender Super Sonic amp. Turning the treble knob all the way off with the bass and mid knobs at noon gives me a vocal lead tone that’s creamy, warm, and still immediate and responsive.
The middle and mid frequency controls work in tandem. The mid control itself works as a cut or boost. The mid frequency control, however, lets you choose the specific frequency you cut or boost. I found these controls invaluable for sculpting tones that could leverage the copious gain without being abrasive. Meanwhile, adding more high midrange lends clarity to complex chords.
The Verdict
The Hard Drive is an unapologetically heavy pedal—if you’re looking for a dirt box that can double as a clean boost, well, the Hard Drive is not that. It’s meant to slay with gain, and it performs this task well and with a vengeance. There are countless dirt boxes on the market that deliver hot rodded, ’80s-style brown sound. Fewer cater to the subsequent generations of high-gain players that used the ’80s as a mere jumping-off point. The Hard Drive is very much voiced for this strain of heavy music. If that’s your jam, the Hard Drive is hard to beat.
Tailored for Yngwie Malmsteen's signature sound, the MXR Yngwie Malmsteen Overdrive is designd to offer simple controls for maximum impact.
Working closely alongside Yngwie, the MXR design team created a circuit that delivers clarity, expressive dynamics, and rich harmonics—all perfectly tailored for his light-speed arpeggios, expressive vibrato, and big, bold riffs. The control setup is simple, with just Level and Gain knobs.
"Want to sound like Yngwie? Crank both knobs to the max."
“This pedal is the culmination of 45+ years developing a sound that’s perfect in every possible way,” Yngwie says. “I present to you: the MXR Yngwie Malmsteen Overdrive. Prepare to be amazed.”
MXR Yngwie Malmsteen Overdrive highlights:
- Perfectly tailored for Yngwie Malmsteen's signature sound and style
- Simple control setup tuned for maximum impact
- Boost every nuance with superior clarity, expressive dynamics, and rich harmonics
- Dig into light-speed arpeggios, expressive vibrato, and big, bold riffs
The MXR Yngwie Malmsteen Overdrive is available now at $129.99 street/$185.70 MSRP from your favorite retailer.
For more information, please visit jimdunlop.com.
Featuring dual-engine processing, dynamic room modeling, and classic mic/speaker pairings, this pedal delivers complete album-ready tones for rock and metal players.
Built on powerful dual‑engine processing and world‑class UAD modeling, ANTI 1992 High Gain Amp gives guitarists the unmistakable sound of an original "block letter" Peavey 5150 amplifier* – the notorious 120‑watt tube amp monster that fueled more than three decades of modern metal music, from Thrash and Death Metal, to Grunge, Black Metal, and more.
"With UAFX Dream, Ruby, Woodrow, and Lion amp emulators, we recreated four of the most famous guitar amps ever made," says UA Sr. Product Manager Tore Mogensen. "Now with ANTI, we're giving rock and metal players an authentic emulation of this punishing high gain amp – with the exact mic/speaker pairings and boost/noise gate effects that were responsible for some of the most groundbreaking modern metal tones ever captured."
Key Features:
- A complete emulation of the early '90s 120‑watt tone monster that defined new genres of modern metal
- Powerful UAFX dual-engine delivers the most authentic emulation of the amp ever placed in a stompbox
- Complete album‑ready sounds with built‑in noise gate, TS‑style overdrive, and TC‑style preamp boost
- Groundbreaking Dynamic Room Modeling derived from UA's award-winning OX Amp Top Box
- Six classic mic/speaker pairings used on decades of iconic metal and hard rock records
- Professional presets designed by the guitarists of Tetrarch, Jeff Loomis, and The Black Dahlia Murder
- UAFX mobile app lets you access hidden amp tweaks and mods, choose overdrive/boost, tweak noise gate, recall and archive your presets, download artist presets, and more
- Timeless UA design and craftsmanship, built to last decades
For more information, please visit uaudio.com.
- YouTube
The Memphis-born avant-funk bassist keeps it simple on the road with a signature 5-string, a tried-and-true stack, and just four stomps.
MonoNeon, aka Dywane Thomas Jr., came up learning the bass from his father in Memphis, Tennessee, but for some reason, he decided to flip his dad’s 4-string bass around and play it with the string order inverted—E string closest to the ground and the G on top. That’s how MonoNeon still plays today, coming up through a rich, inspiring gauntlet of family and community traditions. “I guess my whole style came from just being around my grandma at an early age,” says Thomas.His path has led him to collaborate with dozens of artists, including Nas, Ne-Yo, Mac Miller, and even Prince, and MonoNeon’s solo output is dizzying—trying to count up his solo releases isn’t an easy feat. Premier Guitar’s Chris Kies caught up with the bassist before his show at Nashville’s Exit/In, where he got the scoop on his signature 5-string, Ampeg rig, and simple stomp layout, as well as some choice stories about influences, his brain-melting playing style, and how Prince changed his rig.
Brought to you by D’Addario.
Orange You Glad to See Me?
This Fender MonoNeon Jazz Bass V was created after a rep messaged Thomas on Instagram to set up the signature model, over which Thomas had complete creative control. Naturally, the bass is finished in neon yellow urethane with a neon orange headstock and pickguard, and the roasted maple neck has a 10"–14" compound radius. It’s loaded with custom-wound Fireball 5-string Bass humbuckers and an active, 18V preamp complete with 3-band EQ controls. Thomas’ own has been spruced up with some custom tape jobs, too. All of MonoNeon's connections are handled by Sorry Cables.
Fade to Black
MonoNeon’s Ampeg SVT stack isn’t a choice of passion. “That’s what they had for me, so I just plugged in,” he says. “That’s what I have on my rider. As long as it has good headroom and the cones don’t break up, I’m cool.”
Box Art
MonoNeon’s bass isn’t the only piece of kit treated to custom color jobs. Almost all of his stomps have been zhuzhed up with his eye-popping palette.
Thomas had used a pitch-shifting DigiTech Whammy for a while, but after working with Paisley Park royalty, the pedal became a bigger part of his playing. “When I started playing with Prince, he put the Whammy on my pedalboard,” Thomas explains. “After he passed, I realized how special that moment was.”
Alongside the Whammy, MonoNeon runs a Fairfield Circuitry Randy’s Revenge (for any time he wants to “feel weird”), a literal Fart Pedal (in case the ring mod isn’t weird enough, we guess), and a JAM Pedals Red Muck covers fuzz and dirt needs. A CIOKS SOL powers the whole affair.
Shop MonoNeon's Rig
Fender MonoNeon Jazz Bass V
Ampeg SVT
DigiTech Whammy
CIOKS SOL