
When it comes to cosmic tone, itās critical to have functional potentiometers. Hereās how to install them correctly and keep them ship-shape afterward.
(Originally published March 27, 2020)
Over the last few years, we've discussed the construction of potentiometers and diagnosed several potential problems with these essential, yet sometimes pesky, electric guitar components. (If you missed these, check out āThe Trouble with Tribbles" and āDealing with Knobs and Pots.")
Let's now consider problems that can occur when replacing pots, and then discuss ways to either avoid or solve these potential issues. Over the years I've analyzed virtual cries for help from hundreds of customers, and as a result I can safely say that non-working pots fall into one of two categories that account for essentially 100 percent of the problems: (1) mechanical damage while installing the pots, or (2) soldering damage when wiring them up. It's very, very rare that a pot comes DOA from the factory. Reputable manufactures have quality control systems to prevent this, so it's almost guaranteed that a problem with a potentiometer has to do with the end user. So let's take a look at these two scenarios.
Mechanical damage.
In this case, the most common damage is caused by overtightening the nuts, especially when installing pots into a guitar with a stiff wooden top like a Les Paul.When installing pots, forget the adage "the more, the merrier." Instead, keep this in mind: The next level beyond "tight" and "super-tight" is "broken." Guitar pots don't have to handle a lot of weight or withstand a nuclear strike, so they should only be screwed down tight enough to remain immobile when you rotate the knobs.
First and foremost, it's essential that you install the pots correctly. This might sound obvious or trivial, but you can't imagine how many guitars I've seen where pots have been installed in, shall we say, unusually creative ways.
Here's how to do it right: The first step is to slip the lock washer onto the pot shaft and then insert the shaft through the hole in your guitar's pickguard or top. With the shaft protruding through the other side, now put the flash washer on the shaft, followed by the hex nut, which you can initially thread with your fingers. Finally, use a socket wrench, small adjustable wrench, or an ESP Multi Spanner to carefully tighten the hex nut until it's snug against the washer and doesn't turn anymore.
If you discover that the pot sits too high on your pickguard or guitar top, you'll need to remove the pot and start over by first threading another hex nut on the shaft, followed by the lock washer, and then repeating the installation process. This "underside" hex nut will let you adjust the height of the pot to your individual wishes. Simply insert the shaft through the pickguard or top, eyeball the height, and adjust the hidden hex nut up or down on the pot threads as needed. Finally, add the flash washer and exterior hex nut to complete the process. The key here is to always remember the correct order of these parts.
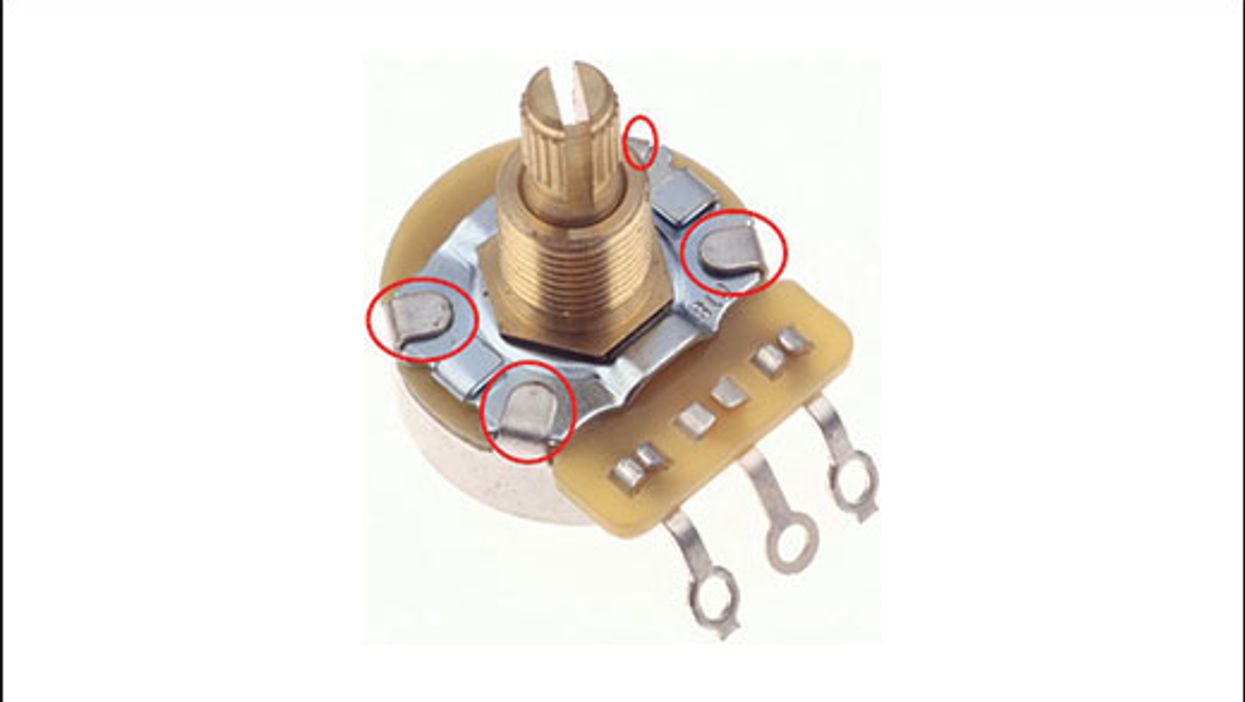
So what happens to a pot when you overtighten it? If the four tiny tabs that hold the little metal plate to the shaft, wiper, etc., are unable to withstand the force applied to the shaft when you torque down the hex nut, they'll bend and let the plate and the shaft rotate freely. Hmm, no good.
But don't worry, it's an easy fix: Use needle-nose pliers or a small flathead screwdriver to gently pull the tabs up a little more so you can rotate the plate and return it to its centered position. Then bend the tabs back into place so they hold the shaft securely (Photo 1). Done!
It's almost guaranteed that a problem with a potentiometer has to do with the end user.
Other mechanical damage is typically caused by trying to remove or install knobs that aren't made for a given pot's shaft. When you try to hammer down a non-fitting knob, you can easily break the shaft by forcing it through the knob bushing. (In most cases, this happens when trying to force a metric knob, measured in millimeters, onto a U.S. pot shaft, measured in fractions of an inch.)
If you try to remove a jammed knob that someone managed to "fit" using brute forceāor even attach with superglueāchances are good you'll break the wiper inside the pot and pull out the entire shaft along with the knob.
Yet this is easy to avoid: Never try to force a knob onto the pot shaft; instead use one that fits. If you need to remove an improperly fitted knob, use a heat gun to soften the plastic or a saw to split it open. Don't use any upward or downward pressureāthat will ruin the pot, for sure.
Soldering damage.
The easiest way to damage a pot is to overheat it, especially when attaching a ground wire to the back casing. It's a common mistake. When it comes to how long your soldering iron should be in contact with the pot, the golden rule is "as short as possible, but as long as necessary." It takes time to develop this skill, so you'll need to practice. Also, to avoid disaster it's crucial to have the right tools. Here are some helpful guidelines for soldering onto pots.
1. If you don't have a soldering station with an adjustable temperature control, you need at least two different handheld soldering irons: one rated at around 30 watts and the other around 60 watts. This is exactly what I use for any soldering job outside the shop. The 30-watt iron is for soldering on the pot terminals, pickup selector switch terminals, output jack terminalsāthose common tasks. The 30-watt iron is our daily go-to tool for all things guitar at the shop.
The 60-watt iron is for soldering to pot casings and Stratocaster tremolo claws. Don't try to solder to a pot's case with a 30-watt ironāthe solder will need a very long time to flow and you'll expose the pot to a lot of heat. With a 60-watt iron, the solder will flow instantly and soldering time will be very short. This yields strong solder joints.
2. If you want to be on the safe side, remove the case from the pot before you solder to it. That's what I do when I want to avoid damaging vintage pots. To remove the case, gently bend the four metal tabs away from you. To reinstall the case, simply bend the tabs back into place. Take your time and go easy.
3. Always rub the metal casing with 180-grit sandpaper before soldering to it. Manufacturers use all kinds of greasy coatings to protect the case against oxidation, which can make a soldering job close to impossible. So sand the case until it's clean and shiny, and then clean it with naphtha. This will provide the perfect base for a good soldering joint. But don't do this to vintage pots! For those, it's paramount to preserve the patina that comes with age.
4. If you decide not to remove the pot's case, strive to avoid any unnecessary heat. Here are some helpful tips:
- Always turn the pot down to 0 before soldering to its case.
- Use a heat sink on the case. For this job, you'll need something bigger than just a standard clip. To enhance its effect, you can chill the heat sink in the fridge ahead of time.
- If you need to connect one of the terminals to ground, as on most volume pots, don't try to solder the terminal directly to the case by bending it back. This may look cool and vintage, but you'll need a lot of heat and good soldering technique to pull this off. Simply use a piece of solid-core wire and solder it to the terminal and from there to the caseāthis yields the same performance.
- After tinning the case, let it completely cool down before you solder the wire to it.
5. Don't apply excessive solder to a terminalāit will flow down the terminal's leg and find its way inside the pot.
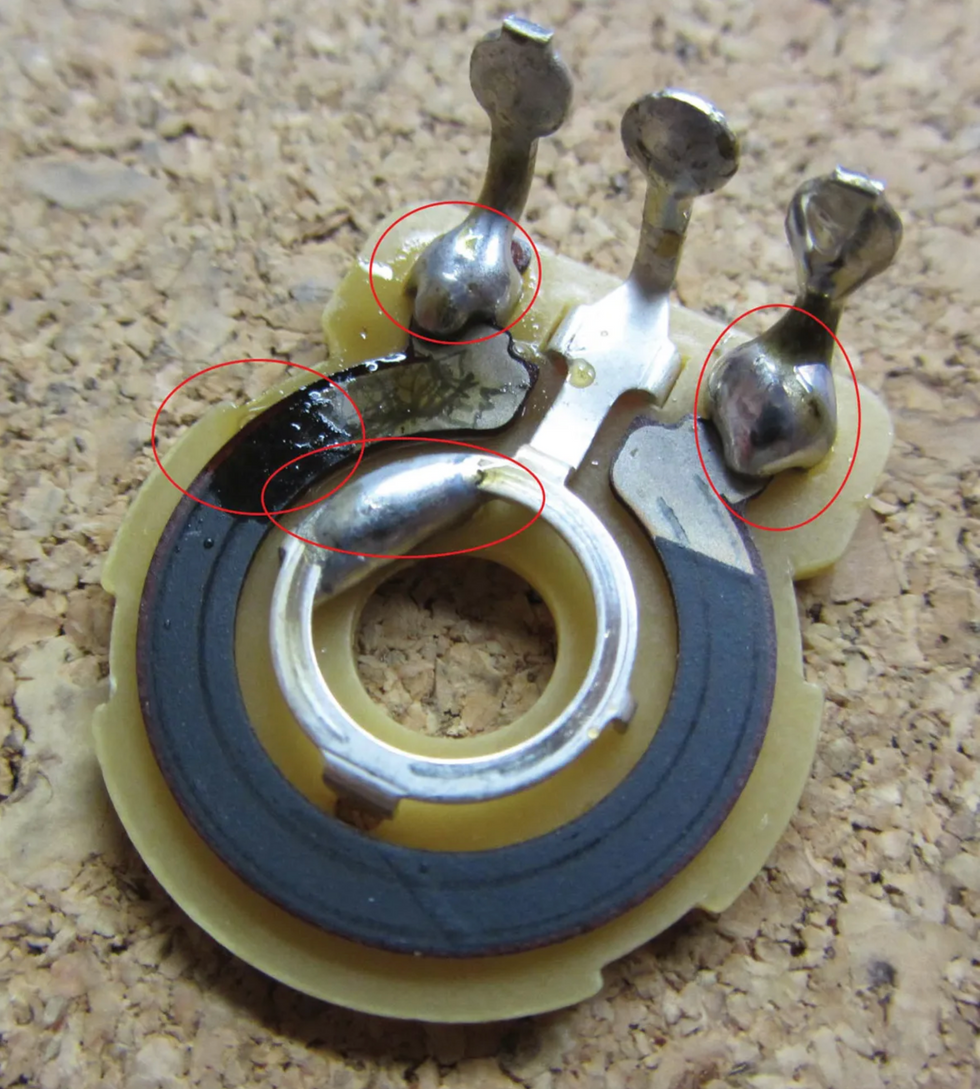
Photo 2 ā Photo courtesy singlecoil.com
Photo 2 shows a pot from my "Hall of Shame" collection. Look at the two red marks at the end of the two terminals. These solder blobs are what happen when you apply way too much solder. There's also a big solder blob on the middle terminal's inner ring. How someone managed to get the solder inside there will forever remain a mystery. On the upper left, notice how the carbon is melted and buckled from too much heat. This poor little thing had to endure cruel treatment ... may it rest in peace!
Remember, if you don't solder regularly, there's no shame in having a professional guitar tech do the work for youāespecially when you have a vintage guitar and need to work on its original pots. Retaining your guitar's value is an excellent investment. Soldering on pots isn't rocket science, but it requires the right tools, experience, and a steady hand.
Maintaining pots.
These are mechanical devices with a limited lifespan, and it's inevitable they'll start to wear out over time. Yes, it's possible to clean, repair, and renew the carbon inside, but this only makes sense for a vintage pot, not a modern one. Instead of trying to repair the latter, it's more cost-effective to simply replace it.
Typical pots are not completely sealed; they have open areas around the terminals, so moisture and dust can creep inside. To prevent this, you can buy pots that are completely sealed or cover standard pots with an additional dust seal. Usually a guitar's electronic compartment is closed and not directly exposed to contamination, so an additional dust cover isn't necessary for our applications.
Also, there's no need to maintain your pots. At a certain point, they'll begin to wear out and make scratchy noises when you turn them. This means it's replacement time! You can delay this a bit with contact cleaner, but this treatment is only temporary. Contact cleaner is cool for some applications, such as servicing hi-fi equipment, but it can't repair worn-out pots.
My advice? Never use contact cleaner on your pots because the cleaner will attract debris, and when it evaporates you're left with hard, dry crudāsomething you definitely do not want inside your pot. To combat this, you'll spray more cleaner and thus begin a destructive cycle. This results in replacing the pot much earlier than necessary, exactly the opposite of what you want. We all know the road to hell is paved with good intentions. If a pot is really dusty and making scratchy noisesāmaybe you took your Tele to Burning Manāthe best thing to do is open it up and swab everything with Q-Tips soaked in naphtha.
Finally, when it comes time to replace a pot, pay attention to the specs. Some pots are designed for 2,000 rotations while others are tested to withstand 20,000. You get what you pay for, and this isn't a place to cut corners.
All right! Next month we'll examine the Peavey Omniac JD, Jerry Donahue's signature model T-style, and I'll show you how to transfer its sophisticated wiring scheme to your own guitar. Until then ... keep on modding!
- Three Must-Try Guitar Wiring Mods - Premier Guitar āŗ
- Mod Garage: Three Ways to Wire a Tone Pot - Premier Guitar āŗ
- Mod Garage: Dealing with Knobs and Pots - Premier Guitar āŗ
Lutefish, the real-time music collaboration device and platform, is excited to announce a suite of new features designed to simplify setup, streamline collaboration, and offer more flexible subscription options for Lutefish Stream users. These latest updates, Audio Presets, Automatic Session Recall, Improved Scheduling with Contact Visibility, and a new Yearly Subscription Plan, are all about making it easier than ever for musicians to jam together, no matter where theyāre based.
Save Time and Stay in the Flow with Audio Presets & Session Recall
Musicians can now save and reuse their exact audio settings, reducing setup time and ensuring every session sounds exactly as they want.
- Automatic Session Recall: When users leave a session, their current audio levels are automatically saved and restored when they rejoin.
- User-Defined Audio Presets: Each user can create and name up to five custom presets, like āBand Practice,ā āStudio Mic Setup,ā or āQuick Jam,ā making it effortless to jump back in with the perfect sound.
āThese tools are all about saving time and hassle,ā said Patrick Finn, Business Manager at Lutefish. āMusicians want to make music, not spend time rebalancing levels every session. With presets and recall, weāre giving them time back and helping them sound their best, every time.ā
Smarter Scheduling and Contact Visibility
The latest update to Lutefish also made it easier to find collaborators and book sessions. Users can now:- View all their contacts at a glance when scheduling a session.
- Instantly identify which contacts own a Lutefish Stream deviceāso they will always know whoās ready to jam.
Go Yearly and Save 20%
Lutefish now offers a Yearly Subscription Plan, providing users with the same great access as the monthly plan at a 20% discount.
This option is now available within the Lutefish app and web platform, and current monthly users are eligible for a discount with an upgrade to a yearly subscription.
Lutefishās mission has always been to empower musicians to connect and collaborate without boundaries. With these new updates, Lutefish Stream continues to break down barriersāwhether youāre jamming with a friend across town or collaborating with a bandmate 500 miles away.
For more information and to start jamming today, visitlutefish.com.
Empress Effects is proud to announce the release of the Bass ParaEq, a bass-specific parametric EQ pedal.
Building on the success of their acclaimed ParaEq MKII series, which has already gained popularity with bassists, the Bass ParaEq offers the same studio-grade precision but with features tailored for bass instruments.
Basses of all types ā including electric and upright basses with active and passive electronics ā can benefit from the Bass ParaEqās tone-sculpting capabilities.
The new pedal follows the success of the Empress Bass Compressor and ParaEq MKII Deluxe, which have become some of the companyās best-reviewed and top-selling products. The Bass Compressorās popularity confirmed what Empress had long suspected: bassists are eager for tools built with their needs in mind, not just adaptations of guitar gear.
The Bass ParaEq retains the lineās powerful 3-band parametric EQ and studio-style features while introducing a bass-optimized frequency layout, a selectable 10M⦠Hi-Z input for piezo-equipped instruments, a dynamically-adjusted low shelf, and automatic balanced output detectionāperfect for live and studio use alike.
The Bass ParaEq also offers an output boost, adjustable by a dedicated top-mounted knob and activated by its own footswitch, capable of delivering up to 30dB of boost. Itās perfect for helping your bass punch through during key moments in live performance.
Whether dialing in clarity for a dense mix or compensating for an unfamiliar venue, the Bass ParaEq offers precise tonal control in a compact, road-ready form. With 27V of internal headroom to prevent clipping from even the hottest active pickups, the Bass ParaEq is the ultimate studio-style EQ designed to travel.
Key features of the Bass ParaEq include:
- Adjustable frequency bands tailored for bass instruments
- Selectable 10M⦠Hi-Z input for upright basses and piezo pickups
- Auto-detecting balanced output for long cable runs and direct recording
- Three sweepable parametric bands with variable Q
- High-pass, low-pass, low shelf, and high shelf filters
- Transparent analog signal path with 27V of internal headroom
- Buffered bypass switching
- Powered by standard 9V external supply, 300mA (no battery compartment)
The Bass ParaEq is now shipping worldwide. It can be purchased from the Empress Effects website for $374 USD and through authorized Empress dealers globally.
Few musical acts did more to put their fame and fortune to good use than punk rock icon Wayne Kramer. Known for his enduring commitment to activism, especially in justice reform, his life story embodies the defiant, DIY ethos of punk, directly inspiring generations of bands and musicians who followed. Now, fans and fellow musicians alike can attempt to emulate Kramerās incendiary sound with the new, limited-edition pedal.
Designed before his death in February 2024, Wayne Kramerātogether with friend Jimi Dunlop (Dunlop CEO) and Daredevil Pedals owner Johnny Wator āthe pedal features artwork from artist and activist Shepard Fairey (Obey Clothing founder). A majority of profits from the sale of the pedal goes directly to Kramerās charity supporting the rehabilitation of incarcerated people of all ages, genders, and backgrounds.
In honor of his close friend, Tom Morelloāthe innovative guitarist behind Rage Against the Machine, Audioslave, the Nightwatchman, and moreādemoed the pedal, showcasing its sound and shining light on Wayne Kramerās incredible legacy.
Tom Morello Introduces MC5 Wayne Kramer-Inspired Pedal For Charity: MXR Jail Guitar Doors Drive
"What they've tried to bake into the MXRĀ® Jail Guitar Doors Drive distortion pedal is not just Wayne's sound but Wayne's attitude, and the grit and the rawness of Detroit and of the MC5," said Morello, one of Kramerās best friends, during his demo of the pedal. "This is the guitar pedal that was used on the song 'Heavy Lifting' that I recorded with Wayne for the last MC5 record.
"Named after the late rocker's charityāwhich provides instruments and art workshops to incarcerated individuals as rehabilitation toolsāthe MXRĀ® Jail Guitar Doors Drive pedal aims to capture all of the high-voltage energy of Wayne Kramer's sound. It features two uniquely voiced gain circuits cascaded together with a singular pot controlling both the output level of each circuit and the overall saturation level of the distortion.
Music makers looking to capture Kramerās raw, fiery sound can pick up the new MXRĀ® Jail Guitar Doors Drive pedal, exclusively on Reverb via The Official MXR Jail Guitar Doors Drive Reverb Shop for $199, here: https://reverb.com/shop/the-official-mxr-jail-guitar-doors-reverb-shop.
The veteran Florida-born metalcore outfit proves that you donāt need humbuckers to pull off high gain.
Last August, metalcore giants Poison the Well gave the world a gift: They announced they were working on their first studio album in 15 years. They unleashed the first taste, single āTrembling Level,ā back in January, and set off on a spring North American tour during which they played their debut record, The Opposite of December⦠A Season of Separation, in full every night.
PGās Perry Bean caught up with guitarists Ryan Primack and Vadim Taver, and bassist Noah Harmon, ahead of the bandās show at Nashvilleās Brooklyn Bowl for this new Rig Rundown.
Brought to you by DāAddario.Not-So-Quiet As a Mouse
Primack started his playing career on Telecasters, then switched to Les Pauls, but when his prized LPs were stolen, he jumped back to Teles, and now owns nine of them.
His No. 1 is this white one (left). Seymour Duncan made him a JB Model pickup in a single-coil size for the bridge position, while the neck is a Seymour Duncan Quarter Pound Staggered. He ripped out all the electronics, added a Gibson-style toggle switch, flipped the control plate orientation thanks to an obsession with Danny Gatton, and included just one steel knob to control tone. Primack also installed string trees with foam to control extra noise.
This one has Ernie Ball Papa Hetās Hardwired strings, .011ā.050.
Here, Kitty, Kitty
Primack runs both a PRS Archon and a Bad Cat Lynx at the same time, covering both 6L6 and EL34 territories. The Lynx goes into a Friedman 4x12 cab thatās been rebadged in honor of its nickname, āDonkey,ā while the Archon, which is like a ārefined 5150,ā runs through an Orange 4x12.
Ryan Primackās Pedalboard
Primackās board sports a Saturnworks True Bypass Multi Looper, plus two Saturnworks boost pedals. The rest includes a Boss TU-3w, DOD Bifet Boost 410, Caroline Electronics Hawaiian Pizza, Fortin ZUUL +, MXR Phase 100, JHS Series 3 Tremolo, Boss DM-2w, DOD Rubberneck, MXR Carbon Copy Deluxe, Walrus Slo, and SolidGoldFX Surf Rider III.
Taverās Teles
Vadim Taverās go-to is this cherryburst FenderĀ Telecaster, which he scored in the early 2000s and has been upgraded to Seymour Duncan pickups on Primackās recommendation. His white Balaguer T-style has been treated to the same upgrade. The Balaguer is tuned to drop C, and the Fender stays in D standard. Both have DāAddario strings, with a slightly heavier gauge on the Balaguer.
Dual-Channel Chugger
Taver loves his 2-channel Orange Rockerverb 100s, one of which lives in a case made right in Nashville.
Vadim Taverās Pedalboard
Taverās board includes an MXR Joshua, MXR Carbon Copy Deluxe, Empress Tremolo, Walrus ARP-87, Old Blood Noise Endeavors Reflector, MXR Phase 90, Boss CE-2w, and Sonic Research Turbo Tuner ST-200, all powered by a Voodoo Lab Pedal Power 2 Plus.
Big Duff
Harmonās favorite these days is this Fender Duff McKagan Deluxe Precision Bass, which heās outfitted with a Leo Quan Badass bridge. His backup is a Mexico-made Fender Classic Series ā70s Jazz Bass. This one also sports Primack-picked pickups.
Rental Rockers
Harmon rented this Orange AD200B MK III head, which runs through a 1x15 cab on top and a 4x10 on the bottom.
Noah Harmonās Pedalboard
Harmonās board carries a Boss TU-2, Boss ODB-3, MXR Dyna Comp, Darkglass Electronics Vintage Ultra, and a Voodoo Lab Pedal Power 2 Plus. His signal from the Vintage Ultra runs right to the front-of-house, and Harmon estimates that that signal accounts for about half of what people hear on any given night.