
This technique works for all standard single-coil pickups, including Fender’s template design, so dive in!
It’s not difficult to replace the wiring in your pickups, but it takes some finesse. Here’s a step-by-step guide.
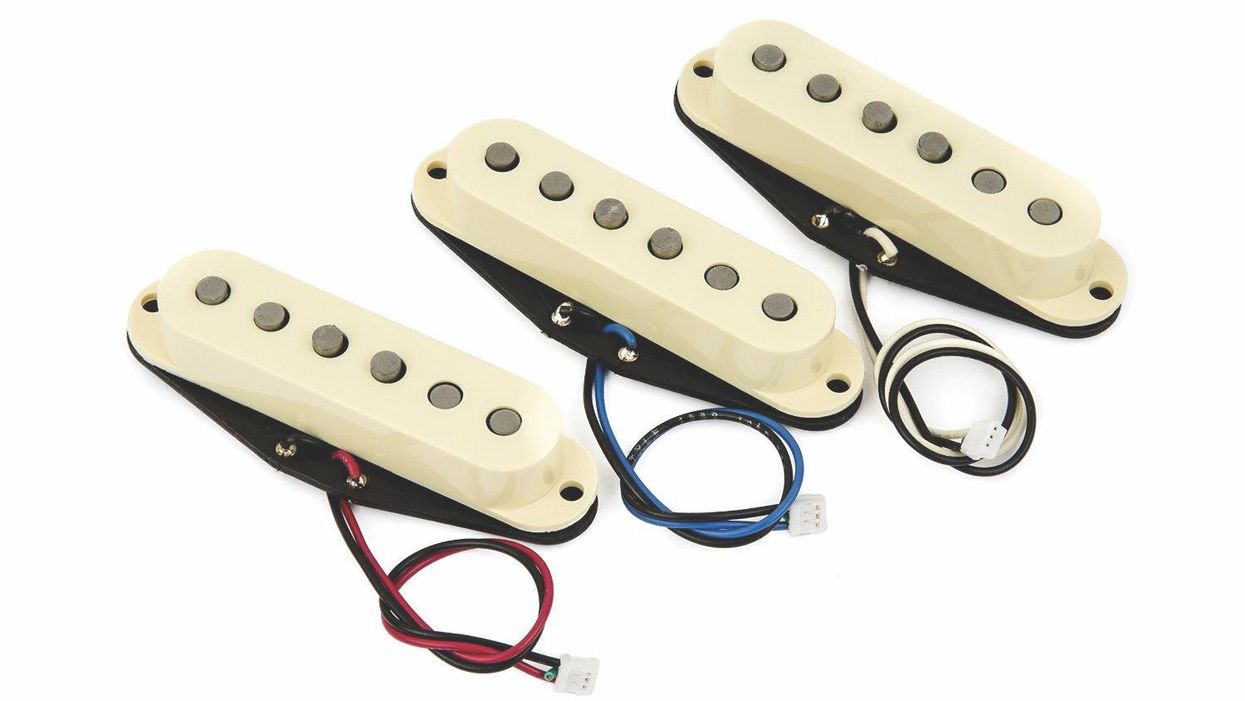
Hello and welcome back to Mod Garage. After numerous requests, this month we’ll have a closer look at changing wires on a single-coil pickup. As our guinea pig for this, I chose a standard Stratocaster single-coil, but it’s basically the same on all single-coil pickups and easy to transfer. It’s not complicated but it is a delicate task to not destroy your pickup during this process, and there are some things you should keep in mind.
Why would you change wires on a pickup? Here’s a list of reasons I mostly hear in the shop when someone brings in a pickup for this operation:
1. A wire is broken and needs to be replaced.
This can happen if the wire was bent too much, or it was damaged with a soldering iron, a screw split it, etc.
2. A used pickup was bought on eBay or a similar marketplace and the wires are too short for your wiring.
Maybe one of the pre-owners snipped it out of the circuit at some point, rather than desoldering it to save the full wire length. The quick-and-dirty solution in such a case will be to extend the wire by soldering another piece of wire to it. For the “Trekkies” of us, that’s the way James T. Kirk and Scotty would fix it. Jean-Luc Picard and Geordi La Forge would solder a new wire with the correct length to the pickup to replace the old one. Make it so!
3. Changing the wires as a quality update.
Often cheap pickups have thin and shoddy plastic-coated wires that will likely break soon. It’s always a good investment regarding reliability and longevity to swap them with a good quality wire.
4. Changing the wires for tonal and/or aesthetic reasons.
Changing the wire material can alter the sound of a pickup, so replacing a cheap plastic-coated wire with a good-quality cloth-covered wire will not only look more vintage but will also result in a slightly warmer tone. Or the other way around for a slightly brighter tone. Or maybe you want to upgrade your pickups with a high-quality Teflon-coated or audiophile HiFi-wire. Perhaps you like to have neon green and pink wires on your pickups, for whatever reason.
5. Changing the wires for a shielded cable to add more shielding to the pickup.
This often goes hand in hand with shielding the complete single-coil pickup and is a logical step in such cases.
6. Changing the wires with NOS wire.
Often vintage pickups are modded with a non-original wire, sometimes as part of a repair. Bringing them back to factory specs is a good investment to keep the value of a vintage pickup alive.
Let's Begin
So, you see there are some good reasons to change the wires on a pickup. This list is not complete; for sure there are others.
Now, let’s start our project by preparing the pickup for this operation. It’s first and foremost important to protect the windings of your pickup against any damage. It only takes a fraction of a second to hit the winding with the tip of the soldering iron and this is a scenario you do not want.
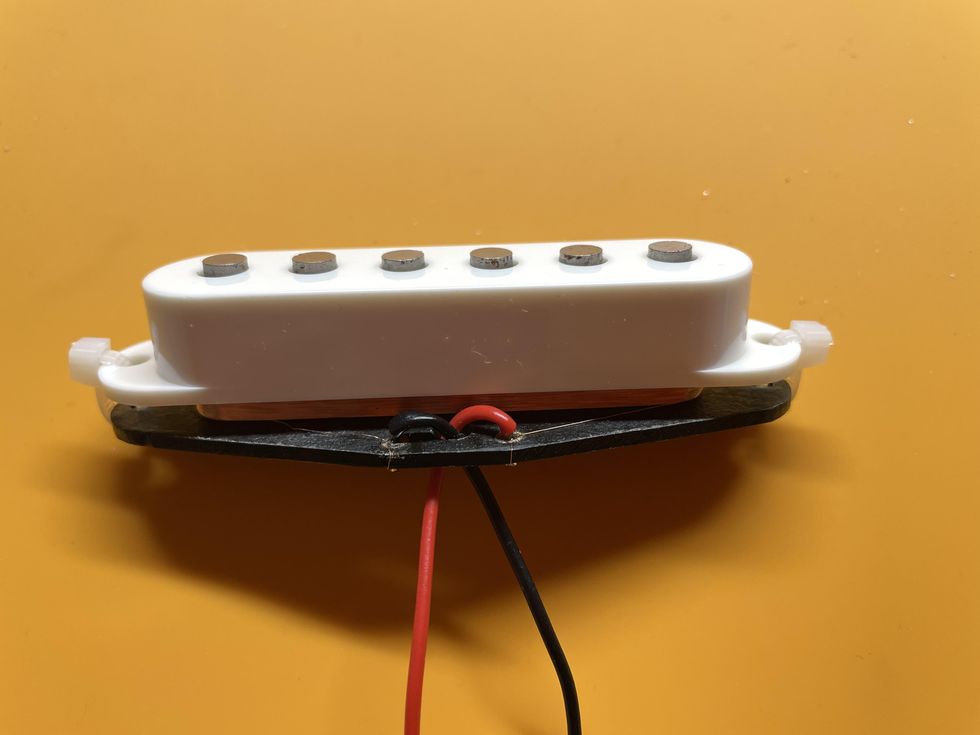
Photo 1
Courtesy of SINGLECOIL (www.singlecoil.com)
1. I simply put a standard plastic pickup cover on the pickup to protect the winding. I usually use two small zip ties to fasten the cover, but you can also use two small screws and a hex nut, a rubber band, or a piece of masking tape.
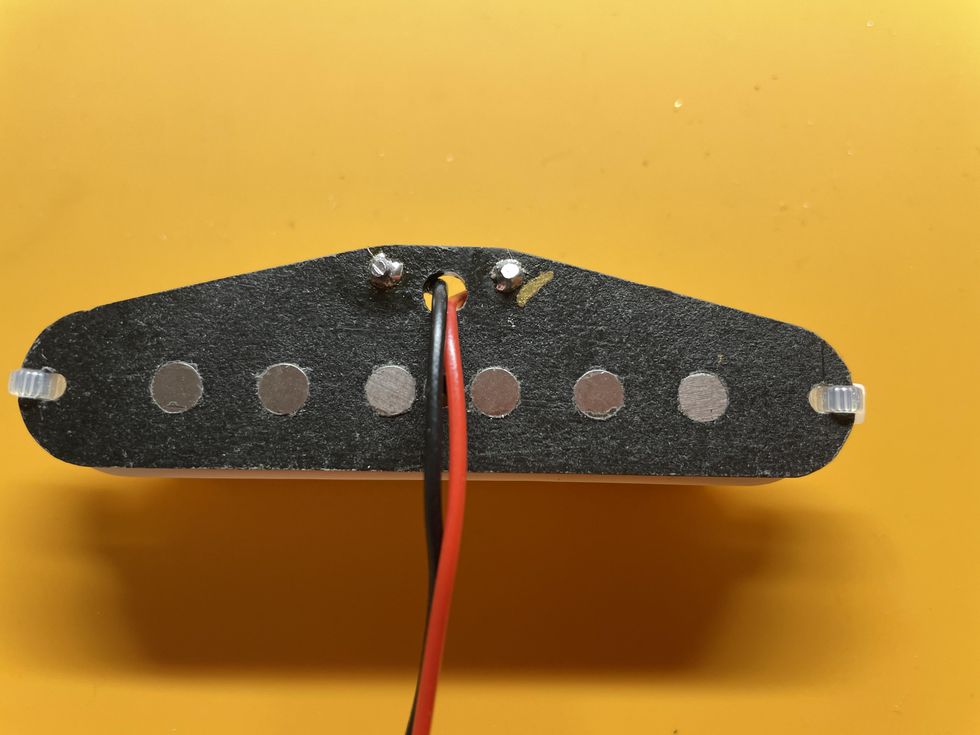
Photo 2
Courtesy of SINGLECOIL (www.singlecoil.com)
2. Have a look where the hot (usually white, yellow, or red) and the ground (usually black) wires are connected to the pickup and mark one of them. I always mark the hot connection by using a Sharpie, but you can also use a drop of nail polish, a small piece of masking tape ... be creative.
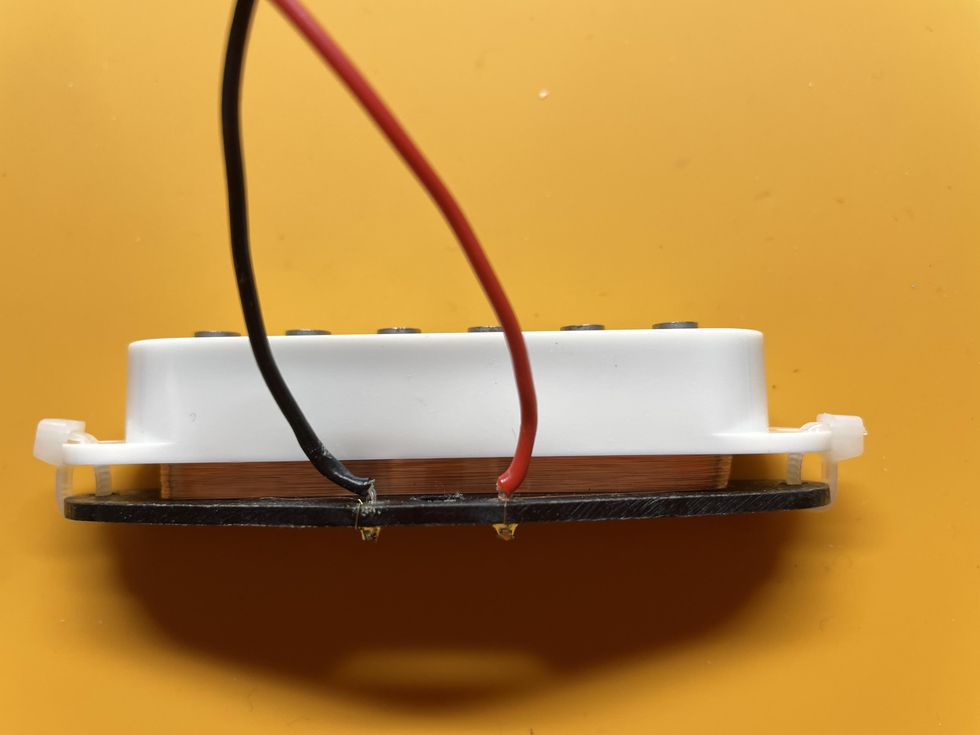
Photo 3
Courtesy of SINGLECOIL (www.singlecoil.com)
3. Measure the DCR (direct current resistance) of your pickup as a reference using your DMM (digital multimeter) and note it. After this is done, push the wires you want to replace upwards through the hole and pull them out, as shown in Photo 1, Photo 2, and Photo 3.
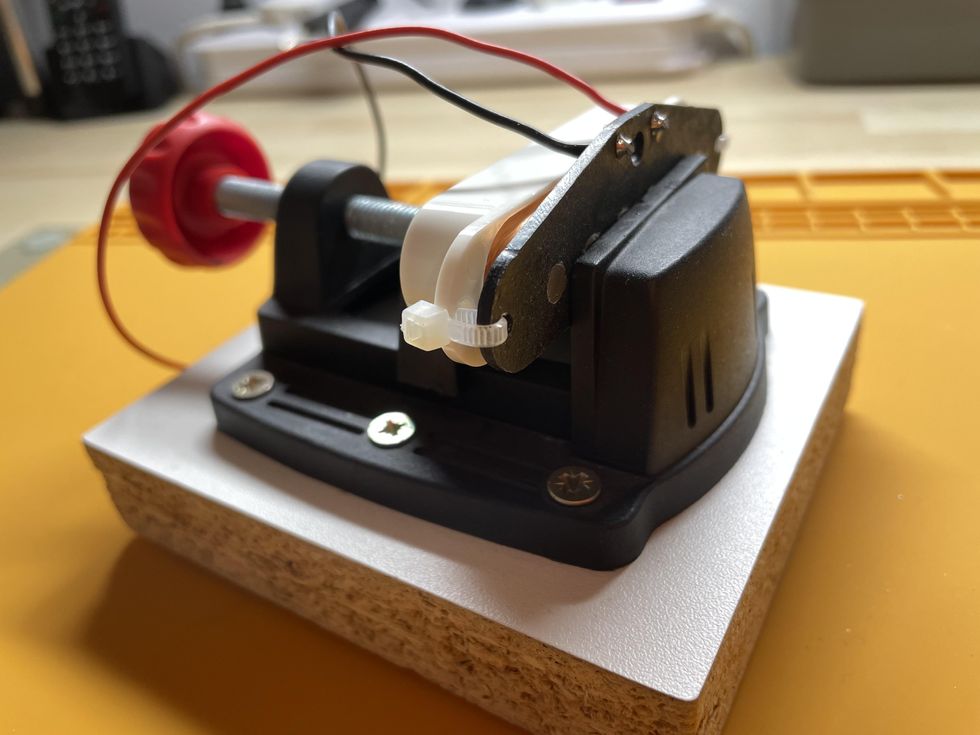
Photo 4
Courtesy of SINGLECOIL (www.singlecoil.com)
Now put the prepared pickup into a small vise and orient it so that you can look at the soldering terminals the two wires are connected to (Photo 4). Take care to not apply too much pressure with the vise: We only want to fasten the pickup, not break it.
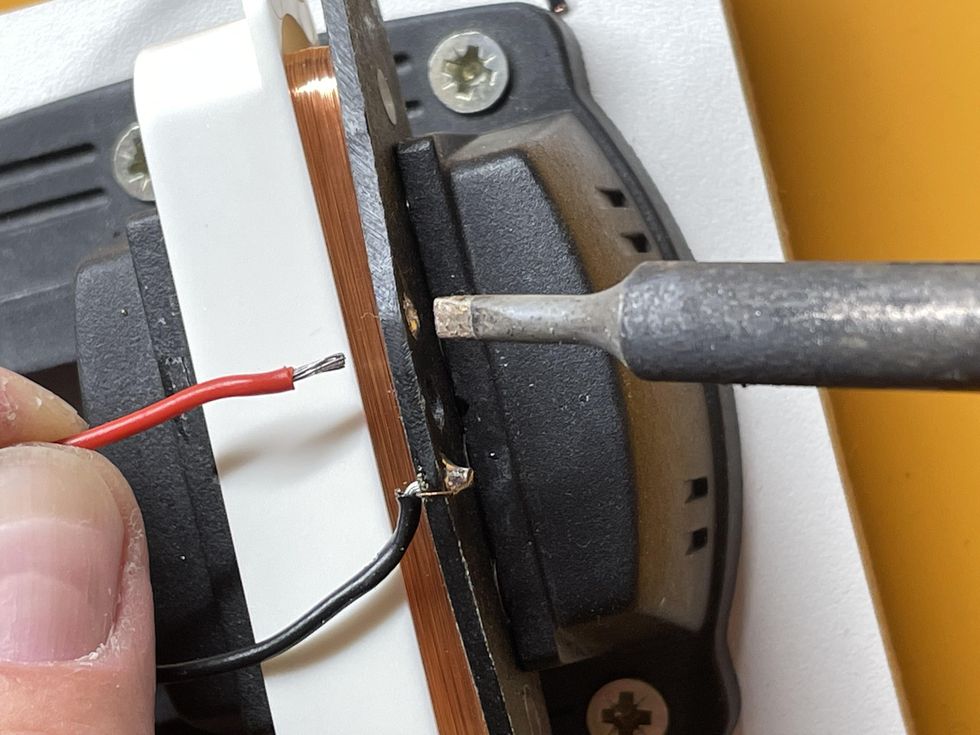
Photo 5
Courtesy of SINGLECOIL (www.singlecoil.com)
Pre-tin the tip of your soldering iron and heat up the soldering spot while gently pulling on the wire until it comes out (Photo 5). This should not take longer than 2 to 3 seconds. A small chisel-shaped soldering tip is my weapon of choice. Warning: Don’t touch the bobbin of the pickup with the soldering iron—it will melt. Repeat this procedure with the second wire.
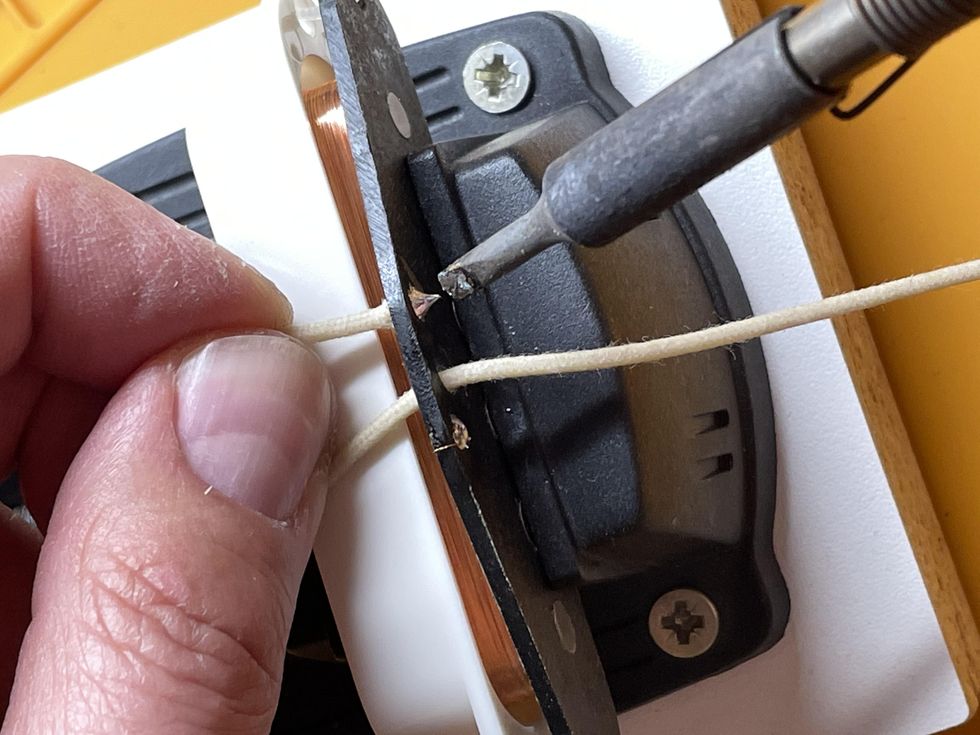
Photo 6
Courtesy of SINGLECOIL (www.singlecoil.com)
Strip the new wire, pre-tin it, pull it through the hole, and bend it so the stripped part will touch the soldering spot (Photo 6). I prefer to guide the wire with my hands, but you can also use tweezers for this. Now pre-tin the tip of your soldering iron and heat up the soldering spot while gently pushing the wire until it is in. This should not take longer than 2 to 3 seconds to perform. Repeat this procedure with the second wire. Cut off the excess wire with a small side cutter.
To check your work, measure the DCR of the pickup and compare it to the value you measured before. Small differences are okay and can be caused by the higher temperature directly after soldering to the pickup, or the new wires can be a different type and might have a different length. If you read zero or infinite, there is something wrong and you should check your soldering spots.
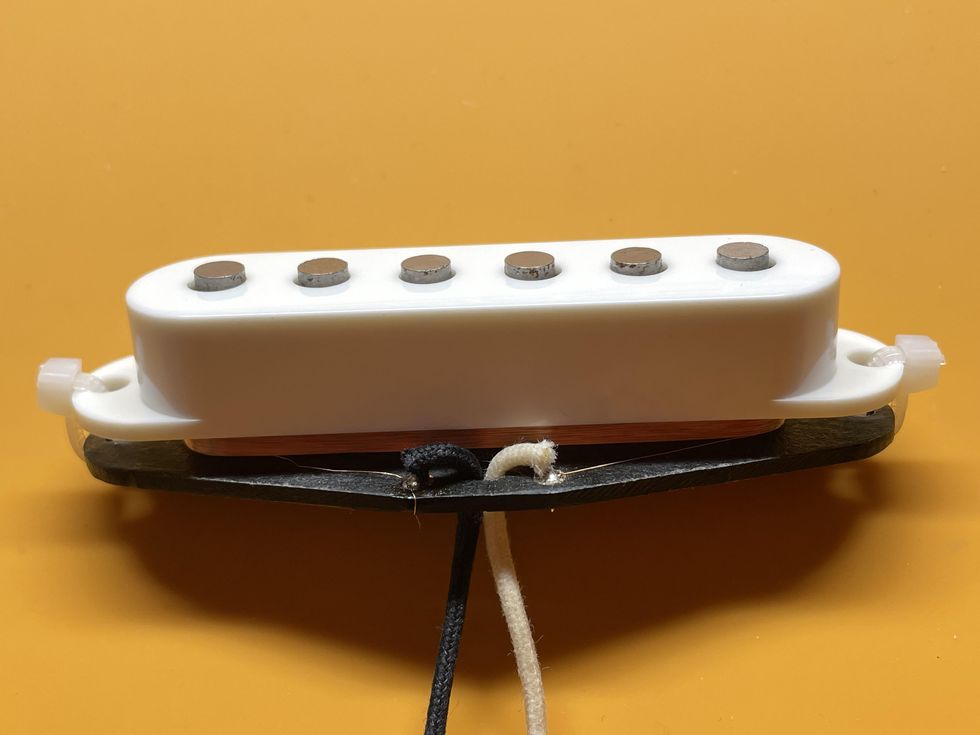
Photo 7
Courtesy of SINGLECOIL (www.singlecoil.com)
Take off the pickup cover you put on the pickup to protect the winding, and you are done (Photo 7). Congratulations! If you’re doing this regularly, you’ll become better and faster over time, so don’t worry if it takes longer than expected the first time.
Bonus: Staggering Pickup Wires
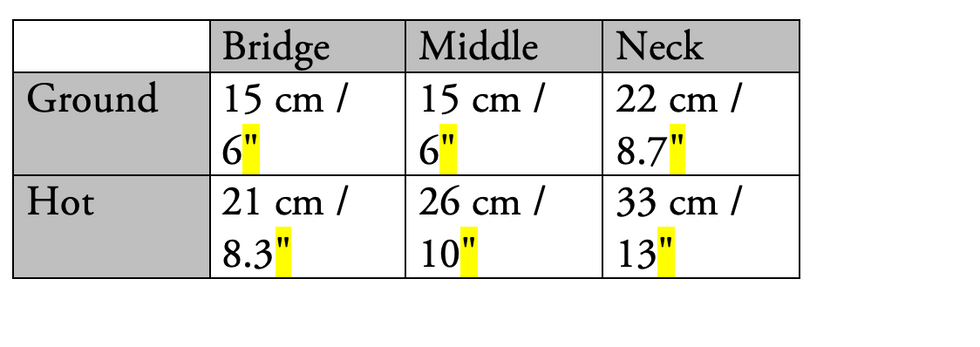
Staggering pickup wires is a neat trick to not waste any wire, which can be a real issue when using expensive audiophile wires. Pickup manufacturers usually apply the same wire length to all pickups, no matter if it’s a bridge, middle, or neck pickup. And they’re usually way too long, resulting in a good portion of obsolete, snipped off wires. To avoid this, you can add only the length of new wire you really need. Here are the values I use in the shop for a standard Stratocaster:
That’s it for this month. Next, we’ll continue with our guitar relic’ing project, so stay tuned. Until then ... keep on modding!
- Three Must-Try Guitar Wiring Mods - Premier Guitar ›
- Mod Garage: Four Ways to Configure a 4-Conductor Humbucker ... ›
- Mod Garage: Telecaster Series Wiring - Premier Guitar ›
Lutefish, the real-time music collaboration device and platform, is excited to announce a suite of new features designed to simplify setup, streamline collaboration, and offer more flexible subscription options for Lutefish Stream users. These latest updates, Audio Presets, Automatic Session Recall, Improved Scheduling with Contact Visibility, and a new Yearly Subscription Plan, are all about making it easier than ever for musicians to jam together, no matter where they’re based.
Save Time and Stay in the Flow with Audio Presets & Session Recall
Musicians can now save and reuse their exact audio settings, reducing setup time and ensuring every session sounds exactly as they want.
- Automatic Session Recall: When users leave a session, their current audio levels are automatically saved and restored when they rejoin.
- User-Defined Audio Presets: Each user can create and name up to five custom presets, like “Band Practice,” “Studio Mic Setup,” or “Quick Jam,” making it effortless to jump back in with the perfect sound.
“These tools are all about saving time and hassle,” said Patrick Finn, Business Manager at Lutefish. “Musicians want to make music, not spend time rebalancing levels every session. With presets and recall, we’re giving them time back and helping them sound their best, every time.”
Smarter Scheduling and Contact Visibility
The latest update to Lutefish also made it easier to find collaborators and book sessions. Users can now:- View all their contacts at a glance when scheduling a session.
- Instantly identify which contacts own a Lutefish Stream device—so they will always know who’s ready to jam.
Go Yearly and Save 20%
Lutefish now offers a Yearly Subscription Plan, providing users with the same great access as the monthly plan at a 20% discount.
This option is now available within the Lutefish app and web platform, and current monthly users are eligible for a discount with an upgrade to a yearly subscription.
Lutefish’s mission has always been to empower musicians to connect and collaborate without boundaries. With these new updates, Lutefish Stream continues to break down barriers—whether you’re jamming with a friend across town or collaborating with a bandmate 500 miles away.
For more information and to start jamming today, visitlutefish.com.
The veteran Florida-born metalcore outfit proves that you don’t need humbuckers to pull off high gain.
Last August, metalcore giants Poison the Well gave the world a gift: They announced they were working on their first studio album in 15 years. They unleashed the first taste, single “Trembling Level,” back in January, and set off on a spring North American tour during which they played their debut record, The Opposite of December… A Season of Separation, in full every night.
PG’s Perry Bean caught up with guitarists Ryan Primack and Vadim Taver, and bassist Noah Harmon, ahead of the band’s show at Nashville’s Brooklyn Bowl for this new Rig Rundown.
Brought to you by D’Addario.Not-So-Quiet As a Mouse
Primack started his playing career on Telecasters, then switched to Les Pauls, but when his prized LPs were stolen, he jumped back to Teles, and now owns nine of them.
His No. 1 is this white one (left). Seymour Duncan made him a JB Model pickup in a single-coil size for the bridge position, while the neck is a Seymour Duncan Quarter Pound Staggered. He ripped out all the electronics, added a Gibson-style toggle switch, flipped the control plate orientation thanks to an obsession with Danny Gatton, and included just one steel knob to control tone. Primack also installed string trees with foam to control extra noise.
This one has Ernie Ball Papa Het’s Hardwired strings, .011–.050.
Here, Kitty, Kitty
Primack runs both a PRS Archon and a Bad Cat Lynx at the same time, covering both 6L6 and EL34 territories. The Lynx goes into a Friedman 4x12 cab that’s been rebadged in honor of its nickname, “Donkey,” while the Archon, which is like a “refined 5150,” runs through an Orange 4x12.
Ryan Primack’s Pedalboard
Primack’s board sports a Saturnworks True Bypass Multi Looper, plus two Saturnworks boost pedals. The rest includes a Boss TU-3w, DOD Bifet Boost 410, Caroline Electronics Hawaiian Pizza, Fortin ZUUL +, MXR Phase 100, JHS Series 3 Tremolo, Boss DM-2w, DOD Rubberneck, MXR Carbon Copy Deluxe, Walrus Slo, and SolidGoldFX Surf Rider III.
Taver’s Teles
Vadim Taver’s go-to is this cherryburst Fender Telecaster, which he scored in the early 2000s and has been upgraded to Seymour Duncan pickups on Primack’s recommendation. His white Balaguer T-style has been treated to the same upgrade. The Balaguer is tuned to drop C, and the Fender stays in D standard. Both have D’Addario strings, with a slightly heavier gauge on the Balaguer.
Dual-Channel Chugger
Taver loves his 2-channel Orange Rockerverb 100s, one of which lives in a case made right in Nashville.
Vadim Taver’s Pedalboard
Taver’s board includes an MXR Joshua, MXR Carbon Copy Deluxe, Empress Tremolo, Walrus ARP-87, Old Blood Noise Endeavors Reflector, MXR Phase 90, Boss CE-2w, and Sonic Research Turbo Tuner ST-200, all powered by a Voodoo Lab Pedal Power 2 Plus.
Big Duff
Harmon’s favorite these days is this Fender Duff McKagan Deluxe Precision Bass, which he’s outfitted with a Leo Quan Badass bridge. His backup is a Mexico-made Fender Classic Series ’70s Jazz Bass. This one also sports Primack-picked pickups.
Rental Rockers
Harmon rented this Orange AD200B MK III head, which runs through a 1x15 cab on top and a 4x10 on the bottom.
Noah Harmon’s Pedalboard
Harmon’s board carries a Boss TU-2, Boss ODB-3, MXR Dyna Comp, Darkglass Electronics Vintage Ultra, and a Voodoo Lab Pedal Power 2 Plus. His signal from the Vintage Ultra runs right to the front-of-house, and Harmon estimates that that signal accounts for about half of what people hear on any given night.
Kiesel Guitars has introduced their newest solid body electric guitar: the Kyber.
With its modern performance specs and competitive pricing, the Kyber is Kiesel's most forward-thinking design yet, engineered for comfort, quick playing, and precision with every note.
Introducing the Kiesel Kyber Guitar
- Engineered with a lightweight body to reduce fatigue during long performances without sacrificing tone. Six-string Kybers, configured with the standard woods and a fixed bridge, weigh in at 6 pounds or under on average
- Unique shape made for ergonomic comfort in any playing position and enhanced classical position
- The Kyber features Kiesel's most extreme arm contour and a uniquely shaped body that enhances classical position support while still excelling in standard position.
- The new minimalist yet aggressive headstock pairs perfectly with the body's sleek lines, giving the Kyber a balanced, modern silhouette.
- Hidden strap buttons mounted on rear for excellent balance while giving a clean, ultra-modern look to the front
- Lower horn cutaway design for maximum access to the upper frets
- Sculpted neck heel for seamless playing
- Available in 6 or 7 strings, fixed or tremolo in both standard and multiscale configurations Choose between fixed bridges, tremolos, or multiscale configurations for your perfect setup.
Pricing for the Kyber starts at $1599 and will vary depending on options and features. Learn more about Kiesel’s new Kyber model at kieselguitars.com
The Sunset is a fully analog, zero latency bass amplifier simulator. It features a ¼” input, XLR and ¼” outputs, gain and volume controls and extensive equalization. It’s intended to replace your bass amp both live and in the studio.
If you need a full sounding amp simulator with a lot of EQ, the Sunset is for you. It features a five band equalizer with Treble, Bass, Parametric Midrange (with frequency and level controls), Resonance (for ultra lows), and Presence (for ultra highs). All are carefully tuned for bass guitar. But don’t let that hold you back if you’re a keyboard player. Pianos and synthesizers sound great with the Sunset!
The Sunset includes Gain and master Volume controls which allow you to add compression and classic tube amp growl. It has both ¼” phone and balanced XLR outputs - which lets you use it as a high quality active direct box. Finally, the Sunset features zero latency all analog circuitry – important for the instrument most responsible for the band’s groove.
Introducing the Sunset Bass Amp Simulator
- Zero Latency bass amp simulator.
- Go direct into the PA or DAW.
- Five Band EQ:
- Treble and Bass controls.
- Parametric midrange with level and frequency controls.
- Presence control for extreme highs.
- Resonance control for extreme lows.
- Gain control to add compression and harmonics.
- Master Volume.
- XLR and 1/4" outputs.
- Full bypass.
- 9VDC, 200mA.
Artwork by Aaron Cheney
MAP price: $210 USD ($299 CAD).