
Welcome back to Mod Garage. This month we’ll have a deeper look into auto-splitting pickups on an HSS-configured Strat and similar guitars. We covered this a long time ago, exploring the basic version of this wiring in “Stratocaster Auto-Split Mod.” Today we’ll take it one step further with a pro version and discuss what can be done with it.
The HSS setup with a bridge humbucker plus two traditional single-coils is the perfect combination for many Strat players, but it’s not limited to Strats. With the bridge humbucker you have a powerful pickup for soloing and rocking the crowd, while the two single-coil pickups give you traditional sounds and everything in between. When you choose a bridge humbucker with 4-conductor wiring, you can even split it for more possible sounds and to also get the famous in-between “quack” tone with the bridge and the middle pickup together in parallel. That’s exactly where the auto-split wiring comes in when you want an easy-to-operate setup. Let’s have a look what can be done with such an HSS pickup configuration and a 5-way pickup selector switch.
Some players may not need the in-between pickup position with the bridge plus the middle pickup together in parallel. Maybe they can’t use this tone in their musical context, or they simply don’t like these slightly hollow tones with less output. Even Leo Fender himself never liked this tone that he called “out of phase” (which is technically incorrect). These players are fine with a standard 2-conductor bridge pickup and standard Stratocaster 5-way switching.
- Both coils in series (standard humbucker operation with full output)
- Both coils in parallel (a kind of hum-free, single-coil-like tone with less output)
- One coil shut down to ground (real split mode with only one coil engaged)
- With a simple 2-way toggle switch you can shut down one of the coils to ground to get an additional single-coil-like tone from the bridge pickup. This can also be used to get the in-between sound together with the middle pickup. You can also use any standard push-pull or push-push pot, or the Fender S-1 switch, for this operation, so you don’t have to alter the appearance of your guitar.
- If you want more, you can use a DPDT on-on-on switch like the DiMarzio “multi-sound switch” to get all three sounds from your bridge humbucker. This operation can’t be done from a push-pull or push-push pot—you need an additional 3-way toggle for this.
- If you want all four possible sounds from your bridge humbucker, an additional rotary switch is the way to go. We discussed this just a few months ago in “Mod Garage: How to Triple Shot Your Humbuckers.”
That’s where the pro version kicks in, replacing the standard 5-way switch with a “super switch” that has four individual switching stages instead of only two, eliminating the two peeves from the basic auto-split wiring.
Please note: This is only possible with a humbucker sporting 4-conductor wiring. You can’t do this with a humbucker with traditional 2-conductor wiring!
Of course, there are players who don’t need all the gadgets. They simply want a powerful humbucker tone in the bridge position and the typical traditional Strat tones from all the other switching positions, including the in-between position of the bridge plus middle pickup. The auto-split wiring is perfect for these players because it’s a set-and-forget situation.
What will happen without the auto-split wiring when dialing in the bridge humbucker together with the middle single-coil pickup in parallel? You won’t hear a big difference in sound compared to the bridge humbucker alone, simply because usually the bridge humbucker is a lot louder compared to the single-coil and will dominate the tone by out-acting the single-coil. To combat this problem, the auto-split wiring will automatically (hence the name) split the humbucker into a single-coil by shutting down the other coil to ground for a traditional in-between sound of both pickups, like we all know from a regular SSS-configured Strat. The switching matrix of the auto-split wiring looks like this:
- Bridge humbucker with both coils in series for full humbucker operation
- Bridge humbucker split + middle single-coil in parallel
- Middle single-coil
- Middle + neck single-coil in parallel
- Neck single-coil
Deciding what coil of the humbucker will be sent to ground leaving the other active could easily be the subject of a whole column. Depending on the winding direction and polarity of both pickups, you usually don’t want to end up with an out-of-phase tone when both pickups are engaged and when your middle pickup is RWRP (reverse-wound, reverse-polarity), you also want to have the hum-cancelling function this switching position can provide. So … choose carefully!
While the basic version of this wiring works great, it has some peeves that some players complain about:
- It’s not possible to freely arrange the dual tone controls. They are fixed to one for the middle and the other for the neck single-coil, leaving the bridge humbucker without any tone control, like in standard Strat wiring.
- You’ll have to use individual tone caps for each tone control.
That’s where the pro version kicks in, replacing the standard 5-way switch with a “super switch” that has four individual switching stages instead of only two, eliminating the two peeves from the basic auto-split wiring.
Good idea, but unfortunately the road to hell is paved with good resolutions.
The super switches are physically a lot larger compared to the standard version, so take care that they’ll fit into your guitar. Recently I had to upgrade an Ibanez HSS guitar with this wiring, and it was impossible to put a super switch in without extensive routing to make space for it. I had such problems before with Yamaha and Fender guitars. The PCB-based versions of this switch require less space, so often this is the way to go.
Often such extended auto-split wirings are trying to also handle what I like to call the “resistance paradigm.” Fender used 250k pots for their guitars with single-coil pickups in the early days, while Gibson used 500k pots for their humbucker-loaded guitars. I don’t think the resistance values were chosen for any tonal reasons. We’re talking about the 1940s and ’50s, when they simply didn’t have the choices we have today. Especially Fender used whatever was available in large quantities for a low price, and it’s likely that Gibson had a similar approach.
Today you can still find unfounded rumors all over the internet that single-coils sound best with 250k pots and humbuckers with 500k pots. While the basic idea behind this contains some truth (500k pots still leave some high-end with a humbucker while 250k pots prevent the single-coil from sounding too harsh), such rules are not set in stone and usually such debates totally neglect that we’re talking about a passive system.
Often 500k pots are used for an auto-split wiring, incorporating some additional resistors to “convert” them to 250k for the single-coil pickups. Good idea, but unfortunately the road to hell is paved with good resolutions. Digging deeper at this point is too much for this column but may be a good subject for a follow-up. My personal recommendation: Forget about it. In more than 20 years, I have tried every variation of such jack-of-all-trades wirings and not a single one really worked in a useable way. Here are my two cents regarding such a wiring:
- A good and useful distribution of the tone controls is one 500k pot for only the bridge humbucker and the other one 250k for the two single-coils.
- Using two tone caps (one for each tone control) is simply perfect for this wiring, i.e., I really like to use a small cap value for the humbucker to control the warmth of it plus a traditional value for the two single-coil pickups.
- Using a 250k master volume works excellent because in a passive system like a Strat, you can benefit from the much better taper regarding evenness compared to a 500k pot. The loss in high-end compared to a 500k pot is marginal: measurable, but not audible. Using a treble-bleed network is a matter of choice and up to your personal preferences.
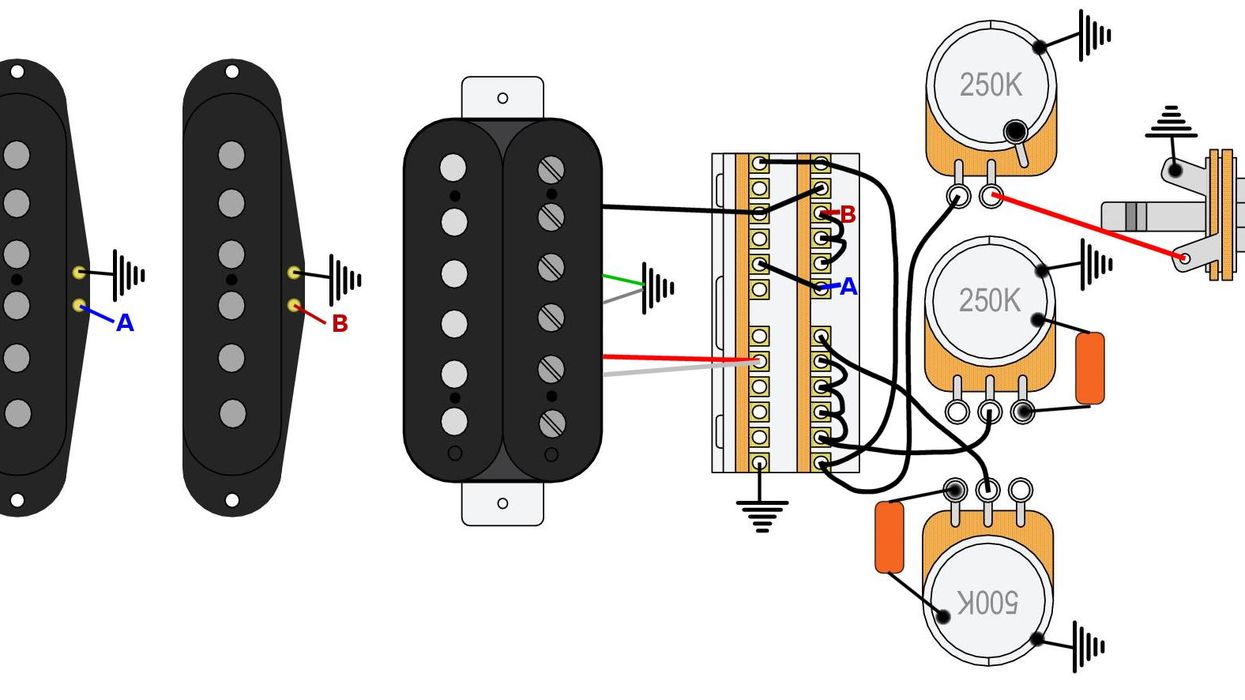
The wiring layout seen in the diagram at the top of this page is what I recommend and that most players will be happy with, so here we go. I assume that the middle pickup will be a RWRP type, and as usual, I used the Seymour Duncan color code for the humbucker. If you have a humbucker from a different company, you’ll have to convert the shown color code with one of the converting charts online. The bare wire of the humbucker always goes to ground, no matter what type it is. I tried to keep the illustration as clean as possible by leaving out all ground wires, so, as usual, they’re shown with the international symbol for ground. Solder all these connections to the back of a pot of your choice.
That’s it. Next month we’ll build a cool and simple yet very effective diagnostic gadget for electric guitars and basses. I use it in my shop daily and you will love it for sure, so stay tuned!
Until then ... keep on modding!