
Hello and welcome back to Mod Garage. This month, we’ll talk about how to wire triple-shot humbucker pickups. I’ll explain what this means and how to do it, so let’s go.
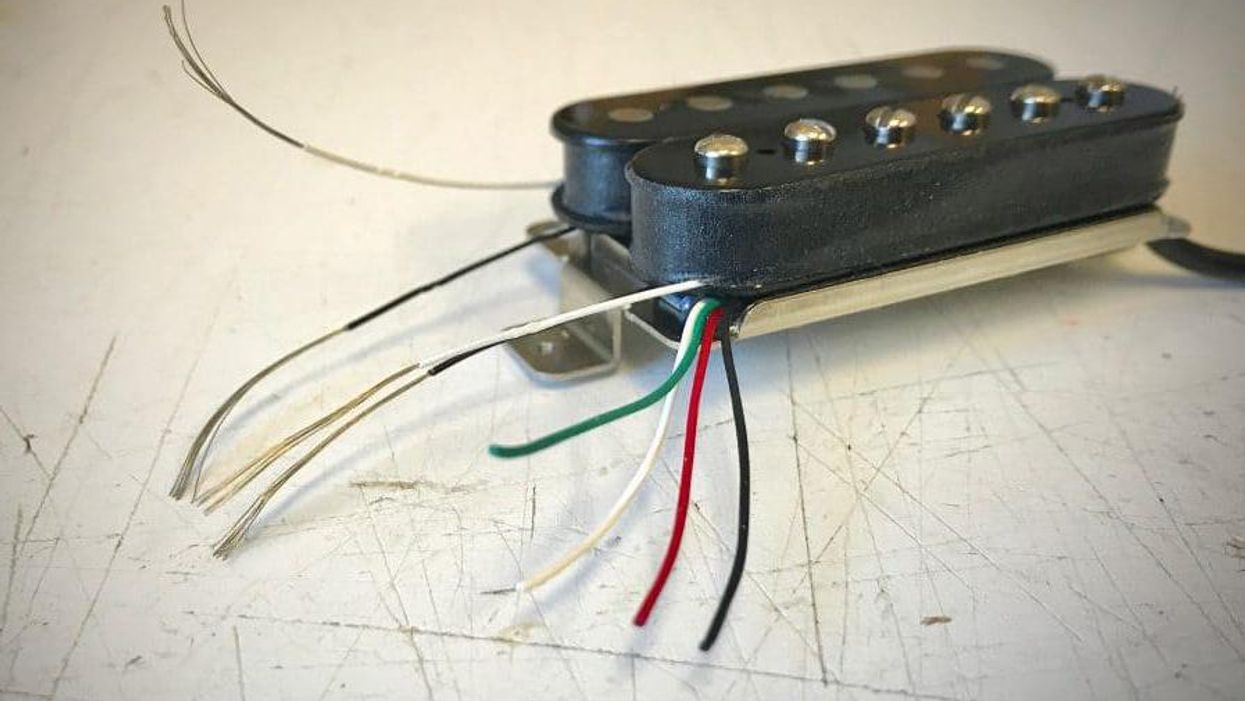
When you have a humbucker with a traditional 2-conductor wiring, you don’t have any sound variation by itself—only together with another pickup that you can put in parallel or in series with it, in phase, out-of-phase, or half out-of-phase, and so on. With a 4-conductor wiring on your humbucker pickup, you have access to the start and the finish of each coil, and this can be used to get a total of four different tones out of it, whether it’s a bridge or a neck pickup. A 4-conductor wiring results in a total of five wires coming from such humbuckers:
- North coil start / north coil finish
- South coil start / south coil finish
- Ground = bare wire (goes always to ground)
The possible combinations and sounds you can dial in are:
1. Both coils together in series = standard humbucker operation mode.
This is the factory standard way all humbuckers are internally connected when they have a 2-conductor wiring with only hot and ground. This is also the standard way in almost every guitar loaded with one or more humbucker pickups, producing a warm, loud, and fat tone with maximum output and the humbucking function engaged.
2. Single-coil-esque humbucker wiring (both coils together in parallel).
This option gives you a single-coil-like tone but keeps the humbucking function engaged. You won’t get a crystal-clear Strat or Tele tone, but to me it sounds at least single-coil-esque, maybe closer to a P-90 than to a standard single-coil. It sounds different with any humbucker, so it’s a matter of trying it out.
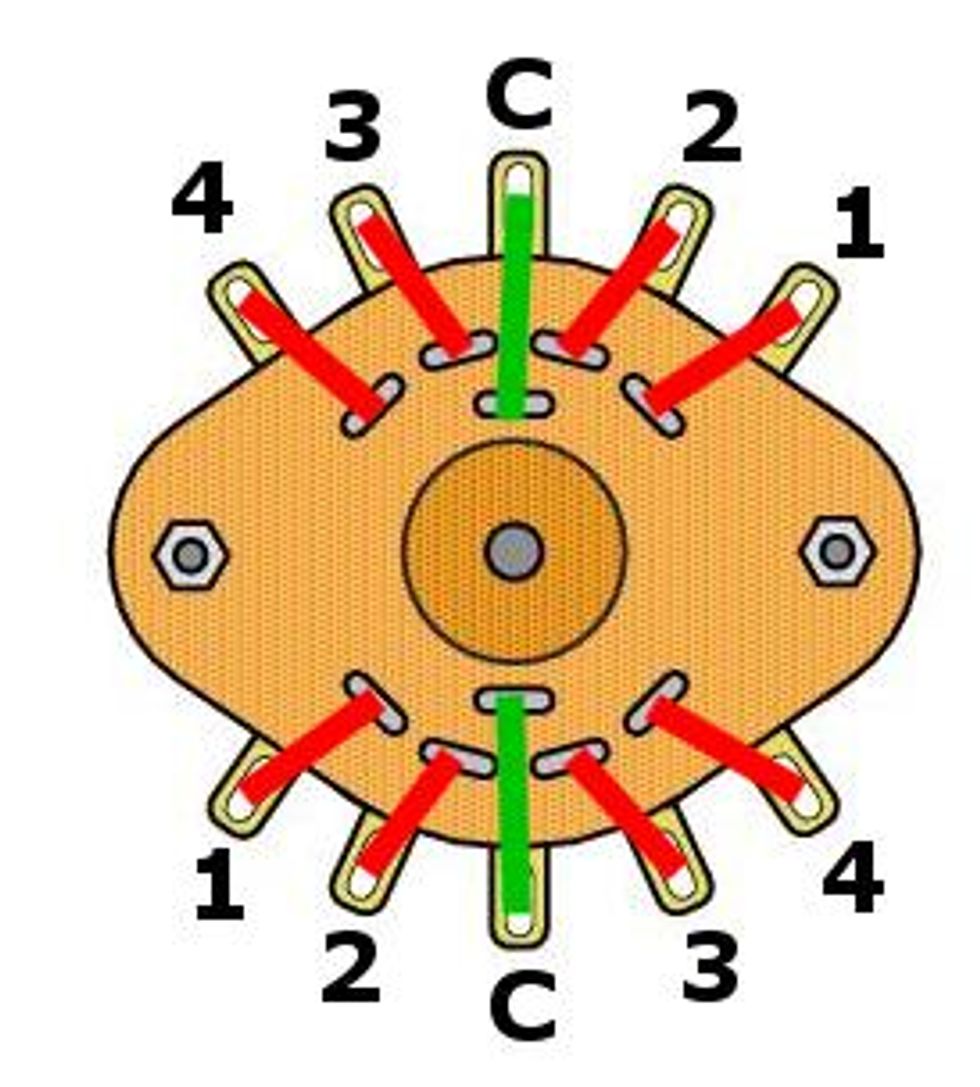
Fig. 1
3. Coil-splitting to the south coil.
This wiring is splitting the humbucker in half, shunting one coil to ground, leaving the other coil engaged like a true single-coil pickup. In this mode, the humbucking function is no longer active, so you’ll receive all kinds of hum and noise, just like with any single-coil pickup. Don’t expect a true Strat or Tele tone. If this is your goal, there are special humbuckers made of two real single-coil pickups. The downside of this special breed is they don’t sound very good as a full humbucker, so it’s always the art of compromising. Splitting to the south coil of the humbucker, which is the screw side, is recommended for neck humbuckers, but can also sound good for bridge humbuckers.
4. Coil-splitting to the north coil.
This wiring follows the same idea as #3, but will leave the north coil, which is the slug side, active. This version is recommended for a bridge humbucker because it gives a fuller sound compared to the screw side.
To clear up some terminology, there are several descriptions given to the individual coils of a humbucker and depending on the manufacturer of the pickup, they are sometimes used side by side: The (non-adjustable) slug coil is also called north coil or inside coil, while the (adjustable) screw coil is called south coil or outside coil.
Having two 4-conductor humbuckers in an HH guitar will result in four different sounds from each pickup. Plus, you can combine them for a total of 16 different sounds, which is a lot of choice, not counting possible additional options like phasing.
What sounds like a good plan or must-have often turns into a real issue, because space is your enemy! Try to do this on a Les Paul and you’ll face that there isn’t enough space for all the additional switches that are needed, and that’s the same with a lot of other guitars. So, some years ago Seymour Duncan came up with a clever product called the “Triple Shot.”
The good news is, you can get the exact same performance from a rotary switch, which costs only a fraction of a Triple Shot. The sad news is, you need one rotary switch for each pickup, and, naturally, you need space to place them somewhere on the guitar.
This is a humbucker mounting ring with two integrated slide switches and a ribbon cable going from the switches to a small printed circuit board (PCB), which is the connection terminal for the five wires coming from the humbucker plus a shielded output cable. The Triple Shot is available in different colors and shapes, so it’ll fit virtually any guitar, no matter if it has a flat (Strat, Tele, SG, etc.) or arched (Les Paul, 335, etc.) top. With the Triple Shot, you don’t have to drill any new holes into your guitar, and you don’t lose any controls by replacing them with switches or the like.
Operating the Triple Shot is easy, but it takes some getting used to. Because of the two slide switches, you need to know what combination will produce each sound, which can cause some confusion at the beginning. Another benefit is that the optical appearance of your guitar is not altered in any way and it’s easy to remove if you need or want to. An often-heard downside is the high price for the Triple Shot ($39 street). Personally, I think it’s worth the price because it’s high quality, but if you’re on a budget, this can be a deal-killer.
The good news is, you can get the exact same performance from a rotary switch, which costs only a fraction of a Triple Shot. The sad news is, you need one rotary switch for each pickup and, naturally, you need space to place them somewhere on the guitar.
For this you need a 2P4T rotary switch, which means it has two poles (comparable to the standard 5- and 3-way switches you all know) and four switching positions. Physically you have five lugs on each switching stage, with one of them being the output of this stage. The lugs are numbered from 1 to 4 and the output on a rotary switch is always labelled with a “C” for “common.” The rotary switch wiring you need is illustrated in Fig. 1.
Take care to get a good-quality switch. These switches are available in a wide range of quality and prices. There are open ones, like the one shown in the diagram, and closed ones. The trick is to connect both switching stages (output of stage #1 goes into stage #2), which is something you already know from your standard 5- or 3-way switch.
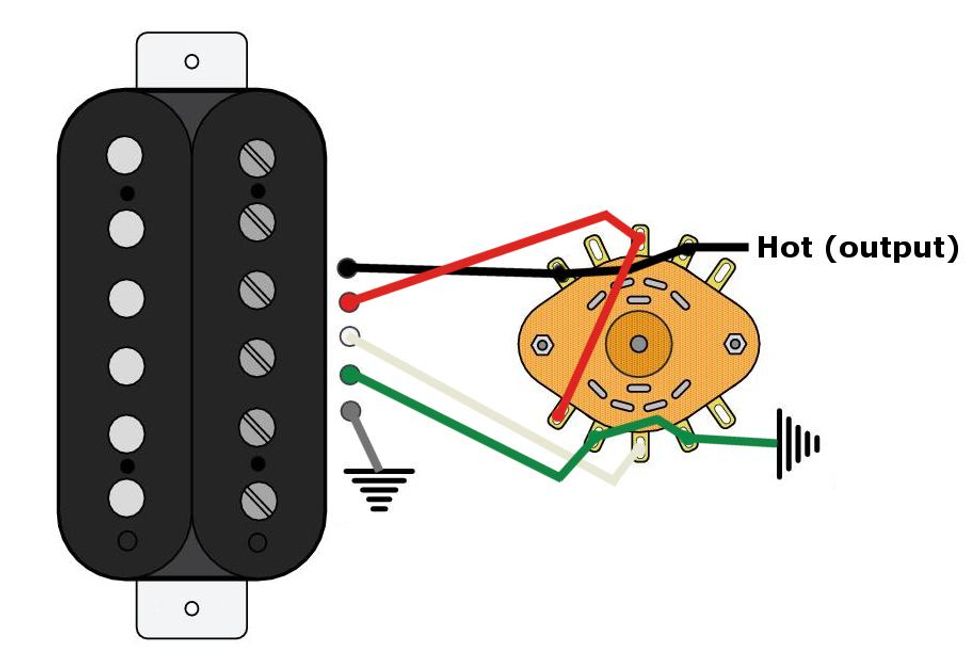
Fig. 2
Fig. 2 shows how to connect your 4-conductor humbucker to the rotary switch. With this wiring you receive the following switching matrix:
- Both coils in series (standard humbucker)
- Both coils in parallel (hum-free single-coil-like tone)
- Slug coil as single-coil
- Screw coil as single-coil
I chose the Seymour Duncan color chart for the diagram, but you can transfer it to any brand humbucker using color code transfer charts on the internet.
That’s it for now. Next month we’ll continue our relic’ing project, focusing on the neck and fretboard. We’re getting close to the finish line on that one, so stay tuned.
Until then ... keep on modding