
Fig. 1
Unravel the mysteries of series, parallel, and coil-splitting wiring schemes.
This month we're going to explore four ways to configure any humbucker that has 4-conductor wiring. (Note: These wiring schemes are not intended for an old-school humbucker with 2-conductor wiring, but rather the modern humbucker that allows coil-splitting and other wiring mods.)
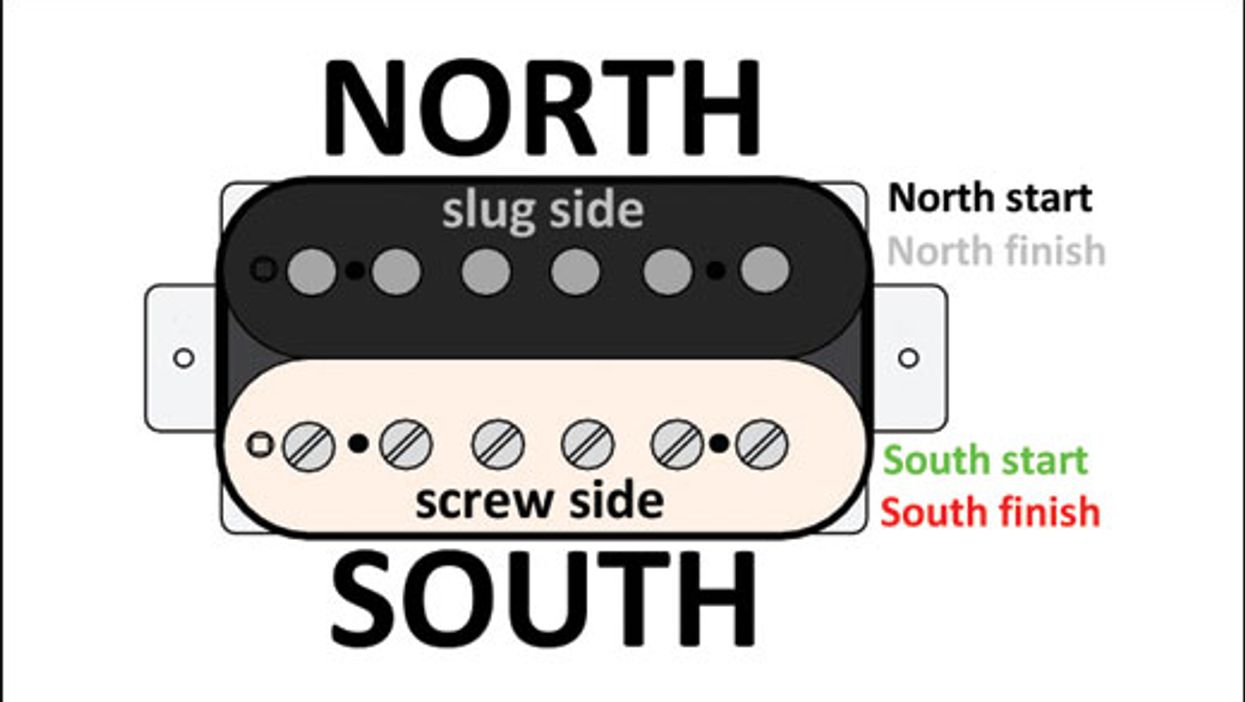
For starters, let's review our terminology. Looking at a humbucker from the front, we call the lower coil "south" and the upper coil "north." The south coil is always the "screw side," while the north coil is the "slug side." The latter is named for the type of magnetic material used on this coil. Each coil is wrapped with very fine wire, and this wire has a start and a finish. This results in a total of five wires coming from the humbucker:
- North coil start plus north coil finish.
- South coil start plus south coil finish.
- Ground.
The bare wire or braided shield always goes to ground—there's no exception—so that leaves us with four wires to play with. Having access to the start and finish of each coil wire not only makes it easy to solve potential out-of-phase issues (a subject we'll cover in another column), but it also gives you the option to wire up your humbucker in one of four different ways. If you're ambitious, you can use a switch to put several options at your fingertips.
The south coil is always the "screw side," while the north coil is the "slug side."
Every pickup company uses its own color-code scheme for these four wires. This makes discussing humbucker wiring a little more confusing than necessary, but that's the way it is. As usual, I'll use the Seymour Duncan color code as a quasi-standard. You should be able to get color-code information for your pickups from their maker, and there are several charts available on the internet that let you compare color-code schemes from different manufacturers. You can use such charts to translate the following wirings into whatever color code corresponds to your particular brand of humbucker. Fortunately that's not too hard—you only need to know which color wire on your pickup indicates the start or finish of which coil. Once you have that info, you can draw up a reference chart to decode this column's wirings.
Here's the Seymour Duncan 4-conductor humbucker color code:
- North coil start is black; north coil finish is white.
- South coil start is green; south coil finish is red.
- Ground is bare wire.
Fig. 1 sums up what we've covered so far in the Seymour Duncan format. Now let's walk through the four ways you can wire up a humbucker. Ready?
Standard humbucker wiring: both coils connected in series.
This is the default wiring in almost every guitar loaded with one or more humbuckers because it produces a warm, fat tone with maximum output while offering hum-cancelling capability. (It's also the factory standard for all humbuckers with 2-conductor wiring consisting of only hot and ground.)
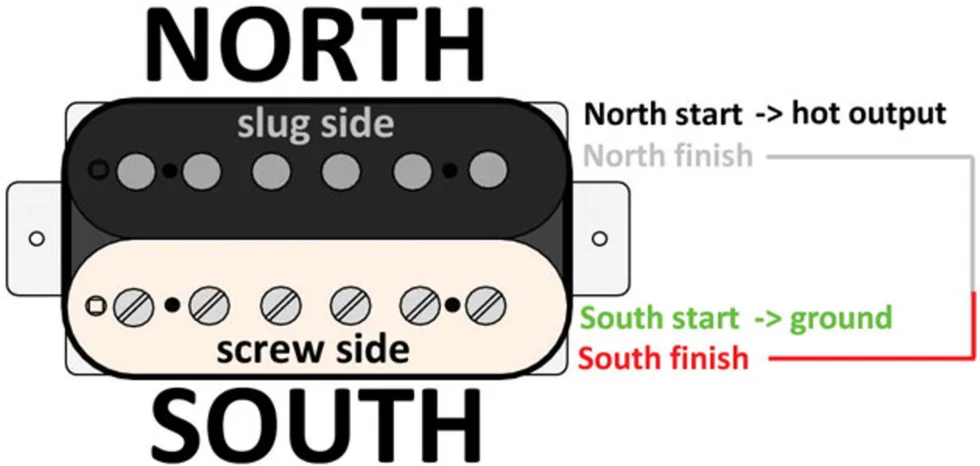
Fig. 2
illustration courtesy of singlecoil.com
Here are the connections for series wiring (Fig. 2):
- North coil start is the hot output.
- North coil finish and south coil finish are soldered together and taped off (this is the series link).
- South coil start is soldered together with the bare wire going to ground.
“Single-coil" humbucker wiring: both coils connected in parallel.
This option gives you a single-coil-like tone, but still retains hum-cancelling capability. It doesn't deliver a crystal-clear Strat or Tele tone, but to my ears it at least resembles a single-coil pickup—maybe closer to a P-90 than to a standard single-coil. Every type of humbucker sounds a little different when wired this way, so it's simply a matter of giving it a try to determine if you like the sound.
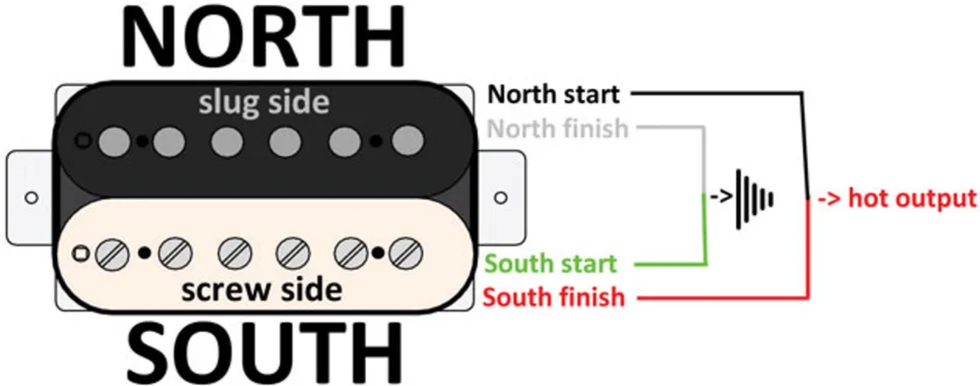
Fig. 3
illustration courtesy of singlecoil.com
Parallel wiring (Fig. 3) requires the following connections:
- North coil start and south coil finish are soldered together as the hot output.
- North coil finish and south coil start are soldered together with the bare ground wire.
Coil-splitting humbucker wiring #1: splitting to the south coil.
This wiring splits the humbucker in half, shunting one coil to ground and leaving the other coil engaged like a true single-coil pickup. In this mode, the hum-cancelling function is no longer active, so you'll get the hum and noise of any single-coil pickup. But don't expect a true Strat or Tele tone: If that's your goal, investigate the special breed of humbuckers that are made out of two real single-coil pickups. The downside of this type of pickup is that it doesn't sound great in full humbucker mode, so, as we're so often reminded, it's about compromise.
Splitting to the humbucker's south coil, which is the screw side, is only recommended for neck pickups. (You'll learn why we're excluding the bridge pickup when we get to our fourth wiring scheme.) Let's also remember that in most guitars with neck humbuckers, the south, screw-side coil lies closest to the neck.
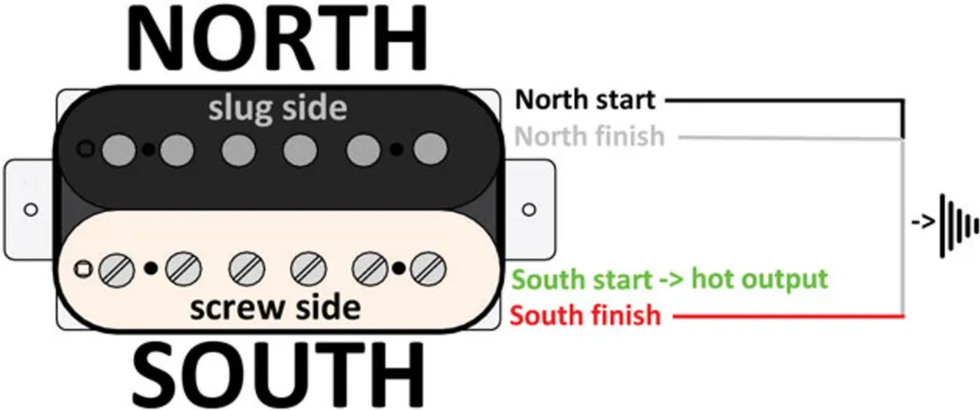
Fig. 4
illustration courtesy of singlecoil.com
For this coil-splitting wiring (Fig. 4), you need the following connections:
- South coil start is the hot output.
- North coil start, north coil finish, and south coil finish are soldered together with the bare ground wire.
Coil-splitting humbucker wiring #2: splitting to the north coil.
This wiring follows the same concept as our previous coil-splitting recipe, but leaves the north coil active—that's the slug side. This version is recommended for a bridge humbucker because pole-piece slugs deliver a fuller sound than pole-piece screws.
Fig. 5
illustration courtesy of singlecoil.com
Here are the connections for our second coil-splitting wiring (Fig. 5):
- North coil start is the hot output.
- North coil finish, south coil start, and south coil finish are soldered together with the bare ground wire.
Well, that's it. In a future column we'll explore how to integrate and control all these options with the help of a switching device. And, of course, we'll learn how to compensate for possible out-of-phase issues that can occur when you combine several humbuckers or a humbucker with a single-coil. But next month, we'll dig into a project designed to make a Telecaster more sonically flexible. Until then ... keep on modding!
[Updated 9/15/21]
- How to Get the Most out of Hum-Sing-Hum Wiring - Premier Guitar ›
- Mod Garage: Three Ways to Wire a Tone Pot - Premier Guitar ›
- Mod Garage: “Jimmy Page” Les Paul Wiring - Premier Guitar ›
- Adding Series Switching To Your Strat - Premier Guitar ›
- How to Change Pickup Wires (& Why) - Premier Guitar ›
Do you overuse vibrato? Could you survive without it?
Vibrato is a powerful tool, but it should be used intentionally. Different players have different styles—B.B. King’s shake, Clapton’s subtle touch—but the key is control. Tom Butwin suggests a few exercises to build awareness, tone, and touch.
The goal? Find a balance—don’t overdo it, but don’t avoid it completely. Try it out and see how it changes your playing!
The author dials in one of his 20-watt Sonzera amps, with an extension cabinet.
Knowing how guitar amplifiers were developed and have evolved is important to understanding why they sound the way they do when you’re plugged in.
Let’s talk about guitar amp history. I think it’s important for guitar players to have a general overview of amplifiers, so the sound makes more sense when they plug in. As far as I can figure out, guitar amps originally came from radios—although I’ve never had the opportunity to interview the inventors of the original amps. Early tube amps looked like radio boxes, and once there was an AM signal, it needed to be amplified through a speaker so you could hear it. I’m reasonably certain that other people know more about this than I do.
For me, the story of guitar amps picks up with early Fenders and Marshalls. If you look at the schematics, amplifier input, and tone control layout of an early tweed Fender Bassman, it’s clear that’s where the original Marshall JTM45 amps came from. Also, I’ve heard secondhand that the early Marshall cabinets were 8x12s, and the roadies requested that Marshall cut them in half so they became 4x12s. Similarly, 8x10 SVT cabinets were cut in half to make the now-industry-standard 4x10 bass cabinets. Our amp designer Doug Sewell and I understand that, for the early Fender amps we love, the design directed the guitar signal into half a tube, into a tone stack, into another half a tube, and the reverb would join it with another half a tube, and then there would be a phase splitter and output tubes and a transformer. (All 12AX7 tubes are really two tubes in one, so when I say a half-tube, I’m saying we’re using only the first half.) The tone stack and layout of these amps is an industry standard and have a beautiful, clean way of removing low midrange to clear up the sound of the guitar. I believe all but the first Marshalls came from a high-powered tweed Twin preamp (which was a 80-watt combo amp) and a Bassman power amp. The schematic was a little different. It was one half-tube into a full-tube cathode follower, into a more midrange-y tone stack, into the phase splitter and power tubes and output transformer. Both of these circuits have different kinds of sounds. What’s interesting is Marshall kept modifying their amps for less bass, more high midrange and treble, and more gain. In addition, master volume controls started being added by Fender and Marshall around 1976. The goal was to give more gain at less volume. Understanding these circuits has been a lifelong event for Doug and me.
Then, another designer came along by the name of Alexander Dumble. He modified the tone stack in Fender amps so you could get more bass and a different kind of midrange. Then, after the preamp, he put in a distortion circuit in a switchable in and out “loop.” In this arrangement, the distortion was like putting a distortion pedal in a loop after the tone controls. In a Fender amp, most of the distortion comes from the output section, so turning the tone controls changes the sound of the guitar, not the distortion. In a Marshall, the distortion comes before the tone controls, so when you turn the tone controls, the distortion changes. The way these amps compress and add harmonics as you turn up the gain is the game. All of these designs have real merit and are the basis of our modern tube–and then modeling—amplifiers.
Everything in these amps makes a difference. The circuits, the capacitor values and types, the resistor values and types, the power and output transformers, and the power supplies—including all those capacitor values and capacitor manufacturers.
I give you this truncated, general history to let you know that the amp business is just as complicated as the guitar business. I didn’t even mention the speakers or speaker cabinets and the artform behind those. But what’s most important is: When you plug into the amp, do you like it? And how much do you like it? Most guitar players have not played through a real Dumble or even a real blackface Deluxe Reverb or a 1966 Marshall plexi head. In a way, you’re trusting the amp designers to understand all the highly complex variations from this history, and then make a product that you love playing through. It’s daunting, but I love it. There is a complicated, deep, and rich history that has influenced and shaped how amps are made today.
Lenny Kravitz’s lead-guitar maestro shares how his scorching hit solo came together.
Hold onto your hats—Shred With Shifty is back! This time, Chris Shiflett sits down with fellow west coaster Craig Ross, who calls in from Madrid equipped with a lawsuit-era Ibanez 2393. The two buddies kick things off commiserating over an increasingly common tragedy for guitarists: losing precious gear in natural disasters. The takeaway? Don’t leave your gear in storage! Take it on the road!
Ross started out in the Los Angeles band Broken Homes, influenced by Chuck Berry, Buddy Holly, and the Beatles, but his big break came when he auditioned for Lenny Kravitz. Kravitz phoned him up the next day to tell him to be at rehearsal that evening. In 1993, they cut one of their biggest hits ever, “Are You Gonna Go My Way?” Ross explains that it came together from a loose, improvisatory jam in the studio—testament to the magic that can be found off-leash during studio time.
Ross recalls his rig for recording the solo, which consisted of just two items: Kravitz’s goldtop Les Paul and a tiny Gibson combo. (No fuzz or drive pedals, sorry Chris.) As Ross remembers, he was going for a Cream-era Clapton sound with the solo, which jumps between pentatonic and pentatonic major scales.
Tune in to learn how he frets and plays the song’s blistering lead bits, plus learn about what amps Ross is leaning on these days.
If you’re able to help, here are some charities aimed at assisting musicians affected by the fires in L.A:
https://guitarcenterfoundation.org
https://www.cciarts.org/relief.html
https://www.musiciansfoundation.org
https://fireaidla.org
https://www.musicares.org
https://www.sweetrelief.org
Credits
Producer: Jason Shadrick
Executive Producers: Brady Sadler and Jake Brennan for Double Elvis
Engineering Support by Matt Tahaney and Matt Beaudion
Video Editor: Addison Sauvan
Graphic Design: Megan Pralle
Special thanks to Chris Peterson, Greg Nacron, and the entire Volume.com crew.
Tobias bass guitars, beloved by bass players for nearly half a century, are back with the all-new Tobias Original Collection.
Built for unrivaled articulation, low-end punch, and exceptional ergonomics, the all-new Tobias Original Collection comprises an array of six four and five-string bass models all offered in both right and left-handed orientations. The Tobias range features Classic, Killer B, and Growler models, and each is equipped with high-quality hardware from Babicz and Gotoh, active electronics from Bartolini, and the iconic Tobias asymmetrical neck design. Crafted from the finest tonewoods, Tobias Original Collection bass guitars are now available worldwide on Gibson.com, at the Gibson Garage locations, and at authorized Gibson dealers.
The bass world has been clamoring for the return of the authentic, high-end Tobias basses, and now, Tobias has returned. Combining the look and tone of the finest exotic tonewoods, such as quilted maple, royal paulownia, purpleheart, sapele, walnut, ebony, and wenge, with the feel of the famous Tobias Asym asymmetrical neck and the eye-catching shapes of the perfectly balanced contoured bodies, Tobias basses are attractive in look and exceptional in playing feel. However, their sonic versatility is what makes them so well suited to the needs of modern bassists. The superior tone from the exotic hardwoods, premium hardware, and active Bartolini® pickups and preamps results in basses with the tonal flexibility that today’s players require. Don’t settle for less than a bass that delivers everything you want and need –the look, the feel, and the sound, Tobias.
“I’m thrilled to release Tobias basses, emphasizing the use of exotic woods, ergonomics, and authenticity to the original Tobias basses,” says Aljon Go, Product Development Manager for Tobias, Epiphone, and Kramer. “This revival is a dream come true, blending modern craftsmanship with the timeless essence of Tobias.”
“It’s amazing to see this icon of the bass world return,” adds Andrew Ladner, Brand Manager for Epiphone and Kramer. “These models are truly a bass player’s bass, and true to the DNA that makes Tobias world-class—the ace up the sleeve of bass players around the globe since 1978. Today’s players can find that unique voice and feel that only Tobias can offer.”
For more information, please visit gibson.com.