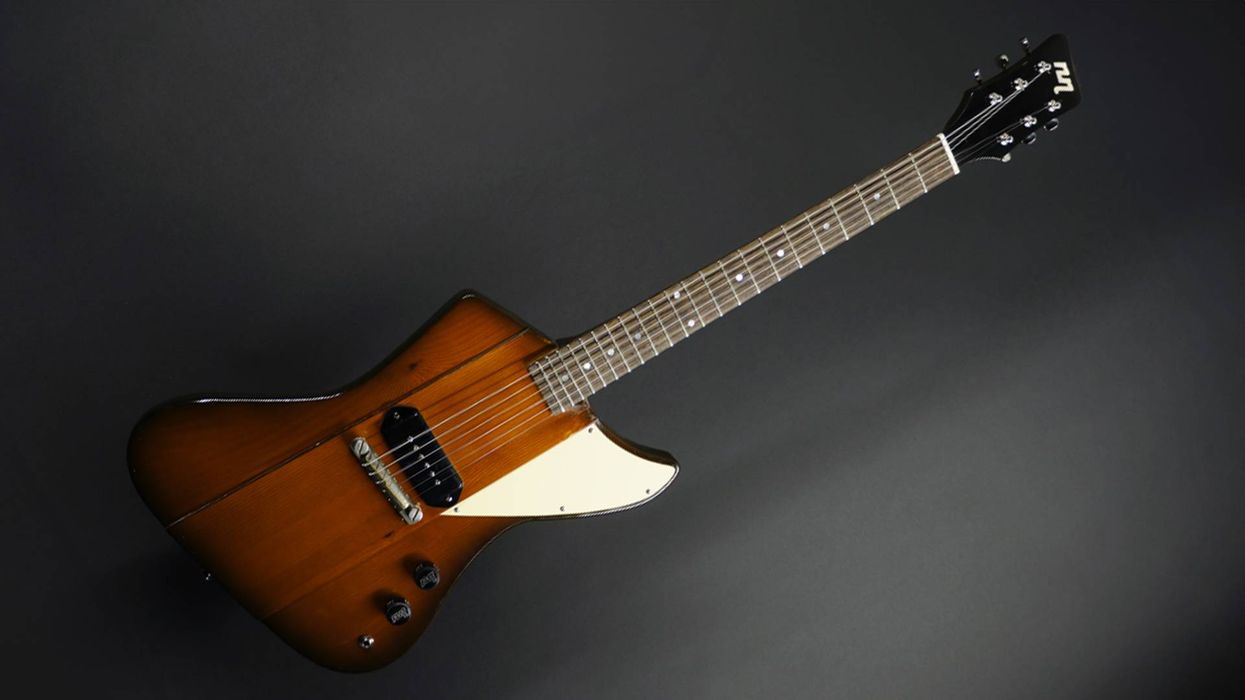
Photo 1
We're getting close to the end of our journey. We've aged most of the metal parts on our project guitar, so now let's take care of the output jack, knobs, back plate, and pickguard.
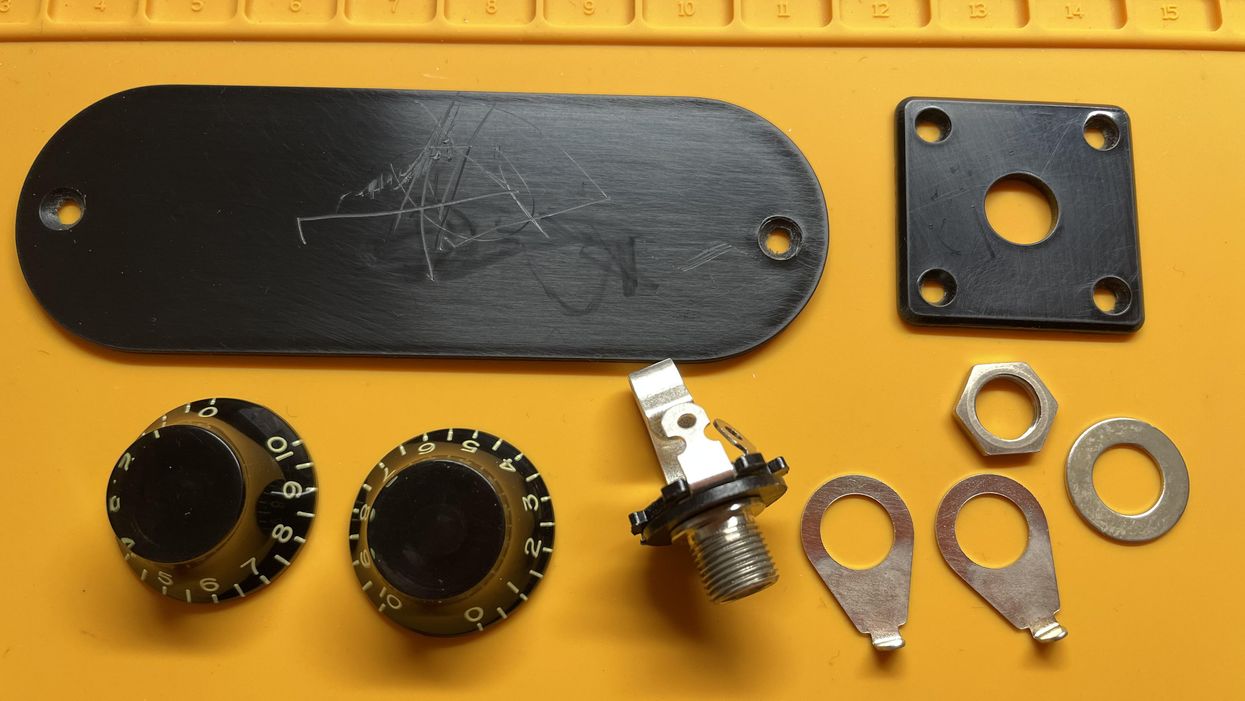
Hello and welcome back to Mod Garage. This month, we'll continue with the aging process of our Harley Benton DC-Junior project guitar (which is a copy of a 1958 Les Paul Junior Double Cut), taking a closer look at the pickguard while aging the rest of the hardware discussed in the last part of this series ["DIY Relic'ing: Harley Benton DC-Junior Electronics"]. If you need a refresher on our aging process for hardware, refer back to "DIY Relic'ing: Break the Shine" for guidance. You can see the parts we'll be discussing today in their "finished" form, aka relic'd, in Photo 1.
1. Output Jack
I'm not a big fan of aging the complete output jack or applying any corrosion to it because it's the transfer point of the signal to the guitar cable. We want this as clean as possible and without any avoidable contact resistance to keep the signal as strong and as fresh as possible. So, aging the parts you can see from the outside is the way to go, meaning the collar, the washer, and the hex nut.
You often see shiny new output jacks on vintage guitars, but why is this? Output jacks don't last forever, and chances are good that a vintage guitar has a replaced output jack that looks new because it is new. If the original output jack is still in a vintage guitar, it's usually dull, often showing some slight rust on the edges of the hex nut. To mimic this appearance, first take off the shine with some steel wool or fine sandpaper as we did before with many other parts. Then use an iron (III) oxide (ferric oxide) liquid to create some patina until you like the result. If you want to mimic some rust on the edges of the hex nut, sand off the nickel until you see the metal underneath—the ferric oxide will do the rest. Just let it sit for soak for a few minutes on these spots.
2. Knobs and Pointers
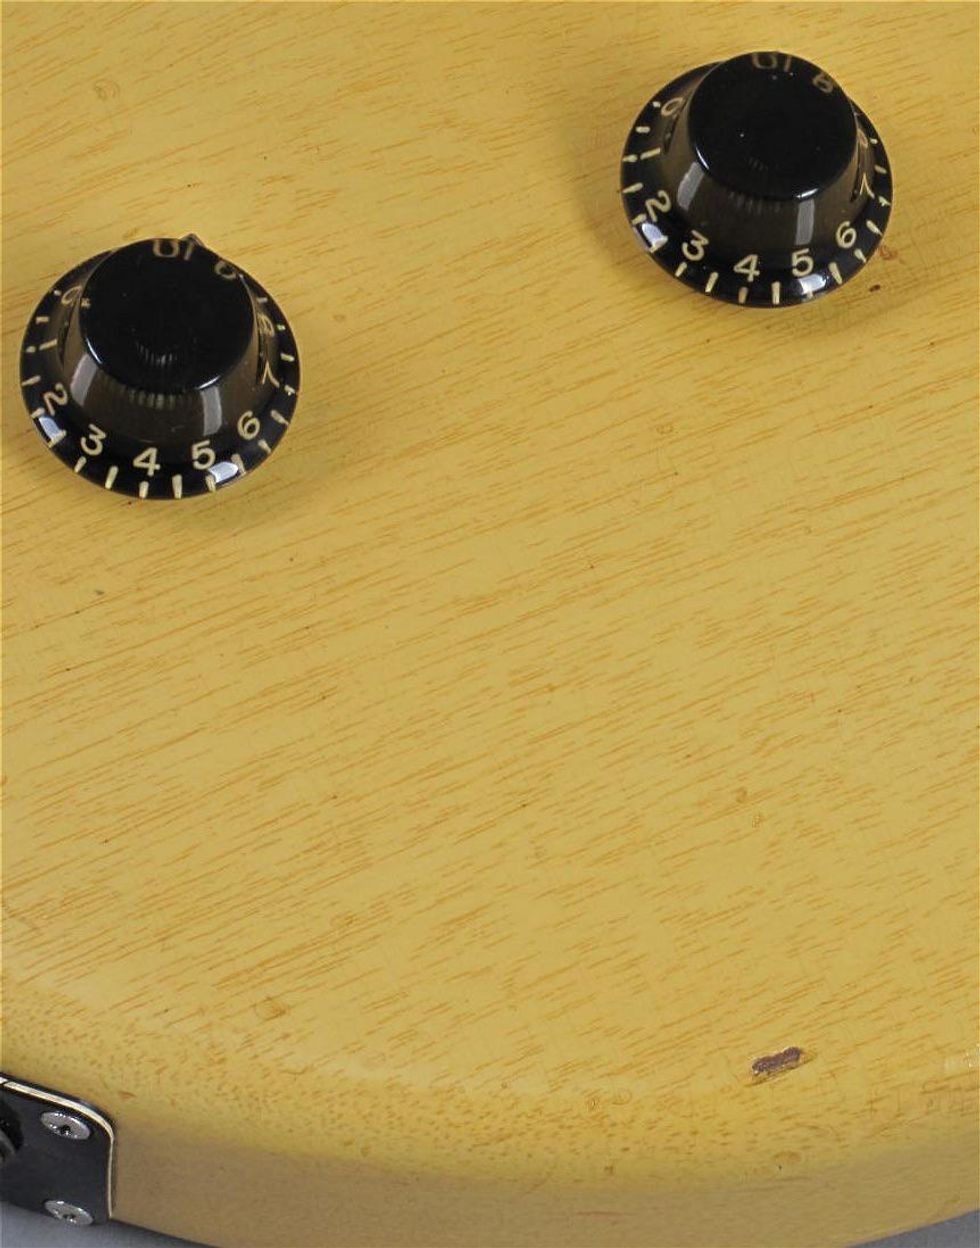
Photo 2
The top-hat knobs on vintage guitars also usually look shiny and new, but for a different reason. Because the knobs are touched and used very often, they get a kind of self-polishing from our fingers through the years, keeping them shiny with a greasy touch. Have a look at the original knobs of a '58 Les Paul Junior, shown in Photo 2, to see what I mean.
To mimic this, you can use a solvent and rub the knobs carefully with a paper towel, the surface will get slightly dull. Afterwards use a polish for plastics (or simply some of your toothpaste) and polish up the knobs a little bit until you like the result. The goal is to find the right mixture between old and new regarding the look. If you like a more beaten-up look, you can add some light scratches and file down some of the edges.
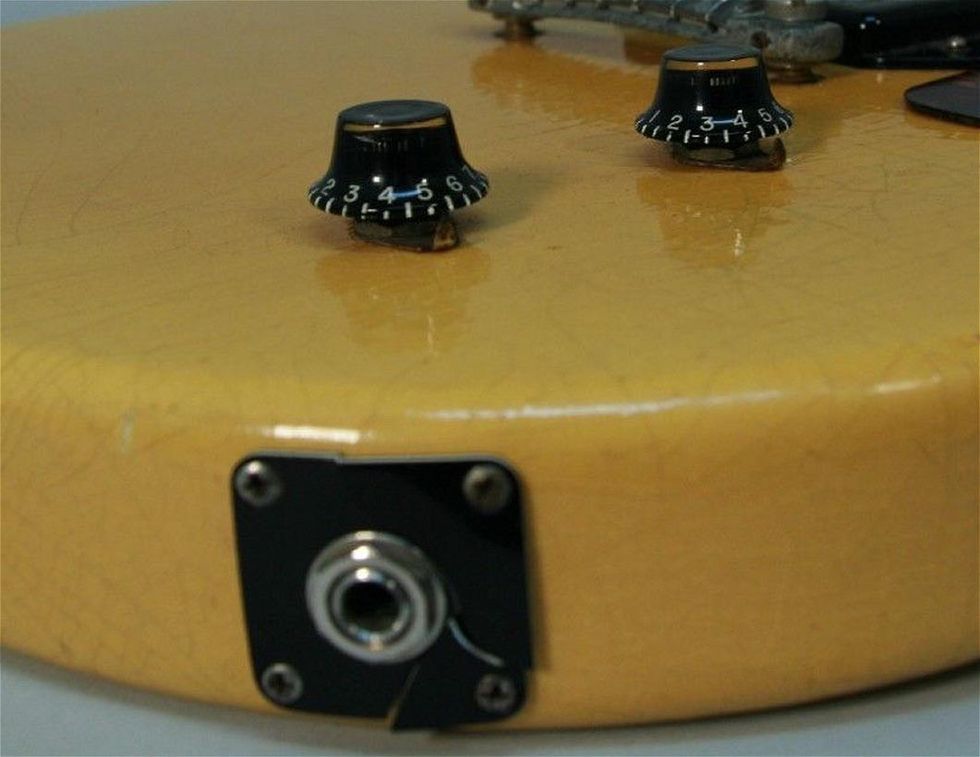
Photo 3
As you can see in Photo 3 of an original Junior from 1958, the pointers usually look dark and rusty. You can use the same process as aging the output jack to give them an old look.
3. Jack Plate and Screws
If you've been following along, you already know how to age screw heads. Nickel works out much better and looks much more authentic compared to chrome, so it's always a good idea to substitute chromed screws like on our Harley Benton with nickel before you proceed.
The jack plate usually shows some dings and scratches from botched attempts to plug in the guitar cable. You can simulate that by scrubbing off the shine with the steel wool, creating some random scratches with sandpaper, and hitting the plastic with the tip of the plug of your guitar cable while the jack plate is lying on a flat and even surface. If you want the jack plate cracked like on the photo of our vintage guitar, as seen in Photo 3, you can sketch out the cracking lines with a fine X-Acto knife on the back of the jack plate. Afterwards, screw it to a flat piece of wood and bolt on the screws very tight until the line cracks. If it doesn't crack, repeat the process and cut deeper with your knife, then install the output jack by fastening the hex nut very tightly.
If you decided to swap the modern 1-ply solid black jack plate for a more authentic 3-ply plate (black/white/black), some more work is required. On vintage guitars, the white sometimes turns to a kind of "nicotine white" or ivory color. To mimic this color, first take off the shine with some steel wool. Now you need something we haven't discussed before: concentrated liquid stain you can mix with alcohol. This is something we'll need again in the future, but as a basis some alcohol like isopropyl or naphtha works great. You also need a stain mixing cup (a small glass) and a spatula or anything else to stir the mixture. To mimic an aged white color, I like to use a stain in amber or vintage amber. Put some alcohol in your glass and add a drop of the stain, stir it, and see what it looks like. If it's too bright, add another drop of the stain and stir again. If it's too dark, add some more alcohol until you like the color.
You can get such stains in almost every luthier supply store. I like to use ColorTone Concentrated Liquid Stain from StewMac. After you finish your mix, take a Q-tip and wipe some of the liquid onto the white layer of your jack plate. Let it dry for a few minutes and watch the result. If it's still too bright, repeat the process. If it's too heavy, use some alcohol to wipe some of it off. You can also use this mix on black plastic parts if you want to mimic some stain spots, with excellent results. Lastly, we use the same mixture of dirt, dust, and ashes that we used for the plastic buttons of the tuners ["DIY Relic'ing Tuners, Part 2"]. I use a mixture of the contents from my vacuum cleaner bag, spiced up with some ashes from my open fireplace. Use your fingers to wipe some dirt onto the white part of the jack plate. Now, how does it look?
I use a mixture of the contents from my vacuum cleaner bag, spiced up with some ashes from my open fireplace.
4. Back Plate and Screws
The back plate of the original '58 Les Paul is a piece of solid black plastic that is held by two screws, and our Harley Benton stays true to this original formula. For the two screws, repeat the process from the jack plate screws. The back plate on vintage guitars usually shows some light scratches, along with some deeper scratches and little chips caused by belt buckles. To mimic this wear, first break the shine with some steel wool, add some random scratches with sandpaper, and use a small chisel or maybe one of your belt buckles to add some deeper scratches and little chips.
By the way, the bottom of the back plate on our Harley Benton is "shielded" with a thick piece of self-adhesive aluminum foil, but it's not connected to ground in any way, so it's pretty useless. If you want to add some shielding, connect it to ground so it can work as it should. There is no shielding inside the cavity of the Harley Benton, same as on the vintage Les Paul. The black color inside the Harley Benton is only black paint but no shielding paint. If you want some shielding in the cavity, go for it, using copper foil or conductive shielding paint.
Congratulations! After you've worked on all these parts, they will look similar to what I did while writing this column for you, as seen in Photo 1.
5. Pickguard
In the last step for today, let's have a look at the pickguard, including the screws. Our Harley Benton comes with a 3-ply (black/white/black) pickguard, so the aging process will be easy: You can simply follow the process from the jack plate. Pickguards usually show scratches from contact with a plectrum, so I recommend using a guitar pick to put some typical scratches on it. Take care of the direction of the pick during this process so it will look authentic afterwards.
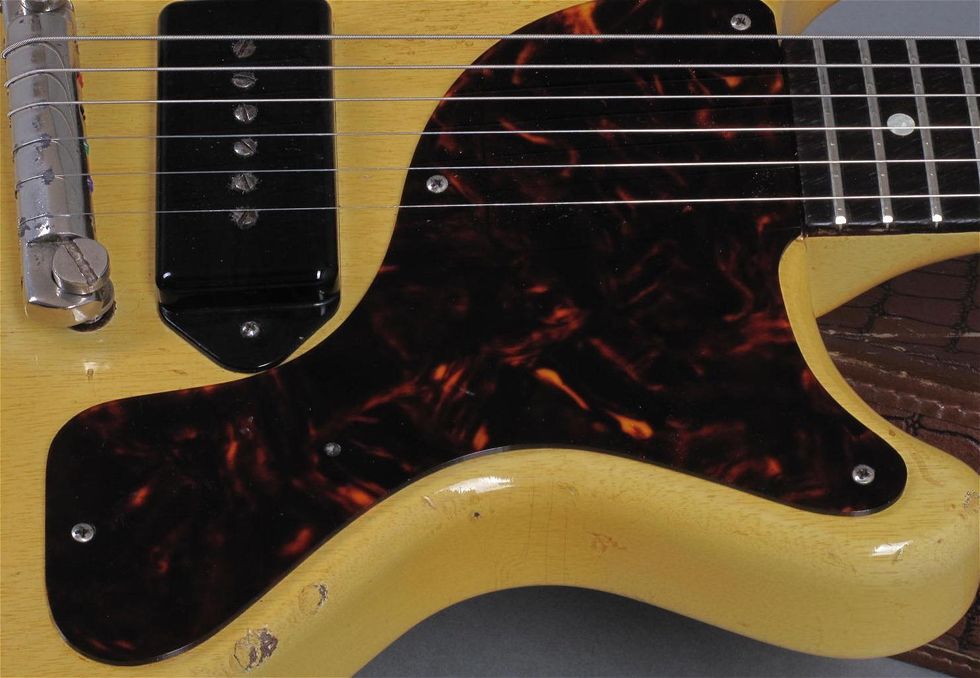
Photo 4
If you're fine with the stock pickguard, you're done for now. The original Les Paul Juniors never had such a pickguard—if they came with a black one, it was always single-ply solid black. Such pickguards are available, and you can swap it if this bothers you. The typical and classic look with a TV yellow Junior guitar was a celluloid tortoise-style pickguard, as seen in Photo 4, which is an original '58 Les Paul Junior.
The old celluloid material was semi-transparent, and the early pickguards had wonderful, rounded edges. The fake tortoiseshell material available today is not transparent in any way, and far from replicating the beauty of the original material. There is a fantastic substitute material called Tortoloid, but it's only available in very thin sheets for acoustic guitars. The only way to come closer to the original would be to use a clear Lucite pickguard and to cover it with a sheet of self-adhesive Tortoloid, or to try to find some of the original celluloid material in the right thickness.
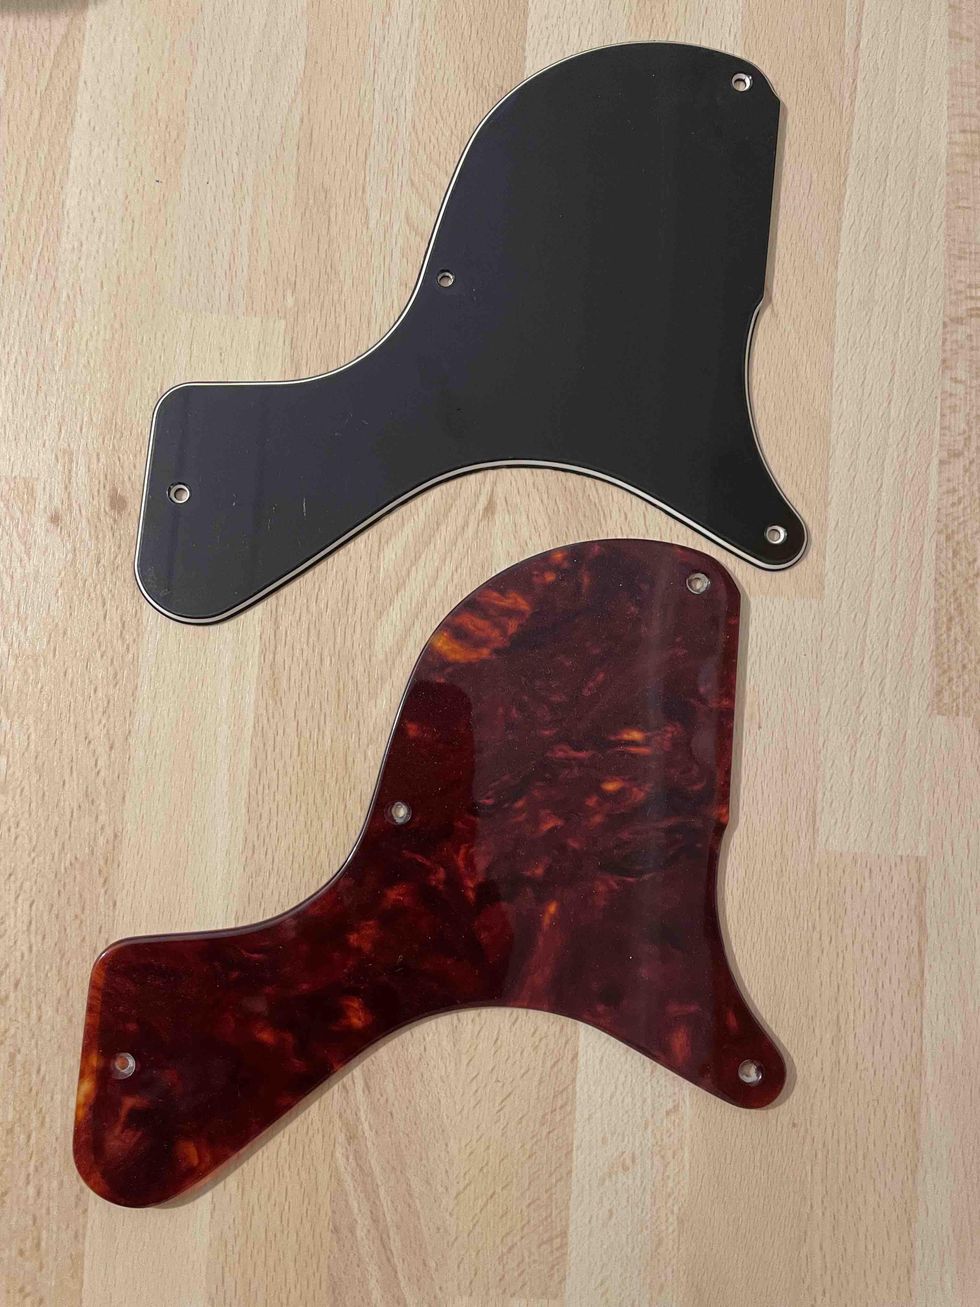
Photo 5
To give this guitar the classic look, and because I love these pickguards very much, I decided to make one for our Harley Benton, using an NOS blank celluloid piece from the '50s, which I got from the Roger Rossmeisl workshop in Berlin. I still have some of these blanks for such projects and working with real celluloid is a pleasure and pain at the same time. Look at this material compared to the stock pickguard in Photo 5.
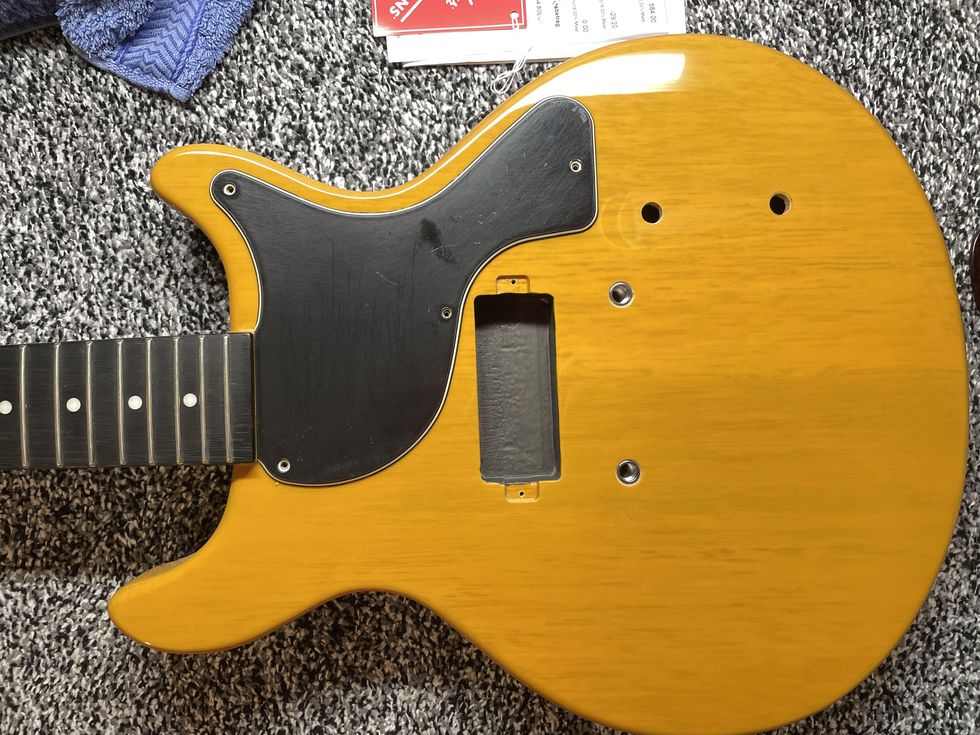
Photo 6
I think it's a big difference. To get a feel for which you prefer, you can see the different pickguards on the project guitar in Photo 6 and Photo 7.
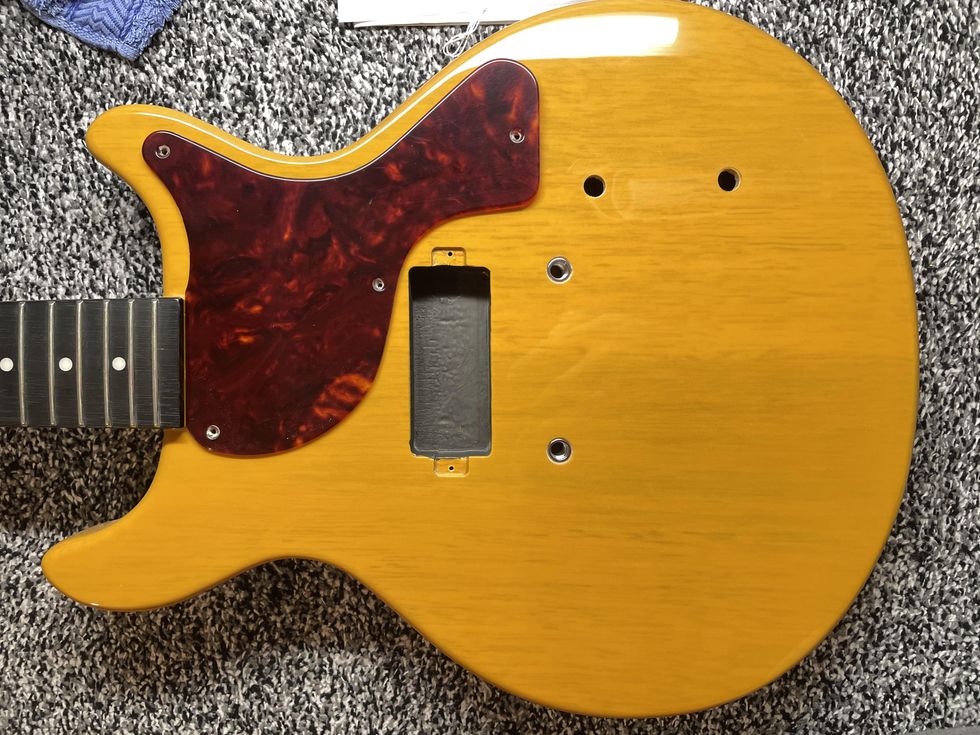
Photo 7
That's it for now. In the next part of this series, we'll work on aging the fretboard and the headstock. But before this, we'll return to guitar mods in the next issue.
Until then ... keep on modding!
- The DIY Relic Job—Fantasy or Reality? - Premier Guitar ›
- DIY: Relic'ing Metal Hardware - Premier Guitar ›
- DIY Relic'ing: Break the Shine - Premier Guitar ›
A satin finish with serious style. Join PG contributor Tom Butwin as he dives into the PRS Standard 24 Satin—a guitar that blends classic PRS craftsmanship with modern versatility. From its D-MO pickups to its fast-playing neck, this one’s a must-see.
PRS Standard 24 Satin Electric Guitar - Satin Red Apple Metallic
Standard 24 Satin, Red App MetThe exquisite BilT Brothers collaborative guitar: a Frank Brothers Ultra Light in BilT eggplant sparkleburst with Arcane 3x3 Gold Foil Humbuckers and loaded with a Caroline Custom Cannonball Distortion.
This forward-thinking custom guitar commissioned by our columnist makes a special case for partnership in the guitar building community.
Owning a guitar shop, your brain is full of to-do lists, questions, and plenty of compulsive thoughts over details. And when you run a shop that specializes in custom builds that you spec out from boutique companies, the ideas for these guitars often come at the most random times of day (and night). While I don’t subscribe to the notion of fate, the following makes a case for its existence.
It was like any other random day at work: We had customers coming in, items shipping out, services on the bench. I was simultaneously working on a pedalboard for a customer and making plans with some vendors. I was on the phone with Brandon Darner of BilT Guitars when DHL dropped off our latest Frank Brothers guitar. Now, I’m never shy about talking up builds from any of our vendors. Spec’ing guitars for our shop, seeing their execution exceed my expectations, and then getting it into the hands of its new owner is one of my absolute favorite parts of my job. So, naturally I mentioned that we just got a new Frank Brothers in. Brandon told me how much he loved their stuff—sort of a “game recognizing game” kind of thing.
After we unboxed the guitar, I called Tim Frank to let him know how we continue to be impressed with their work and how much we loved the new arrival. I also mentioned Brandon had some very nice things to say about their work. Tim’s response was something like, “Oh wow! That’s really cool. Their stuff is amazing and we have a lot of respect for those guys.” At first, I thought he was just being polite, but I’ve gotten to know him pretty well. I knew that the compliment and sentiment was genuine and past the point of his wonderful Canadian pleasantness. One thing led to another, and I started a group text. Very quickly, they became friends. In fact, Brandon even ordered a Frank Brothers shortly after the introduction.
The Frank Brothers and BilT team, left to right: Tim Frank, Tim Thelen (BilT), Nick Frank, and Brandon Darner (BilT).
My last call of the day was to Philippe Herndon from Caroline Guitar Company. As we talked, he was glowing about the pedal building community and how friendly and collaborative it is, and obvious questions popped into my head: “Why aren’t guitar companies like that?” “Why can’t we do a collab guitar?”
Long story extremely short, with tons of excitement, I got Brandon and Tim on the phone and proposed the idea of doing a guitar together. Without hesitation, the response from both was “Hell yeah, let’s do it!” and it was time for us to spec it. We decided on a Frank Brothers Ultra Light. BilT would apply their world-class fit/finish as well as their signature effects treatment. I picked my favorite finish in the BilT repertoire called eggplant sparkleburst, selected Arcane 3x3 Gold Foil Humbuckers, and tapped Philippe on the shoulder to ask if he had any Custom Cannonball Distortions—the first pedal I bought from Caroline in 2013—that he could provide for the build, to which he happily obliged.
A year or so later, the BilT Brothers was born. Of course, it is exceptional beyond words and is a true testament to the results of these incredible companies working together to produce something truly remarkable. We decided, with custom shirts and all, to proudly debut our creation at Fretboard Summit in Chicago. The reaction from everyone exceeded our expectations and showed me that the level of mutual respect and admiration in this business can lead to phenomenal results.
This project has opened a lot of doors that I’m not sure anyone knew existed. For me, the most exciting part of all of this is the fact that, like the smaller pedal companies, there is an actual community here filled with like-minded, pure enthusiasts who also happen to be master craftsmen—and who truly geek out over each other’s work.
Never was this more evident than at the Wood Wire Volts show this January, where not only did the BilT and Frank Brothers crews travel and stay together, they were also often in deep chats with fellow luminaries Sacha Dunable (Dunable Guitars) and Carlos Lopez (Castedosa Guitars), discussing the trade, the work, and ideas for the future. If the vibe is any indicator, we can safely assume that while the BilT Brothers was, by all accounts, the first ever collab guitar of its kind, it will not be the last.
This entire experience is reminiscent of the DIY community ethos that I’ve clung to and has inspired me for most of my life. There is a cliché about the journey being greater than the destination, and while the destination in this case is one of the finest guitars I’ve ever laid my hands on, I’d have to say it holds true
Introducing the new Gibson Acoustic Special models, handcrafted in Bozeman, Montana, featuring solid wood construction, satin nitrocellulose lacquer finishes, and L.R. Baggs electronics.
Solid Wood Construction
Each of the three Acoustic Special models from Gibson are crafted using solid mahogany for the back and sides, solid Sitka spruce for the tops, utile for the necks, and rosewood for the fretboards for a sound that will only get better and better as they age.
Satin Nitrocellulose Lacquer Finishes
All three Gibson Acoustic Special models are finished in satin nitrocellulose lacquer for a finish that breathes, ages gracefully, and lets the natural beauty–both in sound and appearance–of the quality tonewoods come through.
L.R. Baggs Electronics
The Gibson Acoustic Special guitars come with L.R. Baggs Element Bronze under-saddle piezo pickups and active preamps pre-installed, making them stage and studio-ready from the moment you pick them up.
For more information, please visit gibson.com.
Introducing the Gibson Acoustic Specials – J-45, Hummingbird & L-00 Special - YouTube
Great Eastern FX Co. has released the limited-edition OC201 Preamp, featuring vintage Mullard OC201 transistors for a unique fuzz sound. Part of the 'Obsolete Devices' series, this pedal combines classic circuits with modern components for optimal tone and reliability.
Boutique British pedal designers GreatEastern FX Co. have released a new pedal. Limited to just 50 units, the OC201 Preamp is an intriguing twist on the familiar two-transistor fuzz circuit, built around a pair of new-old-stock Mullard OC201 transistors.
“The OC201 is a very early silicon transistor,” company founder David Greeves explains. “It was actually the first silicon transistor made by Mullard, using the same method as their germanium devices. It’s pretty crude by modern standards, with very low gain and limited bandwidth, but that’s exactly what makes it so great in a fuzz pedal.”
This little-known low-gain silicon transistor is responsible for the OC201 Preamp’s palette of sounds, which GreatEastern FX say ranges from dirty boost and garage rock drive sounds up to a raw and richly textured fuzz, all with the excellent volume knob clean-up characteristics this style of fuzz is famous for. The circuit has also been tweaked to deliver a healthy kick of volume to your amp.
This limited-edition pedal is the first in a new series that Great Eastern FX are calling ‘Obsolete Devices’. According to the company, the Obsolete Devices series will feature the company’s take on a range of classic circuits, constructed using a mixture of vintage and modern components. It’s a distinct departure from Great Eastern FX’s main range of pedals.
“With pedals like the Design-a-drive and the XO Variable Crossover, we’re really committed to developing original designs that bring something new to the table,” founder David Greeves explains. “I’m always very conscious of choosing parts that aren’t going to go obsolete so we can go on making the pedals for as long as people want to buy them. But I also love messing around with old parts and classic circuits, which is a totally different mentality. The Obsolete Devices series is basically a way for me to have fun modifying these classic circuits and experimenting with my stash of NOS components, then share the results.
“The name is a little bit of an inside joke,” he continues. “I think what gets labelled as ‘obsolete’ is very subjective. As pedal designers and guitar players, we obsess over obsolete components and what, in any other field, would be considered outdated designs. So the name is a nod to that. I also loved the thought of us coming out with some brand-new Obsolete Devices of our own!”
Alongside the pedal’s new-old-stock Mullard OC201 transistors – which are the reason only 50 of them are being made – the OC201 Preamp uses quality modern components, including high-tolerance Dale metal film resistors and WIMA capacitors. GreatEastern FX say that this hybrid approach, using vintage parts where they make the most difference sonically and low-noise modern parts elsewhere, will deliver the best combination of tone and reliability while also keeping the price from spiralling out of control.
The OC201 Preamp will cost £249 in the UK, $299 in the US and €299 in the EU. It’s available now direct from Great Eastern FX Co. and from the following dealers:
- UK – Andertons
- Europe – Pedaltown.nl
- USA – Sound Shoppe NYC
- Canada – Electric Mojo Guitars
For more information, please visit greateasternfx.com.