


Welcome back to Mod Garage. Let's take a closer look at what's usually referred to as the Brent Mason Telecaster wiring. It's also been called "Telecaster blend wiring" or "Nashville Telecaster wiring," and I think it's time to cover this one in detail for several reasons. First and foremost, I've received numerous requests from you, dear readers, to do this. Fender recently released a faithful replica of Brent Mason's Telecaster, and also, my PG colleague John Bohlinger did a great Rig Rundown video with Mason just weeks ago. Mason is an outstanding player and absolutely nice guy so it's only logical to cover the wiring of his famous '67 Telecaster. Unless you're living in a cave, you've heard about Mason and his playing, which he's laid down on more Nashville studio records than one can count.
Mason's famous "automobile primer gray" 1967 Telecaster has three humbucker pickups and three controls. It's basically a standard 3-way Tele pickup-switching circuit plus an additional volume control to blend in the middle pickup. These are the pickups Mason uses in his Telecaster, all from the Seymour Duncan company:
Rig Rundown: Brent Mason [2021]
- Neck position: Vintage Mini Humbucker (Mason tenderly calls it a "Baby Humbucker"), built-in 180 degrees flipped, so the open pole pieces are facing the bridge rather than the neck for some more high-end and clarity in the tone. The pickup is wired with both coils in series for full humbucking functionality and no control to split it.
- Middle position: Mason is using an older version of the Hot Stack Strat STK-S2 with the red pickup cover and engraved Seymour Duncan logo on top. The current model has a white cover that's partly open on top. Hopefully, the iconic early red pickup cover will be available again for that special look. The pickup is wired with both coils in series for full humbucking functionality and no control to split it.
- Bridge position: Vintage Stack Tele STK-T3b, which is wired with both coils in series for full humbucking functionality and no control to split it.
These are the pickups installed in Brent's original Tele and also the pickups Fender is using for the signature model. This is an HHH pickup combination, by all means. Why Fender labelled it an SSH combination on the webpage ... well, we don't know.
In general, you can use any given pickup combination for this wiring. If you want to be as close as possible, this is your shopping list. If you only want to get in the same ballpark, you should use a vintage-flavored Tele bridge pickup, a hotter (overwound) Stratocaster middle pickup, and a PAF-style humbucker or hot P-90 for the neck position. No matter if they're single-coils or humbuckers, it will work.
"This wiring worked well for Mason right from the start: A hum-free operation is absolutely essential for work in a studio."
Why did Mason choose such an unusual pickup combination, you might ask? According to Mason himself, he didn't have much money in his early career and could only afford one guitar. This had to cover everything he needed in the studio. Brent wanted a Telecaster bridge pickup to cover all the country playing that was popular in the early '90s. For this, he also installed a B-Bender (Joe Glaser system, Mk1 version). He also wanted a Stratocaster tone, especially the in-between tone from bridge and middle together in parallel, and a Les Paul-ish tone from the neck position. So, the pickup combination he chose made sense, and Nashville's Joe Glaser did the wiring for him, which is the reason why Mason named this wiring "Glaser wiring."
This worked well for Mason right from the start: A hum-free operation is absolutely essential for work in a studio. But the wiring underwent some evolution during the years regarding the push-pull pot, which is the master tone control. This was initially wired to split the Hot Stack middle pickup into a single-coil, and all the diagrams of this wiring that are online right now still display this version. Today, the push-pull pot is wired to switch the middle pickup on and off. This is also the way Fender's Mason signature Tele is wired and what I'll be showing you. If you want the older wiring, you can find several examples online. They are also correct, but simply not up to date with Mason's current wiring.
I asked Mason directly about this, and I'm more than happy to share his reply:
"Basically, it's a standard 3-way switch with an extra volume knob that controls the middle pickup. Three knobs, left to right: volume (for neck and bridge), volume (middle), tone (for all 3) with an extra feature to pull on the tone knob to cut the middle pickup off or on. The middle pickup with the volume knob enables you to roll in the desired amount to blend with either neck or bridge. The pull knob on my original '67 Tele cuts the Seymour Duncan Vintage Stack split coil in half to single-coil. Later on, over the years I found that feature useless. We decided to make that tone control knob cut the middle pickup off and on. Upward position is off. The pickups are all Seymour Duncan; Mini Humbucker in front, Hot Stack in middle, and Vintage Stack in bridge." —Brent Mason
Building The Limited-Edition Brent Mason Telecaster | Dream Factory | Fender
For more on the guitar and its story, I recommend watching the video about it.
So, what do we need for this wiring? We know the pickups, but we don't know exactly what's used for the electronics and how it's wired. Fender didn't release a wiring diagram for the signature model yet and Joe Glaser didn't publish anything about it. My diagram (Fig. 1 - scroll below) will work exactly as it should, but maybe the original guitar is wired slightly different. As you know, many roads lead to Rome.
I was able to find a photo of the wiring Fender did (Photo 1) and extracted a still shot of Brent's original guitar from the Fender video mentioned above (Photo 2).
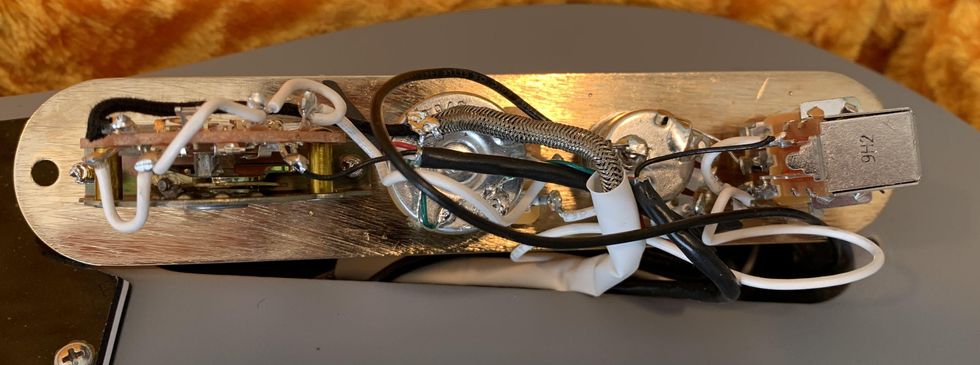
Photo 1
Photo courtesy of FMIC
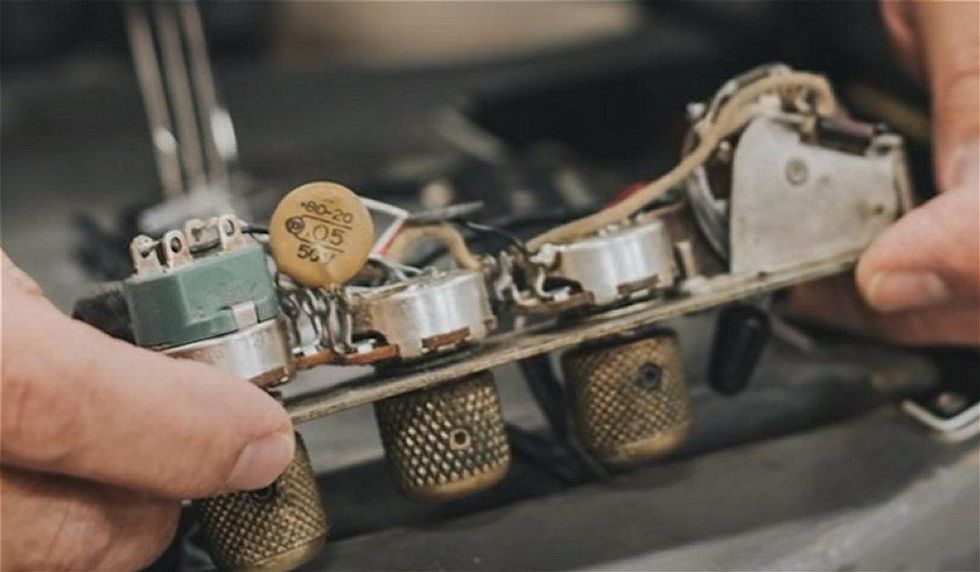
Photo 2
Photo courtesy of FMIC
On these two photos, we can clearly see:
- The push-pull pot is wired to switch the middle pickup on and off.
- All three pickups are wired for full humbucking functionality with both coils in series.
- No treble-bleed networks are used on the two volume pots.
- Mason still has the '67 original Sprague "Circle D" 0.05 uF high-voltage ceramic tone cap in his guitar.
This only leaves us with two unknown parameters: resistance of the three pots, and on/off wiring of the middle pickup. I think it's three 250k audio pots, but if you want a tad more high-end, using a 500k audio push-pull master tone pot is worth a try. I would use two 250k audio volume pots to benefit from the much better taper range compared to a 500k pot—the nature of the (passive) beast.
To activate or cut off the middle pickup there are two different ways: connecting the pickup to the switch or using a push/pull volume pot for the middle pickup. I decided to use the second version because when connecting the pickup directly to the switch, the volume pot stays connected to the circuit, adding some load to it, resulting in less high-end. Please note that the master tone pot will not work on the middle pickup when the master volume is not set to "10" (aka fully opened). When you start to roll down the volume, the middle pickup gets disconnected from the master tone, no matter if you switch the pickup itself or the volume pot—that's part of the game.
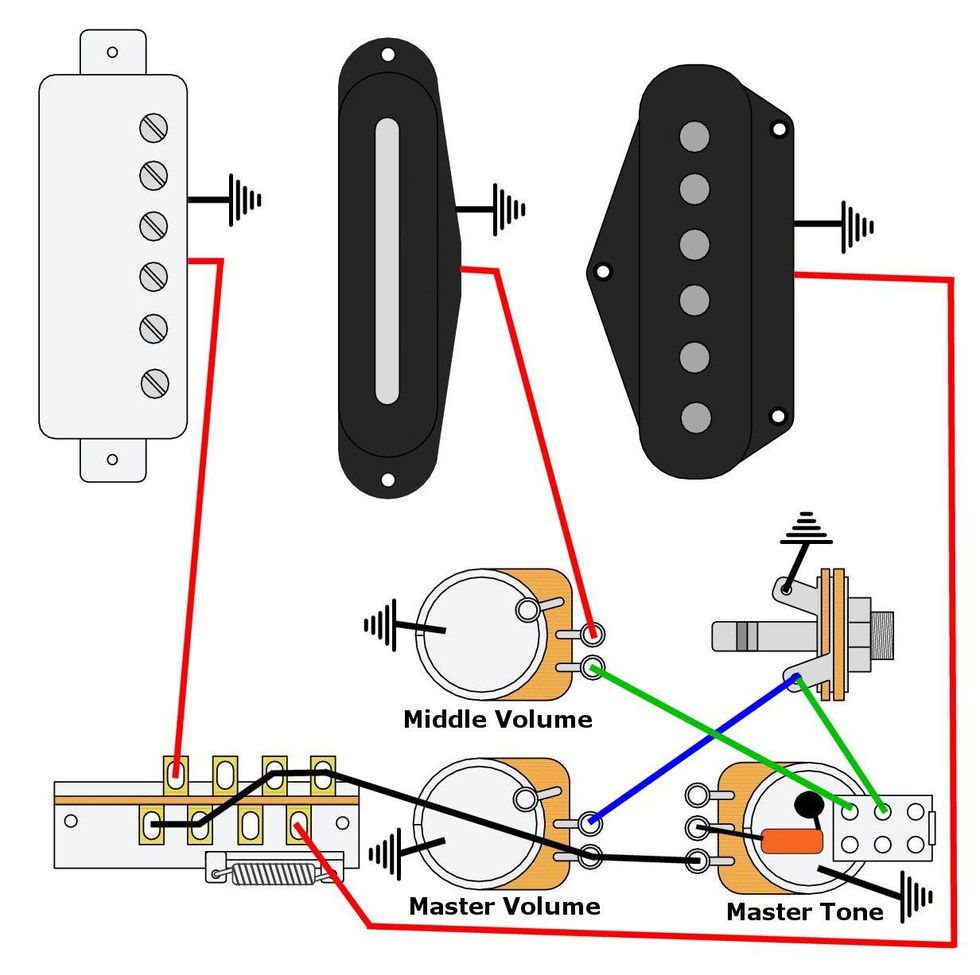
Fig. 1
To keep the wiring diagram (Fig. 1) as clean as possible, I showed all ground connections only with the international symbol for it rather than drawing several black wires through the diagram. I also only show two pickup wires (hot and ground) but keep in mind that these are humbuckers with a four-conductor wiring plus separate ground wire, so you'll have to solder some wires together to end up with only two pickup wires. The separate ground wire always goes directly to ground (casing of a pot, etc.) and assuming you're using Seymour Duncan pickups, you'll have to follow this color code:
- Black wire = hot output
- White and red wire are twisted together, soldered, and isolated
- Green wire = ground
For other pickups, you'll have to use the corresponding color code from the manufacturer. For single-coil pickups, you don't need to do all this.
Is this wiring perfect or are there any mods that can be done? At least it's perfect for Mason and his playing. If it's good enough for him, it should be good enough for all of us. But this is only half the truth.
If you have Brent's playing chops, you don't depend much on any equipment. Even with the cheapest, meanest, off-tuned junk guitar, Mason will sound much better than most of us. The better you play, the less you depend on equipment. It's absolutely okay and no sacrilege to mod this circuit to your personal needs. If you want to use the push-pull pot for splitting one of the pickups rather than switching the middle pickup on and off ... go for it! If you want to use treble-bleed networks for the volume pots or want to implement splitting for all three pickups, there's no law against doing so.
That's it for now. Next month we'll continue with our DIY relic'ing project.
Until then ... keep on modding!


