Whether you’ve got a barebones analog box or a feature-packed digital model, your delay can do a lot more than add ambience to your sound. Here we walk you through everything from basics like signal-chain placement and dialing in traditional sounds to looping and precise tempo matching.
Delay pedals are among the most popular effects around, and the reason is simple: A delay pedal not only gives your sound a professional sheen and adds a three-dimensional quality—even when set for a discreet, atmospheric effect—but it can also produce a wide variety of not-so-subtle sounds and textures, ranging from ear-twisting rhythmic repeats (à la Eddie Van Halen's “Cathedral") to faux twin-guitar harmonies and live looping.
This how-to guide will cover the aforementioned effects, as well as fundamentals like the function of typical delay controls, and where to place your unit in an effects chain. Although there are countless delays on the market—many of which have mind-boggling features—we're going to use a basic delay pedal setup similar to what you'll find on a Boss DD-7 as our reference point. We've also provided some sample settings so you can get the most out of your delay pedal right away.
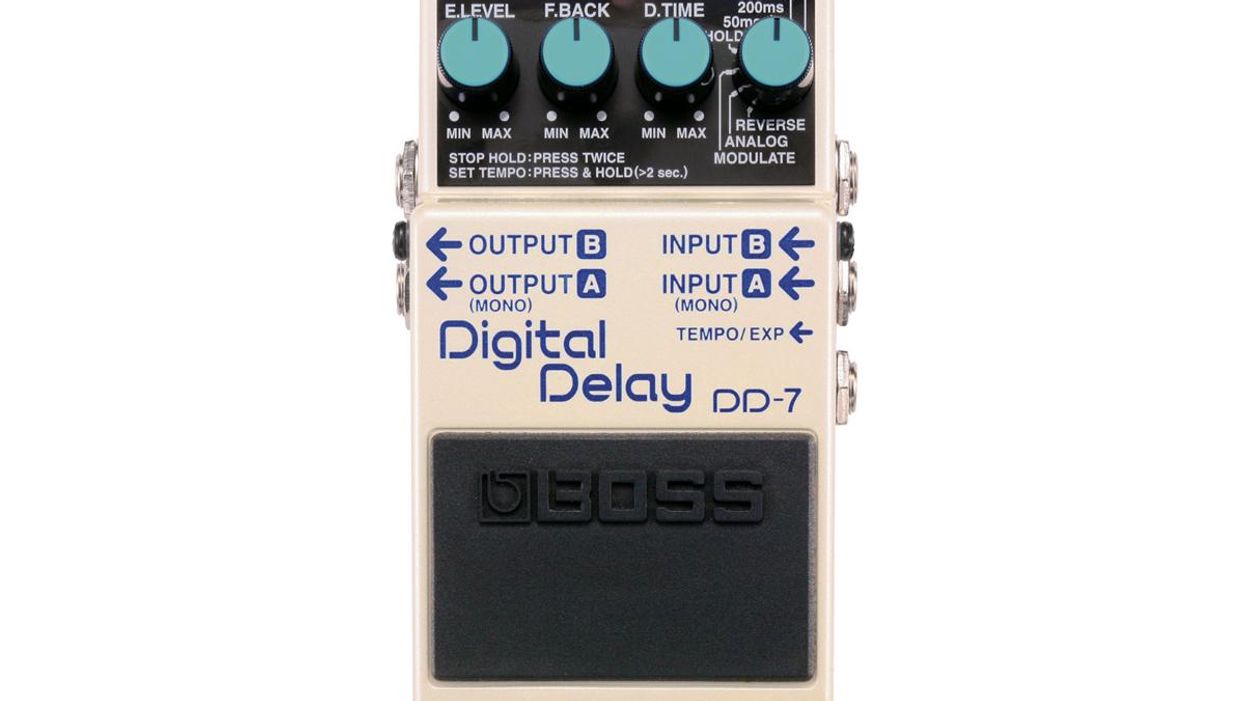
Delay Pedal Controls
Three controls are common to virtually all delay units: Time, Feedback (sometimes labeled "Repeat" or "Regeneration"), and Level (or "Mix").
Time controls the length of time between any two repetitions of your signal. It is most often measured in milliseconds (ms). Most delay pedals don't have a delay-time readout that would enable you to determine exact delay times in milliseconds, so you typically just adjust the Time knob to get an approximate time based on the unit's available range. For instance, the Boss DD-7 (street $179) has a Mode knob that selects between four time ranges—up to 50 ms, 51–200 ms, 201–800 ms, and 801–3200 ms—and the Time knob then adjusts the setting within the selected range.
Feedback determines the amount of repetitions. At its minimum setting, Feedback outputs a single repetition of the original signal. From that point on, as you turn up Feedback you get more repeats. Some delay units allow infinite repeats when this control is maxed.
Level controls the volume of the repeats. When Level is at its minimum setting, you won't hear any repeats. When it's all the way up, the repeats should be as loud as the original signal.
Signal-Chain Placement
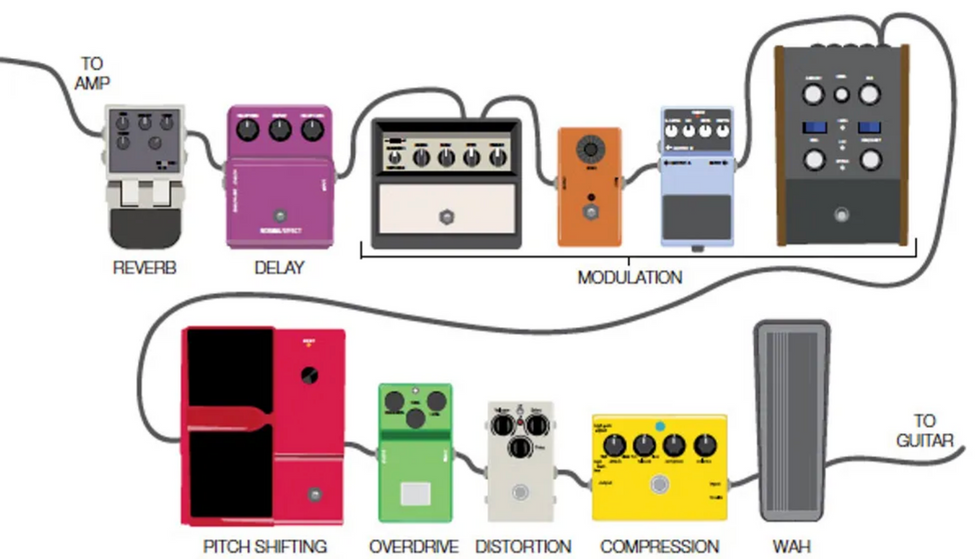
If you plan to use your delay in conjunction with other stompboxes, it's important to consider where to place these effects in the chain—especially if you're using an overdrive, distortion, or fuzz pedal. The most common setup is to place dirt before delay. This is important because it means you'll be delaying the distorted signal as opposed to distorting a delayed signal, which will sound mushy and indistinct. Because a distortion pedal has the strongest impact on your fundamental tone, it's typically placed early in the chain, whereas delay is usually placed toward the end of the chain so it can produce repeats of all of the effects added to your guitar sound. Of course, you should experiment for yourself to see what you prefer.
If you're taking the dirt-before-delay with the distortion from your amp, then you'll want to insert your delay into your amp's effects loop (if it has one) so that it comes in the chain after the preamp gain. For recording, it's less of an issue because you can just record the amp without any effects and then add delay during post-production.
Doubling and Modulation
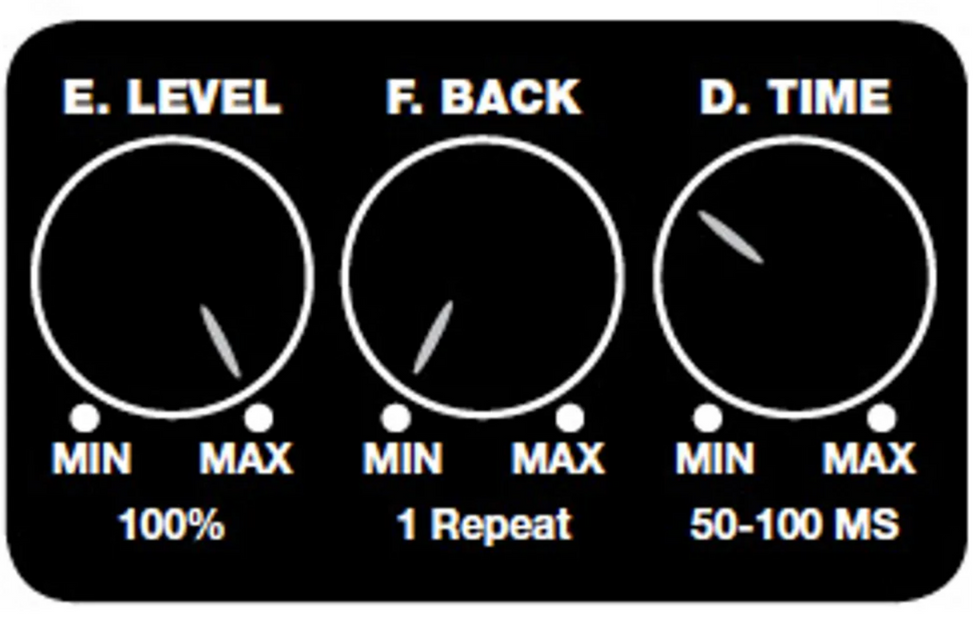
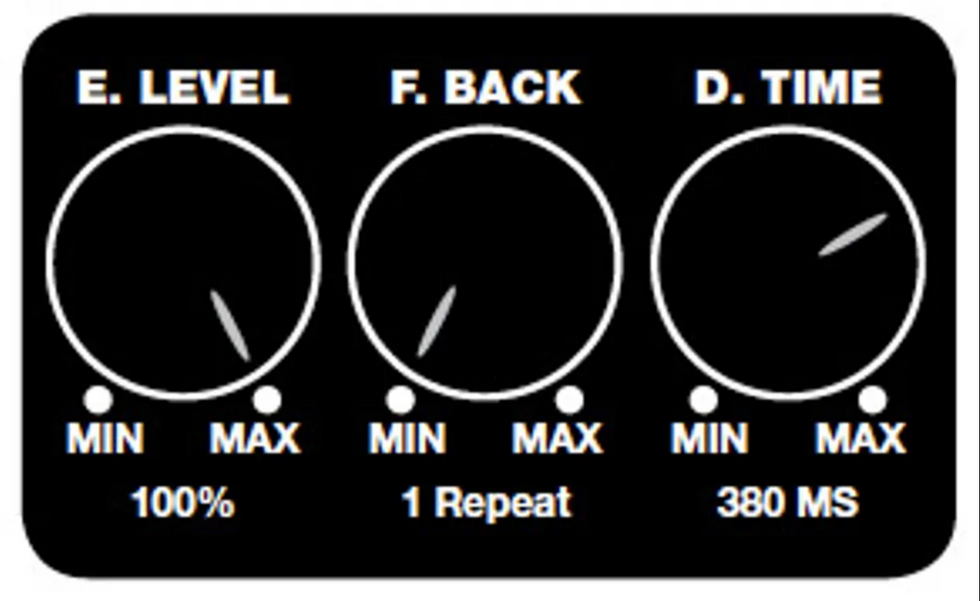
The term "doubling" refers to the process of using a subtle delay to thicken your sound. To get a doubling effect, set Time between 50 and 100 ms, Feedback for minimal repeats (one or two), and Level all the way up. Because the repeat happens so quickly, it creates the illusion of another guitar playing in unison with the original signal rather than sounding like an echo. If you use a lower delay time (20 to 50 ms), you can also get pseudo chorusing and flanging sounds.
Doubling and Modulation Example
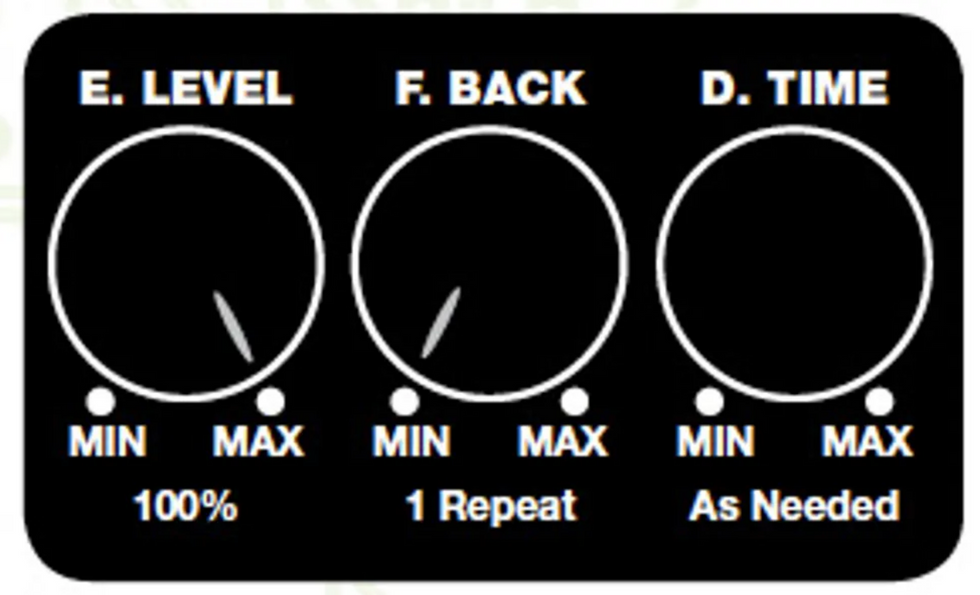
Slapback Echo
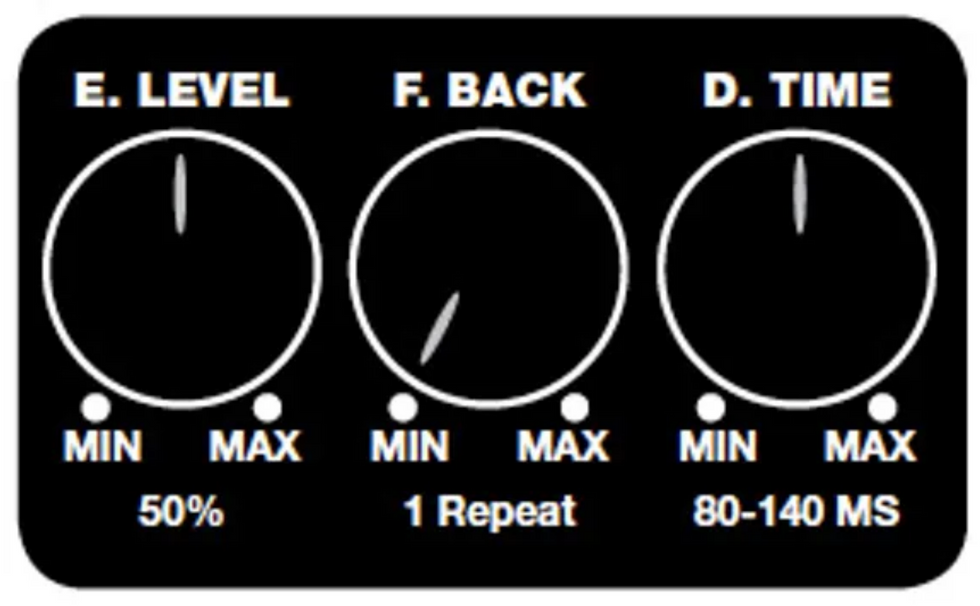
Slapback is a single short repeat similar to a tape slap (the time delay between the record and play heads in an analog tape recorder), and it is most often heard in rockabilly and country. To achieve a slapback effect, keep the Time short (between 80–140 ms), Feedback at 0 (so you only get one repeat), and Level at about 50 percent.
Slapback Example
Faux Reverb
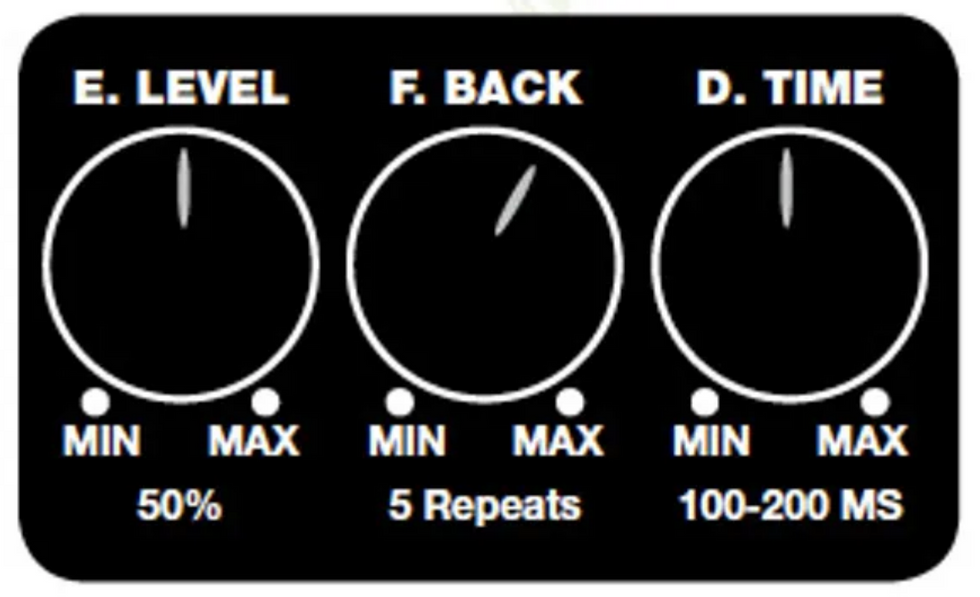
A reverb-type effect can be achieved by modifying some of the settings used for slapback. Set the Time between 100 and 200 ms, Feedback for about 5 repeats, and Level at about 50 percent.
Faux Reverb Example
Tempo Matching
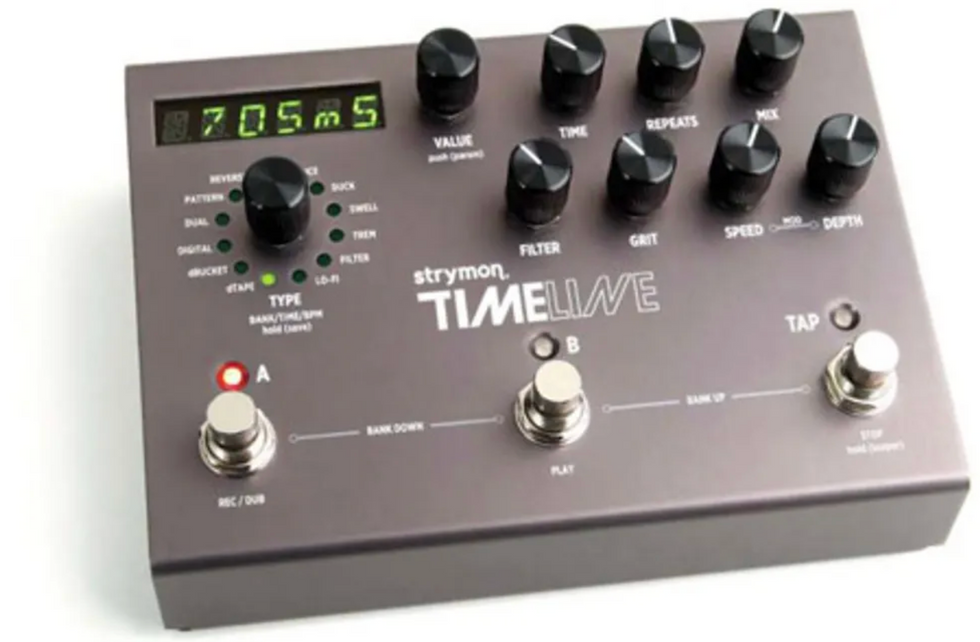
Most delay pedals do not have precise delay time readings on their knob panels. This isn't a crucial issue when you're using shorter delay times or when precise timing of the repeats is not integral to the performance. However, if you're playing to a fixed beat source (say, a band or rhythm track) with a delay time of more than 200 ms and a fairly high Level setting that gives the repeats a distinct note, it will sound best if you dial in a precise delay time that matches the tempo of the band or rhythm track. Otherwise, the repeats will be out of time against the underlying beat. If your music is delay based, delay pedals such as the Providence DLY-4 Chrono Delay (street $449), TC Electronic ND-1 Nova Delay (street $259), and Strymon Timeline (street $449)—all of which feature LED readouts of the delay time—are worth considering.
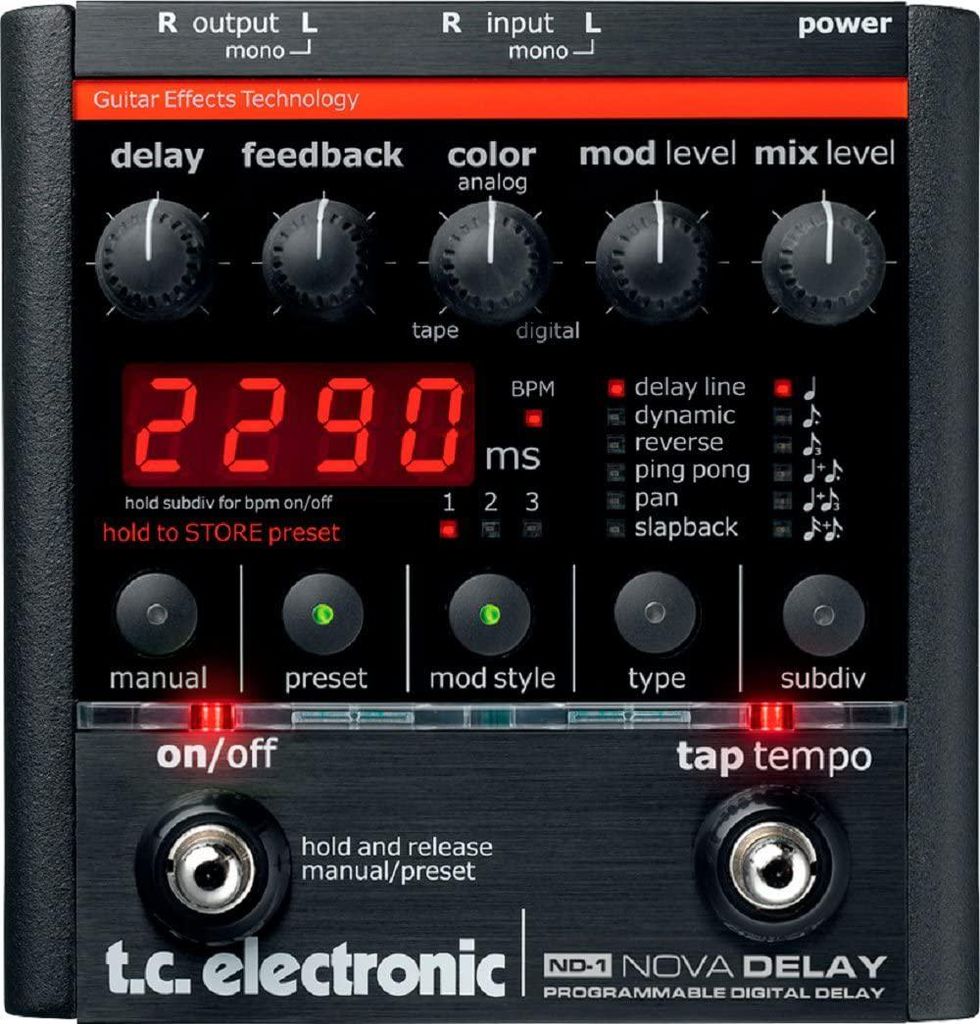
Newer digital delays such as the Providence DLy-4 Chrono Delay, TC Electronic ND-1 Nova Delay, and Strymon Timeline feature exact millisecond readouts for players who need very precise delays for tempo-matching purposes.
Many delay pedals from the last decade or so offer a happy middle ground with tap-tempo functionality (some designs require using an aftermarket external footswitch to access this). If you're familiar with the term but aren't quite sure exactly how it works, here's the scoop: Though many players don't know the exact tempo they need in terms of beats per minute (bpm), most have an innate sense of the tempo they wish to play at, so tapping it out on a delay pedal's tap-tempo footswitch is an easy way to get the sort of tempo matching we've been talking about. If your delay doesn't have tap-tempo functionality, or if you want a formulaic approach to calculating the delay time, see the "Calculating MSfrom BPM" sidebar.
Dotted-Eighth Rhythmic Repeats
Guitarists like Eddie Van Halen, the Edge, and David Gilmour took delays to new heights by making them an integral part of compositions like Van Halen's "Cathedral," U2's "Where the Streets have No Name," and Pink Floyd's "Another Brick in the Wall, Part 1." They popularized a trick using dotted-eighth-note delay repeats to create the illusion that they were playing more notes—and faster—than they really were.
Dotted-Eighth Rhythmic Repeat Example
To do this, set your delay to repeat everything you play a dotted-eighth-note (three 16ths) after you play the original note, and then pluck continuous eighth-notes. After the delay's initial entrance on the last 16th of the first beat, it will fill in the second and fourth 16th-note of every successive beat—as long as you continue to play eighth-notes (newly picked notes will cover the first and third 16th of every beat). To make this sound as natural as possible, set your delay pedal's Level knob all the way up so it matches the volume of the original signal, and try to keep the notes as precise and short as you can to avoid having a picked note overlap with a delayed note.
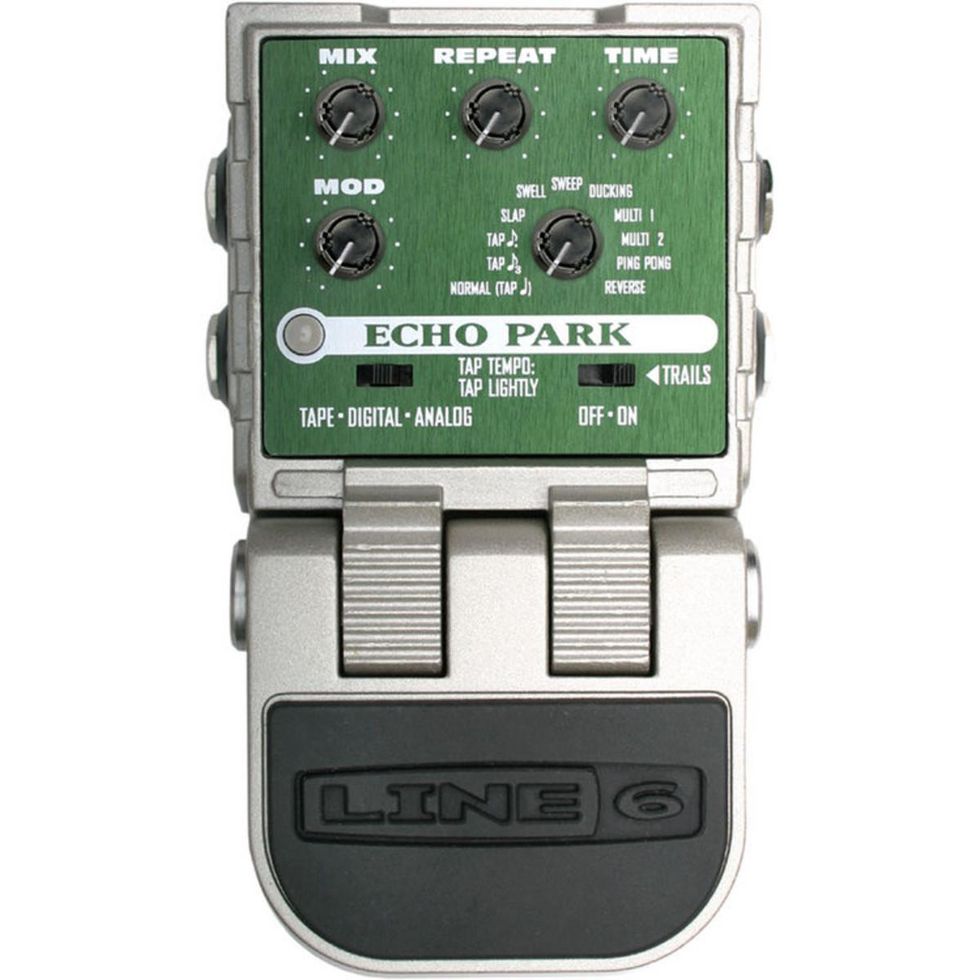
Delays such as the Line 6 Echo Park feature dotted-eighthnote modes that make it a cinch to create rhythmic parts in the style of U2's the Edge or Pink Floyd's David Gilmour.
Some delays, such as the Line 6 Echo Park, have rhythmic subdivision modes built in, so dotted-eighth repeats won't be a problem to set up. However, if your delay doesn't offer subdivisions, you'll have to do some math to get the Time setting right. Here, again, the "Calculating MS fromBPM" sidebar will be a big help.
Delay as Harmonizer
Some delays, such as the Line 6 Echo Park, have rhythmic subdivision modes built in, so dotted-eighth repeats won't be a problem to set up. However, if your delay doesn't offer subdivisions, you'll have to do some math to get the Time setting right. Here, again, the "Calculating MS fromBPM" sidebar will be a big help.
One caveat with using a delay to perform harmonized lines is that you won't be able to easily start both parts simultaneously. You might try using a volume pedal to mute the opening line and bring the volume up when the harmony begins, but the more common approach is to just start a line and opt for a staggered entrance of the harmony line. In fact, some songs were written with staggered harmony parts. For instance, the intro to Iron Maiden's "The Trooper" has a built-in layered entrance of a harmonized line and can be pulled off by a single guitarist using a delay pedal.
Delay as Harmonizer Example
If you're new to harmonizing, here's a quick overview on creating harmony parts. Typically, the intervals of a harmony part are fixed (i.e., the part uses the same interval, shifting between its major or minor form to accommodate diatonic notes) throughout the duration of the line, with thirds and sixths being the most common choices (although fourths, fifths, and octaves are also frequently employed). Of course, there are exceptions to every rule, and different intervals can be used throughout a line. For a more in-depth exploration of harmonized lines, consult a book such as A Player's Guide to Chords and Harmony: Music Theory for Real-World Musicians by Jim Aikin or David Baker's Arranging and Composing for the Small Ensemble: Jazz, R&B, Jazz Rock, an advanced workbook with a forward by Quincy Jones.
Looping
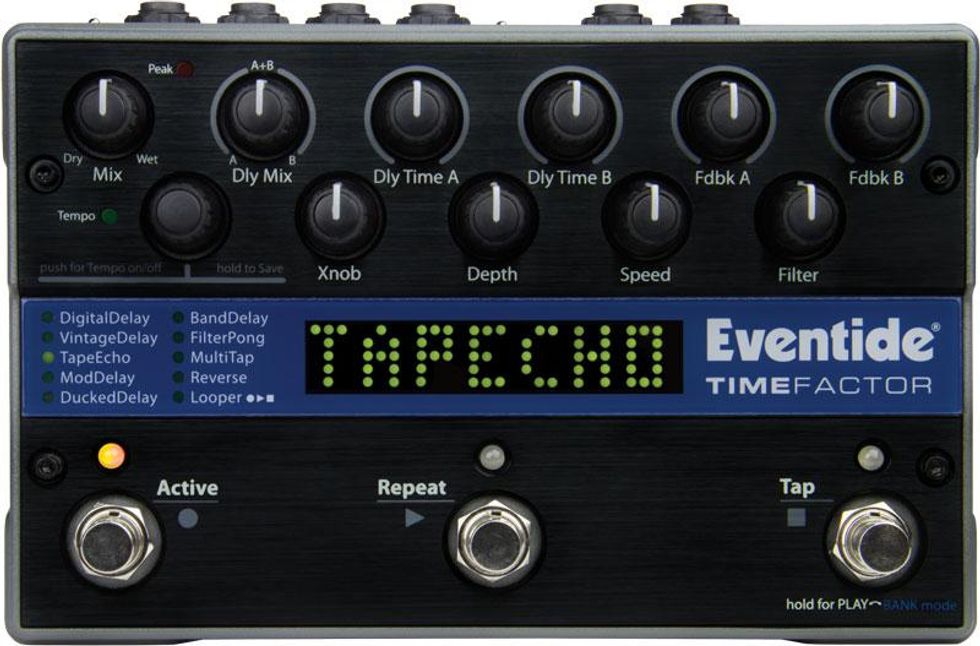
Guitar legends such as Bill Frisell and David Torn have made looping an integral part of their live shows. At its most extreme, looping is almost like real-time multi-tracking: You can continually add layers of sound, starting with a bass figure, then a layer of chords, followed by a muted, single-note rhythm part, and then a solo on top. Pedals like the Line 6 DL4 Delay Modeler (street $236), Boss DD-7, and Eventide TimeFactor (street $399) have built-in looping functionality and are good options for getting started with looping.
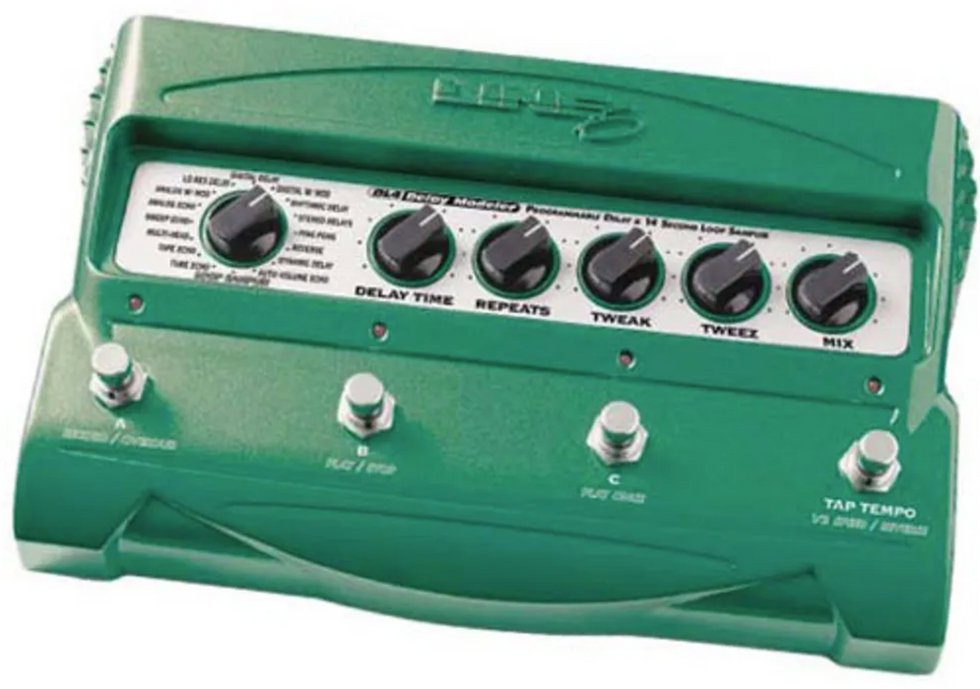
Many newer digital delays—including the Eventide TimeFactor (above), Boss DD-7, and Line 6 DL4 Delay Modeler (bottom) —also feature built-in looping functionality.
One tricky thing with looping is that the start and end points of the loop have to be rhythmically precise: When you first record the loop, you have to start the loop on the first beat of the phrase, beat occurs again—thus cutting off the note's sustain to avoid overlap. In every loop, the last note will immediately flow into the repetition of the first note. Sometimes there might be a very slight lag before the effect is actually activated after you step on the pedal. We're talking milliseconds here, but you might feel it and may have to adjust the timing of your stomps accordingly.
If the maximum looping time available on your delay device is too short for some of your more ambitious looping applications, there are still good uses for it. For example, if you only had enough delay time to have one harmony or drone note sound, you could leave it on for infinite feedback and practice playing and hearing scales or patterns against the fixed tonal center. You could also use it to loop a note that you could tune the rest of your strings to if you don't have a tuner (at least you'd be in tune with yourself!). These may not be performance-critical uses, but they could certainly be helpful in your development as a musician.
Adventure Awaits … Awaits … Awaits
Although we've explored its most common uses, there are still many more sounds and textures that can be created with a delay pedal—in fact, the possibilities are nearly endless. And whether you arm yourself with a basic echo box or one of the newer units with a bunch of bells and whistles, learning to see and use the effect in a fresh new way— just as the Edge and Eddie Van Halen did—could make you the next sonic innovator whose sonic weapon is the delectable delay.
Calculating MS from BPM
A song's tempo is usually expressed in terms of beats per minute (bpm). But figuring out a song's tempo by counting beats for 60 seconds isn't especially practical. A more efficient way is to find a smaller multiple of 60 and use that as the basis for your calculations. For example, you can count how many beats go by in 15 seconds and multiply that by 4 (15 x 4 = 60 seconds or one minute) or you can count how many beats go by in 10 seconds then multiply that by 6. It can be hard to get a really accurate reading with this approach, but it will get you in the ballpark, if you're in a pinch.
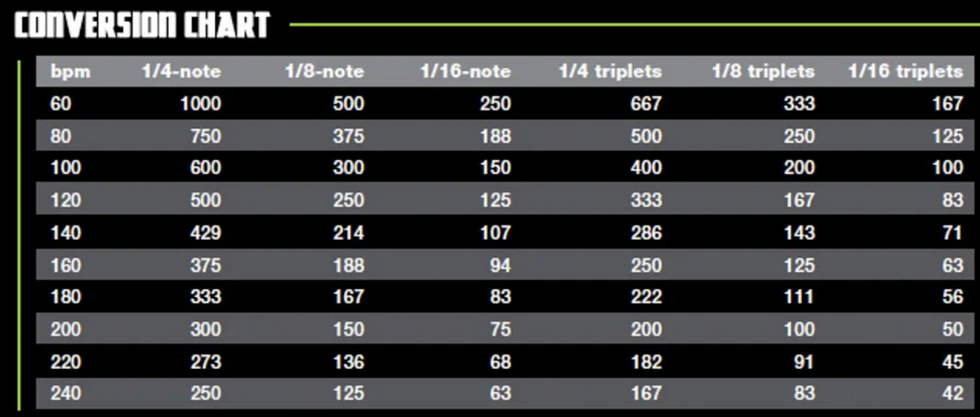
However, while most musicians think of tempo in terms of bpm, most delay units represent delay time as milliseconds (ms). Studio guitarists used to carry conversion charts in their gigbags to make sure they could always lock in with tempos at a session, and we're including one for you below. If you ever find yourself in need of a beat-matched delay but don't have this chart handy, you can use some basic formulas to convert the desired bpm into ms and set your delay accordingly. The basis for the formulas is the number 60,000—the number of milliseconds in a minute. To convert bpm to ms, the formula is:
60,000/bpm = quarter-note ms
For example, 60,000/100 bpm = 600 ms. If you're playing to a track that is 100 bpm, you'll need to set your delay at 600 ms to get quarter-note repeats.
To get smaller subdivisions of the quarter note, there are two approaches. You can divide the quarter-note ms reading proportionately, as needed. For repeats in eighth-notes, divide the quarter-note ms by 2, and for repeats in 16ths, divide the quarter-note ms by 4. At a tempo of 100 bpm, quarter-note repeats are 600 ms, eighth-note repeats are 300 ms, and 16th-note repeats are 150 ms.
Or you can use these formulas:
30,000/bpm = eighth-note ms
15,000/bpm = 16th-note ms
For triplet-based music, the formula is:
40,000/bpm = quarter-note-triplet ms
For example, 40,000 divided by 100 bpm = 400 ms. You can divide the quarter-note-triplet ms reading to get values for eighth- and 16th-note triplets. To get eighth-note-triplet repeats, divide the quarter-note-triplet ms by 2, and to get 16th-note-triplet repeats, divide the quarter-note-triplet ms by 4. At a tempo of 100 bpm, quarter-note-triplet repeats are 400 ms, eighth-note-triplet repeats are 200 ms, and 16thnote- triplet repeats are 100 ms.
Or you can use these formulas:
20,000/bpm = eighth-note-triplet ms
10,000/bpm = 16th-note-triplet ms
To calculate ms for dotted-eighth-note rhythmic repeats,
the formula is:
45,000/bpm = dotted-eighth-note ms
For example at 100 bpm, you will need a delay time of 450 ms to get repeats in dotted-eighth-notes.
[Updated 8/30/21]
- How to Get the Most Out of Your Delay Pedal - Premier Guitar ›
- Recording Dojo: How to Capture the Best Delay Sound - Premier ... ›
- MXR Carbon Copy Delay Review - Premier Guitar ›
- Tone Tips: Thicken It Up! - Premier Guitar ›
- Guitar Shop 101: How to Shim a Bolt-On Neck - Premier Guitar ›
- 7 Ways to Use Your Delay Pedal for Ultimate Guitar Tone - Premier Guitar ›
- 10 Delay Pedals You Need to Check out - Premier Guitar ›
- Keeley Andy Timmons Halo Delay Review - Premier Guitar ›
Once used as a way to preserve American indigenous culture, field recording isn’t just for seasoned pros. Here, our columnist breaks down a few methods for you to try it yourself.
The picture associated with this month’s Dojo is one of my all-time favorites. Taken in 1916, it marks the collision of two diverging cultural epochs. Mountain Chief, the head of the Piegan Blackfeet Tribe, sings into a phonograph powered solely by spring-loaded tension outside the Smithsonian. Across from him sits whom I consider the patron saint of American ethnomusicologists—the great Frances Densmore.
You can feel the scope and weight of theancient culture of the indigenous American West, and the presence of the then-ongoing women’s suffrage movement, which was three years from succeeding at getting the 19th Amendment passed by Congress. That would later happen on June 4, 1919—the initiative towards granting all women of this country the right to vote. (All American citizens, including Black women, were not granted suffrage until 1965.)
Densmore traversed the entire breadth of the country, hauling her gramophone wax cylinder recorders into remote tribal lands, capturing songs by the Seminole in southern Florida, the Yuma in California, the Chippewa in Wisconsin, Quinailet songs in Northern Washington, and, of course, Mountain Chief outside the Smithsonian in Washington, D.C. Author of more than 20 books and 200 articles, she carefully preserved the rich cultural diversity of Native Americans with over 2,500 field recordings.
Why am I writing about this? Firstly, to pay homage! Secondly, because it serves as a great reminder to seek and cultivate sound outside the studio as well. We live in a time of great technological power and convenience. Every week a new sample pack, plugin, pedal, or software instrument hits the market. For all the joy that these offerings bring, they deprive us of the joy of creating our own instruments from scratch.
This month, I’m advocating for you to make some field recordings of your own—nature, urban, indoor, outdoor, specific locations, animals, or anything that piques your interest! Bring the material back to the studio and make music with it! I’ll show you how to make your own sample libraries to use in your music. Tighten up your belts, a multipart Dojo is now open.
What do you need to get started? Quite simply, you just need any device that is capable of recording. This can range from your cell phone to a dedicated field recorder. The real question is: Do you want to use mics housed in handheld units or have more robust mic pres with the ability to power larger live/studio microphones using XLR connectors found with the larger units? Let’s look at three scenarios.
The Cellular Approach
The absolute easiest way to get started is with your cell phone. Take advantage of a voice-memo recording app, or use an app that records multitrack audio like GarageBand on iOS. Phone recordings tend to sound very compressed and slightly lo-fi—which might be exactly what you want. However, the method can also introduce unwanted noise artifacts like low-end rumble (from handling the phone) and phasing (moving the mic while recording). I recommend using a tripod to hold your phone still while recording. You might also want to consider using an external mic and some software to edit your sample recordings on the phone. I like using a Koala Sampler ($4.99) on iOS devices.
Upgrade Me
The next step up is to use a portable recorder. These have much better mic pres, and offer true stereo recording with pivoting mic heads. This can give you the added benefit of controlling the width of your stereo image when recording or helping isolate two sound sources that are apart from each other. You sacrifice the ability to easily edit your recordings. You simply import them into your computer and edit the recording(s) from there.
Pro-Level Quality
I would recommend this scenario if you want to record multiple sources at once. These devices also have SMPTE time code, 60+ dB of gain, phantom power (+48 volts), advanced routing, and a 32-bit/192 kHz sampling rate, so you’ll never have a distorted recording even when the meter gets unexpectedly pegged into the red from a loud sound source. I recommend the Zoom F8n Pro ($1099). Now you can use your microphones!
Best Practices
Try to safely record as close to the sound source as you can to minimize ambient noise and really scrub through your recordings to find little snippets and sound “nuggets” that can make great material for creating your own instrument and sample library—which we’ll explore next month! Namaste.
Need more firepower? Here’s a collection of high-powered stomps that pack plenty of torque.
There’s a visceral feeling that goes along with really cranking the gain. Whether you’re using a clean amp or an already dirty setup, adding more gain can inspire you to play in an entirely different way. Below are a handful of pedals that can take you from classic crunch to death metal doom—and beyond.
Universal Audio UAFX Anti 1992 High Gain Amp Pedal
Early 1990s metal tones were iconic. The Anti 1992 offers that unique mix of overdrive and distortion in a feature-packed pedal. You get a 3-band EQ, noise gate, multiple cab and speaker combos, presets, and full control through the mobile app.
Revv G4 Red Channel Preamp/Overdrive/Distortion Pedal - Anniversary Edition
Based upon the red channel of the company’s Generator 120, this finely tuned circuit offers gain variation with its 3-position aggression switch.
MXR Yngwie Malmsteen Overdrive Pedal - Red
The Viking king of shred guitar has distilled his high-octane tone into a simple, two-knob overdrive. Designed for going into an already dirty amp, this stomp offers clarity, harmonics, and more.
Empress Effects Heavy Menace Distortion Pedal
Arguably the company’s most versatile dirt box, this iteration is all about EQ. It’s loaded with an immensely powerful 3-band EQ with a sweepable mid control, footswitchable noise gate, a low-end sculpting control, and three different distortion modes.
JHS Hard Drive Distortion Pedal - Tan
Designed by late JHS R&D engineer Cliff Smith, the Hard Drive is a powerful and heavy ode to the post-grunge sounds of the late ’90s and early ’00s. This original circuit takes inspiration from many places by including cascading gain stages and Baxandall bass and treble controls.
Boss HM-2W Waza Craft Heavy Metal Distortion Pedal
Few pedals captured the sound of Swedish death metal like the HM-2. The go-to setting is simple—all knobs maxed out. Flip over to the custom mode for more tonal range, higher gain, and thicker low end.
Electro-Harmonix Nano Metal Muff Distortion Pedal
Voiced with an aggressive, heavy tone with a tight low end, this pedal offers +/- 14 dB of bass, a powerful noise gate, and an LED to let you know when the gate is on.
Soldano Super Lead Overdrive Plus Pedal
Aimed to capture the sound of Mike Soldano’s flagship tube amp, the SLO uses the same cascading gain stages as the 100-watt head. It also has a side-mounted deep switch to add low-end punch.
When Building Guitars—or Pursuing Anything—Go Down All the Rabbit Holes
Paul Reed Smith says being a guitar builder requires code-cracking, historical perspective, and an eclectic knowledge base. Mostly, it asks that we remain perpetual students and remain willing to become teachers.
I love to learn, and I don’t enjoy history kicking my ass. In other words, if my instrument-making predecessors—Ted McCarty, Leo Fender, Christian Martin, John Heiss, Antonio de Torres, G.B. Guadagnini, and Antonio Stradivari, to name a few—made an instrument that took my breath away when I played it, and it sounded better than what I had made, I wanted to know not just what they had done, but what they understood that I didn’t understand yet. And because it was clear to me that these masters understood some things that I didn’t, I would go down rabbit holes.
I am not a violin maker, but I’ve had my hands on some of Guadagnini’s and Stradivari’s instruments. While these instruments sounded wildly different, they had an unusual quality: the harder you plucked them the louder they got. That was enough to push me further down the rabbit hole of physics in instrument making. What made them special is a combination of deep understanding and an ability to tune the instrument and its vibrating surfaces so that it produced an extraordinary sound, full of harmonics and very little compression. It was the beginning of a document we live by at PRS Guitars called The Rules of Tone.
My art is electric and acoustic guitars, amplifiers, and speaker cabinets. So, I study bridge materials and designs, wood species and drying, tuning pegs, truss rods, pickups, finishes, neck shapes, inlays, electronics, Fender/Marshall/Dumble amp theories, schematics, parts, and overall aesthetics. I can’t tell you how much better I feel when I come to an understanding about what these masters knew, in combination with what we can manufacture in our facilities today.
One of my favorite popular beliefs is, “The reason Stradivari violins sound good is because of the sheep’s uric acid they soaked the wood in.” (I, too, have believed that to be true.) The truth is, it’s never just one thing: it’s a combination of complicated things. The problem I have is that I never hear anyone say the reason Stradivari violins sound good is because he really knew what he was doing. You don’t become a master of your craft by happenstance; you stay deeply curious and have an insatiable will to learn, apply what you learn, and progress.
“Acoustic and electric guitars, violins, drums, amplifiers, speaker cabinets–they will all talk to you if you listen.”
What’s interesting to me is, if a master passes away, everything they believed on the day they finished an instrument is still in that instrument. These acoustic and electric guitars, violins, drums, amplifiers, speaker cabinets—they will all talk to you if you listen. They will tell you what their maker believed the day they were made. In my world, you have to be a detective. I love that process.
I’ve had a chance to speak to the master himself. Leo Fender, who was not a direct teacher of mine but did teach me through his instruments, used to come by our booth at NAMM to pay his respects to the “new guitar maker.” I thought that was beautiful. I also got a chance to talk to Forrest White, who was Leo’s production manager, right before he passed away. What he wanted to know was, “How’d I do?” I said, “Forrest, you did great.” They wanted to know their careers and contributions were appreciated and would continue.
In my experience, great teachers throw a piece of meat over the fence to see if the dog will bite it. They don’t want to teach someone who doesn’t really want to learn and won’t continue their legacy and/or the art they were involved in. While I have learned so much from the masters who were gone before my time, I have also found that the best teaching is done one-on-one. Along my journey from high school bedroom to the world’s stages, I enrolled scores of teachers to help me. I didn’t justenroll them. I tackled them. I went after their knowledge and experience, which I needed for my own knowledge base to do this jack-of-all-trades job called guitar making and to lead a company without going out of business.
I’ve spent most of my career going down rabbit holes. Whether it’s wood, pickups, designs, metals, finishes, etc., I pay attention to all of it. Mostly, I’m looking backward to see how to go forward. Recently, we’ve been going more and more forward, and I can’t tell you how good that feels. For me, being a detective and learning is lifesaving for the company’s products and my own well-being.
Sometimes it takes a few days to come to what I believe. The majority of the time it’s 12 months. Occasionally, I’ll study something for a decade before I make up my mind in a strong way, and someone will then challenge that with another point of view. I’ll change my mind again, but mostly the decade decisions stick. I believe the lesson I’m hitting is “be very curious!” Find teachers. Stay a student. Become a teacher. Go down all the rabbit holes.
Featuring the SansAmp section, Reverb/Delay/Roto effects, and OMG overdrive, with new additions like a switchable Pre/Post Boost and Effect Loop. Pre-configured for the RK Killer Wail wah, this pedal offers versatile tones and unmatched flexibility.
Since the debut of the original RK5 in 2014, Richie’s needs have changed, both on and off the road. The RK5 v3 retains the same SansAmp section, Reverb/Delay/Roto section, and Richie’sSignature OMG overdrive. New features include a switchable Pre/Post Boost to beef up drive and distortion or increase the overall volume to punch up fills and solos, along with the addition of an Effect Loop. It has also been pre-configured to provide phantom power for Richie’s Tech21 Signature RK Killer Wail wah.
The all-analog SansAmp section of the RK5 focuses on clean tones within the tube amplifier sound spectrum. It includes 3-band active EQ, and Level and Drive controls. To dirty things up, you have the flexibility of using the Drive control, and the Boost function, or you can add overdrive from the OMG section. Or all three. Each method achieves different tones. The OMG section is based upon the Richie Kotzen Signature OMG pedal, which provides a wide range of overdrive, from clean to aggressive. You can add personality to a clean amp or use it for extra punch with a dirty amp tone. Controls include Drive for the overall amount of gain and overdrive and Tone with specialized voicing for adjusting the high-end and mid-range. A Fuzz switch changes the character and attack of the overdrive to a fuzz-style tone, making it thicker and woolier.
Other features include an independent foot-switchable Reverb witha choice of large and small“room sizes;” Tap Tempo Delay, which can be transformed into a rotating speaker effect; included Tech 21 Model #DC9 universal self-adjusting 9V DC power supply, with interchangeable international prong assemblies for use anywhere in the world. Anticipated availability: January 2025
For more information, please visit tech21nyc.com.