Feast your eyes and ears on these 6-string mutants, monsters, and mooncalves—approved by Dr. Frankenstein, but ready to make great music.
The great American journalist Hunter S. Thompson famously said, “When the going gets weird, the weird turn pro." So, heeding an expert's advice, when we went looking for the world's weirdest guitar mods and builds, we turned to the pros—guitarists and builders with an otherness to their aesthetic sensibilities.
We found a sampling of some truly outstanding and uncommon instruments made or modded by a diverse group from the U.S. and abroad, and from urban and rural locales. Some are famous; others obscure. A few are deceased. But all of these axes reflect their highly personal vision of what a guitar can do, or even be. So let's dive into a mind-expanding trip into the world of beautiful fretboard weirdness.
Bo Diddley's Amoeba
Photos by Jonathan Roncolato/Carter Vintage Guitars
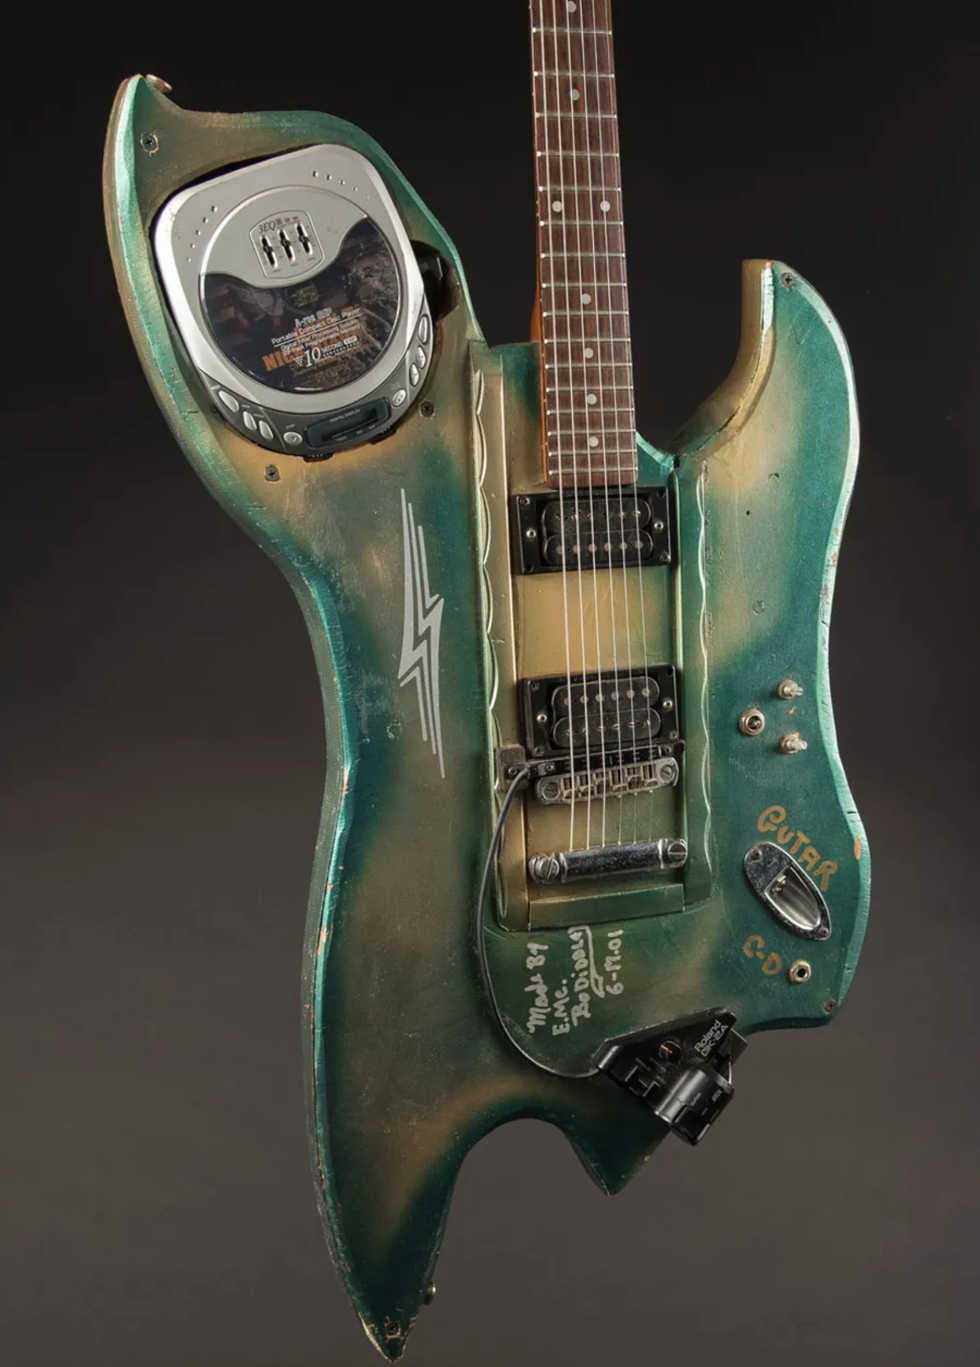
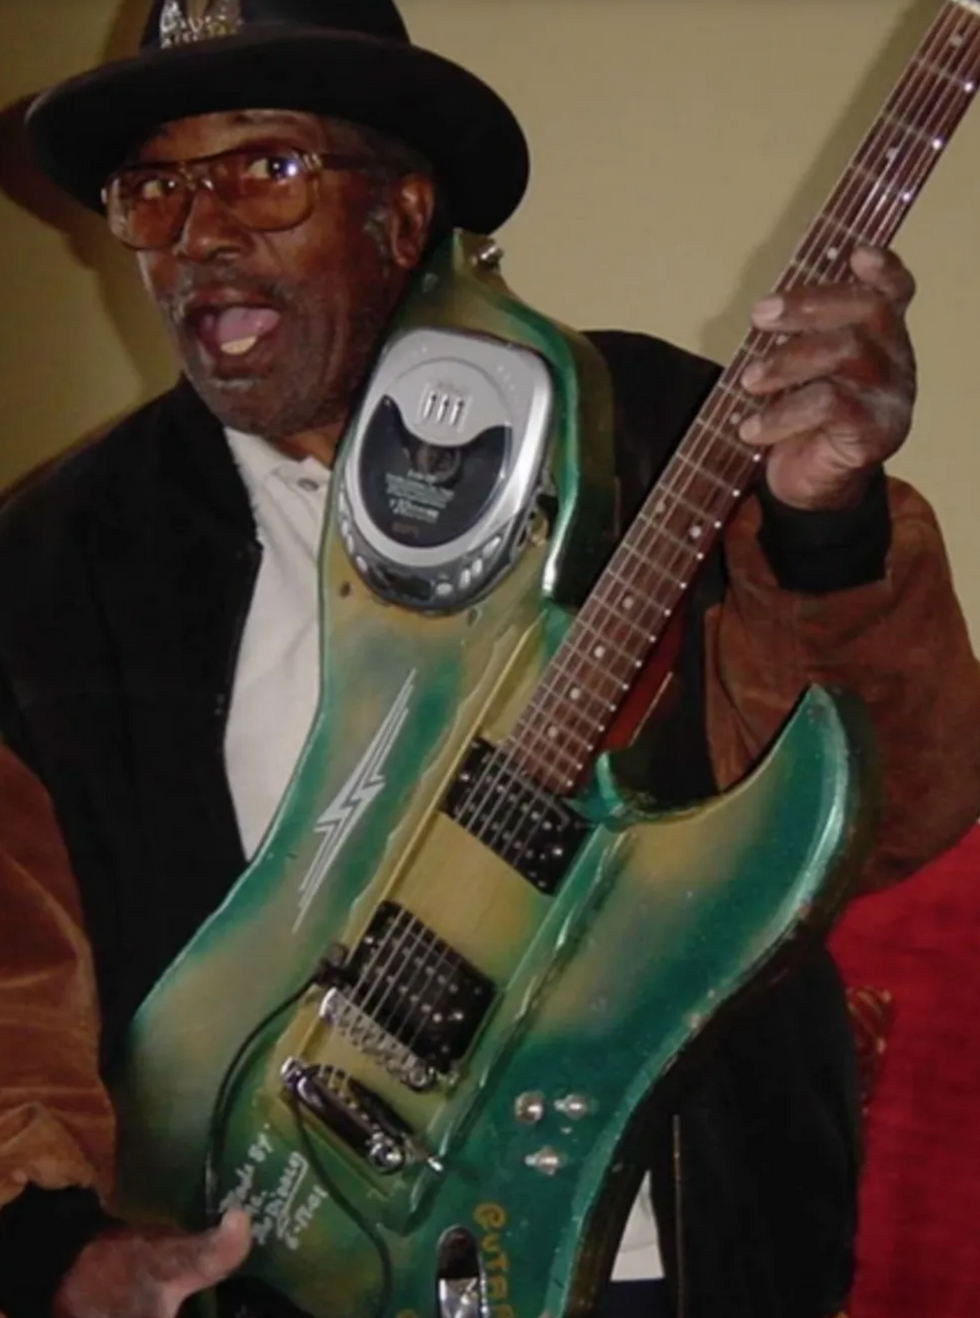
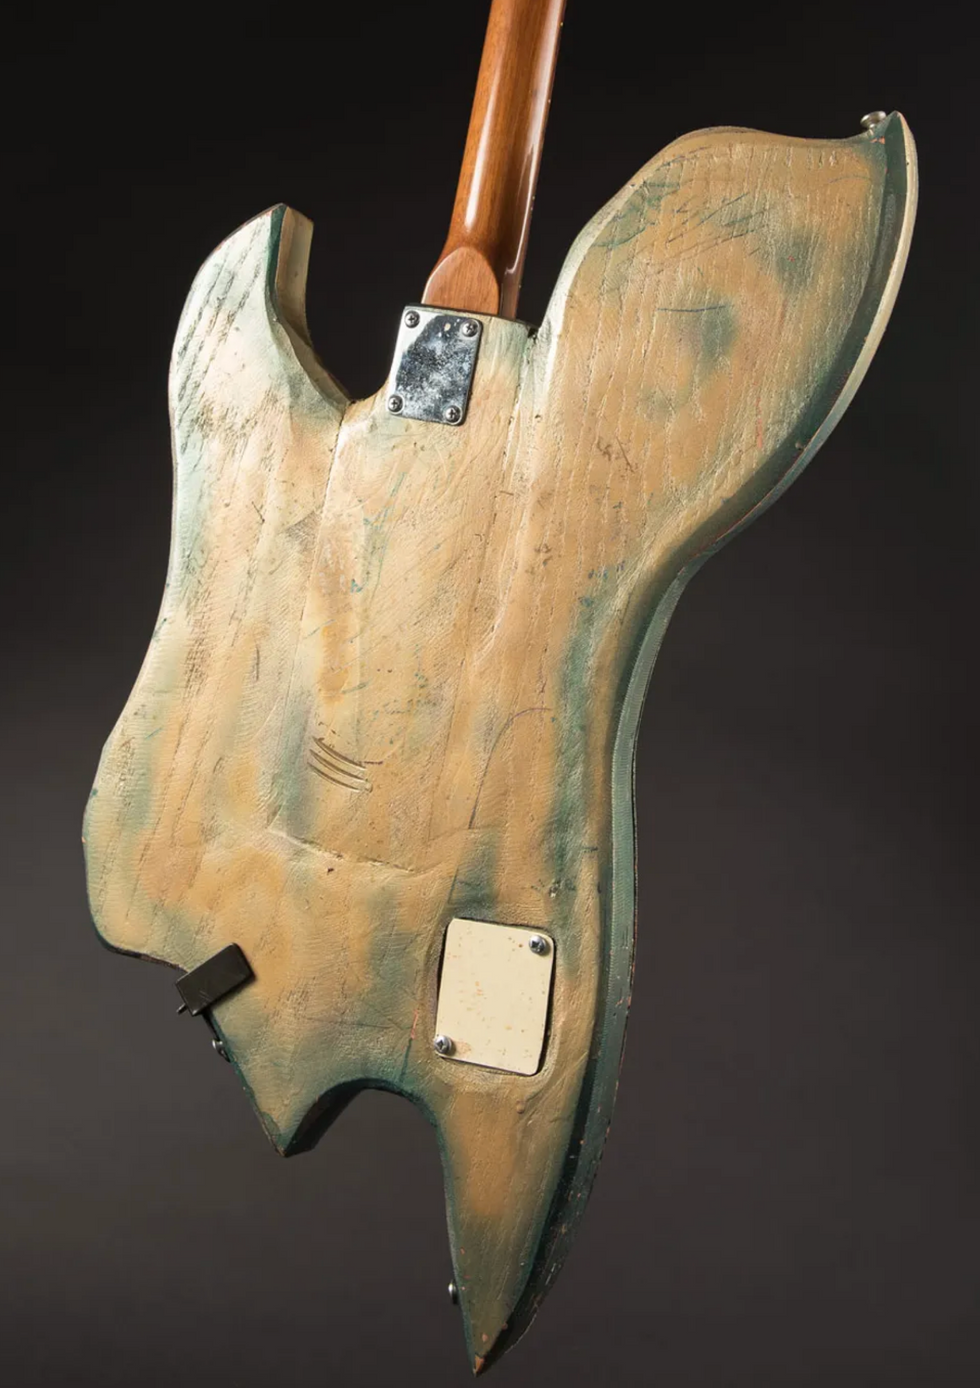
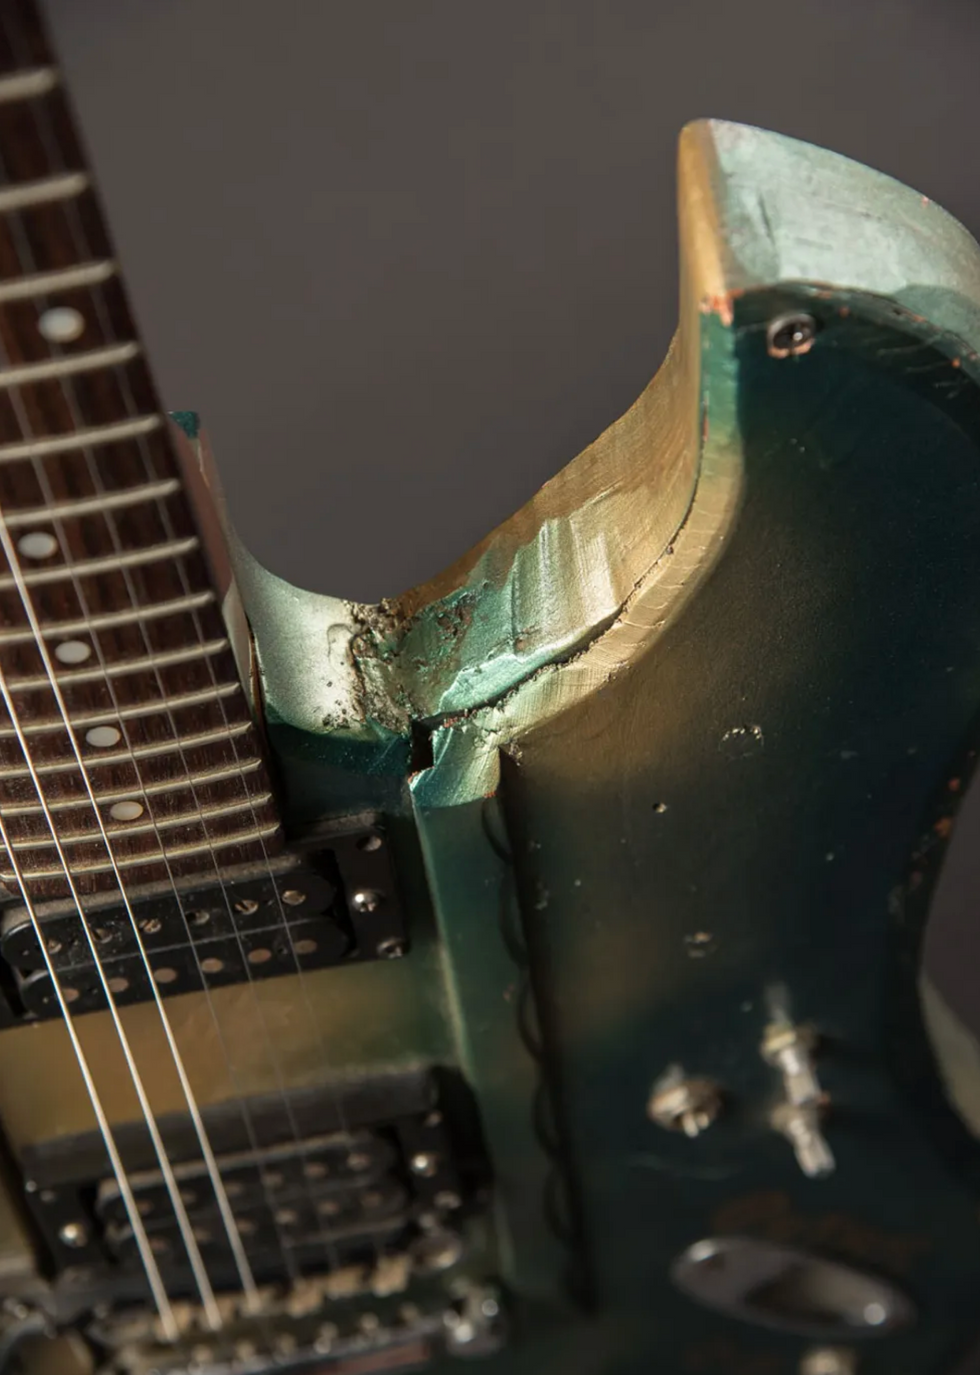
Bo Diddley was no stranger to guitar building, but it's hard to find conventionally played guitars stranger than Bo's. This axe's amoeboid shape reminds me of the tentacled menaces from the 1968 science fiction film The Green Slime. Even the color exudes a kind of alien putrescence. And while the neck feels and plays killer, this is, indeed, a spacey beast.
Photos by Jonathan Roncolato/Carter Vintage Guitars
The foundational rock 'n' roll giant built his first truly playable homemade axe in 1945, fashioned from a cigar box, and he continued to build guitars from slabs of wood and whatever crossed his workbench for the rest of his life. He also commissioned creations. One of the more famous is a drum machine with a Fender Stratocaster built into it. The guitar is now M.I.A., but you can find a photo here.
Photos by Jonathan Roncolato/Carter Vintage Guitars
After his clave-based Bo Diddley beat became a staple of rock guitar via a series of hits starting with 1955's "Bo Diddley" and '56's "Who Do You Love?," Bo convinced Gretsch to expand his love of cigar box guitars into a full-sized, rectangular signature model: the famed firebird red G5810. Altogether, there have been seven differently numbered box-like Gretsch Bo Diddley models over the years. The original is featured prominently on the cover of his 1960 LP, Have Guitar Will Travel.
Photos by Jonathan Roncolato/Carter Vintage Guitars
In '59, Diddley induced Gretsch to also make the G6199 Jupiter Thunderbird model—another oddity with a scooped tail and lower end that Diddley requested because he felt the wider body of his Gretsch 3161 got in his way. Its latest iteration is Gretsch's Billy-Bo, based on an example Diddley gifted to Billy Gibbons.
Photos by Jonathan Roncolato/Carter Vintage Guitars
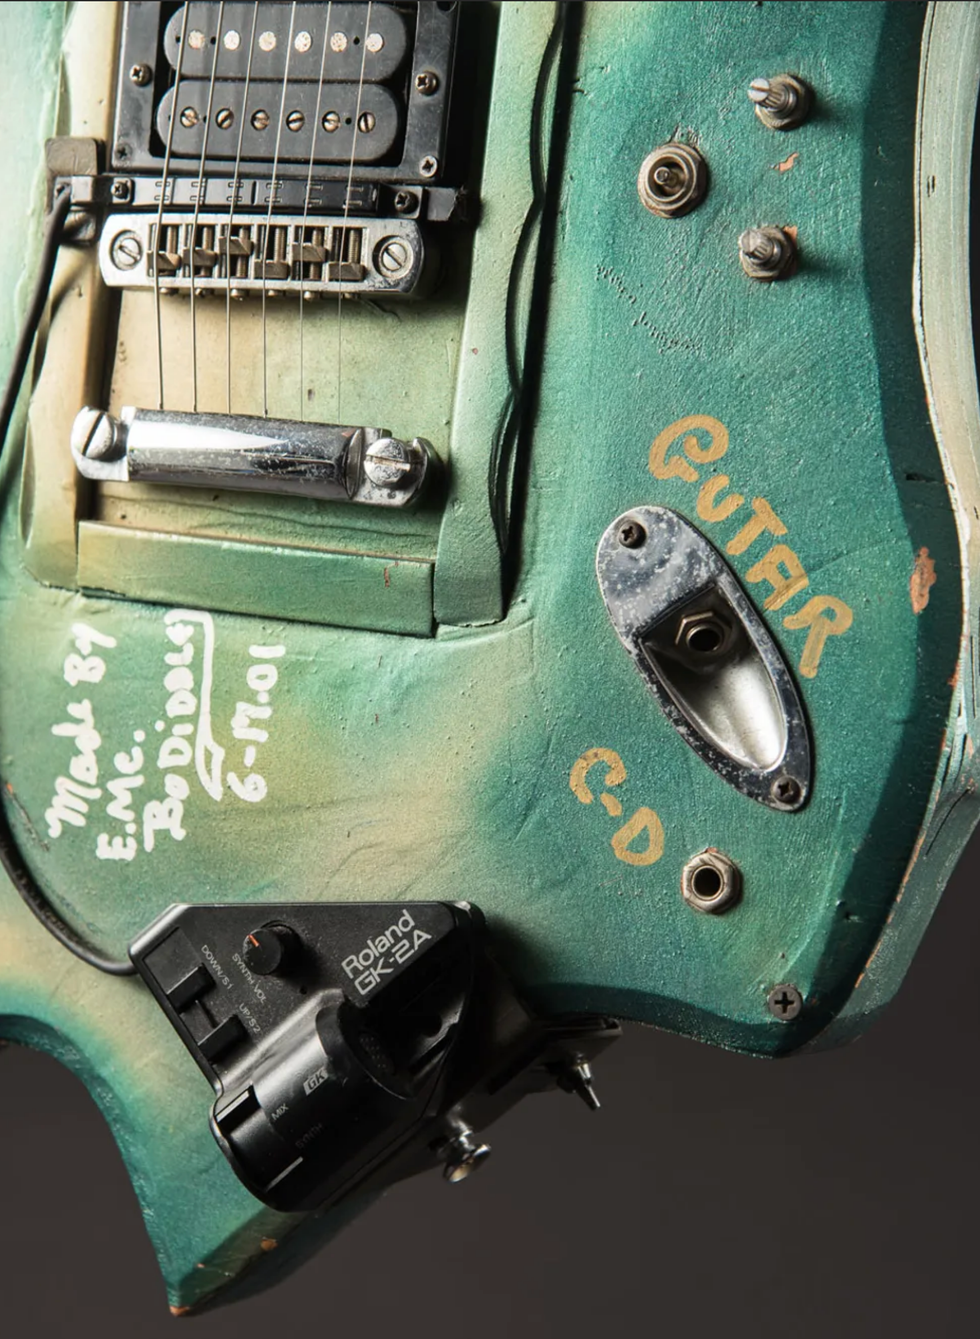
The evidence of Diddley's passion for building and commissioning oddball 6-strings is in photos all over the internet. And it's also now on the wall at Nashville's Carter Vintage Guitars, where the 2001-built amoeba guitar hangs with a $30,000 price tag.
Photos by Jonathan Roncolato/Carter Vintage Guitars
Its lines are less-than-elegantly carved, and the body is plywood with a plywood top that's mounted in place by wood screws. The weight? Well, it seems heavier in my hands than my '68 Les Paul, which comes in at 12 pounds.
Photos by Jonathan Roncolato/Carter Vintage Guitars
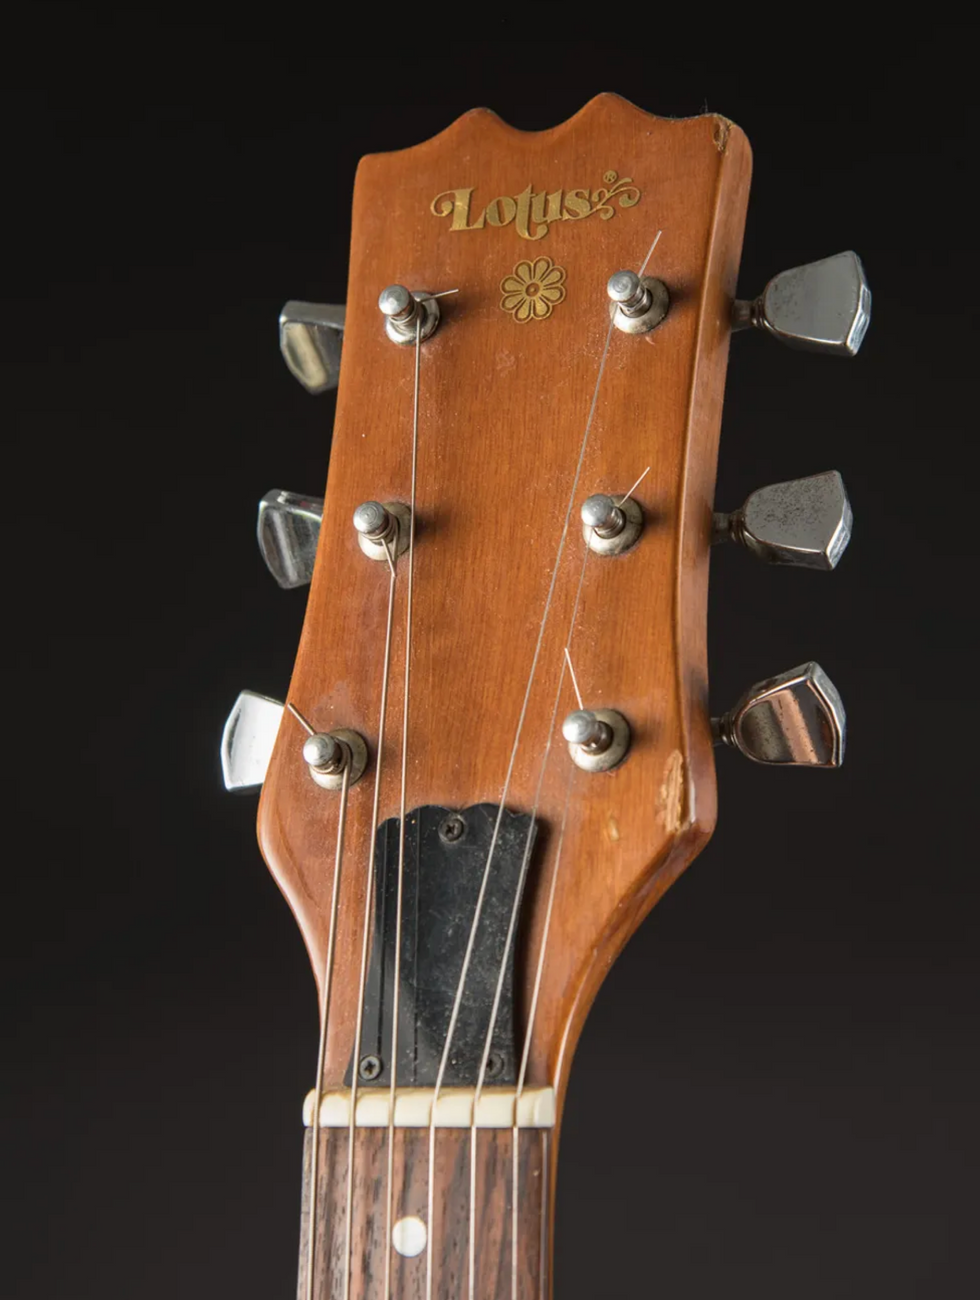
Besides the CD player—which works—the other sound sources are a pair of humbuckers and a Roland GK-2A synth pickup. The Lotus neck is key to the guitar's playability, and its tuners hold their ground, making this green alien more functional than might be anticipated.
BO DIDDLEY 1965
Here's Bo Diddley rocking like a damn freight train on The Ed Sullivan Show in 1965, with one of his specially sculpted Gretsch Jupiter Thunderbirds.
Lewis Waters' Harmonic Hot Rods
Harmonic Isolator
Blend a guitar with a celestial choir, a Theremin, chimes and bells, and a synthesizer and you'd be merely approximating the near-mystical tones created by the instruments Lewis Waters builds in Perth, Australia, under the New Complexity name. For nearly a decade, Waters sought to expand the sonic palette of his conventional 6-strings with pedals and amps and extended technique, both solo and in bands. But, as he explains, the sounds he was hearing in his head were calling for something more organic—a fresh take on the instrument itself.
Inspired primarily by the improvising guitarists and instrument creators Hans Reichel and Yuri Landman, Waters was determined to build the guitars he imagined. (Check out Landman's step-by-step instructions for recreating the drone guitar he built for Thurston Moore, in our May 2016 issue.) First, Waters enrolled in a two-year course in woodworking, while continuing his research into pickups, sustainers, tuners, bridges, and other elements essential to his vision. Then, seven years ago, he began simultaneously building two of the guitars he imagined: the Harmonic Master and the Harmonic Isolator. The sounds both make are otherworldly and solidly of the guitar at the same time.
New Complexity - Harmonic Isolator Demo
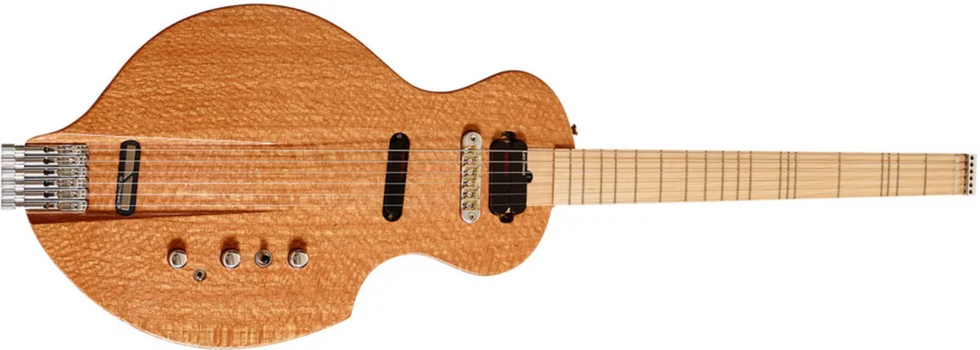
Harmonic Master
The Harmonic Master has an extended bridge that adds an independently tuned harmonic overlay to the notes played on the instrument's neck. And thanks to a behind-the-bridge pickup, the resonating notes in that independent section can be separately amplified. With two string fields, there's a lot going on, but Waters covers all of it with volume controls for each side of the bridge, a 3-way switch for the standard neck and bridge pickups, three output jacks (for guitar only, harmonic tones only, and a mix of both), and pickups by Lace Sensor. The body and neck woods available for all his guitars are Queensland maple, Tasmanian blackwood, and alder. Plus, the Harmonic Master can be ordered with a tremolo arm.
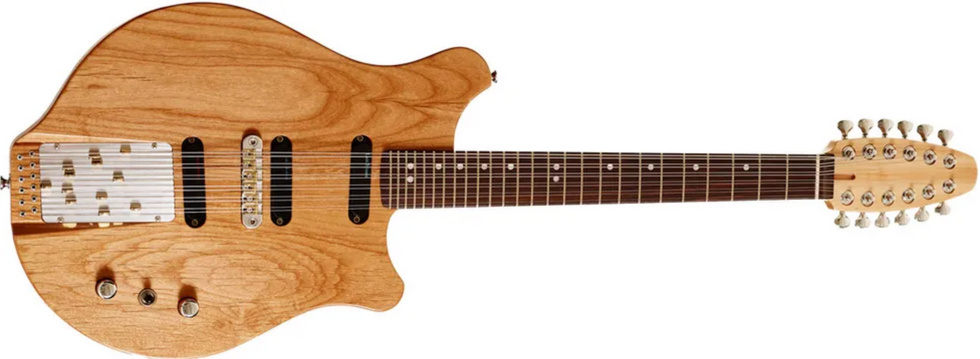
The Harmonic Isolator is a sonic step up from the Master, thanks to the inclusion of a Sustainiac electronic string sustainer and frets calibrated specifically to encourage harmonic resonance, inspired by the designs of the late and wildly inventive Hans Reichel. Those atypically spaced frets correspond to the notes in the harmonic series.
New Complexity - Harmonic Master Guitar Demo
This guitar has the same three-output-jack array as the Harmonic Master with volume controls for each side of the bridge. There's also an on/off toggle for the Sustainiac and a push/pull control for the device's four modes. In addition to the Sustainiac pickup in the neck slot, there are two Lace Sensor pickups between the guitar's two bridges.
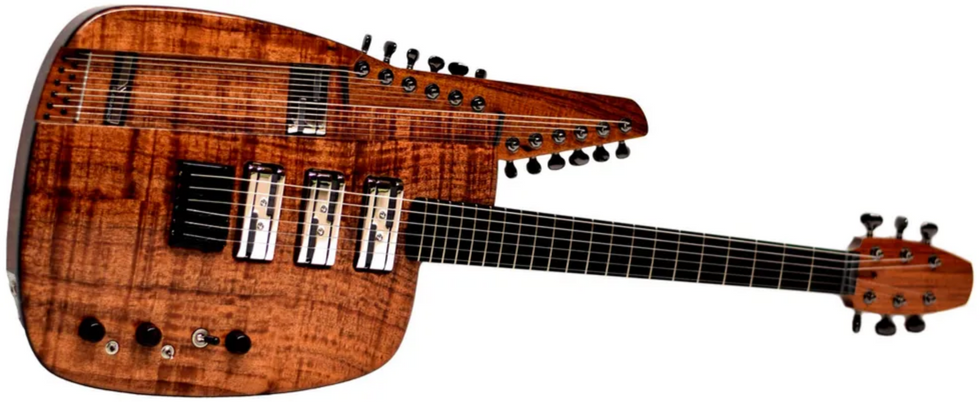
This Reso Harp Special increases the harp portion's string array from the Reso Harp's 10 to a dozen.
Waters' third creation is the Reso Harp, which has an onboard fully tunable string reverb for creating yet another variety of intoxicating soundscapes. Essentially, the string reverb is a mini-harp-like configuration of strings adjacent to the six strings aboard the guitar's neck. Thanks to a Sustainiac, the harp strings can either resonate with the string vibrations generated by playing the instrument conventionally or they can be plucked as their own sound source. Again, there are two volume controls for each side of the central bridge, a 3-way toggle for the standard neck and bridge pickups, the sustainer on/off switch, and the push-pull for its four modes. There are four Lace pickups in all, to cover the guitar and harp portions of the instrument. Also, the Reso Harp has the same three output jacks as its cousins. And it's worth mentioning that Waters makes a hybrid version, blending elements from all three guitars and including a pickup just over the nut, à la Fred Frith.
Demonstration | Harmonic Master Reso Harp Hybrid by New Complexity
Capable of putting out four signals at once, the Harmonic Master Reso Harp has the greatest sonic potential of New Complexity's current offerings.
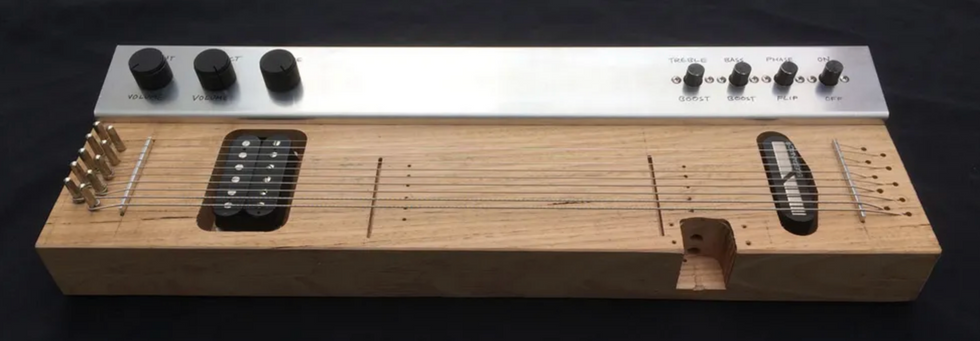
Reso Verb Prototype
Whether your musical tastes run toward an early gospel-blues blind cave fish like Washington Phillips or an avant modernist like Henry Kaiser, it's obvious a resonating harp offers a lot of potentially interesting textures, tones, and pads onstage and in the studio. So the ceaselessly exploring Waters is about to unveil a standalone version of the string reverb section of the Reso Harp, called the Reso Verb.
It's a box with 10 strings and two pickups—one sustaining—and volume controls for the input and reverb levels. There are input and output jacks, and dials marked treble, bass, and phase. It also has an insertable bridge, so players can create their own harmonic ratios. Heck, you don't even need a guitar to make cool sounds with this box. Any instrument with an output could be plugged into the Reso Verb.
Not surprisingly, New Complexity guitars are labor intensive. It takes Waters 200 to 300 hours to make each one, although he's contemplating ways to create his own version from stock parts in the future. For the average guitarist, getting a handle on playing one of his creations might also require many hours of study and practice. In addition to mastering the two-sided bridge concept and the harp-like approaches required to bring the most from these guitars, tuning is subjective. What's most important, says Waters, is that the harmonic ratios for creating overtones are locked in.
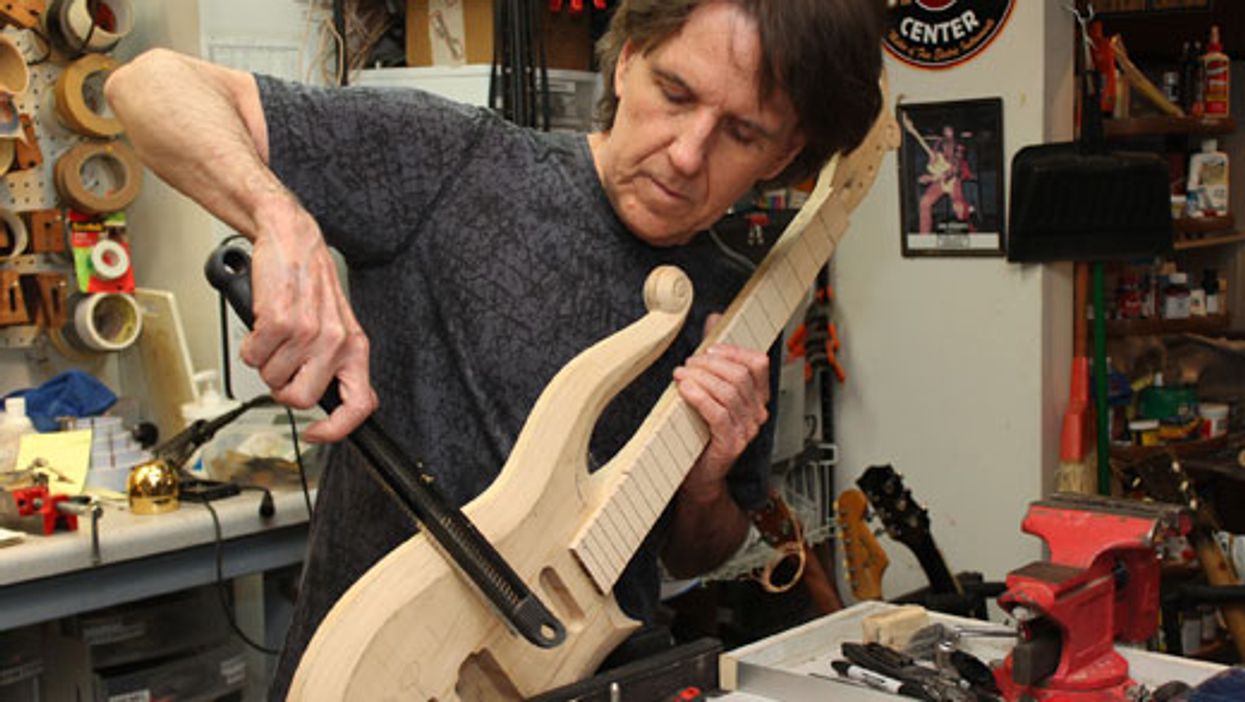
Vaughn Skow's 5-Pickup Frankenstrat
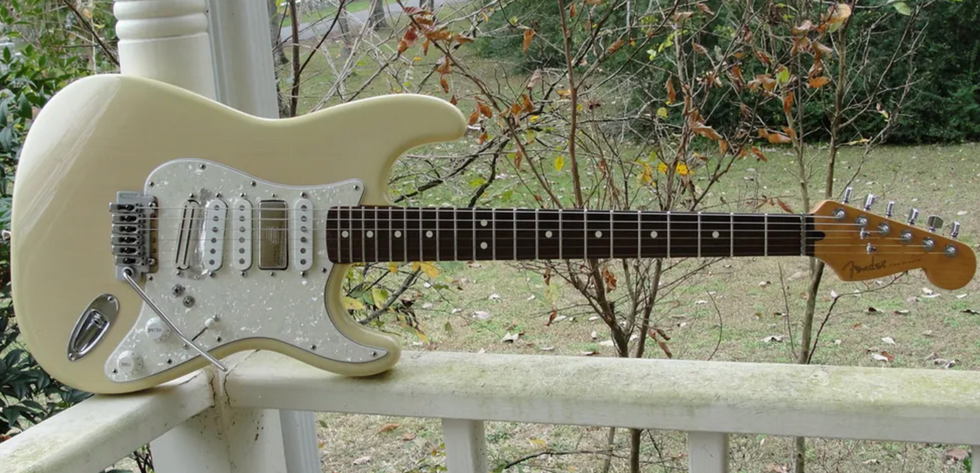
We've all seen Frankenstrats before, but the wall-to-wall pickup configuration on this beast looks like something hatched in one of Kenneth Strickfaden's mad-scientist-movie laboratories. In fact, it was brought to life in Nashville by pickup maker and amp builder Vaughn Skow, who's also got a long resume of sessions, TV work, and production.
"I was worried at one point that a wall of pickups would seriously dampened sustain." —Vaughn Skow
Skow purchased this Japan-made '62 reissue Strat about 15 years ago and started tinkering immediately, although he wasn't its first modder. The guitar came with a roller nut and Sperzel tuners, and, more important, a Seymour Duncan mini-humbucker in the neck slot and a Duncan Hot Rails in the bridge, plus the usual Fender single-coil in the middle. "I started messing with the pickups as soon as I got home, because that's kind of what I do," Skow says. "I like buying guitars that are good, but are already a little messed up so you don't have to worry about doing anything you want to them.
"I liked those pickup flavors, though I missed the honest-to-goodness single-coil sounds of a Strat. But I liked the sound of the Hot Rails, too, because they're a really mid-forward pickup, in the 200 Hz to 400 Hz range. So I decided to put one of my single-coils in next to the Hot Rails. "The body already had an ashtray routing done, so I started thinking about adding a single-coil to the bridge as well," he continues. "The idea became to get as much tonal versatility as possible from a single guitar. I was worried at one point that a wall of pickups would seriously dampen sustain, but then I figured that 3-pickup Les Pauls have a solid wall of pickups from the bridge to the neck, so why not?"
Once all five pickups were in place, Skow swapped the tone control closest to the bridge pickups for a toggle switch. Now, when the guitar's 5-position switch is in the bridge or neck spots, that toggle can activate or deactivate the single-coils. The finishing touch was replacing the Fender bridge with a Wilkinson VS100, and the guitar has been Skow's No. 1 ever since.
Of course, the inveterate experimenter has gone on to many other mods. Recently, he's been in demand among Kay archtop collectors for the minimally invasive pickup install he's developed, and for installing T-style pickups on banjos.
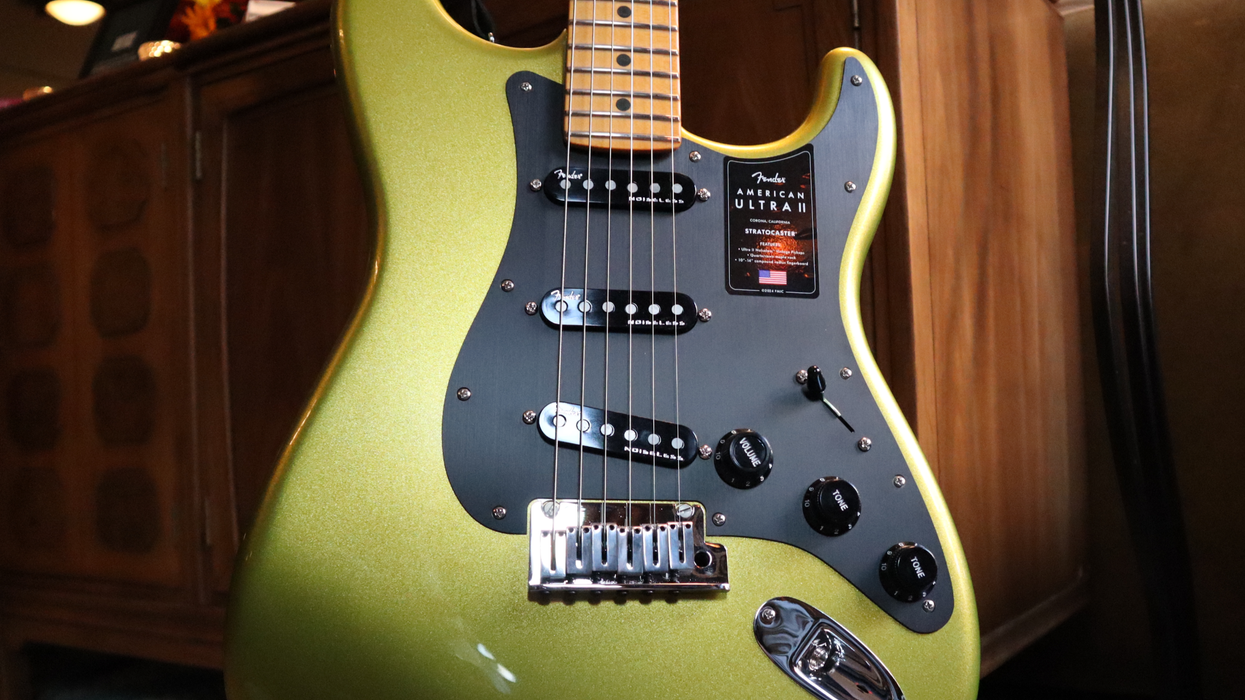
Vaughn Skow 1959 Historic Stratocaster Pickup Set - Jazz
Here's a demo of Vaughn Skow's vintage single-coil Strat-style pickups, which he added to his '62 reissue's three existing pickups.
John Cipollina's Horned Stack and Batwing SG
Photo courtesy of johncipollina.com
The lead guitarist and cofounder of Quicksilver Messenger Service may be the granddaddy of electric-guitar-era mods. By 1965, when the band was emerging as a leading proponent of San Francisco's psychedelic sound—alongside Jefferson Airplane, Big Brother and the Holding Company, and the Grateful Dead—John Cipollina was already using a ferocious assembly of combos, heads, and horns to amplify his guitars. And his famed batwing SG—named for its custom pickguard—was wired to send separate signals to bass and guitar amps, so he could cover the sonic waterfront.
His amp setup and the batwing SG were, until recently, on view at the Rock and Roll Hall of Fame for many years. And they were designed to be inseparable. The stack—a blend of tube and solid-state power—consists of two Standel bass amps, a Fender Twin Reverb, and a Dual Showman head that drove six Wurlitzer horns. Cipollina used a footswitching system for reverb, tremolo, an Astro Echoplex (to the right of the Twin, in the photo), a Standel Modulux vibrato, and the horns. Truck running lights indicated which elements were in use.
"I like the rapid punch of solid-state for the bottom and the rodent-gnawing distortion of the tubes on top." —John Cipollina
Not only the batwing SG, but all of Cipollina's guitars had the split bass/guitar wiring setup. I'm not clear exactly how the wiring worked. Was it bass and guitar pickups in the different slots? Did he simply have specific routing for each pickup? The details at johncipollina.com aren't illuminating and efforts to contact a spokesperson for the late guitarist's legacy were fruitless. Nonetheless, what is clear is that one pickup's signal hit the two Standel bass amps supporting the stack. The other went to the Twin and the Dual Showman, and one of the pickups was reversed.
Cipollina's oft-quoted summation of his setup's strategy is simple: "I like the rapid punch of solid-state for the bottom and the rodent-gnawing distortion of the tubes on top."
Who Do You Love? (1973 B&W) - Quicksilver Messenger Service
With his batwing SG, John Cipollina and Quicksilver Messenger Service go full-tilt psychedelic in this live 1973 performance of Bo Diddley's classic "Who Do You Love?" at San Francisco's Winterland Ballroom.
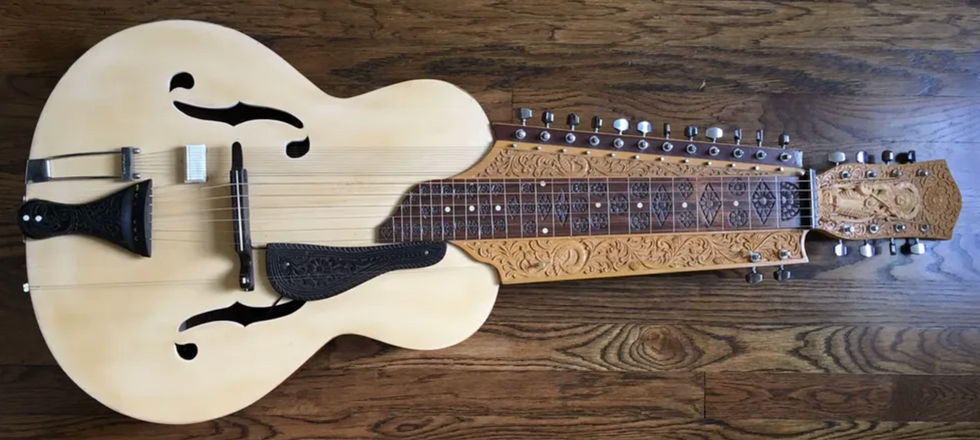
Debashish Bhattacharya's 22-String Slider
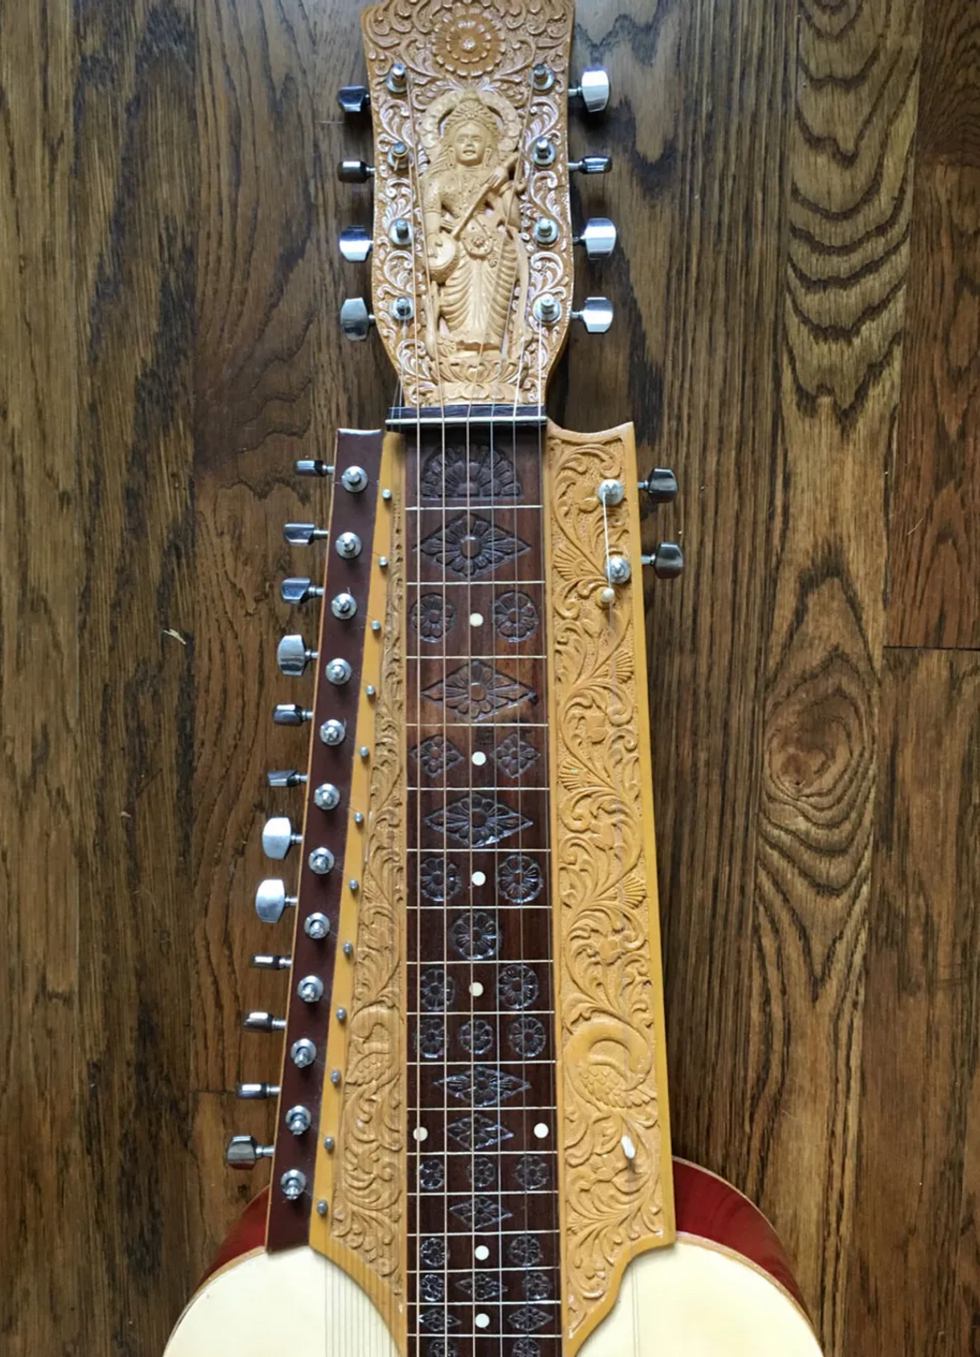
At first listen, the Chaturangui sounds like a cross between a slide guitar and a sitar, but its inventor, Debashish Bhattacharya, explains that it is, indeed, a guitar. It certainly looks and plays like one, with a tone bar—albeit a guitar that's grown a multiplicity of strings and some of the sweetest decorative work ever set to an instrument. And the Chaturangui has become a cornerstone in Bhattacharya's pioneering development of the genre of Hindustani slide guitar. It is indisputably a thing of great beauty, sonically and visually.
This 22-string instrument's invention, Bhattacharya says, began gestating when he was 3, after his mother gave him a solid-neck Hawaiian-style lap-slide guitar. "Since then, the lap guitar and me have been inseparable," he says. But the Hawaiian guitar didn't allow the long sustain, swelling overtones, percussive attack, and wide variety of sounds he was hearing from the long-established instruments in the South Asian musical tradition, like the sitar, sarod, violin, and veena. In search of those sounds, he began drawing out plans for the Chaturangui and built his first model at age 15, in 1978. This was not an easy task. "I had to get information on building this instrument in a world where Wikipedia and Google did not exist," he relates.
"The Chaturangui allows me to do at least a dozen things that can't be dreamt of with a 6-string Hawaiian guitar." —Debashish Bhattacharya
Initially, he was rebuked for his invention by both the Indian guitar establishment and the raga community. But as his career progressed, Bhattacharya won an international following for his wildly inventive playing, with John McLaughlin and Jerry Douglas among his fans and collaborators.
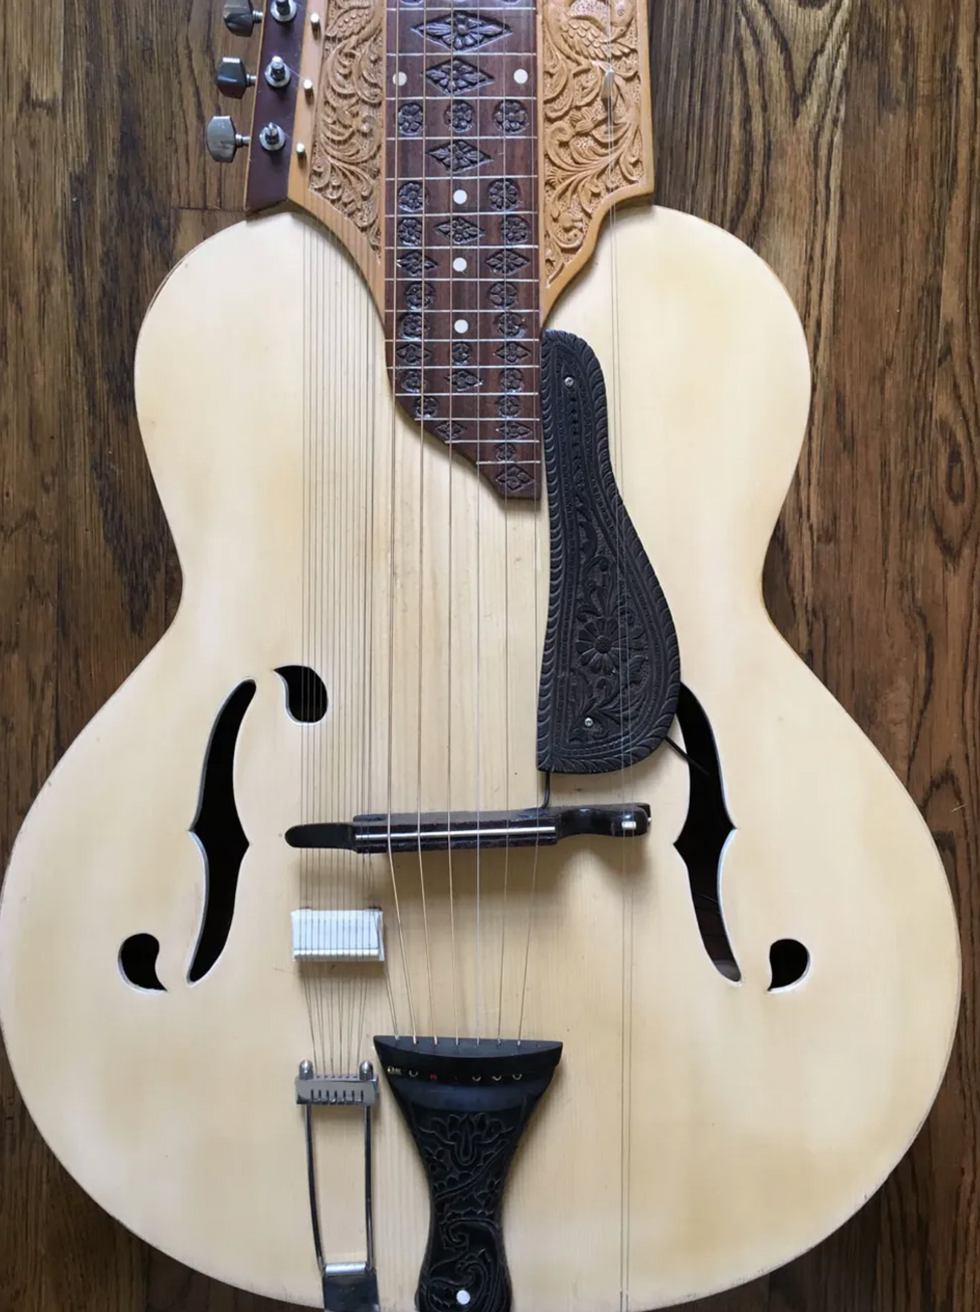
The hollowbody Chaturangui has a solid Poma toon neck. The sides and backs are made of mahogany and Poma toon, and the top is Canadian spruce. It sports brass frets and a resonating bridge made of deer horn. The carving on the neck and fretboard are done in yellowwood. Eight strings extend to the headstock. Six are melody strings played with a tone bar and the two on the bottom are used for low, percussive tones.
Two additional strings on the top—set apart from the neck—are plucked for high percussive tones. These are called chikari strings. A dozen sympathetic strings are set apart from the neck on the opposite side from the chikari. These can simply resonate with the melody or be raked. And the neck is scalloped, which allows the microtonal inflections and bends that give the Chaturangui its sitar- and sarod-like qualities.
"The Chaturangui allows me to do at least a dozen things I do, including tone modulation fingerpicking and resonating sounds that can't be dreamt of with a 6-string Hawaiian guitar," says Bhattacharya.
He's remained ceaselessly inventive as both a player and a builder. Nine years after making his first Chaturangui, Bhattacharya modified a Hofner guitar that was a gift from his guru, Ajoy Chakrabarty, into a Chaturangui-like instrument he simply calls a Hindustani slide guitar. And he's planning to debut a new instrument design at the 2019 Calcutta International Classical Guitar Festival on November 30.
Indian Slide Guitar | Pandit Debashish Bhattacharya | Raag Shuddh Sarang | Music of India
Debashish Bhattacharya takes on a traditional Indian raga with his Chaturangui at London's Queen Elizabeth Hall with Yogesh Samsi on tabla and Unnati Dasgupta on tanpura.
Elliott Sharp's Two-Headed Transplants
Elliott Sharp, who was profiled in the April 2019 issue of Premier Guitar, has been a leader in the international cutting-edge music scene for 40 years. The New York City-based virtuoso has also been an inventor of unconventional instruments, largely motivated by necessity, since 1969. He refers to his creations, like the 3-string violinoid and the triple-course bass pantar, as "proof-of-concept prototypes."
"The metal body is the top from a 50-gallon sweeping compound can that I had found while walking through Chinatown." —Elliott Sharp
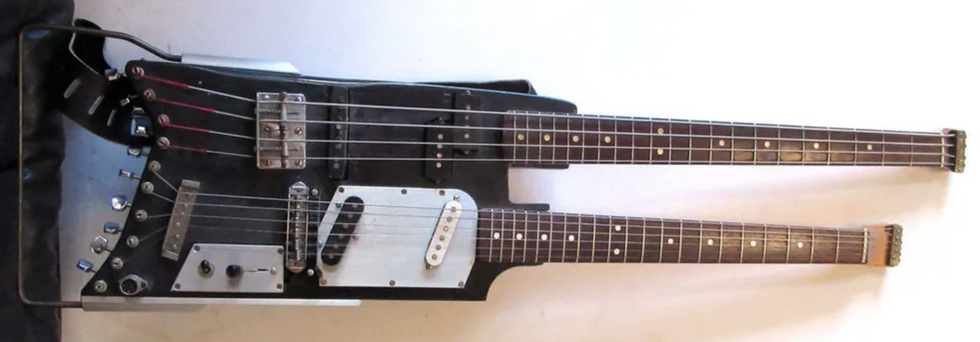
Two of the most practical and intriguing instruments I've seen Sharp play over the decades are his bass/guitar doublenecks. Sharp explains: "Doubleneck 1 was built to my specs in 1984 by Ken Heer [ of now-gone St. Mark's Music Exchange]. I had been using both bass and guitar in my band I/S/M from 1981 to '83, and then with Carbon from 1983 on, and wanted to combine them."
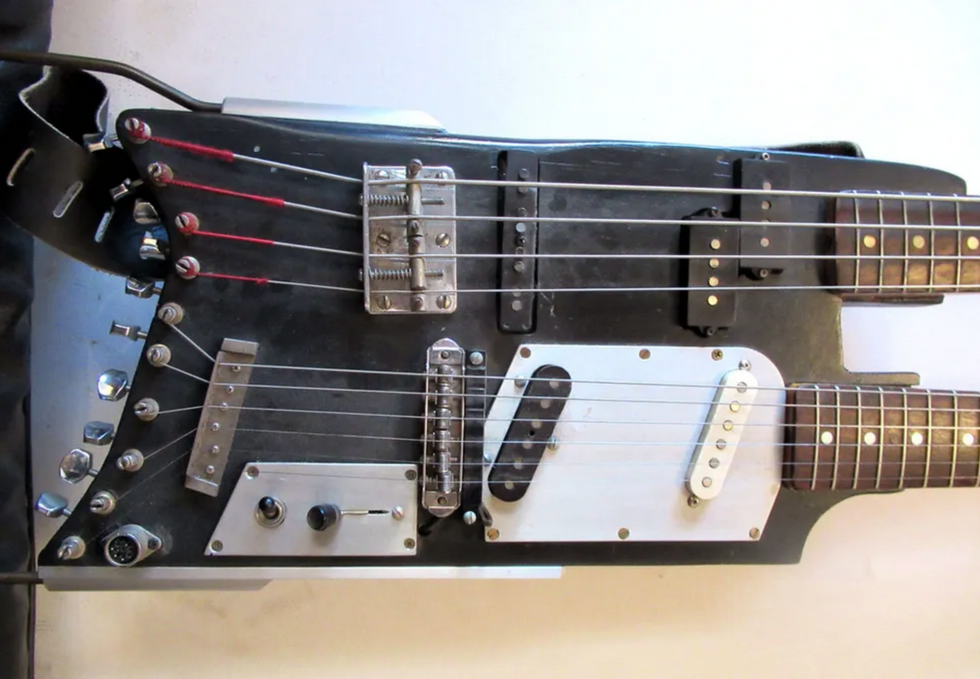
Sharp determined the hybrid would be compact and headless, with a Schecter Strat neck and a medium-scale Fender Coronado bass neck—both with the headstocks removed. The pickups: a Fender Tele bridge and Strat neck, and a DiMarzio P Bass and J Bass set. There are no volume or tone controls—only 3-way switching for each of the necks with the outputs routed to effects through individual volume pedals. There is also an IVL hexaphonic pickup on the guitar that fed an IVL Pitchrider 7000 guitar-to-MIDI converter through a 13-pin cable, to trigger samples or interface with the interactive composition software, M. The body is laminated rosewood, maple, and mahogany. In 1992, it was painted black by New York City-based producer and guitarist Doug Henderson, who also added the aluminum pickguard and roll bar.
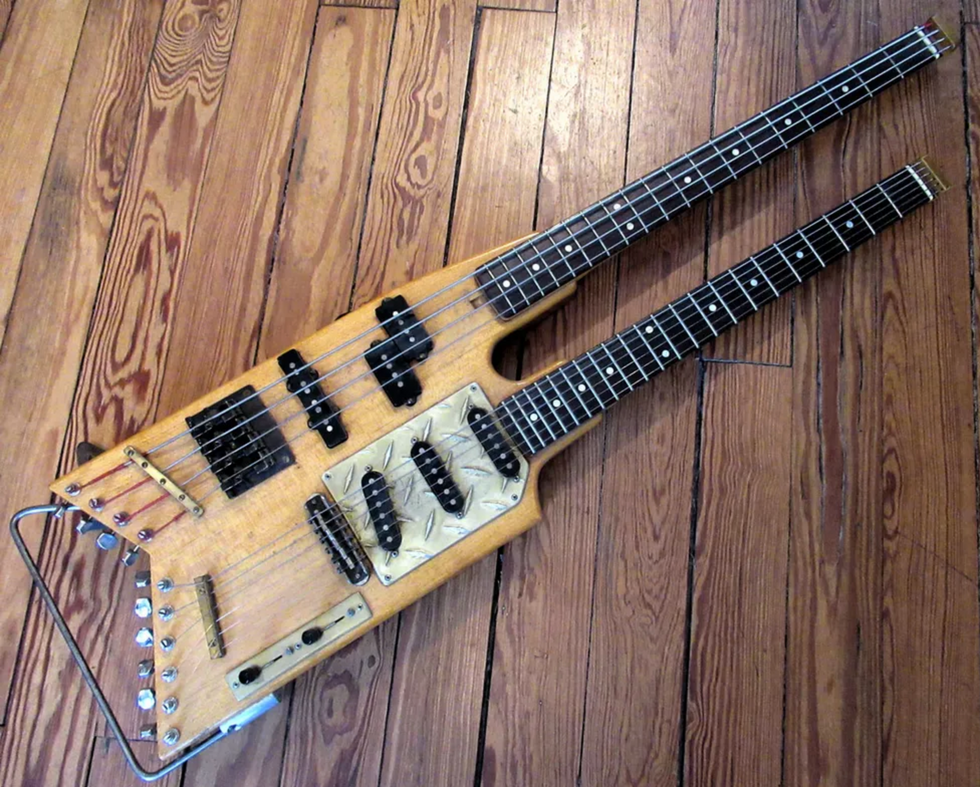
Sharp's Doubleneck 2 was built in 1992 by Henderson. "While I very much liked the bass on Doubleneck 1, the guitar was less centered in its tone, which would be remedied with Doubleneck 2," says Sharp. "The body is African limba with a bird's-eye maple top. Again, a Schecter Strat neck was used, but a Fender Musicmaster bass neck went on the low-end side. Pickups were DiMarzio all around—three Strats plus P and J bass units—and the bass bridge is a massive Wilkinson. The guitar bridge is of unknown origin, but made of brass and very solid. Doug used deck plate for the pickguard. Again, there were no onboard controls except for switching: 5-way on the guitar and 3-way on the bass. The necks were each routed to effects through individual volume pedals. There was no MIDI pickup."
But wait! There's more. Versatile and powerful as they are, these doublenecks are not light. Just look at their slab bodies. "By 1996, the doublenecks—not to mention their associated effects racks—were taking their toll on my back, so I decided to create a compact 8-string extended range instrument," Sharp recounts. That's the Henderson-Greco guitarbass, built to E#'s specs by Henderson and luthier Carlo Greco, who had once been Guild's chief designer. This guitar covers the waterfront with much less real estate. Greco carved a chunky maple neck with an ebony fretboard. Henderson ascribed to Sharp's request for a streamlined V-shaped body made of limba and a bird's-eye maple top. The three pickups are all Bartolini J Bass, for a sound Sharp describes as "very hi-fi." There's a 5-way switch and a volume control, but no tone controls, since Sharp usually does that with his fingers or pedals. The brass bridge was hand-machined by Henderson and stainless-steel Strat saddles were added.
"Although the scale length is 25.5", the bass strings put out some massive low end and the guitar strings have a sweet snap," says Sharp. "For the first few years of its use, I had a trackpad Velcro'd to the body to interface with a computer for triggering samples in the STEIM software LiSa and later for MAX/MSP use."
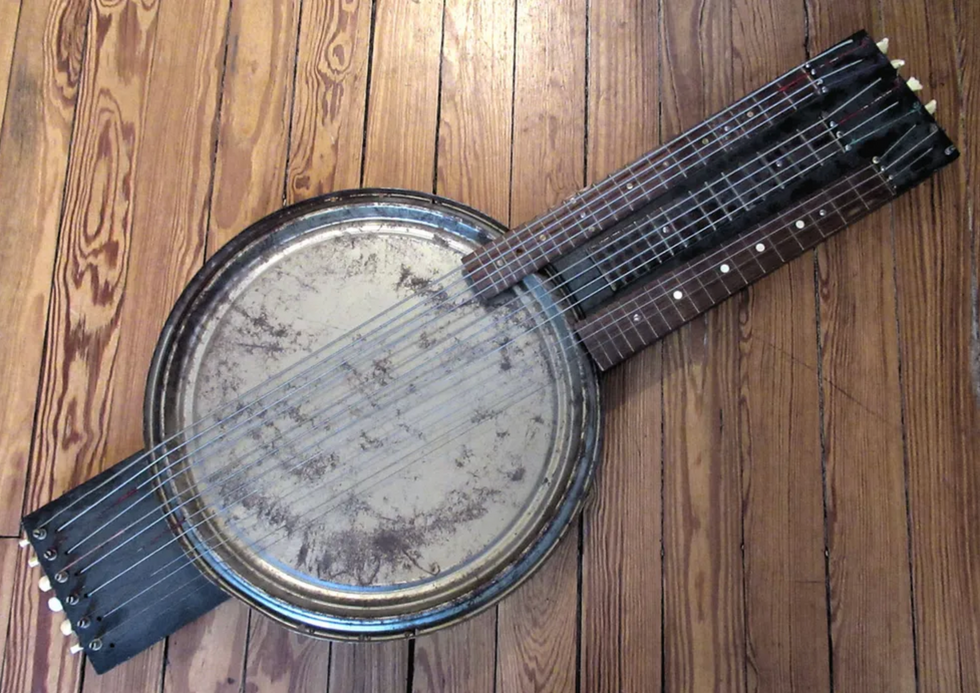
Among the other unusual instruments in Sharp's arsenal is his doubleneck Arches H-Line, which, like New Complexity's instruments, opens up the harmonic possibilities of guitar and was inspired by the work of Hans Reichel. But perhaps the most novel is the triple-course bass pantar, which Sharp built in 1990 with the help of woodworker Andrew Zev Weinstein.
Once again, Sharp explains: "The metal body is the top from a 50-gallon sweeping compound can that I found while walking through Chinatown. It was fitted to a wooden structure that would also serve as the base for the three fingerboards, salvaged from musical roadkill. All 12 strings were bass strings and they could be tuned to various open scales or chords. The rim of the metal top served as a natural bridge. I had planned to mount magnetic pickups under the strings, but opted instead for a piezo. It may be played standing with a strap or horizontally using mallets to create a wide range of sounds reminiscent of steel drums, marimba, gamelan instruments, and string bass."
Night Music #203 Elliott Sharp
Elliott Sharp plays his Doubleneck 1—also using it to trigger samples—during an appearance on the television series Night Music, hosted by David Sanborn. Check out Sharp's insane tapping, and the wild sounds it creates, at the 2:00 mark.
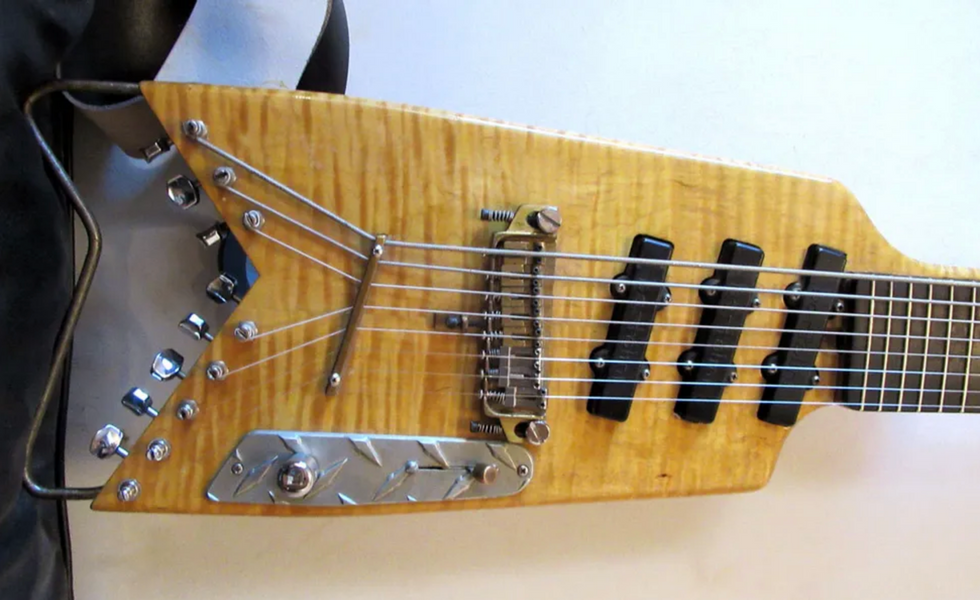
Super Chikan's 6-String Tone Fryers
Fans of hard-core modern Mississippi blues know Clarksdale's James "Super Chikan" Johnson for his ferocious tone and entertaining, full-throttle live performances. But over the past decade, he's also earned a reputation among collectors and players for the funky guitars he builds. They're essentially playable folk-art, and what's truly strange is that no matter their origins and mismatched parts, they all bark like junkyard dogs when they're plugged in.
Johnson has made 1-string diddley bows and guitars from gas cans, cigar boxes, and even an old shotgun, but my favorite is the 6-string in the photo here. The body is a bedazzled motor housing from an antique ceiling fan. Johnson calls it his Chikantar, and it has a tone that is rude, loud, quick to break up, and—when he gets past the 12th fret—head-slicing, but without losing its corpulent tonality. Maybe that's because, as Johnson once confided, it weighs in at about 20 pounds. It also takes to fuzz pedals like a bird on a caterpillar.
Photo by Bill Steber
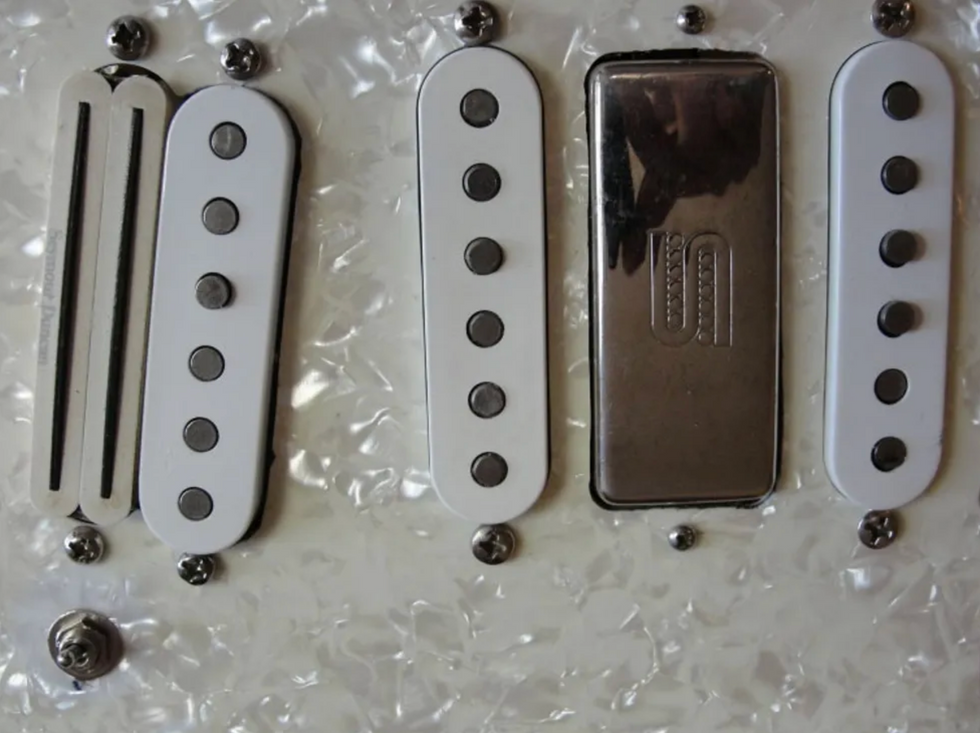
Typically Johnson's instruments, including the gas cans he fashions into guitars that are sometimes painted and decorated to look like chickens—a breed of fowl he claims to talk to and control—are much lighter. And in recent years he's also begun to build or reclaim and redecorate solidbody guitars.
A look at the mismatched pickups on the solidbody above reveals his parts-sourcing strategy: anything goes. Johnson scours pawnshops and junk stores and trash heaps for everything from pickups to, well, ceiling fan motor shells, and whatever is available in his workshop when he's building a guitar goes right into the pot, like a fat hen.
Super Chikan | Mississippi Roads | MPB
Super Chikan and his instruments, including the ceiling-fan-motor-bodied Chikantar, are profiled in this segment of Mississippi Public Television's Mississippi Roads series.
[Updated 9/14/21]
- Weirdest Guitars: Rig Rundown Best-Ofs - Premier Guitar ›
- An Introduction to Weird Guitar - Premier Guitar ›
- Mod Garage: The Original Eddie Van Halen Wiring - Premier Guitar ›
- Guitar Shop 101: “Decking” a Stratocaster Trem - Premier Guitar ›
- Debashish Bhattacharya Pays Tribute to the Master - Premier Guitar ›
- 1981 Inventions Announces the LVL - Premier Guitar ›
- Hooked: The World Is a Beautiful Place & I Am No Longer Afraid to Die on Rage Against the Machine - Premier Guitar ›
An easy guide to re-anchoring a loose tuning machine, restoring a “lost” input jack, refinishing dinged frets, and staunching a dinged surface. Result: no repair fees!
Pardon my French, but I’m about to misethe hell out of some en scenein this article about do-it-yourself guitar repair. Buckle-vous up.
The Guitarist is in the middle of double-tracking a solo. It’s not quite right. Creative juices are flowing, but at any moment, the gate could slam shut. Their social media feed is stagnant, and the algorithm thirsts for content. The studio is 80 bucks an hour. That new boutique fuzz pedal would sound great on this track, surely? It would, of course, as these things are the cure for all problems, but it rests just out of reach.
Desperate for a solution, the Guitarist rests their perfect new guitar against the warm tube amp–only for a moment … but a horrible amplified bwaang from wood, string, and concrete’s violent meeting breaks the temporary silence as gravity muscles potential into the kinetic. The Guitarist breathes a defeated “aw, man,” like a loosened balloon farting hopelessly across an empty room. The gate closes, juices no longer loose, locked, impenetrable by any transistor-based effect. And it’s time to assess the damage.”
I bet you saw yourself in the opening scene of Twenty-Four-and-Three-Quarter-Inches of Woe, which may be the title of the screenplay I just started to write, most likely due to the fact that you’ve made a similarly boneheaded mistake with your instrument.
Unfortunately, my storytelling skills didn’t save a nice new Epiphone Casino from sliding off my amp, meeting the floor, and earning some damage on the way down. Yeah, that’s a true story, and I’m sure something similar has happened to you as well. It can happen to anyone who plays guitar for long enough, but there’s no need for despair yet.
If you’ve been victimized by gravity like I have, as long as the damage isn’t major, you can fix a lot of things yourself. I’ll use my felled Casino as an example. It suffered a loosened tuner, an input jack that fell inside the guitar, a damaged fret, and a few dents in the finish. While I work, I’ll provide some suggestions for supplies and tools to keep in your home repair kit, just in case you ever need them.
Tools for the Tasks
We ordered all of the tools we used in these repairs, excluding the painter’s tape and the toothpicks, which we picked up during lunch at Jack’s Bar-B-Que, from StewMac.
The essentials:
• ESP Multi Spanner
• Archtop Guitar Helping Hand
• Guitar Tech Screwdriver Set
• 3 Corner Fret Dressing Files
• Ultra Thin Master Glue
• GluBoost Fill n’ Finish
• Rectangular Sanding Kit
Can’t Tune It like That
First, let’s take care of the loose tuner, since it’s currently in no shape to reliably hold string tension. The tumble knocked it sideways, which loosened the screws holding in the key, which caused the wood around the screws to strip. It’s alarming to see, but this is a very simple fix.
Add to Repair Kit: Round toothpicks, water-thin CA glue, glue applicator tips, safety goggles
[Note: For the unfamiliar, CA is short for cyanoacrylate. It’s commonly referred to as “Super Glue,” but since that is a brand name, not the generic, I’ll refer to it here as “CA glue.”]
First, remove the tuner by backing the screws out, then pull the tuner from the headstock. My Casino’s tuning keys use a press-in bushing to hold the post straight in the headstock, so no further disassembly is required. However, if you experience this issue with a guitar with more modern-styled tuning keys, you’ll need to use an appropriately sized wrench or socket to remove the screw-in bushing before removing the key.
Next, break a toothpick in half, insert the thicker end into the hole where your mounting screw used to be. Break it off flush with the surface, and repeat the process with the other hole.
Safety goggles on: It’s CA glue time. Trust me, you do not want to squirt this stuff into your eye. Fit an applicator tip to the glue bottle and practice your squeeze on a scrap piece of paper or wood, far away from anything you don’t want glued to your guitar or yourself. This stuff is magic—it will bond things you never intended if you aren’t careful.
All you need is a very small drop, so practice until you can confidently flow out just a small controlled amount. Once you’ve mastered that, drop a small amount of water-thin CA glue into each filled hole. It will soak through the toothpick into the surrounding wood just enough for this quick fix. Let it cure for at least 15 minutes, but longer is even better.
Pop the tuner back in and drive the screws straight into the toothpick-filled holes. The screw will compress the toothpick into the existing wood and create new threads strong enough to hold your tuner in place.
Congratulations! You fixed it well enough to at least make it through a session. I’ve done this on several guitars that lasted years with no issues, so you should be confident in your work.
Hit the Road, Jack
Look, there’s no way to sugarcoat this. Fishing an output jack out of a hollowbody guitar is a pain. You can do this. All you need is patience and a few handy gadgets.
Add to Repair Kit: flashlight, multi-spanner, small drywall anchor, “helping hand,” small screwdriver
Your first task is to locate the jack inside the guitar. Odds are it didn’t fall far away from where it needs to be, since it’s probably wired to one of your control potentiometers. Use your flashlight to shine some light inside the f-hole to help find it.
I found mine wedged against the treble side of the rim, a little farther away than I can reach with my fingers. This is not zesty. I am unhappy but equipped and determined.
The tool I described as a “helping hand” becomes useful here. It’s essentially just a bent hook at the end of a handle made out of pliable heavy wire. Several guitar parts suppliers sell something similar. I got mine from StewMac for a reasonable price, but if you want to be thrifty about it, there’s no reason why you can’t cut and bend a wire coat hanger.
Take a few deep breaths, and working through the f-hole, use the hook end of your helping hand to gently pull the output jack back toward where it was mounted. Bend the helping hand however needed to reach the jack as easily as possible.
I managed to pull the jack back enough to put a small screwdriver through the jack’s mounting hole and then through the jack itself. That screwdriver will act as a guide while I lift the jack back into place with the helping hand.
You should expect this will take several attempts. Try not to get frustrated. With enough patience, you’ll be able to get the jack back where it belongs. Once you have the jack in place, carefully thread the washer and nut back onto the jack. It shouldn’t take much effort to thread it back on. Just be careful not to cross-thread the nut.
Now that the nut is threaded on enough so it won’t fall back in, the challenge is to tighten it without twisting the jack itself to avoid breaking any wires. I’ve seen and used a few different methods to accomplish this, but I came across one recently that I really like.
This is where you’ll use your drywall anchor. Get one small enough to fit inside the jack without using too much force, then tighten the screw in the anchor so that it spreads to fit tightly inside the jack. This will hold it steady enough to tighten the nut with a multi-spanner tool or an appropriately-sized wrench.
I like a multi-spanner for this job, because it’s always the right size and is slim enough to not be clumsy for operations like this. Like the helping hand, lots of suppliers sell something similar using different names. Mine is made by ESP and also arrived in my StewMac tool box. I use it all the time for all sorts of tasks.
Once the nut is tightened, unscrew the drywall anchor, remove it, and test the jack for sound by plugging your guitar into an amp. A positive result should be obvious at this point, but if you don’t hear any signal, or an excessive consistent buzz, get in touch with your local repair tech.
Got a Dent In My Fret, Man
Honestly, face-first is probably the best way a guitar like my Casino could have hit the ground. The damage could’ve been far worse. Check any forum for endless complaints about Gibson/Epiphone headstock breaks. But I do need to address some damage to a fret caused during the fall.
The issue here is that plain steel electric guitar strings—like your G, B, and E strings—are considerably harder than most frets (my stainless steel fret contingency, put your hands down and let me finish), so it’s possible for a string to leave a small sharp dent in a fret if you hit it with enough force. This specific issue might go unnoticed until it’s time to bend a note at that fret, then you’ll feel and hear the string catch it. No good.
Before we get started: Having allof your frets carefully levelled, recrowned, and polished is alwaysa better solution than partially levelling just a few frets. But considering the entire premise we’ve constructed, which is a situation where we just want the guitar back in action relatively quickly, a partial fret level on the upper frets is perfectly fine as long as it’s done carefully.
Add to Repair Kit: Crowning file (three-corner or rounded), assortment of sandpaper (400 grit to 800 should be fine), 0000 extra-fine steel wool (optional), fretboard conditioner, permanent marker.
First thing we need to do is identify which frets need the work. Let’s say you have a nick in your 17th fret on the treble side under the B string. The goal is to bring the height of that damaged fret and all the frets past it down until the nick disappears. After that, remove the strings before you begin working.
To accomplish this, mark the damaged frets and all frets past it with a permanent marker. A trusty black Sharpie works great for this, but any darker color works fine. For this repair, we only need to work on the treble side of the frets, so that’s all you need to focus on. Also, use some blue painter’s marking tape to protect the area of the guitar near where you will be working. Small slips of a file or sandpaper can cause some nasty injuries to the guitar’s surface.
Next, level the damaged fret and all frets past it (moving toward the bridge) with something stiff enough to not flex under pressure. I keep an old credit card—a nice sturdy one—with a bit of 400-grit sandpaper glued to one side along the shorter edge, 800 grit on the other side. Start with the 400 and work your way down, being careful not to use too much pressure. Let the sandpaper do the work.
You’ll notice the ink is removed as you sand. The way to make sure you’re keeping everything level is to stop frequently and observe the new clean areas on top of each fret. Each one should be about the same width.
This will take a while. A 400-grit sandpaper does not remove material quickly, 800 grit even less so. I’m suggesting this technique because working slowly makes it more difficult to get yourself in trouble. Several suppliers sell mini files for spot leveling, but I don’t recommend starting there because they remove fret material pretty aggressively.
Eventually you’ll notice the little divot in your 17th fret is almost gone. Now’s time to switch to 800 grit to finish the job. You guessed correctly: This will take even longer, but it’ll leave a nice finish without removing any more material than necessary.
Great! Now you have five flat-topped frets. That won’t sound very good, so now you need to re-crown them, giving them a rounded profile to match the other frets. I like to use a 3-corner file to slowly round over each side of the fret, working from the fretboard up, but if you feel like dropping some serious flow on a specialized crowning file, this job can be a lot easier. Be sure to get the marker back out, ink up each fret, and stop filing when just a tiny sliver of ink is left on top of each fret.
Use a piece of 800 grit paper to remove any file marks and smooth out each fret. If you have finer grits, you could work your way up to 1200 or so, but don’t go too hard or you could undo your work. You just want the frets clean and smooth. At this point, I like the way frets feel after a quick buff with 0000 steel wool, but the mess left behind does rightfully deter a lot of repair techs. If you opt in for this, be sure to tape off your pickups and consider finding a second location for this step.
Work in some fretboard conditioner if you like (skip it if you have a maple or synthetic board; no need for that here), put some new strings on, and check your work. Play every note on these frets, to make sure they ring out without any buzzes. It may not look perfect, but as long as the guitar sounds good, you’re okay until it’s time for a full level/crown/polish job.
Not Finished Until It’s, Uh, Finished
Now for the last souvenir from my Casino’s short journey to the floor. I noticed a few spots along the rim of the guitar where the finish was damaged. Specifically, it looks like the guitar hit something with an edge on the way down hard enough to put a couple of jagged dents in it, right along the binding.
Funny, that’s actually what binding is intended for–protecting edges and corners from damage. Anyway, we need to discuss a few things about guitar finishes.
For the purpose of this article, I’m only going to discuss repairs to the clear coat, since that’s where my damage is. Most guitars now are finished using polyurethane or lacquer for the top clear-coat layer.
Speaking verygenerally, lacquer finishes are softer and less durable, which makes hiding repairs a lot easier if you have the skills and patience. Polyurethane finishes are hard and tough in every way: hard to damage and tough to hide repairs regardless of skills or patience.
I happen to know that my formerly mint-condition Casino has a polyurethane finish, which means I’m going to lower my expectations with this repair. Instead of trying to make it look like it never happened, which will take a lot of work, I’ll just try to keep it from getting worse over time, which will take considerably less work.
It also means I won’t be discussing how to repair lacquer finishes, which is a bit more in-depth, requires a lot more patience and practice, and is therefore not really recommended for the average DIY’er—at least not in the scope of this piece. So if your guitar has a lacquer finish, I don’t think this part applies. Let someone else take care of it, or maybe skip this part and learn to love your guitar as is. The latter is still an admirable move.
Add to Repair Kit: Nothing! You already have what you need from the previous repairs. Feel good about that.
Since the damage is a pronounced dent with sharp edges in the clear coat, all I really need to do is seal it with an appropriate material. And the material appropriate for repairing polyurethane finishes is—you guessed it—CA glue, because it dries hard, clear, and quickly, much like polyurethane.
Step one: Use painter’s masking tape around the area of the damage, just in case the glue runs when applied. Step two: Put glue on the dented finish. CA glue will fill in all the small cracks within the damage and seal the existing finish. Be careful; use the smallest-drop-possible technique you perfected when fixing the tuning peg, and give it plenty of time to dry.
That’s it. That’s all I need to keep the finish from continuing to chip the more I play it. Yes, I saved the easiest one for last, as a little treat.
Obviously, this isn’t a particularly beautiful repair, so I could go above and beyond by using thicker CA glue—for example, GluBoost Fill n’ Finish—to fill it in completely, sand it level, and polish the area back to the original mirror gloss. Dan Erlewine has a few excellent YouTube videos outlining this exact method that are easy to find, and I encourage you to try if you’re so inclined. But for my purposes, this will do.
Accidents will happen if you’re actually playing your guitar, but they’re no cause for panic when they do. Even though the guitar isn’t perfect anymore, it’s perfectly playable, and I can get by with it for now. I broke it, so I fixed it, which is something I hope you feel empowered to do should you break yours.
Next time, I’ll use a good guitar stand.
The least exciting piece of your rig can impact your tone in a big way. Here’s what you need to know.
Hello, and welcome back to Mod Garage. This month, we will have a closer look at an often overlooked part of our guitar signal chain: the guitar cable. We’ll work out what really counts and how your cable’s tonal imprint differs from your guitar’s tone-control function.
Today, the choice of guitar cables is better than it’s ever been, and you can choose between countless options regarding color, stability, plug style, length, diameter, bending strength, shielding, etc. A lot of companies offer high-quality cables in any imaginable configuration, and there are also cables promising special advantages for specific instruments or music styles, from rock to blues to jazz.
Appearance, stability, longevity, bending stiffness, and plug configuration are matters of personal preference, and every guitarist has their own philosophy here, which I think is a great thing. While one player likes standard black soft cables with two straight plugs, their buddy prefers red cables that are stiff as hell with two angled plugs, and another friend swears by see-through coiled cables with golden plugs.
“We often want to come as close as possible to sounding like our personal heroes, but we fail because we’re using the wrong cable for a passive guitar.”
Regarding reliability, all these parameters are important. Who wants a guitar cable making problems every time you are on stage or in the studio? There are also technical parameters like resistance, capacitance, transfer resistance on the plugs, and more. Without making it too technical, we can summarize that, sound-wise, the only important technical parameter for a passive guitar circuit is the capacitance of the cable. Sadly, this information is often missing in the manufacturer’s description of a guitar cable, and there’s another thing we have to keep in mind: Most manufacturers try to offer cables with the smallest possible capacitance so the guitar can be heard “unaltered” and with a “pure” tone. While these are honourable intentions, they are self-defeating when it comes to making a guitar sound right.
Let’s take a trip back to the past and see what cables players used. Until the early 1980s, no one really cared about guitar cables—players simply used whatever was available. In the ’60s and ’70s, you could see a lot of ultra-long coiled cables on stage with players like Clapton, Hendrix, May, Townshend, Santana, and Knopfler, to name just a few. They used whatever was available, plugged in, and played without thinking about it. Ritchie Blackmore, for example, was famous for notoriously using incredibly long cables on stage so he could walk around. Joe Walsh and many other famous players did the same. Many of us have these players’ trademark sounds in our heads, and we often want to come as close as possible to sounding like our personal heroes, but we fail because we’re using the wrong cable for a passive guitar. So what are we talking about, technically?
It’s important not to look at the guitar cable, with its electrical parameters, as a stand-alone device. The guitar cable has to be seen as part of the passive signal chain together with the pickups, the resistance of the guitar’s pots (usually 250k or 500k), the capacitance of the wires inside the guitar, and, of course, the input impedance of the amp, which is usually 1M. The interaction of all these in a passive system results in the resonance frequency of your pickups. If you change one of the parameters, you are also changing the resonance frequency.
”Ritchie Blackmore, for example, was famous for notoriously using incredibly long cables on stage so he could walk around.“
You all know the basic formulation: The longer the cable, the warmer the tone, with “warmer” meaning less high-end frequencies. While this is true, in a few moments you will see that this is only half the truth. Modern guitar cables are sporting a capacitance of around 100 pF each meter, which is very low and allows for long cable runs without killing all the top end. Some ultra-low-capacitance cables even measure down to only 60 pF each meter or less.
Now let’s have a look at guitar cables of the past. Here, capacitances of up to 400 pF or more each meter were the standard, especially on the famous coiled cables. See the difference? No wonder it’s hard to nail an old-school sound from the past, or that sometimes guitars sound too trebly (especially Telecasters), with our modern guitar cables. This logic only applies to our standard passive guitar circuits, like those in our Strats, Teles, Les Pauls, SGs, and most other iconic guitar models. Active guitars are a completely different ballpark. With a guitar cable, you can fine-tune your tone, and tame a shrill-sounding guitar.
“No problem,” some will say. “I simply use my passive tone control to compensate, and that’s it. Come on, capacitance is capacitance!” While this logic seems solid, in reality this reaction produces a different tone. “Why is this?” you will ask. Thankfully, it’s simple to explain. You might be familiar with the typical diagrams showing a coordinate system with "Gain/dB" on the Y-axis and "Frequency/kHz" on the X-axis. Additional cable capacitance will shift the resonance frequency on the X-axis, with possible differences of more than one octave depending on the cable. A cable with a higher capacitance will shift the resonance frequency towards the left and vice versa.
Diagram courtesy Professor Manfred Zollner (https://www.gitarrenphysik.de)
Now let’s see what happens if you use your standard passive tone control. If you close the tone control, the resonance frequency will be shifted downwards mostly on the Y-axis, losing the resonance peak, which means the high frequencies are gone. This is a completely different effect compared to the additional cable capacitance.
Diagram courtesy Professor Manfred Zollner (https://www.gitarrenphysik.de)
To summarize, we can say that with different cable capacitances, you can mimic a lot of different pickups by simply shifting the resonance frequency on the X-axis. This is something our passive tone control can’t do, and that’s exactly the difference you will have to keep in mind.
So, let’s see what can be done and where you can add additional cable capacitance to your system to simulate longer guitar cables.
1. On the cable itself
2. Inside the guitar
3. Externally
In next month’s follow-up to this column, we will talk about different capacitances and how you can add them to your signal chain with some easy-to-moderate modding, so stay tuned!
Until then ... keep on modding!
Do you overuse vibrato? Could you survive without it?
Vibrato is a powerful tool, but it should be used intentionally. Different players have different styles—B.B. King’s shake, Clapton’s subtle touch—but the key is control. Tom Butwin suggests a few exercises to build awareness, tone, and touch.
The goal? Find a balance—don’t overdo it, but don’t avoid it completely. Try it out and see how it changes your playing!
An ode, and historical snapshot, to the tone-bar played, many-stringed thing in the room, and its place in the national musical firmament.
Blues, jazz, rock, country, bluegrass, rap.… When it comes to inventing musical genres, the U.S. totally nailed it. But how about inventing instruments?
Googling “American musical instruments” yields three.
• Banjo, which is erroneously listed since Africa is its continent of origin.
• Benjamin Franklin’s Glass Armonica, which was 37 glass bowls mounted horizontally on an iron spindle that was turned by means of a foot pedal. Sound was produced by touching the rims of the bowls with water-moistened fingers. The instrument’s popularity did not last due to the inability to amplify the volume combined with rumors that using the instrument caused both musicians and their listeners to go mad.
• Calliope, which was patented in 1855 by Joshua Stoddard. Often the size of a truck, it produces sound by sending steam through large locomotive-style whistles. Calliopes have no volume or tone control and can be heard for miles.
But Google left out the pedal steel. While there may not be a historical consensus, I was talking to fellow pedal-steel player Dave Maniscalco, and we share the theory that pedal steel is the most American instrument.
Think about it. The United States started as a DIY, let’s-try-anything country. Our culture encourages the endless pursuit of improvement on what’s come before. Curious, whimsical, impractical, explorative—that’s our DNA. And just as our music is always evolving, so are our instruments. Guitar was not invented in the U.S., but one could argue it’s being perfected here, as players from Les Paul to Van Halen kept tweaking the earlier designs, helping this one-time parlor instrument evolve into the awesome rock machine it is today.
Pedal steel evolved from lap steel, which began in Hawaii when a teenage Joseph Kekuku was walking down a road with his guitar in hand and bent over to pick up a railroad spike. When the spike inadvertently brushed the guitar’s neck and his instrument sang, Kekuku knew he had something. He worked out a tuning and technique, and then took his act to the mainland, where it exploded in popularity. Since the 1930s, artists as diverse as Jimmie Rodgers and Louis Armstrong and Pink Floyd have been using steel on their records.“The pedal steel guitar was born out of the curiosity and persistence of problem solvers, on the bandstand and on the workbench.”
Immigrants drove new innovations and opportunities for the steel guitar by amplifying the instrument to help it compete for listeners’ ears as part of louder ensembles. Swiss-American Adolph Rickenbacker, along with George Beauchamp, developed the first electric guitar—the Rickenbacker Electro A-22 lap steel, nicknamed the Frying Pan—and a pair of Slovak-American brothers, John and Rudy Dopyera, added aluminum cones in the body of a more traditional acoustic guitar design and created resophonic axes. The pedal steel guitar was born out of the curiosity and persistence of problem solvers, on the bandstand and on the workbench.
As the 20th century progressed and popular music reflected the more advanced harmonies of big-band jazz, the steel guitar’s tuning evolved from open A to a myriad of others, including E7, C6, and B11. Steel guitarists began playing double-, triple-, and even quadruple-necked guitars so they could incorporate different tunings.
In Indianapolis, the Harlan Brothers came up with an elegant solution to multiple tunings when they developed their Multi-Kord steel guitar, which used pedals to change the tuning of the instrument’s open strings to create chords that were previously not possible, earning a U.S. patent on August 21, 1947. In California, equipped with knowledge from building motorcycles, Paul Bigsby revolutionized the instrument with his Bigsby steel guitars. It was on one of these guitars that, in early 1954, Bud Isaacs sustained a chord and then pushed a pedal down to bend his strings up in pitch for the intro of Webb Pierce’s “Slowly.” This I–IV movement became synonymous with the pedal-steel guitar and provided a template for the role of the pedal steel in country music. Across town, church musicians in the congregation of the House of God Keith Dominion were already using the pedal steel guitar in Pentecostal services that transcended the homogeneity of Nashville’s country and Western clichés.
Pedal steels are most commonly tuned in an E9 (low to high: B–D–E–F#–G#–B–E–G#–D#–F#), which can be disorienting, with its own idiosyncratic logic containing both a b7 and major 7. It’s difficult to learn compared to other string instruments tuned to regular intervals, such as fourths and fifths, or an open chord.
Dave Maniscalco puts it like this: “The more time one sits behind it and assimilates its quirks and peculiarities, the more obvious it becomes that much like the country that birthed it, the pedal steel is better because of its contradictions. An amalgamation of wood and metal, doubling as both a musical instrument and mechanical device, the pedal steel is often complicated, confusing, and messy. Despite these contradictions, the pedal-steel guitar is a far more interesting and affecting because of its disparate influences and its complex journey to becoming America’s quintessential musical instrument.”