Dig into the ambiguously beautiful sound of stacked fourths.
Chops: Intermediate
Theory: Advanced
Lesson Overview:
⢠Learn the principles of quartal harmony.
⢠Create quartal voicings on several string sets.
⢠Construct quartal harmony from the Mixolydian, Dorian, and Aeolian modes.
Click here to download a printable PDF of this lesson's notation.
Itās inevitable that at some point jazz guitarists will want to look for something outside of the standard harmonic repertoire and begin investigating more interesting sounds. This desire for something new could evolve out of growing tired of oneās harmonic vocabulary or from encountering compositions that go beyond standard chord structures. One way to open the harmonic palette is by including quartal harmony.
I first heard quartal harmony on recordings by Miles Davis and John Coltrane. Such pianists as Bill Evans, McCoy Tyner, Chick Corea, and Mulgrew Miller were my introduction to these structures. I began to identify those same structures in the guitar playing of Jim Hall, Joe Diorio, Lenny Breau, Vic Juris, and Steve Masakowskiāas well as a number of other musicians. The openness of the chords, along with the tension they can create, was very modern to my ear and drew me into learning more. In this lesson, weāll look at the principles of constructing quartal harmony and how to incorporate these voicings into your playing.
First, letās define what weāre talking about. Quartal harmony is created when sonorities (or chords) are built using primarily fourths instead of the typical thirds. However, when using quartal harmony sometimes youāll find a need to include another interval, such as a fifth or a third. These other intervals are acceptable because a fifth is simply an inverted fourth, and the inclusion of the third interval helps in defining harmonic movement within a key (such as a IImāV progression), as well as specifically defining a particular sonority relating to chordal alterations or extensions.
Weāre going to cover quartal voicings for Mixolydian, Dorian, and Aeolian modes based on a common starting note. Our first mode is E Mixolydian (EāF#āG#āAāBāC#āD), the fifth mode of A major.
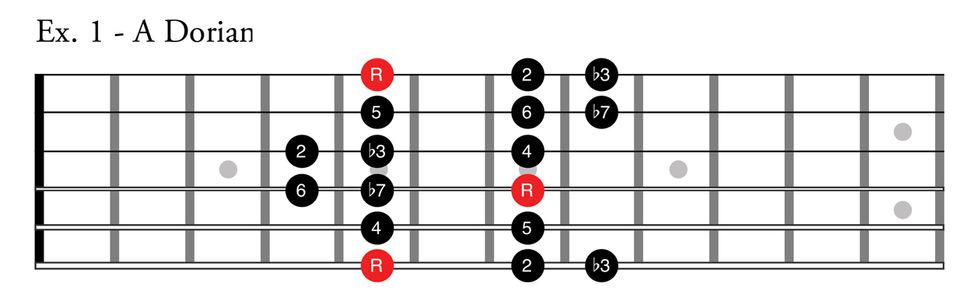
Ex. 1 demonstrates a series of three-note voicings on the top three strings in E Mixolydian. These are presented ascending and descending, starting from the lowest possible voicing. Iāve also given the fingerings for the next adjacent string set as well in Ex. 2. Iād encourage you to move these structures to the remaining string groups too. If the beginnings and endings of some of the following examples seem unresolved, thatās acceptable for now because here weāre simply trying to get the shapes under our fingers and the sound in our ears.
Click here for Ex. 1
Click here for Ex. 2
Next up are E Dorian (EāF#āGāAāBāC#āD) in Ex. 3, and E Aeolian (EāF#āGāAāBāCāD) in Ex. 4. Here, Iāve given you just the top set of stringsāitās up to you to transfer the voicings to the lower string sets. Also, itās easy to expand these into four-note voicings. Simply add a note either a fourth below the lowest note or above the highestādepending on where you are on the fretboard. Later in the lesson we will use some of these over a few common progressions.
Click here for Ex. 3
Click here for Ex. 4
Before we move on, itās important to note that even though we are looking at voicings specifically intended for E Mixolydian, E Dorian, and E Aeolian, there are other applications for this material. Any of these voicings can be used for other modes that appear in their respective keys. For example, the voicings for E Mixolydian can be applied to any mode found in A Major: D Lydian, B Dorian, A Ionian, etc. The same applies for the modes associated with E Dorian (key of D Major) and E Aeolian (key of G Major). The reason this works is due to the ambiguity of the structures and the lack of roots found in them. Experiment with changing the bass note in which you play these voicings over. Now that we have investigated the modal application of these shapes, letās look at how to incorporate them into functional chord progressions.
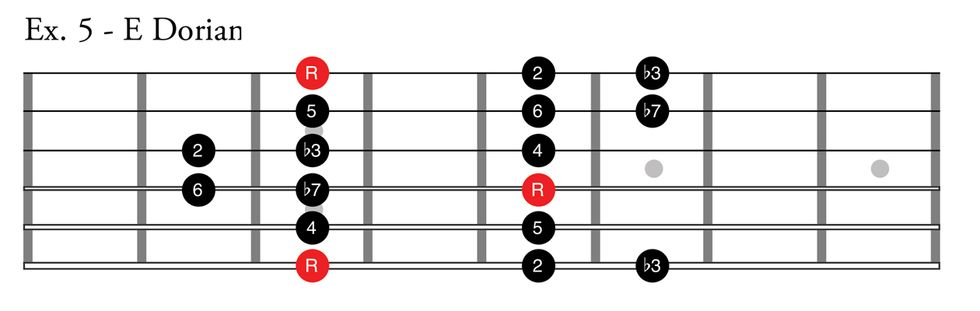
Once the basic horizontal movement of the quartal shapes is under your fingers, itās time to investigate the vertical movements. In the following three examples you can see how a quartal voicing moves across the fretboard, rather than up it. Fig. 5 covers E Mixolydian, Fig. 6 is in E Dorian, and Fig. 7 is E Aeolian. Iām using three-note voicings here because smaller structures are easier to move across the fretboard at a variety of tempos.
Click here for Ex. 5
Click here for Ex. 6
Click here for Ex. 7
You should begin to see that quartal voicings have a chameleon-like quality to them, and depending on the context, can be perceived in a few different ways. Check out the first chord in Ex. 8. Here, itās being interpreted as a C6/9, but if we change the bass note it can also work as a F6/9, Am11, Dm11, D7sus4, Gm11, Gsus(add9), or several others. I encourage you to take any voicing presented and experiment to find your own unique uses.
Letās carry this idea of a single structure wearing many hats a little further. In Ex. 8, we have the chord progression to the classic āOn Green Dolphin Street.ā The voicings were intentionally kept on the top four strings to help you see the plurality of these structures. Experiment with other quartal structures to see if you can retain the same shape on a particular string set.
Click here for Ex. 8
So far we have been looking at modal examples, but now letās move into applying quartal voicings to IImāVāI progressions. Ex. 9 illustrates many ways to incorporate quartal harmony into a more functional progression that is found in countless jazz standards. The first eight measures are mostly diatonic, while the final eight explore more altered sounds over the V7 chord. These examples are just the tip of the iceberg and you should experiment with them to come up with your own variations.
Click here for Ex. 9
Ex. 10 offers quartal harmony within the context of a minor 12-bar blues. In the first two measures Iāll use shapes from E Dorian, and in measure five and six Iāll pull out voicings from A Dorian. I return to E Dorian in measure seven and finish with a typical IImāV7 turnaround. Notice that many of the voicings are similar and the bass line determines the harmonic movement.
Click here for Ex. 10
The final example covers a bunch of major and minor IIāV progressions. Ex. 11 borrows from the āAutumn Leavesā chord progression and once again proves that context is king when it comes to quartal structures.
Notice the chromatic activity in measures two, three, and five, as well as the chordal sequence in measures 13 and 14. This helps outline the chordal functions of the piece and gives the accompaniment forward motion.
Click here for Ex. 11
As you can see, the uses for these voicings are almost infinite. In moving forward with this material, try finding ways to sneak these voicings into your repertoire by mixing them in with your existing chord vocabulary. Donāt forget that these can also be used as arpeggios to develop your melodic ideas as well. Finally, to truly understand how the masters make these sounds work, devote some time to listening.
In a career defined by evolution, Joe Bonamassa is ready to turn the page once again. The blues-rock virtuoso has just announced Breakthrough, his most adventurous and genre-blending studio album to date, out July 18th via his own J&R Adventures.
At the heart of the announcement is the release of the albumās powerful title trackāāBreakthrough' āa soulful, hard-hitting anthem about letting go, moving forward, and finding your fire again, available today on all streaming platforms.
Crafted across multiple continents and infused with a worldās worth of inspiration, Breakthrough marks a bold new chapter for Bonamassaāone that leans on fiery solos, emotionally rich storytelling, groove-driven arrangements, and stylistic exploration. Produced by longtime creative partner Kevin Shirley (Iron Maiden, The Black Crowes, Journey), the album was shaped by sessions in Greece, Egypt, Nashville, and Los Angeles, resulting in a vibrant sonic tapestry that shifts effortlessly from funky blues and Texas swing to acoustic ballads and swaggering hard rock.
Joe Bonamassa āBreakthroughā - Official Lyric Video
Watch the official lyric video for "Breakthrough" by Joe Bonamassa
āI think this album, Breakthrough, marks a shift in the styling of Joe Bonamassaās recording output,ā says Shirley. āWhile there are plenty of guitar solos on this record, his emphasis has been on songs primarily. Each time Joe undertakes a new recording project, he seems to access a different part of his vast library of music genre from the jukebox-in-his-head! This album is a round-the-world musical tripāfrom Little Feat funkiness to Texas swing, from hard rock power to acoustic singer/songwriter-style songs.ā
The newly released single āBreakthrough,ā co-written with longtime collaborator Tom Hambridge (Buddy Guy, ZZ Top, Lynyrd Skynyrd), captures the emotional core of the recordāan uplifting anthem about transformation, persistence, and letting go of the weight that holds us back. With gritty vocals, melodic guitar lines, and lush instrumentation, the track embodies Bonamassaās signature blend of power and finesse while ushering in a bold new direction.
āBreakthroughā follows the success of Bonamassaās recent singles āStill Walking With Meā and āShake This Ground,ā both of which hinted at the adventurous spirit behind the full album. āShake This Groundā delivered a moody, introspective edge, while āStill Walking With Meā leaned into warmth, gratitude, and classic soul. Each track reflects a different facet of Bonamassaās evolving songwriting approach, rooted in emotional honesty and anchored by his unmistakable guitar work.
The album announcement caps a stretch of extraordinary momentum for Bonamassa. Next up, Bonamassa recently began his extensive *European Spring Tour, followed by a June run with his powerhouse supergroup Black Country Communion* (featuring Glenn Hughes, Jason Bonham, and Derek Sherinian). After another round of summer dates across Europeāincluding sold-out shows in Irelandāheāll return stateside for his just-announced* 2025 U.S. Summer Tour*, a limited amphitheater run featuring stops at The Greek Theatre, Red Rocks, and more iconic venues.
With over 50 albums, 28 #1 Billboard Blues albums, and a lifelong commitment to evolving the genre, Bonamassa shows no signs of slowing down. Whether headlining iconic venues, mentoring rising artists through Journeyman Records, or supporting music education via his Keeping the Blues Alive Foundation, Bonamassa continues to shape the future of blues-rock with every note.
For more information on Breakthrough, tour dates, and VIP packages, visit jbonamassa.com.
Patterns can be viewed as boring or trite, but a little bit of creativity can turn them into bits of inspiration.
Chops: Intermediate Theory: Intermediater Lesson Overview: ⢠Learn different ways to arrange scales. ⢠Combine various sequences to create more intersting lines. ⢠Solidify your technique by practicing unusual groupings of notes. Click here to download a printable PDF of this lesson's notation. |
I want to offer some food for thought on making sequences musical. Using sequences in our playing helps develop our musicianship in various ways. It can help us tune into the fretboard, develop melodic ideas all around the neck, and further our improvisation and compositional skills. So, spending time with sequences is certainly not time wasted. Please note that I sometimes use the word ārule" in this column, this is only a pointer to keeping on track of our exploration of these concepts. The intellect is very useful, but intuition is where the creativity comes from. When in balance lots of great things can be done. Let's get stuck in!
It's simple to play a scale from bottom to top, or top to bottom, but we can develop a sequence by shuffling these notes around. In Ex. 1 we have a C Major scale (CāDāEāFāGāAāB) played in thirds followed by a sequence highlighting the diatonic triads of the major scale. By following a ārule" we can develop many different sequences. The options are endless and a little overwhelming.
Click here for Ex. 1
Lets start by simply combining an interval sequence with an arpeggio sequence. In Ex. 2, the first two beats of the first measure feature ascending thirds. This is then followed by a triad arpeggio starting from the third note on the string. The next set of thirds then starts on the āand" of beat 4. The entire sequence is a seven-note pattern that is created by combining two thirds and a triad. It gives us a nice bit of rhythmic displacement as the phrase is now starting in a different place in the measure.
Click here for Ex. 2
Ex. 3 is a descending idea in A minor that basically flips the sequence we looked at in Ex. 2. Here, we are starting with two descending thirds before the triad. I'm using pull-offs and economy picking to articulate the triads. This one works well over D minor as well if you want a D Dorian (DāEāFāGāAāBāC) flavor.
Click here for Ex. 3
You can see the effectiveness of combining different sequences and groupings of notes to create interesting runs. It's also really effective for making phrases. In Ex. 4 we take a small fragment from Ex. 3 and change the rhythm. In the sound example I repeat this a few times over some implied chords in my bass line: Am, F, and Dm. It's great to get more from one line by seeing the different chord types you can play it over.
Click here for Ex. 4
In Ex. 5 we're going to start using fourths and fifths. It starts with an ascending A minor triad (AāCāE) before leaping to the 9 (B) and then hitting a G major triad (GāBāD). A similar pattern leads into the C major triad (CāEāG). Throwing in these wider intervals alongside triads is very effective for creating a dramatic sounding runs.
Click here for Ex. 5
For our next example (Ex. 6), we will take fragments from Ex. 5 and space them out a bit. I wanted once again to show how these sequence ideas can also be helpful for developing melodic phrases. Once we have a cool sequence or fragment, all we need to do is be creative with how we play it. We can change the rhythm, harmonic context, dynamic, and much more.
Click here for Ex. 6
Before we move on, it's important to remember that we can add colorful notes to our triads. Let's begin with some seventh-chord arpeggios. Ex 7 features are diatonic seventh arpeggios in G minor (functioning as a IIm chord) to get a Dorian sound.
Click here for Ex. 7
Ex. 8 is a little gratuitous of me. It begins with an idea made of several different concepts. First, we start with an Am7 arpeggio (AāCāEāG), then descend down an A5 arpeggio. I follow that up with diatonic thirds and end with a pedal-point sequence. If that's not enough, we then take this bigger idea and fit it around a chord progression. I move it to G7, Dm7 and then I break my ārule" slightly and outline notes of a C6 arpeggio (CāEāGāA). However, it does keep the same melodic contour of the initial idea. I used my ear and fretboard to guide me. It's always healthy to have a fine balance between intellect and intuition.
Click here for Ex. 8
We dig into C harmonic minor (CāDāEbāGāAbāB-C) for Ex. 9's monster two-measure lick. It sounds evil! In composing this phrase, I kept to the basic concept of finding seventh-chord arpeggios within C harmonic minor in the 8th position. I followed my ear as well as my slowly developing intellect. However, if you look closely you can see I was following a mini chord progression through this line. We start out with a CmMaj9 arpeggio (CāEbāGāBāD) in the first beat, followed by a G7b9 arpeggio (GĀāBāDāFāAb). Here we have a very strong Im-V7 movement in C minor. I then move back to our CmMaj9 arpeggio and in the second measure we start descending down an Eb augmented triad (EbāGāB). This is then followed by more CmMaj9 goodness.
Click here for Ex. 9
Ex. 10 is now taking Ex. 9 and extending it into a cool flamenco-inspired melody. The rhythms in this were inspired by the incredible Paco De Lucia. I follow the sequence from the previous example almost exactly, but I use a bit of artistic license to repeat certain fragments to fit into a ātop line" or āhead"-style melody.
Click here for Ex. 10
My aim here isn't to give you one rule to follow but instead to encourage you to take the sequences you know and love and start getting more out of them. Enjoy and stay safe!
Neutrikās Timbre plug, made for toggling between capacitors.
This follow-up to May 2025ās column shows you a few basic techniques to inject some capacitance into your rig.
Hello, and welcome back to Mod Garage. This month, we will dive into the details of how to add additional guitar-cable capacitanceāthe right way. Time to get started!
Letās begin with some typical additional capacitance values that certain lengths of cable (or capacitors) can bring to your system:
⢠10ā vintage coiled cable (approx. 3 meters) -> 1 nF
⢠15ā vintage coiled cable (approx. 4.5 meters) -> 1.5 nF
⢠20ā vintage coiled cable (approx. 6 meters) -> 2.2 nF
⢠30ā vintage coiled cable (approx. 9 meters) -> 3.3 nF
⢠Ritchie Blackmore-style, ultra-long vintage coiled cable -> 4.7 nF
I listed standard values here, so you should have no problem getting caps to match them in any local electronics store or online; the type of cap doesnāt really matter and will mostly be dominated by size, but Iāll share more about this in a minute.
Letās quickly summarize the first installment of this column from last monthās issue: From a technical point of view, added capacitance shifts down the resonance frequency of the pickups, so they sound fatter, especially when using overdrive. This is exactly the reason why a lot of distortion and fuzz boxes with a vintage voicing use an additional cap at the input section; the resulting overdriven tone is fat and warm.
This monthās mod, which involves adding a capacitor to your signal, works best with vintage-flavored single-coil pickups (approximately 2.4 H inductance) or a typical old-school PAF-style pickup (approximately 3.8 H inductance). Modern high-output pickups are often sporting inductances of 6 H to 8 H, and donāt sound very good with this modāwhen adding more cable capacitance to such pickups, the result is a dull and wooly tone without any clearness and definition. If you want to make your single-coil guitar sound more Les Paul-ish, you should try a 4.7n capacitor. It will shift the resonance frequency of your single-coil pickups down to the typical PAF ballpark, making for a very cool and usable old-fashioned guitar tone. It might feel a little muffled when playing clean, but ultra fat and punchy when using overdrive! In general, values higher than 4.7n are not recommended.
We have two options for where to install our cap.
On the Guitar Cable
This is the easiest location to add additional capacitance to your system, with several mod options:
1. The lightest mod ever isnāt a mod at allāitās to simply buy a vintage guitar cable and plug it in whenever you need it! I donāt know of any company that offers modern guitar cables with intentionally high capacitance.
2. The Neutrik company offers a special angled plug, called the Timbre Plug, that you can solder to any guitar cable of your choice. The plug has a 4-way rotary knob on top to toggle between different capacitors. In addition to a bypass setting, the plug offers capacitances of 1nF, 2.2nF, and 3.3nF, letting you simulate different cable lengths on the fly.
3. You can add an additional capacitor to any guitar cable of your choice to convert it into a ālonger-soundingā cable. You simply open one of the plugs to solder the cap between the hot and groundāthatās it. Small, 2.5 mm contact spacing ceramic caps are easy to put into a standard plug and are your weapon of choice here. Itās essential to only add the additional cap to one of the two plugs, but it doesnāt matter if you plug this side into your guitar, an effect, or your amp. This method allows you to build yourself some cables that simulate their older, longer relatives.
You can add an additional capacitor to any guitar cable of your choice to convert it into a ālonger-soundingā cable.
Photo courtesy SINGLECOIL (https://singlecoil.com)
Inside the Guitar
You can also add a cap (or several) inside your guitar if you only need this mod for one instrument. If youāre looking for added capacitance with all your guitars, youād be better off choosing one of the techniques mentioned above.
1. The easiest way is to solder your additional capacitor directly to your volume pot; this way it has a fixed value that canāt be changed and is always engaged. This operation is very simple to do, and you can use regular-sized caps for this.
You can add a cap (or several) inside your guitar if you only need this mod for one instrument.
Illustration courtesy SINGLECOIL (https://singlecoil.com)
2. If you want to make the cap switchable, such that you can run it either bypassed or engaged, you can install a SPST mini toggle switch or use half of a push-pull or push-push pot, which usually sport a DPDT switch underneath.
This drawing shows how to make your additional cap switchable.
Illustration courtesy SINGLECOIL (https://singlecoil.com)
3. If you want to use more than one cap to simulate different cable lengths, your weapon of choice is a rotary switch, setting up a kind of Gibson Varitone wiring without the inductor. Because we are switching capacitances, it is essential to run an additional 10 meg resistor in parallel to each of the caps, and to use a make-before-break, not a break-before-make, rotary switch to prevent loud popping noises when using the switch while your guitar is plugged into an amp. Leave the first lug of the rotary switch open for the bypass position without an additional cap.
If you want to use more than one cap to simulate different cable lengths, use a rotary switch.
Illustration courtesy SINGLECOIL (https://singlecoil.com)
4. If you want to make this mod even more flexible, you can add an additional ācable simulator potā to your system. The pot should have the same resistance as your volume pot, and should be wired to your volume pot. This way, for example, you can add a 3.3nF or 4.7nF cap to the extra pot, and dial in as much cable capacitance as you like.
You can also add an additional ācable simulator potā to your system.
Illustration courtesy SINGLECOIL (https://singlecoil.com)
On the Pedalboard
The idea of putting a rotary switch or cable-simulator-pot solution into an external unit to create a kind of extra-capacitance stompbox to use with all of your instruments is just around the corner, and yes, itās possible! However, I donāt recommend this, because itās physically located after the volume pot in the guitar, which means less volume (no unity gain) and less high end. But donāt worry: If you are looking for a pedalboard solution to simulate different cable lengths (which, as we defined earlier, means to shift the resonance frequency of the pickups), there are some active solutions on the market offering such a feature, usually in combination with a boost or buffer functionality. To name just a few, you should look into the Seymour Duncan Pickup Booster, Stellartone Micro Pedal, or the i2e Audio AG1.0 The PURR. Along with some other brands, these pedals will do the trick, and theyāre not difficult to build if you are looking for a DIY solution.
So far, Iāve received several emails from readers asking for some more DIY guitar tools, so next month, we will look into some sustainable and environmentally friendly DIY guitar helpersāall of which you can build yourself easily by upcycling things you already have at home. Stay tuned!
Until then... keep on modding!
MayFly Le Habanero Review
Great versatility in combined EQ controls. Tasty low-gain boost voice. Muscular Fuzz Face-like fuzz voice.
Can be noisy without a lot of treble attenuation. Boost and fuzz order can only be reversed with the internal DIP switch.
$171
May Fly Le Habanero
A fuzz/boost combo thatās as hot as the name suggests, but which offers plenty of smoky, subdued gain shades, too.
Generally speaking, I avoid combo effects. If I fall out of love with one thing, I donāt want to have to ditch another thatās working fine. But recent fixations with spatial economy find me rethinking that relationship. MayFlyās Le Habanero (yes, the Franco/Spanish article/noun mash-up is deliberate) consolidates boost and fuzz in a single pedal. Thatās far from an original concept. But the characteristics of both effects make it a particularly effective one here, and the relative flexibility and utility of each gives this combination a lot more potential staying power for the fickle.
āLe Habaneroās fuzz circuit has a deep switch that adds a little extra desert-rock woof.ā
The fuzz section has a familiar Fuzz Face-like tone profileāa little bit boomy and very present in that buzzy mid-ā60s, midrangey kind of way. But Le Habaneroās fuzz circuit has a deep switch that adds a little extra desert-rock woof (especially with humbuckers) and an effective filter switch that enhances the fuzzās flexibilityāespecially when used with the boost. The boost is a fairly low-gain affair. Even at maximum settings, it really seems to excite desirable high-mid harmonics more than it churns out dirt. Thatās a good thing, particularly when you introduce hotter settings from the boostās treble and bass controls, which extend the boostās voice from thick and smoky to lacerating. Together, the boost and fuzz can be pushed to screaming extremes. But the interactivity between the tone and filter controls means you can cook up many nuanced fuzz shades spanning Jimi scorch and Sabbath chug with tons of cool overtone and feedback colors.