
Tele players often ask about adding series wiring to their instruments—a mod that lets you access a powerful tone when you engage both pickups. On a stock Tele, the pickups are connected in parallel when you use them together, but if you run them in series instead, the resulting output is hotter and louder, and this makes it much easier to drive your amp into saturation. If you're craving burly Tele tones, series wiring will deliver.
There are several ways to mod your Telecaster for series wiring. The most common approach is to replace the standard 3-way pickup selector with a 4-way switch. This keeps the three familiar switching positions untouched and simply adds a new sound in switching position #4. This is my preferred method, and I think it's the most useful Telecaster mod ever. I explained how to do this mod in a previous column, “Telecaster Series Wiring." In that same column, I also describe an alternative scheme that uses a second 2PDT switch to connect both pickups together in series, while overriding the setting of the stock 3-way switch. But not everyone wants to swap their 3-way selector for a 4-way unit or add that extra 2PDT switch. The order of settings on the 4-way selector isn't everyone's cup of tea, and, similarly, adding a second switch to a Tele strikes some guitarists as unnecessarily fussy.
But wait: If you crave that powerful dual-pickup tone, yet want to maintain the Tele's glorious simplicity, why not simply configure the 3-way switch's middle position to connect the bridge and neck pickups in series? Yes, you'll lose the old middle position with both pickups in parallel, but if the series connection is all you need, this wiring is for you. You'll still have access to either the neck or bridge pickup by itself, yet be merely one click away from a hot series tone. It's like having a solo preset sound in the switch's middle position.
So let's investigate this lean, mean series-wiring scheme. The new switching matrix for the 3-way switch looks like this:
- Position #1: bridge pickup alone
- Position #2: both pickups in series
- Position #3: neck pickup alone
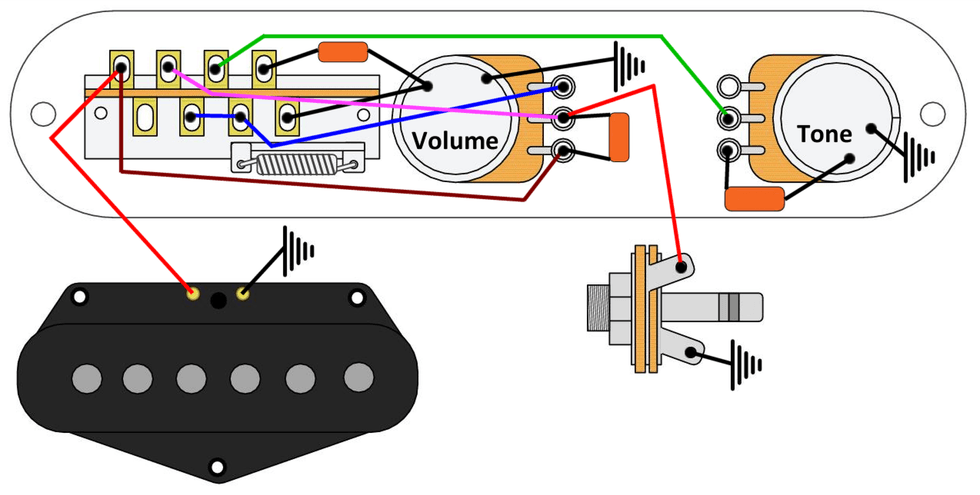
To begin this mod, you must first check if the neck pickup's metal cover is connected to ground—which is the case for almost all standard Telecaster neck pickups. If so, you'll have to break this connection and solder a third, new ground wire to the metal cover.
How do you do this? How do you do this? Glad you asked: We covered this before in “Preparing Your Tele for Future Mods." If you have a Strat pickup, a P-90, or some similar single-coil in the neck position, you can skip this step. For all other pickups sporting a metal cover that's connected to the pickup's ground, you'll need to break this connection before you proceed.
Fig. 1 shows the wiring, which looks familiar but is a little bit more complex than standard Telecaster's wiring. The important detail here is to connect the hot wire from the neck pickup to the volume pot's input lug, rather than directly to the switch, which is the usual approach. There are other ways to accomplish the mod, but this is my favorite method because it's simple to wire and you can easily reverse the mod or upgrade to a 4-way switching system at a later date. And the beauty of this is we still have the familiar operation of a standard Telecaster 3-way selector. The only change is the new sound for the middle position; the other two settings are not affected. Also, you can incorporate other mods into this wiring, such as the '50s wiring that I've covered before.
While we're discussing Tele wiring, I'd like to make a point about grounding—something that comes up quite a bit with modders. Typically, you'll see the two pots being connected to ground by running a wire from the volume pot's case to the tone pot's case, and then soldering the string-grounding wire that's installed underneath the bridge to the case of one of the two pots. When you use a standard Telecaster control plate made from conductive metal, you already have a kind of natural grounding and you can skip the wire connecting one pot to the other. Just connect the string-grounding wire to the case of one of the pots and you're done. Why? When the pots and switch are installed on the control plate with their metal parts touching the metal control plate, they create a perfect grounding system. This applies not only to Telecasters, but all pickguards and control plates made of conductive metal. To confirm this, simply set a digital multimeter to continuity and place both probes on the metal pieces you want to check. If the DMM shows continuity, you've won. If not, then ground your pots or glue a piece of copper foil underneath the pickguard or control plate to add conductivity.
This series wiring offers another benefit when you use a conductive control plate: The lug on the 3-way switch that's connected to ground only needs a short bare jumper wire soldered to it. Simply clamp the other end of the jumper between the 3-way switch's metal frame and the control plate, and you're good to go.
Okay, we're done for now. Next time I'll share a cool shop tip with you—an easy way to maintain your frets and extend their lifespan while changing strings. Until then, keep on modding!