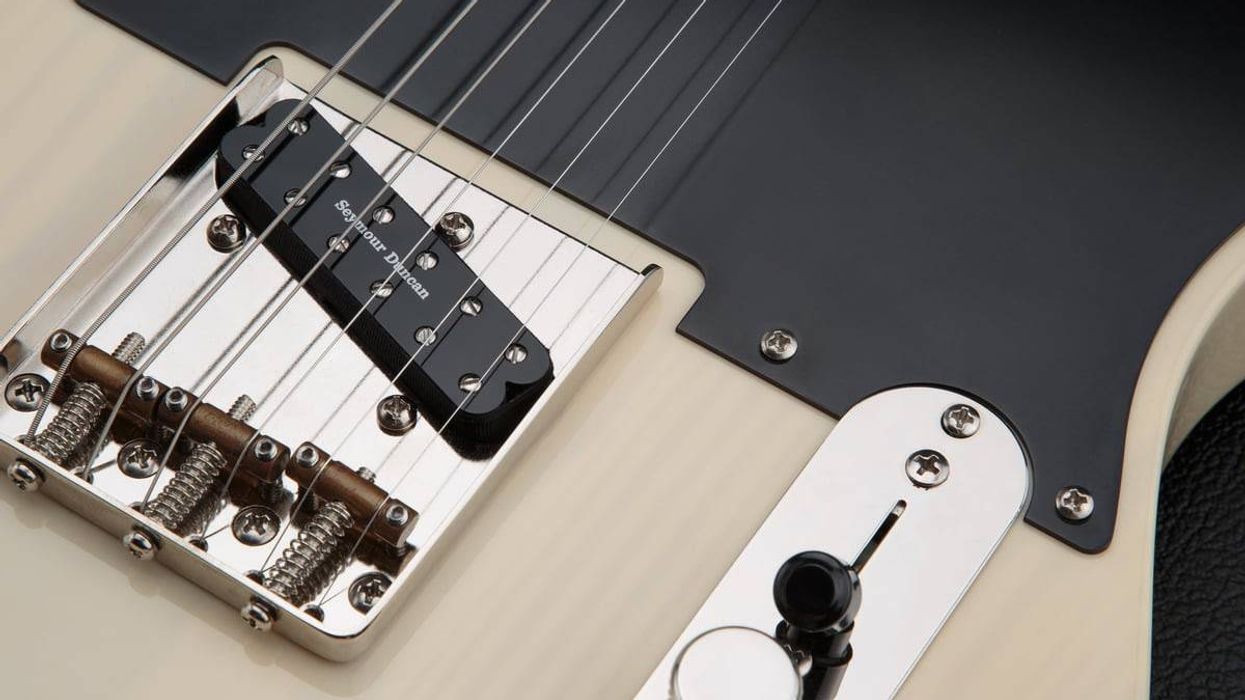
Got a finicky selector on your dual-pickup guitar? No worries—it’s an easy fix.
Given the popularity of Les Pauls, SGs, Explorers, Flying Vs—and the thousands of other two-pickup axes inspired by these iconic models—it's no surprise I've replaced many failing 3-way switches over the years. Switches get used a lot and eventually they can wear out. When this happens, you'll hear loud popping sounds or scratchy noises, and the signal may even cut out when you're switching pickups.
Fortunately, 3-way toggle switches are easy to replace, and you can do it yourself with just a few tools and a bit of patience. It only takes a few minutes to cover the process, so let's get started.
The project.
To illustrate the steps, I'll use a 1983 Ibanez Les Paul copy that has a standard 3-way pickup selector: neck only, neck-plus-bridge, bridge only (Photo 1). Charmingly, Ibanez kept the arcane "Rhythm" and "Treble" designations for the neck and bridge pickups.
This is a cool guitar and it plays great, but the toggle switch is shot. Like many imported guitars, it has a cheap switch. I'm going to upgrade the guitar with a Switchcraft model, one of several options preferred by discerning players and professionals who are willing to pay a bit extra for reliability. Let's take a closer look.
Types of toggle switches.
On most guitars, you'll find one of two different types of 3-way toggle switches: the box style and the open style. In a box toggle switch, the internal parts are enclosed—typically in plastic—and they can fail if the prongs get overheated, especially when the switch has been re-soldered too many times. As a result, box switches tend to have a short life.
The internal parts are exposed on an open toggle switch, but open switches are usually made from better materials. Switchcraft double-pole 3-way switches boast solid construction and last a long time, which explains why they're used on so many high-quality instruments.
Open toggle switches come in three styles: short straight, tall straight, and right-angle. The short and tall straight switches have their switching apparatus below the toggle, while the switching mechanism on the right-angle switch is perpendicular to the toggle. All three are wired identically, they simply differ in depth and width. For example, guitars with shallow electronics cavities, such as the SG and many thin ES-style hollowbodies, use the right-angle switch. Gibson Les Pauls take the tall switch.
Here's an easy way to tell which type of replacement switch you need: Check out the minimum cavity size for all three Switchcraft styles at stewmac.com, and then compare these dimensions to your guitar's switch cavity.
Removing the old switch.
Using a Phillips screwdriver, remove the cover plate on the back of the guitar to access the switch cavity. If you already have an open switch and you're simply replacing it with a new one, draw a diagram of the old switch or label each wire to help you remember the connections.
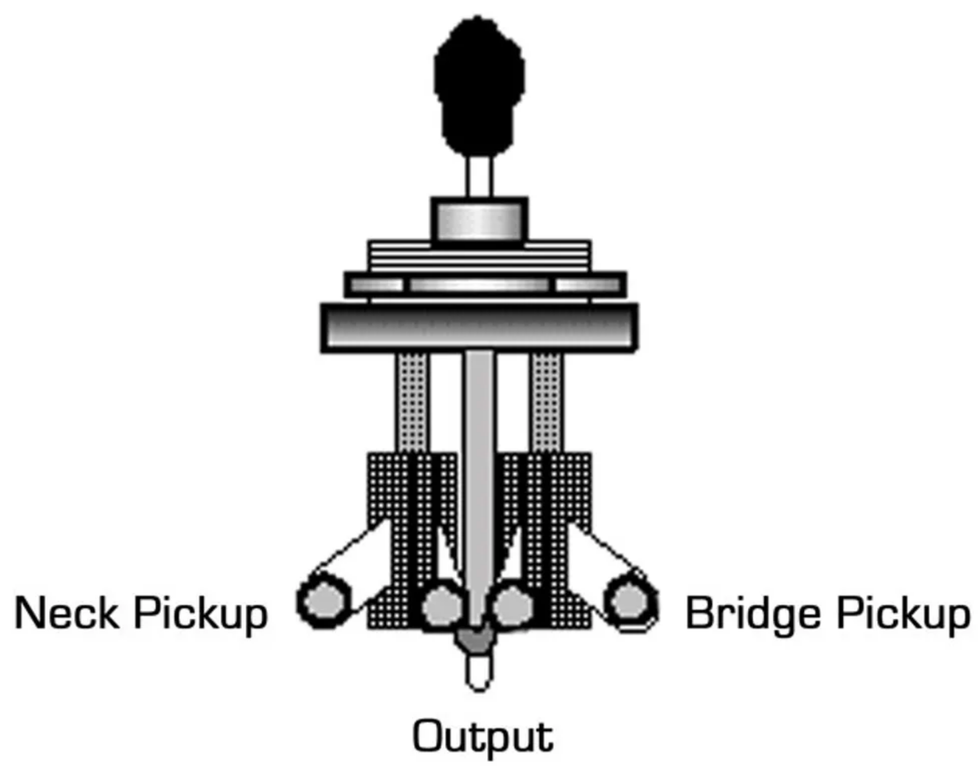
Image 1
If you're replacing a budget box switch with an open toggle switch, you can use the simple diagrams I've provided as a guide. Image 1 (above) shows a common 3-way toggle as seen from the front and Image 2 (below) shows the back view.
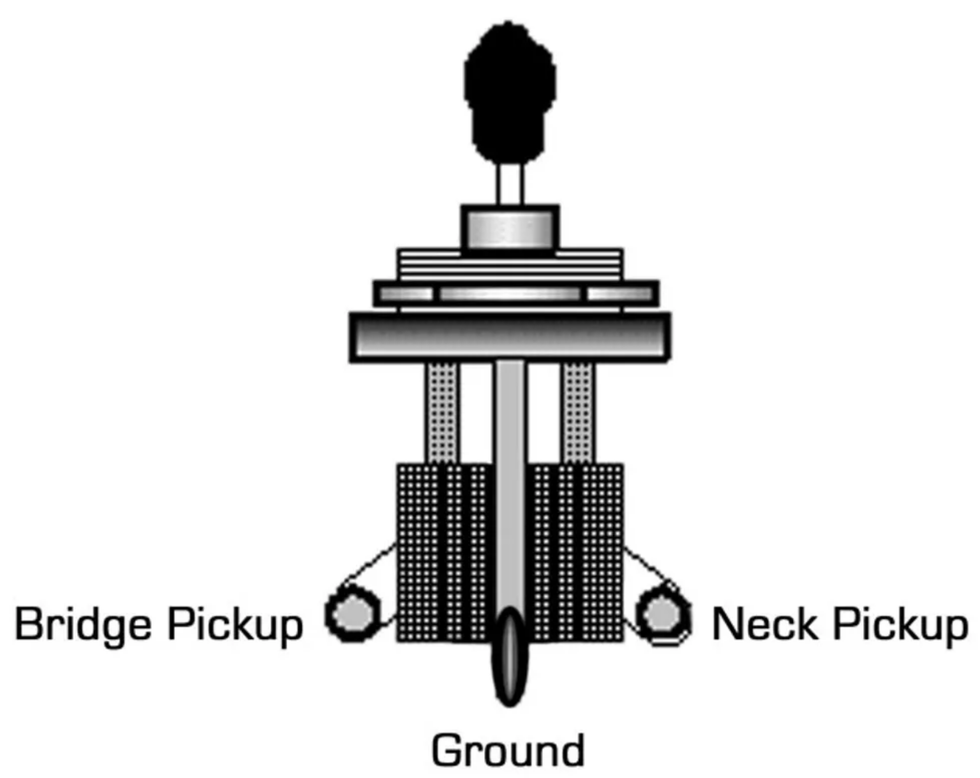
Unsolder each wire and then remove the switch by turning the mounting nut counter-clockwise. Some toggle switches have a hex nut and require a deep well socket wrench, others have a knurled collar nut that can be loosened or tightened using an adjustable toggle switch wrench.
Tip: Don't use a pair of pliers to remove the nut collar! Pliers will mar the knurled nut and if you slip, you'll also damage the top of your guitar.
Installing the new switch.
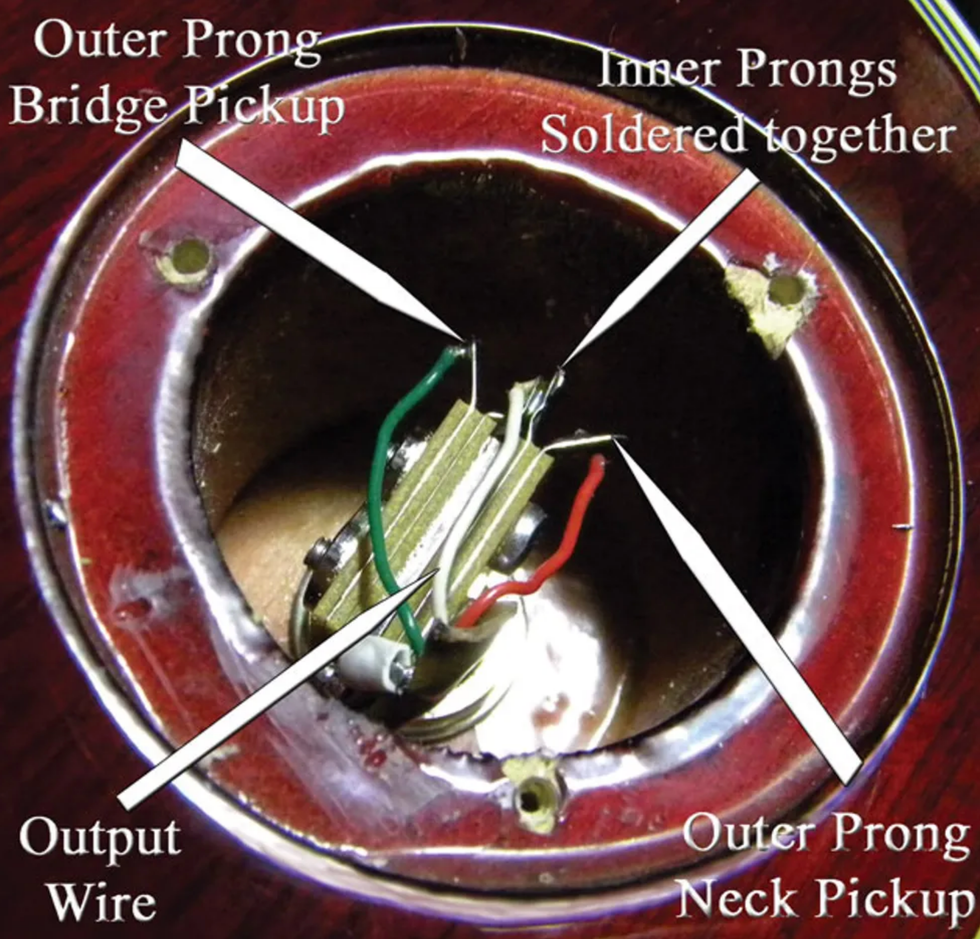
Photo 2
On the open switch I'm installing in this Ibanez, there are four prongs at one end and one prong on the opposite side (Photo 2). The four grouped prongs are the switch's inputs and output, and the single prong on the opposite side is the ground. In the group of four prongs, the two outer prongs are the inputs for the pickups and the two in the center are the outputs.
Before soldering, I use hemostats to gently bend the outer prongs (these connect to the pickups) away from the two output prongs between them. Then I crimp the two inner prongs together, because they'll share one wire from the switch's output to the output jack.
Note: Open 3-way toggles may differ physically. On a right-angle switch, for example, the ground prong and the input and output prongs are stacked vertically, and on some straight switches the ground prong is located between the two inputs, while the outputs are on the opposite side. But regardless of the layout, the principle is the same, and once you understand it you'll be able to confidently wire up your guitar. Study the wiring diagram that came with your new switch to confirm how it's configured, or use a multimeter to test and identify the input and output prongs.
Slide the new switch into the switch cavity, thread on the collar or nut, and then tighten it. Be careful when tightening the collar—it only needs to be "finger tight." If you torque it too much, you'll strip the threads. Also be sure to orient the switch so the toggle throw matches the original.
Switches get used a lot and eventually they can wear out. When this happens, you'll hear loud popping sounds or scratchy noises, and the signal may even cut out when you're switching pickups.
Solder up.
There are typically four wires to solder: the neck pickup, the bridge pickup, the output (this connects to the output lug on the jack), and the ground. Select a wire and clamp it to its respective prong with the hemostats, then briefly touch the tip of your soldering iron to preheat the prong and wire, and finally touch the solder to the connection just long enough to let a small amount of solder flow over the wire and prong. For detailed soldering tips, see "Tips for Replacing a Strat-style 5-way Switch."
Tip: When soldering, be careful not to heat up the prongs too much. Excessive heat can damage the switch.
Once you've soldered the four wires to their prongs, it's time to check your work. Gently tap the pickups with your hemostats for each position of the switch. You should get neck and bridge alone when the toggle is pointed up or down, respectively, as viewed from the playing position, and both when the toggle is in the center position.
If the neck and bridge toggle positions are working in reverse (i.e., the bridge pickup engages when the switch is up), then reverse the leads on the outer prongs. If the pickups are working correctly, reinstall the cover plate and you're done!
[Updated 11/10/21]
- Guitar Shop 101: Tips for Replacing a Tele-Style 3-Way Switch ... ›
- Mod Garage: How to Wire Alternative Tele 3-Way Switches - Premier ... ›
- Mod Garage: Inside the 3-way Telecaster Pickup Switch - Premier ... ›
Stompboxtober is rolling on! Enter below for your chance to WIN today's featured pedal from Peterson Tuners! Come back each day during the month of October for more chances to win!
Peterson StroboStomp Mini Pedal Tuner
The StroboStomp Mini delivers the unmatched 0.1 cent tuning accuracy of all authentic Peterson Strobe Tuners in a mini pedal tuner format. We designed StroboStomp Mini around the most requested features from our customers: a mini form factor, and top mounted jacks. |
Wonderful array of weird and thrilling sounds can be instantly conjured. All three core settings are colorful, and simply twisting the time, span, and filter dials yields pleasing, controllable chaos. Low learning curve.
Not for the faint-hearted or unimaginative. Mode II is not as characterful as DBA and EQD settings.
$199
EarthQuaker Devices/Death By Audio Time Shadows
earthquakerdevices.com
This joyful noisemaker can quickly make you the ringmaster of your own psychedelic circus, via creative delays, raucous filtering, and easy-to-use, highly responsive controls.
I love guitar chaos, from the expressionist sound-painting of Jimi Hendrix’s “Machine Gun” to the clean, clever skronk ’n’ melody of Derek Bailey to the slide guitar fantasias of Sonny Sharrock to the dark, molten eruptions of Sunn O))). When I was just getting a grip on guitar, my friends and I would spend eight-hour days exploring feedback and twisted riffage, to see what we might learn about pushing guitar tones past the conventional.
So, pedals that are Pandora’s boxes of weirdness appeal to me. My two current favorites are my Mantic Flex Pro, a series of filter controls linked to a low-frequency oscillator, and my Pigtronix Mothership 2, a stompbox analog synth. But the Time Shadows II Subharmonic Multi-Delay Resonator is threatening their favored status—or at least demanding a third chair. This collaboration between Death By Audio and EarthQuaker Devices is a wonderful, gnarly little box of noise and fun that—unlike the two pedals I just mentioned—is easy to dial in and adjust on the fly, creating appealing and odd sounds at every turn.
Behind the Wall of Sound
Unlike the Mantic Flex Pro, the Time Shadows is consistent. You can plug the Mantic into the same rig, and that rig into the same outlet, every day, and there are going to be slight—or big—differences in the sound. Those differences are even less predictable on different stages and in different rooms. The Time Shadows, besides its operating consistency, has six user-programmable presets. They write with a single touch of the button in the center of the device’s tough, aluminum 4 3/4" x 2 1/2" x 2 1/4" shell. Inside that shell live ghosts, wind, and unicorns that blow raspberries on cue and more or less on key. EQD and DBA explain these “presences” differently, relating that the Time Shadow’s circuitry combines three delay voices (EQD, II, and DBA) with filters, fuzz, phasing, shimmer, swell, and subharmonics. There’s also an input for an expression pedal, which is great for making the Time Shadows’ more radical sounds voice-like and lending dynamic control. But sustaining a tone sweeping the time, span, and filter dials manually is rewarding on its own, producing a Strickfaden lab’s worth of swirling, sweeping, and dipping sounds.
Guitar Tone from Roswell
Because of the wide variety of sounds, swirls, and shimmers the Time Shadows produces, I found it best to play through a pair of combos in stereo, so the full range of, say, high notes cascading downwards and dropping pitch as they repeat, could be appreciated in their full dimensionality. (That happens in DBA mode, with the time and span at 10 and 4 o’clock respectively, with the filter also at 4, and it’s magical.) The pedal also stands up well to fuzz and overdrives whether paired with humbucker, P-90, or single-coil guitars.
I loved all three modes, but the more radical EQD and DBA positions are especially excellent. The EQD side piles dirt on the incoming signal, adds sub-octave shimmer, and is delayed just before hitting the filters. Keeping the filter function low lends alligator growls to sustained barre chords, and single notes transform into orchestral strings or brass turf, with a soft attack. Pushing the span dial high creates kaleidoscopes of sound. The Death By Audio mode really hones in on the pedal’s delay characteristics, creating crisp repeats and clean sounds with a little less midrange in the filtering, but lending the ability to cut through a mix at volume. The II mode is comparatively clean, and the filter control becomes a mix dial for the delayed signal.
The Verdict
The closest delay I’ve found comparable to the Time Shadows is Red Panda’s function-rich Particle 2 granular delay and pitch-shifter, which also uses filtering, among other tricks. But that pedal has a very deep menu of functions, with a larger learning curve. If you like to expect the unexpected, and you want it now, the Time Shadows supports crafting a wide variety of cool, surprising sounds fast. And that’s fun. The challenge will be working the Time Shadows’ cascading aural whirlpools and dinosaur choirs into song arrangements, but I heard how the pedal could be used to create unique, wonderful pads or bellicose solos after just a few minutes of playing. If you’d like to easily sidestep the ordinary, you might find spelunking the Time Shadows’ cavernous possibilities worthwhile.
This little pedal offers three voices—analog, tape, and digital—and faithfully replicates the highlights of all three, with minimal drawbacks.
Faithful replications of analog and tape delays. Straightforward design.
Digital voice can feel sterile.
$119
Fishman EchoBack Mini Delay
fishman.com
As someone who was primarily an acoustic guitarist for the first 16 out of 17 years that I’ve been playing, I’m relatively new to the pedal game. That’s not saying I’m new to effects—I’ve employed a squadron of them generously on acoustic tracks in post-production, but rarely in performance. But I’m discovering that a pedalboard, particularly for my acoustic, offers the amenities and comforts of the hobbit hole I dream of architecting for myself one day in the distant future.
But by gosh, if delay—and its sister effect, reverb—haven’t always been perfect for the music I like to write and play. Which brings us to the Fishman EchoBack Mini Delay. The EchoBack, along with the standard delay controls of level, time, and repeats—as well as a tap tempo—has a toggle to alternate between analog, tape, and digital-delay voices.
I hooked up my Washburn Bella Tono Elegante to my Blues Junior to give the EchoBack a test run. We love a medium delay—my usual preference for delay settings is to have both level and repeats at 1 o’clock, and time at 11 o’clock. With the analog voice switched on, I heard some pillowy warmth in the processed signal, as well as a familiar degradation with each repeat—until their wake gave way to a gentle, distant, crinkly ticking. Staying on analog and adjusting delay time down to 8 o’clock and repeats to about 11:30, some cozy slapback enveloped my rendition of Johnny Marr’s part to “Back to the Old House,” conjuring up thoughts of Elvis trapped in a small chamber, but in a good way. It sounded indubitably authentic. The one drawback of analog delay for me, generally, is that its roundness can feel a bit under water at times.
Switching over to tape, that pillowy warmth evaporated, and in its place came a very clear replication of my tone—but with just a bit of the highs shaved off the top. With the settings at the medium-length mode listed above, I could see the empty, glass hall the pedal sent my sound bouncing down. I heard several pronounced pings of repeats before the signal fully faded out. On slapback settings (time at 8 o’clock, repeats at 11:30), rather than Elvis, I heard something more along the lines of a honky-tonk mic in a glass bottle. Still relatively crystalline, which actually was not my favorite. I like a bit more crinkle—so maybe analog is my bag....“That pillowy warmth evaporated, and in its place came a very clear, pristine replication of my tone—but with just a bit of the highs shaved off the top.”
Next up, digital. Here we have the brightest voice, and as expected, the most faithful repeats. They ping just a few times before shifting to a smooth, single undulating wave. When putting its slapback hat on, I found that the effect was a bit less alluring than I’d observed for the analog and tape voices. This is where the digital delay felt a little too sterile, with the cleanly preserved signal feeling a bit unnatural.
All in all, I dig the EchoBack for its replications of analog and tape voices, and ultimately, lean towards tape. While it’s nice having the digital delay there as an option, it feels a bit too clean when meddling with time of any given length. Nonetheless, this is surely a handy stomp for any acoustic player looking to venture into the land of live effects, or for those who are already there.
A silicon Fuzz Face-inspired scorcher.
Hot silicon Fuzz Face tones with dimension and character. Sturdy build. Better clean tones than many silicon Fuzz Face clones.
Like all silicon Fuzz Faces, lacks dynamic potential relative to germanium versions.
$229
JAM Fuzz Phrase Si
jampedals.com
Everyone has records and artists they indelibly associate with a specific stompbox. But if the subject is the silicon Fuzz Face, my first thought is always of David Gilmour and the Pink Floyd: Live at Pompeii film. What you hear in Live at Pompeii is probably shaped by a little studio sweetening. Even still, the fuzz you hear in “Echoes” and “Careful With That Axe, Eugene”—well, that is how a fuzz blaring through a wall of WEM cabinets in an ancient amphitheater should sound, like the sky shredded by the wail of banshees. I don’t go for sounds of such epic scale much lately, but the sound of Gilmour shaking those Roman columns remains my gold standard for hugeness.
JAM’s Fuzz Phrase Fuzz Face homage is well-known to collectors in its now very expensive and discontinued germanium version, but this silicon variation is a ripper. If you love Gilmour’s sustaining, wailing buzzsaw tone in Pompeii, you’ll dig this big time. But its ’66 acid-punk tones are killer, too, especially if you get resourceful with guitar volume and tone. And while it can’t match its germanium-transistor-equipped equivalent for dynamic response to guitar volume and tone settings or picking intensity, it does not have to operate full-tilt to sound cool. There are plenty of overdriven and near-clean tones you can get without ever touching the pedal itself.
Great Grape! It’s Purple JAM, Man!
Like any Fuzz Face-style stomp worth its fizz, the Fuzz Phrase Si is silly simple. The gain knob generally sounds best at maximum, though mellower settings make clean sounds easier to source. The output volume control ranges to speaker-busting zones. But there’s also a cool internal bias trimmer that can summon thicker or thin and raspy variations on the basic voice, which opens up the possibility of exploring more perverse fuzz textures. The Fuzz Phrase Si’s pedal-to-the-metal tones—with guitar volume and pedal gain wide open—bridge the gap between mid-’60s buzz and more contemporary-sounding silicon fuzzes like the Big Muff. And guitar volume attenuation summons many different personalities from the Fuzz Phrase Si—from vintage garage-psych tones with more note articulation and less sustain (great for sharp, punctuated riffs) as well as thick overdrive sounds.
If you’re curious about Fuzz Face-style circuits because of the dynamic response in germanium versions, the Fuzz Phrase Si performs better in this respect than many other silicon variations, though it won’t match the responsiveness of a good germanium incarnation. For starters, the travel you have to cover with a guitar volume knob to get tones approaching “clean” (a very relative term here) is significantly greater than that required by a good germanium Fuzz Face clone, which will clean up with very slight guitar volume adjustments. This makes precise gain management with guitar controls harder. And in situations where you have to move fast, you may be inclined to just switch the pedal off rather than attempt a dirty-to-clean shift with the guitar volume.
“The best clean-ish tones come via humbuckers and a high-headroom amp with not too much midrange, which makes a PAF-and-black-panel-Fender combination a great fit.”
The best clean-ish tones come via humbuckers and a high-headroom amp with not too much midrange, which makes a PAF-and-black-panel-Fender combination a great fit if you’re out to extract maximum dirty-to-clean range. You don’t need to attenuate your guitar volume as much with the PAF/black-panel tandem, and you can get pretty close to bypassed tone if you reduce picking intensity and/or switch from flatpick to fingers and nails. Single-coil pickups make such maneuvers more difficult. They tend to get thin in a less-than-ideal way before they shake the dirt, and they’re less responsive to the touch dynamics that yield so much range with PAFs. If you’re less interested in thick, clean tones, though, single-coils are a killer match for the Fuzz Phrase Si, yielding Yardbirds-y rasp, quirky lo-fi fuzz, and dirty overdrive that illuminates chord detail without sacrificing attitude. Pompeii tones are readily attainable via a Stratocaster and a high-headroom Fender amp, too, when you maximize guitar volume and pedal gain. And with British-style amps those same sounds turn feral and screaming, evoking Jimi’s nastiest.
The Verdict
Like every JAM pedal I’ve ever touched, the JAM Fuzz Phrase Si is built with care that makes the $229 price palatable. Cheaper silicon Fuzz Face clones may be easy to come by, but I’m hard-pressed to think they’ll last as long or as well as the Greece-made Fuzz Phrase Si. Like any silicon Fuzz Face-inspired design, what you gain in heat, you trade in dynamics. But the Si makes the best of this trade, opening a path to near-clean tones and many in-between gain textures, particularly if you put PAFs and a scooped black-panel Fender amp in the mix. And if streamlining is on your agenda, this fuzz’s combination of simplicity, swagger, and style means paring down pedals and controls doesn’t mean less fun.