
Fig. 1 — The L.R. Baggs M1 Active is one of several modern magnetic soundhole pickups that offer handy features and superior performance compared to older designs.
Magnetic soundhole pickups have come a long way since they were introduced many decades ago. If you’re considering getting one, here’s how to install it the right way.
A magnetic soundhole pickup makes a nice alternative to installing an under-saddle pickup in your acoustic guitar. Today’s soundhole pickups perform and sound much better than in decades past, so if you’ve written them off based on their old rep, it’s worth keeping an open mind and doing some research on modern options.
One of my clients wanted a pickup installed in his 2004 Martin D-28 that would not acoustically change its tone. Since under-saddle pickups can and do affect a guitar’s acoustic properties, I suggested a soundhole pickup.
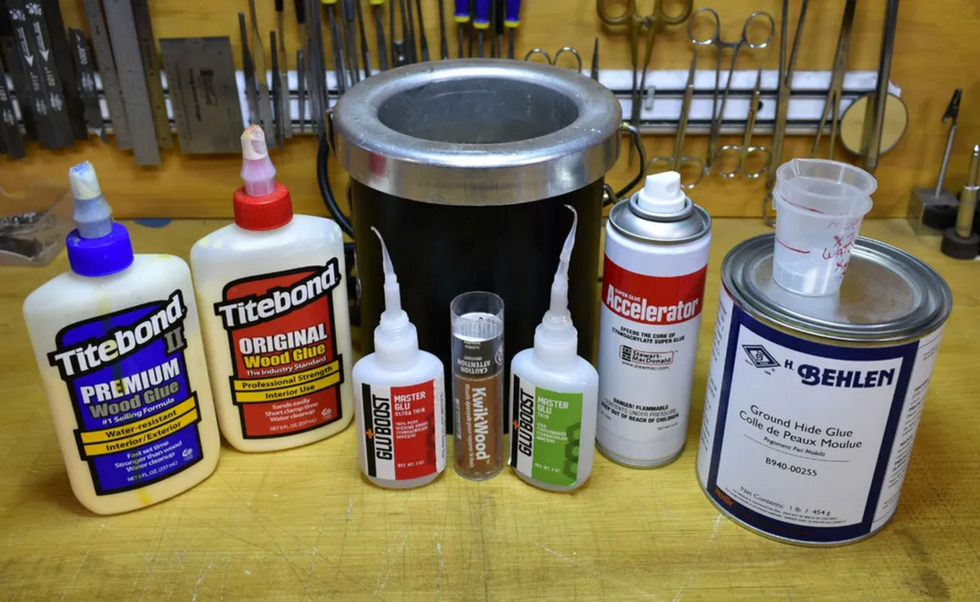
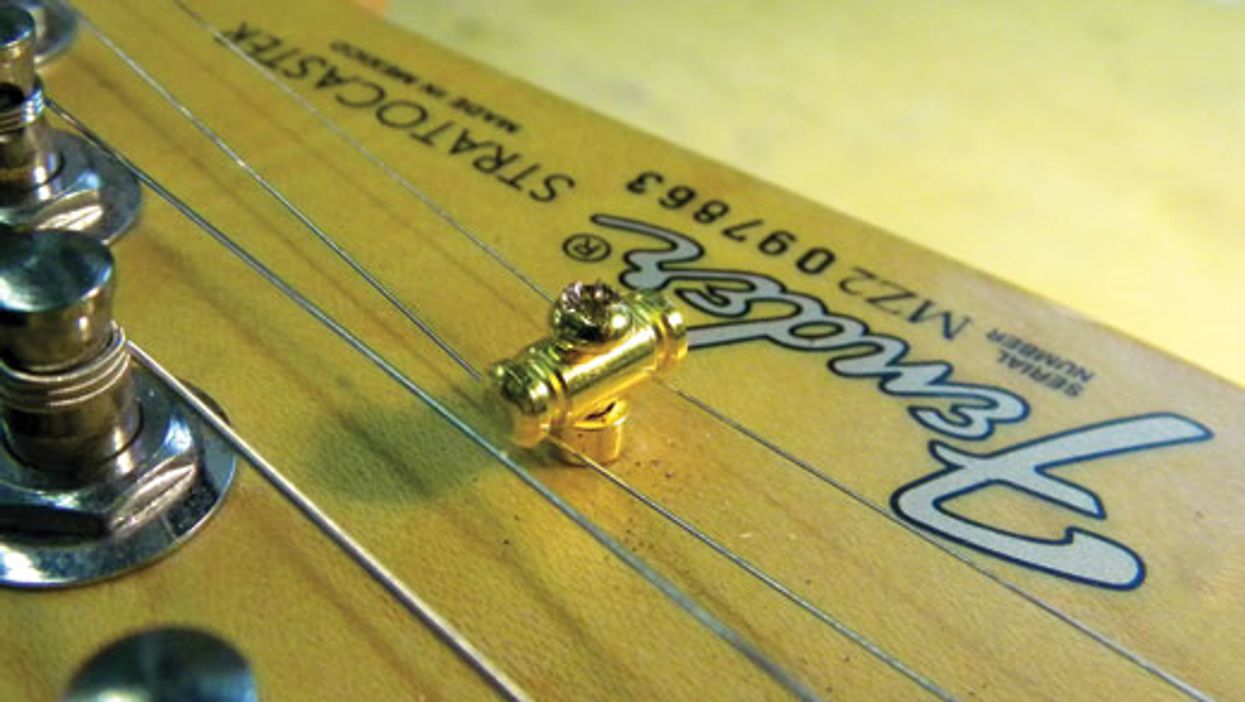
After discussing different models, we decided on a L.R. Baggs M1 Active pickup (Fig. 1). Because the M1 has a built-in preamp, you can plug your guitar directly into a P.A. or acoustic amp and control your level with an onboard volume dial. Powered by a lithium watch battery, the M1 Active is a dual-coil humbucker designed so that one coil senses the strings and the other responds to the guitar’s physical resonance. Six adjustable pole pieces let you balance the output of each string—a handy feature that’s lacking in many older soundhole pickups.
Tip: Before you purchase a pickup, measure your guitar’s soundhole and check the manufacturer’s specs to confirm that the pickup fits your guitar. Soundholes are typically 4" in diameter, but they can vary.
My client wanted to use an endpin jack. To install it, I knew I’d first need to bore out the endpin hole. This operation has to be done carefully, so let’s look at each step. (While these instructions specifically reference the Baggs pickup, the procedure for installing other soundhole pickups is essentially the same.)
Removing the endpin.
Fig. 2
Because this D-28 had its original endpin, I began by removing it from the body. In most cases, you can simply twist the endpin out with your fingers (Fig. 2). But if the endpin is glued in, you may have to carefully use a pair of pliers to remove it. In extreme cases, you might have to cut off the endpin flush to the body and use a drill bit to remove the remaining section. Luckily, the endpin on this D-28 came out easily, so I didn’t have to use pliers or a drill.
Reaming the endpin hole.
Now I was ready to bore out the hole to accommodate the endpin jack that comes prewired to the M1 Active harness. I used an endpin jack reamer from Stewart-MacDonald (stewmac.com). This tapered tool attaches to a drill and has a stepped ream configuration that provides a very clean, precise bore. It will bore a hole from 15/32" up to 1/2" in diameter.
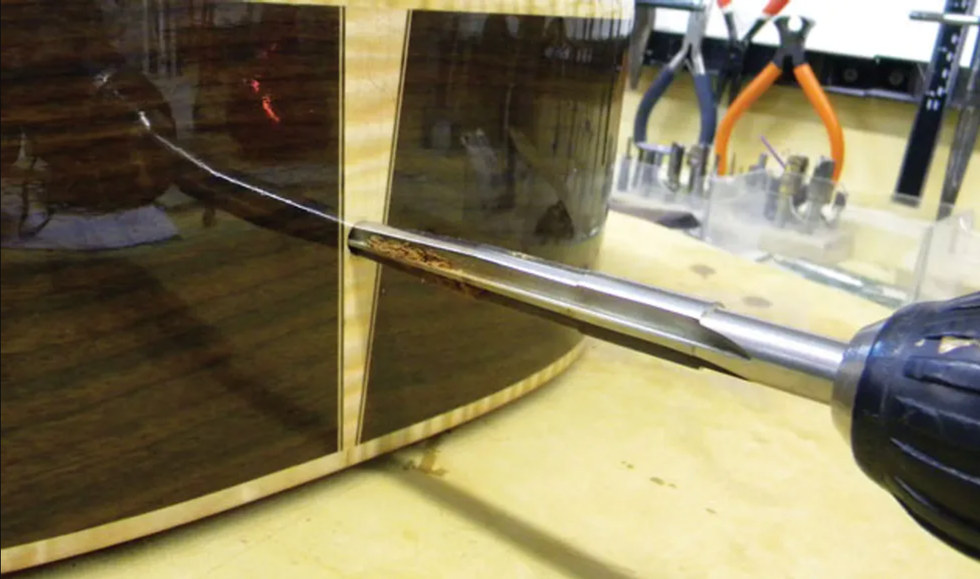
Fig. 3 — Using an endpin jack reamer from Stewart-MacDonald (stewmac.com) to enlarge the endpin hole.
In the past, guitar techs would use a spade bit and hope the hole was symmetrical and didn’t tear up the finish. Spade bits can slip and cause damage, and it’s difficult to keep them perfectly straight as you drill, so the endpin hole can end up crooked. With this reamer, you don’t have to worry about damaging the finish or tearing up wood around the hole. Also it’s easy to keep the reamer straight as you slowly drill (Fig. 3), so the hole ends up clean and accurate. This is the best tool I’ve found for this type of project.
After reaming the endpin hole, vacuum out any sawdust and debris from inside the guitar. It’s always good to keep the guitar’s interior clean.
Installing the endpin jack.
Before you install an endpin jack like this one, be sure to test the hole to be sure the jack fits correctly. The jack should be snug, but not so tight that you have to force it into the hole. If the hole feels too small, ream it out a bit more. Be patient and go slowly—never be in a hurry when drilling holes into a guitar!
Fig. 4 — Install the rear nut and lock washer before mounting the jack from inside the body.
The next step is to install the rear nut and lock washer (Fig. 4) before mounting the jack into the hole from inside the body. To help with this tricky operation, insert a Phillip’s head screwdriver through the hole from the outside to help guide the jack into place. Slide the jack along the screwdriver shank until you can grab the jack from the outside and pull it into place.
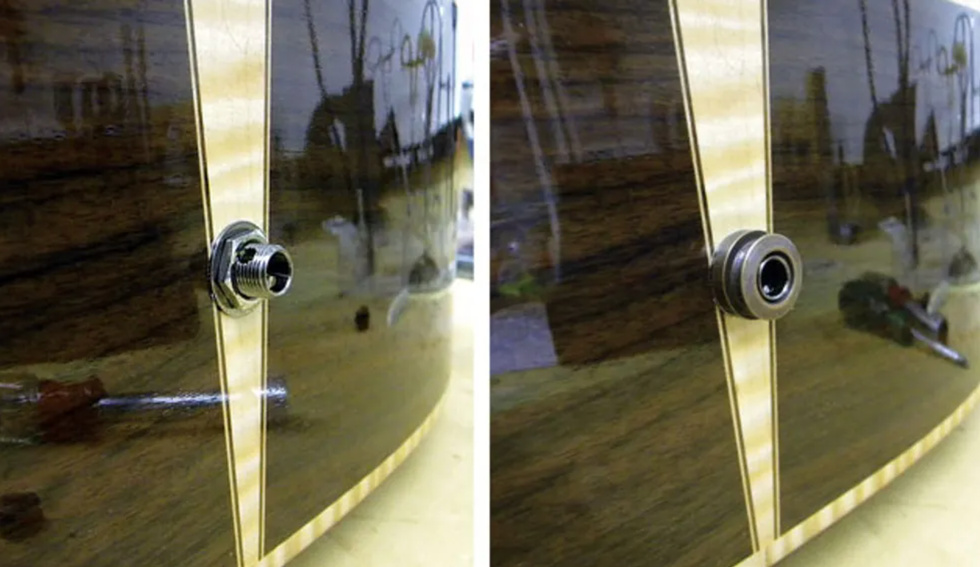
Fig. 5 — (left) After adding the external washer and nut, check the available threads as the jack protrudes out of the endpin hole. Will they accommodate the screw-on strap-button collar? Fig. 6. (right) The strap-button collar should be flush with the end of the jack.
Once it’s in place, check how much of the jack protrudes from the hole. Add the external washer and nut (Fig. 5), and then make sure there are enough accessible threads to grip the screw-on strap-button collar. It should be flush with the end of the jack (Fig. 6).
With the external washer, nut, and strap-button collar installed, the jack should be tight and not wiggle. If the jack is still loose, reach inside the guitar, remove the jack, and add a few turns to the interior nut and lock washer. Once the jack lines up correctly and is flush to the strap-button collar, remove the collar and tighten the outer nut. Finally, reinstall the collar.
I don’t recommend adding any glue or adhesive to the threads. This can cause a lot of damage and aggravation if you need to replace the endpin jack. This type of jack is designed to be tightened and loosened from the outside of the guitar. Adding adhesive interferes with the process and can cause problems down the road.
Installing the soundhole pickup.
Fig. 7 — The endpin jack comes prewired to a harness that plugs into the M1-Active.
Before mounting the M1 Active, I inserted the 3.5mm plug at the other end of the endpin jack harness into the pickup’s output jack (Fig. 7).
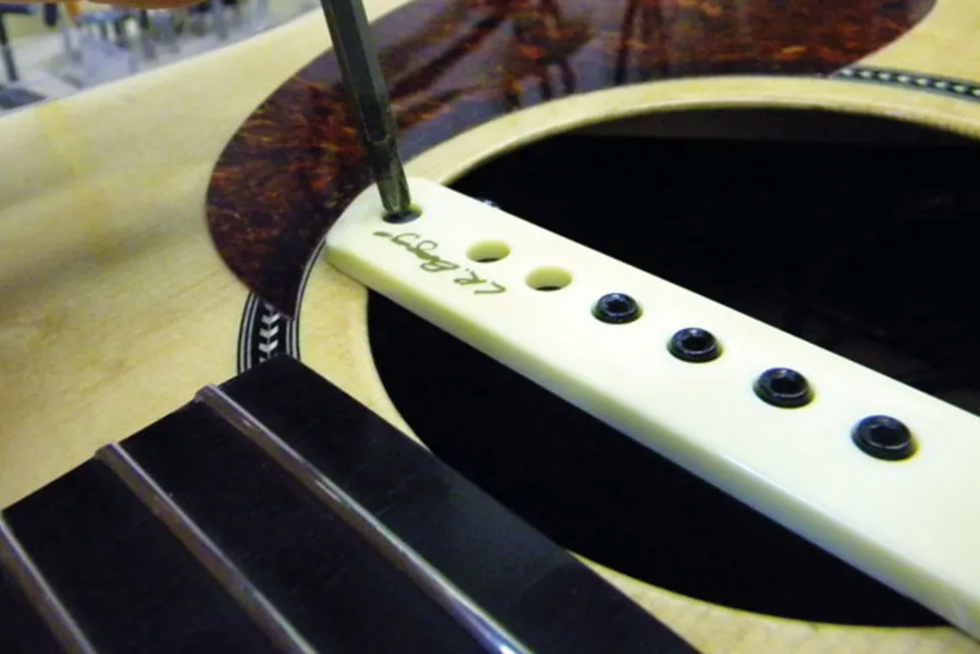
Fig. 8 — Gently tighten the pickup mounting brackets until they’re snug. Don’t overdo it!
Two brackets on either side of the pickup secure it in the soundhole. To make it easier to slide the pickup into the soundhole without damaging the finish, I loosened these brackets by turning their screws counterclockwise. After positioning the pickup in the soundhole—advanced slightly toward the neck—I gently tightened the brackets until they were snug (Fig. 8).
Tip: When you install a magnetic soundhole pickup, double-check that it’s truly secure. You don’t want it to fall into the body while you’re performing. That said, to avoid marring the finish or crushing the soundhole wood, don’t overtighten the mounting brackets.
Adjusting the pole pieces.
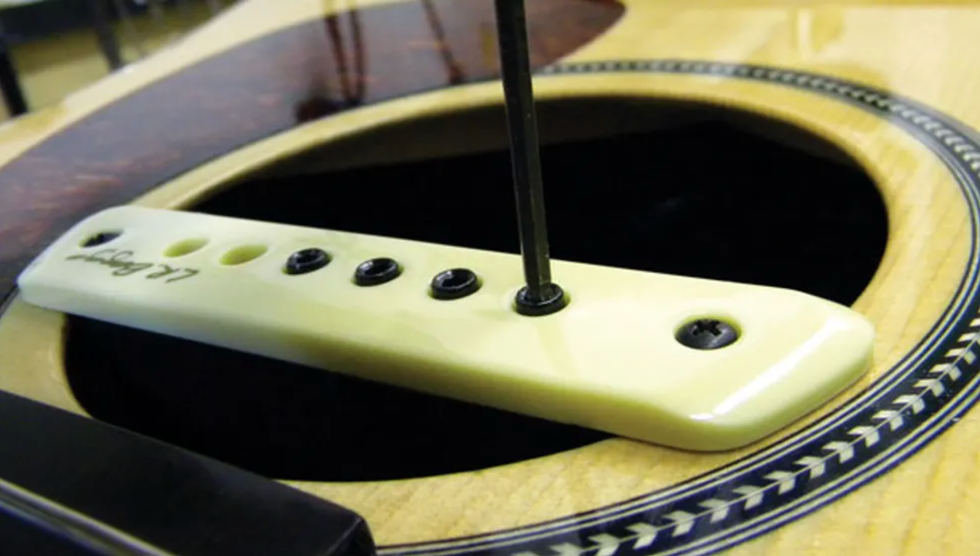
Fig. 9 — Adjusting the pole pieces with a hex wrench.
This is the last step, one that lets you tweak a modern mag pickup to your playing style—something you can’t really do with an under-saddle pickup.
The M1 Active typically ships with the 2nd-string pole piece removed, but included in the packaging. (This is because the B string tends to be much louder than the rest.) I recommend not installing it unless you really need it to balance the volume. The rest of the pole pieces are easy to adjust using the included 3/32" hex key.
First, make sure that the volume control is turned up all the way. To adjust the volume for each string, simply turn your hex key clockwise to lower the pole piece or turn your hex key counter-clockwise to raise it. Only raise the pole pieces a little at a time, and then test the volume by playing through an amplifier. It’s not necessary to raise them a lot—only about one full turn.
I usually lower the 6th-string pole piece flush to the top of the pickup, then adjust the rest of them to match sonically (not physically). You’ll probably find that the pole piece for the 3rd string is closest to the strings. Once all the strings have equal volume, you’re ready to perform or record with your new soundhole pickup.
[Updated 2/16/22]
- Acoustic Amplification: The Newbie's Guide - Premier Guitar ›
- Tools for the Task: Soundhole Pickups - Premier Guitar ›
- The 411 on Acoustic Guitar DIs - Premier Guitar ›
- Guitar Shop 101: How to Install Standard and Locking Strap Buttons - Premier Guitar ›
- 10 Guitar Soundhole Pickups for All Styles ›
- Get Your Perfect Acoustic Tone: Which Pickup Type Is Right For You? - Premier Guitar ›
Columnist Janek Gwizdala with heroes Dennis Chambers (left) and Mike Stern (right).
Keeping your gigging commitments can be tough, especially when faced with a call from a hero. But it’s always the right choice.
Saying “yes!” to everything early on has put me in a place now where I can say no to almost everything and still be okay. That wasn’t without its challenges. I’d like to share a story about a “yes” that would haunt me for years.
As bass players, we can, if we choose, quite easily find ourselves in a wide variety of situations without having to change much about our sound or our playing. If your time is good and you’re able to help those around you feel good and sound better, the telephone will pretty much always ring.
Playing jazz as an electric-bass player living in New York City from 2000 to 2010 was somewhat of a fool’s errand in terms of getting work. No one wanted electric bass, and bandleaders would go to the bottom of a list of 100 upright players before they would even think about calling you. Not only that, but I wasn’t even at the top of the electric list when I first moved there. Not even close. Anthony Jackson, Richard Bona, Will Lee, Tim Lefebvre, James Genus, Lincoln Goines, Mike Pope, John Benitez, Matthew Garrison—that’s a who’s who of the instrument when I first moved to town, and I was very much a freshman with almost no experience. Almost…
I’d been lucky enough to play extensively with Kenwood Dennard (Jaco’s drummer), and a little with Hiram Bullock (Jaco’s guitarist) before moving to NYC which helped create a little momentum, but only a VERY little.
This is where the story begins:
I’d sent Mike Stern a demo back in late ’97. He’d not only taken the time to listen to it but had called my parents’ house right after I moved to the U.S. to tell me he loved it and wanted to hang. I missed the call but eventually met him at a clinic he gave at Berklee.
Of course, I was buzzing about all of this. It helped me stay laser-focused on practice and on moving to NYC as soon as possible. I got the typical “look me up when you get to town” invitation from Stern and basically counted the seconds through the three semesters I stayed at Berklee until I could split town.
I arrived with a ton of confidence but zero gigs. And nothing happened overnight. It really took saying yes to literally everything I was offered just to keep a roof over my head. Through that process, I felt like I was getting further away from playing with my jazz heroes.
The early gigs were far from glamorous—long hours, terrible pay, and sometimes, after travel expenses, they cost me money to play.
“Whenever I have a single moment of doubt, I think about the time I had to say no to my heroes—the reasons I moved to America, the reason I do what I do.”
When Stern finally called, a few years into living in NYC, things started to move pretty quickly. I began playing a lot of gigs at the 55 Bar with him, and short road trips became a thing—a four-night stint at Arturo Sandoval’s new club in Miami, gigs in Chicago, Cleveland, and upstate New York, and then some international work, including a tour of Mexico and a trip to Brazil, if I remember right.
But the hardest phone call of my career came from Mike not long into my time touring with him. It went something like this:
“Hey man, what’s your scene in April? Lincoln can’t make a trip to the West Coast. It’s just one gig. Trio… with DENNIS CHAMBERS.”
Mike didn’t shout Dennis’ name, but that’s how I heard it. My all-time hero. Someone I’d been dreaming about playing with for over 15 years. And here’s the kicker: I had to say no.
I’d just committed to six weeks with Jojo Mayer’s band Nerve in Asia and Europe, and there was no way I could bail on him. And there was no way I could afford to ditch six weeks of work for a single gig with Mike. To say that haunted me for years is an understatement. I was destroyed that I had to turn it down.
The tour with Jojo was amazing—the posters hang in my studio as a reminder of those times to this day. And thankfully, I was able to go on some years later and play dozens of shows with Mike and Dennis all over the world—truly some of the highlights of my career.
I still think about that phone call, though. Whenever I have a single moment of doubt, I think about the time I had to say no to my heroes—the reasons I moved to America, the reason I do what I do. I get emotional writing and thinking about it even now. But I've learned to never have regrets and understand you just have to believe in the process and maintain the willpower to continue—no matter what.
New RAT Sound Solution Offers a Refined Evolution of Distortion
ACT Entertainment ’s iconic RAT brand has unveiledthe Sterling Vermin, a boutique distortion guitar pedal that blends heritage tone with modernrefinement. With a new take on RAT’s unmistakable sound, Sterling Vermin delivers a new levelof precision and versatility.
“The Sterling Vermin was born from a desire for something different — something refined, withthe soul of a traditional RAT pedal, but with a voice all its own,” says Shawn Wells, MarketManager—Sound, ACT Entertainment, who designed the pedal along with his colleague MattGates. “Built in small batches and hand-soldered in ACT’s Jackson, Missouri headquarters, theSterling Vermin is a work of pure beauty that honors the brand legacy while taking a bold stepforward for creativity.”
The Sterling Vermin features the LM741 Op-Amp and a pair of selectable clipping diodes.Players can toggle between the traditional RAT silicon diode configuration for a punchy, mid-range bite, or the BAT41 option for a smoother, more balanced response. The result is a pedalthat’s equally at home delivering snarling distortion or articulate, low-gain overdrive, with a wide,usable tonal range throughout the entire gain spectrum.
The pedal also features CTS pots and oversized knobs for even, responsive control that affordsa satisfying smoothness to the rotation, with just the right amount of tension. Additionally, thepolished stainless-steel enclosure with laser-annealed graphics showcases the merging of thepedal’s vintage flavor and striking design.
“From low-gain tones reminiscent of a Klon or Bluesbreaker, to high-gain settings that flirt withBig Muff territory — yet stay tight and controlled — the Sterling Vermin is a masterclass indynamic distortion,” says Gates, an ACT Entertainment Sales Representative. “With premiumcomponents, deliberate design and a focus on feel, the Sterling Vermin is more than a pedal, it’sa new chapter for RAT.”
The RAT Sterling Vermin is available immediately and retails for $349 USD. For moreinformation about this solution, visit: actentertainment.com/rat-distortion .
The Miku was introduced about 10 years ago and is based on the vocal stylings of Hatsune Miku, a virtual pop icon. But it does much more than artificial vowels and high-pitched words.
It’s tempting to think of this pedal as a joke. Don’t.
It all started a few years ago through a trade with a friend. I just wanted to help him out—he really wanted to get a fuzz pedal but didn’t have enough cash, so he offered up the Korg Miku. I had no idea then, but it turned out to be the best trade I’ve ever made.
Here’s the truth: the Korg Miku is not your typical guitar pedal. It won’t boost your mids, sculpt your gain, or serve up that warm, buttery overdrive you’ve always worshipped. Nope. This little box does something entirely different: It sings! Yes, sings in a Japanese kawaii accent that’s based on the signature voice of virtual pop icon Hatsune Miku.
At first glance, it’s tempting to dismiss this pedal as just a gimmick—a joke, a collector’s oddity, the kind of thing you buy for fun and then forget next to your Hello Kitty Strat. But here’s the twist: Some take it seriously and I’m one of those people.
I play in a punk band called Cakrux, and lately I’ve been working with a member of a Japanese idol-style girl group—yeah, it’s exactly the kind of wild mashup you’d ever imagine. Somewhere in the middle of that chaos, the Miku found its way into my setup, and weirdly enough, it stuck. It’s quirky, beautiful, occasionally maddening, and somehow … just right. After plenty of time spent in rehearsals, studio takes, and more sonic experiments than I care to admit, I’ve come to appreciate this pedal in unexpected ways. So here are a few things you probably didn’t know about this delightfully strange little box.
It’s Not Organic—and That’s OK
Most guitar pedals are chasing something real. Wah pedals mimic the human voice—or even a trumpet. Tube Screamers? They’re built to recreate the warm push of an overdriven tube amp. Cab sims aim to replicate the tone of real-world speaker setups. But the Miku? It breaks the mold. Instead of emulating reality, it channels the voice of a fictional pop icon. Hatsune Miku isn’t a person—she’s a vocaloid, a fully digital creation made of samples and synthesis. The Miku doesn’t try to sound organic, it tries to sound like her. In that sense, it might be the only pedal trying to reproduce something that never existed in the physical world. And honestly, there’s something oddly poetic about that.
A World-Class Buffer
Here’s a fun fact: I once saw a big-name Indonesian session guitarist—you know, the kind who plays in sold-out arenas—with a Miku pedal on his board. I was like, “No way this guy’s busting out vocaloid lines mid-solo.” Plot twist: He only uses it for the buffer. Yep, the man swears by it and says it’s the best-sounding buffer he’s ever plugged into. I laughed … until I tried it. And honestly? He’s not wrong. Even if you never hear Miku sing a note, this pedal still deserves a spot on your board. Just for the tone mojo alone. Wild, right?
“The Miku is one of those pedals that really shouldn’t work for your music, but somehow, it just does.”
Impossible to Tame
Most pedals are built to make your life easier. The Miku? Not so much. This thing demands patience—and maybe a little spiritual surrender. First off, the tracking can be finicky, especially if you’re using low-output pickups. Latency becomes really noticeable and your picking dynamics suddenly matter a lot more. Then there’s the golden rule I learned the hard way. Never—ever—put anything before the Miku. No fuzz, no wah, no compressor, not even a buffer! It gets confused instantly and says “What is going on here?” And don’t even think about punching in while recording. The vocal results are so unpredictable, you’ll never get the same sound twice. Mess up halfway? You’re starting from scratch. Same setup, same take, same chaotic energy. It’s like trying to recreate a fever dream. Good luck with that.
Full Range = Full Power
Sure, it’s made for guitar, but the Miku really comes to life when you run it through a keyboard amp, bass cab, or even a full-range speaker. Why? Because her voice covers way more frequency range than a regular guitar speaker can handle. Plug it into a PA system or a bass rig, and everything sounds clearer, richer, way more expressive. It’s like letting Hatsune Miku out of her cage.
The Miku is one of those pedals that really shouldn't work for your music, but somehow, it just does. Is it the best pedal out there? Nah. Is it practical? Not by a long shot. But every time I plug it in, I can’t help but smile. It’s unpredictable, a little wild, and it feels like you’re jamming in the middle of a bizarre Isekai anime scene. And honestly, that’s what makes it fun.
This thing used to go for less than $100. Now? It’s fetching many times that. Is it worth the price? That’s up to you. But for me, the Korg Miku isn’t just another pedal—it’s a strange, delightful journey I’m glad I didn’t skip. No regrets here.
Two guitars, two amps, and two people is all it takes to bring the noise.
The day before they played the coveted Blue Room at Third Man Records in Nashville, the Washington, D.C.-based garage-punk duo Teen Mortgage released their debut record, Devil Ultrasonic Dream. Not a bad couple of days for a young band.
PG’s Chris Kies caught up with guitarist and vocalist James Guile at the Blue Room to find out how he builds the band’s bombastic guitar attack.
Brought to you by D’Addario.
Devilish Dunable
Guile has been known to use Telecasters and Gretsches in the past, but this time out he’s sticking with this Dunable Cyclops DE, courtesy of Gwarsenio Hall—aka Jordan Olds of metal-themed comedy talk show Two Minutes to Late Night. Guile digs the Dunable’s lightness on his shoulders, and its balance of high and low frequencies.
Storm Warning
What does Guile like about this Squier Cyclone? Simple: its color. This one is also nice and easy on the back, and Guile picked it up from Atomic Music in Beltsville, Maryland.
Crushing It
Guile also scooped this Music Man 410-HD from Atomic, which he got just for this tour for a pretty sweet deal. It runs alongside an Orange Crush Bass 100 to rumble out the low end.
James Guile’s Pedalboard
The Electro-Harmonix Micro POG and Hiwatt Filter Fuzz MkII run to the Orange, while everything else—a DigiTech Whammy, Pro Co Lil’ RAT, and Death by Audio Echo Dream 2—runs to the Music Man. A TC Helicon Mic Mechanic is on board for vocal assistance, and a TC Electronic PolyTune 3, Morley ABY, and Voodoo Labs Pedal Power 3 Plus keep the ship afloat.