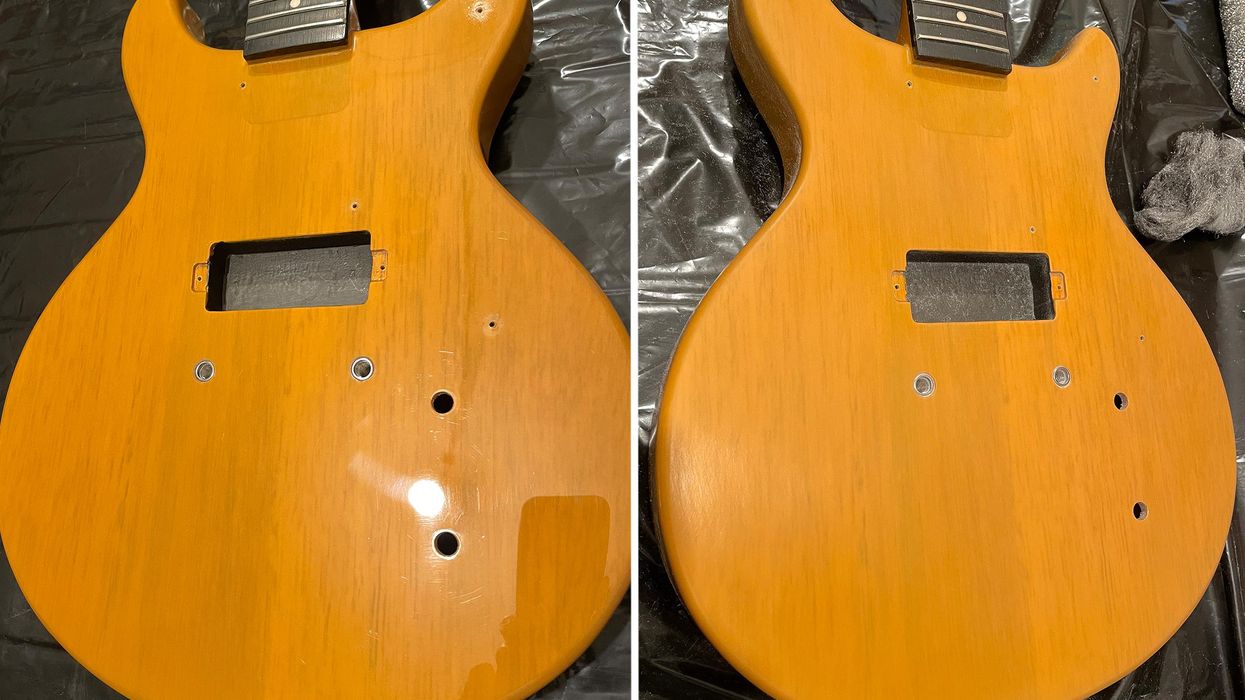
Photo 1 (left) and Photo 2 (right)
A lot of you have been waiting for this penultimate step of our guitar aging project, so let’s do some damage!
Welcome back to Mod Garage. Today we’ll continue to work on our aging project, and some of you might be wondering why there was such a long break. The reason is simple: suboptimal timing from my side. The last part of this column was in the middle of autumn, and I wanted you to do the following steps outside (if possible) and not on the kitchen table. Wintertime is not the best time for such a challenge but now is a good starting point, so let’s go!
We’re almost done with our project, can you believe it? In this installment, we’ll take care of the color, talk about fading, and we’ll crack the lacquer—something a lot of you have been waiting for—before we add some dings and dongs in the last part of this series, which is the final touch before we put it all together again.a
We also have an advice column on aging from my friend and colleague Matthias “Matti” Meyer, from the German-based Bassart Guitars. Matti is one of the best pro agers I know. Please follow his advice and recipe for aging wood at the end of this column—we will need these tools in the next and final part of this project.
Aging the Color
Over time, the colors on guitar bodies start to fade, and depending on the type of color and the paint-job method itself, discolorations can show up. The two main factors are if the guitar was exposed to ultraviolet light and if the paint job is all intact. A famous example is the Gibson Les Paul goldtop guitars with the golden color turning greenish, or the Gibson sunburst Les Pauls losing the red color of the sunburst spray job over time. But Fender guitars also suffer similar problems.
What we want to mimic is an old nitro lacquer, but with our Harley Benton guitar we have two problems:
- The mustard color is not a real TV yellow, as discussed before. TV yellow is much lighter, so even when we find a way to fade the color, it won’t look like a faded TV yellow, but a faded mustard yellow. We can’t change this easily, so we must work with what we have and love it for what it is rather than hating it for what it’s not.
- It’s not nitro lacquer on our Harley Benton but a modern, not-so-thin, ultra-durable poly lacquer. In a technical way, this modern lacquer does a much better job than any vintage nitro stuff regarding protection of the guitar. The downside is that we can’t make poly look like nitro when aging; it will only be an approximation. But again, it is what it is, and we’ll make the best out of it.
If you have the time, exposing the guitar to direct sunlight for some weeks or months will cause a fading of the color to a certain degree. Over the years, I’ve seen the oddest attempts to do such things, including regularly placing the guitar inside a home solarium. Using artificial UV light is also an option but building a well-working construction for such a big object, like a set-neck guitar, is not easy and you’d need a lot of UV lamps for that. Such devices are often used to make yellowed plastic materials look shiny white again. An overspray with the correct color is also an option. but a lighter color on a darker one is always difficult to do—especially with a semi-transparent color like TV yellow. And I doubt it’s worth the time and money. Not everything is doable and this falls into that category. But we’ll do other things to make it look old and cool, so leave the color as it is.
Let’s begin. As usual, grab your steel wool and abrasive cloth to break the shine of the high-gloss lacquer, and don’t forget the backside of the neck. The difference can be seen in Photo 1 (before) and Photo 2 (after).
Aging the Lacquer
This is what a lot of you have been waiting for and today we’ll finally do it: cracking the lacquer!We all know the look of cracked lacquer on vintage guitars, which is part of their special appearance and charm. On vintage guitars this happens over time, the softener disappears, and the paint starts to crack. Here again, facing that our Harley Benton is poly and not nitro-painted, we must follow a different route to get a good result.
Generally, there are two basic methods to do this:
- Mimicking the cracks by using a razor blade to cut the cracks into the paint.
- Using a combination of heat and cold to crack the lacquer.
In both cases this is only the first step. Next, we’ll have to make the cracks more visible, but first things first.
I decided to use the second method: using heat and cold to crack the lacquer. Please note, this will take some time and patience to do it right: It won’t be done in 15 minutes. You don’t need much for this, just a heat gun and several bottles of cooling spray. The process is easy but safety first: Only do this outside, wear gloves and goggles, and place a bucket with cold water or an extinguisher near you … a heat gun gets very hot!
You can’t do this in one step, and you’ll need to work in smaller areas, one by one. Heat up the first area with the heat gun and be careful—you only want to heat up the lacquer and not melt or burn it. If you want to intentionally add some burned spots, a heat gun is the way to go, too. Depending on the type and thickness of the lacquer as well as the power of your heat gun, it can take some time until the lacquer is ready to crack. Start to heat it up from a distance and not with the heat gun directly on the guitar, checking the temperature of the lacquer from time to time with one of your hands. Never put your hand directly under the heat gun! Take the guitar body and your hands away from the gun when you check the temperature. If you feel that it’s not hot enough, keep heating it up until it’s good to go.
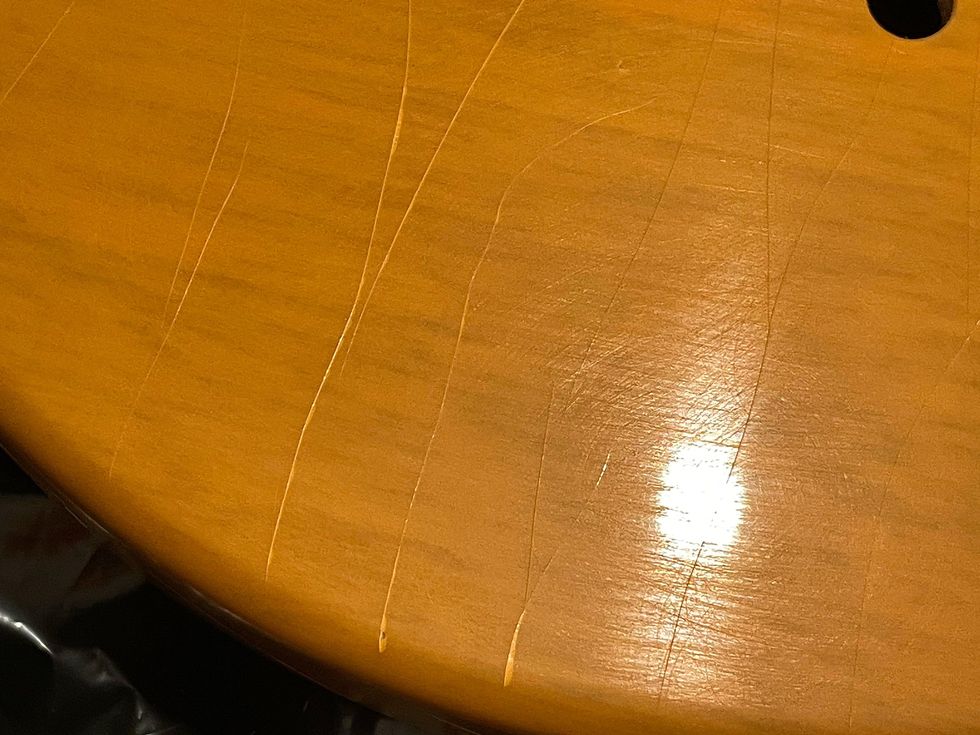
Photo 3
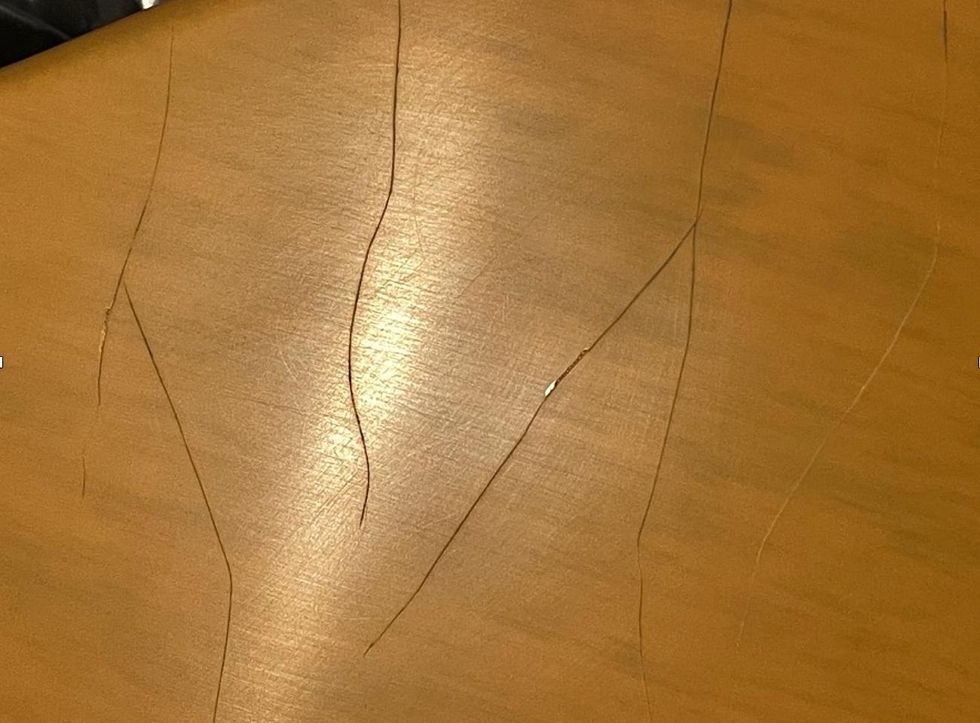
Photo 4
There are no rules set in stone because it depends on the things mentioned above. So, you have to try and see what works on your guitar. If you think the lacquer is hot enough, take away the heat gun and immediately spray the heated area with the cooling spray to create a sudden temperature gradient. You’ll likely have to repeat the process several times until the lacquer starts to crack, and usually you can hear when it cracks, which is a good sign. Work your way all over the guitar and crack it area by area. I needed approximately 90 minutes and four bottles of cooling spray until I was finished (Photo 3).
Does it look the same as cracked nitro lacquer? No, it’s not the same cracking pattern because of two reasons. On a nitro-lacquered guitar, the cracking happens because the softener disappears over time, which is a completely different thing. Poly is hard as glass and will never lose its softener. So, the vintage guitars of the future, let’s say in 100 years from now, will look much different compared to today—no more cracks. The second reason is that only in the middle of the spray is the lowest possible temperature not on the edge of the spray. But it’s the same ballpark, so don’t worry.
After you’re done with the entire guitar, let it cool down for some time before we start to make the cracks more visible. Again, there are different ways to do this. I prefer to use a strong black tea or coffee. Warm up the guitar slightly and dip some paper towels into the black tea or coffee before covering the guitar with them. Let them sit there for some hours before you remove them. The moisture will creep into the cracks, coloring them slightly, so they are more visible. This is a permanent process: The cracks will not lose their color again over time. On poly-lacquered guitars, I’ve also seen and tried alternative methods like using Coca-Cola, potassium permanganate, coffee grounds, stains, and more. The tea/coffee method works great and with good results and is, of course, harmless. But feel free to try other methods if you want to experiment, there’s no law against it.
After removing the paper towels, let it dry for some time before removing any residues from the lacquer using a dampish paper towel. Then, heat up the guitar slightly and let it cool down again. And voila, done! You can see the cracks are now brighter in Photo 4.
Congratulations, we are only one step away from finishing our aging project! Next, we’ll add some dings, dongs, and scratches, which is a lot of fun and a great way to individualize your guitar.
That’s it for now. Next month we’ll do another cool guitar mod, so stay tuned. Until then ... keep on modding!
Teatime: How to Age Wood at Home
Matthias Meyer of Bassart Guitars
Hi PG readers,
Did you ever wonder how it’s possible to add a special gray and dark color to the exposed wood on aged guitars? Here is my recommendation for how to do this with some simple household stuff you already have.
You will need: vinegar essence, water, black tea, steel wool, paper coffee filters, and some jars.
First, twitch a good handful of steel wool and put it in a jar. Next, fill up the jar with vinegar essence, close the jar, and let it sit for one or two days. The reaction of the steel wool and the vinegar will result in iron(II) acetate, which you can use as a dye. Use a cone-shaped paper coffee filter to percolate the liquid into a new jar and you hold the panacea in your hands. By adding some water, you can mitigate the dying effect and it’s easy to make some different aging dyes this way, from very dark to light gray.
Now it’s teatime. Make a strong black tea by using 6 to 8 tea bags in a pot, let it cool down, remove the tea bags, and pour the tea in a new jar.
One way of aging the exposed wood is to use the tea first, immediately followed by the iron(II) acetate (wet on wet technique). For a different effect and color, use the tea first and let it dry before applying the iron(II) acetate. Or use both liquids individually without the other one. It all depends on your personal taste and, of course, the wood itself. Before applying these liquids directly to your precious instruments, you should try to practice the process on some wood scraps you have lying around. Different woods react in very different ways and often the aging process needs one or two days before it becomes visible.
I hope you enjoy experimenting with this process. Cheers!
—Matthias “Matti” Meyer
www.bassartguitars.de
- Last Call: Someday You'll Regret That Relic Job - Premier Guitar ›
- How to Relic Your Guitar Neck Pt. 1 - Premier Guitar ›
- The DIY Relic Job—Fantasy or Reality? - Premier Guitar ›
- The Quick and Dirty Details on Guitar Finishes - Premier Guitar ›
- Can You Really Hear the Difference of Guitar Finishes? - Premier Guitar ›
The series features three distinct models—The Bell,The Dread, and The Parlor—each built to deliver rich, resonant acoustic sound with effortless amplification.
Constructed with solid Sitka spruce tops and solid mahogany back & sides, the Festival Series offers warm, balanced tone with incredible sustain. A Fishman pickup system, paired with hidden volume and tone control knobs inside the sound hole, ensures seamless stage and studio performance.
Grover 16:1 ratio tuners provide superior tuning stability, while D’Addario strings enhance clarity and playability. Each guitar comes with a heavy-padded gig bag, making it a perfect choice for gigging musicians and traveling artists.
Key Features of the Festival Series Guitars:
- Solid Sitka Spruce Top – Provides bright, articulate tone with impressive projection
- Solid Mahogany Back & Sides – Adds warmth and depth for a well-balanced sound
- Fishman Pickup System – Delivers natural, high-fidelity amplified tone
- Hidden Volume & Tone Control Knobs – Discreetly placed inside the sound hole for clean aesthetics
- Grover Tuners (16:1 Ratio) – Ensures precise tuning stability
- D’Addario Strings – Premium strings for enhanced sustain and playability
- Heavy-Padded Gig Bag Included – Provides protection and convenience for musicians on the go
Mooer Prime Minimax M2 Intelligent Pedal boasts 194 effects models, 80 preset slots, MNRS and third-party sample file compatibility, an 80-minute looping module, internal drum machine, high-precision tuner, Bluetooth support, and a rechargeable lithium battery.
Over the last few years, Mooer has released several Prime multi-effects devices, including the Prime P1, P2, S1, and most recently in 2024, the Prime Minimax M1. Excitingly, the company is kicking off 2025 with a brand new addition to the Prime family–the Prime Minimax M2 Intelligent Pedal.
Within this small multi-effects device, a whole lot of functionality is packed in, including an impressive 194 effects models, including overdrive, preamp simulators, cabinet models, delays, reverbs, modulation effects, etc., and more. In typical Mooer style, though, the company took things a step further by offering limitless flexibility through the support of its in-house MNRS sample files, as well as third-party IR sample files. Essentially, this means that users can download additional tonal emulations and effects from the Mooer Cloud and third-party sources to the device, which they can then save across 80 preset slots.
As with some past models in the Prime series, the M2 sports a convenient touchscreen design, facilitating easy browsing through the devices banks of presets. However, guitarists are not limited to interfacing with the pedal in this way, as it also features two footswitches, both of which can be used to switch between presets in each bank. There is even a MIDI jack built into the device, enabling users to connect their MIDI controllers to extend the control functions, and the MOOER F4 wireless footswitch support is also supported. Essentially, these augmentation options facilitate additional footswitches to ensure switching preset tones is always as quick and seamless as possible within any workflow.
While the Prime M2 Intelligent Pedal is primarily designed for effects and tonal simulations, it also comes packed with an array of other useful features. For example, it contains a looping module with a hefty 80-minute capacity, in addition to 10 recording save slots to ensure that any looping creations can be kept for future use in performances. Similar to past looper modules in Mooer's products, users are also free to overdub their recordings and even undo or redo their overdubs, offering a lot of real-time flexibility for creating loop-based musical structures.
As if the addition of a looper wasn’t enough, this feature is also synchronizable with an internal drum machine and metronome, a combination that includes 56 drum grooves and 4 metronome varieties. Ultimately, it’s a reminder that Mooer clearly recognizes and wishes to solve the struggles that musicians have when attempting to produce precise loops while staying in time. Upon commencing recording, the drum machine can produce four initial beats to serve as a count-in cue, and of course, this can be combined with the device's tap-tempo control for dynamic use. Best of all, this feature can also be applied to modulation and delay effects, ensuring that they work perfectly in time with any performance.
Extra features are included to complete this all-in-one pedal, including a high-precision tunerwith fully customizable frequency ranges. Guitarists can even leverage the M2’s built-inBluetooth input support, allowing them to practice, jam, and even produce looped musicalstructures over their favorite backing tracks, band prototypes, and musical pieces.
Perhaps unsurprisingly for existing Mooer product users, the Prime M2 also boasts an impressive variety of audio routing systems. As was previously mentioned, that includes Bluetooth input, as well as industry standards such as dual-channel stereo output, perfect for stereo delay and modulation effects. It also supports headphone output for those who wish to practice in silence, and even OTG recording, which means that guitarists can record their creations directly to their smartphone whilst on the go.
Speaking of on-the-go, Mooer is continuing its recent portable-play focus with the Prime M2Intelligent Pedal, as it is fitted with a built-in rechargeable lithium battery with a battery life of up to 6 hours. Ultimately, this means that even a lack of local power sources won’t get in the way of rehearsals and live performances. Combined with the pedal’s lightweight and small build, it truly is an ideal addition to the pedalboard of any traveling musician.
Overall, the Prime M2 Intelligent Pedal is set to be an impressive new addition to the Prime series. It features augmented functionality when compared to past models, yet still in a minimalist and easy-to-use package, keeping the size small and light yet still packing in footswitches, a touch screen, and other flexible control systems.
Features:
- 194 built-in effect models and tonal emulations
- 80 preset slots for storing downloaded MNRS and third-party sample files
- Compatibility with the MOOER Cloud tone-sharing platform
- Built-in 80-minute looping module
- Record, overdub, pause, delete, and playback functions for looping
- Internal drum machine module, stocked with 56 drum grooves
- 4 unique metronomes
- Synchronization between drum machine and looper
- Convenient count-in cue function support from the metronome
- High-precision and customizable tuner module
- 2 multi-function footswitches
- 1.28-inch touchscreen interface
- LED digital display
- LED charge indicator
- Portable USB/OTG recording
- Direct compatibility with the MOOER prime mobile APP and MOOER Studio desktop software for preset management
- Bluetooth 5.0 audio playback
- 3000mAh integrated lithium battery with up to 6 hours of use time
- DC 5V/2A power supply and charging
- 3 hours charging time
- Low weight of 228g
- Compact, at 74mm (L), 125mm (W), and 49mm (H)
- Sample rate of 44.1kHz
- Bit depth of 24bit
- Compatible with MOOER F4 wireless footswitch
- 3.5mm MIDI port
- Mono TS ¼” input
- Stereo TS ¼” output
- 3.5mm headphone output
- Power switch button
The Prime Minimax M2 Intelligent Pedal will be available from the official distributors or retailersworldwide.
For more information, please visit mooeraudio.com.
Kirk Hammett has partnered with Gibson Publishing to release The Collection: Kirk Hammett, a premium hardcover coffee-table photo book where Kirk tells the stories behind his rare and collectible instruments.
“I am thrilled to announce the launch of The Collection: Kirk Hammett. I’ve worked diligently on this curated collection of vintage and modern guitars for the book. I feel the book captures the rich history and artistry behind each of these unique and rare instruments. Every picture tells a story and thanks to Ross Halfin and his exceptional photography, every picture in this book is worth a million words! This book could not be possible without the help of Gibson, so I’d like to thank them for making my passion for Greeny, and guitars a reality. I hope all of you enjoy this journey as much as I did.”
“It’s exciting the time has come to release The Collection: Kirk Hammett by Gibson,” adds Cesar Gueikian, President and CEO of Gibson. “We have been working on this project with Kirk for years now, and I had the opportunity to work closely with Kirk on the composition of the collection for the book. It was a thrill to put this together and it took a village to get it done! I hope everyone appreciates the work that went into this book and enjoys every story behind the guitars.”
The Collection: Kirk Hammett, Custom Edition is limited to just 300 numbered copies signed by KIRK HAMMETT and comes in a huge 19 x 14.5” (490 x 370mm) presentation box featuring custom artwork and an outstanding case candy package. In addition to the large-format 17 x 12” (432 x 310mm) hardcover version of the book with a stunning lenticular cover, the boxset includes a frameable 16 x 11.6” (407 x 295mm) art print of a Ross Halfin portrait of KIRK HAMMETT signed by both Halfin and the Metallica guitarist. Other case candy includes an Axe Heaven miniature replica of Hammett’s 1979 Gibson Flying V with case and stand, an exclusive pick tin complete with six Dunlop® Kirk Hammett signature Jazz III guitar picks, and a Gibson Publishing Certificate of Authenticity.
Explore The Collection: Kirk Hammett book HERE.
The collection includes Cobalt strings with a Paradigm Core, Tim Henson Signature Classical Strings, and the Tim Henson Signature FretWrap by Gruv Gear.
Engineered for maximum output, clarity, and durability, these strings feature:
- Cobalt with a Paradigm Core (not RPS) for added durability
- Nano-treated for maximum lifespan and corrosion resistance
- Gauges 9.5, 12, 16, 26, 36, 46 (Turbo Slinky set)
- Available individually or as part of the Tim Henson Signature Bundle
Tim Henson Signature Classical Strings
Crafted for dynamic, percussive tonality, these strings pair fluorocarbon trebles with silver-plated copper basses to deliver exceptional response and clarity.
- Gauges: 24, 27, 33, 30, 36, 42
- Available individually or as part of the Tim Henson Signature Bundle
Tim Henson Signature FretWrap by Gruv Gear
An essential string-dampening tool, the Tim Henson Signature FretWrap is designed for cleaner playing by eliminating unwanted overtones and sympathetic vibrations.
- Features Tim Henson’s custom ‘Cherub Logo’ design
- Size Small, fits 4-string basses, 6-string electric/acoustic guitars, and ukuleles
- Ideal for live performance and studio recording
- Ernie Ball collaboration with Gruv Gear
- Available individually or as part of the Tim Henson Signature Bundle
The Ernie Ball Tim Henson Accessory Bundle Kit
For players who want the complete Tim Henson experience, the Ernie Ball Tim HensonSignature Bundle Kit includes:
- Tim Henson Signature Electric Strings (9.5-46)
- Tim Henson Signature Classical Strings (Medium Tension)
- Tim Henson Signature FretWrap by Gruv Gear (Small)
- Tim Henson Signature Cable (Exclusive 10ft white dual-conductor cable, only available in the bundle)
The Tim Henson Signature String & Accessory Collection is available starting today, March 19, 2025, at authorized Ernie Ball dealers worldwide.
For more information, please visit ernieball.com.