We’re almost finished with the aging process on our project guitar. Let’s work on the fretboard, nut, and truss rod cover, and prepare the headstock for the last hurrah.
Hello and welcome back to Mod Garage. This month we’ll continue with our relic’ing project, taking a closer look at the front side of the neck and treating the fretboard and the headstock. We’ll work on the front side of the headstock in the next part, but first we must prepare it.
When we talk about a vintage Gibson fretboard from the ’50s, we’re talking about the mystic Brazilian rosewood (Dalbergia nigra) and its certain look and feel. Our Harley Benton doesn’t have a Brazilian rosewood fretboard. If it did, the fretboard material would cost more than the entire guitar because it’s so rare and limited today. Brazilian rosewood trade is restricted by CITES and almost no guitar companies use it anymore, except for some special custom shops. Other rosewoods or alternative woods are common substitutes.
Our Harley Benton fretboard is amaranth (better known as purpleheart), but sadly it was stained or painted black, giving the guitar a different look that’s closer to ebony rather than rosewood. So, there’s no way to get it brown or make it look like rosewood other than getting a new fretboard installed, which isn’t reasonable. Maybe it’s possible to get the black color out of the wood by using chemicals, but we don’t know what we’d find underneath, either. There could be another surprise waiting for us and all the work would be useless. On a budget guitar like this, we’ll have to live with this fretboard, loving it for what it is rather than hating it for what it’s not. The fretwork is surprisingly good and close to excellent, which is far from the industry standard in this price range.
The fretboard edges of well-played vintage guitars feel comfortable and round because the edges receive pressure from a player’s hand over decades.
But to show you the process of aging a fretboard, I chose a guitar with a rosewood fretboard, so you’ll know how to do this on a guitar with this type of fretboard if you want to. It’s not complicated so here we go.
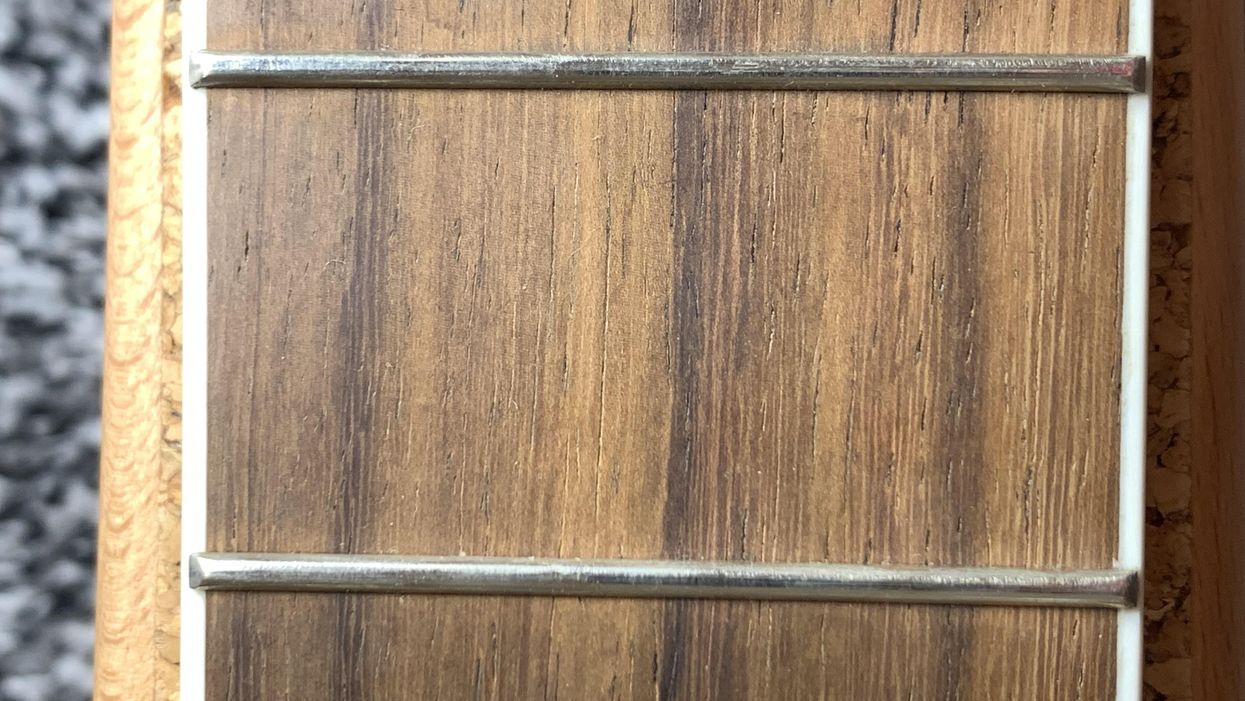
Look at the slightly pale and lifeless color of the rosewood in Photo 1. It has a nice grain but is rather dull. Brazilian rosewood has a rich chocolate brown color, which clearly shows the grain of the wood.
Let’s make it less boring:
Use some fine steel wool or sanding pads to sand the rosewood. Use a soft brush afterwards to get the dust off.
Use some naphtha or alcohol and a cotton cloth to degrease the wood and get all the fine dust and dirt out of it.
Use masking tape to protect the fretboard edges and the binding, if your neck has one. You don’t need to cover the frets. They’re easy to clean after the process. Use a Q-tip and some Vaseline to protect the fretboard dots from the dye.
You need a chocolate brown wood dye and a small soft brush to apply it.
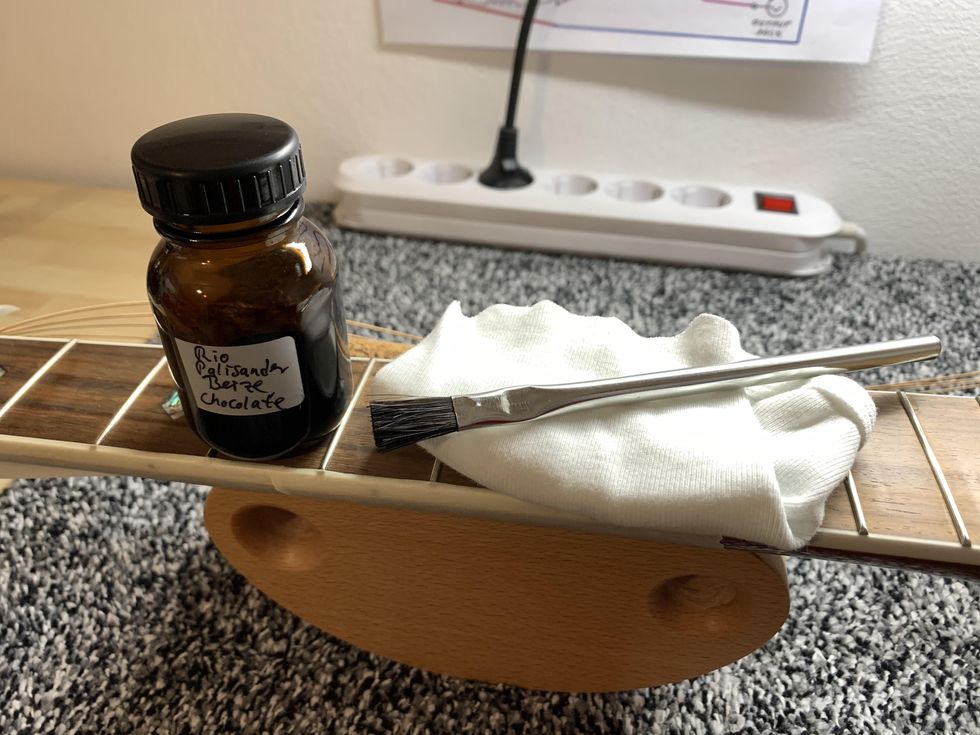
Photo 2
Some luthier supply stores offer special Brazilian rosewood dye in different shades of brown (Photo 2). I decided on a classic chocolate brown color on a solvent base for best results. Apply the dye thin and carefully and let it dry for some minutes.
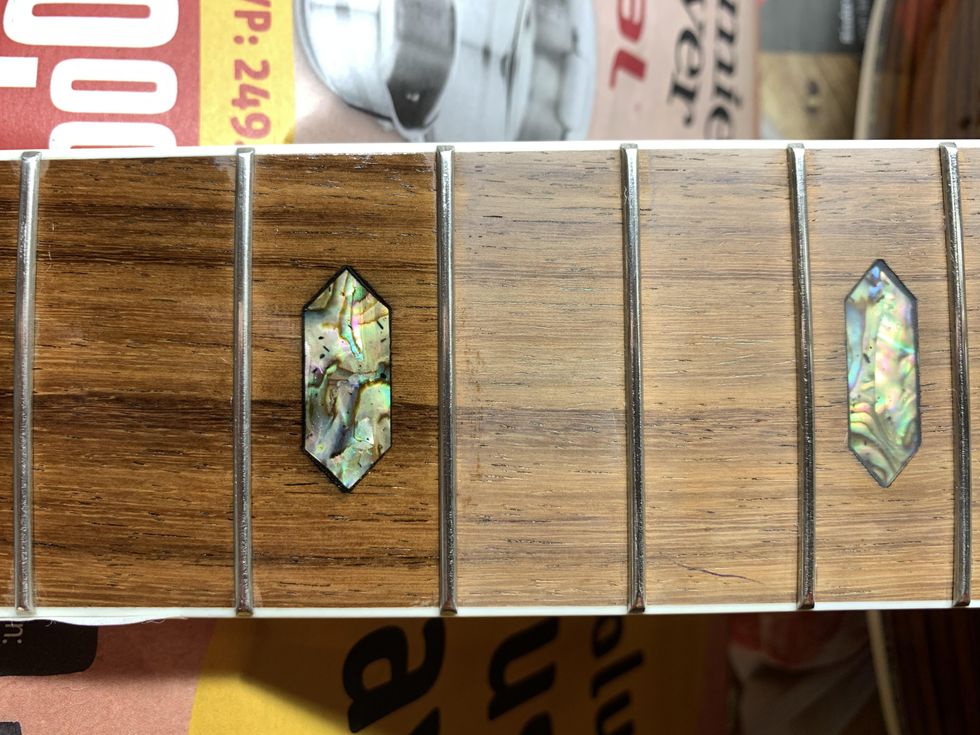
Photo 3
Now look at the difference in Photo 3. It’s easy to see! If you want your fretboard darker, repeat the process until you like it. Cover your workspace with old newspapers and have an old cotton rag nearby just in case. This dye will stain everything permanently and you don’t want it on your clothes or your kitchen table. Let the fretboard dry for a day and take off the masking tape.
Use some very fine steel wool to polish the fretboard and the frets, to get any dye off the fret material easily. Use a soft brush to clean the fretboard afterwards.
Use some naphtha and a Q-tip to carefully clean the fretboard dots from any Vaseline leftovers.
Then use the amber color from the last part of this series [“DIY Relic’ing: Hardware Continued”] together with a fresh Q-tip and apply the amber color to the dots until you like the shade.
Now that we’ve made this rosewood fretboard look much closer to Brazilian rosewood, it’s time to mimic the touch and feel of it. Brazilian rosewood has a certain smell and feel that can be described as greasy compared to most other rosewoods. This is because of the oil content of this wood. We can’t naturally “oil up” other woods, but we can get close to this certain feel by waxing the fretboard rather than oiling it. This is also an easy process so let’s go for it.
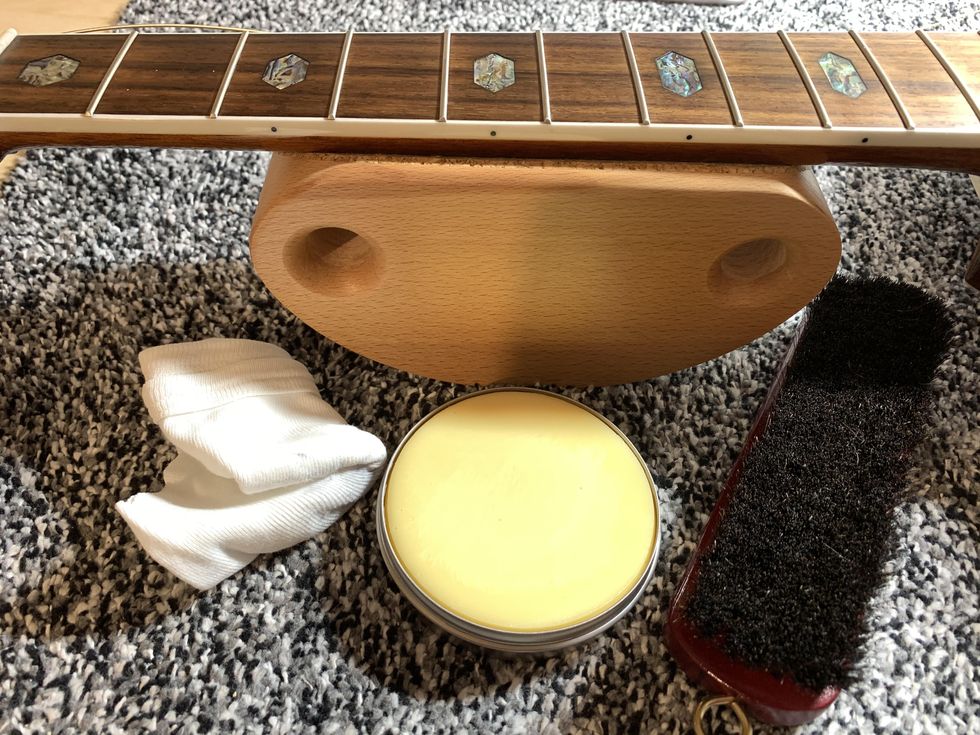
Photo 4
Get a clear, hard wax for fretboards and a soft polishing brush (Photo 4). Apply a thin layer of wax to the fretboard using a cotton cloth to massage it into the wood.
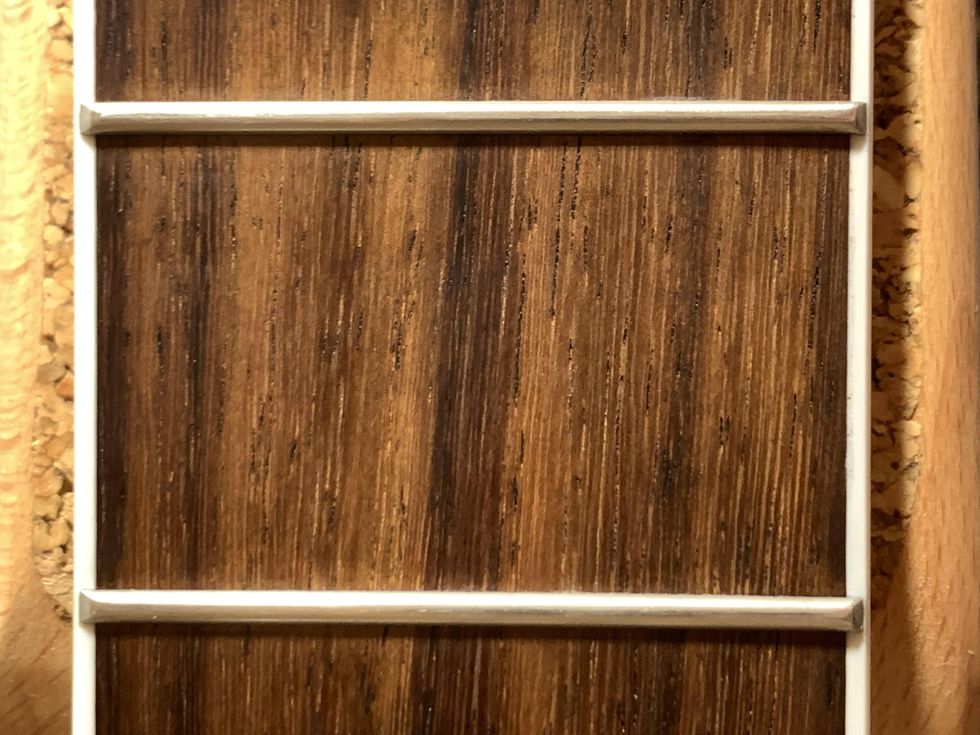
Photo 5
Let it dry for some time, then wipe off any remaining excess wax and use the soft polishing brush to get this greasy look and shine on your fretboard, as seen in Photo 5.
So far, so good. We’ve taken care of the color and the feel of the fretboard but there is another haptic thing to consider when talking about vintage necks: the broken-in feeling of the fretboard edges. The fretboard edges of well-played vintage guitars feel comfortable and round because the edges receive pressure from a player’s hand over decades. This is not what is called “rolled fretboard edge,” which is a common custom shop option, but it goes in the same direction only to a much lesser degree.
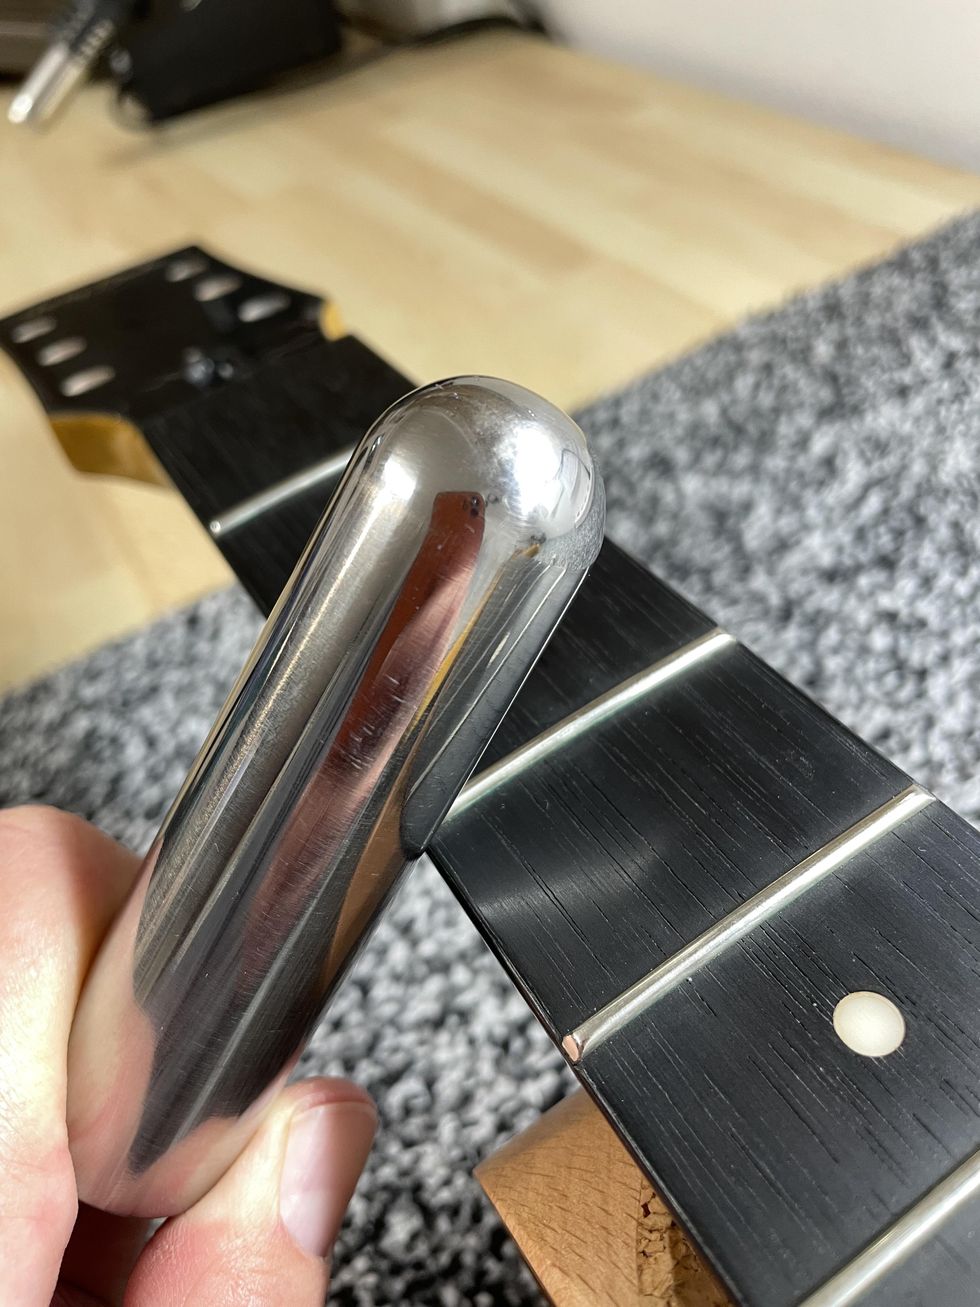
Photo 6
To bring this typical broken-in feeling to your neck, you don’t need much: just a round metal bar and some time. You can do this to any guitar neck. I prefer to use a massive metal slide for pedal-steel players, but you can also use a bigger screwdriver or something similar. If possible, clamp down your guitar and use the steel bar in a 45-degree angle to move it along the edge of the fretboard, applying pressure (Photo 6). What we’re doing with this is not making a rolled edge but compressing fibres, which is exactly the natural process over time. Repeat moving the bar while applying pressure for some time and check the result until you like it. This is not done within a minute, so take your time. With the metal slide, I usually need 10-15 minutes for each edge until I like it, but this depends a lot on how hard your fretboard material is.
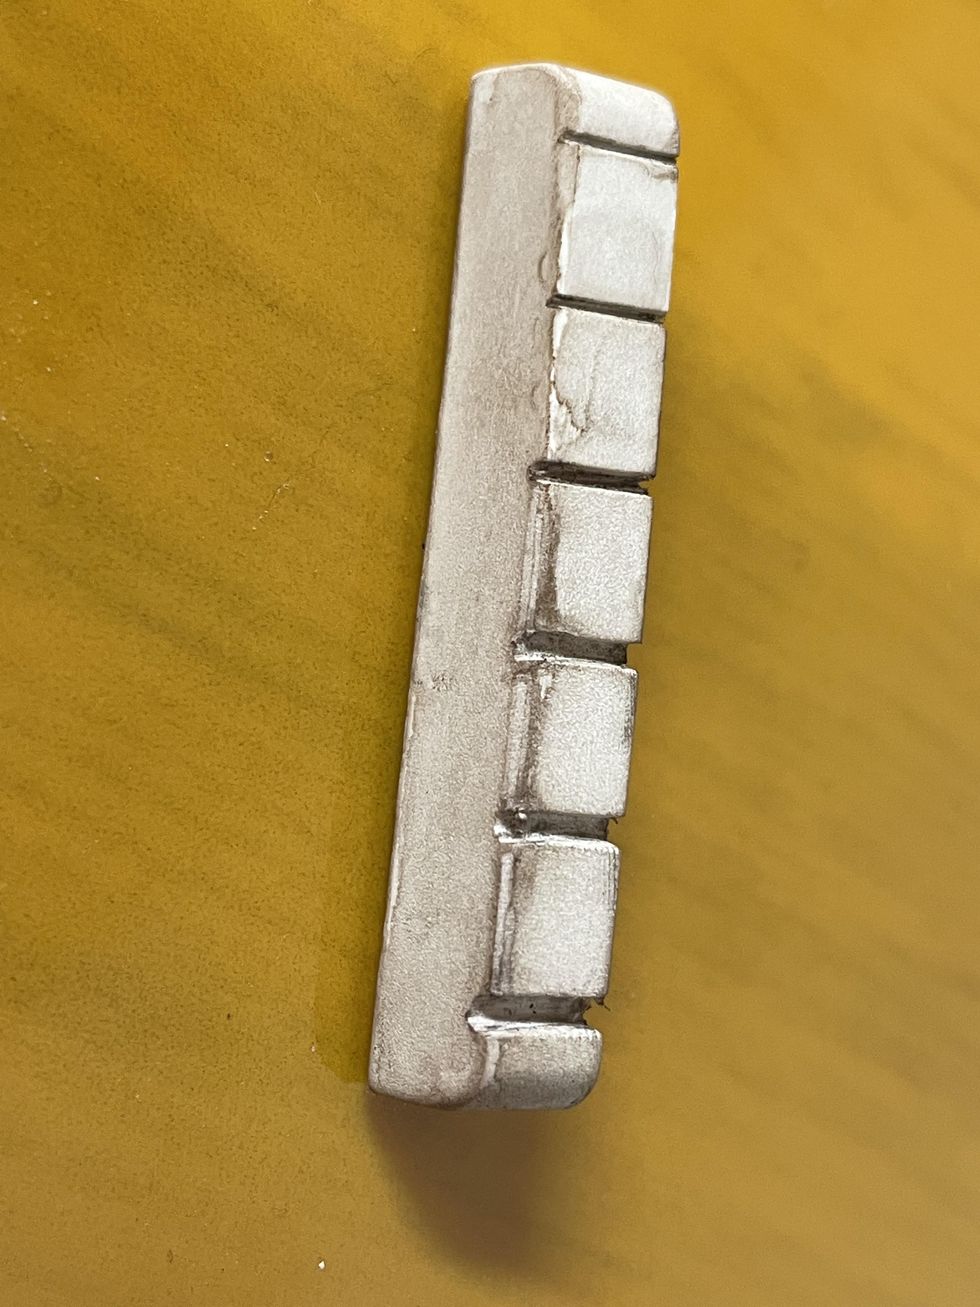
Photo 7
If you’re done with that part, excellent! You just finished your fretboard. Moving up the neck, the nut is our next task. The nut of our Harley Benton is pure white plastic, which not the best choice. If you want to keep it, you can sand it with some steel wool and apply some of the amber color with a Q-tip, followed with some of our mixture of dirt, dust, and ashes we used for the plastic buttons of the tuners [DIY Relic’ing Tuners, Part 2”]. Use your fingers to wipe on some of this mixture and you’re done. If you want to upgrade the nut, nylon is the historically correct material, and such nut blanks are available from numerous luthier supply stores. I decided to use an unbleached bone nut blank and make a new nut. Afterwards, I used some of the amber color and dust to make it look old (Photo 7).
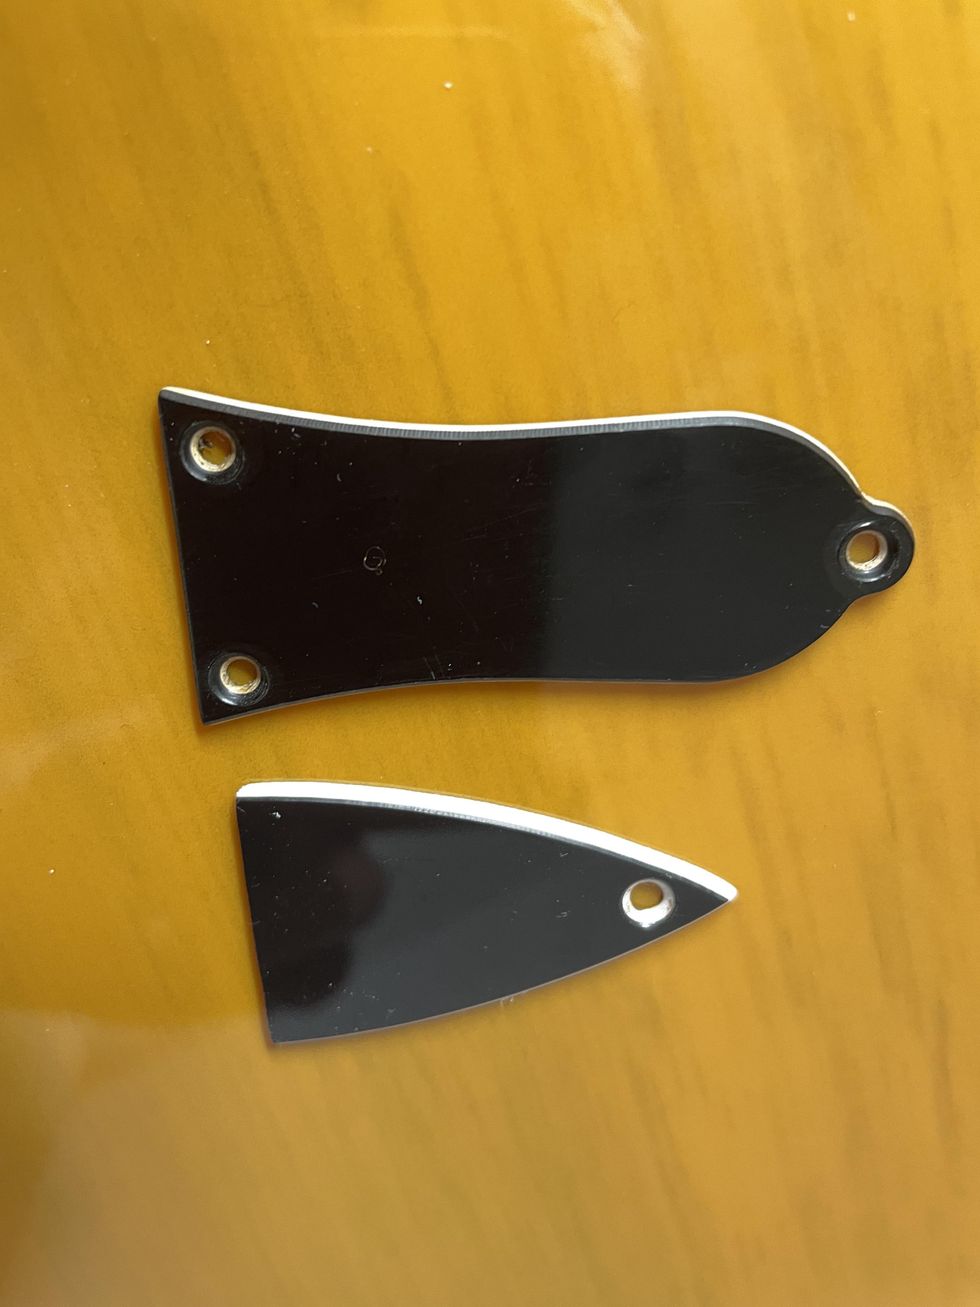
Photo 8
Further up the neck is the cover for the truss rod adjustment screw with its mounting screw. Harley Benton decided to use a modern shape for it, which doesn’t look very good to me. The typical Gibson-style covers with their bell-like shape look much different, so I decided to swap the cover for such a model, modifying it for a flat bottom so it covers the whole opening for the truss rod (Photo 8). To make it look old, you can use the exact steps we used on the jack plate: break the shine with some steel wool, add some light scratches, wipe on some amber color on the white part of the cover, and then rub in some dust and dirt. You already know how to age screws, having done it many times before in the earlier parts of this ongoing project. If you need a refresher on our aging process for screws, refer back to “DIY Relic’ing: Break the Shine” for guidance.
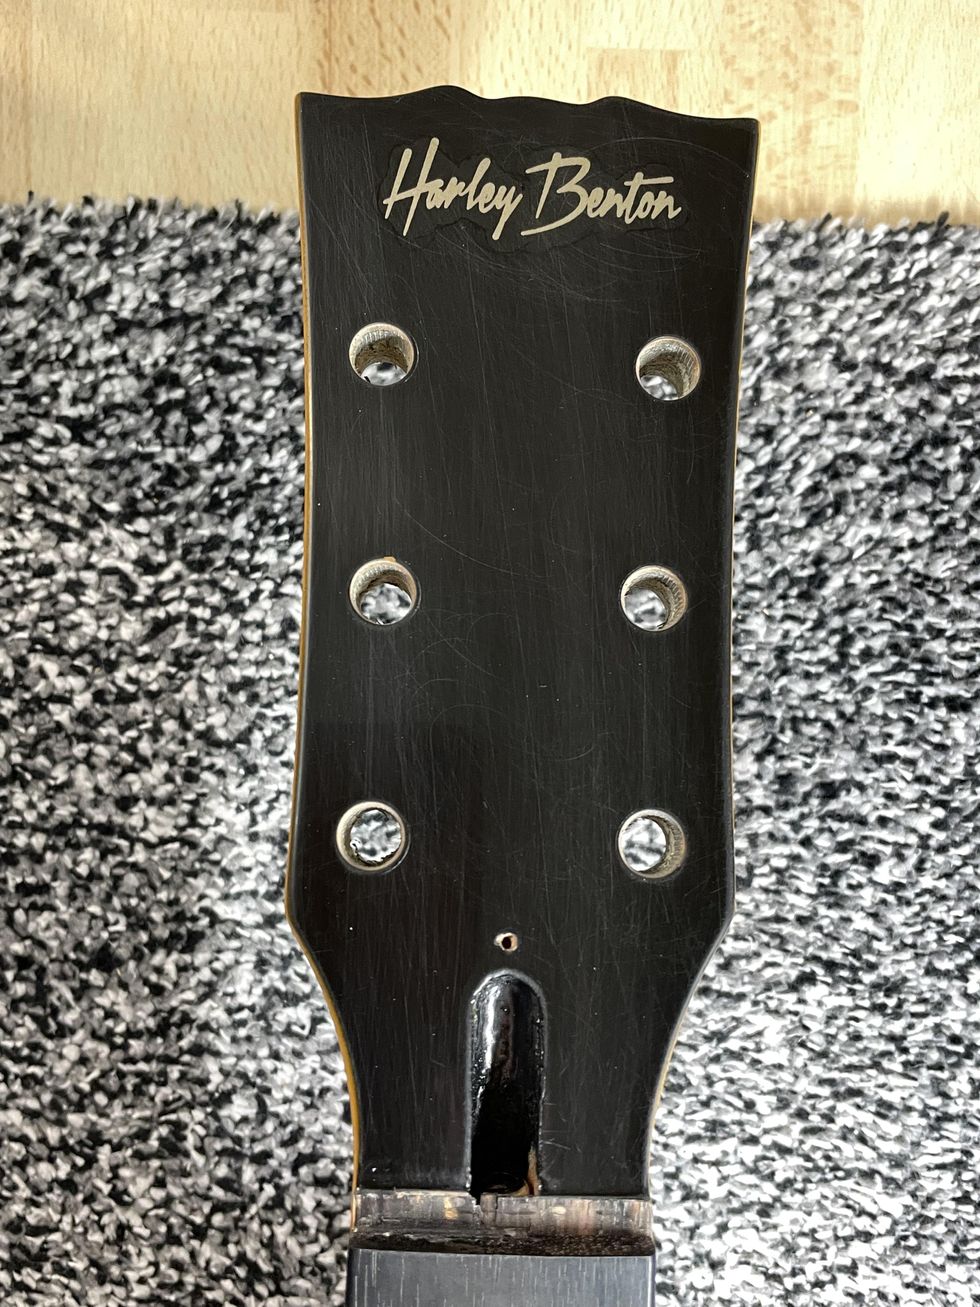
Photo 9
The last thing we’ll do today is begin to work on the headstock of the guitar, which is often a delicate task. A lot of modders try to reshape the headstock so it will look like it’s from a vintage guitar, and, even worse, replace the headstock logo with a fake logo from another company. I would never do that. This project is about aging a guitar and not about making it an exact copy of a vintage original. Personally, I really like the headstock shape of the Harley Benton. It looks at least a little bit Gibson-like, and I also think the Harley Benton logo looks cool the way it is (Photo 9). So, aging it is very easy: Break the shine with some steel wool and wipe off the dust. Use a Q-tip and apply some layers of the amber color to the logo until you like the shade. Adding dings, dongs, and scratches will come later. In the next part of this project, we’ll take care of the backside of the neck and the body by cracking the lacquer to mimic some old nitro lacquer.
That’s it for now. We’re almost finished with this relic’ing project, but before we wrap it up, we’ll return to guitar mods in the next issue. We’ll take a deeper look at putting vintage parts into new electric guitars, so stay tuned.
Until then ... keep on modding!
- Last Call: Someday You'll Regret That Relic Job - Premier Guitar ›
- Mod Garage: DIY Relic'ing—Aging a P-90 Pickup - Premier Guitar ›
- DIY Relic'ing: Break the Shine - Premier Guitar ›
- DIY Guitar Relic'ing: Let's Crack Some Lacquer Finish - Premier Guitar ›
- It’s Rosewood, But What Kind? ›
So, you want to chase the riches and glories of being a mid-level guitar YouTuber. Rhett and Zach have some reality checks.
This outing of Dipped In Tone kicks off with an exciting update from Zach Broyles’ camp: He’s opening a brick-and-mortar guitar shop in Nashville, called High Voltage Guitars. Opening on October 8, the store will carry gear from Two-Rock, Divided By 13, Dr. Z, Castedosa, Fano, Novo, and of course Mythos Pedals. Zach hints that there might be some handwired JHS pedals from Josh Scott himself, too, and Rhett reveals that he plans to consign some of his guitars at the shop.
The business side of Zach’s new venture brings them to a key piece of today’s episode: Rhett and Zach aren’t running charities. They do what they do to make money; guitars, gear, podcasting, and content creation are their literal jobs. And they’re not as glamorous and breezy as most armchair commentators might guess.
Want to do what Rhett and Zach do? Welcome to the club. The guitar-influencer field is what one might call “oversaturated” at the moment, and it’s difficult to break out—but not impossible. As our hosts explain, it requires putting in 60-hour work weeks, a diverse skillset, a knack for catching people’s attention, and a certain level of genuineness. Rhett knows this path well, and he has hard-earned advice for staying true to oneself while building a following in the gear world.
Tune in to learn why Rhett thinks Fretboard Summit, a three-day guitar festival organized by Fretboard Journal, blows NAMM out of the water and builds legitimate connections between guitarists, and catch the duo dipping a Dick Dale-inspired, all-Fender rig.
Get 10% off your order at stewmac.com/dippedintone
Plenty of excellent musicians work day jobs to put food on the family table. So where do they go to meet their music community?
Being a full-time musician is a dream that rarely comes to pass. I’ve written about music-related jobs that keep you close to the action, and how more and more musicians are working in the music-gear industry, but that’s not for everyone. Casual players and weekend warriors love music as much as the hardcore guitarists who are bent on playing full time, but they may have obligations that require more consistent employment.
I know plenty of excellent musicians who work day jobs not to support their musical dreams, but to put food on the family table. They pay mortgages, put children through school, provide services, and contribute to their community. Music may not be their vocation, but it’s never far from their minds. So where do they go to meet their music community?
A good friend of mine has studied music extensively in L.A. and New York. He’s been mentored by the pros, and he takes his playing very seriously. Like many, he always had day jobs, often in educational situations. While pro gigs were sometimes disappointing, he found that he really enjoyed working with kids and eventually studied and achieved certification as an educator. To remain in touch with his love of music, he plays evenings and weekends with as many as three groups, including a jazz trio and a country band. Not actually worrying about having a music gig that could support him in totality has changed the way he views playing out and recording. He doesn’t have to take gigs that put him in stressful situations; he can pick and choose. He’s not fretting over “making it.” In some way, he’s actually doing what we all want, to play for the music plain and simple.
Another guy I know has played in bands since his teens. He’s toured regionally and made a few records. When the time came to raise a family, he took a corporate job that is as about as far away from the music business as you can get. But it has allowed him to remain active as a player, and he regularly releases albums he records in his home studio. His longstanding presence in the music scene keeps him in touch with some famous musicians who guest on his recordings. He’s all about music head to toe, and when he retires, I’m certain he’ll keep on playing.
“Seek out music people regularly. They’re hiding in plain sight: at work, at the park, in the grocery store. They sell you insurance, they clean your teeth.”
I could go on, and I’m sure you know people in similar situations. Maybe this even describes you. So where do we all find our musical compadres? For me, and the people I’ve mentioned, our history playing in bands and gigging while young has kept us in touch with others of the same ilk, or with those who are full-time musicians. But many come to music later in life as well. How do they find community?
Somehow, we manage to find our tribe. It could be at work or a coffee shop. Some clubs still have an open mic night that isn’t trying to be a conveyor belt to commercial success. Guitarists always go up to the stage between changes to talk shop, which can lead to more connections. I like the idea of the old-school music store. Local guitar shops and music stores are great places to meet other musicians. Many have bulletin boards where you can post or find ads looking for bandmates. When I see someone wearing a band T-shirt, I usually ask if they’re a musician. Those conversations often lead to more connections down the line. Remember, building a network of musicians often requires persistence and putting yourself out there. Don’t be afraid to initiate conversations and express your interest in collaborating with others.
Of course, I’m lucky to have worked in the music sphere since I was a teen. My path led to using my knowledge of music and guitars to involve myself in so many adventures that I can hardly count them. Still, it’s the love of music at the root of everything I do, and it’s the people that make that possible. So whether you’re a pro or a beginner, seek out music people regularly. They’re hiding in plain sight: at work, at the park, in the grocery store. They sell you insurance, they clean your teeth. Maybe they’re your kid’s teacher. Musicians are everywhere, and that’s a good thing for all of us.
An amp-in-the-box pedal designed to deliver tones reminiscent of 1950s Fender Tweed amps.
Designed as an all-in-one DI amp-in-a-box solution, the ZAMP eliminates the need to lug around a traditional amplifier. You’ll get the sounds of rock legends – everything from sweet cleans to exploding overdrive – for the same cost as a set of tubes.
The ZAMP’s versatility makes it an ideal tool for a variety of uses…
- As your main amp: Plug directly into a PA or DAW for full-bodied sound with Jensen speaker emulation.
- In front of your existing amp: Use it as an overdrive/distortion pedal to impart tweed grit and grind.
- Straight into your recording setup: Achieve studio-quality sound with ease—no need to mic an amp.
- 12dB clean boost: Enhance your tone with a powerful clean boost.
- Versatile instrument compatibility: Works beautifully with harmonica, violin, mandolin, keyboards, and even vocals.
- Tube preamp for recording: Use it as an insert or on your bus for added warmth.
- Clean DI box functionality: Can be used as a reliable direct input box for live or recording applications.
See the ZAMP demo video here: https://www.youtube.com/watch?v=xJp0jE6zzS8
Key ZAMP features include:
- True analog circuitry: Faithfully emulates two 12AX7 preamp tubes, one 12AX7 driver tube, and two 6V6 output tubes.
- Simple gain and output controls make it easy to dial in the perfect tone.
- At home, on stage, or in the studio, the ZAMP delivers cranked tube amp tones at any volume.
- No need to mic your cab: Just plug in and play into a PA or your DAW.
- Operates on a standard external 9-volt power supply or up to 40 hours with a single 9-volt battery.
The ZAMP pedal is available for a street price of $199 USD and can be purchased at zashabuti.com.
Mooer's Ocean Machine II is designed to bring superior delay and reverb algorithms, nine distinct delay types, nine hi-fidelity reverb types, tap tempo functionality, a new and improved looper, customizable effect chains, MIDI connectivity, expression pedal support, and durable construction.
Similarly to the original, the Ocean Machine II offers two independent delay modules, each with nine different delay types of up to two seconds, including household names such as digital, tape, and echo delays, as well as more abstract options, such as galaxy, crystal, and rainbow. A high-fidelity reverb module complements these delays with nine reverb types, as well as a shimmer effect. Each delay and reverb effect can also be ‘frozen,’ creating static ambient drones, an effect that sounds particularly impressive considering the pedal’s DSP upgrades.
While the original Ocean Machine’s looping capabilities provided just 44 seconds of loop storage, the new addition features an impressive 120 seconds. To experiment with this feature, along with OceanMachine II’s other sonic capabilities, users can use an intuitive LCD screen along with 12 knobs (four for each delay and reverb module) to easily adjust parameters within the device’s ‘Play Mode.’ Three footswitches are also provided to facilitate independent effect toggling, tap tempo control, looper interfacing, and a preset selector.
Once the guitarist has crafted an interesting effect chain, they can save their work as a preset and enter ‘Patch Mode,’ in which they can toggle between saved settings with each of the three footswitches. In total, the Ocean Machine II provides eight preset storage banks, each of which supports up to threepresets, resulting in a total of 24 save slots.
The pedal’s versatility is further enhanced by its programmable parallel and serial effect chain hybrid, a signature element of Devin Townsend’s tone creation. This feature allows users to customize the order of effects, providing endless creative possibilities. Further programming options can be accessed through the LED screen, which impressively includes synchronizable MIDI connectivity, a feature that was absent in the original Ocean Machine.
In addition to MIDI, the pedal supports various external control systems, including expression pedal input through a TRS cable. Furthermore, the pedal is compatible with MOOER's F4 wireless footswitch, allowing for extended capabilities for mapping presets and other features. A USB-C port is also available for firmware updates, ensuring that the pedal remains up-to-date with the latest features and improvements.
Considering the experimental nature of Devin Townsend’s performances, MOOER has also gone above and beyond to facilitate the seamless integration of Ocean Machine II into any audio setup. The device features full stereo inputs and outputs, as well as adjustable global EQ settings, letting users tailor their sound to suit different environments. Guitarists can also customize their effect chains to be used with true bypass or DSP (buffered) bypass, depending on their preferences and specific use cases.
Overall, Ocean Machine II brings higher-quality delay and reverb algorithms, augmented looping support, and various updated connections to Devin Townsend’s original device. As per MOOER’s typical standard, the pedal is engineered to withstand the rigors of touring and frequent use, allowing guitars to bring their special creations and atmospheric drones to the stage.
Key Features
- Improved DSP algorithms for superior delay and reverb quality
- Nine distinct delay types that support up to 2 seconds of delay time: digital, analog, tape, echo,liquid, rainbow, crystal, low-bit, and fuzzy delays
- Nine hi-fidelity reverb types: room, hall, plate, distorted reverb, flanger reverb, filter reverb,reverse, spring, and modulated reverb
- Freeze feedback feature, supported for both delay and reverb effects
- Tap tempo footswitch functionality
- New and improved looper supporting up to 120 seconds of recording time, along withoverdubbing capabilities, half-speed, and reverse effects.
- Customizable order of effects in parallel or series chains
- Flexible bypass options supporting both true bypass and DSP bypass
- Large LCD screen, controllable through twelve easy-to-use physical knobs for real-time parameter adjustments.
- Adjustable Global EQ Settings
- Full stereo inputs and outputs
- Synchronizable and mappable MIDI In and Thru support
- USB-C port for firmware updates
- External expression pedal support via TRS cable
- Support for the MOOER F4 wireless footswitch (sold separately)
- Designed for durability and reliability in both studio and live environments.
The Ocean Machine will be available from official MOOER dealers and distributors worldwide on September 10, 2024.
For more information, please visit mooeraudio.com.