This technique works for all standard single-coil pickups, including Fender’s template design, so dive in!
It’s not difficult to replace the wiring in your pickups, but it takes some finesse. Here’s a step-by-step guide.
Hello and welcome back to Mod Garage. After numerous requests, this month we’ll have a closer look at changing wires on a single-coil pickup. As our guinea pig for this, I chose a standard Stratocaster single-coil, but it’s basically the same on all single-coil pickups and easy to transfer. It’s not complicated but it is a delicate task to not destroy your pickup during this process, and there are some things you should keep in mind.
Why would you change wires on a pickup? Here’s a list of reasons I mostly hear in the shop when someone brings in a pickup for this operation:
1. A wire is broken and needs to be replaced.
This can happen if the wire was bent too much, or it was damaged with a soldering iron, a screw split it, etc.
2. A used pickup was bought on eBay or a similar marketplace and the wires are too short for your wiring.
Maybe one of the pre-owners snipped it out of the circuit at some point, rather than desoldering it to save the full wire length. The quick-and-dirty solution in such a case will be to extend the wire by soldering another piece of wire to it. For the “Trekkies” of us, that’s the way James T. Kirk and Scotty would fix it. Jean-Luc Picard and Geordi La Forge would solder a new wire with the correct length to the pickup to replace the old one. Make it so!
3. Changing the wires as a quality update.
Often cheap pickups have thin and shoddy plastic-coated wires that will likely break soon. It’s always a good investment regarding reliability and longevity to swap them with a good quality wire.
4. Changing the wires for tonal and/or aesthetic reasons.
Changing the wire material can alter the sound of a pickup, so replacing a cheap plastic-coated wire with a good-quality cloth-covered wire will not only look more vintage but will also result in a slightly warmer tone. Or the other way around for a slightly brighter tone. Or maybe you want to upgrade your pickups with a high-quality Teflon-coated or audiophile HiFi-wire. Perhaps you like to have neon green and pink wires on your pickups, for whatever reason.
5. Changing the wires for a shielded cable to add more shielding to the pickup.
This often goes hand in hand with shielding the complete single-coil pickup and is a logical step in such cases.
6. Changing the wires with NOS wire.
Often vintage pickups are modded with a non-original wire, sometimes as part of a repair. Bringing them back to factory specs is a good investment to keep the value of a vintage pickup alive.
Let's Begin
So, you see there are some good reasons to change the wires on a pickup. This list is not complete; for sure there are others.
Now, let’s start our project by preparing the pickup for this operation. It’s first and foremost important to protect the windings of your pickup against any damage. It only takes a fraction of a second to hit the winding with the tip of the soldering iron and this is a scenario you do not want.
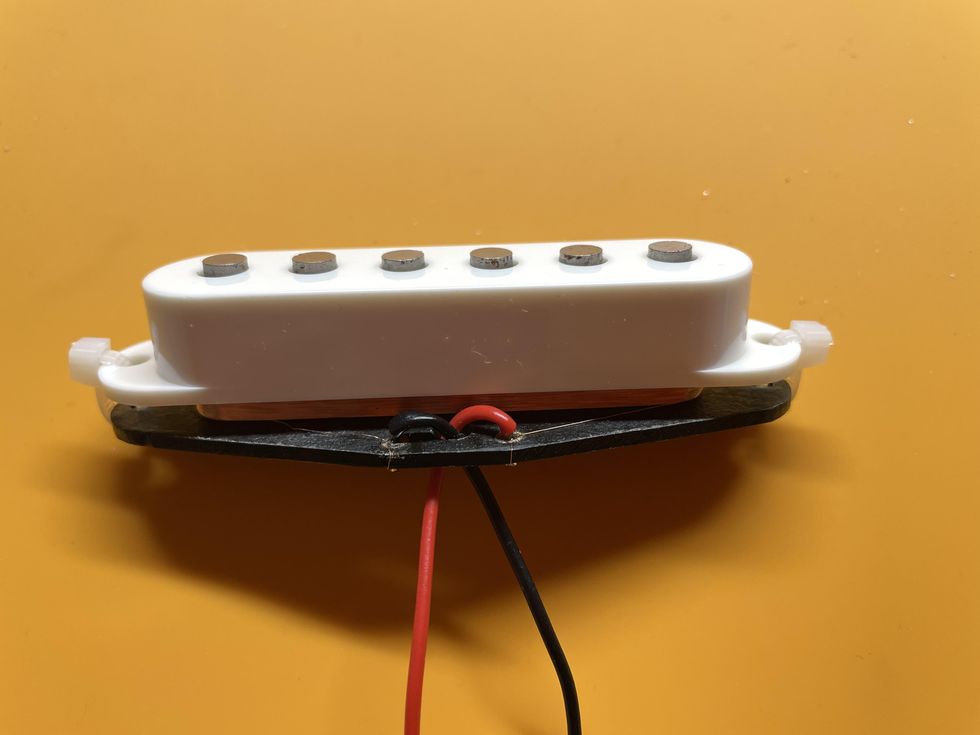
Photo 1
Courtesy of SINGLECOIL (www.singlecoil.com)
1. I simply put a standard plastic pickup cover on the pickup to protect the winding. I usually use two small zip ties to fasten the cover, but you can also use two small screws and a hex nut, a rubber band, or a piece of masking tape.
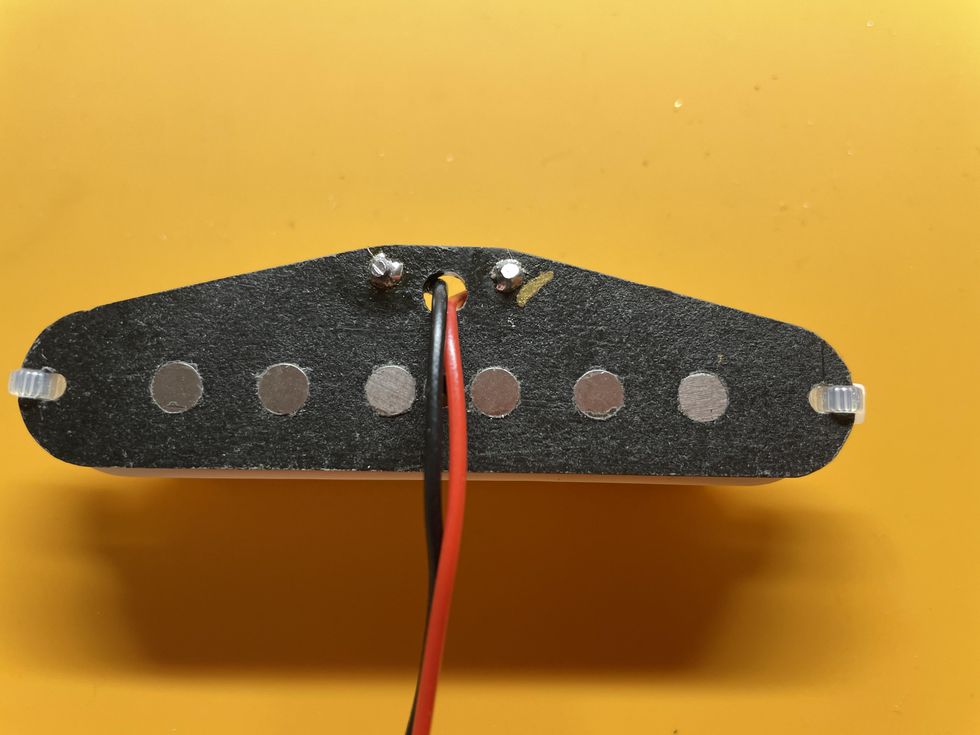
Photo 2
Courtesy of SINGLECOIL (www.singlecoil.com)
2. Have a look where the hot (usually white, yellow, or red) and the ground (usually black) wires are connected to the pickup and mark one of them. I always mark the hot connection by using a Sharpie, but you can also use a drop of nail polish, a small piece of masking tape ... be creative.
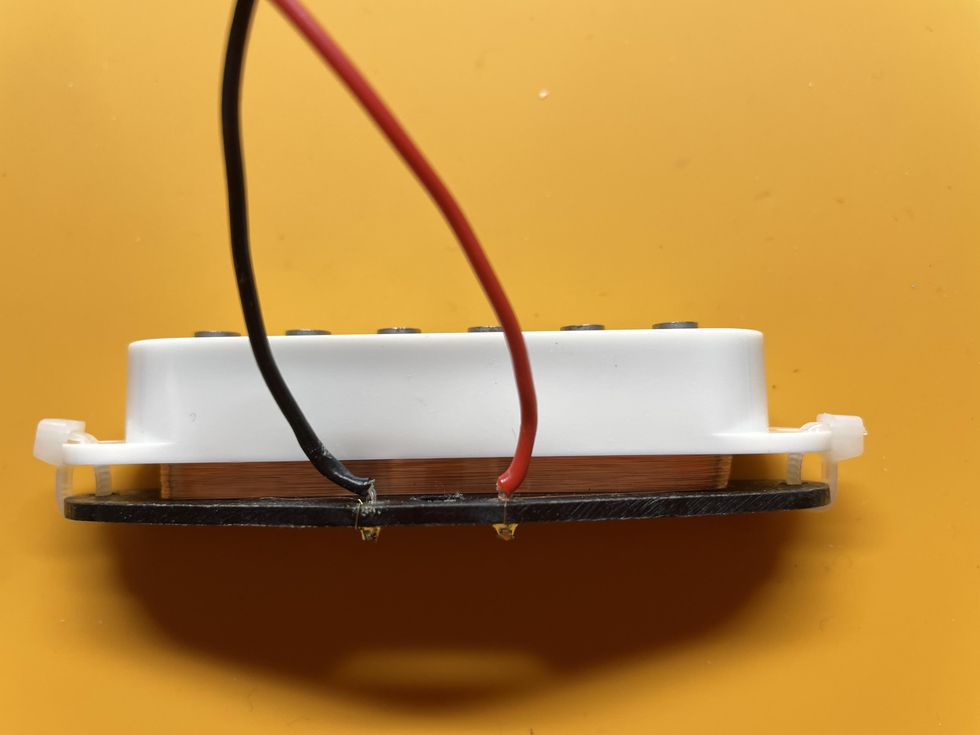
Photo 3
Courtesy of SINGLECOIL (www.singlecoil.com)
3. Measure the DCR (direct current resistance) of your pickup as a reference using your DMM (digital multimeter) and note it. After this is done, push the wires you want to replace upwards through the hole and pull them out, as shown in Photo 1, Photo 2, and Photo 3.
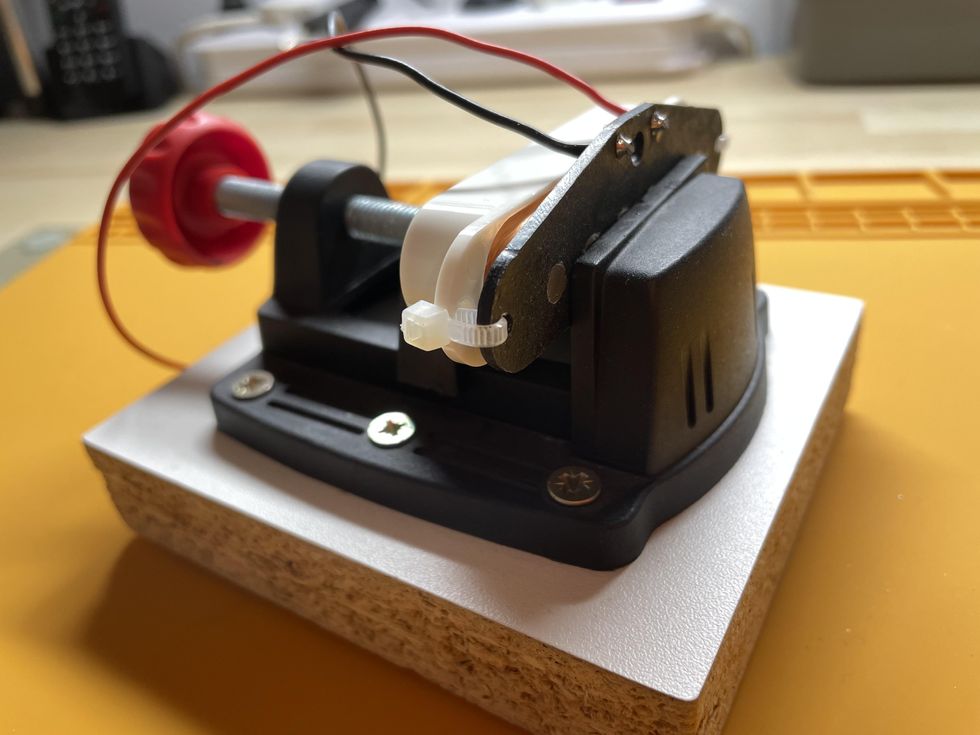
Photo 4
Courtesy of SINGLECOIL (www.singlecoil.com)
Now put the prepared pickup into a small vise and orient it so that you can look at the soldering terminals the two wires are connected to (Photo 4). Take care to not apply too much pressure with the vise: We only want to fasten the pickup, not break it.
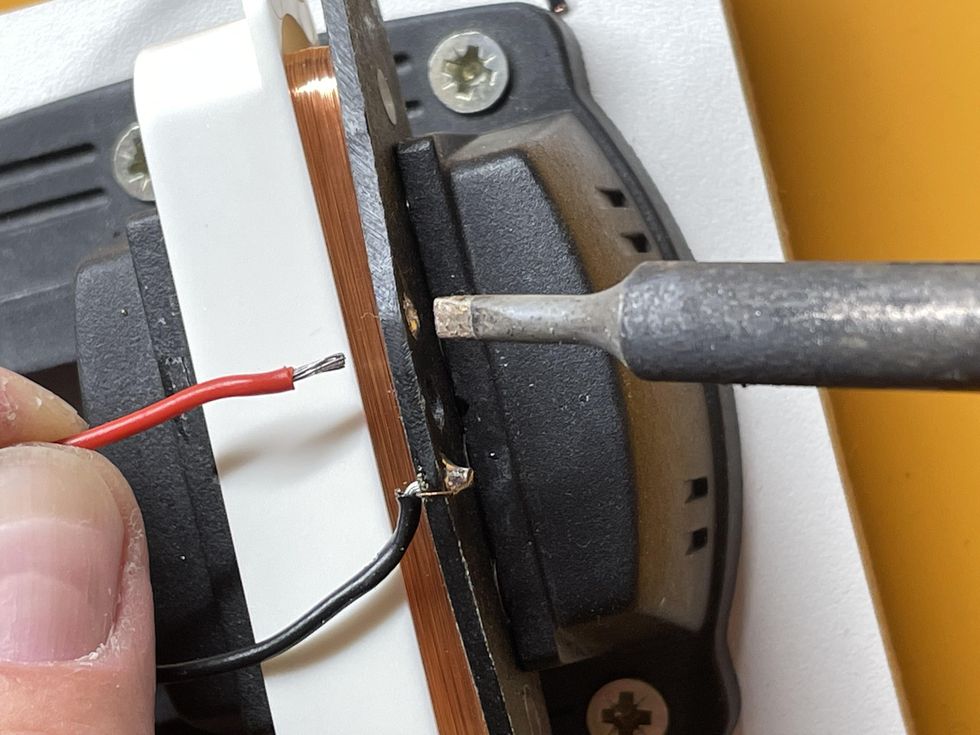
Photo 5
Courtesy of SINGLECOIL (www.singlecoil.com)
Pre-tin the tip of your soldering iron and heat up the soldering spot while gently pulling on the wire until it comes out (Photo 5). This should not take longer than 2 to 3 seconds. A small chisel-shaped soldering tip is my weapon of choice. Warning: Don’t touch the bobbin of the pickup with the soldering iron—it will melt. Repeat this procedure with the second wire.
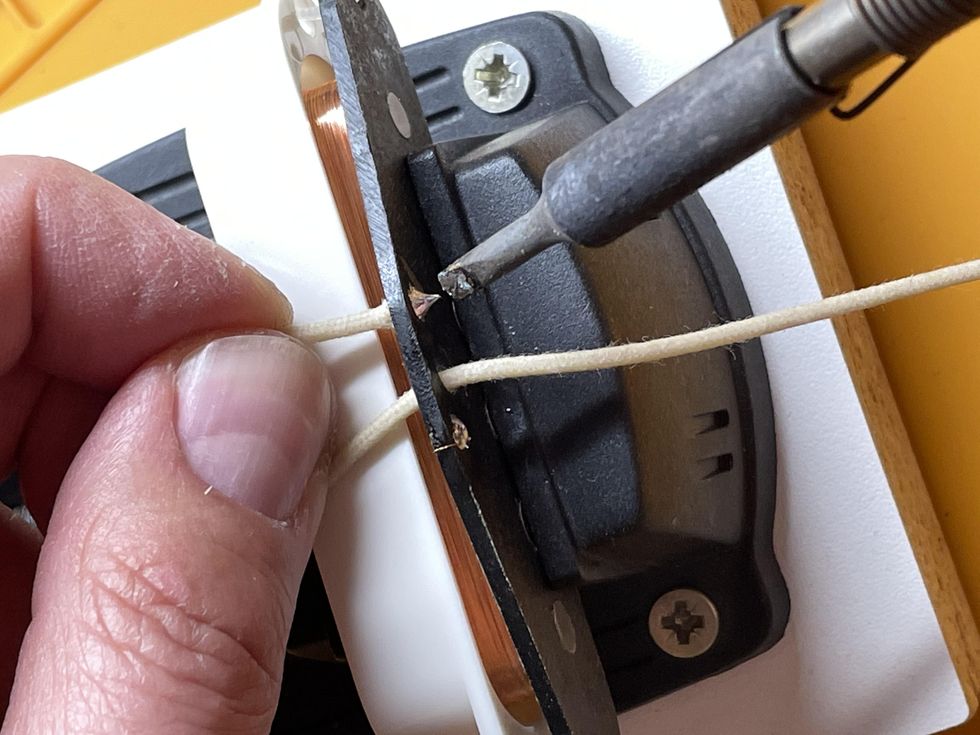
Photo 6
Courtesy of SINGLECOIL (www.singlecoil.com)
Strip the new wire, pre-tin it, pull it through the hole, and bend it so the stripped part will touch the soldering spot (Photo 6). I prefer to guide the wire with my hands, but you can also use tweezers for this. Now pre-tin the tip of your soldering iron and heat up the soldering spot while gently pushing the wire until it is in. This should not take longer than 2 to 3 seconds to perform. Repeat this procedure with the second wire. Cut off the excess wire with a small side cutter.
To check your work, measure the DCR of the pickup and compare it to the value you measured before. Small differences are okay and can be caused by the higher temperature directly after soldering to the pickup, or the new wires can be a different type and might have a different length. If you read zero or infinite, there is something wrong and you should check your soldering spots.
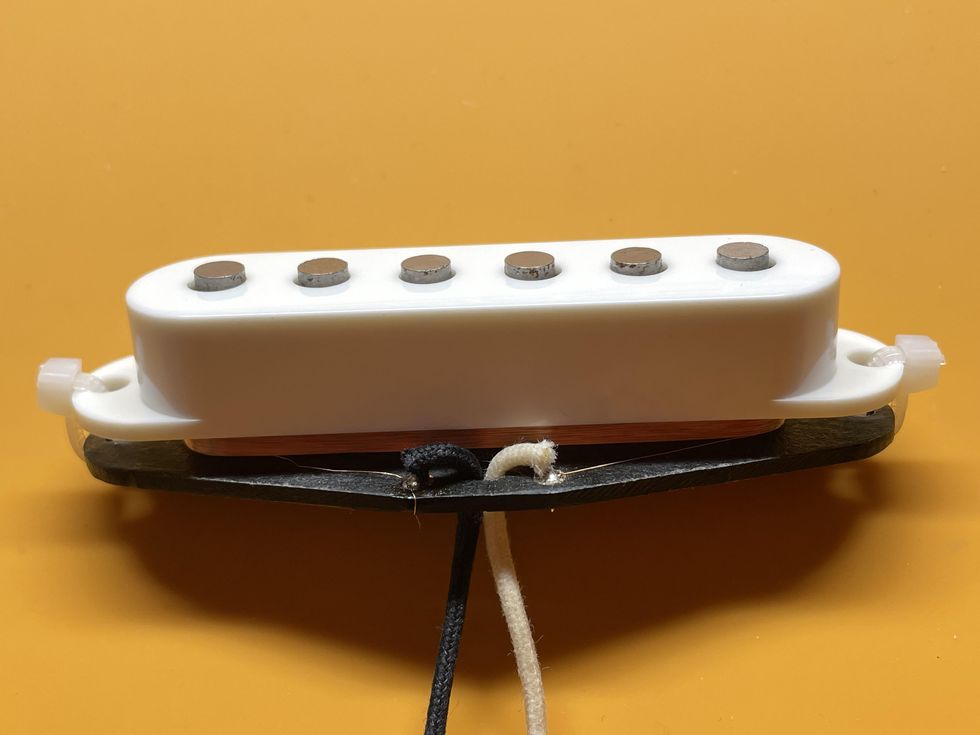
Photo 7
Courtesy of SINGLECOIL (www.singlecoil.com)
Take off the pickup cover you put on the pickup to protect the winding, and you are done (Photo 7). Congratulations! If you’re doing this regularly, you’ll become better and faster over time, so don’t worry if it takes longer than expected the first time.
Bonus: Staggering Pickup Wires
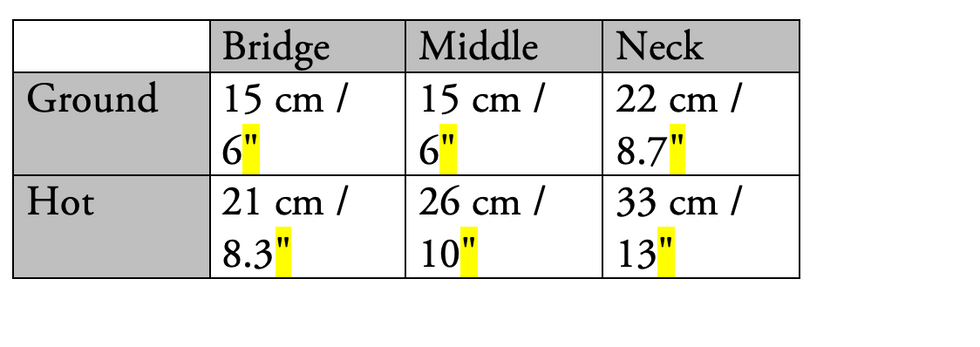
Staggering pickup wires is a neat trick to not waste any wire, which can be a real issue when using expensive audiophile wires. Pickup manufacturers usually apply the same wire length to all pickups, no matter if it’s a bridge, middle, or neck pickup. And they’re usually way too long, resulting in a good portion of obsolete, snipped off wires. To avoid this, you can add only the length of new wire you really need. Here are the values I use in the shop for a standard Stratocaster:
That’s it for this month. Next, we’ll continue with our guitar relic’ing project, so stay tuned. Until then ... keep on modding!
- Three Must-Try Guitar Wiring Mods - Premier Guitar ›
- Mod Garage: Four Ways to Configure a 4-Conductor Humbucker ... ›
- Mod Garage: Telecaster Series Wiring - Premier Guitar ›
Well-designed pickups. Extremely comfortable contours. Smooth, playable neck.
Middle position could use a bit more mids. Price could scare off some.
$2,999
Ernie Ball Music Man StingRay II
A surprise 6-string collaboration with Cory Wong moves effortlessly between ’70s George Benson and Blink-182 tones.
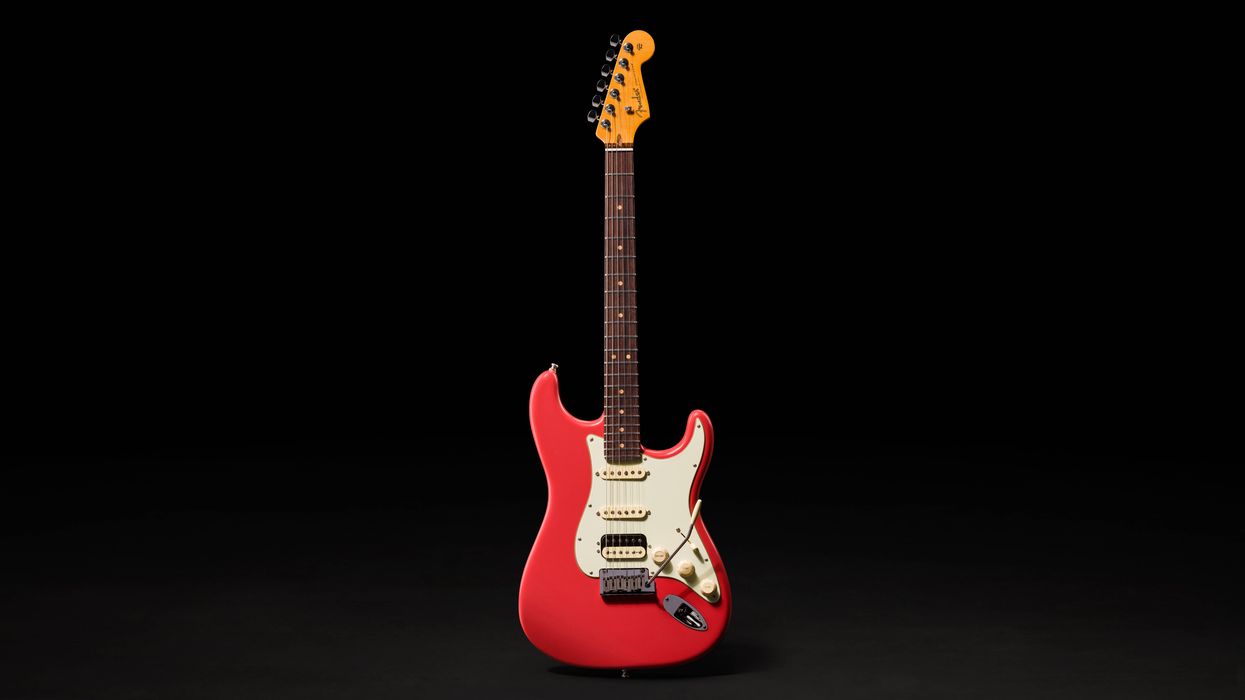
Announced at the 2025 NAMM show, Cory Wong’s new collaboration with Ernie Ball Music Man scratched an itch—namely, the itch for a humbucker-loaded guitar that could appease Wong’s rock-and-R&B alter ego and serve as complement to his signature Fender Strat. Inspiration came from no further than a bandmate’s namesake instrument. Vulfpeck bassist Joe Dart has a line of signature model EBMM basses, one of which uses the classic StingRay bass body profile. So, when Wong went looking for something distinctive, he wondered if EBMM could create a 6-string guitar using the classic StingRay bass body and headstock profile.
Double the Fun
Wong is, by his own admission, a single-coil devotee. That’s where the core of his sound lives and it feels like home to him. However, Wong is as inspired by classic Earth, Wind & Fire tones and the pop-punk of the early ’90s as he is by Prince and the Minneapolis funk that he grew up with. The StingRay II is a guitar that can cover all those bases.
Ernie Ball has a history of designing fast-feeling, comfortable necks. And I can’t remember ever struggling to move around an EBMM fretboard. The roasted maple C-shaped neck here is slightly thicker in profile than I expected, but still very comfortable. (I must also mention that the back of the neck has a dazzling, almost holographic look to the grain that morphs in the light). By any measure, the StingRay II’s curves seemed designed for comfort and speed. Now, let’s talk about those pickups.Hot or Not?
A few years ago EBMM introduced a line of HT (heat-treated) pickups. The pickups are built with technology the company used to develop their Cobalt and M-Series strings. A fair amount of the process is shrouded in secrecy and must be taken on faith, but EBMM says treating elements of the pickup with heat increases clarity and dynamic response.
To find out for myself, I plugged the StingRay II into a Fender Vibroverb, Mesa/Boogie Mark VII, and a Neural DSP Quad Cortex (Wong’s preferred live rig). Right away, it was easy to hear the tight low end and warm highs. Often, I feel like the low end from neck humbuckers can feel too loose or lack definition. Neither was the case here. The HT pickup is beautifully balanced with a bounce that’s rich with ES-335 vibes. Clean tones are punchy and bright—especially with the Vibroverb—and dirty tones have more room for air. Individual notes were clear and articulate, too.
Any guitar associated with Wong needs a strong middle-position or combined pickup tone, and the StingRay II delivers. I never felt any significant signal loss in the blended signal from the two humbuckers, even if I could use a bit more midrange presence in the voicing. The midrange gap is nothing an EQ or Tube Screamer couldn’t fix, though. And not surprisingly, very Strat-like sounds were easy to achieve for having less midrange bump.
Knowing Wong’s love for ’90s alt-rock, I expected the bridge pickup to have real bite, and it does, demonstrating exceptional dynamic range and exceptional high-end response that never approached shrill. Nearly every type of distortion and overdrive I threw at it sounded great, but especially anything with a scooped-mid flavor and plenty of low end.
The Verdict
By any measure, the StingRay II is a top-notch, professional instrument. The fit and finish are immaculate and the feel of the neck makes me wonder if EBMM stashes some kind of secret sandpaper, because I don’t think I’ve ever felt a smoother, more playable neck. Kudos are also due to EBMM and Wong for finding an instrument that can move between ’70s George Benson tones and the hammering power chords of ’90s Blink-182. Admittedly, the nearly $3K price could give some players pause, but considering the overall quality of the instrument, it’s not out of line. Wong’s involvement and search for distinct sounds makes the StingRay II more than a tired redux of a classic model—an admirable accomplishment considering EBMM’s long and storied history.
Ernie Ball Music Man StingRay II Cory Wong Signature Electric Guitar - Charcoal Blue with Rosewood Fingerboard
StingRay II Cory Wong - Charcoal BlueThe Melvins' Buzz Osborne joins the party to talk about how he helped Kurt Cobain find the right sounds.
Growing up in the small town of Montesano, Washington, Kurt Cobain turned to his older pal Buzz Osborne for musical direction. So on this episode, we’re talking with the Melvins leader about their friendship, from taking Cobain to see Black Flag in ’84 to their shared guitar journey and how they both thought about gear. And in case you’ve heard otherwise, Kurt was never a Melvins roadie!
Osborne’s latest project is Thunderball from Melvins 1983, something of a side trajectory for the band, which harkens back to this time in Osborne’s life. We dig into that and how it all relates and much more.
In challenging times, sometimes elemental music, like the late Jessie Mae Hemphill’s raucous Mississippi hill country blues, is the best salve. It reminds us of what’s truly essential––musically, culturally, and emotionally. And provides a restorative and safe place, where we can open up, listen, and experience without judgement. And smile.
I’ve been prowling the backroads, juke joints, urban canyons, and VFW halls for more than 40 years, in search of the rawest, most powerful and authentic American music. And among the many things I’ve learned is that what’s more interesting than the music itself is the people who make it.
One of the most interesting people I’ve met is the late Jessie Mae Hemphill. By the time my wife, Laurie Hoffma, and I met Jessie Mae, on a visit to her trailer in Senatobia, Mississippi, she’d had a stroke and retired from performing, but we’d been fortunate to see her years before at the New Orleans Jazz & Heritage festival, where she brought a blues style that was like quiet thunder, rumbling with portent and joy and ache, and all the other stuff that makes us human, sung to her own droning, rocking accompaniment on an old Gibson ES-120T.
To say she was from a musical family is an understatement. Her grandfather, Sid, was twice recorded by Alan Lomax for the Library of Congress. While Sid played fiddle, banjo, guitar, harmonica, keyboards, and more, he was best known as the leader of a fife-and-drum band that made music that spilled directly from Africa’s main artery. Sid was Jessie Mae’s teacher, and she learned well. In fact, you can see her leading her own fife-and-drum group in Robert Mugge’s wonderful documentary Deep Blues(with the late musician and journalist Robert Palmer as on-screen narrator), where she also performs a mournful-but-hypnotic song about betrayal—solo, on guitar—in Junior Kimbrough’s juke joint.
That movie, a 1982 episode of Mr. Rogers’ Neighborhood (on YouTube) where she appears as part of Othar Turner’s Gravel Springs fife-and-drum band, and worldwide festival appearances are as close as Jessie Mae ever got to fame, although that was enough to make her important and influential to Bonnie Raitt, Cat Power, and others. And she made two exceptional albums during her lifetime: 1981’s She-Wolf and 1990’s Feelin’ Good. If you’re unfamiliar with North Mississippi blues, their sound will be a revelation. The style, as Jessie Mae essayed it, is a droning, hypnotic joy that bumps along like a freight train full of happily rattling box cars populated by carefree hobos. Often the songs ride on one chord, but that chord is the only one that’s needed to put the music’s joy and conviction across. Feelin’ Good, in particular, is essential Jessie Mae. Even the songs about heartbreak, like “Go Back To Your Used To Be” and “Shame on You,” have a propulsion dappled with little bends and other 6-string inflections that wrap the listener in a hypnotic web. Listening to Feelin’ Good, it’s easy to disappear in the music and to have all your troubles vanish as well—for at least as long as its 14 songs last.“She made it clear that she had a gun—a .44 with a pearl handle that took up the entire length of her handbag.”
The challenge I’ve long issued to people unfamiliar with Jessie Mae’s music is: “Listen to Feelin’ Good and then tell me if you’re not feeling happier, more cheerful, and relaxed.” It truly does, as the old cliché would have it, make your backbone slip and your troubles along with it. Especially uptempo songs like the scrappy title track and the charging “Streamline Train.” There’s also an appealing live 1984 performance of the latter on YouTube, with Jessie Mae decked out in leopard-print pants and vest, playing a tambourine wedged onto her left high-heel shoe––one of her stylish signatures.
Jessie Mae was a complex person, caught between the old-school dilemma of playing “the Devil’s music” and yearning for a spiritual life, sweet as pecan pie with extra molasses but quick to turn mean at any perceived slight. She also spent much of her later years in poverty, in a small trailer with a hole in the floor where mice and other critters got in. And she was as mistrustful of strangers as she was warm once she accepted you into her heart. But watch your step before she did. On our first visit to her home, she made it clear that she had a gun—a .44 with a pearl handle that took up the entire length of her handbag and would make Dirty Harry envious.
Happily, she took us into her heart and we took her into ours, helping as much as we could and talking often. She was inspiring, and I wrote a song about her, and even got to perform it for her in her trailer, which was just a little terrifying, since I knew she would not hold back her criticism if she didn't like it. Instead, she giggled like a kid and blushed, and asked if I’d write one more verse about the artifacts she’d gathered while touring around the world.
Jessie Mae died in 2006, at age 82, and, as happens when every great folk artist dies, we lost many songs and stories, and the wisdom of her experience. But you can still get a whiff of all that––if you listen to Feelin’ Good.
Intermediate
Intermediate
How David Gilmour masterully employs target notes to make his solos sing.
When I was an undergraduate jazz performance major struggling to get a handle on bebop improvisation, I remember my professor Dave LaLama admonishing me, “If you think playing over the fast tunes is hard, wait until you try playing over the ballads. What Dr. Lalama was trying to impart was that playing fast scales over fast changes could get you by, but playing melodically over slow tempos, when your note choices are much more exposed, would really test how well you could create meaningful phrases.
Although getting past the “this scale works over these chords” approach to improvisation generally requires hours of shedding, aiming for particular target notes (specific notes over specific chords) is an optimum strategy to maximize your practice time. In the realm of rock guitar, I can think of no greater master of the melodic target note technique while playing ballads than David Gilmour.
For the unfamiliar few, Gilmour was first enlisted by fledgling psychedelic rockers Pink Floyd in 1967, when original guitarist/vocalist Syd Barrett began having drug-induced struggles with mental health. The band experimented with various artistic approaches for several years before refining them into a cohesive “art rock” sound by the early ’70s. The result was an unbroken streak of classic, genre-defining conceptual albums that included Meddle, The Dark Side of the Moon, Wish You Were Here, Animals, and The Wall. Although bassist/vocalist Roger Waters assumed the role of de facto bandleader and primary songwriter, Gilmour was a significant contributor who was praised for his soulful singing and expertly phrased lead playing that seemed to magically rework pedestrian blues phrases into sublimely evocative melodies. His focus on musicality over excessive displays of technique made him a musician’s musician of sorts and earned him a stellar reputation in guitar circles. When Roger Waters left Pink Floyd in the mid ’80s, Gilmour surprised many by calmly assuming the leadership mantle, leading the band through another decade of chart-topping albums and stadium tours. Although Pink Floyd are not officially broken up (keyboardist and founding member Richard Wright died in 2008 while Gilmour and drummer Nick Mason joined forces with Ukrainian singer Andriy Khlyvnyuk on the one-off single “Hey Hey Rise Up” in 2022), Gilmour has mostly spent the last few decades concentrating on his solo career. His latest release, Luck and Strange, features his wife, novelist Polly Sampson, as primary lyricist and daughter Romany Gilmour as vocalist on several tracks. His recent tour filled arenas around the world.
Let’s take a page from Gilmour’s hallowed playbook and see how incorporating a few well-chosen target notes can give our playing more melody and structure.
For the sake of simplicity, all the examples use the Gm/Bb major pentatonic scale forms. In my experience as a teacher, I find that most students can get a pretty solid handle on the root-position, Form-I minor pentatonic scale but struggle to incorporate the other four shapes while playing lead. One suggestion I give them is to work on playing the scales from the top notes down and focus on the four highest strings only. I believe this is a more logical and useful approach to incorporating these forms into your vocabulary. Try playing through Ex. 1, Ex. 2, Ex. 3, and Ex. 4, which are based on the top-down approach of the Form I, Form II, Form IV, and Form I (up an octave) shapes respectively.
Ex. 1
Ex. 2
Ex. 3
Ex. 4
Once you’ve gotten a handle on the scales, try playing Ex. 5, which is loosely based on the extended introduction to Pink Floyd’s “Shine On You Crazy Diamond.” We begin by soloing over a static Gm chord for four measures. As target notes, I’ve chosen the root and 5th of the G minor chord ( the notes G and D, respectively). In the first measure, we’re starting in a minor pentatonic Form I with a bend up to the root of the Gm chord. A flurry of notes on beat 4 sets us up for the bend to the D in the second measure. The D note is again targeted in measure three—this time up an octave via a shift into the minor pentatonic Form II shape. Measure four aims for the G tonic up an octave, but ends with a bend that targets a C—the root of the IVm (Cm) chord in the final measure. By focusing on target notes and connecting them with embellishing licks, your lead lines will have a much better sense of direction and melodic narrative. Also, by only targeting the root and 5th of the chord, the target note approach will be easily transferrable to songs in a G blues context (G pentatonic minor over a G major or G dominant tonality).
Ex. 5
A further exploration of this approach, Ex. 6 begins with a two-beat pickup that resolves to the scale tonic G. This time however, the G isn’t serving as the root of the Im chord. Instead, it’s the 5th of Cm—the IVm chord. Employing the root of the pentatonic scale as the fifth of the IVm chord is a textbook Gilmour-ism and you can hear him use it to good effect on the extended intro to “Echoes” from Live in Gdansk. When approaching the C on beat 2 of the second full measure, bend up from the Bb on the 6th fret of the 1st string then slide up to the C on the 8th fret without releasing the bend or picking again. In the final measure, I’ve introduced two Db notes, which serve as the b5 “blue note” of the scale and provide melodically compelling passing tones on the way to the G target note on beat 4.
Ex. 6
Exclusively positioned in the Form-IV G minor pentatonic shape, Ex. 7 is based on a bluesy lick over the I chord in the first and third measures that alternately targets a resolution to the root of the IV chord (C ) and the root of the V chord (D7#9) in the second and fourth measures. Being able to resolve your lead phrases to the roots of the I, IV, and V chords on the fly is an essential skill ace improvisers like Gilmour have mastered.
Ex. 7
Now let’s turn our attention to the Bb major pentatonic scale, which is the relative major of G minor. Play through the Form I and Form II shapes detailed in Ex. 8 and Ex. 9 below. You’ll see I’ve added an Eb to the scale (technically making them hexatonic scales). This allows us a bit more melodic freedom and—most importantly—gives us the root note of the IV chord.
Ex. 8
Ex. 9
Channeling the melodic mojo of Gilmour’s lead jaunts on Pink Floyd’s “Mother” and “Comfortably Numb,” Ex. 10 targets chord tones from the I, IV, and V (Bb, Eb, and F) chords.
The muted-string rake in first measure helps “sting” the F note, which is the 5th of the Bb. Measure two targets a G note which is the 3rd of the Eb. This same chord/target note pairing is repeated in the third and fourth measures, although the G is now down an octave. For the F and Eb chords of measures five and six, I’ve mirrored a favorite Gilmour go-to: bending up to the 3rd of a chord then releasing and resolving to the root (an A resolving to an F for the F chord and a G resolving to an Eb for the Eb chord.) The final measure follows a melodic run down the Bb scale that ultimately resolves on the tonic. Be sure to pay attention to the intonation of all your bends, especially the half-step bend on the first beat of measure seven.
As a takeaway from this lesson, let’s strive to “Be Like Dave” and pay closer attention to target notes when soloing. Identify the roots of all the chords you’re playing over in your scales and aim for them as the beginning and/or ending notes of your phrases. Think of these target notes as support beams that will provide structure to your lead lines and ultimately make them more melodically compelling.