Fig. 1
Unravel the mysteries of series, parallel, and coil-splitting wiring schemes.
This month we're going to explore four ways to configure any humbucker that has 4-conductor wiring. (Note: These wiring schemes are not intended for an old-school humbucker with 2-conductor wiring, but rather the modern humbucker that allows coil-splitting and other wiring mods.)
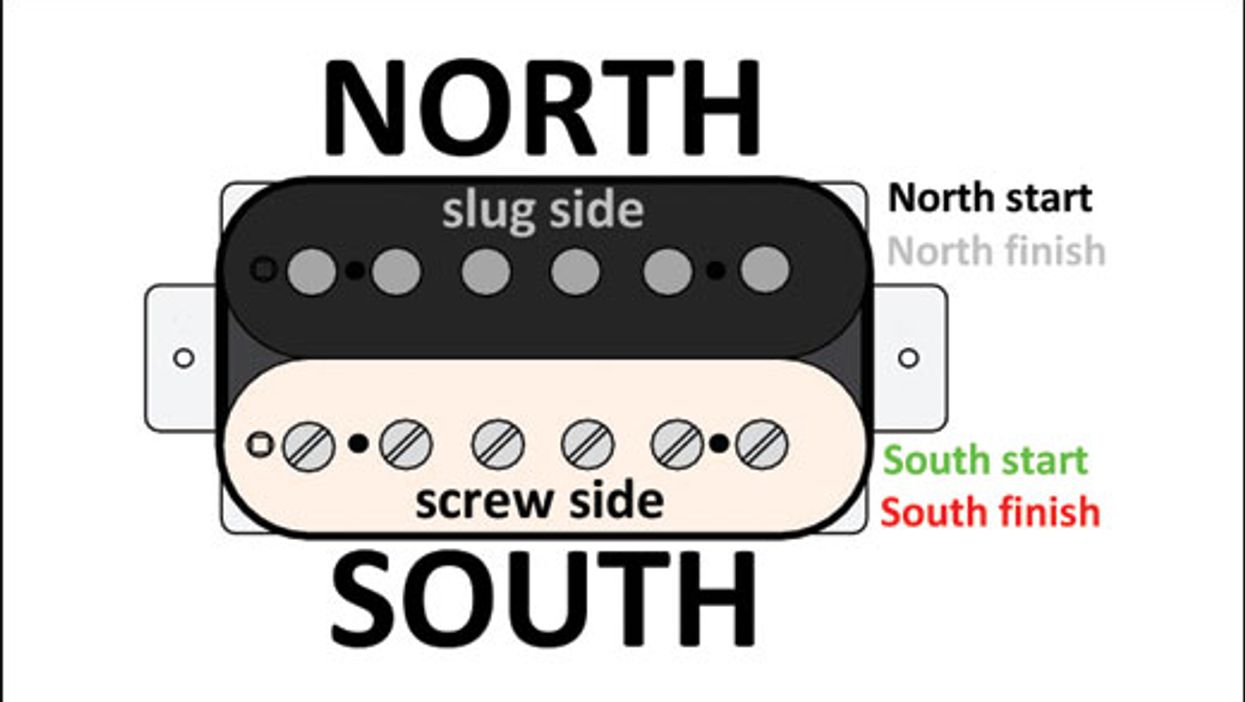
For starters, let's review our terminology. Looking at a humbucker from the front, we call the lower coil "south" and the upper coil "north." The south coil is always the "screw side," while the north coil is the "slug side." The latter is named for the type of magnetic material used on this coil. Each coil is wrapped with very fine wire, and this wire has a start and a finish. This results in a total of five wires coming from the humbucker:
- North coil start plus north coil finish.
- South coil start plus south coil finish.
- Ground.
The bare wire or braided shield always goes to ground—there's no exception—so that leaves us with four wires to play with. Having access to the start and finish of each coil wire not only makes it easy to solve potential out-of-phase issues (a subject we'll cover in another column), but it also gives you the option to wire up your humbucker in one of four different ways. If you're ambitious, you can use a switch to put several options at your fingertips.
The south coil is always the "screw side," while the north coil is the "slug side."
Every pickup company uses its own color-code scheme for these four wires. This makes discussing humbucker wiring a little more confusing than necessary, but that's the way it is. As usual, I'll use the Seymour Duncan color code as a quasi-standard. You should be able to get color-code information for your pickups from their maker, and there are several charts available on the internet that let you compare color-code schemes from different manufacturers. You can use such charts to translate the following wirings into whatever color code corresponds to your particular brand of humbucker. Fortunately that's not too hard—you only need to know which color wire on your pickup indicates the start or finish of which coil. Once you have that info, you can draw up a reference chart to decode this column's wirings.
Here's the Seymour Duncan 4-conductor humbucker color code:
- North coil start is black; north coil finish is white.
- South coil start is green; south coil finish is red.
- Ground is bare wire.
Fig. 1 sums up what we've covered so far in the Seymour Duncan format. Now let's walk through the four ways you can wire up a humbucker. Ready?
Standard humbucker wiring: both coils connected in series.
This is the default wiring in almost every guitar loaded with one or more humbuckers because it produces a warm, fat tone with maximum output while offering hum-cancelling capability. (It's also the factory standard for all humbuckers with 2-conductor wiring consisting of only hot and ground.)
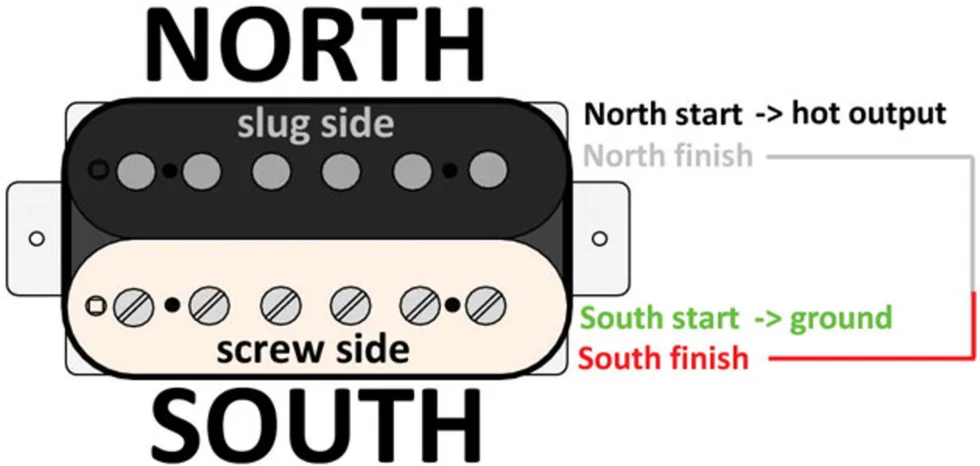
Fig. 2
illustration courtesy of singlecoil.com
Here are the connections for series wiring (Fig. 2):
- North coil start is the hot output.
- North coil finish and south coil finish are soldered together and taped off (this is the series link).
- South coil start is soldered together with the bare wire going to ground.
“Single-coil" humbucker wiring: both coils connected in parallel.
This option gives you a single-coil-like tone, but still retains hum-cancelling capability. It doesn't deliver a crystal-clear Strat or Tele tone, but to my ears it at least resembles a single-coil pickup—maybe closer to a P-90 than to a standard single-coil. Every type of humbucker sounds a little different when wired this way, so it's simply a matter of giving it a try to determine if you like the sound.
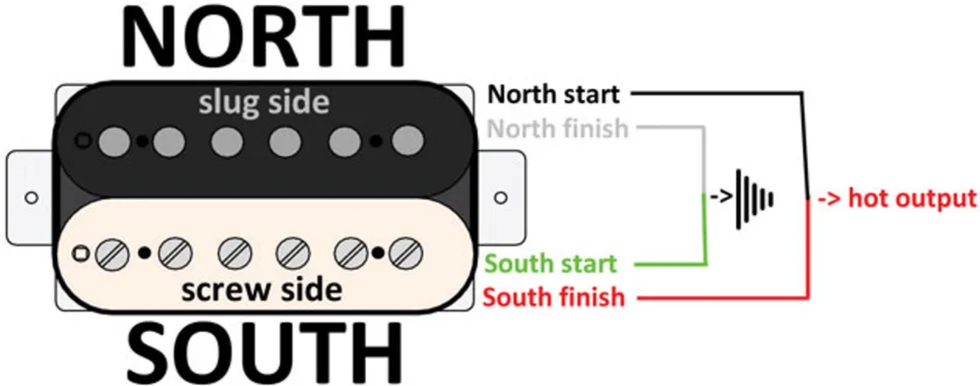
Fig. 3
illustration courtesy of singlecoil.com
Parallel wiring (Fig. 3) requires the following connections:
- North coil start and south coil finish are soldered together as the hot output.
- North coil finish and south coil start are soldered together with the bare ground wire.
Coil-splitting humbucker wiring #1: splitting to the south coil.
This wiring splits the humbucker in half, shunting one coil to ground and leaving the other coil engaged like a true single-coil pickup. In this mode, the hum-cancelling function is no longer active, so you'll get the hum and noise of any single-coil pickup. But don't expect a true Strat or Tele tone: If that's your goal, investigate the special breed of humbuckers that are made out of two real single-coil pickups. The downside of this type of pickup is that it doesn't sound great in full humbucker mode, so, as we're so often reminded, it's about compromise.
Splitting to the humbucker's south coil, which is the screw side, is only recommended for neck pickups. (You'll learn why we're excluding the bridge pickup when we get to our fourth wiring scheme.) Let's also remember that in most guitars with neck humbuckers, the south, screw-side coil lies closest to the neck.
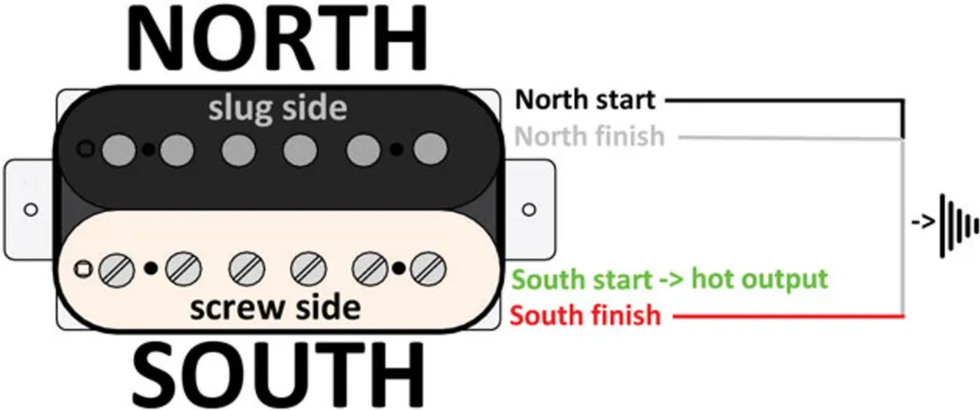
Fig. 4
illustration courtesy of singlecoil.com
For this coil-splitting wiring (Fig. 4), you need the following connections:
- South coil start is the hot output.
- North coil start, north coil finish, and south coil finish are soldered together with the bare ground wire.
Coil-splitting humbucker wiring #2: splitting to the north coil.
This wiring follows the same concept as our previous coil-splitting recipe, but leaves the north coil active—that's the slug side. This version is recommended for a bridge humbucker because pole-piece slugs deliver a fuller sound than pole-piece screws.
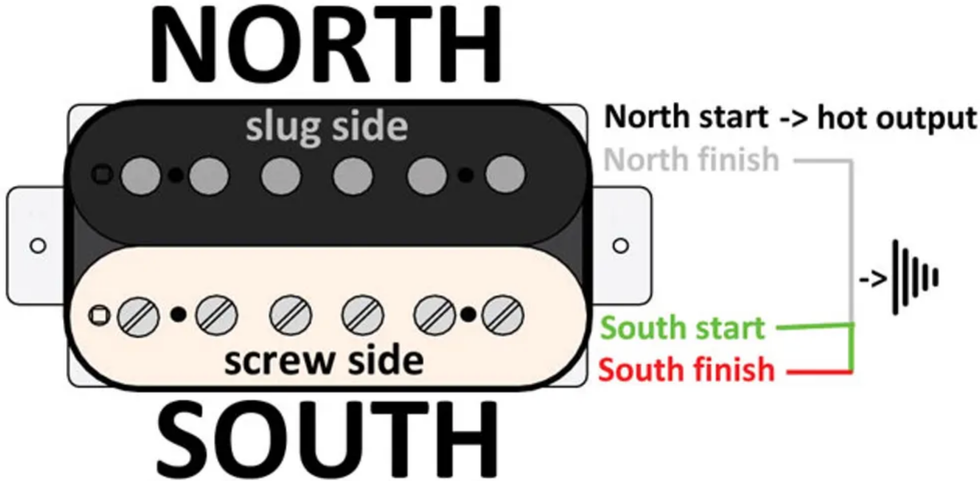
Fig. 5
illustration courtesy of singlecoil.com
Here are the connections for our second coil-splitting wiring (Fig. 5):
- North coil start is the hot output.
- North coil finish, south coil start, and south coil finish are soldered together with the bare ground wire.
Well, that's it. In a future column we'll explore how to integrate and control all these options with the help of a switching device. And, of course, we'll learn how to compensate for possible out-of-phase issues that can occur when you combine several humbuckers or a humbucker with a single-coil. But next month, we'll dig into a project designed to make a Telecaster more sonically flexible. Until then ... keep on modding!
[Updated 9/15/21]
- How to Get the Most out of Hum-Sing-Hum Wiring - Premier Guitar ›
- Mod Garage: Three Ways to Wire a Tone Pot - Premier Guitar ›
- Mod Garage: “Jimmy Page” Les Paul Wiring - Premier Guitar ›
- Adding Series Switching To Your Strat - Premier Guitar ›
- How to Change Pickup Wires (& Why) - Premier Guitar ›
-
Crank the heat! PG's John Bohlinger plugs into the boutique-built Sterling Vermin, a modern twist on the iconic Rat distortion. Hear it rip through Strats, Teles, and a Les Paul with classic snarl and smooth silicon/BAT41 clipping.
Sterling Vermin RAT
The Sterling Vermin was born from a desire for something different — something refined, with the soul of a traditional RAT pedal, but with a voice all its own.
Built in small batches and hand-soldered in ACT’s Jackson, Missouri headquarters, the Sterling Vermin is a work of pure beauty that honors the brand legacy while taking a bold step forward for creativity.
The Sterling Vermin features the LM741 Op-Amp and a pair of selectable clipping diodes. Players can toggle between the traditional RAT silicon diode configuration for a punchy, mid-range bite, or the BAT41 option for a smoother, more balanced response. The result is a pedal that’s equally at home delivering snarling distortion or articulate, low-gain overdrive, with a wide, usable tonal range throughout the entire gain spectrum.
The pedal also features CTS pots and oversized knobs for even, responsive control that affords a satisfying smoothness to the rotation, with just the right amount of tension. Additionally, the polished stainless-steel enclosure with laser-annealed graphics showcases the merging of the pedal’s vintage flavor and striking design.
From low-gain tones reminiscent of a Klon or Bluesbreaker, to high-gain settings that flirt with Big Muff territory — yet stay tight and controlled — the Sterling Vermin is a masterclass in dynamic distortion. With premium components, deliberate design and a focus on feel, the Sterling Vermin is more than a pedal, it’s a new chapter for RAT.
The veteran Florida-born metalcore outfit proves that you don’t need humbuckers to pull off high gain.
Last August, metalcore giants Poison the Well gave the world a gift: They announced they were working on their first studio album in 15 years. They unleashed the first taste, single “Trembling Level,” back in January, and set off on a spring North American tour during which they played their debut record, The Opposite of December… A Season of Separation, in full every night.
PG’s Perry Bean caught up with guitarists Ryan Primack and Vadim Taver, and bassist Noah Harmon, ahead of the band’s show at Nashville’s Brooklyn Bowl for this new Rig Rundown.
Brought to you by D’Addario.Not-So-Quiet As a Mouse
Primack started his playing career on Telecasters, then switched to Les Pauls, but when his prized LPs were stolen, he jumped back to Teles, and now owns nine of them.
His No. 1 is this white one (left). Seymour Duncan made him a JB Model pickup in a single-coil size for the bridge position, while the neck is a Seymour Duncan Quarter Pound Staggered. He ripped out all the electronics, added a Gibson-style toggle switch, flipped the control plate orientation thanks to an obsession with Danny Gatton, and included just one steel knob to control tone. Primack also installed string trees with foam to control extra noise.
This one has Ernie Ball Papa Het’s Hardwired strings, .011–.050.
Here, Kitty, Kitty
Primack runs both a PRS Archon and a Bad Cat Lynx at the same time, covering both 6L6 and EL34 territories. The Lynx goes into a Friedman 4x12 cab that’s been rebadged in honor of its nickname, “Donkey,” while the Archon, which is like a “refined 5150,” runs through an Orange 4x12.
Ryan Primack’s Pedalboard
Primack’s board sports a Saturnworks True Bypass Multi Looper, plus two Saturnworks boost pedals. The rest includes a Boss TU-3w, DOD Bifet Boost 410, Caroline Electronics Hawaiian Pizza, Fortin ZUUL +, MXR Phase 100, JHS Series 3 Tremolo, Boss DM-2w, DOD Rubberneck, MXR Carbon Copy Deluxe, Walrus Slo, and SolidGoldFX Surf Rider III.
Taver’s Teles
Vadim Taver’s go-to is this cherryburst Fender Telecaster, which he scored in the early 2000s and has been upgraded to Seymour Duncan pickups on Primack’s recommendation. His white Balaguer T-style has been treated to the same upgrade. The Balaguer is tuned to drop C, and the Fender stays in D standard. Both have D’Addario strings, with a slightly heavier gauge on the Balaguer.
Dual-Channel Chugger
Taver loves his 2-channel Orange Rockerverb 100s, one of which lives in a case made right in Nashville.
Vadim Taver’s Pedalboard
Taver’s board includes an MXR Joshua, MXR Carbon Copy Deluxe, Empress Tremolo, Walrus ARP-87, Old Blood Noise Endeavors Reflector, MXR Phase 90, Boss CE-2w, and Sonic Research Turbo Tuner ST-200, all powered by a Voodoo Lab Pedal Power 2 Plus.
Big Duff
Harmon’s favorite these days is this Fender Duff McKagan Deluxe Precision Bass, which he’s outfitted with a Leo Quan Badass bridge. His backup is a Mexico-made Fender Classic Series ’70s Jazz Bass. This one also sports Primack-picked pickups.
Rental Rockers
Harmon rented this Orange AD200B MK III head, which runs through a 1x15 cab on top and a 4x10 on the bottom.
Noah Harmon’s Pedalboard
Harmon’s board carries a Boss TU-2, Boss ODB-3, MXR Dyna Comp, Darkglass Electronics Vintage Ultra, and a Voodoo Lab Pedal Power 2 Plus. His signal from the Vintage Ultra runs right to the front-of-house, and Harmon estimates that that signal accounts for about half of what people hear on any given night.
Kiesel Guitars has introduced their newest solid body electric guitar: the Kyber.
With its modern performance specs and competitive pricing, the Kyber is Kiesel's most forward-thinking design yet, engineered for comfort, quick playing, and precision with every note.
Introducing the Kiesel Kyber Guitar
- Engineered with a lightweight body to reduce fatigue during long performances without sacrificing tone. Six-string Kybers, configured with the standard woods and a fixed bridge, weigh in at 6 pounds or under on average
- Unique shape made for ergonomic comfort in any playing position and enhanced classical position
- The Kyber features Kiesel's most extreme arm contour and a uniquely shaped body that enhances classical position support while still excelling in standard position.
- The new minimalist yet aggressive headstock pairs perfectly with the body's sleek lines, giving the Kyber a balanced, modern silhouette.
- Hidden strap buttons mounted on rear for excellent balance while giving a clean, ultra-modern look to the front
- Lower horn cutaway design for maximum access to the upper frets
- Sculpted neck heel for seamless playing
- Available in 6 or 7 strings, fixed or tremolo in both standard and multiscale configurations Choose between fixed bridges, tremolos, or multiscale configurations for your perfect setup.
Pricing for the Kyber starts at $1599 and will vary depending on options and features. Learn more about Kiesel’s new Kyber model at kieselguitars.com
The Sunset is a fully analog, zero latency bass amplifier simulator. It features a ¼” input, XLR and ¼” outputs, gain and volume controls and extensive equalization. It’s intended to replace your bass amp both live and in the studio.
If you need a full sounding amp simulator with a lot of EQ, the Sunset is for you. It features a five band equalizer with Treble, Bass, Parametric Midrange (with frequency and level controls), Resonance (for ultra lows), and Presence (for ultra highs). All are carefully tuned for bass guitar. But don’t let that hold you back if you’re a keyboard player. Pianos and synthesizers sound great with the Sunset!
The Sunset includes Gain and master Volume controls which allow you to add compression and classic tube amp growl. It has both ¼” phone and balanced XLR outputs - which lets you use it as a high quality active direct box. Finally, the Sunset features zero latency all analog circuitry – important for the instrument most responsible for the band’s groove.
Introducing the Sunset Bass Amp Simulator
- Zero Latency bass amp simulator.
- Go direct into the PA or DAW.
- Five Band EQ:
- Treble and Bass controls.
- Parametric midrange with level and frequency controls.
- Presence control for extreme highs.
- Resonance control for extreme lows.
- Gain control to add compression and harmonics.
- Master Volume.
- XLR and 1/4" outputs.
- Full bypass.
- 9VDC, 200mA.
Artwork by Aaron Cheney
MAP price: $210 USD ($299 CAD).