Hello and welcome back to Mod Garage. This month, we will explore the Fender John 5 Ghost Telecaster wiring and how you can adopt it for your own Telecaster. Fender recently released this signature Telecaster in a limited edition of 600 pieces, and they quickly sold out. Before many serious musicians could grab one, collectors with big purses bought them all. So, your only chance to get one now is to look for a used one, or hope that Fender will have mercy and build some more. Or, you can read on to learn what’s inside and how to build your own version of this guitar.
I have to confess that this is a matter of heart for me because I’m a John 5 fan. I’m really fascinated with his playing style. This guy can play it all. No matter if he’s picking country swing or shredding death metal, his playing is very close to the traditional tones and techniques, but is always in his own style. Besides this, he’s a very humble guy with a great sense of humor, so I’m really happy to write a piece about his new signature Telecaster.
Fender worked very closely with John 5 on this model. At its core, this guitar is a standard HH Telecaster in arctic white—including the neck and fretboard—with red accents that include the binding, nut, knobs, pickups, and more. It’s a matter of taste, if you like this flashy aesthetic or not.
Let’s have a look at the basic features, so you have a shopping list if you want to build your own:
- alder body with HH pickup routings and binding
- maple neck with a medium C shape, 9.5" radius, and 22 narrow tall frets
- 42 mm synthetic bone nut
- string-through Tele bridge with humbucker pickup cutout and six block steel saddles
- sealed locking tuners
- 1-piece pickguard/control plate combination in mirrored chrome
- .009–.042 nickel-plated steel strings
What makes this guitar really stand out besides its appearance is the wiring, which I think is very special but also minimal. You can put this wiring inside any Telecaster, as long as it accepts two humbuckers. It consists of:
- two DiMarzio D Activator humbucker pickups
- master volume control (most likely 500k audio) without treble-bleed network
- Gibson-style 3-way pickup-selector toggle switch
- momentary kill switch
That’s all John 5 needs to sound like no one else, so let’s go through the pieces step by step and see what is under the hood.
Pickups
The DiMarzio D Activator humbuckers are passive mid-output pickups with ceramic magnets that have been available since 2006. In the John 5 Ghost Telecaster, both pickups are permanently wired to run as full humbuckers with both coils in series. For the wiring diagram, I used the DiMarzio color code: Green and bare wire are going to ground, black and white are connected and taped off, red is the hot output. If you want to use different humbuckers, you will have to transfer the colors of the wires using one of the numerous color code charts on the internet.
On the Ghost Tele, the pickups are red, but they are available in many different colors, too.
Pots
There is only a single master volume control, without a treble-bleed network. I haven’t had an opportunity to look at one of these guitars in person, and Fender has not released a wiring diagram, but I’m pretty sure they choose a 500k audio pot together with these pickups, so that’s what I also recommend using.
John 5 chose a Gibson-style “speed knob” in red, but any knob will work.
Selector Switch
The John 5 model uses a standard Gibson 3-way pickup-selector toggle switch (with a red tip, of course) mounted to the upper bout for swift pickup switching. It should be wired like this:
- bridge pickup as full humbucker alone
- both pickups as full humbuckers in parallel
- neck pickup as full humbucker alone
Kill Switch
Instead of a tone control, there is a kill switch beside the master volume pot (in red ... what else?) that Fender calls “arcade style.” And yes, it reminds me a lot of the hardware of the ’80s game consoles .... Space Invaders or Donkey Kong, anyone?
A kill switch is a momentary switch that is usually used for machine gun sounds or stuttering effects. (A momentary switch only cuts off your guitar’s signal against ground while being pressed and resumes normal sound when released.) For a kill switch, you only need a basic on/off 2-position switch. An SPST (single pole-single throw) switch is ideal. SPST switches have only two contacts on the bottom and the switch simply connects (or disconnects) these two terminals to each other when the switch is pressed.
“What makes this guitar really stand out besides its appearance is the wiring, which I think is very special but also minimal.”
Be sure to buy a good quality switch, and make sure it’s a momentary and not a latching type. The type you need is a “normally open” (off) switch. When you are pressing the switch, you make a connection between the two contacts. The switch returns to the off position when you release the button.
There are special high-quality, all-metal kill switches for guitars available. There are also models with an LED inside if you are looking for a cool look. But keep in mind that you will need a battery for the LED, plus space inside the guitar to install it.
Here we go for the wiring. As usual, I substituted all ground connections with the international symbol for ground to keep the diagram as clean as possible. The wiring itself is very easy to do and is also a good beginner’s project.
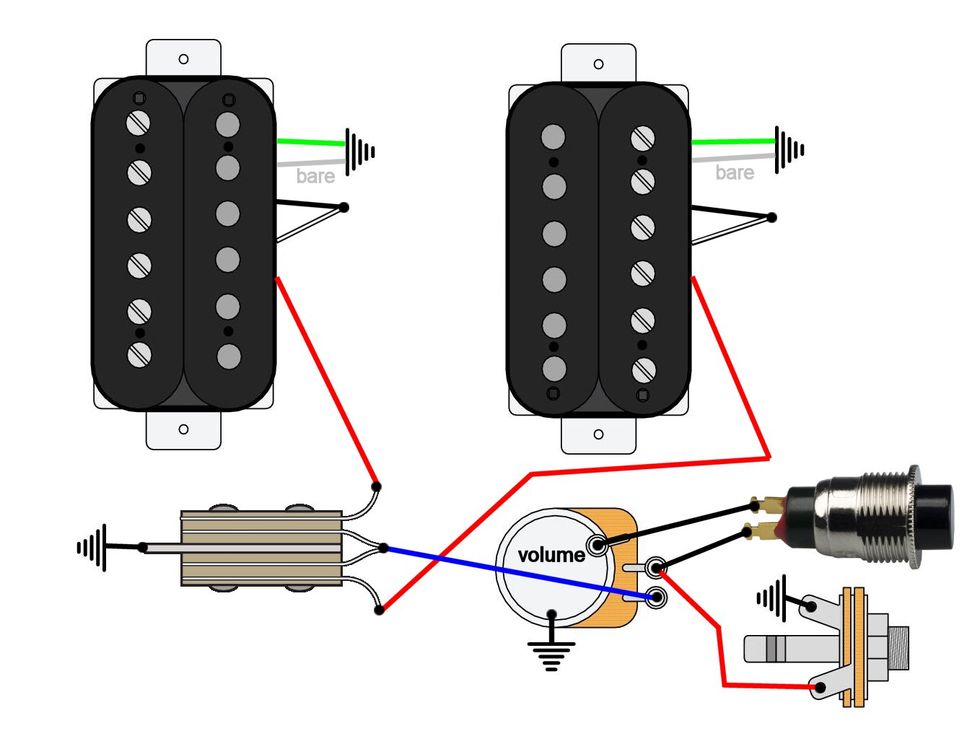
Fig. 1
Illustration courtesy of singlecoil.com
That’s it! Next month, we will take a deep dive into something I received many email requests for, because it’s always confusing and not easy to understand: phase and polarity, and the difference between these two pickup parameters. So, stay tuned!
Until then ... keep on modding!


