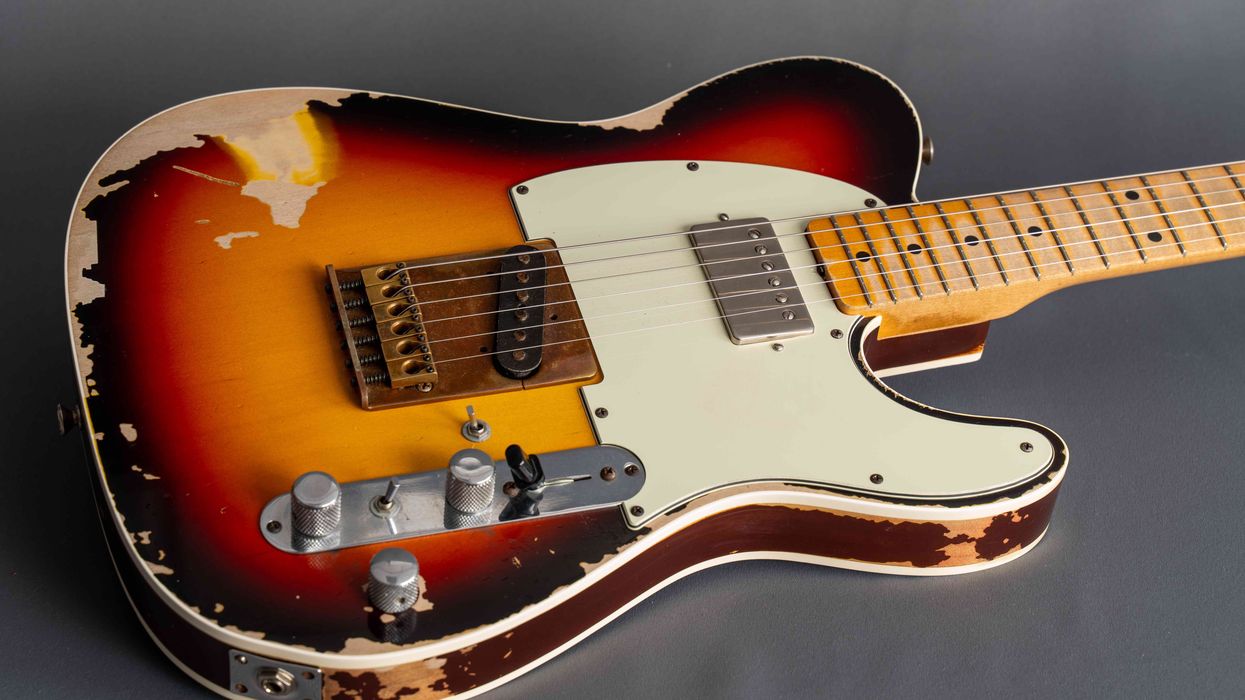
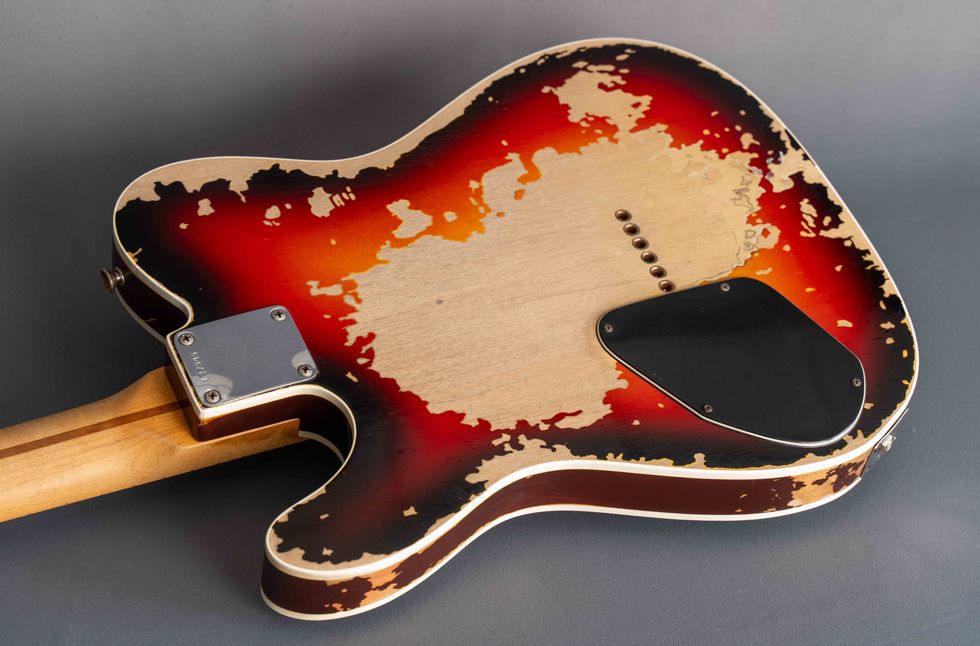
Fender just released a signature model for one of Nashville's most prolific session guitarists. Let's look inside his number one guitar.
Welcome back to Mod Garage. Let's take a closer look at what's usually referred to as the Brent Mason Telecaster wiring. It's also been called "Telecaster blend wiring" or "Nashville Telecaster wiring," and I think it's time to cover this one in detail for several reasons. First and foremost, I've received numerous requests from you, dear readers, to do this. Fender recently released a faithful replica of Brent Mason's Telecaster, and also, my PG colleague John Bohlinger did a great Rig Rundown video with Mason just weeks ago. Mason is an outstanding player and absolutely nice guy so it's only logical to cover the wiring of his famous '67 Telecaster. Unless you're living in a cave, you've heard about Mason and his playing, which he's laid down on more Nashville studio records than one can count.
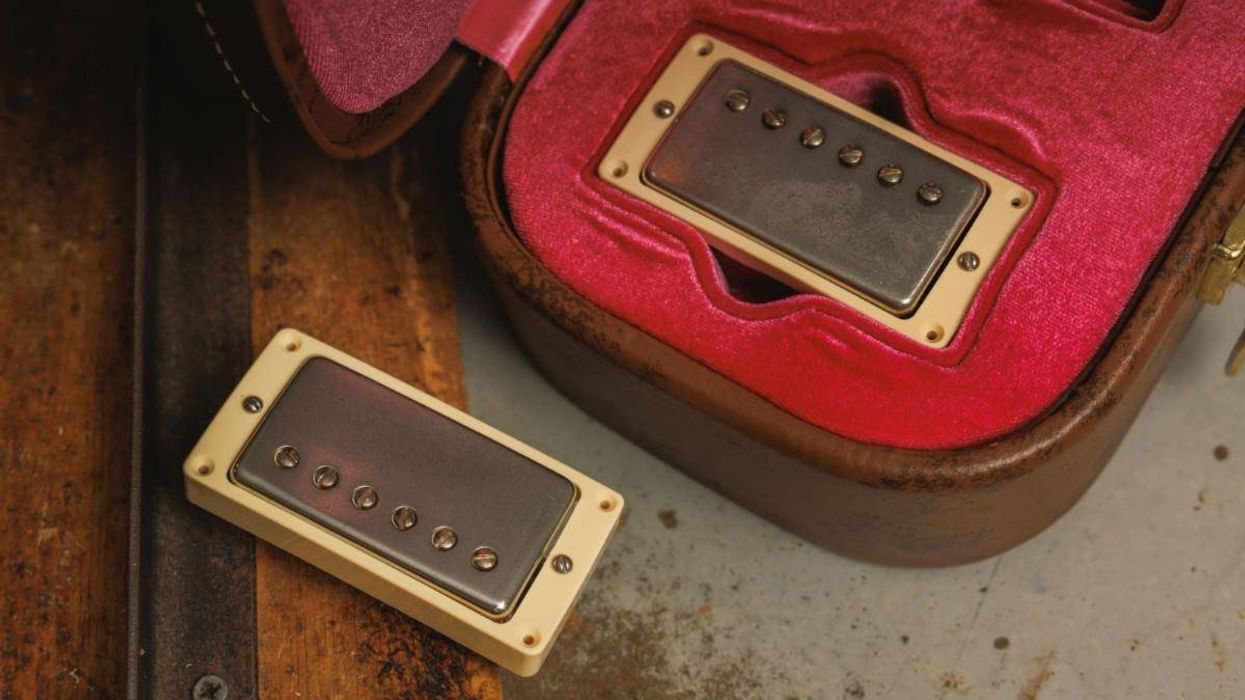
Mason's famous "automobile primer gray" 1967 Telecaster has three humbucker pickups and three controls. It's basically a standard 3-way Tele pickup-switching circuit plus an additional volume control to blend in the middle pickup. These are the pickups Mason uses in his Telecaster, all from the Seymour Duncan company:
Rig Rundown: Brent Mason [2021]
- Neck position: Vintage Mini Humbucker (Mason tenderly calls it a "Baby Humbucker"), built-in 180 degrees flipped, so the open pole pieces are facing the bridge rather than the neck for some more high-end and clarity in the tone. The pickup is wired with both coils in series for full humbucking functionality and no control to split it.
- Middle position: Mason is using an older version of the Hot Stack Strat STK-S2 with the red pickup cover and engraved Seymour Duncan logo on top. The current model has a white cover that's partly open on top. Hopefully, the iconic early red pickup cover will be available again for that special look. The pickup is wired with both coils in series for full humbucking functionality and no control to split it.
- Bridge position: Vintage Stack Tele STK-T3b, which is wired with both coils in series for full humbucking functionality and no control to split it.
These are the pickups installed in Brent's original Tele and also the pickups Fender is using for the signature model. This is an HHH pickup combination, by all means. Why Fender labelled it an SSH combination on the webpage ... well, we don't know.
In general, you can use any given pickup combination for this wiring. If you want to be as close as possible, this is your shopping list. If you only want to get in the same ballpark, you should use a vintage-flavored Tele bridge pickup, a hotter (overwound) Stratocaster middle pickup, and a PAF-style humbucker or hot P-90 for the neck position. No matter if they're single-coils or humbuckers, it will work.
"This wiring worked well for Mason right from the start: A hum-free operation is absolutely essential for work in a studio."
Why did Mason choose such an unusual pickup combination, you might ask? According to Mason himself, he didn't have much money in his early career and could only afford one guitar. This had to cover everything he needed in the studio. Brent wanted a Telecaster bridge pickup to cover all the country playing that was popular in the early '90s. For this, he also installed a B-Bender (Joe Glaser system, Mk1 version). He also wanted a Stratocaster tone, especially the in-between tone from bridge and middle together in parallel, and a Les Paul-ish tone from the neck position. So, the pickup combination he chose made sense, and Nashville's Joe Glaser did the wiring for him, which is the reason why Mason named this wiring "Glaser wiring."
This worked well for Mason right from the start: A hum-free operation is absolutely essential for work in a studio. But the wiring underwent some evolution during the years regarding the push-pull pot, which is the master tone control. This was initially wired to split the Hot Stack middle pickup into a single-coil, and all the diagrams of this wiring that are online right now still display this version. Today, the push-pull pot is wired to switch the middle pickup on and off. This is also the way Fender's Mason signature Tele is wired and what I'll be showing you. If you want the older wiring, you can find several examples online. They are also correct, but simply not up to date with Mason's current wiring.
I asked Mason directly about this, and I'm more than happy to share his reply:
"Basically, it's a standard 3-way switch with an extra volume knob that controls the middle pickup. Three knobs, left to right: volume (for neck and bridge), volume (middle), tone (for all 3) with an extra feature to pull on the tone knob to cut the middle pickup off or on. The middle pickup with the volume knob enables you to roll in the desired amount to blend with either neck or bridge. The pull knob on my original '67 Tele cuts the Seymour Duncan Vintage Stack split coil in half to single-coil. Later on, over the years I found that feature useless. We decided to make that tone control knob cut the middle pickup off and on. Upward position is off. The pickups are all Seymour Duncan; Mini Humbucker in front, Hot Stack in middle, and Vintage Stack in bridge." —Brent Mason
Building The Limited-Edition Brent Mason Telecaster | Dream Factory | Fender
So, what do we need for this wiring? We know the pickups, but we don't know exactly what's used for the electronics and how it's wired. Fender didn't release a wiring diagram for the signature model yet and Joe Glaser didn't publish anything about it. My diagram (Fig. 1 - scroll below) will work exactly as it should, but maybe the original guitar is wired slightly different. As you know, many roads lead to Rome.
I was able to find a photo of the wiring Fender did (Photo 1) and extracted a still shot of Brent's original guitar from the Fender video mentioned above (Photo 2).
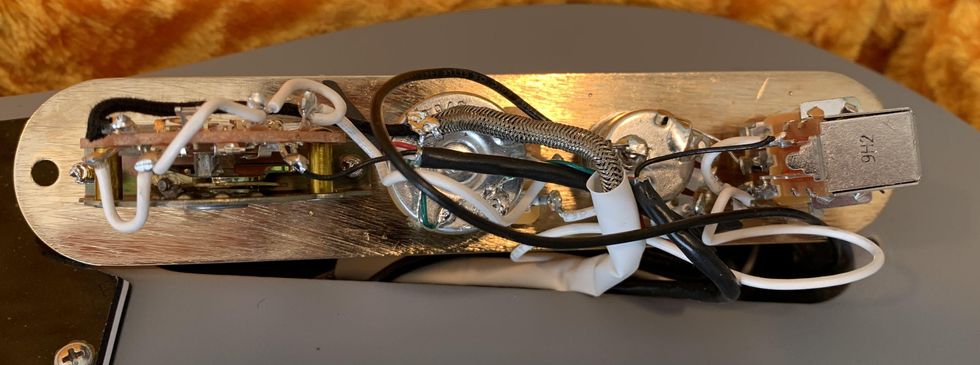
Photo 1
Photo courtesy of FMIC
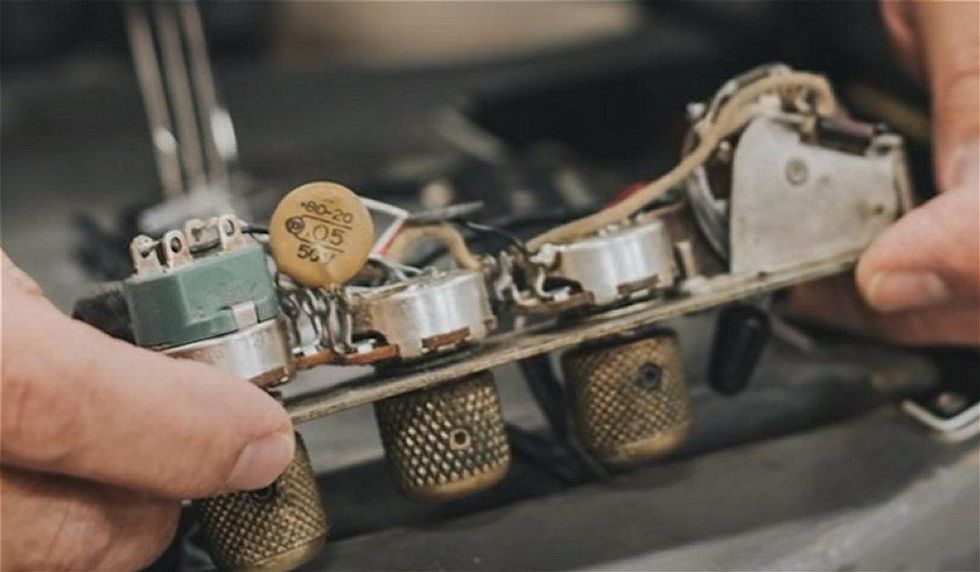
Photo 2
Photo courtesy of FMIC
On these two photos, we can clearly see:
- The push-pull pot is wired to switch the middle pickup on and off.
- All three pickups are wired for full humbucking functionality with both coils in series.
- No treble-bleed networks are used on the two volume pots.
- Mason still has the '67 original Sprague "Circle D" 0.05 uF high-voltage ceramic tone cap in his guitar.
This only leaves us with two unknown parameters: resistance of the three pots, and on/off wiring of the middle pickup. I think it's three 250k audio pots, but if you want a tad more high-end, using a 500k audio push-pull master tone pot is worth a try. I would use two 250k audio volume pots to benefit from the much better taper range compared to a 500k pot—the nature of the (passive) beast.
To activate or cut off the middle pickup there are two different ways: connecting the pickup to the switch or using a push/pull volume pot for the middle pickup. I decided to use the second version because when connecting the pickup directly to the switch, the volume pot stays connected to the circuit, adding some load to it, resulting in less high-end. Please note that the master tone pot will not work on the middle pickup when the master volume is not set to "10" (aka fully opened). When you start to roll down the volume, the middle pickup gets disconnected from the master tone, no matter if you switch the pickup itself or the volume pot—that's part of the game.
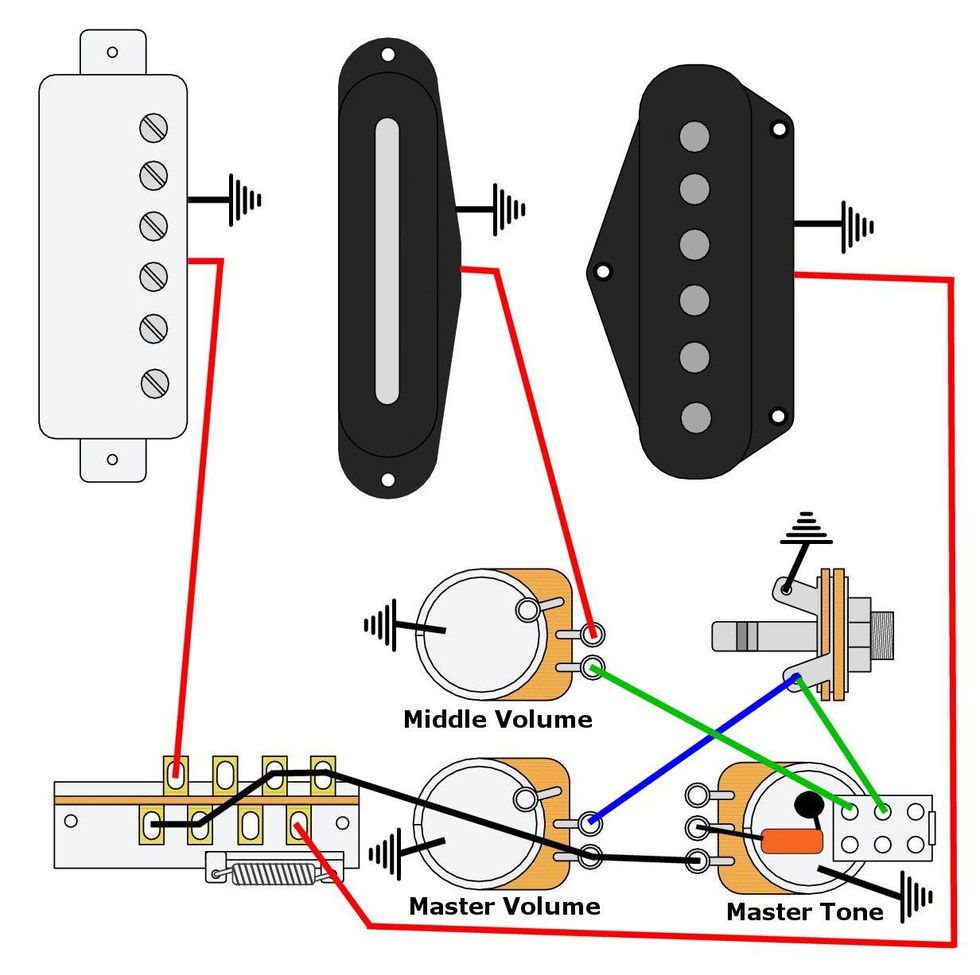
Fig. 1
To keep the wiring diagram (Fig. 1) as clean as possible, I showed all ground connections only with the international symbol for it rather than drawing several black wires through the diagram. I also only show two pickup wires (hot and ground) but keep in mind that these are humbuckers with a four-conductor wiring plus separate ground wire, so you'll have to solder some wires together to end up with only two pickup wires. The separate ground wire always goes directly to ground (casing of a pot, etc.) and assuming you're using Seymour Duncan pickups, you'll have to follow this color code:
- Black wire = hot output
- White and red wire are twisted together, soldered, and isolated
- Green wire = ground
For other pickups, you'll have to use the corresponding color code from the manufacturer. For single-coil pickups, you don't need to do all this.
Is this wiring perfect or are there any mods that can be done? At least it's perfect for Mason and his playing. If it's good enough for him, it should be good enough for all of us. But this is only half the truth.
If you have Brent's playing chops, you don't depend much on any equipment. Even with the cheapest, meanest, off-tuned junk guitar, Mason will sound much better than most of us. The better you play, the less you depend on equipment. It's absolutely okay and no sacrilege to mod this circuit to your personal needs. If you want to use the push-pull pot for splitting one of the pickups rather than switching the middle pickup on and off ... go for it! If you want to use treble-bleed networks for the volume pots or want to implement splitting for all three pickups, there's no law against doing so.
That's it for now. Next month we'll continue with our DIY relic'ing project.
Until then ... keep on modding!- Rig Rundown: Brent Mason [2021] - Premier Guitar ›
- First Look: Fender Brent Mason Telecaster - Premier Guitar ›
- The Telecaster Mod Guide - Premier Guitar ›
- Fender Esquire Basics - Premier Guitar ›
- Ultimate Broadway Nashville T-Style Guitar Build & Test - Premier Guitar ›
In collaboration with Cory Wong, the Wong Press is a 4-in-1 Press pedal features Cory’s personal specs: blue & white color combination, customized volume control curve, fine-tuned wah Q range, and a dual-color STATUS LED strip indicating current mode/pedal position simultaneously.
In collaboration with Cory Wong, this Wong Press is a 4-in-1 Press pedal features Cory’s personal specs: Iconic blue & white color combination, customized volume control curve, fine-tuned wah Q range, and a dual-color STATUS LED strip indicating current mode/pedal position simultaneously.
Renowned international funk guitar maestro and 63rd Grammy nominee Cory Wong is celebrated for his unique playing style and unmistakable crisp tone. Known for his expressive technique, he’s been acclaimed across the globe by all audiences for his unique blend of energy and soul. In 2022, Cory discovered the multi-functional Soul Press II pedal from Hotone and instantly fell in love. Since then, it has become his go-to pedal for live performances.Now, two years later, the Hotone team has meticulously crafted the Wong Press, a pedal tailored specifically for Cory Wong. Building on the multi-functional design philosophy of the Soul Press series, this new pedal includes Cory’s custom requests: a signature blue and white color scheme, a customized volume pedal curve, an adjustable wah Q value range, and travel lights that indicate both pedal position and working mode.
Cory’s near-perfect pursuit of tone and pedal feel presented a significant challenge for our development team. After countless adjustments to the Q value range, Hotone engineers achieved the precise WAH tone Cory desired while minimizing the risk of accidental Q value changes affecting the sound. Additionally, based on Cory’s feedback, the volume control was fine-tuned for a smoother, more musical transition, enhancing the overall feel of volume swells. The team also upgraded the iconic travel lights of the Soul Press II to dual-color travel lights—blue for Wah mode and green for Volume mode—making live performances more intuitive and visually striking.
Features
- True Bypass
- 4 in 1 functionality (volume, expression, wah, volume/wah)
- New dual-color STATUS LED strip indicating pedal mode and position in real time
- Cory’s custom volume curve and wah Q control
- Classic-voiced wah tone with flexible tonal range
- Active volume design for keeping lossless tone
- Separate tuner and expression outputs for more connection possibilities
- 9V DC or 9V battery power supply
Introducing the Hotone Wong Press - Cory Wong's signature Volume/Wah/Expression Pedal - YouTube
Check the product page at hotone.com
Big time processing power in a reverb that you can explore for a lifetime.
An astoundingly lush and versatile reverb of incredible depth and flexibility. New and older BigSky algorithms included. More elegant control layout and better screen.
It’s pricey and getting the full use out of it takes some time and effort.
$679
Strymon BigSky MX
strymon.net
Strymon calls the BigSky MX pedal “one reverb to rule them all.” Yep, that’s a riff on something we’ve heard before, but in this case it might be hard to argue. In updating what was already one of the market’s most comprehensive and versatile reverbs, Strymon has created a reverb pedal that will take some players a lifetime to fully explore. That process is likely to be tons of fun, too.
Grinding out impressive DSP power via an 800 MHz tri-core ARM processor with 32-bit floating-point processing, the BigSky MX introduces seven brand-new reverb algorithms, allows users to load any compatible convolution reverb (or impulse response) as well as to use two reverbs simultaneously—in series, parallel, and split—plus it delivers several other mind-bending features. Given this wealth of goodies, it’s impossible to test and discuss every sound and function, but what we heard is exciting.
Infinite Space
The updated MX will look very familiar to those who know the original BigSky. The form factor is nearly identical, though the MX is a bit larger. Its control interface is similar too, albeit rearranged into a single row of knobs that looks more balanced. Rotary controls include decay, pre-delay, tone, mod, parameter 1, parameter 2, and mix. A value knob enables effect-level manipulation on the larger, clearer OLED screen. It also allows you to select between the older or “classic” algorithms from the original BigSky and the seven new ones. Three footswitches allow for preset selection, bank up or down (two switches pressed together), and an infinite hold/sustain switch that’s always available. The rotary “type” knob in the upper-left corner spins between 12 basic reverb voices. As with most things Strymon, many of these controls are multi-function.
Also very Strymon-like are the top-mounted, 5-pin DIN MIDI I/O connections, which come in handy if you want to maximize the pedal’s potential in a MIDI-controlled rig. But you can access more than enough right from the pedal itself to satisfy the needs of most standard pedalboard-based setups. A USB-C port enables computer connection for MIDI control via that route, use of the Nixie 2 editing app, or firmware updates.
There are stereo jacks for both input and output, plus a multi-function 1/4" TRS/MIDI expression jack for use with a further range of external controllers. The standard center-negative power jack requires a DC supply offering at least 500 mA of current draw.
It is utterly hypnotic and addictive once you settle in and work a little more intuitively.
Sky’s the Limit
The BigSky MX was, initially, a bit mind-boggling on account of the seemingly endless possibilities. But it is utterly hypnotic and addictive once you settle in and work a little more intuitively. Suffice it to say, the core quality of the reverb sounds themselves are excellent, and the sheer variety is astounding. Beyond the standard emulations, I really dug several permutations of the cloud reverb, the chorale mode (which adds tenor and baritone harmonizing tones), and bloom mode (which generates deep synthesizer-style pads), and I could have gotten lost in any of these for hours if there wasn’t so much more to explore. Among the highlights: There is now an option to pan reverbs across the stereo field. The MX also uses audio design concepts borrowed from tape delays to create rhythmic pattern-based reverbs, which is an excellent compositional tool.
The Verdict
This latest evolution of the already impressive and super-capable BigSky is the kind of pedal that could cause you to disappear into your basement studio, never to return. The sounds are addictive and varied and can be configured in endless creative ways. The programmability and connectivity are also superb. Additionally, the new algorithms weren’t added at expense of the old BigSky algos. There’s no doubt that it will be flat-out too much horsepower for the guitarist that needs a few traditional sounds and, perhaps, a few more spacious options. And it would be interesting to know what percentage of the pedal’s customers end up being synth artists, engineers, or sound designers of one kind or another. If you’re the kind of guitar player that enjoys stretching the sound and capabilities of your instrument as far as they will go, the BlueSky MX will gladly ride along to the bounds of your imagination. It may test the bounds of your budget, too. But in many ways, the BigSky MX is as much a piece of outboard studio gear as a stompbox, and if you’re willing to invest the time, the BigSky MX has the goods to pay you back.
“The Player II Series represents our continued evolution in design and functionality,” said Justin Norvell, EVP of Product, FMIC. “We listened to the feedback from musicians around the world and incorporated their insights to refine and innovate our instruments. The re-introduction of rosewood fingerboards is a restoration of the ‘original Fender recipe’ and will no doubt be a fan favorite - but we didn’t want to stop there. We’ve also incorporated our rolled fingerboard edges for a broken-in feel, upgraded hardware, and have some new body options as well- which underscores our commitment to providing players and creators with the tools they need to express their unique sound and style. The Player II Series is not just an upgrade, it's a detailed re-imagining of our core silhouettes, highlighting our dedication to quality and the continuous refinement of our instruments.”
Additionally, Player II offers new options for chambered ash and chambered mahogany bodies for the Player II Stratocaster and Telecaster models, which will be available in October. Designed for musicians ready to elevate their craft, the Player II Series sets a new standard for quality and performance in the mid-price range.
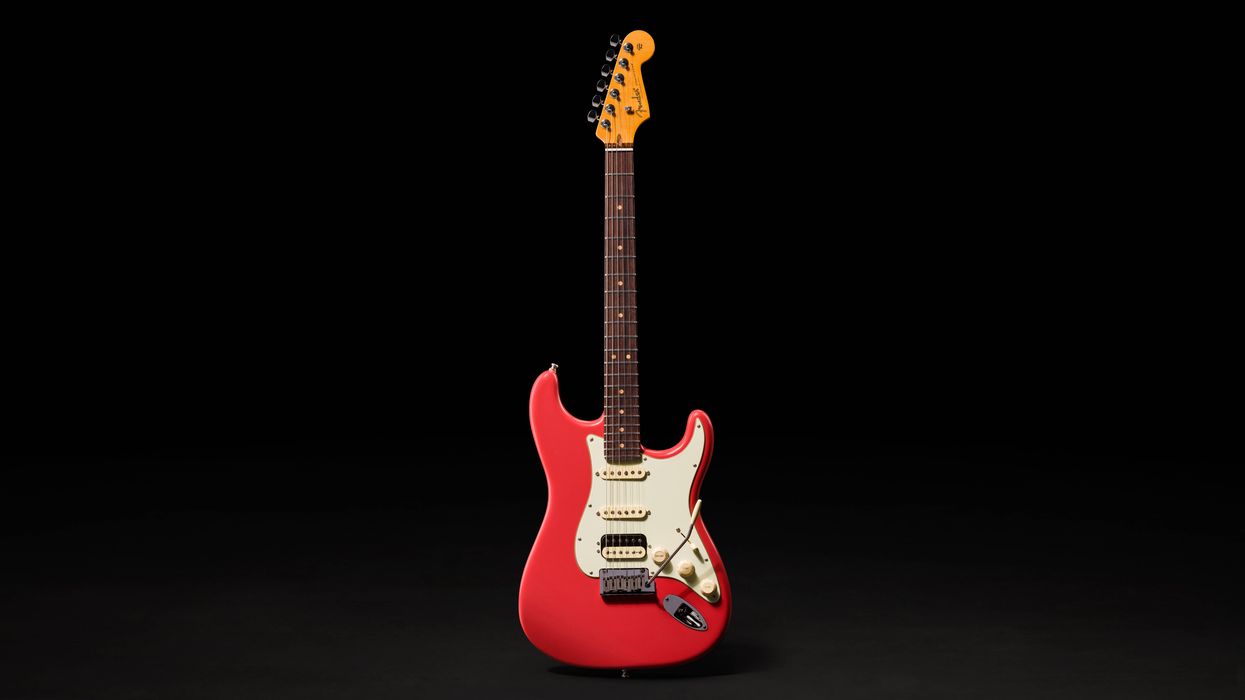
Fender Player II Stratocaster HSS Electric Guitar - Coral Red
Player II Strat HSS RW, Coral RedFender Player II Jaguar Electric Guitar - Aquatone Blue
Player II Jaguar RF, Aquatone BlueThis convenient, easy-to-use controller can open up an entire world of sonic shape-shifting. Here are some tips to either inspire you to try one or expand how you’re currently using this flexible, creative device.
If you’re not yet using expression pedals, you should consider them. They have the power to expand and control your sonic universe. For the uninitiated, expression pedals are controllers that typically look like volume or wah pedals. Of course, traditional volume and wah pedals are expression pedals, too, but they are dedicated to controlling only those two effects.
Modern expression pedals allow you to assign and control parameters of your stomps or modelers by moving the expression pedal as you would a volume or wah. Dunlop, Boss, Ernie Ball, Yamaha, Behringer, Mission Engineering, and other manufacturers make these handy devices.
Many, but not all, of today’s stompboxes and modelers have expression pedal inputs that allow for manipulation of one or more parameters of those devices. In the past, this required bending over and turning a knob, or trying to turn a small knob with your foot—both of which can hamper your playing. The freedom of an expression pedal is the control you have over more aspects of your sound, especially in a live setting.
Although some of the uses for expression pedals below can also be accomplished by creating multiple presets, that will not allow real-time control over the parameters like an expression pedal will. Here are some notes about expression pedal use that might get you thinking about how one could help you.
Delay Repeats: Controlling the timing of a delay with tap tempo is very common, but how about controlling the number of repeats? With an expression pedal, by setting the expression control on your delay to control the number of repeats, you can easily go from a few for your rhythm sound to more for your lead sound, and then back off again.
Reverb and Delay Mix: The mix control on reverb and delay pedals allows you to balance the amount of wet to dry signal that you hear. There is often a delicate line to having just the right amount of wet signal with these two effects. If you have too much, your sound can be washed out and undefined. Too little and it can be dry and lack space. The part you are playing, and the venue you are in, can also change the amount of mix you need for these effects. By using an expression pedal for the mix control on reverb or delay, you can alter the sound on the fly to compensate for the part and the room, including turning down the mix for busy parts and up for parts with fewer notes.“Some uses for expression pedals can also be accomplished by creating multiple presets, but that will not allow real-time control over the parameters like an expression pedal will.”
Modulation Depth: The depth of a modulation effect, like a phaser, can drastically alter your guitar sound. A light amount can create a feeling of subtle movement, while a heavy amount can give a thick, underwater-type sound. An expression pedal can help you create a constant feeling of change throughout a song, allowing you to build up and break down the depth for different sections as you see fit.
Tremolo Speed: While the speed of tremolo can often be controlled by tap tempo, using an expression pedal for the same parameter offers other creative uses of the effect. With an expression pedal, you can easily speed the tremolo up to make subtle increases to the energy of a part or slow it down to decrease the energy. You can also create drastic changes in the speed that sound like a fan accelerating or slowing down. Or you can abruptly turn the tremolo off. This last option can be an exciting way to end a song or part.
EQ Change: Every guitar player uses EQ to sculpt their sound—whether via the tone controls on your instrument or amp (modelers included), or a dedicated equalizer used as part of your rig. Subtle tweaks can help you do things like balance out different guitars, cut through the mix more, or compensate for a boomy stage. Real-time control of EQ with an expression pedal is more common in the modeler world than the amp and pedal world, but it does exist in both. For example, increasing the midrange can give you more clarity and cut for solos. Decreasing it can create a flatter sound that can help you stay in the mix with the rest of the band. An expression pedal allows you to have one setting and alter it for multiple situations or guitars as opposed to having separate presets.
While this is a very short list of options for expression-pedal use, it should give you a good place to start. The most important thing is to always be creative, have fun, and find your own voice. An expression pedal can help you do all three.