
Here’s how you can squeeze five different sounds from Fender’s iconic 6-string.
PG readers often ask me for more “super switch" projects, so here we go—Mod Garage delivers! This one is designed to expand a Telecaster's tonal palette, but you can adapt it to other guitars with two single-coil pickups.
Okay, before we launch into this cool mod, let's review: Dual-pickup electrics typically come from the factory wired to yield three sounds: each pickup solo and the two pickups together. With its bridge and neck pickups connected to a master volume and master tone control, the Telecaster is the archetype for dual-pickup guitars, and its elegant simplicity has made it an enduring favorite for playing virtually all styles of music. The Telecaster offers the three pickup combinations mentioned above, but if you dig deeper, you'll find additional tones that can't be accessed with a standard 3-way switch. Potentially, a guitar with dual single-coils offers six switchable tones. They are:
- 1. Bridge pickup solo.
- 2. Neck pickup solo.
- 3. Bridge and neck pickups wired in parallel, in phase.
- 4. Bridge and neck pickups wired in parallel, out of phase.
- 5. Bridge and neck pickups wired in series, in phase.
- 6. Bridge and neck pickups wired in series, out of phase.
So a standard Tele yields only half of its tonal palette. The other sounds lie dormant under the hood ... unless we wake them up. What do you think, shall we give it a shot?
As any hardcore Tele fan will tell you, this idea isn't new. One of the earliest “mods" for expanding Telecaster tones dates back to the '60s and James Burton, who discovered the out-of-phase glories of his stock-wired, late-'50s Telecaster by accident while backing up Ricky Nelson. He found that by carefully placing the 3-way pickup selector switch between its prescribed “clicks" (similar to what Strat players did to achieve positions 2 and 4 before the 5-way Strat switch became the standard), he could coax a thin, out-of-phase sound from his Tele. You can hear this sound on many famous Ricky Nelson recordings, including Burton's solo parts on “Travelin' Man."
Another step forward was the 4-way pickup selector switch from Oak Grigsby (now Electroswitch), which you can find in many Telecasters worldwide, mostly wired to get both pickups together in series and in phase. So you see, players have always wanted to expand the Tele's tones. When looking at Telecaster photos, you can often see additional switches and/or pots on the control plate that clearly show these attempts.
Now we'll take this one step further by using a 5-way “super switch" to give us five of the six possible tones without changing the visual appearance of a stock Telecaster. (In a future column, I'll share a mod to this mod that will give you all six possible sounds.)
You don't need much for the “5-tone Tele mod" besides a 5-way super switch and a piece of wire. But here's an important caveat: When shopping for the 5-way super switch, be sure to confirm that the common open-frame version will physically fit in your guitar's control cavity. If it won't, you can opt for the PCB-based version that's noticeably smaller. Depending on your guitar, it can sometimes be necessary to chisel out some wood from the bottom of the cavity to make these super switches fit. Also, to prevent any accidental shorts, be sure that no part of the switch physically touches the cavity, especially if the cavity is shielded with copper foil or conductive paint.
Our next step is to get the pickups ready for this project, something I covered previously in “Preparing Your Tele for Future Mods." This is essential if your pickup has a metal cover that's connected to the pickup's ground. For all series/parallel and phase switching trickery, you need to separate the metal cover from the pickup's ground to prevent hum and noise issues. The new ground wire for the cover always goes to ground—no exceptions!
After preparing your pickups, the next step is to wire up the 5-way super switch. To make this process much easier, I highly recommend soldering all possible connections (jumper wires) outside the guitar. There's not much space inside a Telecaster control cavity, so you can save a lot of time and avoid jangled nerves using this approach.
I chose the following switching matrix for this mod. It yields five switchable sounds:
- 1. Bridge pickup solo.
- 2. Bridge and neck pickups in series, out of phase (hum cancelling).
- 3. Bridge and neck pickups in parallel, in phase.
- 4. Bridge and neck pickups in series, in phase (hum cancelling).
- 5. Neck pickup solo.
So the only missing possible tone is both pickups in parallel, out of phase. After performing this mod successfully, you'll have all the other options at your fingertips.
I chose this matrix for three reasons. First, the two new combinations offer hum cancelling because they use the two single-coil pickups as a humbucker.
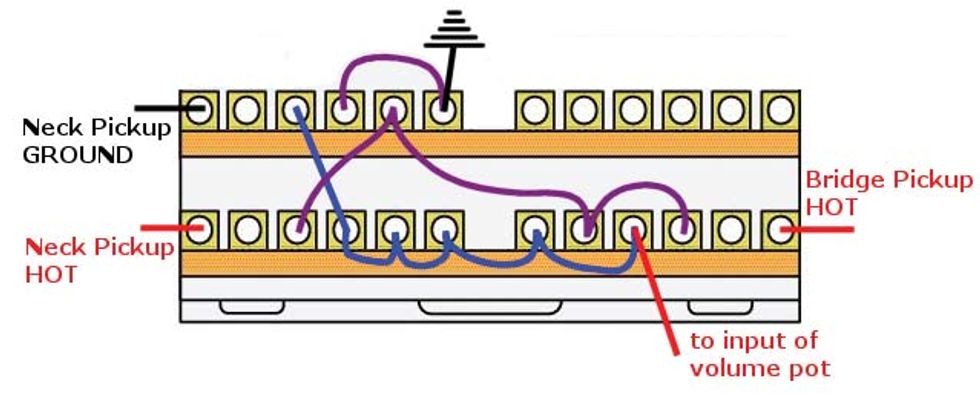
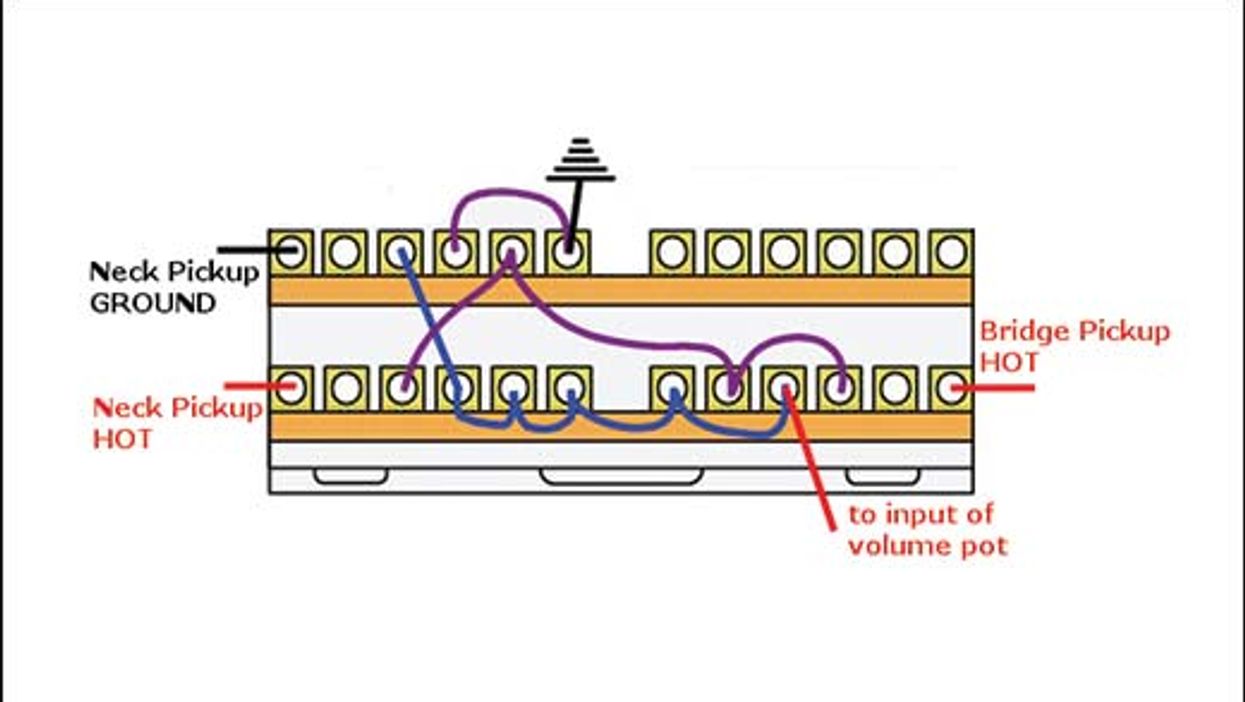
Fig. 2 — Schematic courtesy singlecoil.com
Second, armed with these two new combinations, you're ready to rock the crowd! Both pickups in series/in phase will give you a very fat and loud solo tone—perfect for both clean and overdriven lead tones. Both pickups in series/out of phase doesn't sound as shrill and thin as both pickups in parallel/out of phase (that's the sound you might associate with “out-of-phase pickups"), so it's useful for clean tones too. And it's perfect for full-tilt distortion or fuzz orgies, because it prevents the tone from getting too boomy by reducing the bass frequencies. To cut through the mix while playing with Queen, Brian May used this tone a lot on his Red Special guitar for his heavily overdriven lead tones.
Finally, both pickups in parallel/out of phase is the easiest combination to add to this wiring at a later date.
Fig. 1 shows how your new 5-way super switch should look after you solder all jumper wires. In this wiring scheme, the bridge pickup's black ground wire, as well as the new, third ground wire for the neck pickup's metal cover, go to ground. Be careful not to mix up the neck pickup's two ground wires. To be on the safe side, I find it helpful to choose a new color (perhaps blue or green) for the third ground wire attached to the neck pickup's metal cover.
The last step is to unsolder all wires from the stock 3-way switch and mark them as to what goes where. Unscrew the 3-way switch from the control plate, install the new 5-way super switch and reconnect everything as shown in Fig. 2. Carefully close the cavity without using any force or pressure and finally attach the control plate. Your new project is complete!
It's likely you'll have to readjust your pickup height after performing this mod—especially after having removed the neck pickup to prepare it for series sounds, as described above. We demystified pickup height adjustment in “Adjusting Stratocaster Pickup Height, Pt. 1" and “Adjusting Stratocaster Pickup Height, Pt. 2." Though these guidelines were ostensibly written for Stratocaster pickups, they apply perfectly well to Telecaster pickups too.
That's it! Next month, we'll begin an exciting new series on DIY relic treatments for your guitars, so stay tuned. Until then ... keep on modding!
Delicious, dynamic fuzz tones that touch on classic themes without aping them. Excellent quality. Super-cool and useful octave effect.
Can’t mix and match gain modes.
$349
Great Eastern FX Co. Focus Fuzz Deluxe
Adding octave, drive, and boost functions to an extraordinary fuzz yields a sum greater than its already extraordinary parts.
One should never feel petty for being a musical-instrument aesthete. You can make great music with ugly stuff, but you’re more likely to get in the mood for creation when your tools look cool. Great Eastern FX’s Focus Fuzz Deluxe, an evolution of their très élégantFocus Fuzz, is the sort of kit you might conspicuously keep around a studio space just because it looks classy and at home among design treasures likeRoland Space Echoes, Teletronix LA-2As, andblonde Fender piggyback amps. But beneath the FFD’s warmly glowing Hammerite enclosure dwells a multifaceted fuzz and drive that is, at turns, beastly, composed, and unique. Pretty, it turns out, is merely a bonus.
Forks in the Road
Though the Cambridge, U.K.-built FFD outwardly projects luxuriousness, it derives its “deluxe” status from the addition of boost, overdrive, and octave functions that extend an already complex sound palette. Unfortunately, a significant part of that fuzzy heart is a Soviet-era germanium transistor that is tricky to source and limited the original Focus Fuzz production to just 250 units. For now, the Focus Fuzz Deluxe will remain a rare bird. Great Eastern founder David Greaves estimates that he has enough for 400 FFDs this time out. Hopefully, the same dogged approach to transistor sourcing that yielded this batch will lead to a second release of this gem, and on his behalf we issue this plea: “Transistor hoarders, yield your troves to David Greaves!”
The good news is that the rare components did not go to waste on compromised craft. The FFD’s circuit is executed with precision on through-hole board, with the sizable Soviet transistor in question hovering conspicuously above the works like a cross between a derby hat and B-movie flying saucer. If the guts of the FFD fail to allay doubts that you’re getting what you paid for, the lovingly designed enclosure and robust pots and switches—not to mention the pedal’s considerable heft—should take care of whatever reticence remains.
Hydra in Flight
Just as in the original Focus Fuzz, the fuzz section in the Deluxe deftly walks an ideal path between a germanium Fuzz Face’s weight and presence, a Tone Bender’s lacerating ferocity, and the focus of a Dallas Rangemaster. You don’t have to strain to hear that distillate of elements. But even if you can’t easily imagine that combination, what you will hear is a fuzz that brims with attitude without drowning in saturation. There’s lots of dynamic headroom, you’ll feel the touch responsiveness, and you’ll sense the extra air that makes way for individual string detail and chord overtones. It shines with many different types of guitars and amps, too. I was very surprised at the way it rounded off the sharp edges made by a Telecaster bridge pickup and AC15-style combo while adding mass and spunk. The same amp with a Gibson SG coaxed out the Tony Iommi-meets-Rangemaster side of the fuzz. In any combination, the fuzz control itself, which boosts gain while reducing bias voltage (both in very tasteful measure) enhances the vocabulary of the guitar/amp pairing. That range of color is made greater still by the fuzz’s sensitivity to guitar volume and tone attenuation and touch dynamics. Lively clean tones exist in many shades depending on your guitar volume, as do rich low-gain overdrive sounds.
The drive section is similarly dynamic, and also quite unique thanks to the always versatile focus control, which adds slight amounts of gain as well as high-mid presence. At advanced focus levels, the drive takes on a fuzzy edge with hints of Fender tweed breakup and more Black Sabbath/Rangemaster snarl. It’s delicious stuff with Fender single-coils and PAFs, and, just as with the fuzz, it’s easily rendered thick and clean with a reduction in guitar volume or picking intensity. The boost, meanwhile, often feels just as lively and responsive—just less filthy—lending sparkle and mass to otherwise thin and timid combo amp sounds.
Among this wealth of treats, the octave function is a star. It works with the fuzz, drive, or boost. But unlike a lot of octave-up effects, you needn’t approach it with caution. Though it adds plenty of the buzzing, fractured, and ringing overtones that make octave effects so wild and distinct, it doesn’t strip mine low end from the signal. The extra balance makes it feel more musical under the fingers and even makes many chords sound full and detailed—a trick few octave effects can manage. With the fuzz, the results are concise, burly, and articulate single notes that lend themselves to lyrical, melodic leads and power chords. In drive-plus-octave mode, there are many hues of exploding practice-amp trash to explore. The boost and the octave may be my favorite little gem among the FFD’s many jewels, though. Adding the octave to boosted signals with a generous heap of focus input yields funky, eccentric electric-sitar tones that pack a punch and are charged with character in their fleeting, flowering state.
The Verdict
It’s hard to imagine adding extra footswitches to the Focus Fuzz Deluxe without sacrificing its basic elegance and proportions, and without elevating its already considerable price. Certainly, there would be real utility in the ability to mix and match all three excellent gain modes. On the other hand, the output level differences between fuzz, drive, and boost are pretty uniform, meaning quick switches on the fly will shift texture and attitude dramatically without delivering an ear-frying 30 dB boost. And though it’s hard not be tantalized by sounds that might have been, from combining the fuzz and/or boost and drive circuits, the myriad tones that can be sourced by blending any one of them with the superbly executed octave effect and the varied, rangeful focus and output controls will keep any curious tone spelunker busy for ages. For most of them, I would venture, real treasure awaits.
Patterns can be viewed as boring or trite, but a little bit of creativity can turn them into bits of inspiration.
Chops: Intermediate Theory: Intermediater Lesson Overview: • Learn different ways to arrange scales. • Combine various sequences to create more intersting lines. • Solidify your technique by practicing unusual groupings of notes. Click here to download a printable PDF of this lesson's notation. |
I want to offer some food for thought on making sequences musical. Using sequences in our playing helps develop our musicianship in various ways. It can help us tune into the fretboard, develop melodic ideas all around the neck, and further our improvisation and compositional skills. So, spending time with sequences is certainly not time wasted. Please note that I sometimes use the word “rule" in this column, this is only a pointer to keeping on track of our exploration of these concepts. The intellect is very useful, but intuition is where the creativity comes from. When in balance lots of great things can be done. Let's get stuck in!
It's simple to play a scale from bottom to top, or top to bottom, but we can develop a sequence by shuffling these notes around. In Ex. 1 we have a C Major scale (C–D–E–F–G–A–B) played in thirds followed by a sequence highlighting the diatonic triads of the major scale. By following a “rule" we can develop many different sequences. The options are endless and a little overwhelming.
Click here for Ex. 1
Lets start by simply combining an interval sequence with an arpeggio sequence. In Ex. 2, the first two beats of the first measure feature ascending thirds. This is then followed by a triad arpeggio starting from the third note on the string. The next set of thirds then starts on the “and" of beat 4. The entire sequence is a seven-note pattern that is created by combining two thirds and a triad. It gives us a nice bit of rhythmic displacement as the phrase is now starting in a different place in the measure.
Click here for Ex. 2
Ex. 3 is a descending idea in A minor that basically flips the sequence we looked at in Ex. 2. Here, we are starting with two descending thirds before the triad. I'm using pull-offs and economy picking to articulate the triads. This one works well over D minor as well if you want a D Dorian (D–E–F–G–A–B–C) flavor.
Click here for Ex. 3
You can see the effectiveness of combining different sequences and groupings of notes to create interesting runs. It's also really effective for making phrases. In Ex. 4 we take a small fragment from Ex. 3 and change the rhythm. In the sound example I repeat this a few times over some implied chords in my bass line: Am, F, and Dm. It's great to get more from one line by seeing the different chord types you can play it over.
Click here for Ex. 4
In Ex. 5 we're going to start using fourths and fifths. It starts with an ascending A minor triad (A–C–E) before leaping to the 9 (B) and then hitting a G major triad (G–B–D). A similar pattern leads into the C major triad (C–E–G). Throwing in these wider intervals alongside triads is very effective for creating a dramatic sounding runs.
Click here for Ex. 5
For our next example (Ex. 6), we will take fragments from Ex. 5 and space them out a bit. I wanted once again to show how these sequence ideas can also be helpful for developing melodic phrases. Once we have a cool sequence or fragment, all we need to do is be creative with how we play it. We can change the rhythm, harmonic context, dynamic, and much more.
Click here for Ex. 6
Before we move on, it's important to remember that we can add colorful notes to our triads. Let's begin with some seventh-chord arpeggios. Ex 7 features are diatonic seventh arpeggios in G minor (functioning as a IIm chord) to get a Dorian sound.
Click here for Ex. 7
Ex. 8 is a little gratuitous of me. It begins with an idea made of several different concepts. First, we start with an Am7 arpeggio (A–C–E–G), then descend down an A5 arpeggio. I follow that up with diatonic thirds and end with a pedal-point sequence. If that's not enough, we then take this bigger idea and fit it around a chord progression. I move it to G7, Dm7 and then I break my “rule" slightly and outline notes of a C6 arpeggio (C–E–G–A). However, it does keep the same melodic contour of the initial idea. I used my ear and fretboard to guide me. It's always healthy to have a fine balance between intellect and intuition.
Click here for Ex. 8
We dig into C harmonic minor (C–D–Eb–G–Ab–B-C) for Ex. 9's monster two-measure lick. It sounds evil! In composing this phrase, I kept to the basic concept of finding seventh-chord arpeggios within C harmonic minor in the 8th position. I followed my ear as well as my slowly developing intellect. However, if you look closely you can see I was following a mini chord progression through this line. We start out with a CmMaj9 arpeggio (C–Eb–G–B–D) in the first beat, followed by a G7b9 arpeggio (G–B–D–F–Ab). Here we have a very strong Im-V7 movement in C minor. I then move back to our CmMaj9 arpeggio and in the second measure we start descending down an Eb augmented triad (Eb–G–B). This is then followed by more CmMaj9 goodness.
Click here for Ex. 9
Ex. 10 is now taking Ex. 9 and extending it into a cool flamenco-inspired melody. The rhythms in this were inspired by the incredible Paco De Lucia. I follow the sequence from the previous example almost exactly, but I use a bit of artistic license to repeat certain fragments to fit into a “top line" or “head"-style melody.
Click here for Ex. 10
My aim here isn't to give you one rule to follow but instead to encourage you to take the sequences you know and love and start getting more out of them. Enjoy and stay safe!
Neutrik’s Timbre plug, made for toggling between capacitors.
This follow-up to May 2025’s column shows you a few basic techniques to inject some capacitance into your rig.
Hello, and welcome back to Mod Garage. This month, we will dive into the details of how to add additional guitar-cable capacitance—the right way. Time to get started!
Let’s begin with some typical additional capacitance values that certain lengths of cable (or capacitors) can bring to your system:
• 10’ vintage coiled cable (approx. 3 meters) -> 1 nF
• 15’ vintage coiled cable (approx. 4.5 meters) -> 1.5 nF
• 20’ vintage coiled cable (approx. 6 meters) -> 2.2 nF
• 30’ vintage coiled cable (approx. 9 meters) -> 3.3 nF
• Ritchie Blackmore-style, ultra-long vintage coiled cable -> 4.7 nF
I listed standard values here, so you should have no problem getting caps to match them in any local electronics store or online; the type of cap doesn’t really matter and will mostly be dominated by size, but I’ll share more about this in a minute.
Let’s quickly summarize the first installment of this column from last month’s issue: From a technical point of view, added capacitance shifts down the resonance frequency of the pickups, so they sound fatter, especially when using overdrive. This is exactly the reason why a lot of distortion and fuzz boxes with a vintage voicing use an additional cap at the input section; the resulting overdriven tone is fat and warm.
This month’s mod, which involves adding a capacitor to your signal, works best with vintage-flavored single-coil pickups (approximately 2.4 H inductance) or a typical old-school PAF-style pickup (approximately 3.8 H inductance). Modern high-output pickups are often sporting inductances of 6 H to 8 H, and don’t sound very good with this mod—when adding more cable capacitance to such pickups, the result is a dull and wooly tone without any clearness and definition. If you want to make your single-coil guitar sound more Les Paul-ish, you should try a 4.7n capacitor. It will shift the resonance frequency of your single-coil pickups down to the typical PAF ballpark, making for a very cool and usable old-fashioned guitar tone. It might feel a little muffled when playing clean, but ultra fat and punchy when using overdrive! In general, values higher than 4.7n are not recommended.
We have two options for where to install our cap.
On the Guitar Cable
This is the easiest location to add additional capacitance to your system, with several mod options:
1. The lightest mod ever isn’t a mod at all—it’s to simply buy a vintage guitar cable and plug it in whenever you need it! I don’t know of any company that offers modern guitar cables with intentionally high capacitance.
2. The Neutrik company offers a special angled plug, called the Timbre Plug, that you can solder to any guitar cable of your choice. The plug has a 4-way rotary knob on top to toggle between different capacitors. In addition to a bypass setting, the plug offers capacitances of 1nF, 2.2nF, and 3.3nF, letting you simulate different cable lengths on the fly.
3. You can add an additional capacitor to any guitar cable of your choice to convert it into a “longer-sounding” cable. You simply open one of the plugs to solder the cap between the hot and ground—that’s it. Small, 2.5 mm contact spacing ceramic caps are easy to put into a standard plug and are your weapon of choice here. It’s essential to only add the additional cap to one of the two plugs, but it doesn’t matter if you plug this side into your guitar, an effect, or your amp. This method allows you to build yourself some cables that simulate their older, longer relatives.
You can add an additional capacitor to any guitar cable of your choice to convert it into a “longer-sounding” cable.
Photo courtesy SINGLECOIL (https://singlecoil.com)
Inside the Guitar
You can also add a cap (or several) inside your guitar if you only need this mod for one instrument. If you’re looking for added capacitance with all your guitars, you’d be better off choosing one of the techniques mentioned above.
1. The easiest way is to solder your additional capacitor directly to your volume pot; this way it has a fixed value that can’t be changed and is always engaged. This operation is very simple to do, and you can use regular-sized caps for this.
You can add a cap (or several) inside your guitar if you only need this mod for one instrument.
Illustration courtesy SINGLECOIL (https://singlecoil.com)
2. If you want to make the cap switchable, such that you can run it either bypassed or engaged, you can install a SPST mini toggle switch or use half of a push-pull or push-push pot, which usually sport a DPDT switch underneath.
This drawing shows how to make your additional cap switchable.
Illustration courtesy SINGLECOIL (https://singlecoil.com)
3. If you want to use more than one cap to simulate different cable lengths, your weapon of choice is a rotary switch, setting up a kind of Gibson Varitone wiring without the inductor. Because we are switching capacitances, it is essential to run an additional 10 meg resistor in parallel to each of the caps, and to use a make-before-break, not a break-before-make, rotary switch to prevent loud popping noises when using the switch while your guitar is plugged into an amp. Leave the first lug of the rotary switch open for the bypass position without an additional cap.
If you want to use more than one cap to simulate different cable lengths, use a rotary switch.
Illustration courtesy SINGLECOIL (https://singlecoil.com)
4. If you want to make this mod even more flexible, you can add an additional “cable simulator pot” to your system. The pot should have the same resistance as your volume pot, and should be wired to your volume pot. This way, for example, you can add a 3.3nF or 4.7nF cap to the extra pot, and dial in as much cable capacitance as you like.
You can also add an additional “cable simulator pot” to your system.
Illustration courtesy SINGLECOIL (https://singlecoil.com)
On the Pedalboard
The idea of putting a rotary switch or cable-simulator-pot solution into an external unit to create a kind of extra-capacitance stompbox to use with all of your instruments is just around the corner, and yes, it’s possible! However, I don’t recommend this, because it’s physically located after the volume pot in the guitar, which means less volume (no unity gain) and less high end. But don’t worry: If you are looking for a pedalboard solution to simulate different cable lengths (which, as we defined earlier, means to shift the resonance frequency of the pickups), there are some active solutions on the market offering such a feature, usually in combination with a boost or buffer functionality. To name just a few, you should look into the Seymour Duncan Pickup Booster, Stellartone Micro Pedal, or the i2e Audio AG1.0 The PURR. Along with some other brands, these pedals will do the trick, and they’re not difficult to build if you are looking for a DIY solution.
So far, I’ve received several emails from readers asking for some more DIY guitar tools, so next month, we will look into some sustainable and environmentally friendly DIY guitar helpers—all of which you can build yourself easily by upcycling things you already have at home. Stay tuned!
Until then... keep on modding!
MayFly Le Habanero Review
Great versatility in combined EQ controls. Tasty low-gain boost voice. Muscular Fuzz Face-like fuzz voice.
Can be noisy without a lot of treble attenuation. Boost and fuzz order can only be reversed with the internal DIP switch.
$171
May Fly Le Habanero
A fuzz/boost combo that’s as hot as the name suggests, but which offers plenty of smoky, subdued gain shades, too.
Generally speaking, I avoid combo effects. If I fall out of love with one thing, I don’t want to have to ditch another that’s working fine. But recent fixations with spatial economy find me rethinking that relationship. MayFly’s Le Habanero (yes, the Franco/Spanish article/noun mash-up is deliberate) consolidates boost and fuzz in a single pedal. That’s far from an original concept. But the characteristics of both effects make it a particularly effective one here, and the relative flexibility and utility of each gives this combination a lot more potential staying power for the fickle.
“Le Habanero’s fuzz circuit has a deep switch that adds a little extra desert-rock woof.”
The fuzz section has a familiar Fuzz Face-like tone profile—a little bit boomy and very present in that buzzy mid-’60s, midrangey kind of way. But Le Habanero’s fuzz circuit has a deep switch that adds a little extra desert-rock woof (especially with humbuckers) and an effective filter switch that enhances the fuzz’s flexibility—especially when used with the boost. The boost is a fairly low-gain affair. Even at maximum settings, it really seems to excite desirable high-mid harmonics more than it churns out dirt. That’s a good thing, particularly when you introduce hotter settings from the boost’s treble and bass controls, which extend the boost’s voice from thick and smoky to lacerating. Together, the boost and fuzz can be pushed to screaming extremes. But the interactivity between the tone and filter controls means you can cook up many nuanced fuzz shades spanning Jimi scorch and Sabbath chug with tons of cool overtone and feedback colors.