
Theory: Beginner
Lesson Overview:
• Learn the fundamentals of the CAGED system.
• Spice up your chords with colorful notes.
• Understand how to move chord shapes along the neck.
One of the things that made me fall in love with the guitar is how it gave me the ability to play chord shapes up and down the neck. Think about this: You could be playing a simple progression with a friend, and although you're playing the same four chords, by using different voicings, you can make the song sound so full. How does that work? In this lesson, I want to answer that question and show you a few ways to bring the most out of your chord progressions.
Capo-Free Chords
Let's get some theory out of the way first. You might have heard of the CAGED system before. [Editor's note: If you want an in-depth lesson on the CAGED system, check out our eBook here.] This rather simple system is based off the open-chord shapes we all started with. It has expanded the way I think about guitar and helped me discover new, creative ways to approach songwriting.
The CAGED system works a little bit like this: We use those open-chord shapes as a framework to understand the fretboard. For example, we can play five different C major chords, each based upon a different shape going up the neck. In Ex. 1 you can see how I'd lay out each C major chord.
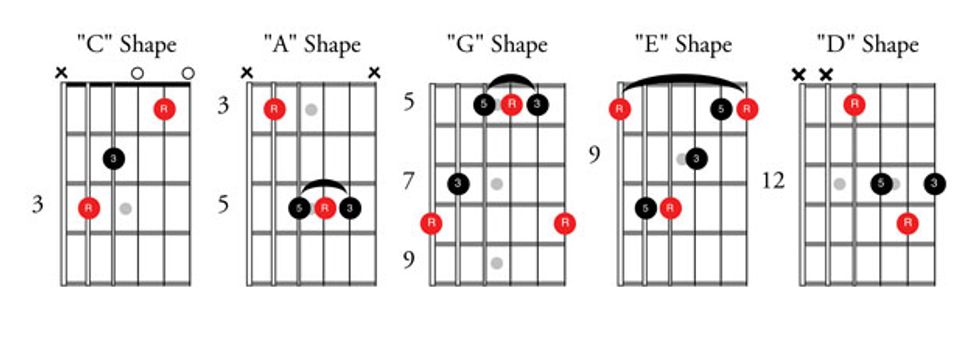
Below you can hear how each chord shape sounds. Check out Clip 1 and notice the subtle difference between voicings.
To easily apply the CAGED system, you'll need to learn your root notes around the neck—especially on the lowest two strings. This will help you easily find the different shapes in the middle of a song. Once you get a good handle on your root-note positions, get familiar with a few options for every chord around the neck. I often use the “A" shape and the “E" shape in almost every key up and down the fretboard. This has also helped me get rid of my capo! Sometimes I'll still use a capo in the studio if I want to play specific chord voicings, but for the most part, I play capo-free thanks to the CAGED system. With practice, these will become second nature and they'll really help you expand your harmonic palette.
Now, let's break this down. In Clip 2, I've recorded a simple G–Em–C–D–G progression with the easy open-position chords we all know and love.
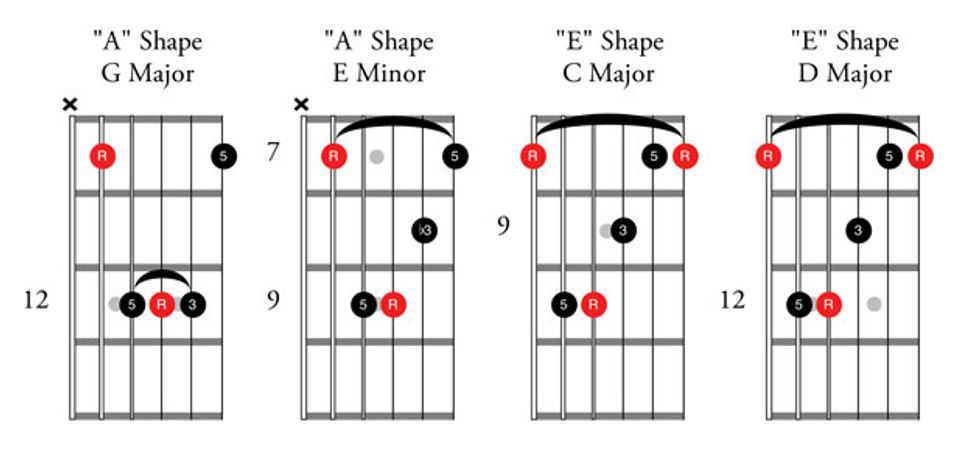
Now let's apply the CAGED system and play the same progression higher up the neck. I'm going to try to play all the chords around the 10th fret (Ex. 2). You'll hear what this sounds like in Clip 3.
Open-String Shimmer
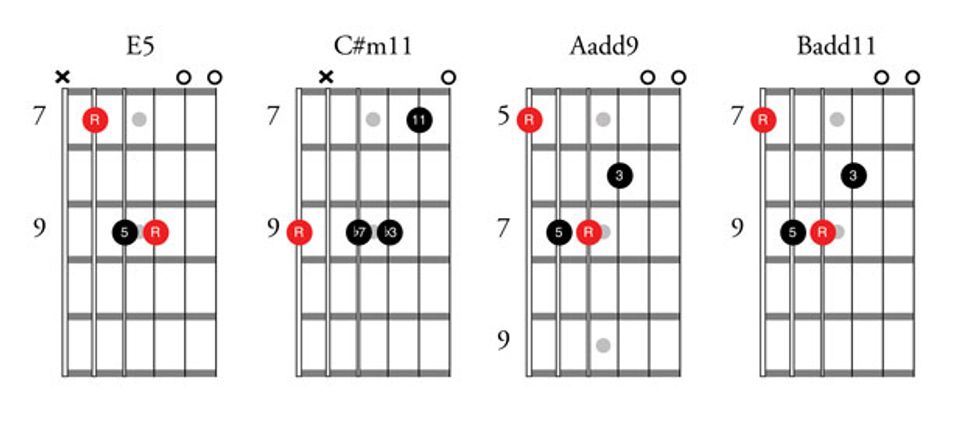
Now, you can take it a step further. In certain keys, you can let some open strings ring. These open strings sound so beautiful and can really give some nice harmonies when someone else in your band is playing chords in open position. Let's take a listen (Clip 4). The chord progression is E–C#m–A–B–E. As you can see in Ex. 3, we leave the top two strings open throughout the progression.
This simple I–VIm–IV–V–I progression can be played in so many different ways. Using a capo, you can continue to use some of these chord shapes to layer intriguing harmonies if you're playing with other musicians or recording multiple guitar tracks in the studio.
Colorful Tones
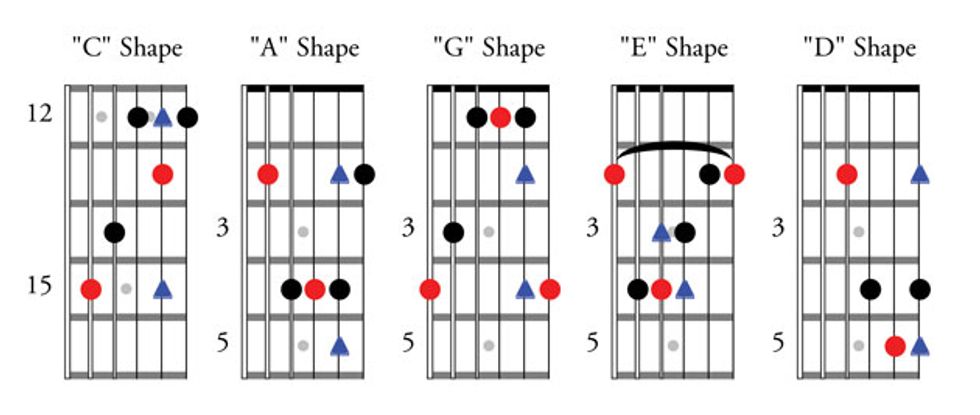
Lastly, there are a few notes within these CAGED shapes that can enhance a chord progression with some cool, ear-grabbing colors. In Ex. 4, I've marked blue triangles on some of my favorite tones that surround the five CAGED shapes and add distinctive sonic flavors. Some are extended chord tones (like the 7 in the “C" shape), while others are ambiguous-sounding suspensions (the 2 in the “D" shape).
I hope this helps you get the most out of your chord progressions. See ya next time!


![Rig Rundown: Russian Circles’ Mike Sullivan [2025]](https://www.premierguitar.com/media-library/youtube.jpg?id=62303631&width=1245&height=700&quality=70&coordinates=0%2C0%2C0%2C0)