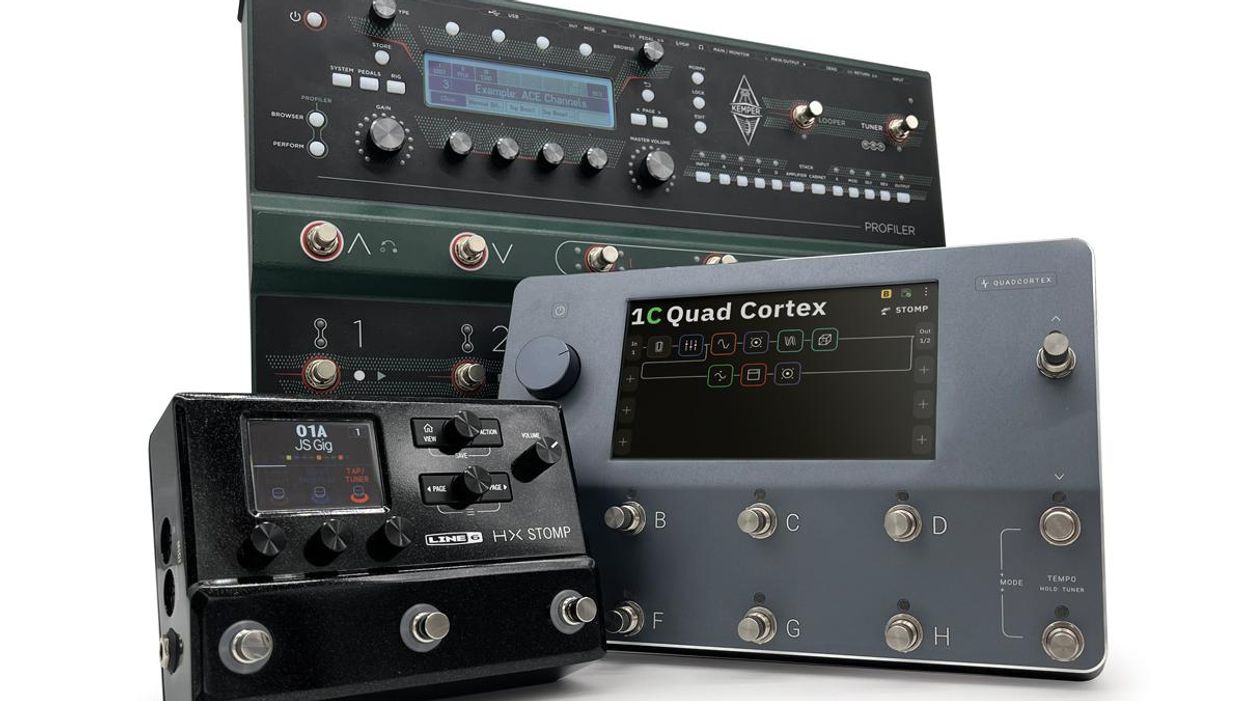
Kemper Profiler Stage, Nueral DSP Quad Cortex & Line 6 HX Stomp (clockwise from top)
A deep dive into faux amps, futuristic setups, and how to use modern technology’s powers for good.
The jump between analog and digital gear has never been more manageable. It no longer takes a rack full of outboard gear with a six-figure price tag to help realize not only the tone you have in your head, but the expansive workflows that started to pop up in the early ’80s. We’re now about a decade into the modern era of digital modelers and profilers and it seems like the technology has finally come into its own. “This is really the first time in a while where you can have bar bands playing the exactsame gear as stadium acts,” says Cooper Carter, a Fractal Audio Systems production consultant who has done sound design and rig building for Neal Schon, James Valentine, John Petrucci, and others.
That democratization of pro-level workflows has opened new and exciting paths for guitarists to explore. Barry O’ Neal, who is the chief puzzle solver for Xact Tone Solutions in Nashville, has built rigs for some of the biggest acts in the world, including Taylor Swift, Bon Iver, and Peter Frampton. “In the beginning, all gear was pro gear, to an extent,” he says. “There is a line of demarcation between pro-grade gear and consumer gear. And there used to be a lot clustered around that line. Now, they are all either way above or way below.”
At this point, the difference between modeling technology mainly has to do with features. Do you need more inputs and outputs? Is direct recording via USB a priority? Are there certain one-off effects or sounds you need on a gig? All the top-level units have a somewhat similar set of core features, but each one also branches off into more specialized realms. Let’s dig in and discuss choosing a modeler, break down some myths that surround these units, and help novice users get just a little bit more out of their chosen processor.
Which One is For You?
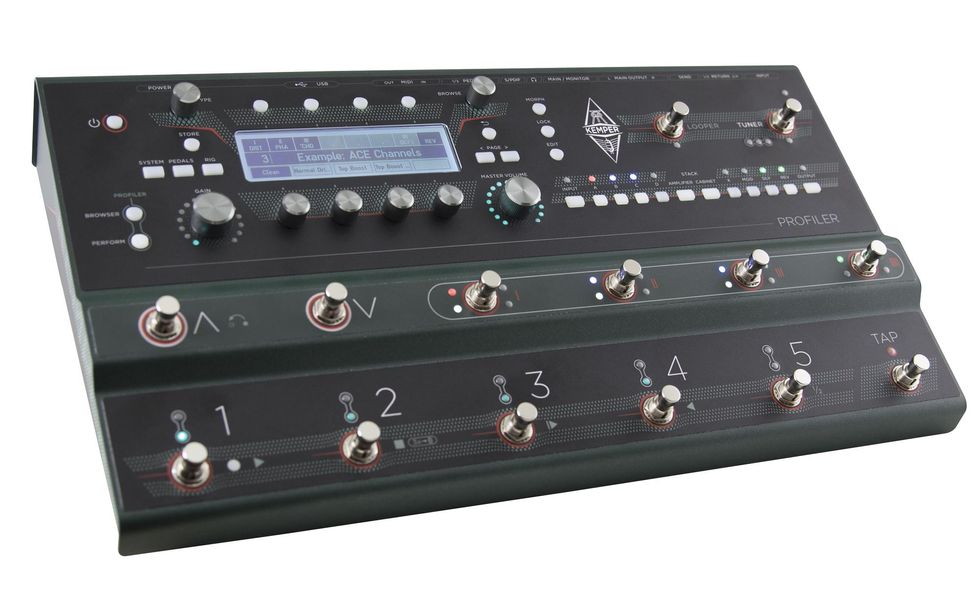
Kemper Profiler Stage
Ah, the eternal question—as a guitar journalist, this might be one of the most frequent questions I get asked. There are many ways to tackle this. One element of this puzzle that I’ll leave for others to debate is how these different units compare in terms of tone. From my perspective, you need to figure out what you’re missing in your current setup and how a digital rig would make your life easier. As we’ve seen in literally hundreds of Rig Rundowns over the years, these units have passed the test both onstage and in the studio. Even when you have Dumbles and vintage high-powered tweed Twins at your disposal, having a modeler in the rack can still be useful. (Hi, Keith Urban!) “Go online and watch videos on how you program and use the unit. If those don't make immediate and visceral sense to you, bail,” says O’Neal.
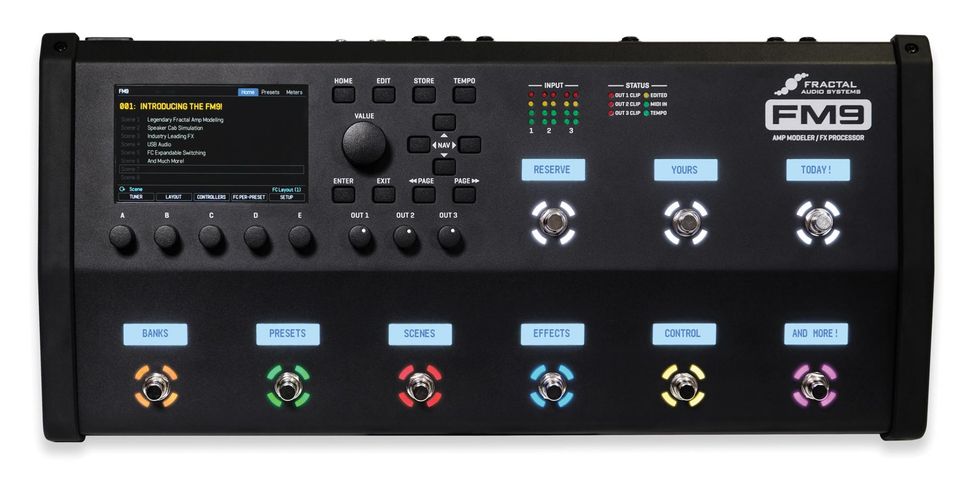
Fractal Audio FM9
I usually point people to two different camps: the all-in-one units (Line 6 Helix, Fractal Axe-Fx, Neural DSP Quad Cortex, Kemper, etc.) or the smaller stomp-sized boxes that have a narrower focus on amp, cab, and mic emulation (Strymon Iridium, Walrus ACS1, or the Boss IR-200). This is an important fork in the road because both types of units offer their own solutions. Plus, price can vary widely. Although there will be some overlap, this article will focus mostly on the all-in-one units. However, the stomp-sized amp emulators have their place. Simply place one at the end of your board for an easy analog-digital hybrid setup or keep one within arm’s reach in case a tube goes out on the gig.
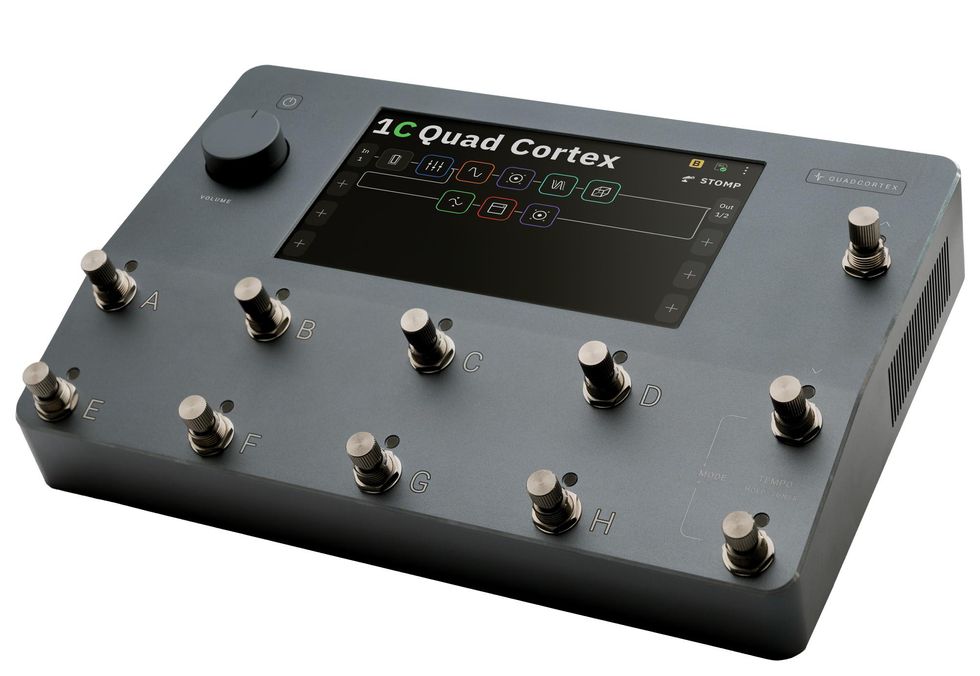
Neural DSP Quad Cortex
One of the bigger conceptual things to think about when choosing a modeler is the difference between an open ecosystem and a closed one. The Line 6 Helix and Fractal Axe-Fx units (and their various spinoffs) are what I consider closed systems, because you can’t create an entirely new amp model within their space. (The Axe-Fx III has an incredibly powerful ToneMatch feature, but that’s more based on deep customization of a pre-existing amp.) Both offer regular firmware updates with new amps, cabs, effects, and features. On the other side of things, you have Kemper and Neural’s Quad Cortex, which allow you to “profile” or“capture” digital versions of your amps and effects. This is really the defining feature of these units. With a simple recording setup, you can get extremely accurate versions of your prized—and fragile—tube amp and leave the original at home. The one caveat is that the quality of the result is only as good as your engineering skills, which is why a cottage industry of purchasable, professionally made profiles has popped up.
Start With What You Know
A piece of advice that I always recommend to anyone getting into modeling is to create your own presets. Yeah, it might take more time than just tweaking a factory or purchased preset, but in the end, you will learn much more about the features of your unit, as well as how the various elements of your signal chain interact with each other. For example, let’s say you’re a country-rock player who prefers a Vox-style amp.
With a simple recording setup, you can get extremely accurate versions your prized—and fragile—tube amp and leave the original at home.
Put aside the bells and whistles for the moment and focus on how to create a good base tone. Carter suggests a similar route: “Start simple with just an amp and cab. Get used to the interface and GUI [graphical user interface]. If you’re a Bassman player, it doesn’t make sense to just jump in and start tweaking a Mesa/Boogie.” Depending on your modeler, the various parameters for amps and effects might be different—or nonexistent—but at least you will have a point of reference before jumping into the deep end with experimentation.
Once you have the basics down, a prime place to start branching out is in routing. Gone are the days of needing a huge amount of rack gear to experiment with pre- and post-effects, parallel solutions, and MIDI. With a virtual playground, you can emulate nearly any imaginable signal flow and even design some that would be impossible in the analog realm.
Fig. 1
Most of the digital “boards” that guitarist and PG contributor Joe Gore designs are subversive, inspiring, and far from the mainstream. (He offers 13 different meticulously crafted Helix presets through the Line 6 marketplace.) Gore’s presets taught me invaluable lessons about using expression pedals when I tried to reverse-engineer them. Each scene or snapshot change has up to 60 different parameter changes, which alone is quite the feat. I would highly recommend his Blood & Pasta and Psych presets—they are simply mind-blowingly creative. In Fig. 1 you can see an example of how extensive this can get. Don’t be afraid to push the limits and reverse-engineer something from a more complicated setup.
“This is really the first time in a while where you can have bar bands playing the exact same gear as stadium acts.” —Cooper Carter
If you’re at least considering a digital unit, you likely don’t get the cold sweats when you think about learning your way around various menus and options. Each of us has our own specific tolerance of those, but in my experience the better you learn the ins and outs of your gear, the better you will sound. Although these are very, very tech-heavy units, you can get incredible results with simple setups. Going “digital” isn’t an all-or-nothing proposal. If you really dig your amp or pedals you can easily integrate those with any digital modeler. Let’s look at a few options that allow you to hold on to a bit of the analog.
4 Cables or 7?
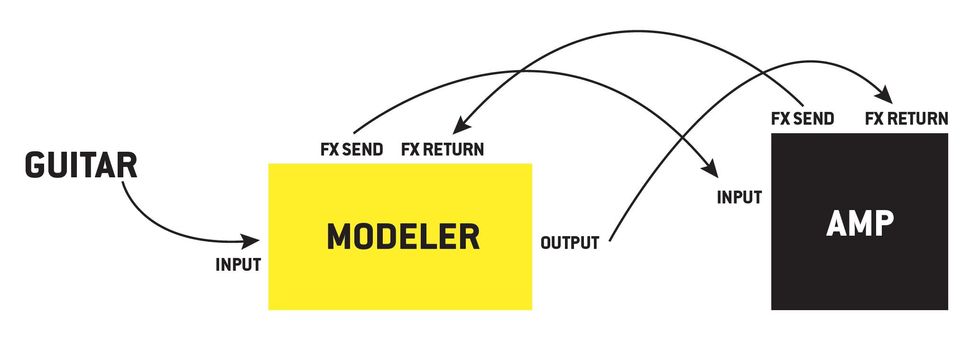
Fig. 2
The easiest way to combine digital control with analog pedals is to take advantage of the effects loop. Here’s a scenario: You want to use your modeler simply for effects alongside your trusty tube amp, but you don’t want to run everything in front. This is where the “4-Cable Method” comes in. In this arrangement, you’re able to run all your compression and drive pedals directly into the preamp and move all your modulation and time-based effects to after the preamp. In Fig. 2 you can see a diagram of how to hook everything up. Here are the steps:
- Arrange you signal chain in your modeler so that the effects loop insert is at the point where everything before it will go in front of your amp and everything after will go directly to the power amp.
- Connect your guitar to the input of your modeler (cable 1).
- Connect the effects send of your modeler to the input of your amp (cable 2).
- Connect the effects send of your amp to the effects return of your modeler (cable 3).
- Connect the output of your modeler to the effects return of your amp (cable 4).
This results in a hybrid setup that allows an incredible amount of flexibility with routing your digital effects within a traditional tube amp. (One tip: Check the global settings on your unit and make sure the effects loop is set to instrument level rather than line level.) Not sure if a certain effect works better before or after the preamp? Simply move them around in your modeler.
In Clip 1 you can hear what it sounds like with distortion, delay, and reverb running directly into the front of the amp.
And in Clip 2 I used the 4-cable method to clean things up.
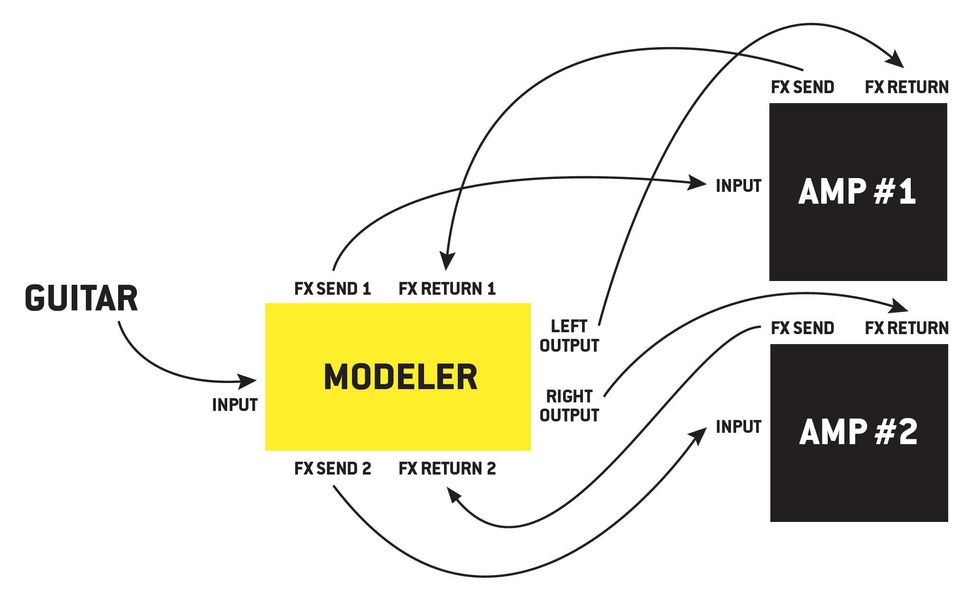
Fig. 3
But what if you’re running a stereo rig? That’s where the 7-cable method comes in. There are a few more things you’ll need (other than cables) to pull this off. First, your modeler must have two effects loops and dual outputs. Let’s pretend that the 4-cable setup described above is for amp #1 via output 1 of your modeler (Fig. 3). Now, follow the steps below for the second amp:
- Connect effects send 2 from your modeler to the input of amp #2 (cable 5).
- Connect the effects send from amp #2 to effects return 2 of the modeler (cable 6).
- Connect the main right output of the modeler to the effects return of amp #2 (cable 7).
It always helps me to sketch out how I envision everything working before diving into editing a patch.
The signal flow in the modeler will also become a bit more complicated. It always helps me to sketch out how I envision everything working before diving into editing a patch. If you think of these two as simply two parallel signal paths that come from a single source, it helps to keep everything straight.
Monitor This!
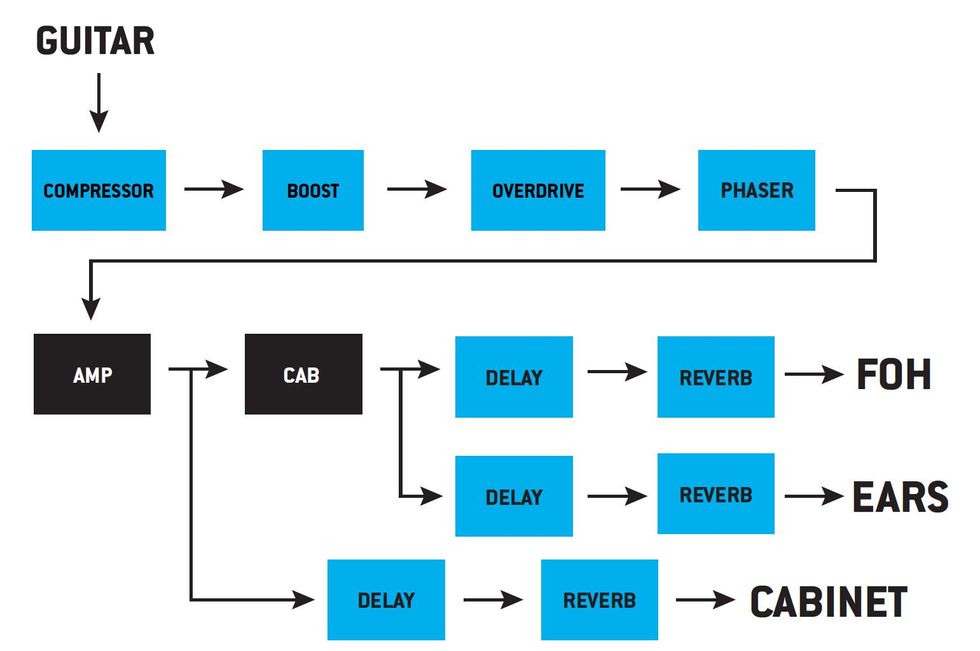
Fig. 4
On major tours, there’s an army of talented engineers that help craft the best sound possible, both onstage and out front. For most of us, that’s a real luxury. One routing setup that Carter suggests helps with both your monitor mix and getting a bit of that amp-in-the-room feel onstage. “The most practical application would be to run your fully processed signal to FOH and then a separate signal to a powered cabinet on stage,” he says. “From there, you can insert a split before the delay and reverb and feed that to your monitor or in-ears.” In Fig. 4 you can see an example of how to feed FOH, an onstage cabinet, and your in-ears. Tweaking the level of delay and reverb in your ears separately from FOH will allow you to better shape the reverb for the room without affecting what you’re hearing. “Whatever sounds best to you will make you play better,” says Carter.
Impulses Galore
One of the easiest ways to level up the realism of a preset is to use an impulse response (IR). This is where the all-in-one units and smaller stomp-sized modelers cross paths. Remember, the speaker and cab configuration in a traditional setup is basically an EQ—different cabinets and speakers treat the signal differently and therefore match better with certain amps and guitars. An impulse response is a digital version of everything after the amp, which would include the mic pre, mic, cab, and speaker. With a digital modeler, these would run in place of a cabinet block and before any time-based effects or reverbs.
Creating an impulse response isn’t too complicated. There is a wealth of tutorial videos on YouTube detailing the process, and some DAWs come with a built-in IR creator. In short, you sample ambient sound around a core tone and then the modeler uses that to treat your guitar tone.
In Clip 3 you can hear a Vox-style amp with a closed 2x12 cab IR.
And in Clip 4 you can hear that exact same tone with a larger 4x12 cab IR.
There are a host of ways to use IRs in your signal chain, but often it can be a somewhat paralyzing notion to try and wade through dozens of options to find the right one. Most IR packs come with loads of different WAV files that that can be separated by either cab, mic, or, for acoustic settings, guitar type. One way to quickly parse through them would be to set up a simple template with your preferred signal chain and then insert a split after the amp block to two separate IR blocks. Then map those IR blocks to different footswitches. This allows you to A/B a pair of IRs without taking your hands off the guitar.
Acoustic amplification can be a tougher road. Brian Wahl and Bradford Mitchell are behind Worship Tutorials, a website that offers various presets and IRs for many types of modelers including Helix, Kemper, and Axe-Fx. A few years ago, Wahl purchased a few acoustic IRs but never really connected with them. So, he decided to make his own. “One of the big myths I see is that people think you need to get an IR pack that closely matches their guitar type. That’s not true,” he says. “It’s like thinking you can’t put Telecaster pickups in a different guitar,” adds Mitchell. The purpose of the IR is to help shape the tone of your instrument in ways that EQ can’t quite reach since there’s a bit of reverb and possibly delay packed into each one. Another myth that Wahl hears is that if you have a really good pickup system, you don’t need an IR. “My response to that is we’ve found that guitars with higher-end pickup systems actually benefit more by using an IR,” he says.
“One of the big myths I see is that people think you need to get an IR pack that closely matches their guitar type. That’s not true.” —Brian Wahl
The process for Wahl and Mitchell starts with making a high-quality recording of the miked acoustic. Then, they will match the recording across six different pickup systems and 10 different mic options. Once you factor in different sample rates and WAV lengths, the process can become quite intense. “When deciding which IR is for you, I typically recommend staring with a mic you’re familiar with and cycle through the different pickup options,” says Wahl. Trust your ears at this point in the process above all else. “Most of them actually might sound bad,” he adds, “but once the correct IR clicks, you’ll know it.”
Talking with Wahl and Mitchell inspired me to dig up a few acoustic IRs and test his theory. I plugged my Córdoba Acero straight into my HX Stomp and recorded into Logic Pro X via USB.
In Clip 5 you can hear my completely unaffected signal. The Acero’s pickup system combines a piezo and under-saddle mic, so I kept the blend at noon. It’s not a bad tone, but enough of the piezo quack is coming through to warrant a better solution.
For Clip 6 I loaded up an AKG C12 dreadnought IR. The result sounds better. There’s more air around the sound, but the high end is a bit thin.
Clip 7 is an IR from the same mic, but I chose a different pickup option. It’s not as good as Clip 6, but still has that ambience that I dig.
Finally, we have Clip 8, which is a combo of a piezo pickup and a Neumann U67-style microphone. It’s kind of gross and thin but could serve a purpose in the right mix. I think recording examples like this is essential to finding the right IR match. Taking an objective listen will help you decide between options that could be quite subtle.
State of Expression
One of the most fun—and interactive—parts of using a modeler is exploring the absolutely endless options that expression pedals can offer. In most units, nearly any parameter you can think of can be assigned to an expression pedal for real-time tweaking. One player who really opened my eyes to what’s possible with expression pedals is John Nathan Cordy, a British guitarist who specializes in jazz-fusion styles and has a YouTube channel that explores most of the modern modelers. One of his favorite expression pedal tricks was inspired by the ambient pads Eric Johnson would play on the intro to live versions of “Cliffs of Dover.”
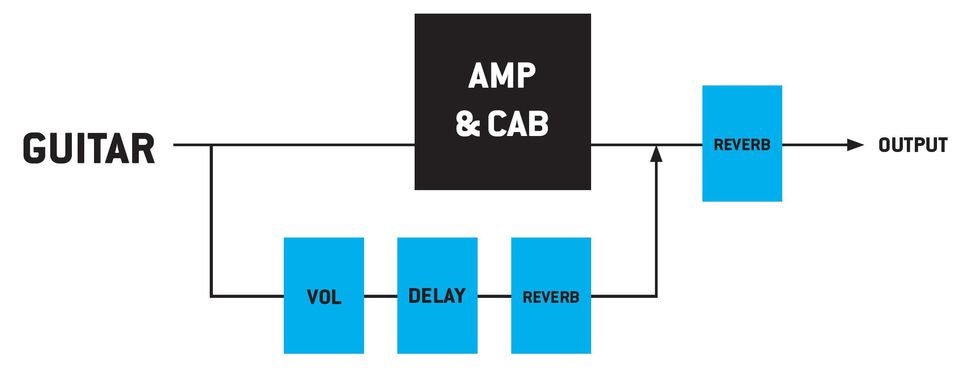
Fig. 5 shows the diagram, but here’s how you set it up:
- Arrange a basic signal path and then add a parallel path.
- Place a digital delay on the parallel path. Digital works better because with analog emulations you can dip into self-oscillation, and we don’t want that.
- Within the delay, assign your expression pedal to the feedback control so that when the heel is down you’re at about 10 percent and toe down is 100 percent.
- Put a volume pedal block before the delay and assign the expression pedal so when the toe is down it mutes the input.
- Add reverb to taste after the delay.
- Connect the parallel path back to the main path after the amp and cab block.
I’d recommend saving this as a template and then experimenting with loopers, compression, multiple outputs, and more.
Next Steps
Ultimately, the better you know any piece of gear, the better it will sound. Once you find a modeler that you connect with, invest the time to learn and explore the features and effects that you can put into practice. Understand its strengths and weaknesses and make sure those align with the goals you have for your rig. And don’t be too bashful to ask questions online—each of these units has a robust community of users, which means there’s a ton of info out there. Chances are if you run into a roadblock, someone else has too.
Finally, do what inspires you. Don’t overthink things or get distracted from the big picture, which is to enjoy making music.
- First Look: Fender Tone Master Deluxe Reverb - Premier Guitar ›
- Tone Tips: Modelers vs. Traditional Rigs - Premier Guitar ›
- Even If You Hate Modelers, You Probably Owe 'Em a Debt of ... ›
- Journey Guitar Legend Neal Schon Talks Vintage Instruments - Premier Guitar ›
- Legacy Amp Makers Face the Digital Challenge - Premier Guitar ›
Stevie Van Zandt with “Number One,” the ’80s reissue Stratocaster—with custom paisley pickguard from luthier Dave Petillo—that he’s been playing for the last quarter century or so.
With the E Street Band, he’s served as musical consigliere to Bruce Springsteen for most of his musical life. And although he stands next to the Boss onstage, guitar in hand, he’s remained mostly quiet about his work as a player—until now.
I’m stuck in Stevie Van Zandt’s elevator, and the New York City Fire Department has been summoned. It’s early March, and I am trapped on the top floor of a six-story office building in Greenwich Village. On the other side of this intransigent door is Van Zandt’s recording studio, his guitars, amps, and other instruments, his Wicked Cool Records offices, and his man cave. The latter is filled with so much day-glo baby boomer memorabilia that it’s like being dropped into a Milton Glaser-themed fantasy land—a bright, candy-colored chandelier swings into the room from the skylight.
There’s a life-size cameo of a go-go dancer in banana yellow; she’s frozen in mid hip shimmy. One wall displays rock posters and B-movie key art, anchored by a 3D rendering of Cream’s Disraeli Gearsalbum cover that swishes and undulates as you walk past it. Van Zandt’s shelves are stuffed with countless DVDs, from Louis Prima to the J. Geils Band performing on the German TV concert seriesRockpalast. There are three copies ofIggy and the Stooges: Live in Detroit. Videos of the great ’60s-music TV showcases, from Hullabaloo to Dean Martin’s The Hollywood Palace, sit here. Hundreds of books about rock ’n’ roll, from Greil Marcus’s entire output to Nicholas Schaffner’s seminal tome, The Beatles Forever, form a library in the next room.
But I haven’t seen this yet because the elevator is dead, and I am in it. Our trap is tiny, about 5' by 5'. A dolly filled with television production equipment is beside me. There’s a production assistant whom I’ve never met until this morning and another person who’s brand new to me, too, Geoff Sanoff. It turns out that he’s Van Zandt’s engineer—the guy who runs this studio. And as I’ll discover shortly, he’s also one of the several sentinels who watch over Stevie Van Zandt’s guitars.
There’s nothing to do now but wait for the NYFD, so Sanoff and I get acquainted. We discover we’re both from D.C. and know some of the same people in Washington’s music scene. We talk about gear. We talk about this television project. I’m here today assisting an old pal, director Erik Nelson, best known for producing Werner Herzog’s most popular documentaries, like Grizzly Man and Cave of Forgotten Dreams. Van Zandt has agreed to participate in a television pilot about the British Invasion. After about half an hour, the elevator doors suddenly slide open, and we’re rescued, standing face-to-face with three New York City firefighters.
As our camera team sets up the gear, Sanoff beckons me to a closet off the studio’s control room. I get the sense I am about to get a consolation prize for standing trapped in an elevator for the last 30 minutes. He pulls a guitar case off the shelf—it’s stenciled in paint with the words “Little Steven” on its top—snaps open the latches, and instantly I am face to face with Van Zandt’s well-worn 1957 Stratocaster. Sanoff hands it to me, and I’m suddenly holding what may as well be the thunderbolt of Zeus for an E Street Band fan. My jaw drops when he lets me plug it in so he can get some levels on his board, and the clean, snappy quack of the nearly 70-year-old pickups fills the studio. For decades, Springsteen nuts have enjoyed a legendary 1978 filmed performance of “Rosalita” from Phoenix, Arizona, that now lives on YouTube. This is the Stratocaster Van Zandt had slung over his shoulder that night. It’s the same guitar he wields in the famous No Nukes concert film shot at Madison Square Garden a year later, in 1979. My mind races. The British Invasion is all well and essential. But now I’m thinking about Van Zandt’s relationship with his guitars.
Stevie Van Zandt's Gear
Van Zandt’s guitar concierge Andy Babiuk helped him plunge deeper down the Rickenbacker rabbit hole. Currently, Van Zandt has six Rickenbackers backstage: two 6-strings and four 12-strings.
Guitars
- 1957 Fender Stratocaster (studio only)
- ’80s Fender ’57 Stratocaster reissue “Number One”
- Gretsch Tennessean
- 1955 Gibson Les Paul Custom “Black Beauty” (studio only)
- Rickenbacker Fab Gear 2024 Limited Edition ’60s Style 360 Model (candy apple green)
- Rickenbacker Fab Gear 2023 Limited Edition ’60s Style 360 Model (snowglo)
- Rickenbacker 2018 Limited Edition ’60s Style 360 Fab Gear (jetglo)
- Two Rickenbacker 1993Plus 12-strings (candy apple purple and SVZ blue)
- Rickenbacker 360/12C63 12-string (fireglo)
- Vox Teardrop (owned by Andy Babiuk)
Amps
- Two Vox AC30s
- Two Vox 2x12 cabinets
Effects
- Boss Space Echo
- Boss Tremolo
- Boss Rotary Ensemble
- Durham Electronics Sex Drive
- Durham Electronics Mucho Busto
- Durham Electronics Zia Drive
- Electro-Harmonix Satisfaction
- Ibanez Tube Screamer
- Voodoo Labs Ground Control Pro switcher
Strings and Picks
- D’Addario (.095–.44)
- D’Andrea Heavy
Van Zandt has reached a stage of reflection in his career. Besides the Grammy-nominated HBO film, Stevie Van Zandt: Disciple, which came out in 2024, he recently wrote and published his autobiography, Unrequited Infatuations (2021), a rollicking read in which he pulls no punches and makes clear he still strives to do meaningful things in music and life.
His laurels would weigh him down if they were actually wrapped around his neck. In the E Street Band, Van Zandt has participated in arguably the most incredible live group in rock ’n’ roll history. And don’t forget Southside Johnny and the Asbury Jukes or Little Steven and the Disciples of Soul. He created both the Underground Garage and Outlaw Country radio channels on Sirius/XM. He started a music curriculum program called TeachRock that provides no-cost resources and other programs to schools across the country. Then there’s the politics. Via his 1985 record, Sun City, Van Zandt is credited with blasting many of the load-bearing bricks that brought the walls of South African apartheid tumbling into dust. He also acted in arguably the greatest television drama in American history, with his turn as Silvio Dante in The Sopranos.
Puzzlingly, Van Zandt’s autobiography lacks any detail on his relationship with the electric guitar. And Sanoff warns me that Van Zandt is “not a gearhead.” Instead he has an organization in place to keep his guitar life spinning like plates on the end of pointed sticks. Besides Sanoff, there are three others: Ben Newberry has been Van Zandt’s guitar tech since the beginning of 1982. Andy Babiuk, owner of Rochester, New York, guitar shop Fab Gear and author of essential collector reference books Beatles Gear and Rolling Stones Gear (the latter co-authored by Greg Prevost) functions as Van Zandt’s guitar concierge. Lastly, luthier Dave Petillo, based in Asbury Park, New Jersey, oversees all the maintenance and customization on Van Zandt’s axes.
“I took one lesson, and they start to teach you the notes. I don’t care about the notes.” —Stevie Van Zandt
I crawl onto Zoom with Van Zandt for a marathon session and come away from our 90 minutes with the sense that he is a man of dichotomies. Sure, he’s a guitar slinger, but he considers his biggest strengths to be as an arranger, producer, and songwriter. “I don’t feel that being a guitar player is my identity,” he tells me. “For 40 years, ever since I made my first solo record, I just have not felt that I express myself as a guitar player. I still enjoy it when I do it; I’m not ambivalent. When I play a solo, I am in all the way, and I play a solo like I would like to hear if I were in the audience. But the guitar part is really part of the song’s arrangement. And a great solo is a composed solo. Great solos are ones you can sing, like Jimi Hendrix’s solo in ‘All Along the Watchtower.’”
In his autobiography, Van Zandt mentions that his first guitar was an acoustic belonging to his grandfather. “I took one lesson, and they start to teach you the notes. I don’t care about the notes,” Van Zandt tells me. “The teacher said I had natural ability. I’m thinking, if I got natural ability, then what the fuck do I need you for? So I never went back. After that, I got my first electric, an Epiphone. It was about slowing down the records to figure out with my ear what they were doing. It was seeing live bands and standing in front of that guitar player and watching what they were doing. It was praying when a band went on TV that the cameraman would occasionally go to the right place and show what the guitar player was doing instead of putting the camera on the lead singer all the time. And I’m sure it was the same for everybody. There was no concept of rock ’n’ roll lessons. School of Rock wouldn’t exist for another 30 years. So, you had to go to school yourself.”
By the end of the 1960s, Van Zandt tells me he had made a conscious decision about what kind of player he wanted to be. “I realized that I really wasn’t that interested in becoming a virtuoso guitar player, per se. I was more interested in making sure I could play the guitar solo that would complement the song. I got more into the songs than the nature of musicianship.”
After the Beatles and the Stones broke the British Invasion wide open, bands like Cream and the Yardbirds most influenced him. “George Harrison would have that perfect 22-second guitar solo,” Van Zandt remembers. “Keith Richards. Dave Davies. Then, the harder stuff started coming. Jeff Beck in the Yardbirds. Eric Clapton with things like ‘White Room.’ But the songs stayed in a pop configuration, three minutes each or so. You’d have this cool guitar-based song with a 15-second, really amazing Jeff Beck solo in it. That’s what I liked. Later, the jam bands came, but I was not into that. My attention deficit disorder was not working for the longer solos,” he jokes. Watch a YouTube video of any recent E Street Band performance where Van Zandt solos, and the punch and impact of his approach and attack are apparent. At Nationals Park in Washington, D.C., last year, his solo on “Rosalita” was 13 powerful seconds.
Van Zandt and Bruce Springsteen’s relationship goes back to their earliest days on the Jersey shore. “Everybody had a different guitar; your guitar was your identity,” recalls Van Zandt. “At some point, a couple of years later, I remember Bruce calling me and asking me for my permission to switch to Telecaster. At that point, I was ready to switch to Stratocaster.”
Photo by Pamela Springsteen
Van Zandt left his Epiphone behind for his first Fender. “I started to notice that the guitar superstars at the time were playing Telecasters. Mike Bloomfield. Jeff Beck. Even Eric Clapton played one for a while,” he tells me. “I went down to Jack’s Music Shop in Red Bank, New Jersey, because he had the first Telecaster in our area and couldn’t sell it; it was just sitting there. I bought it for 90 bucks.”
In those days, and around those parts, players only had one guitar. Van Zandt recalls, “Everybody had a different guitar; your guitar was your identity. At some point, a couple of years later, I remember Bruce calling me and asking me for my permission to switch to Telecaster. At that point, I was ready to switch to Stratocaster, because Jimi Hendrix had come in and Jeff Beck had switched to a Strat. They all kind of went from Telecaster to Les Pauls. And then some of them went on to the Stratocaster. For me, the Les Paul was just too out of reach. It was too expensive, and it was just too heavy. So I said, I’m going to switch to a Stratocaster. It felt a little bit more versatile.”
Van Zandt still employs Stratocasters, and besides the 1957 I strummed, he was seen with several throughout the ’80s and ’90s. But for the last 20 or 25 years, Van Zandt has mainly wielded a black Fender ’57 Strat reissue from the ’80s with a maple fretboard and a gray pearloid pickguard. He still uses that Strat—dubbed “Number One”—but the pickguard has been switched to one sporting a purple paisley pattern that was custom-made by Dave Petillo.
Petillo comes from New Jersey luthier royalty and followed in the footsteps of his late father, Phil Petillo. At a young age, the elder Petillo became an apprentice to legendary New York builder John D’Angelico. Later, he sold Bruce Springsteen the iconic Fender Esquire that’s seen on the Born to Run album cover and maintained and modified that guitar and all of Bruce’s other axes until he passed away in 2010. Phil worked out of a studio in the basement of their home, not far from Asbury Park. Artists dropped in, and Petillo has childhood memories of playing pick-up basketball games in his backyard with members of the E Street Band. (He also recalls showing his Lincoln Logs to Johnny Cash and once mistaking Jerry Garcia for Santa Claus.)
“I was more interested in making sure I could play the guitar solo that would complement the song. I got more into the songs than the nature of musicianship.” —Stevie Van Zandt
“I’ve known Stevie Van Zandt my whole life,” says Petillo. “My dad used to work on his 1957 Strat. That guitar today has updated tuners, a bone nut, new string trees, and a refret that was done by Dad long ago. I think one volume pot may have been changed. But it still has the original pickups.” Petillo is responsible for a lot of the aesthetic flair seen on Van Zandt’s instruments. He continues, “Stevie is so much fun to work with. I love incorporating colors into things, and Stevie gets that. When you talk to a traditional Telecaster or Strat player, and you say, ‘I want to do a tulip paisley pickguard in neon blue-green,’ they’re like, ‘Holy cow, that’s too much!’ But for Stevie, it’s just natural. So I always text him with pickguard designs, asking him, ‘Which one do you like?’ And he calls me a wild man; he says, ‘I don’t have that many Strats to put them on!’ But I’ll go to Ben Newberry and say, ‘Ben, I made these pickguards; let’s get them on the guitar. And I’ll go backstage, and we’ll put them on. I just love that relationship; Stevie is down for it.”
Petillo takes care of the electronics on Van Zandt’s guitars. Almost all of the Strats are modified with an internal Alembic Stratoblaster preamp circuit, which Van Zandt can physically toggle on and off using a switch housed just above the input jack. Van Zandt tells me, “That came because I got annoyed with the whole pedal thing. I’m a performer onstage, and I’m integrated with the audience and I like the freedom to move. And if I’m across the stage and all of a sudden Bruce nods to me to take a solo, or there’s a bit in the song that requires a little bit of distortion, it’s just easier to have that; sometimes, I’ll need that extra little boost for a part I’m throwing in, and it’s convenient.”
In recent times, Van Zandt has branched out from the Stratocaster, which has a lot to do with Andy Babiuk's influence. The two met 20 years ago, and Babiuk’s band, the Chesterfield Kings, is on Van Zandt’s Wicked Cool Records. “He’d call me up and ask me things like, ‘What’s Brian Jones using on this song?’” explains Babiuk. “When I’d ask him why, he’d tell me, ‘Because I want to have that guitar.’ It’s a common thing for me to get calls and texts from him like that. And there’s something many people overlook that Stevie doesn’t advertise: He’s a ripping guitar player. People think of him as playing chords and singing backup for Bruce, but the guy rips. And not just on guitar, on multiple instruments.”
Van Zandt tells me he wanted to bring more 12-string to the E Street Band this tour, “just to kind of differentiate the tone.” He explains, “Nils is doing his thing, and Bruce is doing his thing, and I wanted to do more 12-string.” He laughs, “I went full Paul Kantner!” Babiuk helped Van Zandt plunge deeper down the Rickenbacker rabbit hole. Currently, Van Zandt has six Rickenbackers backstage: two 6-strings and four 12-strings. Each 12-string has a modified nut made by Petillo from ancient woolly mammoth tusk, and the D, A, and low E strings are inverted with their octave.
Van Zandt explains this to me: “I find that the strings ring better when the high ones are on top. I’m not sure if that’s how Roger McGuinn did it, but it works for me. I’m also playing a wider neck.”
Babiuk tells me about a unique Rick in Van Zandt’s rack of axes: “I know the guys at Rickenbacker well, and they did a run of 30 basses in candy apple purple for my shop. I showed one to Stevie, and purple is his color; he loves it. He asked me to get him a 12-string in the same color, and I told him, ‘They don’t do one-offs; they don’t have a custom shop,’ but it’s hard to say no to the guy! So I called Rickenbacker and talked them into it. I explained, ‘He’ll play it a lot on this upcoming tour.’ They made him a beautiful one with his OM logo.”
The purple one-off is a 1993Plus model and sports a 1 3/4" wide neck—1/8" wider than a normal Rickenbacker. Van Zandt loved it so much that he had Babiuk wrestle with Rickenbacker again to build another one in baby blue. Petillo has since outfitted them with paisley-festooned custom pickguards. When guitar tech Newberry shows me these unique axes backstage, I can see the input jack on the purple guitar is labeled with serial number 01001.“Some of my drive is based on gratitude,” says Van Zandt, “feeling like we are the luckiest guys in the luckiest generation ever.”
Photo by Rob DeMartin
Van Zandt also currently plays a white Vox Teardrop. That guitar is a prototype owned by Babiuk. “Stevie wanted a Teardrop,” Babiuk tells me, “but I explained that the vintage ones are hit and miss—the ones made in the U.K. were often better than the ones manufactured in Italy. Korg now owns Vox, and I have a new Teardrop prototype from them in my personal collection. When I showed it to him, he loved it and asked me to get him one. I had to tell him, ‘I can’t; it’s a prototype, there’s only one,’ and he asked me to sell him mine,” he chuckles. “I told him, ‘It’s my fucking personal guitar, it’s not for sale!’ So I ended up lending it to him for this tour, and I told him, ‘Remember, this is my guitar; don’t get too happy with it, okay?’
“He asked me why that particular guitar sounds and feels so good. Besides being a prototype built by only one guy, the single-coil pickups’ output is abnormally hot, and the neck feels like a nice ’60s Fender neck. Stevie’s obviously a dear friend of mine, and he can hold onto it for as long as he wants. I’m glad it’s getting played. It was just hanging in my office.”
Van Zandt tells me how Babiuk’s Vox Teardrop sums up everything he wants from his tone, and says, “It’s got a wonderfully clean, powerful sound. Like Brian Jones got on ‘The Last Time.’ That’s my whole thing; that’s the trick—trying to get the power without too much distortion. Bruce and Nils get plenty of distortion; I am trying to be the clean rhythm guitar all the time.”
If Van Zandt has a consigliere like Tony Soprano had Silvio Dante, that’s Newberry. Newberry has tech’d nearly every gig with Van Zandt since 1982. “Bruce shows move fast,” he tells me. “So when there’s a guitar change for Stevie, and there are many of them, I’m at the top of the stairs, and we switch quickly. There’s maybe one or two seconds, and if he needs to tell me something, I hear it. He’s Bruce’s musical director, so he may say something like, ‘Remind me tomorrow to go over the background vocals on “Ghosts,”’ or something like that. And I take notes during the show.”
“Everybody had a different guitar; your guitar was your identity. At some point, a couple of years later, I remember Bruce calling me and asking me for my permission to switch to a Telecaster.” —Stevie Van Zandt
When I ask Newberry how he defines Van Zandt’s relationship to the guitar, he doesn’t hesitate, snapping back, “It’s all in his head. His playing is encyclopedic, whether it’s Bruce or anything else. He may show up at soundcheck and start playing the Byrds, but it’s not ‘Tambourine Man,’ it’s something obscure like ‘Bells of Rhymney.’ People may not get it, but I’ve known him long enough to know what’s happening. He’s got everything already under his fingers. Everything.”
As such, Van Zandt says he never practices. “The only time I touch a guitar between tours is if I’m writing something or maybe arranging backing vocal harmonies on a production,” he tells me.
Before we say goodbye, I tell Van Zandt about my time stuck in his elevator, and his broad grin signals that I may not be the only one to have suffered that particular purgatory. When I ask him about the 1957 Stratocaster I got to play upon my release, he recalls: “Bruce Springsteen gave me that guitar. I’ve only ever had one guitar stolen in my life, and it was in the very early days of my joining the E Street Band. I only joined temporarily for what I thought would be about seven gigs, and in those two weeks or so, my Stratocaster was stolen. It was a 1957 or 1958. Bruce felt bad about that and replaced that lost guitar with this one. So I’ve had it a long, long time. Once that first one was stolen, I decided I would resist having a personal relationship with any one guitar. But that one being a gift from Bruce makes it special. I will never take it back on the road.”
After 50 years of rock ’n’ roll, if there is one word to sum up Stevie Van Zandt, it may be “restless”—an adjective you sense from reading his autobiography. He gets serious and tells me, “I’m always trying to catch up. The beginning of accomplishing something came quite late to me. I feel like I haven’t done nearly enough. What are we on this planet trying to do?” he asks rhetorically. “We’re trying to realize our potential and maybe leave this place one percent better for the next guy. And some of my drive is based on gratitude, feeling like we are the luckiest guys in the luckiest generation ever. That’s what I’m doing: I want to give something back. I feel an obligation.”
YouTube It
“Rosalita” is a perennial E Street Band showstopper. Here’s a close-up video from Philadelphia’s Citizens Bank Park last summer. Van Zandt’s brief but commanding guitar spotlight shines just past the 4:30 mark.
Adding to the line of vintage fuzzboxes, Ananashead unleashes a new stompbox, the Spirit Fuzz, their take on the '60s plug-in fuzz.
The Spirit Fuzz is a mix of the two first California versions of the plug-in fuzz used by Randy California from Spirit, Big Brother & The Holding Company or ZZ TOP among others, also maybe was used in the "Spirit in the Sky" song.
A handmade pedal-shaped version with less hiss and more low-end with modern fatures like filtered and protected 9V DC input and true bypass. Only two controls for Volume and Attack that goes from clean to buzzy fuzz with some fuzzy overdrive in-between, also it cleans well with the guitar's volume.
The pedal offers the following features:
- Two knobs to control Volume and Attack
- Shielded inputs/outputs to avoid RF
- Filtered and protected 9VDC input
- Daisy-chain friendly
- Popless True Bypass switching
- Low current draw, 1mA
Each of the Hornet 15 Li amplifiers is designed to leverage Mooer's digital modeling technology to provide 9 preamp tones based on world-renowned amplifiers.
This modeling amplifier comes in two colors (White, Black), each of which is paired with its own carefully curated selection of preamp models.
The modulation dial can be adjusted to choose between chorus, phaser, and vibrato effects, whereas the delay dial facilitates analog, tape echo, and digital delay. Also, the reverb unit includes room, hall, and church emulations, making sure that there is an atmosphere and effect chain that works for any practice scenario.
A unique feature of this amplifier is how it can be used in two modes: “Live” and “Preset” mode. When using Live mode, guitarists will be able to browse the device's built-in preamp tones, which they can then enhance if they wish to throw the effect units. In contrast, the "Preset" mode allows users to save these effects and dynamic parameter changes into each preset, enabling them to customize them without overwriting the originals.
As any good amplifier should, the Hornet 15 Li is complete with industry-standard features, such as three-band EQ adjustment dials, volume and gain dials, a 1/4" guitar input, and both an auxiliary input and headphone output. However, MOOER has gone above and beyond to pack the amplifier with several special features; for example, this modeling amp boasts separate tap-tempo buttons for both the modulation and delay units, in addition to a dedicated tuner button and function, allowing guitarists to use the device's screen to ensure their guitar tuning is precise. What's more, the Hornet 15 Li also supports Bluetooth input, meaning that any guitarist can stream their favorite songs and backing tracks directly to the amplifier, making practice sessions and rehearsals easier than ever.
Arguably, the most impressive feature of the Hornet 15 Li is the fact that, in addition to being powered by a mains supply, it can also operate on battery. The device is built with an integrated 4000mA.h lithium battery, empowering guitarists to practice guitar on the go for hours–even when there’s no power source nearby. Combining this with how the amp weighs just 2.9kg and comes with a built-in handle, it’s clear that MOOER had portability and convenience in mind when designing this product.
Features:
- Available in 2 colors (White, Black), each with its own selection of classic preamps
- 9 high-quality preamp models, each captured through MOOER’s MNRS technology (controllable through the 9-way tone rotary switch)
- Modulation effects unit (chorus, phaser, vibrato) and dial
- Delay effects unit (analog, tape echo, digital) and dial
- Reverb effects unit (room, hall, church) and dial
- Three dials for three-band EQ adjustment (treble, mid, bass)
- Gain and master volume dials
- Live/Preset mode toggle switch
- Tap tempo buttons and features for modulation and delay effects
- 15 watts of rated power, ideal for practicing
- Digital screen for displaying functional and tuning information
- Built-in digital tuner
- ¼” guitar input
- 3.5mm auxiliary input
- 3.5mm headphone output
- Bluetooth support for high-quality audio input playback, perfect for backing tracks
- Convenient handle for easy transportation
- Rechargeable 4000mA.h lithium battery for portable play
- Power switch for easy on/off control
The Hornet 15 Li is available from distributors and retailers worldwide now.
Pickup screws with latex tubing.
If you’re used to cranking your Tele, you may have encountered a feedback issue or two. Here are some easy solutions.
Hello and welcome back to Mod Garage. A lot of players struggle with feedback issues ontheir Telecasters. This is a common problem caused by the design and construction of the instrument and can be attributed to the metal cover on the neck pickup, the metal base plate underneath the bridge pickup, the design of the routings, and the construction of the metal bridge and how the bridge pickup is installed in it.
Here is a step-by-step guide on how to eliminate most of these issues. And if you haven’t faced such problems on your Tele, you can still give these a try, and chances are good that you never will. These procedures will not alter the tone of your Telecaster in any way, so it’s better to have it and not need rather than to need it and not have it.
Checking the Pickups
Over the years, I have seen the wildest things coming stock from the factory, especially on budget pickups: unbent metal tabs on neck pickups, loose metal base plates on bridge pickups, bridge pickups only held by the springs, and other crazy stuff.
Let’s start with the neck pickup. Make sure the cover is installed tightly and is not loose in any way. The metal cover is only held by three metal tabs that are bent around the bottom of the pickup, one of them usually connected to the pickup’s ground. Make sure they are tight, holding the metal cover firmly in place. If not, they need to be re-bent. Be careful to not break them.
“Often, these small metal springs can cause feedback, and I’m sure Leo Fender had his reasons for choosing latex tubing instead.”
On the bridge pickup, the metal base plate on the bottom needs to be attached firmly. Check with your fingers to see if it can move. If so, even in only one spot, you need to re-glue it to isolate vibration. Otherwise, it will squeal at high volumes. This is easy to do, and the easiest and best way is to completely take the base plate off, clean it, and re-glue it with a thin layer of silicone from your local Home Depot.
While you are in there, it’s always a good idea to convert both pickups to 3-conductor wiring by breaking the ground connection of the metal cover (neck pickup) and the base plate (bridge pickup). Attach a third wire to one of the lugs of the metal cover and another one to the metal base plate, and solder both to a grounding point of your choice, e.g. the casing of one of the pots. This can be helpful for future mods, like any 4-way switch mod, where this is a mandatory requirem
Un-springing the Pickup Attachment
If your pickups are attached with metal springs to enable height-adjustment, you should replace them with some latex tubing. Often, these small metal springs can cause feedback, and I’m sure Leo Fender had his reasons for choosing latex tubing instead of metal springs. This is cheap, fast, and easy to do; you can get latex tubing from any guitar store or online for only a few cents. (See photo at top.)
Cushioning the Pickups
On a Tele, there’s usually a gap between the bottom of the pickups and the inside of the guitar’s body. This open space can exacerbate feedback issues. Luckily, it’s easy to solve with a piece of foam.
Using a piece of white paper, outline the routing for each pickup. Cut them out as a template for the foam. Then, trim the foam to shape. Place the foam on the bottom of both pickup routings, and you are done. There is no need to glue or attach the foam in any way.
It’s important that the bottom of the pickup is touching the foam so there is no more open gap. I usually use foam that is a little bit thicker than necessary, so the pickup will press on it slightly, making a perfect connection. The type of foam is not important as long as the gap is closed. I prefer to use foam rubber that is easily available in a variety of thicknesses.
Closing Support Routings
On a lot of Telecasters, you can find open support routings from the neck pickup routing towards the electronic compartment. This is for easier access when running the wires of the neck pickup through the body.
Note the various cavities in this typical Telecaster body.
Photo courtesy of Singlecoil (https://singlecoil.com)
There are two ways of routing the wires of the neck pickup through the body: from the neck pickup routing directly into the electronic compartment or into the routing of the bridge pickup, and from there into the electronic compartment, which is the traditional way. In the latter case, make sure all the wires are running underneath the additional piece of foam. If you have any open support routings on your Telecaster body, put some foam in to close them. You don’t need to attach the foam; the pickguard will hold it in place. The kind of foam doesn’t matter, and you can also use things like a small piece of cotton cloth, cotton wool, Styrofoam, etc. in there.
Addressing Bridge Plate Flaws
One of the most common reasons for unwanted feedback is the typical Telecaster bridge plate. The Telecaster bridge system was designed in the ’40s by Leo Fender himself and is crude at best. Its function was simply positioning the strings and providing a rough, easy adjustment of the intonation and the string-height settings. It wasn’t long before Fender released the much-improved bridge design found on the Stratocaster.
The current production Fender vintage bridge plate, as well as most budget aftermarket bridge plates, is made from thin hot-rolled steel in a deep-drawn process. Using this manufacturing process, parts can be made very quickly and cheaply, but at severe cost in quality. The steel used must be very soft and thin to allow it to fold and bend in the corners.
A classic Telcaster bridge plate.
Photo courtesy of Singlecoil (https://singlecoil.com)
Unfortunately, this process creates unusual internal stress in the steel, which can bow the plate so it can’t sit flat on the wooden body. This is a common reason for unwanted feedback on so many Teles. Interestingly, the early vintage bridge plates Fender made used a cold-rolled steel procedure to relieve stress in the material and to avoid this problem. Long live modern mass production!
If you have a Tele with a bowed bridge plate, there are three possible things you can do:
• Change the bowed bridge plate for a straight and even one. (This is the easiest way to avoid any troubles.) There are excellent replacement bridge plates on the market, so you’ll have plenty of choices for materials, designs, finishes, etc.
• Get the bowed bridge plate to a metal fabricator or tool maker so they can try to solve the problem for you. This process will probably cost you more than a new bridge, so this is only an option if it’s a special bridge you want to keep, no matter the cost.
• Drill two small additional holes on the front of the bridge plate, shown as red dots in the picture. After re-installing the bridge plate on the guitar, tightly drill two wood screws through these holes. Often, modern replacement bridges already have these two additional holes. In many cases, this will do the trick, so you don´t have to buy a new bridge.
If you have gone through this entire list and still have problems with feedback, it’s very likely that the pickup itself needs to be re-potted, which a pickup builder can do for you.
Next month, we will stay on the Telecaster subject, taking a close look at the famous Andy Summers Telecaster wiring, so stay tuned!
Until then ... keep on modding!