Whether electric bass is your main instrument or you're a guitarist who doubles on 4-string, it's important to keep your axe in tip-top shape. In this handy guide, Nashville guitar tech and luthier Tony Nagy explains how the pros do a bass setup.
As you'll soon discover, it's not hard to make your bass play and sound great. In this step-by-step tutorial, Nagy walks you through the entire process. With a few tools and some patience, you'll get the job done right and—best of all—have the satisfaction of knowing you did it yourself.
I've read many articles and repair manuals on bass setup, and I've personally set up thousands of basses as a professional. So when PG asked me to write a DIY piece on the subject, I thought, "What can I bring to this discussion that's truly helpful? Is there a little something I can describe that you don't already know?"
In this article, we'll cover the essentials with the goal of helping you decide what you can handle yourself and what you should leave to your local repair technician. Even if there are aspects of the job you're not prepared to attempt on your own, it's good to understand what's involved with a bass setup. Knowing the steps and terminology will let you communicate more confidently and effectively with your repair guy or gal.
More than likely you're thinking about setup because in some way, your instrument is not performing the way you'd like. To pinpoint any problems, we need to look at all the factors that affect your instrument's overall playability, sound, and function.
Preliminary Inspection
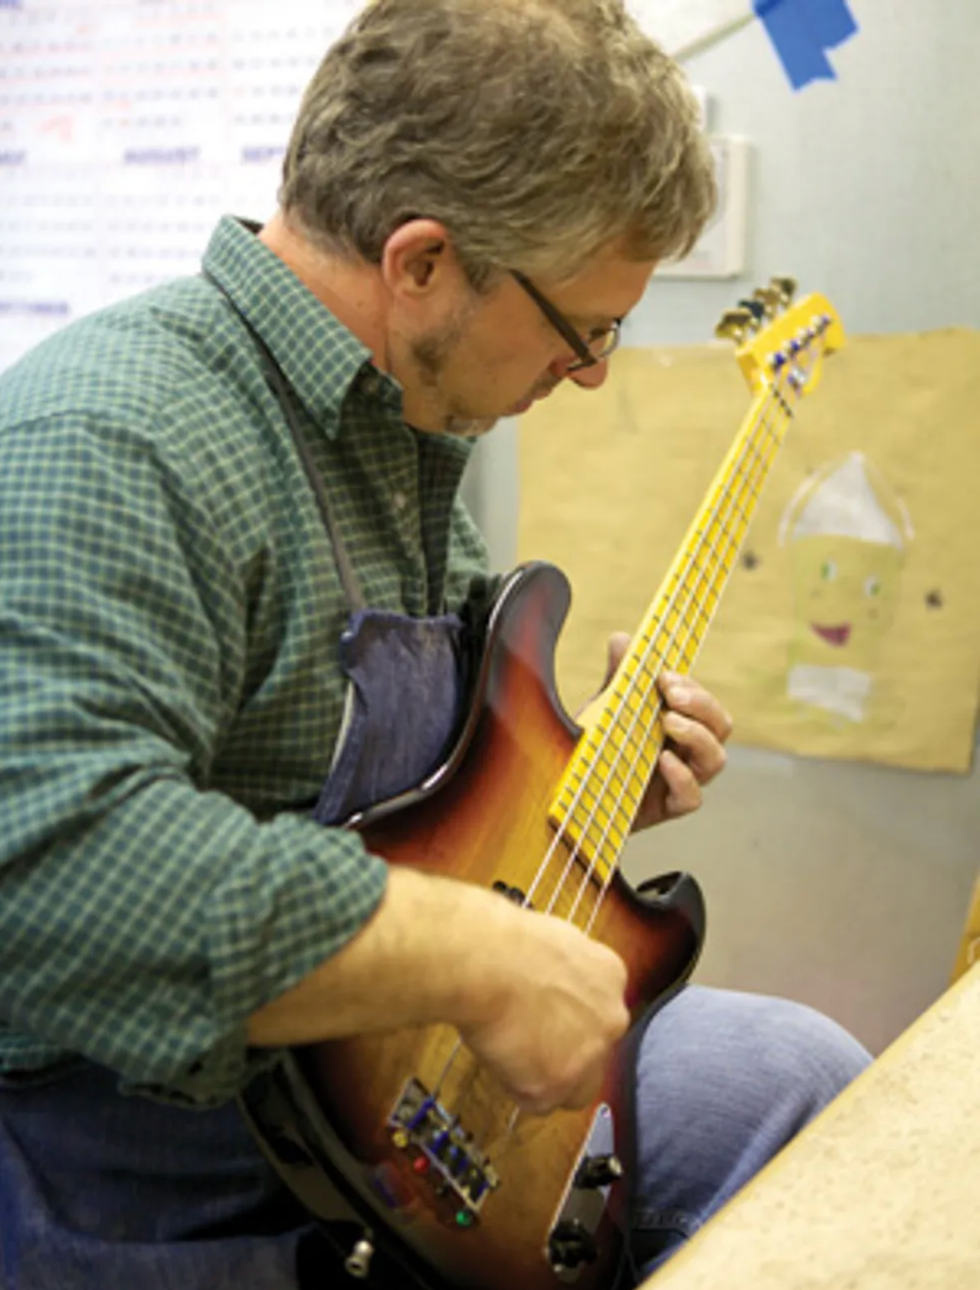
Photo 1: A setup begins with a preliminary, hands-on inspection of your bass. Check playability and listen for issues like buzzing frets and hardware rattles. List any problems you find.
Our journey begins with a general inspection (Photo 1), which consists of playing the instrument while asking yourself these questions: Is the action too high? Too low? Are there buzzing frets? If so, that indicates a need for adjustment.
While you're at it, work the volume and tone controls, checking for noise. Gently jiggle the 1/4" plug at the output jack to check it for noise. Are there any hardware-related rattles? Take notes on all your observations and list any issues you need to address.
After you've given your bass a hands-on evaluation, you're ready to get to work on the setup.
Tip: Because the adjustments that control playability are affected by string gauge and tension, be sure your bass sports the type of strings you plan to use. If you change string gauge, you'll need to do a fresh setup to accommodate the new strings.
Step 1: Measure the Neck Relief
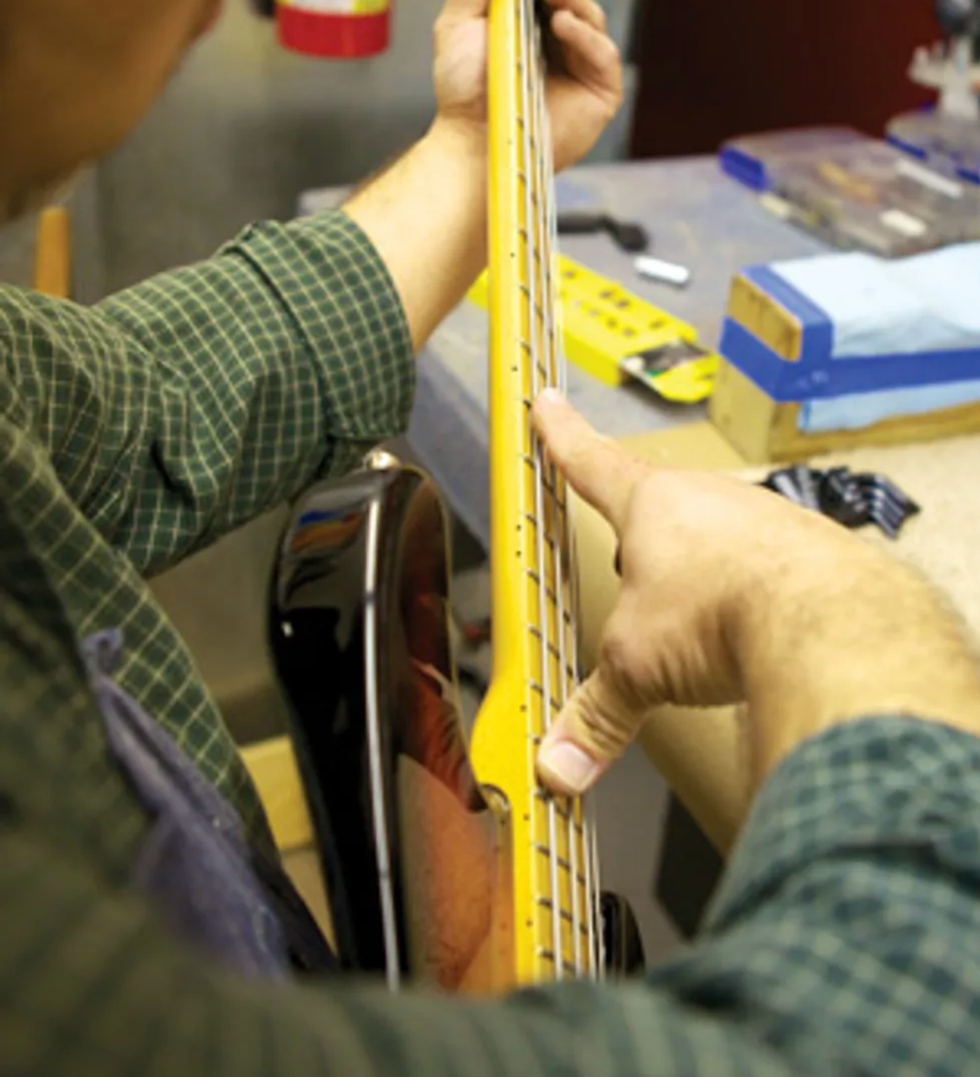
Photo 2: To gauge the amount of relief in your neck, use both hands to simultaneously fret the 4th string at the 1st fret and somewhere between the 14th and 16th frets. At the mid point between these two fretted notes, look at the gap between the bottom of the string and the top of the frets. To get another perspective on this gap, bounce the string against the frets with your picking-hand index finger.
We start with checking the "relief" or amount of bend in the neck. I often see people sighting down the neck from all angles and making some very ballpark assessments about neck relief. But the precise and accurate way to measure relief is to use the strings as a straightedge. Here's how to measure neck relief:
- Tune your bass to pitch. Use the primary tuning you put this instrument in when performing or recording.
- With your fretting hand, hold your lowest string against the 1st fret as if you were playing that note.
- Stretch your picking hand across the fretboard with your thumb aiming towards the bridge and index finger extended toward the nut (Photo 2). Open your hand as far as you can comfortably stretch and fret the lowest string with your thumb. The object is to move your thumb as close to the bridge as you can, while allowing your index finger to touch the lowest string approximately halfway between your fretting finger at the 1st fret and picking hand thumb. (Depending on the fretboard scale length, my picking hand thumb lands on the 14th, 15th, or 16th fret.) Now the lowest string is fretted at two points with two hands. With the lowest string secured at the 1st and, say, 15th fret, you can now use it as a straightedge.
- With your picking-hand index finger, tap the string against the middle frets. By repeatedly tapping and releasing, you'll be able to gauge how much space lies between the bottom of the string and the top of those frets. The gap (if any) is the amount of relief. How much of a gap you need depends very much on your playing style, but to get started, I adjust an instrument to have a gap that's equivalent to the thickness of one or two business cards.
Tip: Make sure you continually check the tuning of your bass so it stays at pitch. This is crucial for making accurate measurements and adjustments.
Step 2: Adjust the Truss Rod
This is very important: If you don't feel comfortable adjusting your truss rod or don't have the proper tool, take this to your local qualified repair technician. You can really mess up your instrument by stripping the threads on your truss rod or over tightening and breaking this critical part of the neck. Whether the truss rod is adjusted via a male hex nut, a female socket, or a Phillips nut at the neck heel, make sure your tool has a snug fit so you don't strip out this vital part.
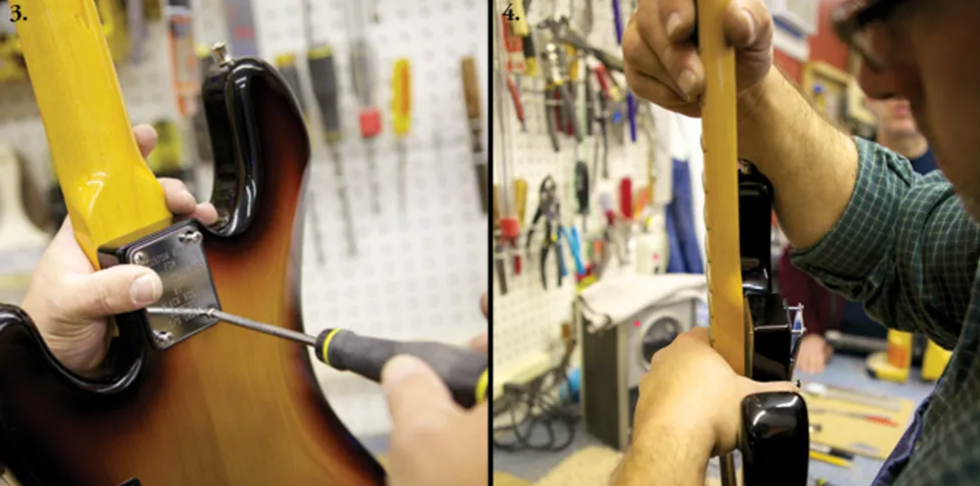
Photo 3: To remove the neck to expose a truss rod that's installed at the heel, take off the strings and back out the screws at the neck plate. Photo 4: Once the screws have released the neck, gently pull it free from the body being careful not to scratch the neck on the exposed screw tips.
The vast majority of truss rods adjust clockwise to tighten and counter-clockwise to loosen. If your truss rod is located at the headstock, look down the neck from headstock to body to determine clockwise and counter-clockwise direction. If your truss rod adjustment is at the heel of the neck, you'll need to remove it (Photos 3 and 4). The movements will be the same when you look from the heel down.
Tip: If you have any doubts about how to adjust a truss rod, get a guitar repair book or study the manual that came with your instrument. Many manufacturers offer free online instructions for adjusting the truss rods on their guitars.
If you decide you want to change the gap between the string and fret, here's the process:
- To reduce the gap between string and fret, tighten the truss rod. Conversely, to increase the space between string and fret, loosen it. Move the truss rod in quarter-turn increments.
- Retune and recheck relief each time you move the rod.
Continue the process until you get the desired gap between the string and fret. Again, unless you have a specific gap in mind, shoot for the thickness of one or two business cards.
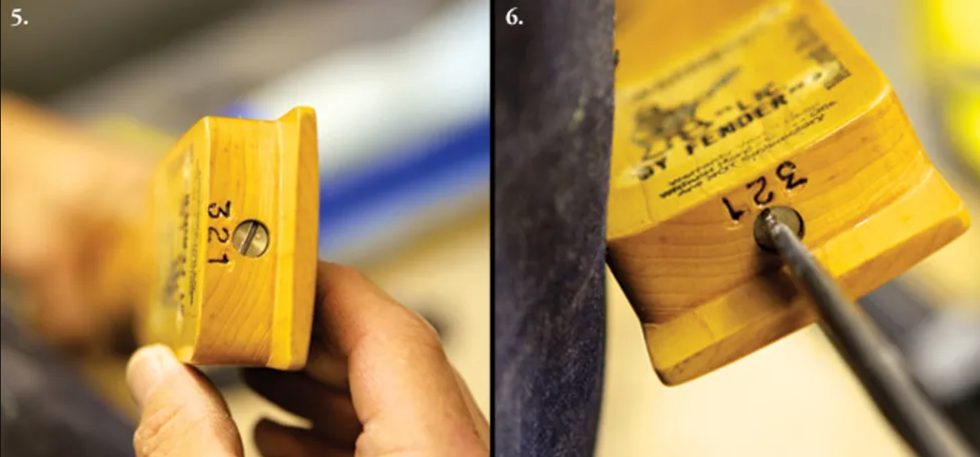
Photo 5: Truss rods accessed at the neck heel are often adjusted with a screwdriver. Photo 6: Whether the truss rod is installed at the headstock or neck heel, the vast majority adjust clockwise to tighten and counterclockwise to loosen.
If your bass requires adjustments at the neck heel (Photos 5 and 6), rather than the headstock, you'll face the tedious prospect of reinstalling the neck and restringing to check each adjustment.
Tip: If your truss rod seems very difficult to adjust, or stops moving, or makes a loud noise, see a local repair tech. Although adjusting a truss rod may be foreign to you, all qualified technicians understand how it functions. It's definitely worth paying the price to have this done right.
There are several adjustments that affect action, but they need to be done in the correct order. Because your decisions about all the other action-related adjustments are based on neck relief, it's important to deal with the truss rod first. Once you've made any necessary truss-rod adjustments, you're ready to move on to the other factors that control playability.
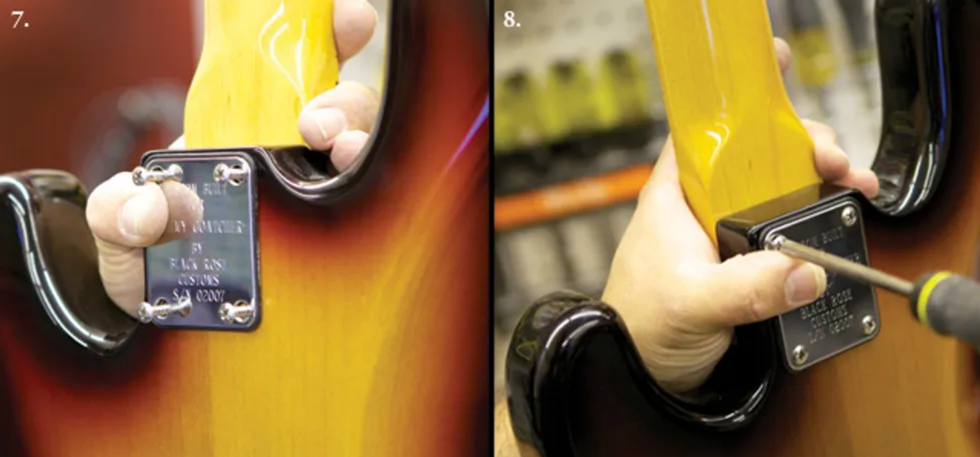
Photo 7: To reattach the neck, carefully place the heel into the neck pocket and then insert the screws by hand, slipping them through the body and seating the tips into their respective holes. Photo 8: Tighten the neck screws securely. As you do this, use your free hand to control the screwdriver tip so it doesn't slip out and mar the body.
If you've removed the neck to make truss rod adjustments, reattach it now (Photos 7 and 8), restring, and retune.
Step 3: Inspect the Nut Slots
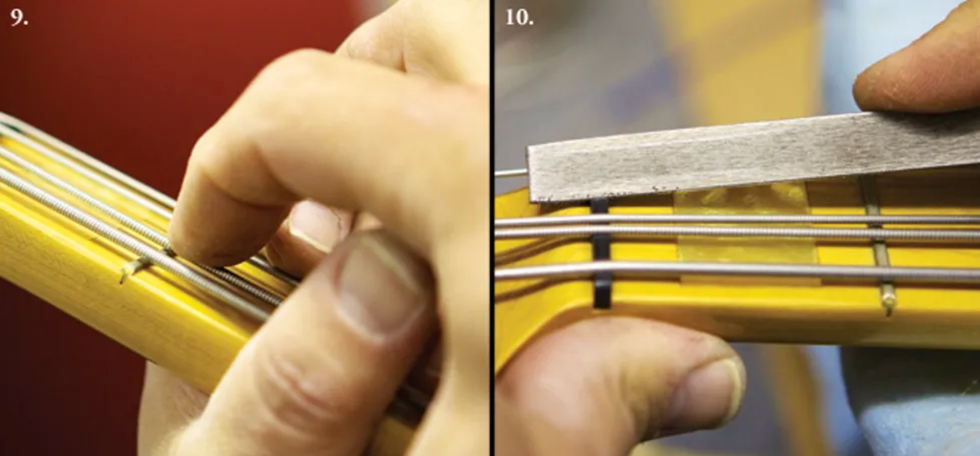
Photo 9: Checking action at the 1st fret while holding the string against the 2nd fret. In addition to eyeballing the clearance, tap the string against the fret to determine the distance between them. Photo 10: Deepening the 2nd-string nut slot.
Next, we check the nut slots and the string height at this end of the neck.
- Tune up.
- Hold each string down on the 2nd fret and look at the space between the bottom of the string and the top of the 1st fret (Photo 9). We want this clearance to be as small as possible, yet when you play the open string, you don't want to hear it buzz against the 1st fret. If the clearance is insufficient, you'll get a buzz.
For bass guitar, a good middle-of-the-road clearance over the 1st fret (with the string still pressed against the 2nd fret) would be the thickness of one business card. If the string has more than that amount of space, the respective nut slot may need to be deepened (Photo 10) so the action at the 1st and 2nd frets is low enough to play comfortably and you don't pull the strings sharp trying to press them against the frets.
Anyone can get nut files from Stewart-MacDonald (stewmac.com) or Luthiers Mercantile (lmii.com), but there is more to cutting a proper nut slot than just making a groove. It needs to be exactly the proper size for each string. The slot must hold a string firmly in place so it can't move around or sympathetically vibrate against the sides of the nut slot, but not be so tight that the string binds and hangs in the slot and then goes out of tune when it's stretched or played.
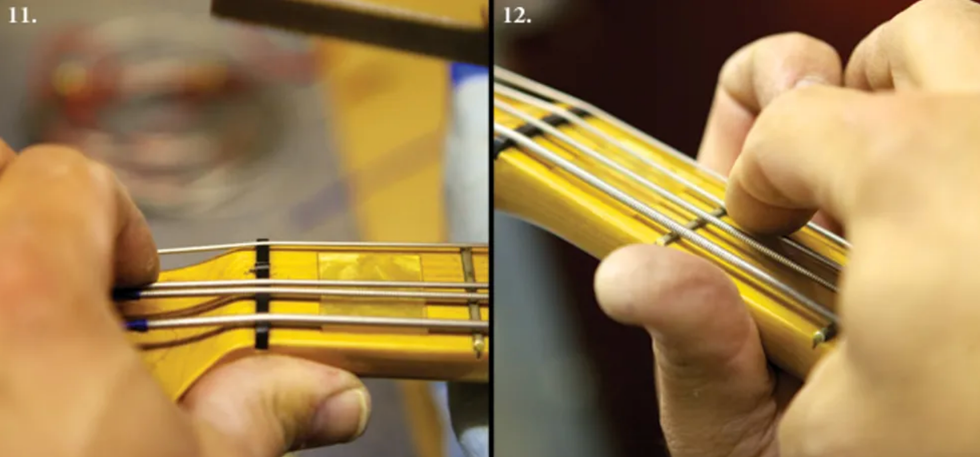
Photo 11: A slot needs to be gently angled downward as it points back toward the headstock and the string must "speak" from the nut's front edge—right where the nut touches the fretboard. Photo 12: When deepening a nut slot, recheck the 1st-fret action after a few light strokes with the file.
Also, the slot needs to be gently angled downward as it points back toward the headstock (Photo 11). The string must "speak" from the nut's front edge—right where the nut touches the fretboard and not somewhere inside the nut slot. (If a string rests on a point inside the slot, rather than at the leading edge, this can create a "sitar" effect or cause a string to play out-of-tune along the fretboard.)
If you deepen a nut slot, work very slowly and frequently recheck the action at the 1st fret after a stroke or two of the nut file (Photo 12).
If a string touches the 1st fret when you press it against the 2nd fret, then the nut slot is too low. The offending slot will have to be filled and then fine-tuned with a nut file, or the nut itself shimmed to gain more height, or you need to fabricate a new nut. Sonically and mechanically, the latter is the best option. If you're not comfortable tackling this project, see your repair tech. [For detailed explanations on cutting a bone nut, visit premierguitar.com and read "How to Convert Your Axe to a Baritone," "How to Intonate a Flattop Guitar," and "How to Convert a Flattop to Nashville Tuning" in the March, April, and September 2012 issues.]
Step 4: Adjust Saddle Height
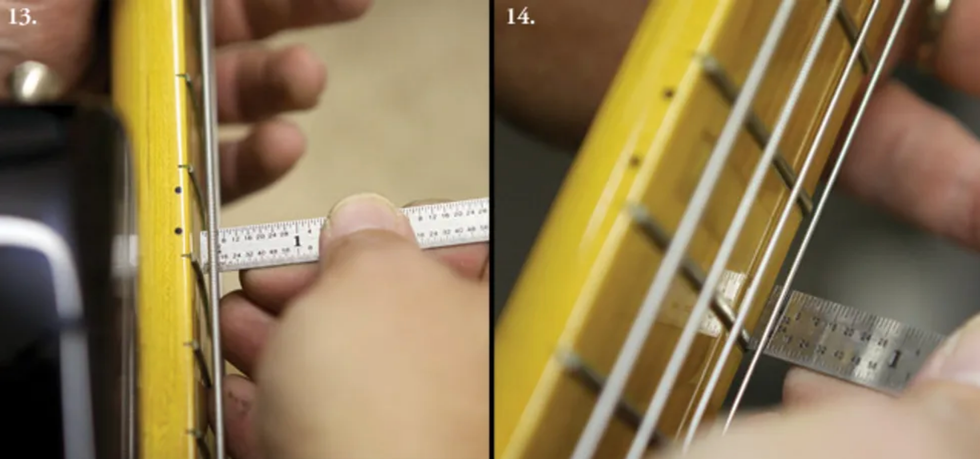
Photo 13: Measuring the distance between the 4th string and 12th fret with a precision metal ruler. Photo 14: Measuring the distance between the 1st string and 12th fret.
Now we're ready to check and adjust string height at the bridge:
- Tune up. (This is automatic by now, right?)
- At the 12th fret, measure the distance between the bottom of each string and the top of the fret (Photos 13 and 14 )
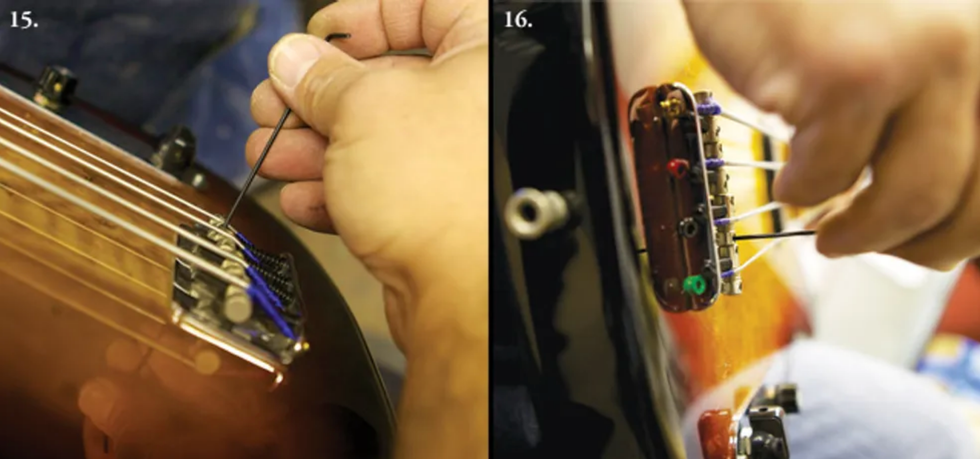
Photo 15: Adjusting saddle height for the 1st string. Photo 16: Another view of saddle-height adjustment. Here, the 2nd string is being raised.
- Using the appropriate wrench, adjust each saddle up or down to the desired height (Photos 15 and 16).
- Naturally, string action has to be adjusted for an individual's playing style. If you have a light touch and play very technically, you can get away with slightly lower action. However, you'll want a somewhat higher action if you love to dig into the strings and produce big, clear, sustaining tones. By experimenting, you'll eventually determine the ideal action for your music—and that's the beauty of learning how to do a setup yourself.
- For a middle-of-theroad action, I set the bass side of a 4-string (the E string in standard tuning) to 7/64", and then set the treble side (G string) to 5/64". I then graduate the heights as I go across the fretboard, making it 6+/64" on the A string and 6-/64" on the D string.
The goal is to gradually make the strings go from higher to lower as they cross the fretboard from the bass to treble side. With multi-string basses (5, 6, and more), continue this concept across the strings by adding some height for lower strings and shaving a little off for higher ones.
Step 5: Evaluate Your Frets
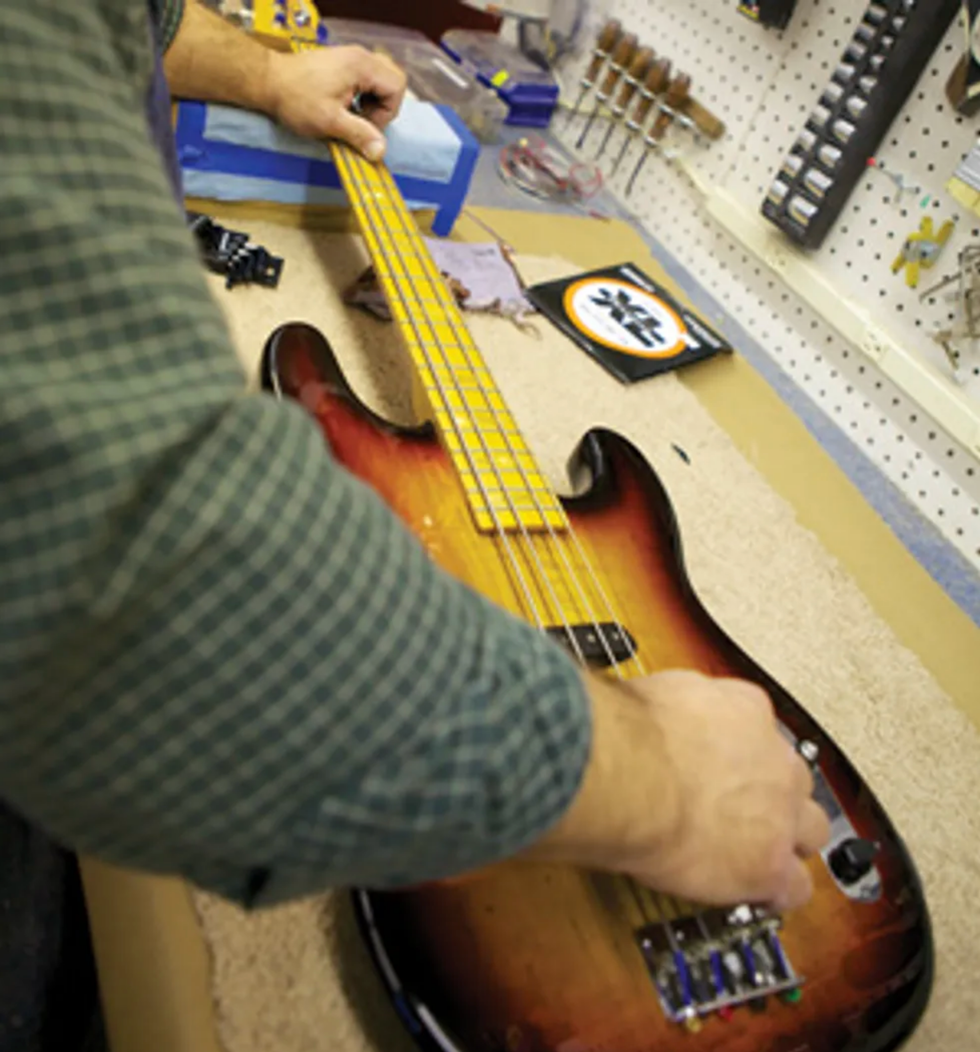
Photo 17: Once the neck relief, nut slots, and basic saddle height have all been adjusted, it's a good time to check fret condition.
Once you have the strings close to their proper height with the instrument at pitch and the previous adjustments dialed in, you can really see if the frets are level all the way along the fretboard. We're now at the stage in the setup where fret problems will be revealed (Photo 17).
High or low frets, loose frets, and even dead spots from the buildup of gunk and funk that gradually seeps between the frets and fretboard over the years can create inconsistent string vibration, so be on the lookout for these problems.
Speaking of fret condition, if you notice that even after being tuned to pitch and intonated (which we will get to in a moment), your bass does not play in tune with itself on some notes, check to see whether your frets have a nice round crown on top or if they're flat. Frets that are worn flat will allow the string to read from either the front edge of the fret and play sharp, or read from the back side of the fret and create a sitar-like sound. Having your frets in level, crowned, tip-top condition is essential for optimal playability, focused sound, and spot-on intonation. Fretwork is definitely the domain of a trusted repair technician.
Step 6: Adjust Intonation
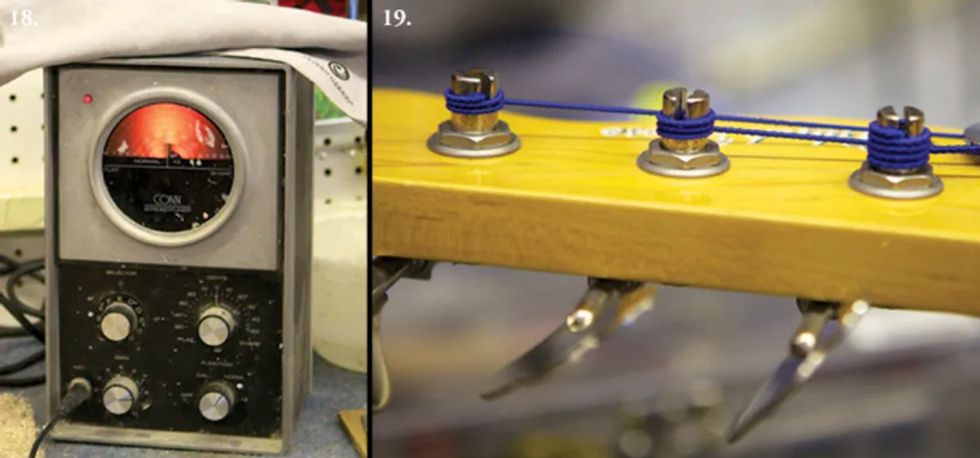
Photo 18: A strobe tuner or pedal with strobe functions provides superior visual feedback for setting intonation. Photo 19: Properly wound strings wrap from the top of the post to its bottom. The wraps should lie tight against one another and not overlap.
Now we're ready to check and adjust intonation. Unless the strings are fresh, install a new set before going any further.
Intonating your instrument involves individually adjusting the length of each string so its notes are in tune along the entire fretboard. To do this, it's best to use a strobe tuner (Photo 18) because it lets you visually track incremental pitch changes in both a note's fundamental vibration and its overtones.
Before we start, here are some tuning tips to consider. In my experience, you'll end up with a more stable tuning if you come up to pitch from below. By tuning up, you reduce the possibility of slack being in the string that could release while you're playing.
Also, be sure the windings progress around the post sequentially from top to bottom—with no overlapping—and that these winds are snug or butted up against each other so they can't move around (Photo 19).
Stretching is important too. I spend time stretching strings when they're new. Usually tuning up to pitch and stretching a string six to eight times will get it stable. There's no need to really yank— applying a firm upward pull as you move along the string's entire playing length is sufficient.
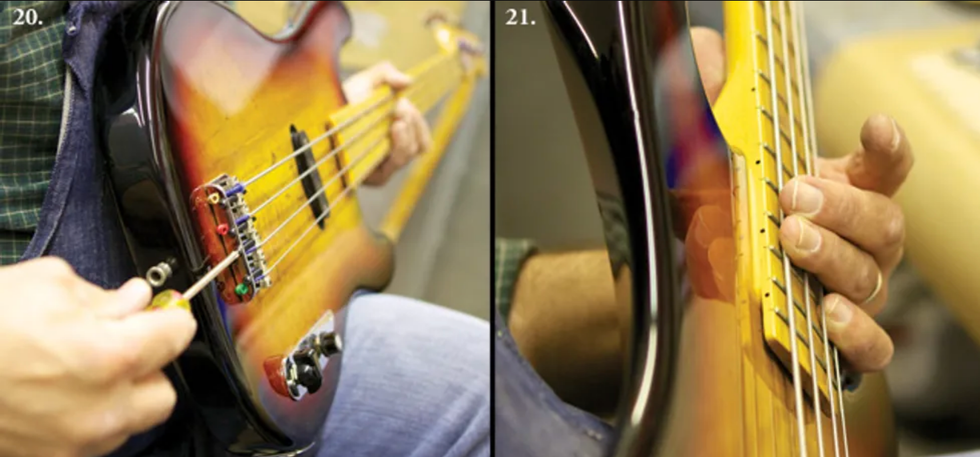
Photo 20: Using a Phillips screwdriver to shift the 2nd-string saddle backward. Photo 21: Checking the low-E's second-octave fifth interval—that's B at the 19th fret—with a tuner to see how it's intonating after the octave has been adjusted.
- After your strings are properly installed, stretched, and all tuned to pitch, start with the lowest string and make sure it's in tune while you play it open. Then, on the same string, play the note at the 12th fret. The open string is your reference, and the 12th-fret note—which is an octave higher—should also be in tune without you touching the string's tuning machine. If the 12th-fret tone isn't in tune, you'll make adjustments at the saddle to raise or lower the fretted note's pitch until that note is in tune with the open string.With that in mind, also take care to play the 12th-fret note as if you were performing it—not with less or more pressure than you'd use to play the note while you're onstage.
- If the high octave—the fretted note—is sharper than the open pitch, this means the speaking length of your string is too short. That is, the distance between the fretted octave and the saddle is too small. If that's the case, you need to make the string slightly longer by moving the saddle away from the neck.Conversely, if the fretted octave is flatter than the open string, the vibrating section of the string between the 12th fret and saddle is too long and needs to be shortened a tad. To do this, move the saddle toward the neck.Different basses have different processes for shifting the saddle backward or forward (Photo 20). This can include loosening setscrews to allow the saddles to have forward and backward motion. If you're not sure how your saddles operate, consult the owner's manual that came with your bass or go online to research the particular bridge.
- After the bottom string is intonated, move to the 3rd string, then the 2nd, and finally the 1st.
Tip: Make small adjustments and always retune before making another adjustment. Be patient— it's a painstaking process, but well worth the time investment.
Once I get the 12-fret octaves in tune with their respective open strings, I like to check if the fifth of each open string is in tune. For example, assuming my 4th string is tuned to E— standard tuning—the fifth is B, which occurs at the 7th fret and also one octave higher at the 19th fret (Photo 21).
There are articles and books that explain the math behind the 12-tone, equal-tempered tuning system that Western instruments—including the bass guitar—are designed around. It's beyond the scope of this DIY tutorial to delve into the details of equal temperament, but in a nutshell, the system presumes that your octaves are perfectly in tune. All other intervals are fudged by a few cents from their pure harmonic form to allow the octave to be evenly divided into 12 notes, or half-steps. (Each half-step consists of 100 cents.)
In practical terms, once you've intonated each string so the octave is in tune with its corresponding open string, you may find that the fifth—a crucial note for bassists—is disagreeably out of tune. This can be a result of equal-temperament "fudging" and how it affects fret placement, but also the thickness and material of a given string can contribute to the issue. We are, after all, simply stretching wire into different vibrating lengths to make music—a primitive scheme when you think about it.
If it happens, let's say, that the 19th-fret B on the 4th string is a little sharp, but the octave is dead on, I may fudge the intonation a little bit to favor the B note. This entails moving the saddle back slightly to reduce the sharpness of the B. It's a tricky and imperfect game—you don't want to put your octave noticeably out of tune because then the whole equal-tempered tuning system collapses.
If you find large discrepancies between the correctly tuned open string and its octave relative to other intervals, seek out an experienced repair technician who can help you diagnose and remedy such intonation troubles. There are a lot of techniques available to address this particular dilemma.
Step 7: Check Electronics
As a part of my setups, I also include a thorough electronics check. Dirty pots, loose pots or jacks, and loose knobs can all interrupt the seamless connection between performer and instrument. Often the scratchy sound from a dirty pot can be remedied with a squirt of contact cleaner. This requires disassembly, and depending on your instrument, you may want to have your tech handle it.
As you troubleshoot and adjust your instrument, remember that the aim is to remove everything that can distract or hinder you from playing music. Between you and an experienced repair technician, you should be able to achieve this goal. Good luck!
[Updated 11/17/21]
- Rig Rundown: Greta Van Fleet [2021] - Premier Guitar ›
- DIY: How to Set Up a 5-String Bass - Premier Guitar ›
- Top 5 Bass Rig Rundowns - Premier Guitar ›
- The Big 5: Adeline - Premier Guitar ›
- Flashy Is Fun, but the Bass Has a Deeper Function - Premier Guitar ›
- Squier Paranormal Rascal HH Review - Premier Guitar ›
- Epiphone Newport Bass Review - Premier Guitar ›
- Unlock Your Guitar's Potential with this Easy 4-Step Setup Guide ›
- Bassist Ciara Moser and Her Groundbreaking Debut Album ›
- How to Find Your Sound on Bass, with Thanks to P-Funk - Premier Guitar ›
- How Playing Bass in an Orchestra Can Improve Your Musicality - Premier Guitar ›
Stevie Van Zandt with “Number One,” the ’80s reissue Stratocaster—with custom paisley pickguard from luthier Dave Petillo—that he’s been playing for the last quarter century or so.
With the E Street Band, he’s served as musical consigliere to Bruce Springsteen for most of his musical life. And although he stands next to the Boss onstage, guitar in hand, he’s remained mostly quiet about his work as a player—until now.
I’m stuck in Stevie Van Zandt’s elevator, and the New York City Fire Department has been summoned. It’s early March, and I am trapped on the top floor of a six-story office building in Greenwich Village. On the other side of this intransigent door is Van Zandt’s recording studio, his guitars, amps, and other instruments, his Wicked Cool Records offices, and his man cave. The latter is filled with so much day-glo baby boomer memorabilia that it’s like being dropped into a Milton Glaser-themed fantasy land—a bright, candy-colored chandelier swings into the room from the skylight.
There’s a life-size cameo of a go-go dancer in banana yellow; she’s frozen in mid hip shimmy. One wall displays rock posters and B-movie key art, anchored by a 3D rendering of Cream’s Disraeli Gearsalbum cover that swishes and undulates as you walk past it. Van Zandt’s shelves are stuffed with countless DVDs, from Louis Prima to the J. Geils Band performing on the German TV concert seriesRockpalast. There are three copies ofIggy and the Stooges: Live in Detroit. Videos of the great ’60s-music TV showcases, from Hullabaloo to Dean Martin’s The Hollywood Palace, sit here. Hundreds of books about rock ’n’ roll, from Greil Marcus’s entire output to Nicholas Schaffner’s seminal tome, The Beatles Forever, form a library in the next room.
But I haven’t seen this yet because the elevator is dead, and I am in it. Our trap is tiny, about 5' by 5'. A dolly filled with television production equipment is beside me. There’s a production assistant whom I’ve never met until this morning and another person who’s brand new to me, too, Geoff Sanoff. It turns out that he’s Van Zandt’s engineer—the guy who runs this studio. And as I’ll discover shortly, he’s also one of the several sentinels who watch over Stevie Van Zandt’s guitars.
There’s nothing to do now but wait for the NYFD, so Sanoff and I get acquainted. We discover we’re both from D.C. and know some of the same people in Washington’s music scene. We talk about gear. We talk about this television project. I’m here today assisting an old pal, director Erik Nelson, best known for producing Werner Herzog’s most popular documentaries, like Grizzly Man and Cave of Forgotten Dreams. Van Zandt has agreed to participate in a television pilot about the British Invasion. After about half an hour, the elevator doors suddenly slide open, and we’re rescued, standing face-to-face with three New York City firefighters.
As our camera team sets up the gear, Sanoff beckons me to a closet off the studio’s control room. I get the sense I am about to get a consolation prize for standing trapped in an elevator for the last 30 minutes. He pulls a guitar case off the shelf—it’s stenciled in paint with the words “Little Steven” on its top—snaps open the latches, and instantly I am face to face with Van Zandt’s well-worn 1957 Stratocaster. Sanoff hands it to me, and I’m suddenly holding what may as well be the thunderbolt of Zeus for an E Street Band fan. My jaw drops when he lets me plug it in so he can get some levels on his board, and the clean, snappy quack of the nearly 70-year-old pickups fills the studio. For decades, Springsteen nuts have enjoyed a legendary 1978 filmed performance of “Rosalita” from Phoenix, Arizona, that now lives on YouTube. This is the Stratocaster Van Zandt had slung over his shoulder that night. It’s the same guitar he wields in the famous No Nukes concert film shot at Madison Square Garden a year later, in 1979. My mind races. The British Invasion is all well and essential. But now I’m thinking about Van Zandt’s relationship with his guitars.
Stevie Van Zandt's Gear
Van Zandt’s guitar concierge Andy Babiuk helped him plunge deeper down the Rickenbacker rabbit hole. Currently, Van Zandt has six Rickenbackers backstage: two 6-strings and four 12-strings.
Guitars
- 1957 Fender Stratocaster (studio only)
- ’80s Fender ’57 Stratocaster reissue “Number One”
- Gretsch Tennessean
- 1955 Gibson Les Paul Custom “Black Beauty” (studio only)
- Rickenbacker Fab Gear 2024 Limited Edition ’60s Style 360 Model (candy apple green)
- Rickenbacker Fab Gear 2023 Limited Edition ’60s Style 360 Model (snowglo)
- Rickenbacker 2018 Limited Edition ’60s Style 360 Fab Gear (jetglo)
- Two Rickenbacker 1993Plus 12-strings (candy apple purple and SVZ blue)
- Rickenbacker 360/12C63 12-string (fireglo)
- Vox Teardrop (owned by Andy Babiuk)
Amps
- Two Vox AC30s
- Two Vox 2x12 cabinets
Effects
- Boss Space Echo
- Boss Tremolo
- Boss Rotary Ensemble
- Durham Electronics Sex Drive
- Durham Electronics Mucho Busto
- Durham Electronics Zia Drive
- Electro-Harmonix Satisfaction
- Ibanez Tube Screamer
- Voodoo Labs Ground Control Pro switcher
Strings and Picks
- D’Addario (.095–.44)
- D’Andrea Heavy
Van Zandt has reached a stage of reflection in his career. Besides the Grammy-nominated HBO film, Stevie Van Zandt: Disciple, which came out in 2024, he recently wrote and published his autobiography, Unrequited Infatuations (2021), a rollicking read in which he pulls no punches and makes clear he still strives to do meaningful things in music and life.
His laurels would weigh him down if they were actually wrapped around his neck. In the E Street Band, Van Zandt has participated in arguably the most incredible live group in rock ’n’ roll history. And don’t forget Southside Johnny and the Asbury Jukes or Little Steven and the Disciples of Soul. He created both the Underground Garage and Outlaw Country radio channels on Sirius/XM. He started a music curriculum program called TeachRock that provides no-cost resources and other programs to schools across the country. Then there’s the politics. Via his 1985 record, Sun City, Van Zandt is credited with blasting many of the load-bearing bricks that brought the walls of South African apartheid tumbling into dust. He also acted in arguably the greatest television drama in American history, with his turn as Silvio Dante in The Sopranos.
Puzzlingly, Van Zandt’s autobiography lacks any detail on his relationship with the electric guitar. And Sanoff warns me that Van Zandt is “not a gearhead.” Instead he has an organization in place to keep his guitar life spinning like plates on the end of pointed sticks. Besides Sanoff, there are three others: Ben Newberry has been Van Zandt’s guitar tech since the beginning of 1982. Andy Babiuk, owner of Rochester, New York, guitar shop Fab Gear and author of essential collector reference books Beatles Gear and Rolling Stones Gear (the latter co-authored by Greg Prevost) functions as Van Zandt’s guitar concierge. Lastly, luthier Dave Petillo, based in Asbury Park, New Jersey, oversees all the maintenance and customization on Van Zandt’s axes.
“I took one lesson, and they start to teach you the notes. I don’t care about the notes.” —Stevie Van Zandt
I crawl onto Zoom with Van Zandt for a marathon session and come away from our 90 minutes with the sense that he is a man of dichotomies. Sure, he’s a guitar slinger, but he considers his biggest strengths to be as an arranger, producer, and songwriter. “I don’t feel that being a guitar player is my identity,” he tells me. “For 40 years, ever since I made my first solo record, I just have not felt that I express myself as a guitar player. I still enjoy it when I do it; I’m not ambivalent. When I play a solo, I am in all the way, and I play a solo like I would like to hear if I were in the audience. But the guitar part is really part of the song’s arrangement. And a great solo is a composed solo. Great solos are ones you can sing, like Jimi Hendrix’s solo in ‘All Along the Watchtower.’”
In his autobiography, Van Zandt mentions that his first guitar was an acoustic belonging to his grandfather. “I took one lesson, and they start to teach you the notes. I don’t care about the notes,” Van Zandt tells me. “The teacher said I had natural ability. I’m thinking, if I got natural ability, then what the fuck do I need you for? So I never went back. After that, I got my first electric, an Epiphone. It was about slowing down the records to figure out with my ear what they were doing. It was seeing live bands and standing in front of that guitar player and watching what they were doing. It was praying when a band went on TV that the cameraman would occasionally go to the right place and show what the guitar player was doing instead of putting the camera on the lead singer all the time. And I’m sure it was the same for everybody. There was no concept of rock ’n’ roll lessons. School of Rock wouldn’t exist for another 30 years. So, you had to go to school yourself.”
By the end of the 1960s, Van Zandt tells me he had made a conscious decision about what kind of player he wanted to be. “I realized that I really wasn’t that interested in becoming a virtuoso guitar player, per se. I was more interested in making sure I could play the guitar solo that would complement the song. I got more into the songs than the nature of musicianship.”
After the Beatles and the Stones broke the British Invasion wide open, bands like Cream and the Yardbirds most influenced him. “George Harrison would have that perfect 22-second guitar solo,” Van Zandt remembers. “Keith Richards. Dave Davies. Then, the harder stuff started coming. Jeff Beck in the Yardbirds. Eric Clapton with things like ‘White Room.’ But the songs stayed in a pop configuration, three minutes each or so. You’d have this cool guitar-based song with a 15-second, really amazing Jeff Beck solo in it. That’s what I liked. Later, the jam bands came, but I was not into that. My attention deficit disorder was not working for the longer solos,” he jokes. Watch a YouTube video of any recent E Street Band performance where Van Zandt solos, and the punch and impact of his approach and attack are apparent. At Nationals Park in Washington, D.C., last year, his solo on “Rosalita” was 13 powerful seconds.
Van Zandt and Bruce Springsteen’s relationship goes back to their earliest days on the Jersey shore. “Everybody had a different guitar; your guitar was your identity,” recalls Van Zandt. “At some point, a couple of years later, I remember Bruce calling me and asking me for my permission to switch to Telecaster. At that point, I was ready to switch to Stratocaster.”
Photo by Pamela Springsteen
Van Zandt left his Epiphone behind for his first Fender. “I started to notice that the guitar superstars at the time were playing Telecasters. Mike Bloomfield. Jeff Beck. Even Eric Clapton played one for a while,” he tells me. “I went down to Jack’s Music Shop in Red Bank, New Jersey, because he had the first Telecaster in our area and couldn’t sell it; it was just sitting there. I bought it for 90 bucks.”
In those days, and around those parts, players only had one guitar. Van Zandt recalls, “Everybody had a different guitar; your guitar was your identity. At some point, a couple of years later, I remember Bruce calling me and asking me for my permission to switch to Telecaster. At that point, I was ready to switch to Stratocaster, because Jimi Hendrix had come in and Jeff Beck had switched to a Strat. They all kind of went from Telecaster to Les Pauls. And then some of them went on to the Stratocaster. For me, the Les Paul was just too out of reach. It was too expensive, and it was just too heavy. So I said, I’m going to switch to a Stratocaster. It felt a little bit more versatile.”
Van Zandt still employs Stratocasters, and besides the 1957 I strummed, he was seen with several throughout the ’80s and ’90s. But for the last 20 or 25 years, Van Zandt has mainly wielded a black Fender ’57 Strat reissue from the ’80s with a maple fretboard and a gray pearloid pickguard. He still uses that Strat—dubbed “Number One”—but the pickguard has been switched to one sporting a purple paisley pattern that was custom-made by Dave Petillo.
Petillo comes from New Jersey luthier royalty and followed in the footsteps of his late father, Phil Petillo. At a young age, the elder Petillo became an apprentice to legendary New York builder John D’Angelico. Later, he sold Bruce Springsteen the iconic Fender Esquire that’s seen on the Born to Run album cover and maintained and modified that guitar and all of Bruce’s other axes until he passed away in 2010. Phil worked out of a studio in the basement of their home, not far from Asbury Park. Artists dropped in, and Petillo has childhood memories of playing pick-up basketball games in his backyard with members of the E Street Band. (He also recalls showing his Lincoln Logs to Johnny Cash and once mistaking Jerry Garcia for Santa Claus.)
“I was more interested in making sure I could play the guitar solo that would complement the song. I got more into the songs than the nature of musicianship.” —Stevie Van Zandt
“I’ve known Stevie Van Zandt my whole life,” says Petillo. “My dad used to work on his 1957 Strat. That guitar today has updated tuners, a bone nut, new string trees, and a refret that was done by Dad long ago. I think one volume pot may have been changed. But it still has the original pickups.” Petillo is responsible for a lot of the aesthetic flair seen on Van Zandt’s instruments. He continues, “Stevie is so much fun to work with. I love incorporating colors into things, and Stevie gets that. When you talk to a traditional Telecaster or Strat player, and you say, ‘I want to do a tulip paisley pickguard in neon blue-green,’ they’re like, ‘Holy cow, that’s too much!’ But for Stevie, it’s just natural. So I always text him with pickguard designs, asking him, ‘Which one do you like?’ And he calls me a wild man; he says, ‘I don’t have that many Strats to put them on!’ But I’ll go to Ben Newberry and say, ‘Ben, I made these pickguards; let’s get them on the guitar. And I’ll go backstage, and we’ll put them on. I just love that relationship; Stevie is down for it.”
Petillo takes care of the electronics on Van Zandt’s guitars. Almost all of the Strats are modified with an internal Alembic Stratoblaster preamp circuit, which Van Zandt can physically toggle on and off using a switch housed just above the input jack. Van Zandt tells me, “That came because I got annoyed with the whole pedal thing. I’m a performer onstage, and I’m integrated with the audience and I like the freedom to move. And if I’m across the stage and all of a sudden Bruce nods to me to take a solo, or there’s a bit in the song that requires a little bit of distortion, it’s just easier to have that; sometimes, I’ll need that extra little boost for a part I’m throwing in, and it’s convenient.”
In recent times, Van Zandt has branched out from the Stratocaster, which has a lot to do with Andy Babiuk's influence. The two met 20 years ago, and Babiuk’s band, the Chesterfield Kings, is on Van Zandt’s Wicked Cool Records. “He’d call me up and ask me things like, ‘What’s Brian Jones using on this song?’” explains Babiuk. “When I’d ask him why, he’d tell me, ‘Because I want to have that guitar.’ It’s a common thing for me to get calls and texts from him like that. And there’s something many people overlook that Stevie doesn’t advertise: He’s a ripping guitar player. People think of him as playing chords and singing backup for Bruce, but the guy rips. And not just on guitar, on multiple instruments.”
Van Zandt tells me he wanted to bring more 12-string to the E Street Band this tour, “just to kind of differentiate the tone.” He explains, “Nils is doing his thing, and Bruce is doing his thing, and I wanted to do more 12-string.” He laughs, “I went full Paul Kantner!” Babiuk helped Van Zandt plunge deeper down the Rickenbacker rabbit hole. Currently, Van Zandt has six Rickenbackers backstage: two 6-strings and four 12-strings. Each 12-string has a modified nut made by Petillo from ancient woolly mammoth tusk, and the D, A, and low E strings are inverted with their octave.
Van Zandt explains this to me: “I find that the strings ring better when the high ones are on top. I’m not sure if that’s how Roger McGuinn did it, but it works for me. I’m also playing a wider neck.”
Babiuk tells me about a unique Rick in Van Zandt’s rack of axes: “I know the guys at Rickenbacker well, and they did a run of 30 basses in candy apple purple for my shop. I showed one to Stevie, and purple is his color; he loves it. He asked me to get him a 12-string in the same color, and I told him, ‘They don’t do one-offs; they don’t have a custom shop,’ but it’s hard to say no to the guy! So I called Rickenbacker and talked them into it. I explained, ‘He’ll play it a lot on this upcoming tour.’ They made him a beautiful one with his OM logo.”
The purple one-off is a 1993Plus model and sports a 1 3/4" wide neck—1/8" wider than a normal Rickenbacker. Van Zandt loved it so much that he had Babiuk wrestle with Rickenbacker again to build another one in baby blue. Petillo has since outfitted them with paisley-festooned custom pickguards. When guitar tech Newberry shows me these unique axes backstage, I can see the input jack on the purple guitar is labeled with serial number 01001.“Some of my drive is based on gratitude,” says Van Zandt, “feeling like we are the luckiest guys in the luckiest generation ever.”
Photo by Rob DeMartin
Van Zandt also currently plays a white Vox Teardrop. That guitar is a prototype owned by Babiuk. “Stevie wanted a Teardrop,” Babiuk tells me, “but I explained that the vintage ones are hit and miss—the ones made in the U.K. were often better than the ones manufactured in Italy. Korg now owns Vox, and I have a new Teardrop prototype from them in my personal collection. When I showed it to him, he loved it and asked me to get him one. I had to tell him, ‘I can’t; it’s a prototype, there’s only one,’ and he asked me to sell him mine,” he chuckles. “I told him, ‘It’s my fucking personal guitar, it’s not for sale!’ So I ended up lending it to him for this tour, and I told him, ‘Remember, this is my guitar; don’t get too happy with it, okay?’
“He asked me why that particular guitar sounds and feels so good. Besides being a prototype built by only one guy, the single-coil pickups’ output is abnormally hot, and the neck feels like a nice ’60s Fender neck. Stevie’s obviously a dear friend of mine, and he can hold onto it for as long as he wants. I’m glad it’s getting played. It was just hanging in my office.”
Van Zandt tells me how Babiuk’s Vox Teardrop sums up everything he wants from his tone, and says, “It’s got a wonderfully clean, powerful sound. Like Brian Jones got on ‘The Last Time.’ That’s my whole thing; that’s the trick—trying to get the power without too much distortion. Bruce and Nils get plenty of distortion; I am trying to be the clean rhythm guitar all the time.”
If Van Zandt has a consigliere like Tony Soprano had Silvio Dante, that’s Newberry. Newberry has tech’d nearly every gig with Van Zandt since 1982. “Bruce shows move fast,” he tells me. “So when there’s a guitar change for Stevie, and there are many of them, I’m at the top of the stairs, and we switch quickly. There’s maybe one or two seconds, and if he needs to tell me something, I hear it. He’s Bruce’s musical director, so he may say something like, ‘Remind me tomorrow to go over the background vocals on “Ghosts,”’ or something like that. And I take notes during the show.”
“Everybody had a different guitar; your guitar was your identity. At some point, a couple of years later, I remember Bruce calling me and asking me for my permission to switch to a Telecaster.” —Stevie Van Zandt
When I ask Newberry how he defines Van Zandt’s relationship to the guitar, he doesn’t hesitate, snapping back, “It’s all in his head. His playing is encyclopedic, whether it’s Bruce or anything else. He may show up at soundcheck and start playing the Byrds, but it’s not ‘Tambourine Man,’ it’s something obscure like ‘Bells of Rhymney.’ People may not get it, but I’ve known him long enough to know what’s happening. He’s got everything already under his fingers. Everything.”
As such, Van Zandt says he never practices. “The only time I touch a guitar between tours is if I’m writing something or maybe arranging backing vocal harmonies on a production,” he tells me.
Before we say goodbye, I tell Van Zandt about my time stuck in his elevator, and his broad grin signals that I may not be the only one to have suffered that particular purgatory. When I ask him about the 1957 Stratocaster I got to play upon my release, he recalls: “Bruce Springsteen gave me that guitar. I’ve only ever had one guitar stolen in my life, and it was in the very early days of my joining the E Street Band. I only joined temporarily for what I thought would be about seven gigs, and in those two weeks or so, my Stratocaster was stolen. It was a 1957 or 1958. Bruce felt bad about that and replaced that lost guitar with this one. So I’ve had it a long, long time. Once that first one was stolen, I decided I would resist having a personal relationship with any one guitar. But that one being a gift from Bruce makes it special. I will never take it back on the road.”
After 50 years of rock ’n’ roll, if there is one word to sum up Stevie Van Zandt, it may be “restless”—an adjective you sense from reading his autobiography. He gets serious and tells me, “I’m always trying to catch up. The beginning of accomplishing something came quite late to me. I feel like I haven’t done nearly enough. What are we on this planet trying to do?” he asks rhetorically. “We’re trying to realize our potential and maybe leave this place one percent better for the next guy. And some of my drive is based on gratitude, feeling like we are the luckiest guys in the luckiest generation ever. That’s what I’m doing: I want to give something back. I feel an obligation.”
YouTube It
“Rosalita” is a perennial E Street Band showstopper. Here’s a close-up video from Philadelphia’s Citizens Bank Park last summer. Van Zandt’s brief but commanding guitar spotlight shines just past the 4:30 mark.
Follow along as we build a one-of-a-kind Strat featuring top-notch components, modern upgrades, and classic vibes. Plus, see how a vintage neck stacks up against a modern one in our tone test. Watch the demo and enter for your chance to win this custom guitar!
With over 350 effects models, 120 sampling slots, and a Groove Station with a 480-second looper, this pedal offers unparalleled versatility for guitarists worldwide.
In 2025, MOOER has announced that it will be set to release its latest multi-effects pedal, the GS1000 Intelligent Amp Profiling Processor, an augmented intelligent amp profiling processor. Built on MOOER’s advanced third-generation digital platform, the GS1000 introduces groundbreaking MNRS 2.0 technology, allowing guitarists around the world to emulate their favorite gear with immense precision–specifically, for distortion pedals, preamps, amplifier heads, and cabinets.
With this innovation, guitarists can fully capture the essence of their favorite guitar gear without owning the physical hardware, enabling them to carry their favorite tones wherever they go. Users are even able to use third-party IRs for cabinets of their choice, further enhancing the flexibility of this feature.
It’s unforgettable how much MOOER’s multi-effects pedals have impressed audiences so far, primarily thanks to their robust tone libraries. However, even still, the GS1000 continues to build upon this with storage for up to 120 sampling profiles, along with continued integration with the MOOER Cloud app. Essentially, this cloud integration facilitates infinite upload and download possibilities, giving users access to a global community of shared tones, widely expanding the number of accessible tones. More still, the GS1000’s previously mentioned third-party IR cabinet simulations support up to 2048 sample points, guaranteeing studio-grade tonal accuracy across the board.
Even more impressive for the price is how the GS1000 inherits the dual-chain effects architecture that made previous MOOER gear so versatile, making it suitable for highly complex usage scenarios. With over 350 factory effects models and a Sub-Patch preset grouping mode, the GS1000 makes it far simpler for users to make seamless transitions between tones, all while maintaining effect tails to guarantee seamless transitions. Additionally, the reintroduction of the innovative AI-driven EQ Master builds upon MOOER devices’ previous capabilities, using intelligent adjustments in real-time to match the musical style of players to tones, while still allowing manual tweaks for precise control.
Impressively, the GS1000 also comes packed with a Groove Station module, consisting of a combination of drum machine and looper features–including 56 high-quality drum kits! It offers a 480-second phrase looper with infinite overdubs, automated detection, and synchronization capabilities, resulting in an intuitive platform for solo jamming, composition, and live loop-based performance. Overall, the Groove Station acts as an all-in-one suite for creating full arrangements, without having to depend on additional backing tracks or bandmates.
Visually and functionally, the GS1000 really stands out thanks to its sleek visual design and enhanced user experience. For example, it features a convenient 5-inch high-resolution touchscreen, which is also paired with ambient lighting to add a visually stunning element to the pedal. As a result, the GS1000 is not only designed for convenient touch-based control but also as a standout centerpiece in any guitar rig.
In addition to this touchscreen control system, the GS1000 also provides expanded connectivity options, improving upon the already impressive flexibility of past pedals. Most notably, it supports connectivity with the MOOER F4 wireless footswitch, as well as the ability to control presets via external MIDI devices.
As is expected from MOOER these days, the GS1000 also excels when it comes to routing opportunities, going above and beyond the typical stereo ¼” inputs and outputs that would be expected from other brands. Yes, it still includes such staples, but it also includes an XLRmicrophone input, alongside balanced TRS outputs for long-distance signal clarity. The configurable serial/parallel stereo effects loop enables seamless integration of external effects, and the addition of Bluetooth audio input and MIDI compatibility broadens its wide range of use cases for live and practice-based applications.
Furthermore, the pedal also serves as a professional audio solution thanks to its low-latency 2-in/2-out ASIO USB sound card. Supporting up to 192kHz sampling rates, the GS1000 makes recording and live streaming effortless, as it can easily be used with software DAWs, MOOER’s editing software, as well as the USB-based MIDI control.
The GS1000 will be available in two versions–the standard white edition, which is powered by mains power, and the GS1000 Li version, which introduces a 7.4V 4750mAh lithium battery, chargeable through its power port. With this upgrade, users can enjoy up to six hours of continuous power-free playtime, making it ideal for practicing, busking, and generally performing on the go.
Overall, for fans of MOOER’s previous amp simulation offerings, the GS1000 represents a natural evolution, building on everything that made its predecessors great while introducing cutting-edge features and expanded capabilities. Most importantly, MOOER has promised to continuously update its MOOER 4.0 tonal algorithms on the MOOER Cloud in line with therelease, keeping things fresh for the company’s dedicated user base.
- MNRS 2.0 sampling technology for emulating distortion pedals, preamps, amplifier heads, and cabinets
- Over 350 original factory effects models
- 120 sampling slots with upload/download support via the MOOER Cloud app
- Supports third-party cabinet IR files up to 2048 sample points
- Integrated Groove Station with a drum machine and 480-second looper, featuring infinite overdubs and synchronization capabilities
- 54 high-quality drum kits
- 4 metronome tones
- Tap-tempo control for timing effects
- Advanced AI-driven EQ Master for intelligent tone adjustment based on music styles, with manual customization options
- Built-in high-precision digital tuner
- Quick-access dual-chain effects architecture for seamless creative workflows
- 5-inch high-resolution touchscreen with ambient lighting for enhanced usability
- Four multi-purpose footswitches
- Configurable serial/parallel TRS stereo effects loop for external effects integration
- 6.35mm instrument input and XLR microphone input for expanded connectivity
- Balanced TRS stereo outputs for long-distance signal transmission without quality loss
- Bluetooth audio input functionality for accompaniment playback
- Low-latency ASIO 2-in/2-out USB sound card supporting up to 192kHz sampling rate
- MIDI controller compatibility for managing presets and features
- USB-C port for preset management, USB audio, and USB MIDI functionality
- Supports MOOER F4 wireless footswitch for extended control
- Also available as the GS1000 Li, which features a built-in 7.4V 4750mAh lithium battery, offering up to 6 hours of continuous playtime, chargeable through the power port
The GS1000 will be available from the official distributors and retailers worldwide on January 16th, 2025.
For more information, please visit mooeraudio.com.
Hand-crafted in Petaluma, California, this amp features upgrades while maintaining the original's legendary tone.
The Mesa/Boogie Dual Rectifier Solo Head’s arrival in 1992 was a watershed moment for alternative rock and metal that changed everything; heavy music would never sound the same again, and the Dual Rectifier’s crushing, harmonically rich tone became the most sought-after guitar sound of the era. With a feel as empowering as its sound, the Rectifiers provided an ease of playing that supported and elevated proficiency and was inspirational, rewarding, and addictive.
Its sound and impact on the generation that used it to define what rock music would become were as sweeping as they have been lasting. And it remains arguably the most modeled in today’s digital amp landscape. Now, the 90s Dual Rectifier is back with a vengeance, built in Petaluma, California, by the same artisans who made the originals the most desirable high-gain guitar amplifier of all time.
For more information, please visit mesaboogie.com.