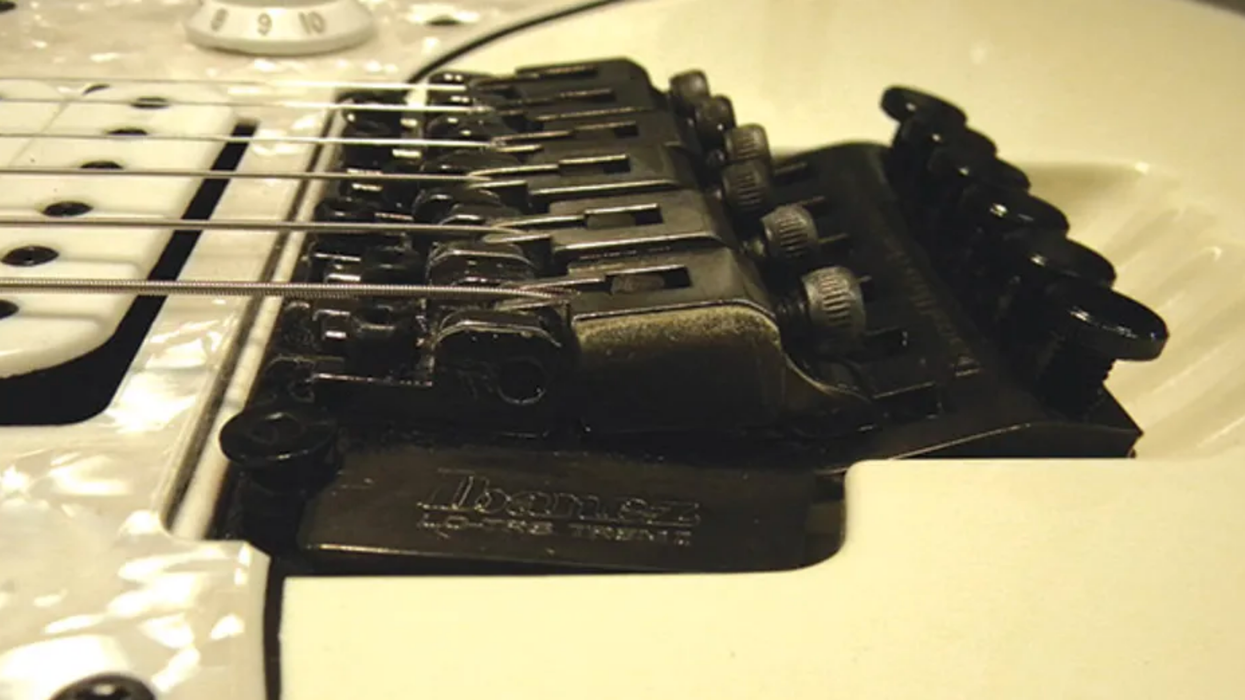
Fig. 1: When a Floyd Rose-style tremolo is tilted back against the body—as shown here—you can't use the system to its full potential.
When a Floyd Rose-style tremolo is tilted back against the body—as shown here—you can’t use the system to its full potential.
Last week, a client brought in an Ibanez solidbody for a setup. Overall, it was in great condition, but the Edge tremolo was out of adjustment and the action at the locking nut was ridiculously high. My client wanted to perform with the guitar, but it was unplayable in its current condition. At first glance, it looked as if it was going to be a typical setup, but as you'll see, looks can be deceiving.
The project guitar.
The instrument we're dealing with is a 1987 Steve Vai signature model Ibanez Jem. My client wanted it set up in standard (A-440) tuning with D'Addario EXL120 strings, which are gauged .009–.042. The guitar appeared to have been previously set up (and I use that term loosely) for a .010 set of strings. The action was very high and the tremolo was tilted back against the body (Fig. 1). This guitar is designed to have a "floating" tremolo, which means it should have been level with the body. However, my biggest concern was the locking nut.
Locking Nut Pitfalls
There are three common issues I run into with the locking nuts in a Floyd Rose-style tremolo system:
- The radius of the locking nut doesn't match the fretboard radius.
- The locking nut sits too high and there are no removable shims.
- There are deep grooves in the string blocks caused by overtightening.
When the radius of the locking nut is rounder or flatter than the fretboard, the action will be inconsistent at the nut. When the nut is too curved, the middle strings will ride higher than the two E strings. When the nut is too flat, the middle strings will be low and the E strings will be too high. Make sure you have the correct locking nut for your guitar.
If the entire locking nut assembly is too high—as in this project—you'll probably have to remove some of the wood under it. Don't try this unless you have the proper tools and training to do it correctly.
Take great care when you tighten the string blocks at the nut. If you overtighten them, it will ruin the blocks and you might strip the bolts. The blocks just need to be snug. When grooves appear in the blocks, it's time to replace them. Otherwise, the blocks won't lock down the strings and can cause them to break.
Preliminary evaluation.
The first step in evaluating a guitar's condition is to tune it to concert pitch and take four primary measurements: action (string height) at the 12th fret, neck relief (or gap between the strings and frets), action at the 1st fret, and intonation.
To measure the action, I place a capo on top of the 1st fret and then use an action gauge (a specialized ruler available from stewmac.com) to measure the string height at the 12th fret. Measuring from the bottom of the string to the top of the fret, the string height was 3/64" on the 1st string and 5/64" on the 6th string. The action was way out of balance!
To measure the amount of relief in the neck, I hold down the 6th string at the last fret and measure the greatest distance between the bottom of the 6th string and the top of the frets. The relief was .020"—a little more than necessary.
For string height at the 1st fret, I remove the capo and measure again with the action gauge. At the 1st fret, the 1st string was 2/64" and the 6th string was just over 3/64". Again, this is extremely high action at the locking nut. To make this guitar playable, I'd need to slightly tighten the truss rod, float the tremolo, and lower the locking nut.
Adjust the truss rod.
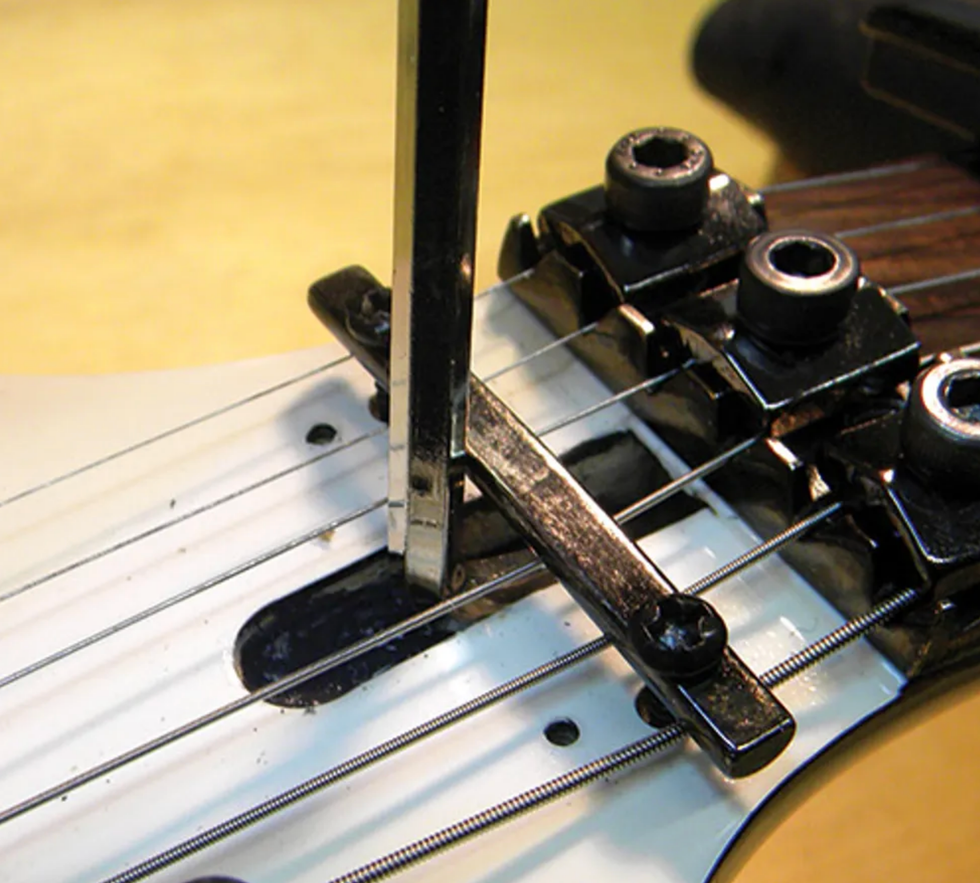
Fig. 2: Adjusting the truss rod to reduce neck relief.
With the guitar tuned to concert pitch with .009 gauge strings, I began by adjusting the truss rod (Fig. 2). Tightening the truss rod reduced the relief from .020" to .012"—the proper amount of relief for my client's shred-oriented playing style.
Note: On single-action truss rods, clockwise motion tightens the rod, lessening the relief. Counter-clockwise motion loosens the rod, increasing relief. Just think "lefty-loosey, righty-tighty."
Adjust the trem claw and bridge base.
As I mentioned, the Edge tremolo was tilted back against the guitar body. On a Floyd Rose-style system, you can't use the tremolo to its full potential if the bridge base isn't level with the body. When properly adjusted, the tremolo should be able to pivot forward and backward.
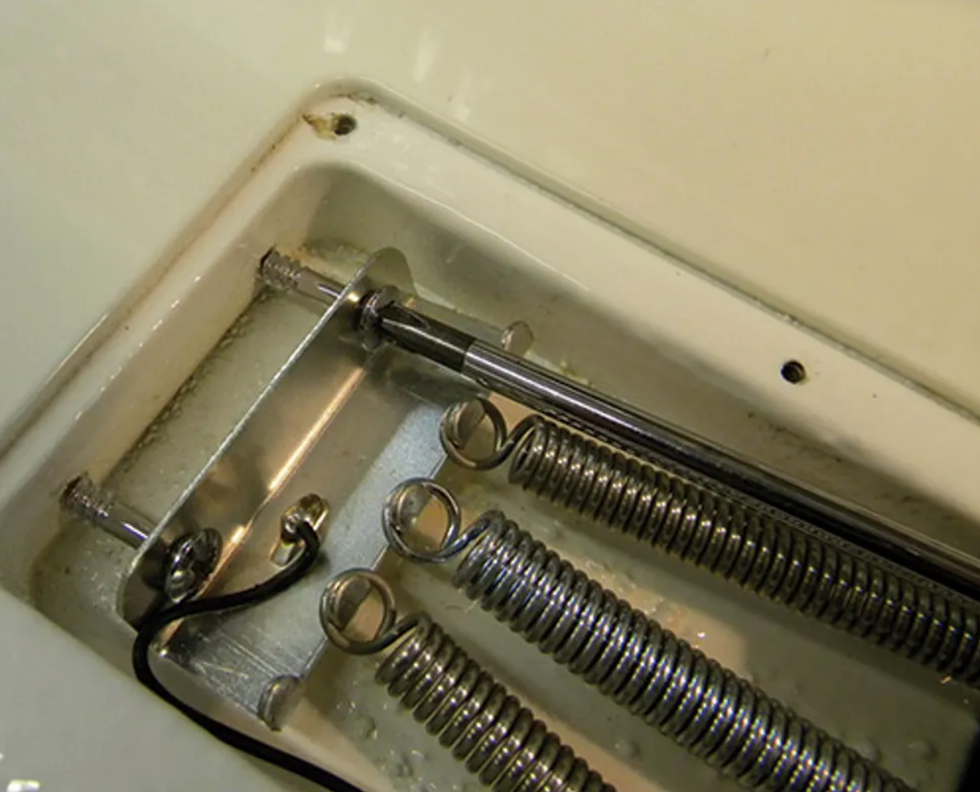
Fig. 3: Adjusting the trem claw to bring the bridge base level with the guitar body.
Using a medium Phillips screwdriver, here's how I adjust the trem claw to get the bridge base level with the body:
- Tune to pitch.
- Check the tremolo to see if it's tilting back toward the body or lifting up too much away from the body.
- Inside the trem-string cavity, adjust the two screws holding the claw to the body of the guitar (Fig. 3). Loosen the screws to lift the bridge base away from the body. Conversely, tighten the screws to pull the bridge base back toward the body. Always adjust both screws equally.
- Retune the guitar and inspect the tremolo to determine if it needs more adjustment. Expect to turn the claw screws and retune repeatedly before you level the bridge base.
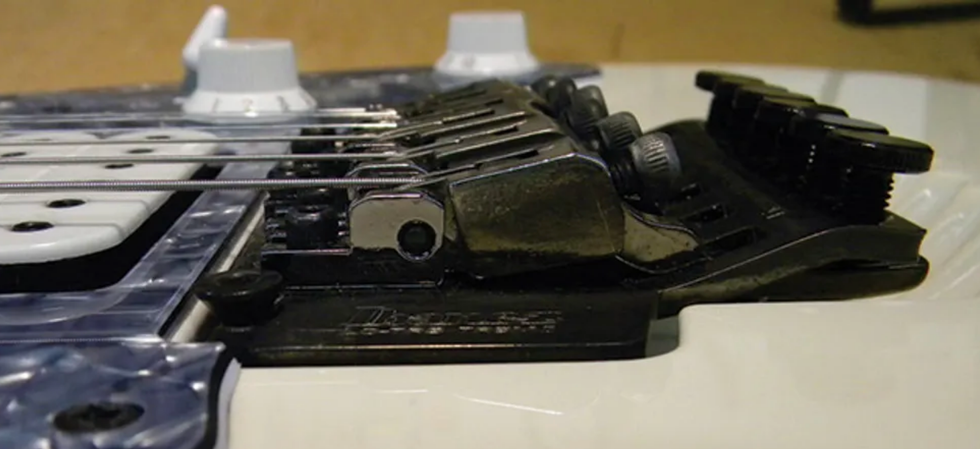
Fig. 4: On a correctly adjusted Floyd Rose-style trem, the bridge base is level with the body.
After several attempts, I finally got the bridge floating parallel to the body with just enough clearance to pull the tremolo in both directions (Fig. 4).
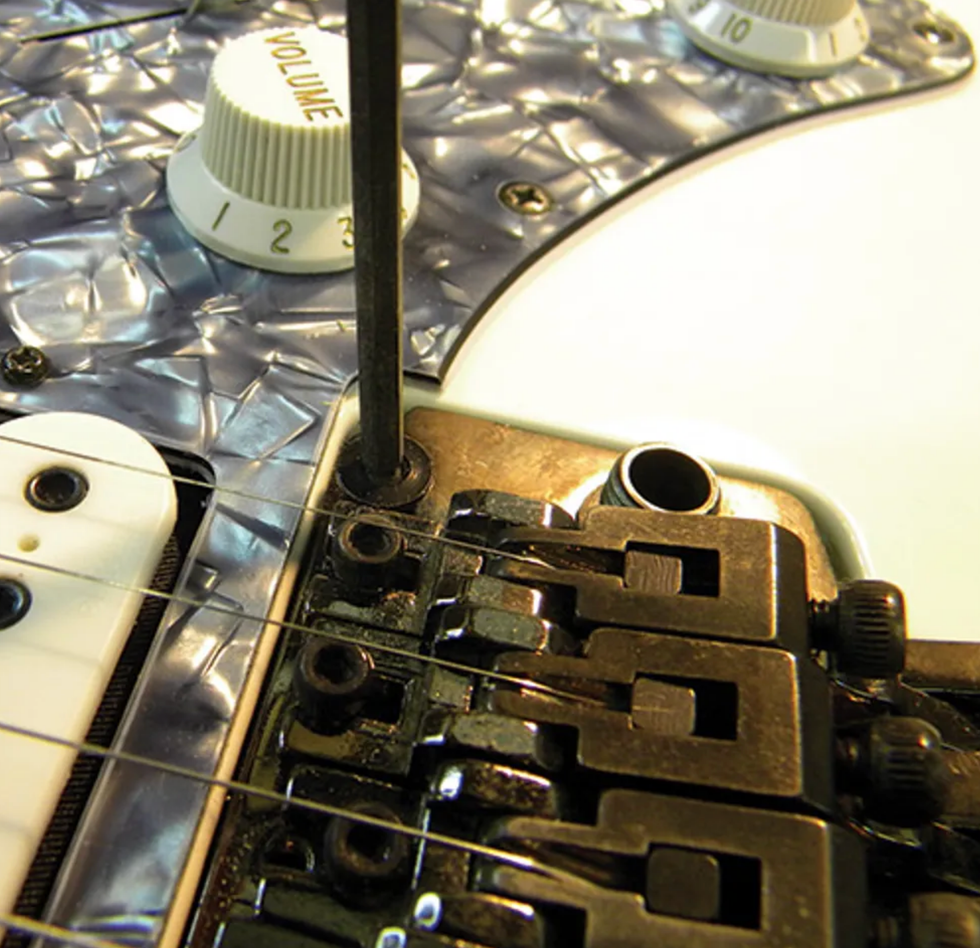
Fig. 5: Adjust bridge height by raising or lowering the two screws located on either side of the bridge assembly.
Once this task is complete, adjust the overall bridge height by raising or lowering the two screws located on either side of the base (Fig. 5). The goal is to raise the bridge to have enough clearance to actually use the tremolo. Note: This is a balancing act between the amount of "float" and "height."
The measurements that matched my client's playing style were a little lower than on a typical guitar. I set the action at the 12th fret to 2/64" on the 1st string, graduating to 3/64" on the 6th. This was a comfortable action that worked perfectly for my client's preferred .009 set of strings.
Adjust the action at the nut.
When the action is too high at the nut, the strings will pull sharp when you fret them. And, of course, the guitar is tough to play—we don't want that.
As we know from the preliminary evaluation, the string height at the 1st fret was extremely high on this Jem. Usually, you can lower the locking nut by removing it and taking out small metal shims.
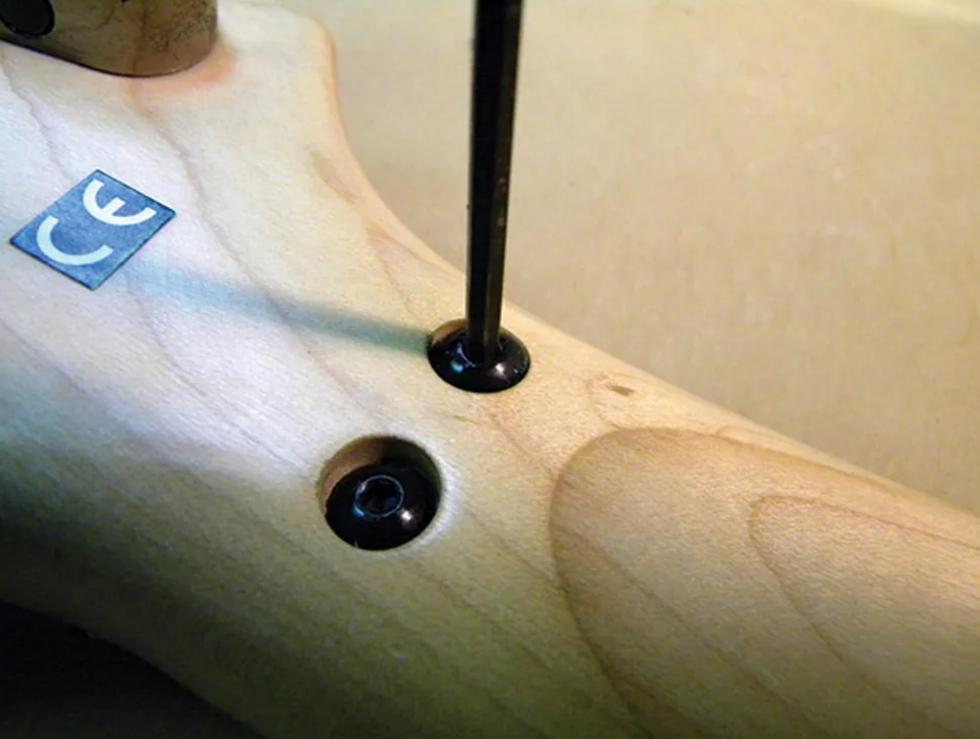
Fig. 6: To remove the locking nut, take off the strings and then undo these two screws.
But when I took off the strings and removed the locking nut (Fig. 6), there weren't any shims. This is one of those little "surprises" you'll run into from time to time working on guitars.
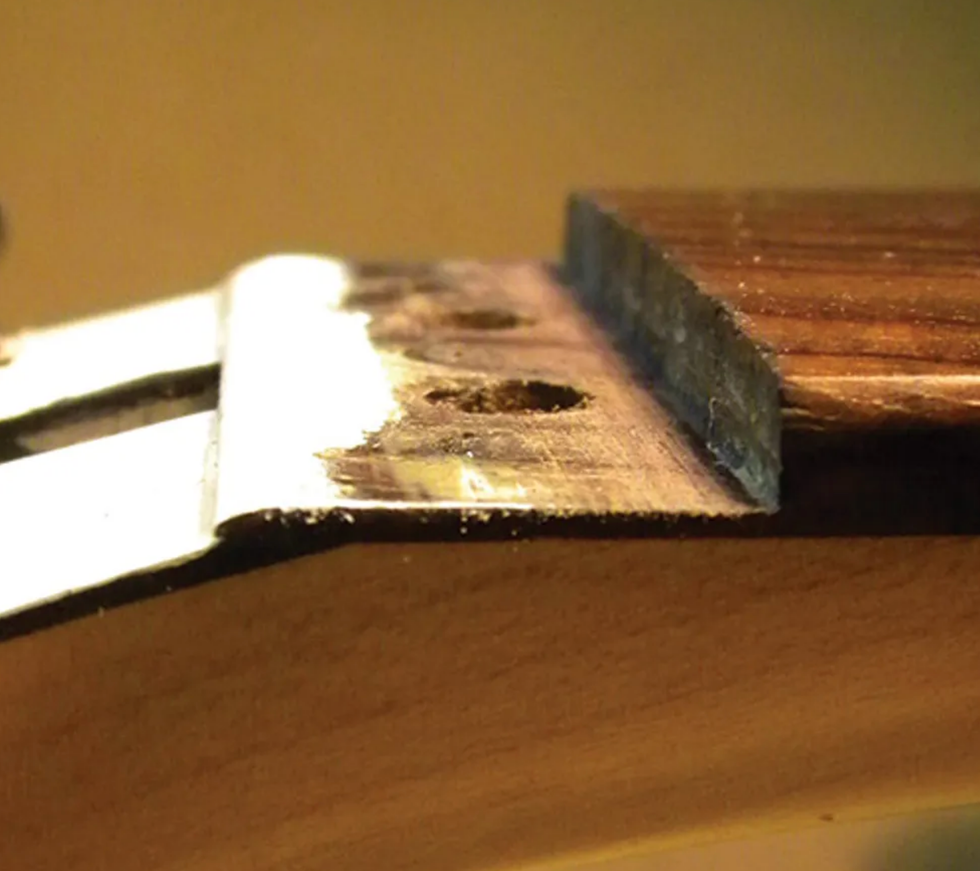
Fig. 7: The paint glob under the locking nut acted like a shim.
Instead of shims under the locking nut, I found a big glob of paint (Fig. 7). This raised the locking nut, so it had to be removed. When a locking nut is jacked up too high, the best way to deal with the problem is to measure the depth of the rosewood slab that's under the locking nut to determine if you can remove any wood without compromising the structural integrity of the neck.
Caution! If the action at the locking nut is too high, consult a qualified luthier or guitar tech before attempting to sand the neck.
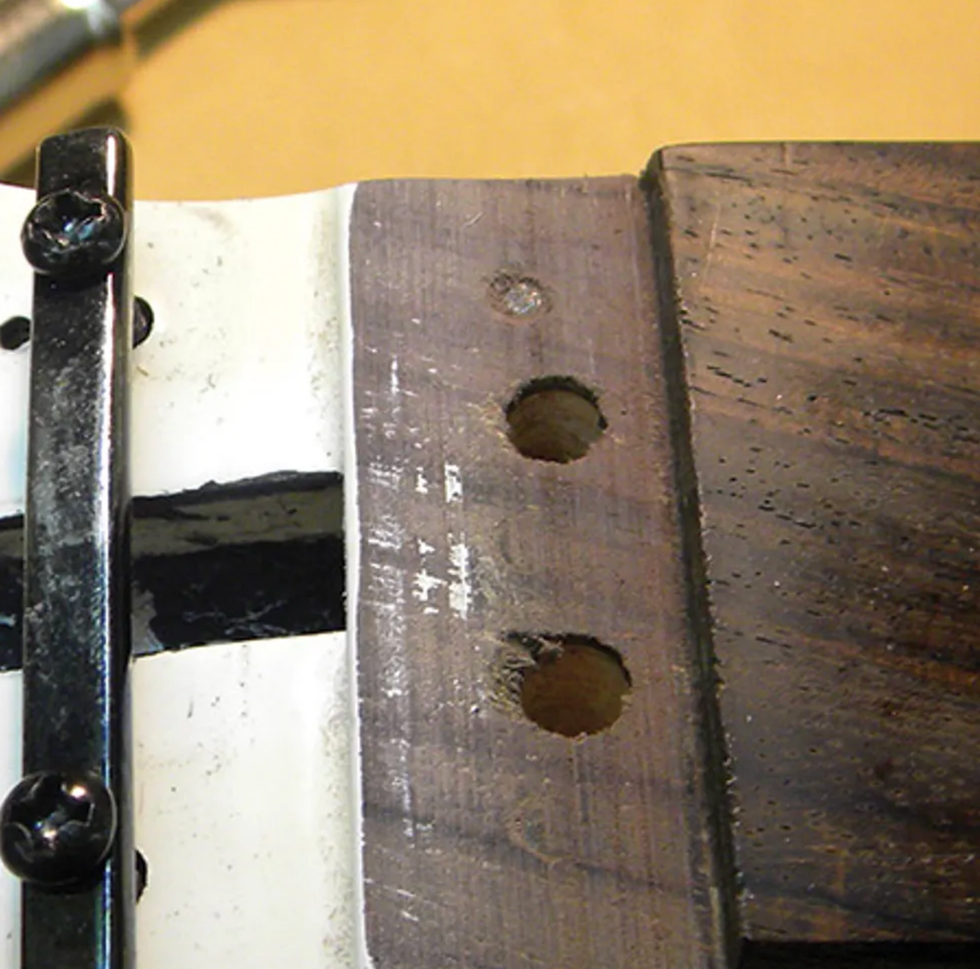
Fig. 8: Sanding off the paint and 1/64" of wood lowered the locking nut and improved the guitar's playability and intonation.
Fortunately, the slab was thick enough that I could safely remove both the paint and some rosewood to lower the locking nut. I sanded off the paint and then about 1/64" of wood (Fig. 8) and reinstalled the locking nut.
After tuning the guitar to pitch, I again measured the action at the 1st fret. It had 1/64" clearance at the 1st string and 2/64" at the 6th string. This is perfect action for the string nut—just high enough to prevent open strings from rattling on the 1st fret, but low enough to keep the strings from pulling sharp when fretted.
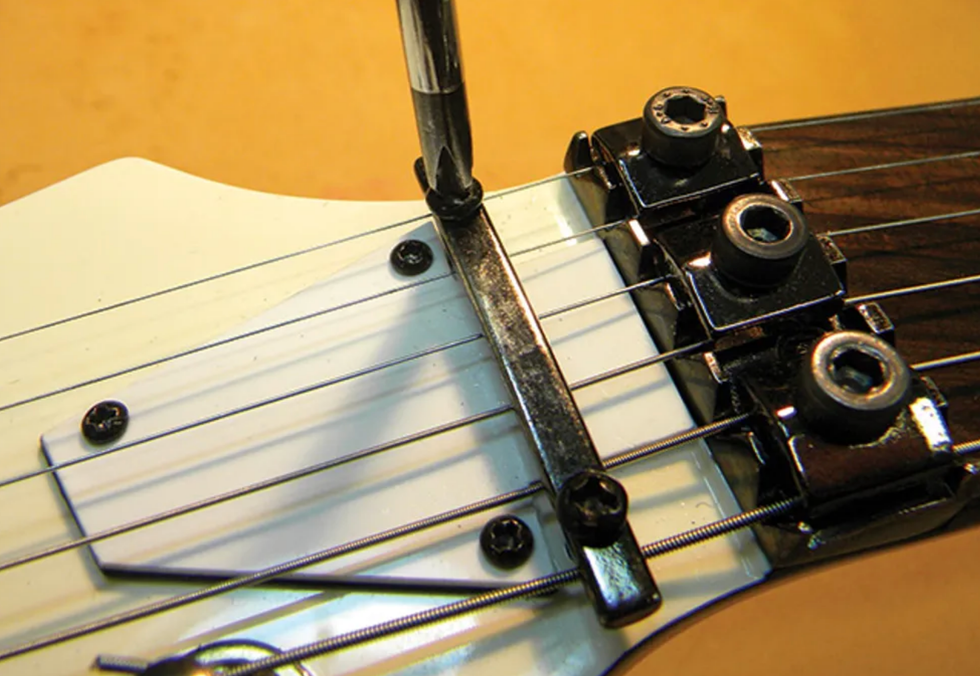
Fig. 9: Adjusting the string retainer.
Next, I adjusted the string retainer behind the locking nut (Fig. 9).
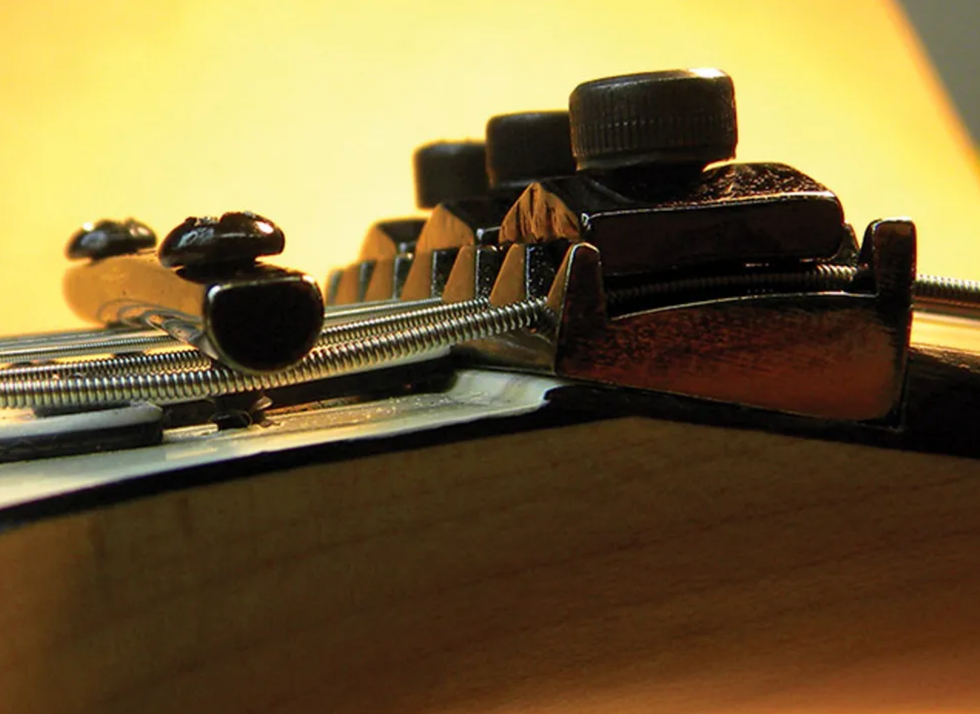
Fig. 10: The string retainer should provide just enough downward tension that the strings don't change pitch when you tighten the string blocks.
Here, the goal is to lower the retainer just enough that the strings don't change pitch when you tighten the string blocks (Fig. 10).
Adjust the intonation.
Adjusting the intonation is the final step in setting up a guitar. I've covered this process in detail in "DIY: How to Set Up a Fender Stratocaster." Here's a summary: Intonating a guitar involves adjusting the length of each string so the instrument will play in tune. I use a strobe tuner for this. First, install new strings and tune the 12th-fret harmonic on each string to pitch. Then, fret each string at the 12th fret and compare it to the 12th-fret harmonic, which is the reference. If the fretted note is sharp, move the saddle away from the neck. If the fretted note is flat, move the saddle toward the neck.
Some tips: Remember to always retune after every adjustment. Also make sure you strike the string as you would when playing. In other words, if you normally strike the string lightly, then use the same technique when tuning and checking the intonation.
On this guitar, some of the strings fretted sharp and others flat—the variation was between 5 cents flat to 8 cents sharp (a cent is 100th of a half-step). No wonder this Jem wouldn't play in tune. Most locking tremolo systems, including the Edge tremolo, require a hex key to loosen the bolt that holds the bridge saddle in place. After you move the saddle to the correct location, tighten the bolt, retune, and check the intonation for that string. Take your time—it's important to get this right.
[Updated 10/6/21]
- Guitar Shop 101: Installing an EVH D-Tuna on a Floyd Rose ... ›
- Rig Rundown: Slayer - Premier Guitar ›
- Titans of Tremolo - Premier Guitar ›
- Dunlop Pivot Capo Review - Premier Guitar ›
- 8 Steps to Float Your Fender Stratocaster Trem - Premier Guitar ›
- DIY: How to Adjust Your Guitar's Neck Relief & Truss Rod—Plus, Fix Your Action | Helmer’s How-Tos - Premier Guitar ›
- Floyd Rose USA Facility Launches - Premier Guitar ›
- Upgrade Your Sound with Floyd Rose's 3D Printed Locking Nuts - Premier Guitar ›
Featuring a 25.5" scale length, mahogany body, gold hardware, and 490R/498T pickups. Stand out with the unique design and comfortable playing experience of the Gibson RD Custom.
Initially released in 1977, the Gibson RD model has been a cult classic for years. It is famous for its unique appearance, which takes inspiration from both the Gibson Explorer and Firebird designs, as well as its functionality and use by several popular guitarists across multiple genres.
Now, the iconic RD Custom joins the Gibson Custom core lineup for the first time. Not only is this the first Custom Shop-built RD model, but it is also the first 25.5” scale length solidbody core model offered by Gibson Custom. Complete with the classic and comfortable RD body shape, including a rear tummy cut for extra comfort, this model also features a mahogany body with multi-ply top binding, Gibson Custom aesthetics, including gold hardware and mother-of-pearl block inlays on the neck, and a mother-of-pearl Custom split diamond headstock inlay. The RD Custom also has a 25.5” scale mahogany neck with a Medium C profile and long neck tenon, a bound ebony fretboard with 22 medium jumbo frets, and a bound headstock with Grover Rotomatic tuners. The updated electronics include 490R and 498T pickups, CTS potentiometers, and a hand-wired harness.
The Gibson RD Custom is designed to help players stand out from the crowd with its longer scale length, curvaceously elegant body, and classic design. Now is your opportunity to experience the unique and comfortable playing experience of the cult-favorite Gibson RD Custom for yourself. A Custom Shop hardshell case is also included.
For more information, please visit gibson.com.
The iconic alt-rock duo leans on floor modelers to execute their carefully choreographed live shows.
Along with contemporaries like MGMT and Passion Pit, Greenwich, New York, duo Phantogram’s experiments crosspollinating hip-hop, indie, and punk rock helped cement and elevate a new era of electronic-influenced alt-rock and indie music. At the start of the 2010s, you’d be hard-pressed to find a college radio station or dorm-room playlist that didn’t include a Phantogram hit.
Sixteen years after the release of their debut record, band leaders Josh Carter and Sarah Barthel, who started Phantogram in a town of just a few thousand people, are touring behind their latest full-length, 2024’s Memory of a Day. The tour included a sold-out stop at Nashville’s Ryman Auditorium—a different sort of barn than the kind they used to perform in back in Greenwich—where PG’s John Bohlinger caught up with Carter and Barthel. Courtesy of some help from their tech, the duo showed us how they’re pulling off their theatrical live experience.
Brought to you by D’Addario
XPND - Pedal Power Battery Kit: https://ddar.io/power-rr
XPND - Adjustable Daisy Chain: https://ddar.io/daisychain-rr
XPND - Isolator: https://ddar.io/isolator-rr
Music Mantogram
Carter is endorsed by Ernie Ball Music Man guitars, so all three of his road axes are variations on his current favorite Cutlass model. This one, first among the trio, is finished in black with a gold pickguard, and like its stablemates, it bears the Phantogram logo inlaid on the first fret. Carter removes the vibrato bar and uses his hand to pull the bridge up to nail the warbles. Aside from that, this one is all stock, and strung with Ernie Ball Paradigm .010s. While he sometimes grabs a pick, Carter plays most of the set with an acrylic nail on his index finger.
Brown Sound
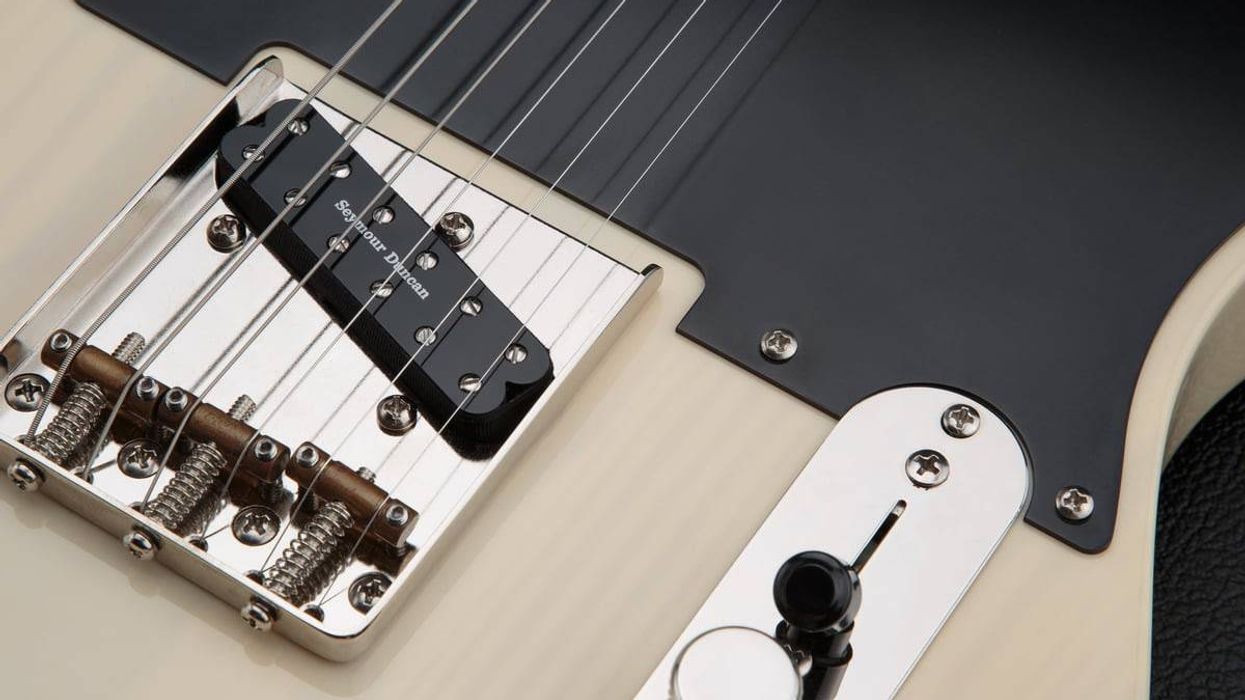
This first backup Cutlass is finished in brown with the woodgrain peeking through and a burgundy tortoiseshell pickguard. It has a Seymour Duncan single-coil-sized humbucker in the bridge position for a hotter output than its black counterpart.
Step It Up
This natural finish Cutlass has had the same pickup mod as the brown one, but this one stays tuned a half-step up for special deployment.
Clean Business
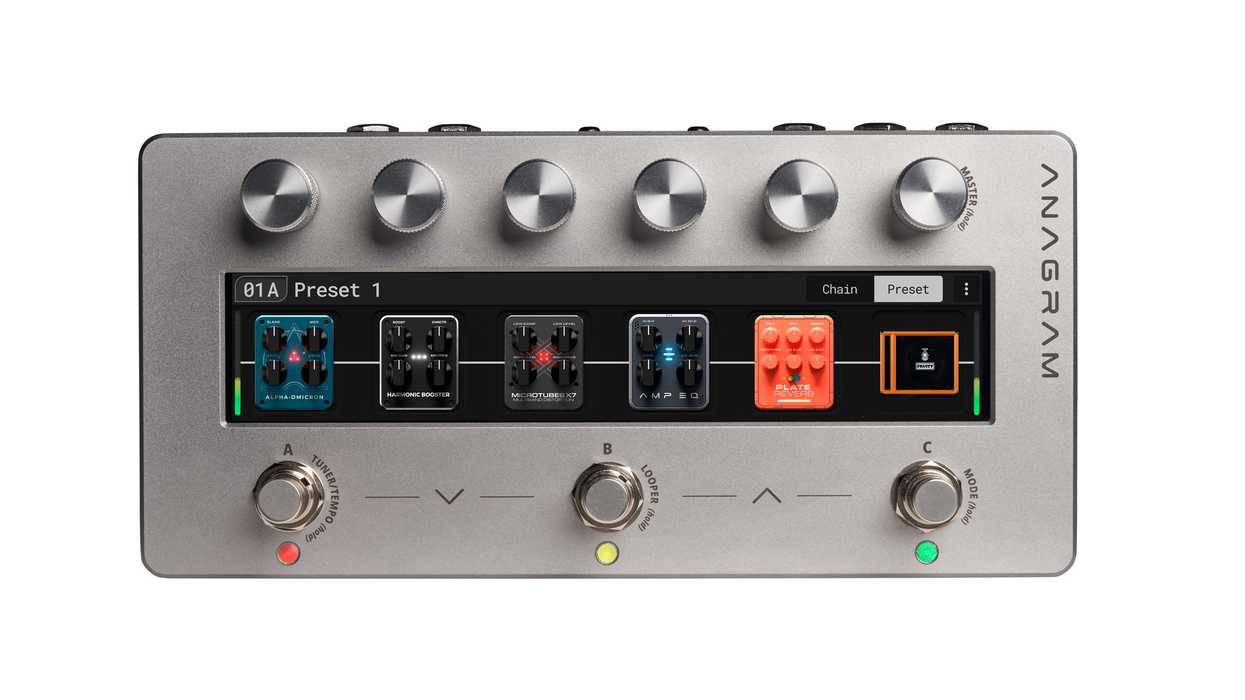
Carter uses a wireless system to run to this Neural DSP Quad Cortex at his feet. His tech has set it up to emulate many of the pedals Carter uses in the studio. Carter appreciates the tactile and flexible nature of the system; it can take MIDI programming so Carter can focus on performing, or it can be rigged up to function like a traditional pedalboard. He uses a mix of amp emulations, including AC30-, 5150-, Fender tweed-, and Jazz Chorus-style patches.
A Boss volume and expression pedal alongside the Quad Cortex give Carter some extra control over the setup.
Josh Carter's Pedalboard Playground
While Carter carried a compact stomp station for tour, he’s addicted to stompboxes and uses them for inspiration when writing and sound building during studio sessions. Here’s what a small selection shared from his collection:
“The most prominent pedals I used for years onstage before switching to the Quad Cortex were the Line 6 DL4, Electro-Harmonix Holy Grail, Boss
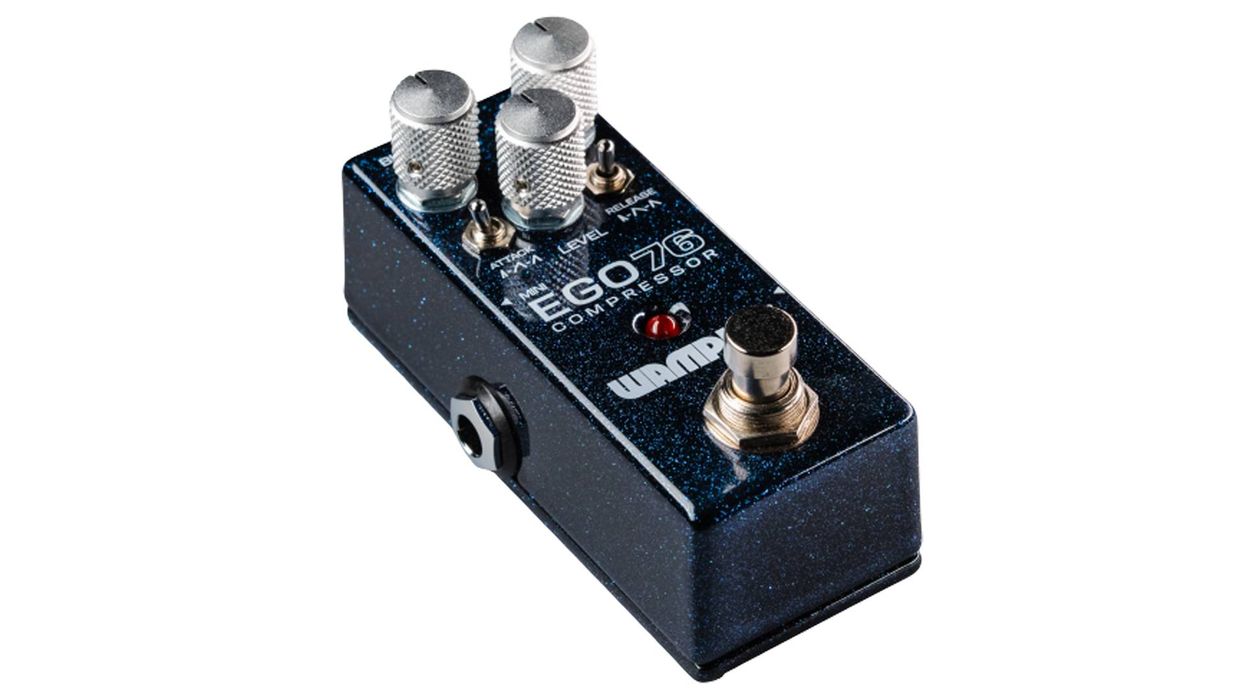
DD-6 Digital Delay, Boss OC-3 Super Octave OC-3, Fulltone OCD, Wampler Ego Compressor, and Route 66 American Overdrive.
My go-to studio pedals are the MXR Joshua Ambient Echo, Line 6 DL4, Death By Audio Reverberation Machine, Electro-Harmonix Holy Grail, Chase Bliss Generation Loss MkII, Chase Bliss Mood MkII, Boss DD-500 Digital Delay, Chase Bliss Audio Automatone CXM 1978, Old Blood Noise Mondegreen Delay and Reflector Chorus.
And some honorable mentions for pedals I’ve been really digging as of late would be the Neon Egg Planetarium, Roland Space Echo, and various vintage & new spring reverbs.
Silver Stunner
Sarah Barthel initially played keys in Phantogram, but she learned bass and mimicked her synth parts on the instrument so she could move about freely and interact more with Carter. This custom-made sparkle-finish Fender Mustang is the perfect size for her, and she just recently started playing it with a pick. She runs into a Quad Cortex, too, but the Fender Bassman stack lurking behind the bass serves as an onstage monitor.
Jazzmaster
Barthel isn’t confined to the bass, either. At some points in the set she jumps onto this prized Jazzmaster, which she’s had for 15 years.
Minus the Bear announces nationwide tour celebrating 20th anniversary of Menos el Oso album.
Formed in Seattle, WA at the turn of the millennium, Minus the Bear burst onto the alternative rock scene in the waning days of nineties burn-out, and at the birth of the early-aughts indie revival. When they played their debut show in Seattle back in September 2001, there was an immediate hype surrounding the band.
Four years later, on August 23, 2005, the band would release their sophomore album, Menos el Oso, on local independent label, Suicide Squeeze Records. Since then there have been a number of line-up changes, with the addition of Alex Rose on keyboard and backing vocal duty and drummer Joshua Sparks.
The band bid farewell to performing in 2018, to focus on other priorities, but the passage of time has brought them back together, just in time to celebrate the album that changed their lives forever twenty years after the fact. Last week, the band was announced as co-headliners of Best Friends Forever in Las Vegas, NV this October, and today are thrilled to announce a nationwide tour, where they will be playing the seminal album in full. Dates below, tickets available for purchase on Friday, March 14 at 10:00 A.M. local time.
Guitarist and founding member David Knudson, while reflecting on the album, notes “Menos el Oso put us on a trajectory that none of us were expecting. There is a “before ‘Pachuca Sunrise’ video” moment in time, and then there is an “after ‘Pachuca Sunrise’ video” moment in time. It seemed like once people heard that song, and saw that video, everyone went straight to Limewire, Napster, Soulseek, BitTorrent, etc. and shared the album immediately. Celebrating the twentieth anniversary of something this monumental in our lives is a gift. Having the chance to appreciate it with our fans, families and fellow bandmates while we are all alive and kicking is an opportunity I can’t wait to embrace.”
At the first Minus the Bear rehearsal in seven years earlier this year, the band’s drummer Joshua Sparks put it this way, “These songs are like having a really nice car in the garage… it’d be a shame not to take them out for a drive every now and then.”
For more information, please visit minusthebear.com.
Minus the Bear Tour Dates:
- 10/04/25 - Portland, OR @ Roseland Theater
- 10/06/25 - Sacramento, CA @ Ace of Spades
- 10/07/25 - San Francisco, CA @ Regency Ballroom
- 10/08/25 - San Diego, CA @ The Observatory North Park
- 10/10/25 - Las Vegas, NV @ Best Friends Forever Festival
- 10/11/25 - Los Angeles, CA @ The Belasco
- 10/12/25 - Los Angeles, CA @ The Belasco
- 10/14/25 - Tempe, AZ @ Marquee Theatre
- 10/17/25 - Dallas, TX @ Granada Theater
- 10/18/25 - Austin, TX @ Emo's Austin
- 10/21/25 - Orlando, FL @ The Beacham
- 10/22/25 - Atlanta, GA @ Masquerade
- 10/24/25 - Philadelphia, PA @ The Fillmore
- 10/25/25 - Boston, MA @ House of Blues
- 11/05/25 - Washington, D.C. @ 9:30 Club
- 11/07/25 - Brooklyn, NY @ Brooklyn Steel
- 11/08/25 - New York, NY @ Irving Plaza
- 11/11/25 - Pittsburgh, PA @ Roxian Theatre
- 11/12/25 - Cleveland, OH @ House of Blues
- 11/14/25 - Detroit, MI @ Majestic Theatre
- 11/15/25 - Chicago, IL @ Metro
- 11/16/25 - Chicago, IL @ Metro
- 11/18/25 - Minneapolis, MN @ First Avenue
- 11/21/25 - Denver, CO @ Ogden Theatre
- 11/22/25 - Denver, CO @ Ogden Theatre
- 11/23/25 - Salt Lake City, UT @ The Depot
- 11/28/25 - Seattle, WA @ The Showbox
- 11/29/25 - Seattle, WA @ The Showbox
An overdrive and mangled fuzz that’s a wolf in a maniacal, rabid wolf’s clothing.
Invites new compositional approaches to riffs and solos. Gray Channel distortion is versatile and satisfying. Unpredictable.
Unpredictable. Footswitches for distortion and fuzz are quite close.
$199
Fuzz can be savored in so many ways. It can be smooth. It can be an agent of chaos. But it can also be a trap. In service of mayhem, it can be a mere noise crutch. Smooth, classy, “tasty” fuzz, meanwhile, can lead to dull solos crafted as Olympian demonstrations of sustain. To touch the soulful, rowdy essence of fuzz, it’s good to find one that never lets you get quite comfortable. The EarthQuaker Devices Gary, a two-headed distortion/overdrive and rabid, envelope-controlled square-wave fuzz designed with IDLES’ Lee Kiernan, is a gain device in this vein.
Gary is not exclusively a destruction machine. Its distortion/overdrive section is a very streamlined take on EarthQuaker’s Gray Channel, a versatile DOD 250-derived double distortion. Like any good circuit of the 250 ilk, Gary’s hard clipping OD/distortion section bites viciously in the high- and high-mid frequencies, supported by a tight, punchy low-mid output. You can play anything from balanced M.O.R. studio crunch to unhinged feedback leads with this side of Gary. But it’s the envelope-triggered pulse-width fuzz—which most of us will hear as a gated fuzz, in many instances—that gives the Gary its werewolf duality. Though practice yields performance patterns that change depending on the instrument and effects you use around the Gary, its fuzz ultimately sputters and collapses into nothingness—especially when you throw a few pitch bends its way. The cut to silence can be jarring, but also compels a player to explore more rhythmic leads and choppy riffs that would sound like sludge with a Big Muff. The Gary’s unpredictable side means it won’t be for everybody, but its ability to span delicioso distortion and riotous splatter fuzz in a single unit is impressive.