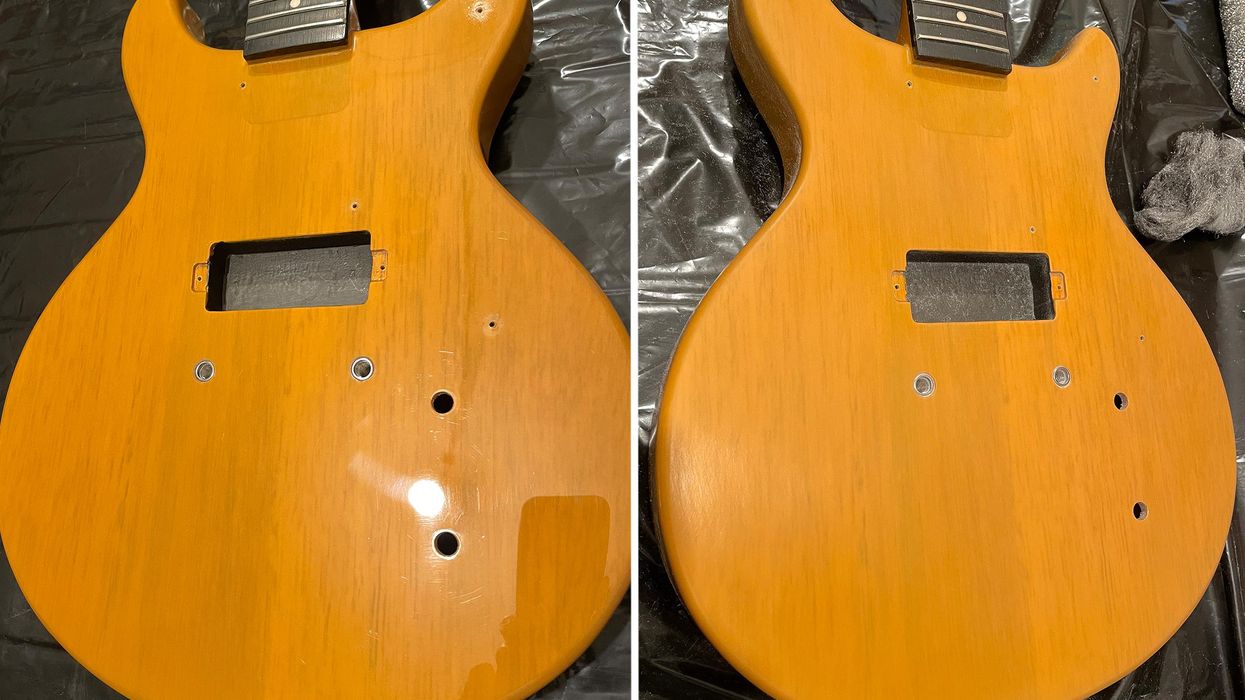
Photo 1 (left) and Photo 2 (right)
A lot of you have been waiting for this penultimate step of our guitar aging project, so let’s do some damage!
Welcome back to Mod Garage. Today we’ll continue to work on our aging project, and some of you might be wondering why there was such a long break. The reason is simple: suboptimal timing from my side. The last part of this column was in the middle of autumn, and I wanted you to do the following steps outside (if possible) and not on the kitchen table. Wintertime is not the best time for such a challenge but now is a good starting point, so let’s go!
We’re almost done with our project, can you believe it? In this installment, we’ll take care of the color, talk about fading, and we’ll crack the lacquer—something a lot of you have been waiting for—before we add some dings and dongs in the last part of this series, which is the final touch before we put it all together again.a
We also have an advice column on aging from my friend and colleague Matthias “Matti” Meyer, from the German-based Bassart Guitars. Matti is one of the best pro agers I know. Please follow his advice and recipe for aging wood at the end of this column—we will need these tools in the next and final part of this project.
Aging the Color
Over time, the colors on guitar bodies start to fade, and depending on the type of color and the paint-job method itself, discolorations can show up. The two main factors are if the guitar was exposed to ultraviolet light and if the paint job is all intact. A famous example is the Gibson Les Paul goldtop guitars with the golden color turning greenish, or the Gibson sunburst Les Pauls losing the red color of the sunburst spray job over time. But Fender guitars also suffer similar problems.
What we want to mimic is an old nitro lacquer, but with our Harley Benton guitar we have two problems:
- The mustard color is not a real TV yellow, as discussed before. TV yellow is much lighter, so even when we find a way to fade the color, it won’t look like a faded TV yellow, but a faded mustard yellow. We can’t change this easily, so we must work with what we have and love it for what it is rather than hating it for what it’s not.
- It’s not nitro lacquer on our Harley Benton but a modern, not-so-thin, ultra-durable poly lacquer. In a technical way, this modern lacquer does a much better job than any vintage nitro stuff regarding protection of the guitar. The downside is that we can’t make poly look like nitro when aging; it will only be an approximation. But again, it is what it is, and we’ll make the best out of it.
If you have the time, exposing the guitar to direct sunlight for some weeks or months will cause a fading of the color to a certain degree. Over the years, I’ve seen the oddest attempts to do such things, including regularly placing the guitar inside a home solarium. Using artificial UV light is also an option but building a well-working construction for such a big object, like a set-neck guitar, is not easy and you’d need a lot of UV lamps for that. Such devices are often used to make yellowed plastic materials look shiny white again. An overspray with the correct color is also an option. but a lighter color on a darker one is always difficult to do—especially with a semi-transparent color like TV yellow. And I doubt it’s worth the time and money. Not everything is doable and this falls into that category. But we’ll do other things to make it look old and cool, so leave the color as it is.
Let’s begin. As usual, grab your steel wool and abrasive cloth to break the shine of the high-gloss lacquer, and don’t forget the backside of the neck. The difference can be seen in Photo 1 (before) and Photo 2 (after).
Aging the Lacquer
This is what a lot of you have been waiting for and today we’ll finally do it: cracking the lacquer!We all know the look of cracked lacquer on vintage guitars, which is part of their special appearance and charm. On vintage guitars this happens over time, the softener disappears, and the paint starts to crack. Here again, facing that our Harley Benton is poly and not nitro-painted, we must follow a different route to get a good result.
Generally, there are two basic methods to do this:
- Mimicking the cracks by using a razor blade to cut the cracks into the paint.
- Using a combination of heat and cold to crack the lacquer.
In both cases this is only the first step. Next, we’ll have to make the cracks more visible, but first things first.
I decided to use the second method: using heat and cold to crack the lacquer. Please note, this will take some time and patience to do it right: It won’t be done in 15 minutes. You don’t need much for this, just a heat gun and several bottles of cooling spray. The process is easy but safety first: Only do this outside, wear gloves and goggles, and place a bucket with cold water or an extinguisher near you … a heat gun gets very hot!
You can’t do this in one step, and you’ll need to work in smaller areas, one by one. Heat up the first area with the heat gun and be careful—you only want to heat up the lacquer and not melt or burn it. If you want to intentionally add some burned spots, a heat gun is the way to go, too. Depending on the type and thickness of the lacquer as well as the power of your heat gun, it can take some time until the lacquer is ready to crack. Start to heat it up from a distance and not with the heat gun directly on the guitar, checking the temperature of the lacquer from time to time with one of your hands. Never put your hand directly under the heat gun! Take the guitar body and your hands away from the gun when you check the temperature. If you feel that it’s not hot enough, keep heating it up until it’s good to go.
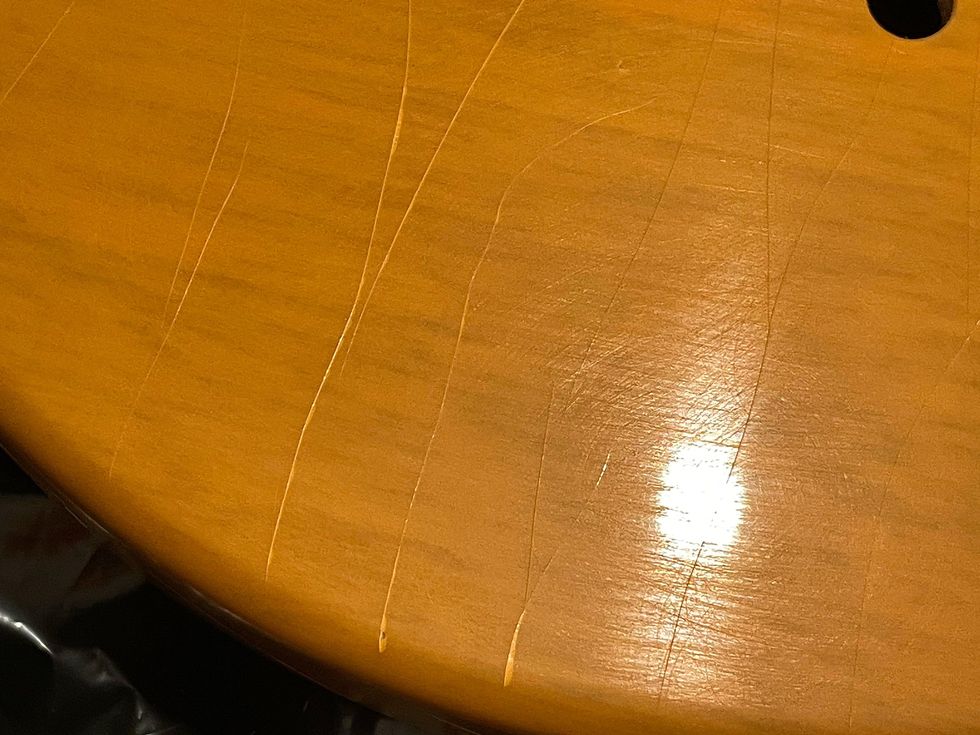
Photo 3
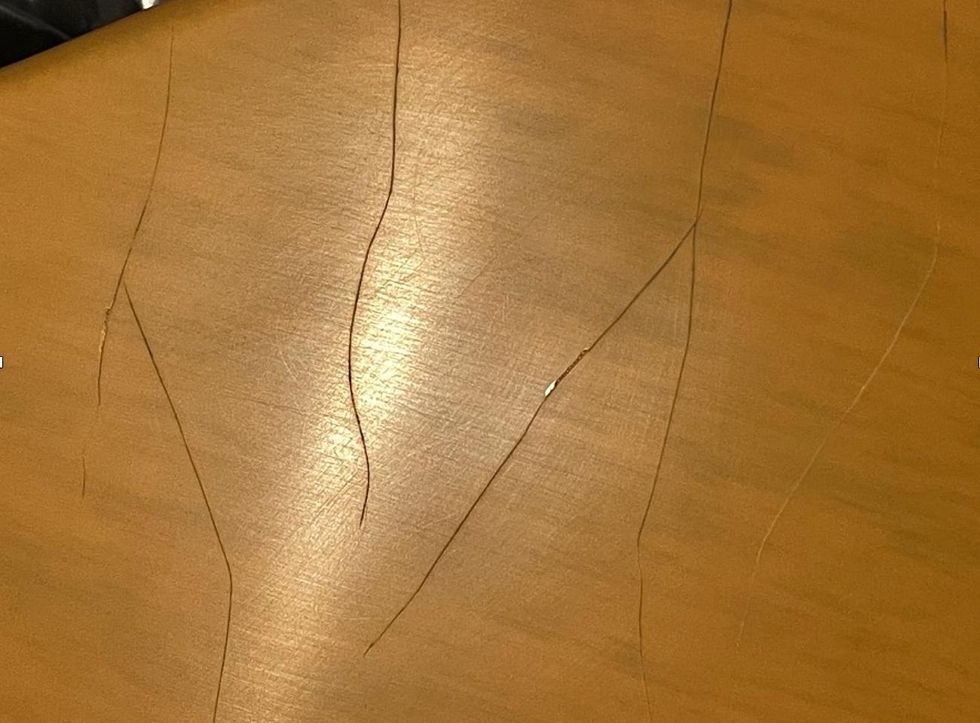
Photo 4
There are no rules set in stone because it depends on the things mentioned above. So, you have to try and see what works on your guitar. If you think the lacquer is hot enough, take away the heat gun and immediately spray the heated area with the cooling spray to create a sudden temperature gradient. You’ll likely have to repeat the process several times until the lacquer starts to crack, and usually you can hear when it cracks, which is a good sign. Work your way all over the guitar and crack it area by area. I needed approximately 90 minutes and four bottles of cooling spray until I was finished (Photo 3).
Does it look the same as cracked nitro lacquer? No, it’s not the same cracking pattern because of two reasons. On a nitro-lacquered guitar, the cracking happens because the softener disappears over time, which is a completely different thing. Poly is hard as glass and will never lose its softener. So, the vintage guitars of the future, let’s say in 100 years from now, will look much different compared to today—no more cracks. The second reason is that only in the middle of the spray is the lowest possible temperature not on the edge of the spray. But it’s the same ballpark, so don’t worry.
After you’re done with the entire guitar, let it cool down for some time before we start to make the cracks more visible. Again, there are different ways to do this. I prefer to use a strong black tea or coffee. Warm up the guitar slightly and dip some paper towels into the black tea or coffee before covering the guitar with them. Let them sit there for some hours before you remove them. The moisture will creep into the cracks, coloring them slightly, so they are more visible. This is a permanent process: The cracks will not lose their color again over time. On poly-lacquered guitars, I’ve also seen and tried alternative methods like using Coca-Cola, potassium permanganate, coffee grounds, stains, and more. The tea/coffee method works great and with good results and is, of course, harmless. But feel free to try other methods if you want to experiment, there’s no law against it.
After removing the paper towels, let it dry for some time before removing any residues from the lacquer using a dampish paper towel. Then, heat up the guitar slightly and let it cool down again. And voila, done! You can see the cracks are now brighter in Photo 4.
Congratulations, we are only one step away from finishing our aging project! Next, we’ll add some dings, dongs, and scratches, which is a lot of fun and a great way to individualize your guitar.
That’s it for now. Next month we’ll do another cool guitar mod, so stay tuned. Until then ... keep on modding!
Teatime: How to Age Wood at Home
Matthias Meyer of Bassart Guitars
Hi PG readers,
Did you ever wonder how it’s possible to add a special gray and dark color to the exposed wood on aged guitars? Here is my recommendation for how to do this with some simple household stuff you already have.
You will need: vinegar essence, water, black tea, steel wool, paper coffee filters, and some jars.
First, twitch a good handful of steel wool and put it in a jar. Next, fill up the jar with vinegar essence, close the jar, and let it sit for one or two days. The reaction of the steel wool and the vinegar will result in iron(II) acetate, which you can use as a dye. Use a cone-shaped paper coffee filter to percolate the liquid into a new jar and you hold the panacea in your hands. By adding some water, you can mitigate the dying effect and it’s easy to make some different aging dyes this way, from very dark to light gray.
Now it’s teatime. Make a strong black tea by using 6 to 8 tea bags in a pot, let it cool down, remove the tea bags, and pour the tea in a new jar.
One way of aging the exposed wood is to use the tea first, immediately followed by the iron(II) acetate (wet on wet technique). For a different effect and color, use the tea first and let it dry before applying the iron(II) acetate. Or use both liquids individually without the other one. It all depends on your personal taste and, of course, the wood itself. Before applying these liquids directly to your precious instruments, you should try to practice the process on some wood scraps you have lying around. Different woods react in very different ways and often the aging process needs one or two days before it becomes visible.
I hope you enjoy experimenting with this process. Cheers!
—Matthias “Matti” Meyer
www.bassartguitars.de
- Last Call: Someday You'll Regret That Relic Job - Premier Guitar ›
- How to Relic Your Guitar Neck Pt. 1 - Premier Guitar ›
- The DIY Relic Job—Fantasy or Reality? - Premier Guitar ›
- The Quick and Dirty Details on Guitar Finishes - Premier Guitar ›
- Can You Really Hear the Difference of Guitar Finishes? - Premier Guitar ›
- Save Money with DIY Guitar Repairs: No Repair Fees! - Premier Guitar ›
See and hear Taylor’s Legacy Collection guitars played by his successor, Andy Powers.
Last year, Taylor Guitars capped its 50th Anniversary by introducing a new guitar collection celebrating the contributions of co-founders Bob Taylor and Kurt Listug to the guitar world. The Legacy Collection revives five of Bob Taylor’s classic acoustic models, curated by the legendary luthier and innovator himself. “To imagine that we’re doing guitars that harken to our past, our present and our future all at the same time,” Bob says, “I really like that.”
In developing the collection, Bob preserved the essence of his originals while integrating performance and playability upgrades introduced during his tenure as designer-in-chief. “It’s an up-to-date version of what those guitars would be,” Bob explains, “but with the same sound.”
Visually, these guitars feel classic—clean, understated and unmistakably Taylor. While Bob’s original aesthetic preferences are showcased in his Legacy models, the nod to the past runs deeper than trade dress.
From his earliest builds, Bob favored slim-profile necks because he found them easier to play. That preference set a design precedent that established Taylor’s reputation for smooth-playing, comfortable necks. Legacy models feature slim mahogany necks built with Taylor's patented New Technology (NT) design. “My first neck was a bolted-on neck but not an NT neck,” Bob says. “These are NT necks because it’s a better neck.” Introduced in 1999, the NT neck allowed for unprecedented micro-adjustability while offering a consistent, hand-friendly Taylor playing experience.
What makes this collection unique within the Taylor line is Bob’s use of his X-bracing architecture, favoring his time-tested internal voicing framework over more recent Taylor bracing innovations to evoke a distinctive tone profile. Since Andy Powers—Taylor’s current Chief Guitar Designer, President and CEO—debuted his patented V-Class bracing in 2018, V-Class has become a staple in Taylor’s premium-performance guitars. Still, Bob’s X-bracing pattern produces a richly textured sound with pleasing volume, balance and clarity that long defined the Taylor voice. All Legacy models feature LR Baggs VTC Element electronics, which Bob says “harkens back to those days.”
The team at Taylor thought the best way to demonstrate the sound of the Legacy guitars was to ask Andy Powers, Bob’s successor, to play them. A world-class luthier and musician, Andy has spent the past 14 years leading Taylor’s guitar innovation. In addition to V-Class bracing, his contributions include the Grand Pacific body style, the ultra-refined Builder’s Edition Collection, and most recently, the stunning Gold Label Collection.
Below you’ll find a series of videos that feature Powers playing each Legacy model along with information about the guitars.
Legacy 800 Series Models
First launched in 1975, the 800 Series was Taylor’s first official guitar series. Today, it remains home to some of the brand’s most acclaimed instruments, including the flagship 814ce, Builder’s Edition 814ce and new Gold Label 814e.
The Legacy 800 Series features the 810e Dreadnought and two Jumbos: the 6-string 815e and 12-string 855e. Each model serves up a refined version of the Dreadnought and Jumbo body shapes Bob inherited from Sam Radding—the original owner of the American Dream music shop where Bob and Kurt first met. “I was making my guitars in the molds that Sam had made at American Dream,” Bob recalls. “There was a Jumbo and a Dreadnought. That’s all we had.”
All three Legacy 800 Series guitars feature one of Bob’s favorite tonewood combos. Solid Indian rosewood back and sides are paired with a Sitka spruce top, yielding warm lows, clear trebles and a scooped midrange.
Aesthetic appointments include a three-ring abalone rosette, mother-of-pearl Large Diamond inlays, white binding around the body and fretboard, and Bob’s “straight-ear” peghead design. Both Jumbo models also showcase a mustache-style ebony bridge—a nod to Bob’s early Jumbo builds.
Legacy 810e
The 810 Dreadnought holds a special place in Bob Taylor’s heart. “My first 810, the one I made for myself, was a thrilling guitar for me to make,” he says. “It’s the one and only guitar I played. It didn’t matter how many guitars we made at Taylor, that’s the one I took out and played.” The Legacy 810e brings back that bold, room-filling Dreadnought voice along with the easy playability expected from a Taylor.
Taylor Guitars | Legacy 810e | Playthrough Demo
Legacy 855e
Taylor’s first 12-strings found an audience in 1970s Los Angeles. “I was making guitars that would find their way to McCabe’s in Santa Monica and Westwood Music,” Bob says, “and these guitars were easy to play. Twelve-strings were a popular sound in that music. It was a modern country/folk/rock music genre that was accepting our guitars because they were easy to play. They also liked the sound of them because our guitars were easier to record.” The Legacy 855e, with its resonant Jumbo body, slim neck and gorgeous octave sparkle, carries that tradition forward.
Taylor Guitars | Legacy 855e | Playthrough Demo
Legacy 815e
The Legacy 815e revives Taylor’s original Jumbo 6-string, delivering a big, lush sound with beautifully blooming overtones.
Legacy Grand Auditoriums
In the early 1990s, Bob Taylor heard a consistent refrain from dealers: “Not everybody wants a dreadnought guitar anymore.” Players were asking for something with comparable volume but different proportions—something more comfortable, yet still powerful. This feedback inspired Bob to design a new body style with more elegant curves, more accommodating proportions and a balanced tonal response. The result was the Grand Auditorium, which Taylor introduced in 1994 to celebrate its 20th anniversary.
Thanks to its musical versatility and easy playability, Bob’s Grand Auditorium attracted a wide variety of players. “We came into our own with our Grand Auditorium,” he says. “People were describing it as ‘all around.’ It’s a good strummer and good for fingerstyle, but it’s not totally geared toward strumming or totally geared toward fingerstyle.” Also referred to as the “Swiss-Army Knife” of guitars or the “Goldilocks” guitar, the GA quickly became a favorite among guitarists across playing styles, musical genres and different playing applications including recording and live performance. “That guitar made studio work successful,” Bob says. It gained a wider fanbase with the debut of the “ce” version, which introduced a Venetian cutaway and onboard electronics. “That became one of our hallmarks,” says Bob. “If you want to plug in your guitar, buy a Taylor.”
Today, the Grand Auditorium is Taylor’s best-selling body shape.
The Legacy Collection features two cedar-top Grand Auditoriums inspired by past favorites: the mahogany/cedar 514ce and rosewood/cedar 714ce. Both models incorporate Bob’s original X-bracing pattern for a tonal character reminiscent of their 1990s and 2000s counterparts. Shared aesthetic details include a green abalone three-ring rosette, ebony bridge pins with green abalone dots, a faux-tortoiseshell pickguard and Taylor gold tuning machines.
Taylor Guitars | Legacy 815e | Playthrough Demo
Legacy 514ce
The Legacy 514ce features solid mahogany back and sides paired with a Western Red cedar top, yielding a punchy midrange and dry, woody sonic personality that pairs beautifully with cedar’s soft-touch sensitivity and warmth. It’s a standout choice for fingerstyle players and light strummers who crave nuance and depth. Distinct visual details include faux-tortoise body and fretboard binding, black-and-white top trim, and mother-of-pearl small diamond fretboard inlays.
Taylor Guitars | Legacy 514ce | Playthrough Demo
Legacy 714ce
The Legacy 714ce also features a cedar top, this time matched with solid Indian rosewood back and sides. The result is a richly textured sound with deep lows, clear trebles and a warm, mellow response. Inspiring as it is, this specific wood pairing isn’t currently offered in any other standard Taylor model. Additional aesthetic details include green abalone dot fretboard inlays, black body and fretboard binding, and black-and-white “pinstripe” body purfling.
While the Legacy Collection spotlights Taylor’s past, newer models from the Gold Label, Builder’s Edition and Somos Collections show the company’s legacy is always evolving. Explore the Legacy Collection at taylorguitars.com or visit your local authorized Taylor dealer.
Taylor Guitars | Legacy 714ce | Playthrough Demo
Detail of Ted’s 1997 National resonator tricone.
What instruments should you bring to an acoustic performance? These days, with sonic innovations and the shifting definition of just what an acoustic performance is, anything goes.
I believe it was Shakespeare who wrote: “To unplug, or not to unplug, that is the question. Whether ’tis nobler in the mind to suffer the slings and arrows of acoustic purists, or to take thy electric guitar in hand to navigate the sea of solo performing.”
Four-hundred-and-twenty-four years later, many of us still sometimes face the dilemma of good William when it comes to playing solo gigs. In a stripped-down setting, where it’s just us and our songs, do we opt to play an acoustic instrument, which might seem more fitting—or at least more common, in the folksinger/troubadour tradition—or do we bring a comfy electric for accompaniment?
For me, and likely many of you, it depends. If I’m playing one or two songs in a coffeehouse-like atmosphere, I’m likely to bring an acoustic. But if I’m doing a quick solo pop up, say, as a buffer between bands in a rock room, I’m bringing my electric. And when I’m doing a solo concert, where I’ll be stretching out for at least an hour, it’s a hybrid rig. I’ll bring my battered old Guild D25C, a National tricone resonator, and my faithful Zuzu electric with coil-splitting, and likely my gig pedalboard, or at least a digital delay. And each guitar is in a different tuning. Be prepared, as the Boy Scouts motto states. (For the record, I never made it past Webelos.)
My point is, the definition of the “acoustic” or “coffeehouse” performance has changed. Sure, there are still a few Alan Lomax types out there who will complain that an electric guitar or band is too loud, but they are the last vestiges of the folk police. And, well, acoustic guitar amplification is so good these days that I’ve been at shows where each strum of a flattop box has threatened to take my head off. My band Coyote Motel even plays Nashville’s hallowed songwriter room the Bluebird Café as a fully electric five-piece. What’s key, besides a smart, flexible sound engineer, is controlling volume, and with a Cali76 compressor or an MXR Duke of Tone, I can get the drive and sustain I need at a low level.
“My point is, the definition of the ‘acoustic’ or ‘coffeehouse’ performance has changed.”
So, today I think the instruments that are right for “acoustic” gigs are whatever makes you happiest. Left to my own devices, I like my Guild for songs that have a strong basis in folk or country writing, my National for blues and slide, and my electric for whenever I feel like adding a little sonic sauce or showing off a bit, since I have a fluid fingerpicking hand that can add some flash to accompaniment and solos. It’s really a matter of what instrument or instruments make you most comfortable because we should all be happy and comfortable onstage—whether that stage is in an arena or theater, a club or coffeehouse, or a church basement.
At this point, with instruments like Fender’s Acoustasonic line, or piezo-equipped models from Godin, PRS, and others, and the innovative L.R. Baggs AEG-1, it’s worth considering just what exactly makes a guitar acoustic. Is it sound? In which case there’s a wide-open playing field. Or is it a variation on the classic open-bodied instrument that uses a soundhole to move air? And if we arrive at the same end, do the means matter? There is excellent craftsmanship available today throughout the entire guitar spectrum, including foreign-built models, so maybe we can finally put the concerns of Shakespeare to rest and accept that “acoustic” has simply come to mean “low volume.”
Another reason I’m thinking out loud about this is because this is our annual acoustic issue. And so we’re featuring Jason Isbell, on the heels of his solo acoustic album, a piece on how acoustic guitars do their work authored by none other than Lloyd Baggs, and Andy Fairweather Low, whose new solo album—and illustrious career—includes exceptional acoustic performances. If you’re not familiar with his work, and you are, even if you don’t know it, he was the gent sitting next to Clapton for the historic 1992 Unplugged concert—and lots more. There are also reviews of new instruments from Taylor, Martin, and Godin that fit the classic acoustic profile, so dig in, and to heck with the slings and arrows!Ernie Ball, the world’s leading manufacturer of premium guitar strings and accessories, proudly announces the launch of the all-new Earthwood Bell Bronze acoustic guitar strings. Developed in close collaboration with Grammy Award-winning guitarist JohnMayer, Bell Bronze strings are engineered to meet Mayer’s exacting performance standards, offering players a bold new voice for their acoustic guitars.Crafted using a proprietary alloy inspired by the metals traditionally found in bells and cymbals, Earthwood Bell Bronze strings deliver a uniquely rich, full-bodied tone with enhanced clarity, harmonic content, and projection—making them the most sonically complex acoustic strings in the Ernie Ball lineup to date.
“Earthwood Bell Bronze strings are a giant leap forward in tone, playability, and durability. They’re great in any musical setting but really shine when played solo. There’s an orchestral quality to them.” -John Mayer
Product Features:
- Developed in collaboration with John Mayer
- Big, bold sound
- Inspired by alloys used for bells and cymbals
- Increased resonance with improved projection and sustain
- Patent-pending alloy unique to Ernie Ball stringsHow is Bell Bronze different?
- Richer and fuller sound than 80/20 and Phosphor Bronze without sounding dark
- Similar top end to 80/20 Bronze with richer low end than Phosphor Bronze
The Irish post-punk band’s three guitarists go for Fairlane, Fenders, and a fake on their spring American tour.
We caught up with guitarists Carlos O’Connell and Conor Curley from red-hot Dublin indie rock outfit Fontaines D.C. for a Rig Rundown in 2023, but we felt bad missing bassist Conor “Deego” Deegan III, so we’ve been waiting for the lads to make their way back.
This time, riding the success of their fourth LP, 2024’s Romance, we caught up with all three of them at Nashville’s Marathon Music Works ahead of their April 30 gig to see what they brought across the pond.
Brought to you by D’Addario
All’s Fairlane
Curley’s go-to is this Fairlane Zephyr, loaded with Monty’s P-90s and a Mastery bridge. It mostly stays in standard tuning and, like his other axes, has Ernie Ball Burly Slinky strings.
Blue Boy
Fender sent Curley this Jazzmaster a couple of years ago, and since then, he’s turned to it for heavier, more driven sounds. It’s tuned to E flat, but Curley also tunes it to a unique shoegaze-y tuning for their tune “Sundowner.”
You can also catch Curley playing a Fender Johnny Marr Jaguar.
Twin Win
Fender Twin Reverbs are where Conor Curley feels most comfortable, so they’re his go-to backline. The amps are EQ’d fairly flat to operate as pedal platforms.
Conor Curley’s Pedalboard
Curley’s pedalboard for this tour includes a TC Electronic PolyTune3 Noir, Strymon Timeline, Boss RV-6, Boss PN-2, Boss BF-3, Keeley Loomer, Death by Audio Echo Dream, Fairfield Circuitry Hors d'Ouevre?, Strymon Sunset, Strymon Deco, DigiTech Hardwire RV-7, Electro-Harmonix Nano POG, and Lehle Little Dual.
Fake Out
Connor Deegan didn’t own a bass when Fontaines D.C. began, and his first purchase was the black Fender Jazz bass (right)—or so he thought. He later discovered it was a total knock-off, with a China-made body, Mexico-made neck, and a serial number that belongs to a Jaguar. But he fell in love with it, and its sound—nasal on the high strings, with cheap high-output pickups—is all over the band’s first record, Dogrel. Deego plays with orange Dunlop .60 mm picks, and uses Rotosound Swing Bass 66 strings.
Deegan picked up the Squier Bass VI (left) for its “surfy vibes,” and upgraded the pickups and bridge.
Also in his arsenal is this 1972 Fender P-bass (middle). (He’s a bit nervous to check the serial number.)
V-4 You Go
Deego plays through an Ampeg V-4B head into a Fender 6x10 cabinet.
Conor Deegan’s Pedalboard
Deegan’s board includes a Boss TU-3, Electro-Harmonix Hum Debugger, Boss TR-2, modded Ibanez Analog Delay, Death by Audio Reverberation Machine, Boss CE-2w, Tech 21 SansAmp Bass Driver DI, Darkglass Electronics Alpha Omega Ultra, and Dunlop Volume (X) Mini pedal. A GigRig QuarterMaster helps him switch sounds.
Mustang Muscle
Carlos O’Connell favors this 1964 Fender Mustang, which has been upgraded with a Seymour Duncan Hot Rails pickup since Romance. It’s set up so that the single-coil pickup is always on, and he’ll add in the Hot Rails signal for particular moments.
Ghost of Gallagher
After getting to play a number of Rory Gallagher’s guitars thanks to a private invitation from the guitarist’s estate, O’Connell picked up this Fender Custom Shop Rory Gallagher Signature Stratocaster. The jangly, direct tone of this one is all over tunes like “Boys in the Better Land.”
More Fender Friends
O’Connell runs his guitars, including a vintage Martin acoustic which he picked up in Nashville, through a Fender Twin Reverb and Deluxe Reverb.
Carlos O’Connell’s Pedalboard
The gem of O’Connell’s board is this Soundgas 636p, an imitation of the infamous Grampian 636 mic preamp’s breakup. Alongside it are a TC Electronic PolyTune, Ceriatone Centura, Strymon Volante, Eventide H9, Orchid Electronics Audio 1:1 Isolator, Vein-Tap Murder One, MXR Micro Amp, Moog MF Flange, MXR Smart Gate, and Freqscene Koldwave Analog Chorus. A Radial BigShot ABY navigates between the Twin and Deluxe Reverb.