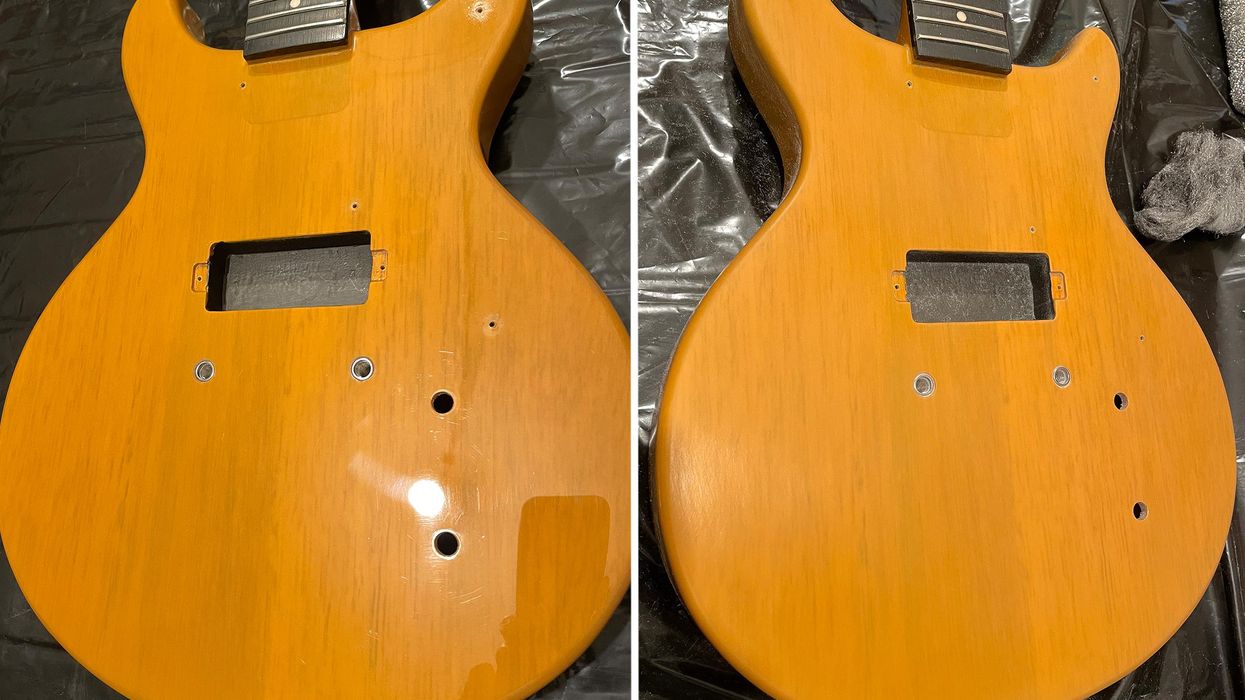
Photo 1 (left) and Photo 2 (right)
A lot of you have been waiting for this penultimate step of our guitar aging project, so let’s do some damage!
Welcome back to Mod Garage. Today we’ll continue to work on our aging project, and some of you might be wondering why there was such a long break. The reason is simple: suboptimal timing from my side. The last part of this column was in the middle of autumn, and I wanted you to do the following steps outside (if possible) and not on the kitchen table. Wintertime is not the best time for such a challenge but now is a good starting point, so let’s go!
We’re almost done with our project, can you believe it? In this installment, we’ll take care of the color, talk about fading, and we’ll crack the lacquer—something a lot of you have been waiting for—before we add some dings and dongs in the last part of this series, which is the final touch before we put it all together again.a
We also have an advice column on aging from my friend and colleague Matthias “Matti” Meyer, from the German-based Bassart Guitars. Matti is one of the best pro agers I know. Please follow his advice and recipe for aging wood at the end of this column—we will need these tools in the next and final part of this project.
Aging the Color
Over time, the colors on guitar bodies start to fade, and depending on the type of color and the paint-job method itself, discolorations can show up. The two main factors are if the guitar was exposed to ultraviolet light and if the paint job is all intact. A famous example is the Gibson Les Paul goldtop guitars with the golden color turning greenish, or the Gibson sunburst Les Pauls losing the red color of the sunburst spray job over time. But Fender guitars also suffer similar problems.
What we want to mimic is an old nitro lacquer, but with our Harley Benton guitar we have two problems:
- The mustard color is not a real TV yellow, as discussed before. TV yellow is much lighter, so even when we find a way to fade the color, it won’t look like a faded TV yellow, but a faded mustard yellow. We can’t change this easily, so we must work with what we have and love it for what it is rather than hating it for what it’s not.
- It’s not nitro lacquer on our Harley Benton but a modern, not-so-thin, ultra-durable poly lacquer. In a technical way, this modern lacquer does a much better job than any vintage nitro stuff regarding protection of the guitar. The downside is that we can’t make poly look like nitro when aging; it will only be an approximation. But again, it is what it is, and we’ll make the best out of it.
If you have the time, exposing the guitar to direct sunlight for some weeks or months will cause a fading of the color to a certain degree. Over the years, I’ve seen the oddest attempts to do such things, including regularly placing the guitar inside a home solarium. Using artificial UV light is also an option but building a well-working construction for such a big object, like a set-neck guitar, is not easy and you’d need a lot of UV lamps for that. Such devices are often used to make yellowed plastic materials look shiny white again. An overspray with the correct color is also an option. but a lighter color on a darker one is always difficult to do—especially with a semi-transparent color like TV yellow. And I doubt it’s worth the time and money. Not everything is doable and this falls into that category. But we’ll do other things to make it look old and cool, so leave the color as it is.
Let’s begin. As usual, grab your steel wool and abrasive cloth to break the shine of the high-gloss lacquer, and don’t forget the backside of the neck. The difference can be seen in Photo 1 (before) and Photo 2 (after).
Aging the Lacquer
This is what a lot of you have been waiting for and today we’ll finally do it: cracking the lacquer!We all know the look of cracked lacquer on vintage guitars, which is part of their special appearance and charm. On vintage guitars this happens over time, the softener disappears, and the paint starts to crack. Here again, facing that our Harley Benton is poly and not nitro-painted, we must follow a different route to get a good result.
Generally, there are two basic methods to do this:
- Mimicking the cracks by using a razor blade to cut the cracks into the paint.
- Using a combination of heat and cold to crack the lacquer.
In both cases this is only the first step. Next, we’ll have to make the cracks more visible, but first things first.
I decided to use the second method: using heat and cold to crack the lacquer. Please note, this will take some time and patience to do it right: It won’t be done in 15 minutes. You don’t need much for this, just a heat gun and several bottles of cooling spray. The process is easy but safety first: Only do this outside, wear gloves and goggles, and place a bucket with cold water or an extinguisher near you … a heat gun gets very hot!
You can’t do this in one step, and you’ll need to work in smaller areas, one by one. Heat up the first area with the heat gun and be careful—you only want to heat up the lacquer and not melt or burn it. If you want to intentionally add some burned spots, a heat gun is the way to go, too. Depending on the type and thickness of the lacquer as well as the power of your heat gun, it can take some time until the lacquer is ready to crack. Start to heat it up from a distance and not with the heat gun directly on the guitar, checking the temperature of the lacquer from time to time with one of your hands. Never put your hand directly under the heat gun! Take the guitar body and your hands away from the gun when you check the temperature. If you feel that it’s not hot enough, keep heating it up until it’s good to go.
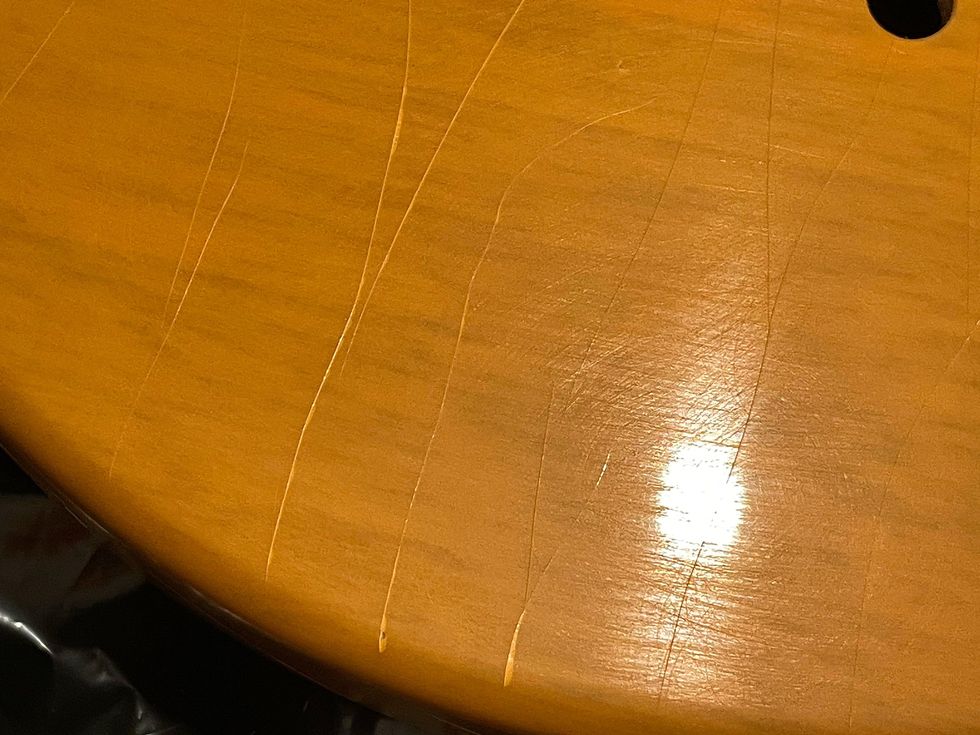
Photo 3
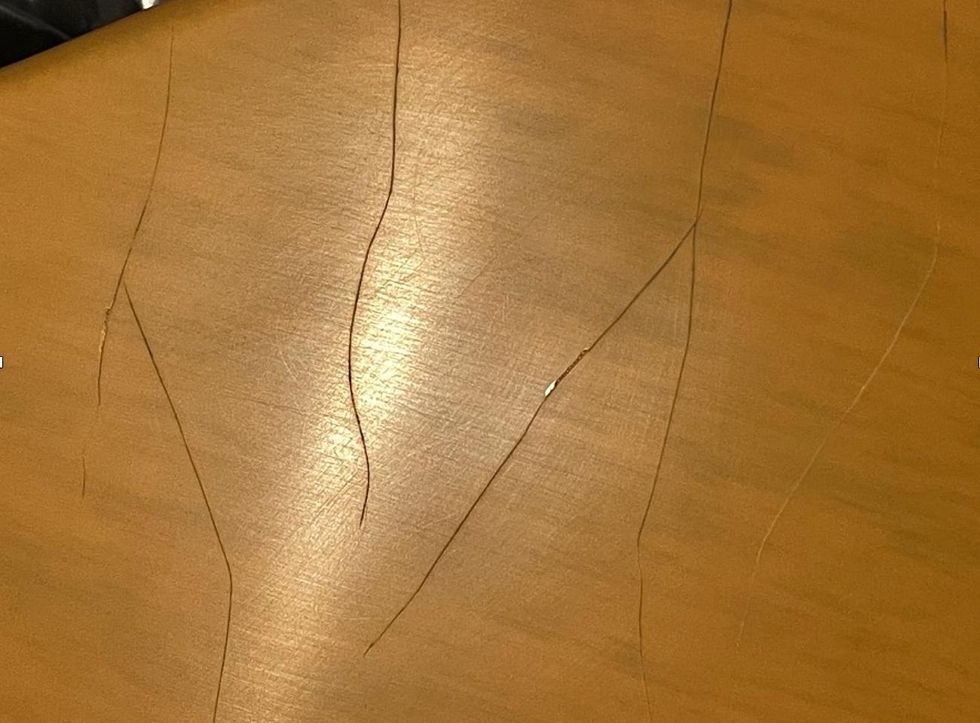
Photo 4
There are no rules set in stone because it depends on the things mentioned above. So, you have to try and see what works on your guitar. If you think the lacquer is hot enough, take away the heat gun and immediately spray the heated area with the cooling spray to create a sudden temperature gradient. You’ll likely have to repeat the process several times until the lacquer starts to crack, and usually you can hear when it cracks, which is a good sign. Work your way all over the guitar and crack it area by area. I needed approximately 90 minutes and four bottles of cooling spray until I was finished (Photo 3).
Does it look the same as cracked nitro lacquer? No, it’s not the same cracking pattern because of two reasons. On a nitro-lacquered guitar, the cracking happens because the softener disappears over time, which is a completely different thing. Poly is hard as glass and will never lose its softener. So, the vintage guitars of the future, let’s say in 100 years from now, will look much different compared to today—no more cracks. The second reason is that only in the middle of the spray is the lowest possible temperature not on the edge of the spray. But it’s the same ballpark, so don’t worry.
After you’re done with the entire guitar, let it cool down for some time before we start to make the cracks more visible. Again, there are different ways to do this. I prefer to use a strong black tea or coffee. Warm up the guitar slightly and dip some paper towels into the black tea or coffee before covering the guitar with them. Let them sit there for some hours before you remove them. The moisture will creep into the cracks, coloring them slightly, so they are more visible. This is a permanent process: The cracks will not lose their color again over time. On poly-lacquered guitars, I’ve also seen and tried alternative methods like using Coca-Cola, potassium permanganate, coffee grounds, stains, and more. The tea/coffee method works great and with good results and is, of course, harmless. But feel free to try other methods if you want to experiment, there’s no law against it.
After removing the paper towels, let it dry for some time before removing any residues from the lacquer using a dampish paper towel. Then, heat up the guitar slightly and let it cool down again. And voila, done! You can see the cracks are now brighter in Photo 4.
Congratulations, we are only one step away from finishing our aging project! Next, we’ll add some dings, dongs, and scratches, which is a lot of fun and a great way to individualize your guitar.
That’s it for now. Next month we’ll do another cool guitar mod, so stay tuned. Until then ... keep on modding!
Teatime: How to Age Wood at Home
Matthias Meyer of Bassart Guitars
Hi PG readers,
Did you ever wonder how it’s possible to add a special gray and dark color to the exposed wood on aged guitars? Here is my recommendation for how to do this with some simple household stuff you already have.
You will need: vinegar essence, water, black tea, steel wool, paper coffee filters, and some jars.
First, twitch a good handful of steel wool and put it in a jar. Next, fill up the jar with vinegar essence, close the jar, and let it sit for one or two days. The reaction of the steel wool and the vinegar will result in iron(II) acetate, which you can use as a dye. Use a cone-shaped paper coffee filter to percolate the liquid into a new jar and you hold the panacea in your hands. By adding some water, you can mitigate the dying effect and it’s easy to make some different aging dyes this way, from very dark to light gray.
Now it’s teatime. Make a strong black tea by using 6 to 8 tea bags in a pot, let it cool down, remove the tea bags, and pour the tea in a new jar.
One way of aging the exposed wood is to use the tea first, immediately followed by the iron(II) acetate (wet on wet technique). For a different effect and color, use the tea first and let it dry before applying the iron(II) acetate. Or use both liquids individually without the other one. It all depends on your personal taste and, of course, the wood itself. Before applying these liquids directly to your precious instruments, you should try to practice the process on some wood scraps you have lying around. Different woods react in very different ways and often the aging process needs one or two days before it becomes visible.
I hope you enjoy experimenting with this process. Cheers!
—Matthias “Matti” Meyer
www.bassartguitars.de
- Last Call: Someday You'll Regret That Relic Job - Premier Guitar ›
- How to Relic Your Guitar Neck Pt. 1 - Premier Guitar ›
- The DIY Relic Job—Fantasy or Reality? - Premier Guitar ›
- The Quick and Dirty Details on Guitar Finishes - Premier Guitar ›
- Can You Really Hear the Difference of Guitar Finishes? - Premier Guitar ›
- Save Money with DIY Guitar Repairs: No Repair Fees! - Premier Guitar ›
There’s so much that goes into bringing a pedal to life. Here’s a stash of DIY kits in various stages of completion at the author’s workshop.
Do you scoff at pedal prices? Here’s a deep look at the process and expenses of bringing a pedal to market.
You’ve come up with something special and inspiring on the breadboard and are ready to put the circuit into a pedal. How do you do that? You could hire a contractor, but let’s go full DIY.
You will need a CAD program to lay out the schematic and the subsequent circuit board. Once purchased, you need to learn to use the software to create a digital schematic and PC board. This process is not strictly about understanding the software—you also need to learn PCB layout practices as they relate to grounding, trace length, footprint design, and other common elements. While adhering to these, you also need to layout hardware, like potentiometers and toggles, in specific locations that allow them to appropriately mate with the enclosure that they will be stuffed into.
Now that we have our circuit laid out, we need to create specific file types to send off to a fabrication house so that they can open the files and manufacture the PC boards correctly to our design. Once we’ve submitted the files and they are approved, we wait with excitement, and dread, until they come in. Why dread? Well, we won’t know if the PCB is correctly populated with components that fit the package footprints and distribute power correctly, and if the audio sounds like what we designed on the breadboard, until they arrive. There may also be noise or other issues that we’ll need to track down before we can call the PCB finished. The first PCB that I ever designed came in looking exactly like the digital file, but did not work whatsoever.
After we’ve debugged the PCB to make it work, we get to a fun and frustrating step: putting the circuit into our enclosure. The enclosure part is fun because it’s the external, artistic side of the product where the builder’s creativity is first seen. An unappealing look could be the deciding factor for a consumer. I’m sure most of us have made a decision on a guitar or pedal before it’s even plugged in.
Trying to squeeze everything into an enclosure can become discouraging. The more hardware that’s affixed to the PCB, the more every measurement counts. This means every knob, toggle, footswitch, audio jack, and DC jack will play a role in making the PCB line up with the drill holes on the enclosure. That’s an aspect we haven’t even covered yet.
“An unappealing look could be the deciding factor for a consumer.”
Most of us in the industry have our enclosures manufactured at one-stop-shop locations. This is because having the facilities and tools to do drilling, powder coating, and UV or screen printing in-house is simply not feasible for most. Once we get a line on an enclosure manufacturer, we need to get them our drill measurements. This includes drill-hole diameters and locations related to each other, and from the edges of the enclosure. Once done, we need to get those measurements into digital form along with any artwork. We also need to pick a powdercoat color from the thousands of colors available. Not all powders adhere the same way to metal and not all powders work well with UV printing. So how do we take our drill measurements, powder color, and artwork to the next step? This is stomping grounds for Adobe Illustrator—another software program to purchase and learn. Crud!
After the enclosure files are sent off, made to spec, and received, we hold our breath and hope the populated PCB fits into the drilled enclosure. If it does, we dance. If it doesn’t, we break out the ruler and calipers and measure the places that we messed up. If the changes are to the PCB, we make them and order new samples. Same goes for the enclosure. While those revisions are being fabricated, we can focus on the packaging for the pedal. This is another fun part, and something that the customer will interact with upon receiving.
This is where I need to leave you. Before doing so, I’d like to point out that we haven’t gone into the remaining aspects of bringing a boutique pedal to life. There are still major considerations like product photos done in a photo area with a nice camera and edited with (more) software. Website construction to display that pedal along with copy and SEO, packaging materials, a label printer, and shipping software that talks to the website.
And at that, I’ve omitted a lot of small and medium steps in the breakdown of bringing a pedal to market. So I ask, are pedals really overpriced?
Strong midrange-focused personality. Particularly vowel-ly and vocal sweep. Feels controlled.
Some players will miss silkier, hazier bass-range sounds.
$249
Dunlop Mick Ronson Cry Baby
Park and fly with this mid-focused but very vocal wah honoring Bowie’s right-hand man.
Dunlop Mick Ronson Wah - MAIN by premierguitar
Mick Ronson—lead ripper, lieutenant, riff-dealer, and arranger in David Bowie’s Spiders from Mars—was such a cool amalgam of ’60s British guitar voices. He had Keith Richards’ sense of rhythm and hooks, Jimmy Page’s knack for evil-sounding ear candy, and a preference for loud, simple rigs: Les Paul, Marshall, Tone Bender, Echoplex, and, most critically, a Cry Baby wah. You know the sound of this Cry Baby. It’s everywhere on early 1970s Bowie records—“Queen Bitch,” “Moonage Daydream,” and “Width of a Circle,” to name a few—and it put discernible fangs and venom in his playing. There are many such sounds in Dunlop’s excellent new tribute, the Mick Ronson Cry Baby.
Ronno was not a wah player in the “wocka-wocka” sense. He primarily used the pedal in a fixed position or with subtle longer sweeps. His favorite wah for the job was an early Cry Baby built in Italy by Jen. These wahs were notoriously, shall we say, “unique” from specimen to specimen. And without Ronno’s original on hand for comparison, it’s hard to know how close the tribute gets to nailing it. But there is an unmistakable mid focus that mirrors and invites Ronno’s biting phrasing—particularly in Bowie’s live recordings from the time. The new pedal’s sweep starts out squawky at the heel-down position, where my other vintage-voiced wahs just sound foggy. That midrange emphasis and presence remains through its sweep, suggesting the Ronson Wah’s singing range is narrow. On the contrary, the many distinctly different vowel sounds within that range color the base tone more strongly than many wahs with a smoother, bassier taper. That profile lends itself to great control and multiple bold, distinct sounds—particularly when an angry gain device is situated upstream.
Legendary shredder Joe Satriani was the first ever guest on Wong Notes, so it makes sense that he’s the first returning sit-in with Cory Wong.
He teases a new song with Sammy Hagar, plus delves into the intricacies of Eddie Van Halen’s playing and why he can’t quite replicate it—every guitarist has their strengths and deficiencies, claims Satch. And believe it or not, Satriani didn’t figure standing in front of huge crowds to be one of his strengths when he was younger. Fate figured otherwise.
Satriani goes deep on one of his favorite tools, the Sustainiac pickup, and talks about how it’s defined his playing—just like his trademark sunglasses, even in dark rooms. (“Stupid idea, right?” he jokes.)
And young guitarists, listen up: Satriani has some wise words on the importance of rigorous practice while you’re budding on the instrument. The big takeaway? Learn. Your. Scales.
Paul Reed Smith also continues to evolve as a guitarist, and delivered a compelling take on Jeff Beck’s interpretation of “Cause We’ve Ended As Lovers” at the PRS 40th Anniversary Celebration during this year’s NAMM.
After 40 years at the helm of PRS Guitars, our columnist reflects on the nature of evolution in artistry—of all kinds.
Reflecting on four decades in business, I don’t find myself wishing I “knew then what I know now.” Instead, I’m grateful to still have the curiosity and environment to keep learning and to be in an art that has a nonstop learning curve. There’s a quote attributed to artist Kiki Smith that resonates deeply with me: “I can barely control my kitchen sink.” That simple truth has been a guiding principle in my life. We can’t control the timing of knowledge or discovery. If profound learning comes late in life, so be it. The important thing is to remain open to it when it arrives.
I look at what’s happened at PRS Guitars over the last 40 years with real pride. I love what we’ve built—not just in terms of instruments but in the culture of innovation and craftsmanship that defines our company. The guitar industry as a whole has evolved in extraordinary ways, and I’m fortunate to be part of a world filled with passionate, talented, and good-hearted people.
I love learning. It may sound odd, but there’s something almost spiritual about it. Learning isn’t constant; it comes in stages. Sometimes, there are long dry spells where you can even struggle to hold onto what you already know. Other times, learning is sporadic, with nuggets of understanding appearing here and there that are treasured for their poignancy. And then there are those remarkable moments when the proverbial floodgates open, and the lessons come so fast that you can barely keep up. I’ve heard songwriters and musicians describe this same pattern. Sometimes, no new songs emerge; sometimes, they trickle out one by one; and sometimes, they arrive so quickly it’s impossible to capture them all. I believe it’s the same for all creatives, including athletes, engineers, and everyone invested in their art.
Looking back over 40 years in business and a decade of preparation before that, I recognize these distinct phases of learning. Right now, I’m in one of those high-gain learning periods. I’ve taken on a teacher who is introducing me to concepts I never imagined, ideas I didn’t think anyone could explain—things I wasn’t even sure I was worthy of understanding. But when he calls and says, “Have you thought about this?” I lean in, eager to absorb, not just to learn something new for myself, but because I want him to feel his teaching is appreciated, making it more likely that the teaching continues.
“Learning isn’t just about accumulating knowledge; it’s about applying it, sharing it, and evolving because of it.”
Beyond structured teaching, learning also comes through experience, discovery, and problem solving. We recently got our hands on some old, magical guitars, vintage pickups, microphones, and mic preamps. These aren’t just relics; they’re windows into a deeper understanding of how things work and what the engineers who invented them knew. By studying the schematics of tube-mic preamps, we’re uncovering insights that directly influence how we wire guitar pickups and their electronics. It may seem like an unrelated field, but the many parallels in audio engineering are there if you look. Knowledge in one area has a ripple effect, unlocking new possibilities in another.
Even as I continue learning, I recognize that our entire team at PRS is on this journey with me. We have people whose sole job is to push the boundaries of what we understand about pickups, spending every day refining and applying that knowledge so that when you pick up a PRS guitar, it sounds better. More than 400 people work here, each contributing to the collective advancement of our craft. I am grateful to be surrounded by such a dedicated and smart team.
One of my favorite memories at PRS was at a time we were deep into investigating scale lengths on vintage guitars, and some unique pickup characteristics, when one of our engineering leaders walked into my office. He had just uncovered something astonishing and said, “You’re not going to believe this one.” That excitement and back-and-forth exchange of ideas is what keeps this work so rewarding.
As I reflect on my journey, I see that learning isn’t just about accumulating knowledge; it’s about applying it, sharing it, and evolving because of it. I get very excited when something we’ve learned ends up on a new product. Whether lessons come early or late, whether they arrive in waves or trickles, there is always good work to be done. And that is something I just adore.