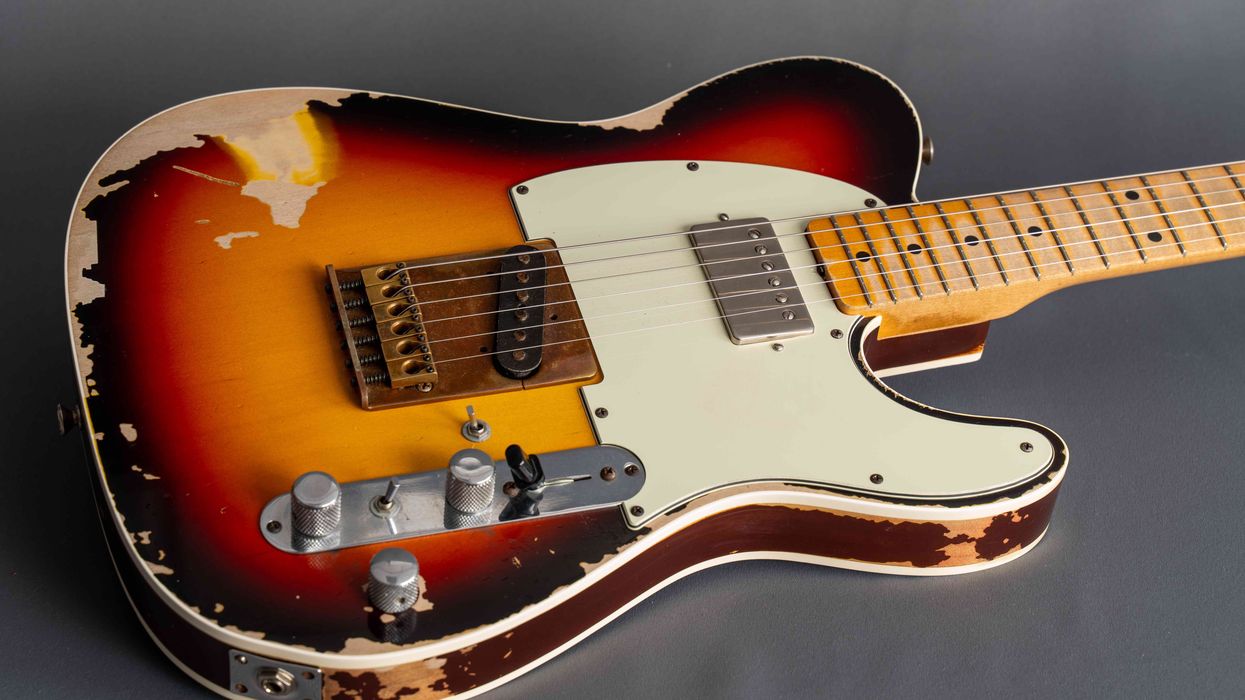
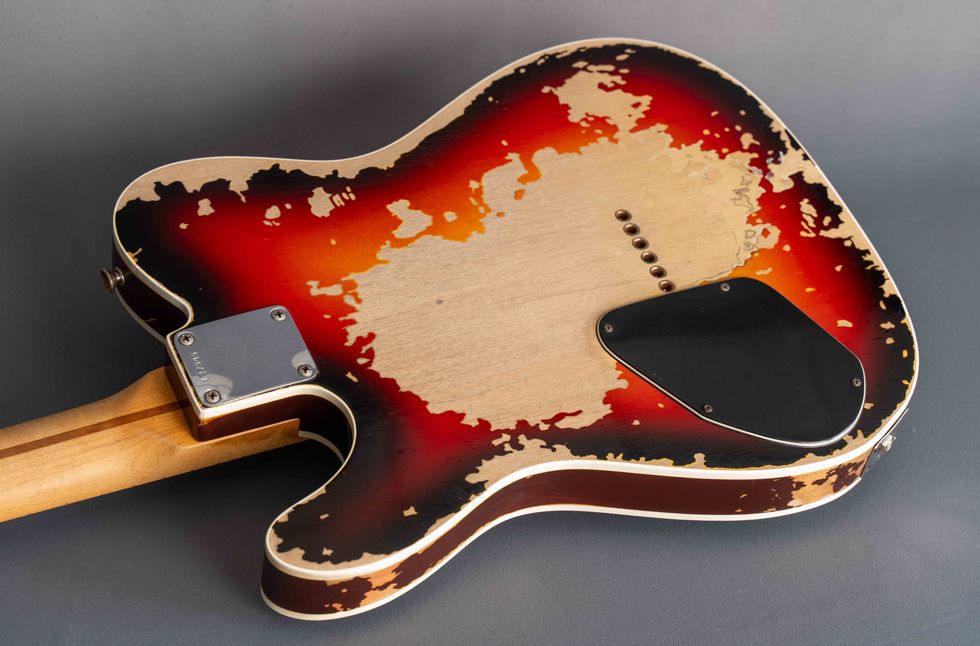
A lot of you have been waiting for this penultimate step of our guitar aging project, so let’s do some damage!
Welcome back to Mod Garage. Today we’ll continue to work on our aging project, and some of you might be wondering why there was such a long break. The reason is simple: suboptimal timing from my side. The last part of this column was in the middle of autumn, and I wanted you to do the following steps outside (if possible) and not on the kitchen table. Wintertime is not the best time for such a challenge but now is a good starting point, so let’s go!
We’re almost done with our project, can you believe it? In this installment, we’ll take care of the color, talk about fading, and we’ll crack the lacquer—something a lot of you have been waiting for—before we add some dings and dongs in the last part of this series, which is the final touch before we put it all together again.a
We also have an advice column on aging from my friend and colleague Matthias “Matti” Meyer, from the German-based Bassart Guitars. Matti is one of the best pro agers I know. Please follow his advice and recipe for aging wood at the end of this column—we will need these tools in the next and final part of this project.
Aging the Color
Over time, the colors on guitar bodies start to fade, and depending on the type of color and the paint-job method itself, discolorations can show up. The two main factors are if the guitar was exposed to ultraviolet light and if the paint job is all intact. A famous example is the Gibson Les Paul goldtop guitars with the golden color turning greenish, or the Gibson sunburst Les Pauls losing the red color of the sunburst spray job over time. But Fender guitars also suffer similar problems.
What we want to mimic is an old nitro lacquer, but with our Harley Benton guitar we have two problems:
- The mustard color is not a real TV yellow, as discussed before. TV yellow is much lighter, so even when we find a way to fade the color, it won’t look like a faded TV yellow, but a faded mustard yellow. We can’t change this easily, so we must work with what we have and love it for what it is rather than hating it for what it’s not.
- It’s not nitro lacquer on our Harley Benton but a modern, not-so-thin, ultra-durable poly lacquer. In a technical way, this modern lacquer does a much better job than any vintage nitro stuff regarding protection of the guitar. The downside is that we can’t make poly look like nitro when aging; it will only be an approximation. But again, it is what it is, and we’ll make the best out of it.
If you have the time, exposing the guitar to direct sunlight for some weeks or months will cause a fading of the color to a certain degree. Over the years, I’ve seen the oddest attempts to do such things, including regularly placing the guitar inside a home solarium. Using artificial UV light is also an option but building a well-working construction for such a big object, like a set-neck guitar, is not easy and you’d need a lot of UV lamps for that. Such devices are often used to make yellowed plastic materials look shiny white again. An overspray with the correct color is also an option. but a lighter color on a darker one is always difficult to do—especially with a semi-transparent color like TV yellow. And I doubt it’s worth the time and money. Not everything is doable and this falls into that category. But we’ll do other things to make it look old and cool, so leave the color as it is.
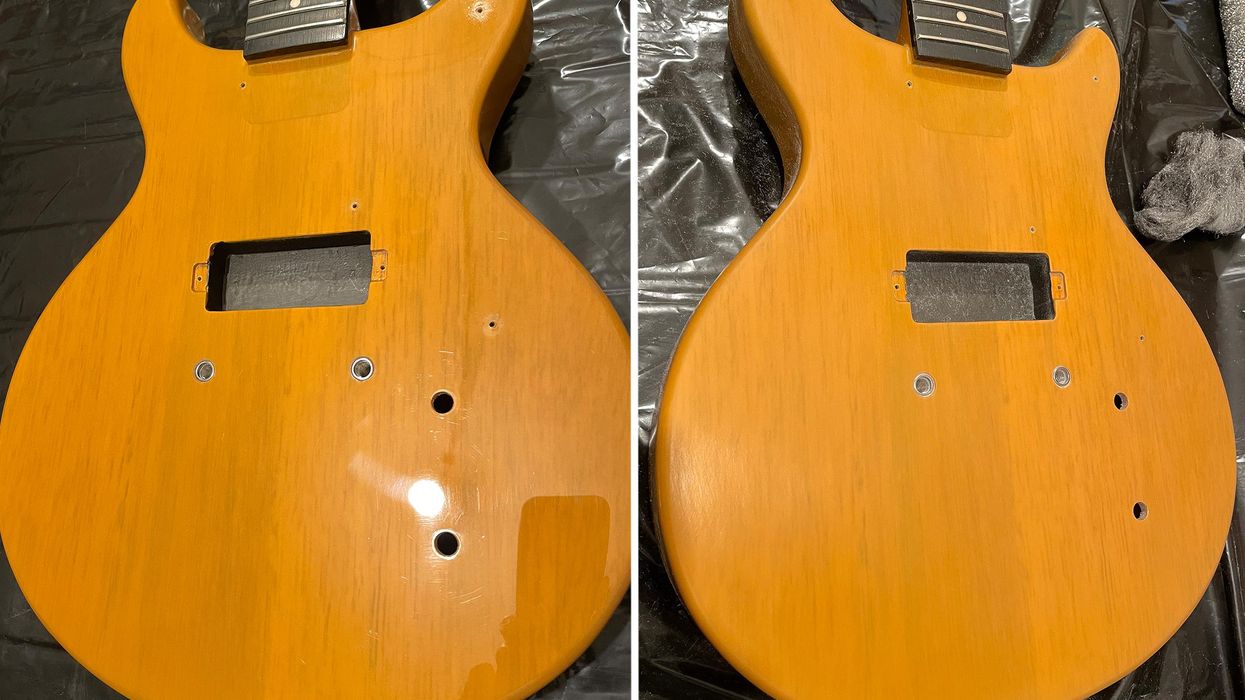
Let’s begin. As usual, grab your steel wool and abrasive cloth to break the shine of the high-gloss lacquer, and don’t forget the backside of the neck. The difference can be seen in Photo 1 (before) and Photo 2 (after).
Aging the Lacquer
This is what a lot of you have been waiting for and today we’ll finally do it: cracking the lacquer!We all know the look of cracked lacquer on vintage guitars, which is part of their special appearance and charm. On vintage guitars this happens over time, the softener disappears, and the paint starts to crack. Here again, facing that our Harley Benton is poly and not nitro-painted, we must follow a different route to get a good result.
Generally, there are two basic methods to do this:
- Mimicking the cracks by using a razor blade to cut the cracks into the paint.
- Using a combination of heat and cold to crack the lacquer.
In both cases this is only the first step. Next, we’ll have to make the cracks more visible, but first things first.
I decided to use the second method: using heat and cold to crack the lacquer. Please note, this will take some time and patience to do it right: It won’t be done in 15 minutes. You don’t need much for this, just a heat gun and several bottles of cooling spray. The process is easy but safety first: Only do this outside, wear gloves and goggles, and place a bucket with cold water or an extinguisher near you … a heat gun gets very hot!
You can’t do this in one step, and you’ll need to work in smaller areas, one by one. Heat up the first area with the heat gun and be careful—you only want to heat up the lacquer and not melt or burn it. If you want to intentionally add some burned spots, a heat gun is the way to go, too. Depending on the type and thickness of the lacquer as well as the power of your heat gun, it can take some time until the lacquer is ready to crack. Start to heat it up from a distance and not with the heat gun directly on the guitar, checking the temperature of the lacquer from time to time with one of your hands. Never put your hand directly under the heat gun! Take the guitar body and your hands away from the gun when you check the temperature. If you feel that it’s not hot enough, keep heating it up until it’s good to go.
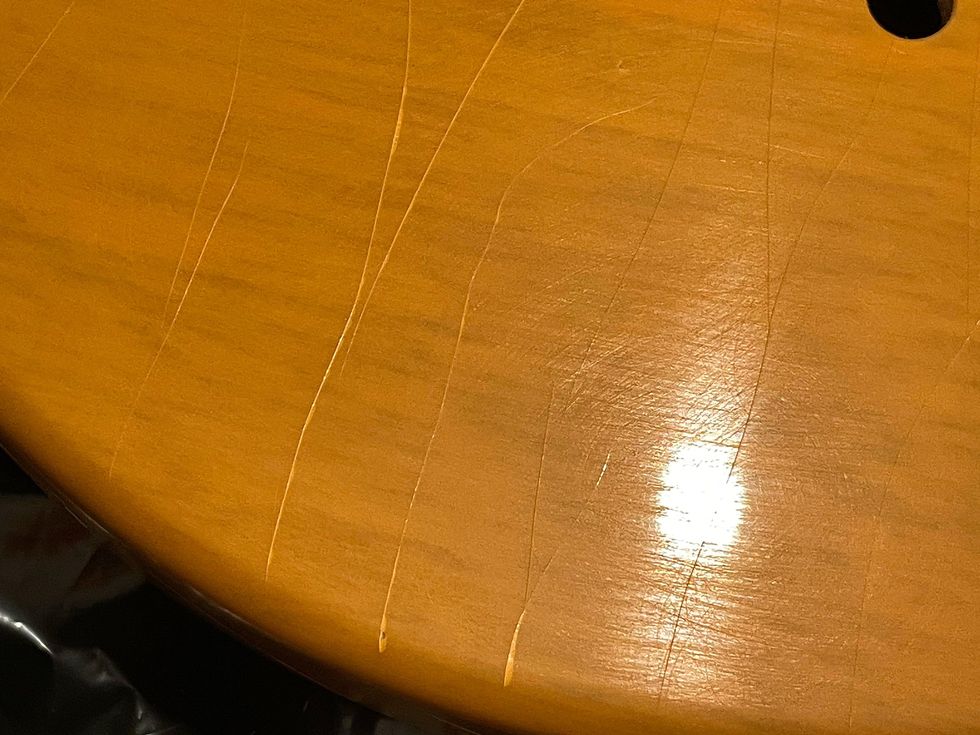
Photo 3
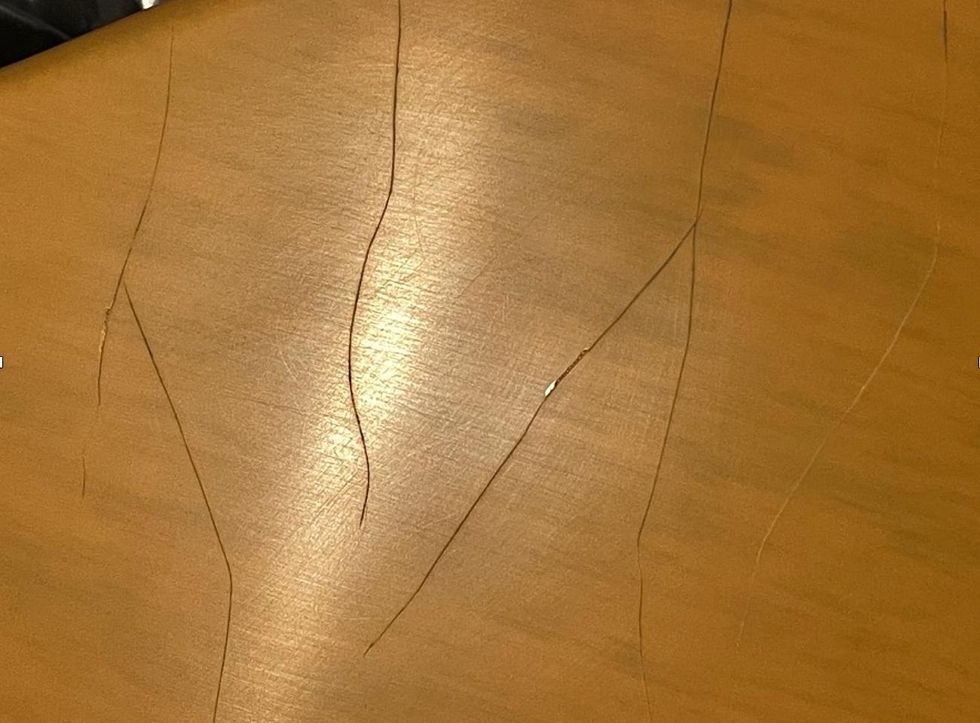
Photo 4
There are no rules set in stone because it depends on the things mentioned above. So, you have to try and see what works on your guitar. If you think the lacquer is hot enough, take away the heat gun and immediately spray the heated area with the cooling spray to create a sudden temperature gradient. You’ll likely have to repeat the process several times until the lacquer starts to crack, and usually you can hear when it cracks, which is a good sign. Work your way all over the guitar and crack it area by area. I needed approximately 90 minutes and four bottles of cooling spray until I was finished (Photo 3).
Does it look the same as cracked nitro lacquer? No, it’s not the same cracking pattern because of two reasons. On a nitro-lacquered guitar, the cracking happens because the softener disappears over time, which is a completely different thing. Poly is hard as glass and will never lose its softener. So, the vintage guitars of the future, let’s say in 100 years from now, will look much different compared to today—no more cracks. The second reason is that only in the middle of the spray is the lowest possible temperature not on the edge of the spray. But it’s the same ballpark, so don’t worry.
After you’re done with the entire guitar, let it cool down for some time before we start to make the cracks more visible. Again, there are different ways to do this. I prefer to use a strong black tea or coffee. Warm up the guitar slightly and dip some paper towels into the black tea or coffee before covering the guitar with them. Let them sit there for some hours before you remove them. The moisture will creep into the cracks, coloring them slightly, so they are more visible. This is a permanent process: The cracks will not lose their color again over time. On poly-lacquered guitars, I’ve also seen and tried alternative methods like using Coca-Cola, potassium permanganate, coffee grounds, stains, and more. The tea/coffee method works great and with good results and is, of course, harmless. But feel free to try other methods if you want to experiment, there’s no law against it.
After removing the paper towels, let it dry for some time before removing any residues from the lacquer using a dampish paper towel. Then, heat up the guitar slightly and let it cool down again. And voila, done! You can see the cracks are now brighter in Photo 4.
Congratulations, we are only one step away from finishing our aging project! Next, we’ll add some dings, dongs, and scratches, which is a lot of fun and a great way to individualize your guitar.
That’s it for now. Next month we’ll do another cool guitar mod, so stay tuned. Until then ... keep on modding!
Teatime: How to Age Wood at Home
Matthias Meyer of Bassart Guitars
Hi PG readers,
Did you ever wonder how it’s possible to add a special gray and dark color to the exposed wood on aged guitars? Here is my recommendation for how to do this with some simple household stuff you already have.
You will need: vinegar essence, water, black tea, steel wool, paper coffee filters, and some jars.
First, twitch a good handful of steel wool and put it in a jar. Next, fill up the jar with vinegar essence, close the jar, and let it sit for one or two days. The reaction of the steel wool and the vinegar will result in iron(II) acetate, which you can use as a dye. Use a cone-shaped paper coffee filter to percolate the liquid into a new jar and you hold the panacea in your hands. By adding some water, you can mitigate the dying effect and it’s easy to make some different aging dyes this way, from very dark to light gray.
Now it’s teatime. Make a strong black tea by using 6 to 8 tea bags in a pot, let it cool down, remove the tea bags, and pour the tea in a new jar.
One way of aging the exposed wood is to use the tea first, immediately followed by the iron(II) acetate (wet on wet technique). For a different effect and color, use the tea first and let it dry before applying the iron(II) acetate. Or use both liquids individually without the other one. It all depends on your personal taste and, of course, the wood itself. Before applying these liquids directly to your precious instruments, you should try to practice the process on some wood scraps you have lying around. Different woods react in very different ways and often the aging process needs one or two days before it becomes visible.
I hope you enjoy experimenting with this process. Cheers!
—Matthias “Matti” Meyer
www.bassartguitars.de
Pure nickel wound strings designed to capture classic tones. Available in popular gauges (9s and 10s), these strings are intended to offer rich, warm tones and longer string life.
The Seymour Duncan Antiquity series of pickups have always given musicians access to the true vintage tones of the most famous guitars ever produced. To further our commitment to capturing these influential sounds, Seymour Duncan is now pleased to offer the perfectly voiced companion, a set of Antiquity Vintage Modern Strings.
Before nickel-alloy plated strings became commonplace, pure nickel wound strings were found on most electric guitars. Their rich, warm tone became a crucial ingredient to the sounds of classic blues and rock & roll. An added benefit of a pure nickel wrap is a longer string life and a more consistent tone between string changes. Now our Antiquity Vintage Modern Strings bring you even closer to the sound of electric guitar’s early heyday. Pure nickel wound and available in your favorite modern gauges (9s and 10s), Antiquity Vintage Modern Strings are the perfect start to your signal chain in the quest to unlock your favorite classic guitar sounds.
For more information, please visit seymourduncan.com.
Over three-and-a-half years after Randall Smith sold Mesa/Boogie to Gibson, Smith has completed his time with Gibson as the brand’s master designer and pioneer. Through his ground-breaking work at Mesa/Boogie, Smith was responsible for innovative modifications that gave small amplifiers more input gain, making them much louder, as well as creating an all-new high-gain distorted guitar tones.
Mesa/Boogie began as a small amplifier repair shop and was founded 55 years ago in 1969, in Mill Valley, CA by Smith who simultaneously respected and improved the vintage classics with his inventions. Smith’s ear for tone, passion for tube technology, and vision for building handcrafted high-performance amplifiers continues to redefine how we experience sound. Beginning at Prune Music in Northern California, Smith reconfigured amplifiers for more sound and power for all the great San Francisco area bands over 50 years ago when vintage gear was new. Being close to so many great guitar players, from Bloomfield to Santana and The Rolling Stones, Smith learned the virtues and shortcomings of the era’s gear and began a process of innovation, excellence, and invention that continues at the Mesa/Boogie craftory in Petaluma, CA today. Mesa/Boogie was the first boutique amplifier builder and revolutionized amplifier performance in ways that impact rock music worldwide.
Throughout the ‘80s and ‘90s a score of additional innovative and patented improvements saw Mesa Engineering emerge as the leader in tube amplifier technology. Today, Mesa/Boogie amplifiers and cabinets are renowned worldwide and unparalleled in performance and quality, every product is still hand-built, and our artisans are tenured with an average of 15 years at their post, many for much longer. We still hold true to the simple but increasingly rare principles Smith used to catapult Mesa/Boogie onto the world stage, hand-building the very best amps and cabinets and treating each customer as we wish to be treated.
Smith has positioned his legacy to be carried forward through the Mesa/Boogie team's continued commitment to quality and tone, and for the last two decades has been training the next generation of Mesa/Boogie designers.
Smith has been instrumental in growing the Mesa/Boogie portfolio with exciting new product offerings and overseeing the launch of the popular new Gibson Falcon amplifiers.
“I am incredibly grateful for Smith’s pioneering insights, design, and trust in Gibson,” says Cesar Gueikian, CEO of Gibson. “Randy’s DNA will always be present, and over the last few decades he has trained the new generation of designers that have been leading the way for Gibson and MESA/Boogie amps. As we evolve our Gibson Amps collection, including our Gibson and MESA/Boogie brands, Randy, and his original design ideas, will continue to inspire us to make the best and highest quality amplifiers we’ve ever made.”
“We’ve all talked about this day and have prepared for it in many ways over the years, but Randall Smith is a ‘force of nature’, and you can’t imagine it coming to fruition,” adds Doug West, Director of R&D at Mesa/Boogie. “Now, I reflect on the fact that few in this world ever get the chance to be mentored, coached to excellence and to perform at their consistent personal best in the ways our design team, and everyone here at Mesa/Boogie, have under his tutelage. Randy leaves us in good stead to carry on his legacy and tradition of excellence. With our respect for him and our shared love for what Gibson and Mesa/Boogie represent to music, Randy can bask in the contentment of knowing he has spread Tone and Joy the world over with his creations and that his contributions to music have made an indelible mark on generations, and the sound of electric guitar and bass over the last 55 years.”
For more information, please visit mesaboogie.com.
Our columnist traces the history of the 6-string Cuban tres—from Africa, to Cuba, to the top of American country music.
I love that I was taught by my father and grandfather to build a variety of string instruments. I have continued to do this—I have built so many different types, and I learn from each one. I am currently building a nanga, a rectangular, harp-like African instrument played by the Ganda people of Uganda.
As I have been building this instrument and learning from the musician who commissioned it, I am often reminded of the influence Africa has on so many instruments, from drums to the banjo, or akonting as it was originally named. A popular instrument that I have recently been getting more requests for that is equally influenced by Africa’s music is the tres cubano, or Cuban tres.
In comparison to other chordophones—instruments whose sounds come from the vibration of stretched strings—from around the world, this instrument is relatively young, appearing first towards the end of the 1800s. The original tres is said to have three courses with a total of six strings, and while the 9-string version is now more associated to the Puerto Rican tres, a 9-string iteration of the Cuban tres is documented as early as 1913, though it’s believed that the Puerto Rican instrument influenced the additional strings.
Most early models of the tres have a similar body to a classical guitar or the requinto romántico, but the more common shape now is a smaller, pear-shaped body offered either with or without a cutaway. The tres has only begun to get more visibility in the past 25 years, so sizing can vary greatly from luthier to luthier, but to help players who are unfamiliar with this instrument to get a better idea of the size, here are some specs from a Delgado model.
“The note placements of the tres in a changüí summon something deep inside any musician who is stirred by tempo and a hypnotic rhythm.”
One of the models I make has a body depth of 4″. The upper bout is 9″ and the lower bout is 14 1/2″ with a scale length of 545 mm, or 21 1/2″. The tuning also depends upon the player, but the traditional tuning is G–G–C–C–E–E. The outer string pairs—the Gs and Es—are each tuned an octave apart. Their gauges, from top to bottom, are .031–.011–.014–.014–.012–.023.
Again, you will see a range of string placements, gauges, and differences in tuning, but this is the foundation to help give you a basic understanding.
Now to describe the sound and style of the tres—I am literally moving to the rhythms I hear in my mind as I write this. While my heritage is Mexican, I feel so in touch with so many genres of music from around the world, and the music from Cuba is one of them. I like to describe this instrument as a percussive string instrument, because the note placements of the tres in a changüí—the Cuban music form that gave way to the Son Cubano, or “Cuban Sound”—with its strong African-infused beats, summon something deep inside any musician who is stirred by tempo and a hypnotic rhythm.
Like how Linda Ronstadt was key in helping bring audiences to appreciate and invest in mariachi music with the release of Canciones de mi Padre, I would argue that Ry Cooder did the same for Cuban music when, after traveling to Cuba, he helped introduce the world to Cuban artists as old as 89 on the 1997 album, Buena Vista Social Club, the creation of which was captured in the 1999 documentary of the same name.
Since the release of this album, we have seen the tres grow in popularity and availability. Many artists and bands have fused the tres into their music, using it in untraditional styles, but the sound is still recognizable. We have even built custom electric tres cubanos for clients! Pancho Amat, an ambassador for the tres and arguably one of the greatest living musicians to play the instrument, blends his classical and jazz backgrounds with the tres’ natural sounds to create a unique sound. Thinking in terms of a drum pattern and African roots, you will have a better grip on the method when trying this instrument for the first time.
Now, do yourself a favor. Find an evening to relax, mix yourself a beverage—preferably a mojito—and rent the Buena Vista Social Club … then give me a call for your Delgado tres cubano.
Through The Official Fender Certified Pre-Owned Reverb Shop, musicians can buy pre-owned Fender instruments that have been professionally inspected and come with a Fender one-year limited warranty at a significant discount to new gear prices.
“We’re excited to offer for the first time ever Fender Certified Pre-Owned guitars directly on Reverb. Pre-owned guitars have long been popular among players, particularly new players and collectors. Fender Certified Pre-Owned gives players of all levels the opportunity to own a quality instrument at an affordable price,” said Fender CEO Andy Mooney. “Fender Certified Pre-Owned guitars represent not only a fantastic value—allowing players to purchase an instrument that is professionally inspected, backed by Fender, and sold at a discount—but an opportunity to support a more sustainable guitar industry, giving the instruments a second, third, or fourth life and participating in the circular economy.”
Used music gear continues to grow in popularity among price-conscious musicians, with sales for used guitars on Reverb growing by more than 50% between 2019 and 2023. Certified pre-owned instruments offer the affordability of used music gear, plus the added benefit of warranties and easy returns. While certified pre-owned programs are common in industries like automotive and tech, Fender Certified Pre-Owned on Reverb is the first program of this magnitude within the musical instrument industry, launched by the world’s leading guitar manufacturer and the largest online marketplace dedicated to music gear.
“Over the years, many of my very best creative tools were bought from other musicians and the secondary market. In fact, The Hitmaker was from a pawn shop in 1973. These guitars come with stories and history that just make them special,” said Nile Rodgers. “The fact that you can now buy pre-owned guitars from Fender means that you get the character and the affordability of pre-owned gear, plus Fender’s seal of approval.“
The Official Fender Certified Pre-Owned Reverb Shop will feature unique pre-owned electric, acoustic, and bass guitars, with new instruments added weekly. All guitars will come with a Fender-backed one year limited warranty and have been professionally inspected and, as needed, refurbished by Fender’s sustainability partner MIRC. Since 1993, MIRC has kept thousands of guitars from going to landfills as the nation’s largest wholesaler of quality used guitars.
“We’re thrilled for the opportunity to partner with Fender to offer musicians not only affordable guitars, but affordable guitars that have been meticulously inspected and, as needed, repaired to look and sound incredible,” said Reverb CEO David Mandelbrot. “It’s more important than ever that the music-making community has access to affordable musical instruments and Fender Certified Pre-Owned on Reverb will help many players get their hands on great-sounding guitars that fit within their budget.”
The Official Fender Certified Pre-Owned Reverb Shop is now open. Save the shop to your Favorites to be notified as new guitars are added.
For more information, please visit reverb.com.