When it comes to cosmic tone, it’s critical to have functional potentiometers. Here’s how to install them correctly and keep them ship-shape afterward.
(Originally published March 27, 2020)
Over the last few years, we've discussed the construction of potentiometers and diagnosed several potential problems with these essential, yet sometimes pesky, electric guitar components. (If you missed these, check out “The Trouble with Tribbles" and “Dealing with Knobs and Pots.")
Let's now consider problems that can occur when replacing pots, and then discuss ways to either avoid or solve these potential issues. Over the years I've analyzed virtual cries for help from hundreds of customers, and as a result I can safely say that non-working pots fall into one of two categories that account for essentially 100 percent of the problems: (1) mechanical damage while installing the pots, or (2) soldering damage when wiring them up. It's very, very rare that a pot comes DOA from the factory. Reputable manufactures have quality control systems to prevent this, so it's almost guaranteed that a problem with a potentiometer has to do with the end user. So let's take a look at these two scenarios.
Mechanical damage.
In this case, the most common damage is caused by overtightening the nuts, especially when installing pots into a guitar with a stiff wooden top like a Les Paul.When installing pots, forget the adage "the more, the merrier." Instead, keep this in mind: The next level beyond "tight" and "super-tight" is "broken." Guitar pots don't have to handle a lot of weight or withstand a nuclear strike, so they should only be screwed down tight enough to remain immobile when you rotate the knobs.
First and foremost, it's essential that you install the pots correctly. This might sound obvious or trivial, but you can't imagine how many guitars I've seen where pots have been installed in, shall we say, unusually creative ways.
Here's how to do it right: The first step is to slip the lock washer onto the pot shaft and then insert the shaft through the hole in your guitar's pickguard or top. With the shaft protruding through the other side, now put the flash washer on the shaft, followed by the hex nut, which you can initially thread with your fingers. Finally, use a socket wrench, small adjustable wrench, or an ESP Multi Spanner to carefully tighten the hex nut until it's snug against the washer and doesn't turn anymore.
If you discover that the pot sits too high on your pickguard or guitar top, you'll need to remove the pot and start over by first threading another hex nut on the shaft, followed by the lock washer, and then repeating the installation process. This "underside" hex nut will let you adjust the height of the pot to your individual wishes. Simply insert the shaft through the pickguard or top, eyeball the height, and adjust the hidden hex nut up or down on the pot threads as needed. Finally, add the flash washer and exterior hex nut to complete the process. The key here is to always remember the correct order of these parts.
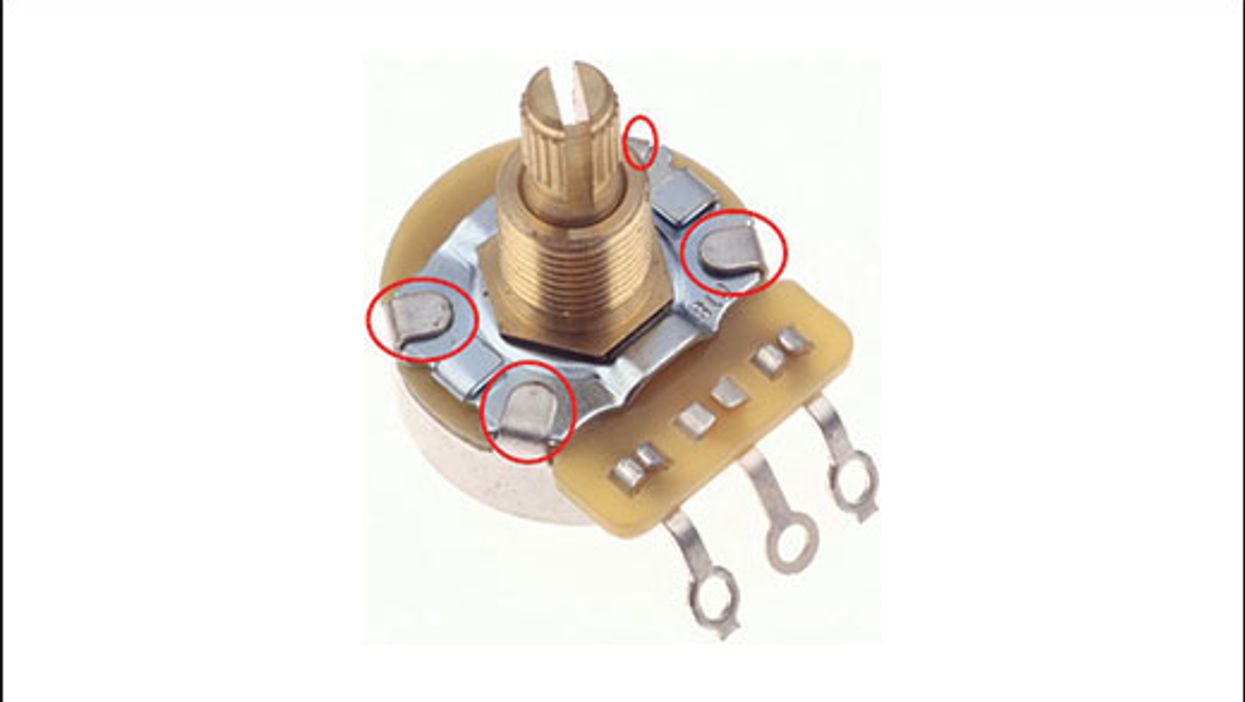
So what happens to a pot when you overtighten it? If the four tiny tabs that hold the little metal plate to the shaft, wiper, etc., are unable to withstand the force applied to the shaft when you torque down the hex nut, they'll bend and let the plate and the shaft rotate freely. Hmm, no good.
But don't worry, it's an easy fix: Use needle-nose pliers or a small flathead screwdriver to gently pull the tabs up a little more so you can rotate the plate and return it to its centered position. Then bend the tabs back into place so they hold the shaft securely (Photo 1). Done!
It's almost guaranteed that a problem with a potentiometer has to do with the end user.
Other mechanical damage is typically caused by trying to remove or install knobs that aren't made for a given pot's shaft. When you try to hammer down a non-fitting knob, you can easily break the shaft by forcing it through the knob bushing. (In most cases, this happens when trying to force a metric knob, measured in millimeters, onto a U.S. pot shaft, measured in fractions of an inch.)
If you try to remove a jammed knob that someone managed to "fit" using brute force—or even attach with superglue—chances are good you'll break the wiper inside the pot and pull out the entire shaft along with the knob.
Yet this is easy to avoid: Never try to force a knob onto the pot shaft; instead use one that fits. If you need to remove an improperly fitted knob, use a heat gun to soften the plastic or a saw to split it open. Don't use any upward or downward pressure—that will ruin the pot, for sure.
Soldering damage.
The easiest way to damage a pot is to overheat it, especially when attaching a ground wire to the back casing. It's a common mistake. When it comes to how long your soldering iron should be in contact with the pot, the golden rule is "as short as possible, but as long as necessary." It takes time to develop this skill, so you'll need to practice. Also, to avoid disaster it's crucial to have the right tools. Here are some helpful guidelines for soldering onto pots.
1. If you don't have a soldering station with an adjustable temperature control, you need at least two different handheld soldering irons: one rated at around 30 watts and the other around 60 watts. This is exactly what I use for any soldering job outside the shop. The 30-watt iron is for soldering on the pot terminals, pickup selector switch terminals, output jack terminals—those common tasks. The 30-watt iron is our daily go-to tool for all things guitar at the shop.
The 60-watt iron is for soldering to pot casings and Stratocaster tremolo claws. Don't try to solder to a pot's case with a 30-watt iron—the solder will need a very long time to flow and you'll expose the pot to a lot of heat. With a 60-watt iron, the solder will flow instantly and soldering time will be very short. This yields strong solder joints.
2. If you want to be on the safe side, remove the case from the pot before you solder to it. That's what I do when I want to avoid damaging vintage pots. To remove the case, gently bend the four metal tabs away from you. To reinstall the case, simply bend the tabs back into place. Take your time and go easy.
3. Always rub the metal casing with 180-grit sandpaper before soldering to it. Manufacturers use all kinds of greasy coatings to protect the case against oxidation, which can make a soldering job close to impossible. So sand the case until it's clean and shiny, and then clean it with naphtha. This will provide the perfect base for a good soldering joint. But don't do this to vintage pots! For those, it's paramount to preserve the patina that comes with age.
4. If you decide not to remove the pot's case, strive to avoid any unnecessary heat. Here are some helpful tips:
- Always turn the pot down to 0 before soldering to its case.
- Use a heat sink on the case. For this job, you'll need something bigger than just a standard clip. To enhance its effect, you can chill the heat sink in the fridge ahead of time.
- If you need to connect one of the terminals to ground, as on most volume pots, don't try to solder the terminal directly to the case by bending it back. This may look cool and vintage, but you'll need a lot of heat and good soldering technique to pull this off. Simply use a piece of solid-core wire and solder it to the terminal and from there to the case—this yields the same performance.
- After tinning the case, let it completely cool down before you solder the wire to it.
5. Don't apply excessive solder to a terminal—it will flow down the terminal's leg and find its way inside the pot.
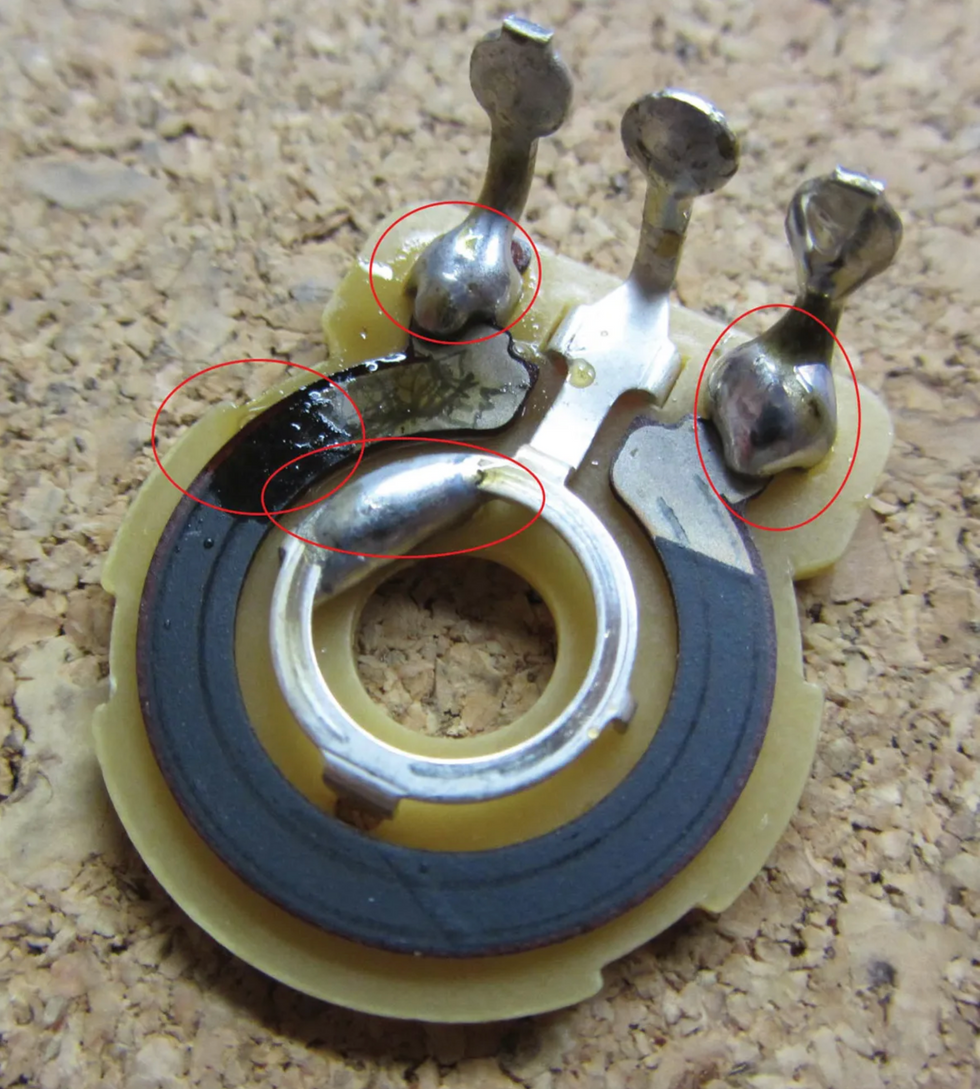
Photo 2 — Photo courtesy singlecoil.com
Photo 2 shows a pot from my "Hall of Shame" collection. Look at the two red marks at the end of the two terminals. These solder blobs are what happen when you apply way too much solder. There's also a big solder blob on the middle terminal's inner ring. How someone managed to get the solder inside there will forever remain a mystery. On the upper left, notice how the carbon is melted and buckled from too much heat. This poor little thing had to endure cruel treatment ... may it rest in peace!
Remember, if you don't solder regularly, there's no shame in having a professional guitar tech do the work for you—especially when you have a vintage guitar and need to work on its original pots. Retaining your guitar's value is an excellent investment. Soldering on pots isn't rocket science, but it requires the right tools, experience, and a steady hand.
Maintaining pots.
These are mechanical devices with a limited lifespan, and it's inevitable they'll start to wear out over time. Yes, it's possible to clean, repair, and renew the carbon inside, but this only makes sense for a vintage pot, not a modern one. Instead of trying to repair the latter, it's more cost-effective to simply replace it.
Typical pots are not completely sealed; they have open areas around the terminals, so moisture and dust can creep inside. To prevent this, you can buy pots that are completely sealed or cover standard pots with an additional dust seal. Usually a guitar's electronic compartment is closed and not directly exposed to contamination, so an additional dust cover isn't necessary for our applications.
Also, there's no need to maintain your pots. At a certain point, they'll begin to wear out and make scratchy noises when you turn them. This means it's replacement time! You can delay this a bit with contact cleaner, but this treatment is only temporary. Contact cleaner is cool for some applications, such as servicing hi-fi equipment, but it can't repair worn-out pots.
My advice? Never use contact cleaner on your pots because the cleaner will attract debris, and when it evaporates you're left with hard, dry crud—something you definitely do not want inside your pot. To combat this, you'll spray more cleaner and thus begin a destructive cycle. This results in replacing the pot much earlier than necessary, exactly the opposite of what you want. We all know the road to hell is paved with good intentions. If a pot is really dusty and making scratchy noises—maybe you took your Tele to Burning Man—the best thing to do is open it up and swab everything with Q-Tips soaked in naphtha.
Finally, when it comes time to replace a pot, pay attention to the specs. Some pots are designed for 2,000 rotations while others are tested to withstand 20,000. You get what you pay for, and this isn't a place to cut corners.
All right! Next month we'll examine the Peavey Omniac JD, Jerry Donahue's signature model T-style, and I'll show you how to transfer its sophisticated wiring scheme to your own guitar. Until then ... keep on modding!
- Three Must-Try Guitar Wiring Mods - Premier Guitar ›
- Mod Garage: Three Ways to Wire a Tone Pot - Premier Guitar ›
- Mod Garage: Dealing with Knobs and Pots - Premier Guitar ›
This wonky Zim-Gar was one of many guitars sold by importer Gar-Zim Musical Instruments, operated by Larry Zimmerman and his wife.
The 1960s were strange days indeed for import guitars, like this cleaver-friendly Zim-Gar electric.
Recently I started sharing my work office with a true gem of a guy … one of the nicest fellas I’ve ever come across. If you’ve been following my column here, you might remember my other work mate Dylan, who is always telling me about new, fad-type things (like hot Honey guitars) and trying to convince me to use AI more. (What can I say, he’s a millennial.) But Steve, on the other hand, is about 10 years my senior and is a native New Yorker—Brooklyn actually, from the Canarsie neighborhood. Steve is a retired teacher and spent many years teaching in the Brownsville area of Brooklyn, and man, he has some amazing stories.
Mostly we talk about music and sports (he’s exiled here among us Philadelphia sports fans) and he’s just endlessly interesting to me. He has a huge appetite and can eat a whole pizza. When he talks, he sounds like one of the Ramones and he still has an apartment in Rockaway Beach. We both love Seinfeld and, like George Costanza, Steve knows where all the great bathrooms are across New York City. Since he’s been added to my circle (and is such a mensch), I decided I should work him into a column.
So here’s the connection: Back in the day there were many American importers, dealers, and wholesalers. A lot of them were based in New York, Chicago, and Los Angeles, but I only know of one guitar importer located in Brooklyn: Gar-Zim Musical Instruments. The company was run by Larry Zimmerman and his wife, and the couple had some success importing and selling Japanese guitars and drums. I used to see early Teisco imports with the Zim-Gar badge, which was the brand name of Gar-Zim. I’ve also seen Kawai guitars with the Zim-Gar label, but the Zimmerman’s seemed to sell cheaper and cheaper gear as the ’60s wore on, including the piece you see here.
“This build reminds me of the cutting boards I used to make in wood shop back in my high school days.”
The model name and factory origin of this guitar is a mystery to me, but this build reminds me of the cutting boards I used to make in wood shop back in my high school days. The guitar is just flat across the top and back, with absolutely no contouring or shaping. Its offset body is plywood with a thin veneer on the top and back. From a distance this guitar actually looks kind of nice, but up close you can see a rather crude and clunky instrument that offers little flexibility and playability. The non-adjustable bridge is off center, as is the tremolo. It was really hard to get this guitar playing well, but in the end it was worth it, because the pickups were the saving grace. Another example of gold-foils, these units sound strong and raw. The electronics consist of an on/off switch for each pickup and a volume and tone knob. The tuners are okay, and the headstock design is reminiscent of the Kay “dragon snout” shape of the mid to late ’60s, which is where I would place the birthdate of this one, probably circa 1966. Everything is just so goofy about this build—even the upper strap button is located on the back of the neck. It reminds me of that era when simple wood factories that were making furniture were tasked with building electric guitars, and they simply didn’t know what they were doing. So, you get oddities like this one.
Gar-Zim continued to sell guitars and other musical instruments through the 1970s and possibly into the ’80s. I once even saw a guitar with the label Lim-Gar, which is totally puzzling. I think there should’ve been a Stee-Gar designation for my new buddy Steve-o! Yes, good readers, with guitars and me, there are always just a few degrees of separation.
See and hear Taylor’s Legacy Collection guitars played by his successor, Andy Powers.
Last year, Taylor Guitars capped its 50th Anniversary by introducing a new guitar collection celebrating the contributions of co-founders Bob Taylor and Kurt Listug to the guitar world. The Legacy Collection revives five of Bob Taylor’s classic acoustic models, curated by the legendary luthier and innovator himself. “To imagine that we’re doing guitars that harken to our past, our present and our future all at the same time,” Bob says, “I really like that.”
In developing the collection, Bob preserved the essence of his originals while integrating performance and playability upgrades introduced during his tenure as designer-in-chief. “It’s an up-to-date version of what those guitars would be,” Bob explains, “but with the same sound.”
Visually, these guitars feel classic—clean, understated and unmistakably Taylor. While Bob’s original aesthetic preferences are showcased in his Legacy models, the nod to the past runs deeper than trade dress.
From his earliest builds, Bob favored slim-profile necks because he found them easier to play. That preference set a design precedent that established Taylor’s reputation for smooth-playing, comfortable necks. Legacy models feature slim mahogany necks built with Taylor's patented New Technology (NT) design. “My first neck was a bolted-on neck but not an NT neck,” Bob says. “These are NT necks because it’s a better neck.” Introduced in 1999, the NT neck allowed for unprecedented micro-adjustability while offering a consistent, hand-friendly Taylor playing experience.
What makes this collection unique within the Taylor line is Bob’s use of his X-bracing architecture, favoring his time-tested internal voicing framework over more recent Taylor bracing innovations to evoke a distinctive tone profile. Since Andy Powers—Taylor’s current Chief Guitar Designer, President and CEO—debuted his patented V-Class bracing in 2018, V-Class has become a staple in Taylor’s premium-performance guitars. Still, Bob’s X-bracing pattern produces a richly textured sound with pleasing volume, balance and clarity that long defined the Taylor voice. All Legacy models feature LR Baggs VTC Element electronics, which Bob says “harkens back to those days.”
The team at Taylor thought the best way to demonstrate the sound of the Legacy guitars was to ask Andy Powers, Bob’s successor, to play them. A world-class luthier and musician, Andy has spent the past 14 years leading Taylor’s guitar innovation. In addition to V-Class bracing, his contributions include the Grand Pacific body style, the ultra-refined Builder’s Edition Collection, and most recently, the stunning Gold Label Collection.
Below you’ll find a series of videos that feature Powers playing each Legacy model along with information about the guitars.
Legacy 800 Series Models
First launched in 1975, the 800 Series was Taylor’s first official guitar series. Today, it remains home to some of the brand’s most acclaimed instruments, including the flagship 814ce, Builder’s Edition 814ce and new Gold Label 814e.
The Legacy 800 Series features the 810e Dreadnought and two Jumbos: the 6-string 815e and 12-string 855e. Each model serves up a refined version of the Dreadnought and Jumbo body shapes Bob inherited from Sam Radding—the original owner of the American Dream music shop where Bob and Kurt first met. “I was making my guitars in the molds that Sam had made at American Dream,” Bob recalls. “There was a Jumbo and a Dreadnought. That’s all we had.”
All three Legacy 800 Series guitars feature one of Bob’s favorite tonewood combos. Solid Indian rosewood back and sides are paired with a Sitka spruce top, yielding warm lows, clear trebles and a scooped midrange.
Aesthetic appointments include a three-ring abalone rosette, mother-of-pearl Large Diamond inlays, white binding around the body and fretboard, and Bob’s “straight-ear” peghead design. Both Jumbo models also showcase a mustache-style ebony bridge—a nod to Bob’s early Jumbo builds.
Legacy 810e
The 810 Dreadnought holds a special place in Bob Taylor’s heart. “My first 810, the one I made for myself, was a thrilling guitar for me to make,” he says. “It’s the one and only guitar I played. It didn’t matter how many guitars we made at Taylor, that’s the one I took out and played.” The Legacy 810e brings back that bold, room-filling Dreadnought voice along with the easy playability expected from a Taylor.
Taylor Guitars | Legacy 810e | Playthrough Demo
Legacy 855e
Taylor’s first 12-strings found an audience in 1970s Los Angeles. “I was making guitars that would find their way to McCabe’s in Santa Monica and Westwood Music,” Bob says, “and these guitars were easy to play. Twelve-strings were a popular sound in that music. It was a modern country/folk/rock music genre that was accepting our guitars because they were easy to play. They also liked the sound of them because our guitars were easier to record.” The Legacy 855e, with its resonant Jumbo body, slim neck and gorgeous octave sparkle, carries that tradition forward.
Taylor Guitars | Legacy 855e | Playthrough Demo
Legacy 815e
The Legacy 815e revives Taylor’s original Jumbo 6-string, delivering a big, lush sound with beautifully blooming overtones.
Legacy Grand Auditoriums
In the early 1990s, Bob Taylor heard a consistent refrain from dealers: “Not everybody wants a dreadnought guitar anymore.” Players were asking for something with comparable volume but different proportions—something more comfortable, yet still powerful. This feedback inspired Bob to design a new body style with more elegant curves, more accommodating proportions and a balanced tonal response. The result was the Grand Auditorium, which Taylor introduced in 1994 to celebrate its 20th anniversary.
Thanks to its musical versatility and easy playability, Bob’s Grand Auditorium attracted a wide variety of players. “We came into our own with our Grand Auditorium,” he says. “People were describing it as ‘all around.’ It’s a good strummer and good for fingerstyle, but it’s not totally geared toward strumming or totally geared toward fingerstyle.” Also referred to as the “Swiss-Army Knife” of guitars or the “Goldilocks” guitar, the GA quickly became a favorite among guitarists across playing styles, musical genres and different playing applications including recording and live performance. “That guitar made studio work successful,” Bob says. It gained a wider fanbase with the debut of the “ce” version, which introduced a Venetian cutaway and onboard electronics. “That became one of our hallmarks,” says Bob. “If you want to plug in your guitar, buy a Taylor.”
Today, the Grand Auditorium is Taylor’s best-selling body shape.
The Legacy Collection features two cedar-top Grand Auditoriums inspired by past favorites: the mahogany/cedar 514ce and rosewood/cedar 714ce. Both models incorporate Bob’s original X-bracing pattern for a tonal character reminiscent of their 1990s and 2000s counterparts. Shared aesthetic details include a green abalone three-ring rosette, ebony bridge pins with green abalone dots, a faux-tortoiseshell pickguard and Taylor gold tuning machines.
Taylor Guitars | Legacy 815e | Playthrough Demo
Legacy 514ce
The Legacy 514ce features solid mahogany back and sides paired with a Western Red cedar top, yielding a punchy midrange and dry, woody sonic personality that pairs beautifully with cedar’s soft-touch sensitivity and warmth. It’s a standout choice for fingerstyle players and light strummers who crave nuance and depth. Distinct visual details include faux-tortoise body and fretboard binding, black-and-white top trim, and mother-of-pearl small diamond fretboard inlays.
Taylor Guitars | Legacy 514ce | Playthrough Demo
Legacy 714ce
The Legacy 714ce also features a cedar top, this time matched with solid Indian rosewood back and sides. The result is a richly textured sound with deep lows, clear trebles and a warm, mellow response. Inspiring as it is, this specific wood pairing isn’t currently offered in any other standard Taylor model. Additional aesthetic details include green abalone dot fretboard inlays, black body and fretboard binding, and black-and-white “pinstripe” body purfling.
While the Legacy Collection spotlights Taylor’s past, newer models from the Gold Label, Builder’s Edition and Somos Collections show the company’s legacy is always evolving. Explore the Legacy Collection at taylorguitars.com or visit your local authorized Taylor dealer.
Taylor Guitars | Legacy 714ce | Playthrough Demo
The Oceans Abyss expands on Electro-Harmonix’s highly acclaimed reverb technology to deliver a truly immersive effects workstation. The pedal is centered around dual reverb engines that are independently programmable with full-stereo algorithms including Hall, Spring, Shimmer and more. Place these reverbs into a customizable signal path with additional FX blocks like Delay, Chorus, Tremolo, or Bit Crusher for a completely unique soundscape building experience.
Electro-Harmonix has paved the way for powerful, accessible reverbs since the release of the original Holy Grail and now we’ve pushed the envelope deeper with the fully-equipped Oceans Abyss. Featuring a customizable signal path with up to 8 effects blocks, the Oceans Abyss can be configured as individual reverb, modulation, EQ, delay, bit crusher, saturation or volume effects, or as countless combinations for incredibly creative effect shaping. From a simple Spring reverb to a lush stereo field featuring stereo hall and shimmer reverbs, chorus, delay, overdrive, and tremolo, you can go from surf to shoegaze instantly, without breaking a sweat.
Deep parameter editing is accessible via the high-visibility OLED display with multiple graphical views and easy-to-read designs. Expression/CV control over nearly every parameter gives artful control of your effects and dynamics. Fully-stereo I/O plus an FX Loop allows for use with any instrument, recording set up, or live rig. 128 programmable presets via onboard footswitching or MIDI ensure perfect recall in all performance situations. MIDI IN/OUT ports with MIDI IN support of PC, CC, and Tempo Clock expand the already immense talents of the Oceans Abyss. Connect with UBS-C to Windows or Mac for effects editing, preset management, and more with the free EHXport™ app (coming soon).
- Two Stereo Reverbs available at once, each fully pannable in the stereo field
- 10 reverb types to choose from: Room, Hall, Spring, Plate, Reverse, Dynamic, Auto-Infinite, Shimmer, Polyphonic, Resonant
- Additional FX blocks: Delay (Digital, Analog and Tape emulations), Tremolo, Chorus, Flanger, Phaser, Graphic EQ, Saturation, Bit Crusher, External FX Loop, Volume
- Create custom signal path routing with up to 8 effects blocks. Two blocks may be re-verb, the rest may be any of the additional FX blocks.
- Infinite reverb sustain with the press of a footswitch
- Stereo Audio I/O
- Stereo FX Loop routing on TRS Jacks
- Dual action footswitches allow for momentary or latching use
- Easily enable or disable tails
- 128 fully customizable presets
- All controls can be saved to presets
- Dive deep into global and preset settings to set up Oceans Abyss for your specific needs
- Illuminated slide pots and buttons
- High-visibility OLED graphical display
- Multiple graphical views: Signal Path, Performance, Settings, Physical, Explorer
- Easy-to-navigate menu system
- Ergonomic NavCoder knob allows rotary and directional navigation through menus
- EXPRESSION / CV input to control nearly any parameter in any FX block
- Footswitch input allows for adding up to three external footswitches, each assigna-ble to a number of functions
- MIDI In and Out. MIDI IN supports PC, CC (over nearly every available parameter), and Tempo Clock
- USB-C port to connect to Windows or Mac and interface with EHXport™ app (coming soon)
- 96kHz / 24-bit sample rate conversion
- Supplied with 9.6VDC / 500mA power supply
Our columnist’s silver-panel Fender Bandmaster.
How this longstanding, classic tube amp design evolved from its introduction in 1953.
I have a silver-panel Bandmaster Reverb that I don’t think I’ve talked about enough in this column. It’s one of the most versatile and flexible amps I own, so I use it for everything. It’s portable, has tube-driven reverb and tremolo, and has a full set of EQ knobs including the critical bright switch, which we discussed the importance of earlier this year (“How to ‘Trebleshoot’ a Vintage Fender Amp,” March 2025). The amp is not only pedal-friendly; the flexible 4-ohm output impedance will handle almost all speaker configurations and sound any way you’d like. Let’s take a deeper look at the Fender Bandmaster amp and walk through its development through the years.
The first Bandmaster was introduced in 1953 as a wide-panel tweed amp with Fender’s 5C7 circuit. This rare combo was loaded with a single 15" Jensen P15N and powered by dual 6L6GC tubes in push-pull configuration to produce a modest 25 watts. The 6L6GCs were cathode biased and along with the 5U4GB rectifier tube contributed to a forgiving sag, early breakup, and a midrange-y voice.
Fender made several changes when they launched that amp’s successor in 1955, the more widely known 5E7 narrow-panel Bandmaster, a well-proven amp that has come back as a reissue model. It was still a dual-channel amp—instrument and microphone—but the newer 5E7 model had a fixed bias and a negative feedback loop, providing a louder, firmer, and cleaner tone. Most importantly, the single 15" speaker was replaced by three 10" speakers, making it very similar to the narrow-panel tweed Bassman, the granddaddy of all Marshall amps. This Bandmaster had three speakers instead of the Bassman’s four, and it delivered 25–30 watts instead of 40. It offered early breakup with a midrange-y, big and full tone.
For those not acquainted with tweed amps, the volume and EQ knobs behave differently than on silver- and black-panel Fender amps. The volume pot can act like a distortion control, while the EQ knobs control the volume, and many players I’ve talked to have not really unlocked this secret. This works because, in these circuits, the volume pot sits right before the preamp tube, which allows it to push the tube into full distortion. Since the EQ pots are located right after and are capable of reducing the volume, you’re able to distort the preamp at low volume settings.
“Things became more standardized in 1964 with the arrival of the black-panel AB763 Bandmaster, an amp I have worked on a lot and appreciate for its robustness, simplicity, and versatility.”
In 1960, a short-lived and rare Bandmaster dressed in brown tolex and a black faceplate appeared with the 5G7 circuit. From here on, all Bandmasters had the modern top-mounted chassis. With this circuit, the Bandmaster started to both look and sound more like a black-panel amp. It kept the 3x10" speakers but got a diode rectifier and bigger transformers resulting in a 45-watt output. Tremolo was introduced for the first time, and both channels were now intended for guitar.
The following year, a blonde 6G7 Bandmaster followed as a smaller amp head paired with a 1x12 extension cabinet. It had the timeless early blonde looks with cream tolex, brown faceplate, oxblood grill cloth, large Fender logo, and white knobs. But halfway into the blonde era, towards 1964, things turned strange and rather confusing. There were suddenly two 12" speakers, black knobs, a wheat-colored grill cloth, a more slim black-panel-style Fender logo, a black faceplate, and all in various combinations close to the transition into ’64.
Things became more standardized in 1964 with the arrival of the black-panel AB763 Bandmaster, an amp I have worked on a lot and appreciate for its robustness, simplicity, and versatility. It offers a pure, clean, scooped black-panel tone that’s somewhere between a Vibrolux Reverb and Pro Reverb, which share the medium-sized 125A6A output transformer and dual 6L6GC tubes. With its medium/high power and flexible 4-ohm output impedance, it can drive all kinds of speaker cabinets—as long as you stay between 2 and 8 ohms, you are safe.
For a short time in 1967–68, there was a transitional Bandmaster with aluminum trim and black-panel innards before the all-new silver-panel Bandmaster Reverb replaced it in 1968. The small-head cabinet had grown in size and, unfortunately, weight to accommodate the reverb tank. The amp got a 5U4GB rectifier tube along with a few general silver-panel changes to the circuit. Several silver-panel models existed with minor differences until a 70-watt beast version came along in 1977 with master volume.
To my own 1968 Bandmaster Reverb, I have done a few adjustments. First, I made a custom baffle to hold two 8" speakers. I installed a pair of WGS G8C speakers that fit perfectly on the baffle board without colliding with the reverb tank or transformers. Sometimes, I use only one of the 8" speakers for bedroom volume levels. Second, I reversed the bias circuitry to standard AB763 specs, making it easier to adjust bias correctly on both power tubes. If you are into sparkling clean and funky Strat sounds, you would love this little 2x8" combo.