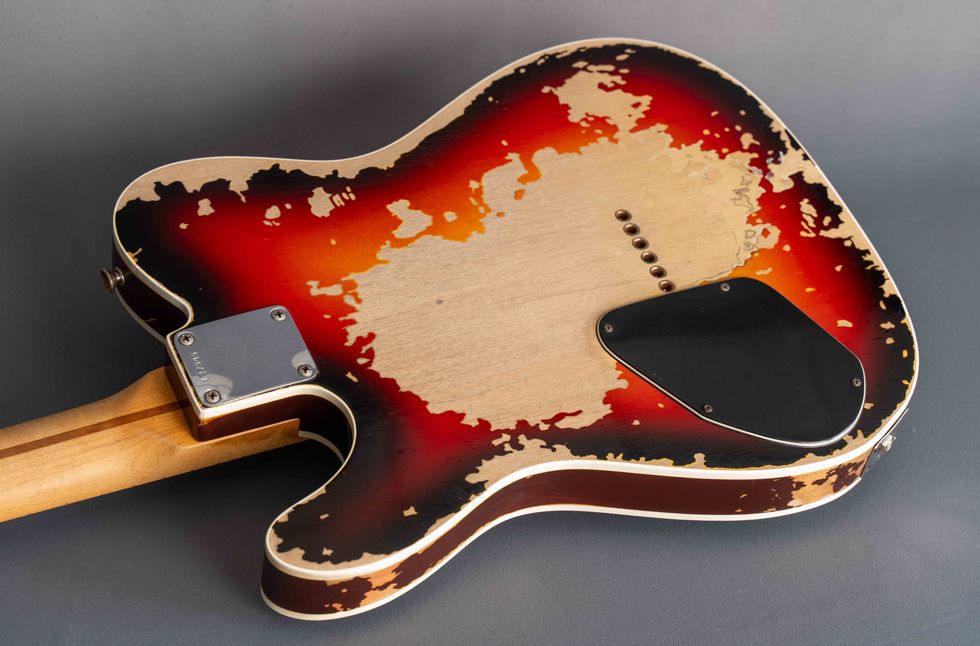
Unravel the mysteries of series, parallel, and coil-splitting wiring schemes.
This month we're going to explore four ways to configure any humbucker that has 4-conductor wiring. (Note: These wiring schemes are not intended for an old-school humbucker with 2-conductor wiring, but rather the modern humbucker that allows coil-splitting and other wiring mods.)
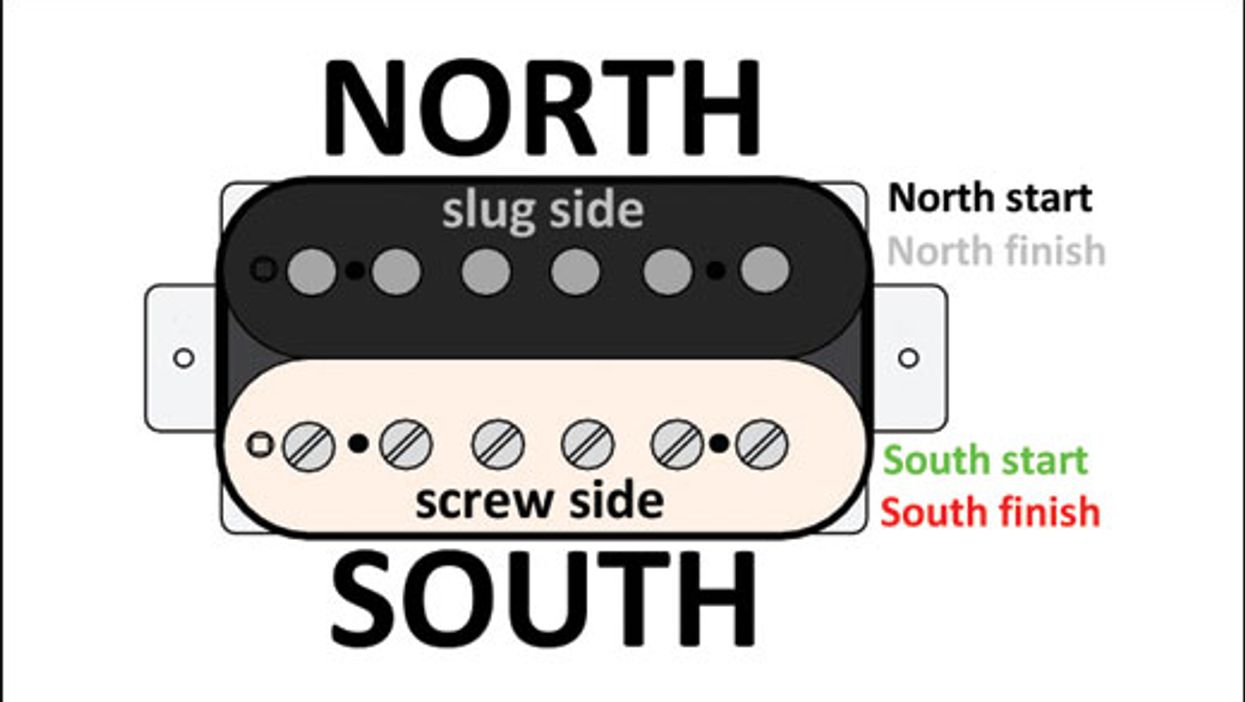
For starters, let's review our terminology. Looking at a humbucker from the front, we call the lower coil "south" and the upper coil "north." The south coil is always the "screw side," while the north coil is the "slug side." The latter is named for the type of magnetic material used on this coil. Each coil is wrapped with very fine wire, and this wire has a start and a finish. This results in a total of five wires coming from the humbucker:
- North coil start plus north coil finish.
- South coil start plus south coil finish.
- Ground.
The bare wire or braided shield always goes to ground—there's no exception—so that leaves us with four wires to play with. Having access to the start and finish of each coil wire not only makes it easy to solve potential out-of-phase issues (a subject we'll cover in another column), but it also gives you the option to wire up your humbucker in one of four different ways. If you're ambitious, you can use a switch to put several options at your fingertips.
The south coil is always the "screw side," while the north coil is the "slug side."
Every pickup company uses its own color-code scheme for these four wires. This makes discussing humbucker wiring a little more confusing than necessary, but that's the way it is. As usual, I'll use the Seymour Duncan color code as a quasi-standard. You should be able to get color-code information for your pickups from their maker, and there are several charts available on the internet that let you compare color-code schemes from different manufacturers. You can use such charts to translate the following wirings into whatever color code corresponds to your particular brand of humbucker. Fortunately that's not too hard—you only need to know which color wire on your pickup indicates the start or finish of which coil. Once you have that info, you can draw up a reference chart to decode this column's wirings.
Here's the Seymour Duncan 4-conductor humbucker color code:
- North coil start is black; north coil finish is white.
- South coil start is green; south coil finish is red.
- Ground is bare wire.
Fig. 1 sums up what we've covered so far in the Seymour Duncan format. Now let's walk through the four ways you can wire up a humbucker. Ready?
Standard humbucker wiring: both coils connected in series.
This is the default wiring in almost every guitar loaded with one or more humbuckers because it produces a warm, fat tone with maximum output while offering hum-cancelling capability. (It's also the factory standard for all humbuckers with 2-conductor wiring consisting of only hot and ground.)
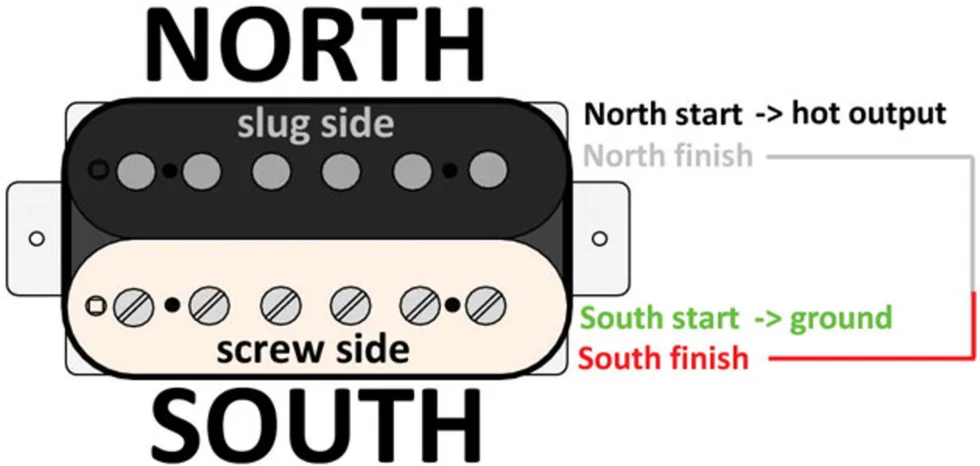
Fig. 2
illustration courtesy of singlecoil.com
Here are the connections for series wiring (Fig. 2):
- North coil start is the hot output.
- North coil finish and south coil finish are soldered together and taped off (this is the series link).
- South coil start is soldered together with the bare wire going to ground.
“Single-coil" humbucker wiring: both coils connected in parallel.
This option gives you a single-coil-like tone, but still retains hum-cancelling capability. It doesn't deliver a crystal-clear Strat or Tele tone, but to my ears it at least resembles a single-coil pickup—maybe closer to a P-90 than to a standard single-coil. Every type of humbucker sounds a little different when wired this way, so it's simply a matter of giving it a try to determine if you like the sound.
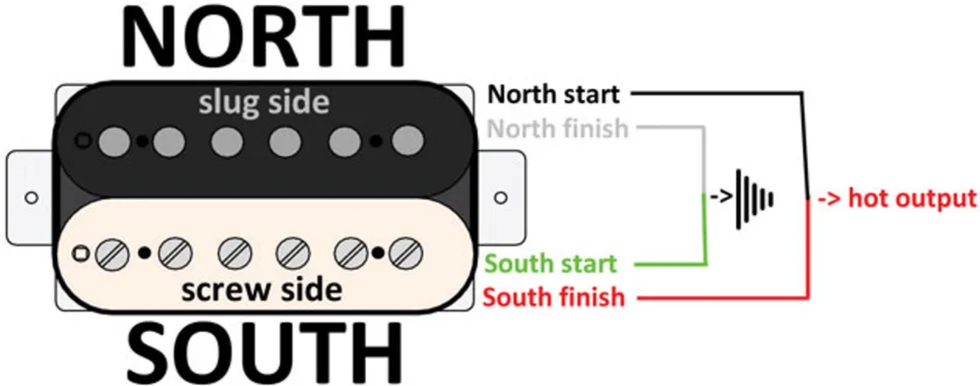
Fig. 3
illustration courtesy of singlecoil.com
Parallel wiring (Fig. 3) requires the following connections:
- North coil start and south coil finish are soldered together as the hot output.
- North coil finish and south coil start are soldered together with the bare ground wire.
Coil-splitting humbucker wiring #1: splitting to the south coil.
This wiring splits the humbucker in half, shunting one coil to ground and leaving the other coil engaged like a true single-coil pickup. In this mode, the hum-cancelling function is no longer active, so you'll get the hum and noise of any single-coil pickup. But don't expect a true Strat or Tele tone: If that's your goal, investigate the special breed of humbuckers that are made out of two real single-coil pickups. The downside of this type of pickup is that it doesn't sound great in full humbucker mode, so, as we're so often reminded, it's about compromise.
Splitting to the humbucker's south coil, which is the screw side, is only recommended for neck pickups. (You'll learn why we're excluding the bridge pickup when we get to our fourth wiring scheme.) Let's also remember that in most guitars with neck humbuckers, the south, screw-side coil lies closest to the neck.
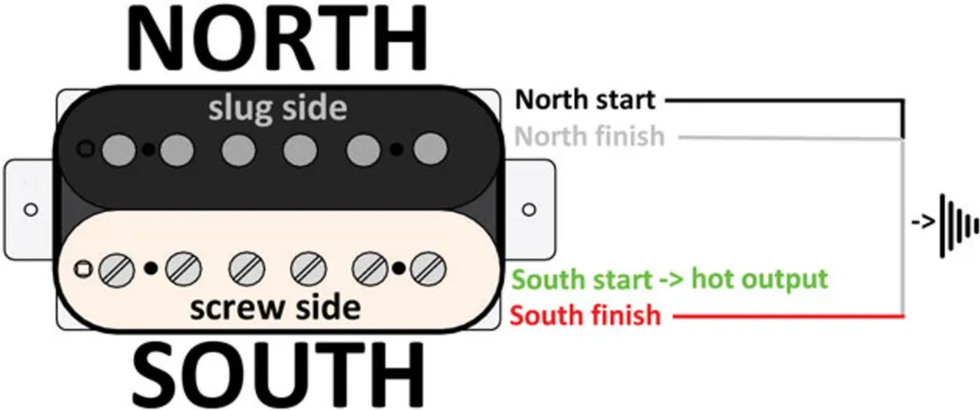
Fig. 4
illustration courtesy of singlecoil.com
For this coil-splitting wiring (Fig. 4), you need the following connections:
- South coil start is the hot output.
- North coil start, north coil finish, and south coil finish are soldered together with the bare ground wire.
Coil-splitting humbucker wiring #2: splitting to the north coil.
This wiring follows the same concept as our previous coil-splitting recipe, but leaves the north coil active—that's the slug side. This version is recommended for a bridge humbucker because pole-piece slugs deliver a fuller sound than pole-piece screws.
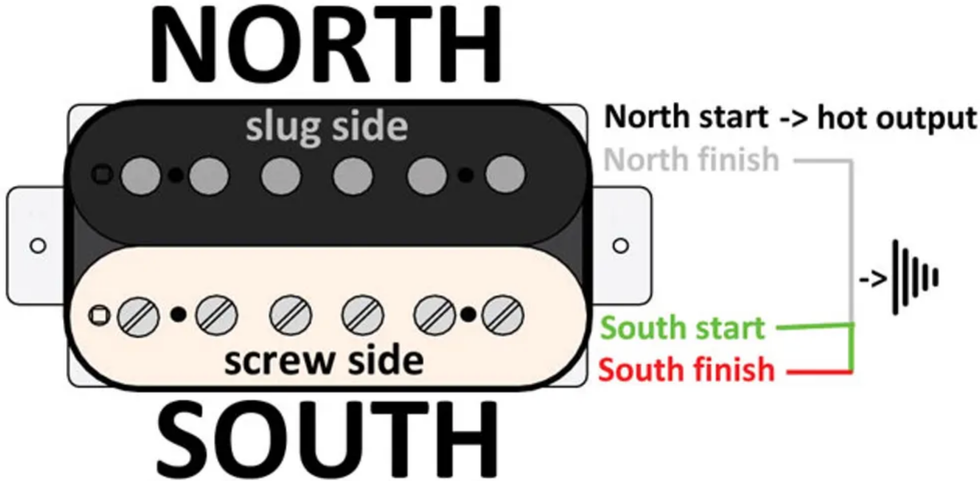
Fig. 5
illustration courtesy of singlecoil.com
Here are the connections for our second coil-splitting wiring (Fig. 5):
- North coil start is the hot output.
- North coil finish, south coil start, and south coil finish are soldered together with the bare ground wire.
Well, that's it. In a future column we'll explore how to integrate and control all these options with the help of a switching device. And, of course, we'll learn how to compensate for possible out-of-phase issues that can occur when you combine several humbuckers or a humbucker with a single-coil. But next month, we'll dig into a project designed to make a Telecaster more sonically flexible. Until then ... keep on modding!
[Updated 9/15/21]
- How to Get the Most out of Hum-Sing-Hum Wiring - Premier Guitar ›
- Mod Garage: Three Ways to Wire a Tone Pot - Premier Guitar ›
- Mod Garage: “Jimmy Page” Les Paul Wiring - Premier Guitar ›
- Adding Series Switching To Your Strat - Premier Guitar ›
- How to Change Pickup Wires (& Why) - Premier Guitar ›
Marshall mass in miniature.
Many inspiring and realistic big-Marshall tones. Cool variation in amp, cab, and room models.
Authentic as it sounds, it’s hard to replace the visceral experience of a big, bad stack.
$399
Universal Audio UAFX Lion ’68
uaudio.com
Though their ears may ultimately thank them, many guitarists never experience the visceral thrill of piloting a big Marshall plexi. But if nothing replaces the sensory wallop of standing before a stack—or the dynamic interactions such proximity affords—the art of digitally replicating those tonalities is in an elevated place. In terms of sounding satisfying on playback, Universal Audio’s UAFX Lion ’68 is at the leading edge, and a convenient path to big-Marshall-isms with minimum hassle and mega convenience.
The plexi-in-a-pedal format won’t work for players that need every amp and effect model under the sun. But if you relish Marshall tones, the Lion ’68 is a brilliant solution for tracking or gigging when the stack can’t make the trip. It offers an expansive tone palette, too. Super Bass and Super Lead models have ample headroom and reproduce the rich, underrated clean sounds of those amps as easily as they kick out Ramones walls of grind or Jimmy Page lead sizzle. The Lion ’68 exhibits lifelike dynamic response. It also reacts to gain devices as hectic as a Super-Fuzz with authenticity. The three amp models, six speaker cabs, and room ambience control offer scads of tone and dynamic variations. You can even jumper the two channels with realistic results. I still think I’d feel weird blasting MC5 riffs through a coffee house PA with the Lion ’68. But I would certainly try it in a bigger room and wouldn’t hesitate to record with this impressive plexi stand-in.
With a few minor fingering adjustments another world of musical expression can be unlocked.
Beginner
Beginner
- Look at the pentatonic scale in a new light.
- Understand how to navigate diagonally across the fretboard.
- Use this newfound knowledge to create more musical phrases.
Likely the first melodic device any improvising musician learns is the pentatonic scale. It’s a simple pattern to learn on guitar, it’s easy to play, and it always sounds “correct.” It contains mostly the “good” notes and usually you don’t need to think too much about which notes to avoid. What’s not to love? After a while, however, a certain sameness begins to emerge, and one begins to wonder, “Is there something more here?” Well, it has much more to offer than what you see on the surface.
How do you play a pentatonic scale?
One of the first shapes that guitarists learn when starting to explore the pentatonic scale is the ubiquitous box in Ex. 1. And why not? It’s a simple pattern to memorize, it’s easy to play, and you can get musical sounding results almost immediately. In fact, if you play these notes in just about any order, play in time, and exercise some logical phrasing, you can’t really mess it up.
There is a wealth of guitar vocabulary in this simple device. Eric Johnson, Eric Clapton, Eric Gales, and other legendary guitarists not named Eric have demonstrated this for decades. However, the two-note-per-string nature of the pattern can limit your phrasing. Let’s dive into a few simple things we can do to inject some articulations into an otherwise choppy march across the fretboard.
This isn’t a “Stop doing this and start doing that” proposition but rather a supplement to your bag of badassery that you’ve accumulated. Let’s remap some of the notes found in Ex. 1 to other strings to elongate the scale along the neck rather than simply march across it (Ex. 2).
Notice that we alternate between two notes on a string and three notes on a string. Add some strategic slides into the mix and our little fretboard square dance gets a welcome dose of swagger. Naturally, we will need to practice this descending pattern (Ex. 3) as well. These fingerings have a certain hipness that the box lacks.
Ex. 4 features a nice blues gesture that exemplifies the articulations that this fingering invites. Judicious use of bends, slides, hammer-ons, and pull-offs make the magic happen.
Double-Stop the Presses
The slippery fourths found on adjacent strings combined with an eighth-note delay summon an early ’80s funk/pop feeling. Play Ex. 5 with long legato notes and have a glass of chardonnay on hand for a funky smooth-jazz vibe.
Two often-used tricks are the sliding fourths/hammer-on double-stop phrases in Ex. 6. Once again, it’s the strategic use of slides, hammer-ons, and pull-offs that make the slinky goodness happen. These tasty double-stop licks are useful chordal accents in your solos or R&B-style rhythm parts. Even though Ex. 6 is a bucket of pentatonic scale phrases over a I–VIm–IIm–V chord progression, the double-stops provide a harmonically informed sound. Think Mateus Asato, Stevie Ray Vaughan, or Jimi Hendrix.
Get Louder … Without Turning Up
Did you know that two notes are louder than one? How ’bout that? Next time you’re playing at your local blues jam and the well-intentioned but way-too-loud rhythm player tempts you to turn up your amp, don’t do it. You’ll just add to the problem. Instead try some double-stops (Ex. 7). It transforms otherwise basic melodies into majestic, purposeful, and yes, louder statements without adding to a never-ending volume war.
Peace, Love, and Understanding
Play some nice rhythm guitar without banging out all those barre chords. Yes, barre chords are useful but sometimes it’s just way too much. Guitarists already have to deal with the stigma of being eye-rolling loud. Why is that? The bottom portion of the chord (the power chord part) is an essential sound if you’re in a rock band. But in a blues, R&B, jazz, or country setting, it can sound muddy (and kinda stupid). The low-register notes are getting in your bass player’s way and the keyboard player, by default, is already annoyed at you. Let’s be friends with these folks and sound better in the process.
Reimagining the pentatonic box will add depth and vibe to your playing. And using smaller double-stops versus banging out giant fists-full of notes not only tends to make the band sound better but they’re easier to play too. As a bonus you just may find that your solos sound fuller and more interesting. Don’t forget to acknowledge the perceptive audience that applauds your tasty masterpiece.
Blackstar's 30-watt combo amp with two footswitchable channels, ISF tone control, and built-in tape delay. Available in vintage cream or black finishes.
The features of the Debut 30E have been carefully selected to cover all the needs of an aspiring guitarist; two footswitchable channels, our patented ISF(Infinite Shape Feature) tone control, series effects loop, and a built-in tape delay. This amp is available in two gorgeous vintage finishes; cream covering with oxblood fret, or black and ‘biscuit’ basketweave.
Debut 30E Combo Features
- 30 Watt combo
- 2 Channels – Clean + Overdrive
- Patented ISF tone control
- Line In for jamming along or listening to music
- Speaker emulated Line Out for ‘silent’ practice or recording
- 1x10" custom-designed speaker, producing true Blackstar tones
- Series effects loop
- Stereo playback of Line In sources through headphones
- Dual footswitch control for channel switching
- Compatible with any 2-button latching footswitch (available separately)
- Vintage styling in cream and black options
Debut 30E | No Talking, Just Tones | Blackstar - YouTube
At a recent outdoor NHL Stadium Series performance, it was so cold that my hands went numb. So, I had to improvise. Last month, I wrapped the NHL Stadium Series at Nashville’s Nissan Stadium in front of 68,619 screaming fans and an army of TV production, crew, etc. The network chose to lean into Nashville’s Music City theme by including performances by 12 of the city’s biggest names in music. About a month ago, the director, Michael Dempsey, whom I worked with on several award shows, hired me as the music director. Here’s how it went....