Intonating a flattop’s bridge saddle is tricky, and that’s especially true when it comes to vintage 12-string guitars. Back in the day, it was rare to find an acoustic 12-string with a compensated bridge saddle. In fact for many players, the slightly out-of-tune jangle was a big part of a 12-string’s aural mystique. But times have changed, and as music and recording technology have evolved, most musicians and producers expect a 12-string to play reasonably in tune all along the fretboard.
Intonating a flattop 12-string with a straight bridge saddle involves filing unique break angle and intonation points for each string—an operation that requires skill and patience. Let’s investigate and see exactly what’s involved.
We’ll use a beautiful 1972 Martin D-12-20 as our project guitar. The guitar was in good shape when its owner brought it into the shop, but it didn’t play even remotely in tune and the action was uncomfortably high. Many old 12-strings require a neck reset (an expensive proposition), but I checked the neck angle and it was fine. Fortunately for the guitar’s current owner, the problem was rather simple. Somewhere along the line a previous owner or tech had installed a saddle that was both too high and incorrectly radiused (Photo 1).
My job was twofold: lower the action by reshaping the bridge saddle and then intonate each string. I knew that once I completed these tasks, the D-12-20 would play better than ever and sound more in tune at the higher frets.
Requisite tools. To intonate a 12-string, you need a few specialized luthier tools. These include a string action gauge, radius gauges, and a radius block (the latter must match the fretboard radius). You’ll also need a mechanical pencil, a capo, self-adhesive 80-grit and standard 400-grit sandpaper, and flat, single-cut miniature needle files.
You can estimate where each string should rest on the saddle, but it’s nearly impossible to get it perfect on the first try.
Preliminary check. Before starting this kind of work on a guitar, it’s important to tune to concert pitch and take measurements. These specs provide a baseline to help gauge your progress. You’ll be taking several measurements, so write them down as you go.
First, put a capo on the 1st fret and measure action at the 12th fret with a string action gauge. Take this measurement for both the 1st and 11th strings—the first of the doubled high Es and the low E string. (We’ll assume your 12-string has the standard octave-string configuration, i.e., the octaves in each pair are closer to you than their wound partners. Some electric 12s, notably Rickenbackers, reverse this order.) Measure the distance between the bottom of the string and the top of the 12th fret.
Next measure the relief: With the capo still on the 1st fret, hold the 11th and 12th strings down at the 14th fret and measure the greatest gap between the bottom of the 11th string and the top of the frets. Typically this occurs around the middle of the fretboard, somewhere between the 7th and 9th frets. You can identify this gap by tapping the 11th and 12th strings against the frets while still pressing them down at the 14th fret.
Now remove the capo and check the action at the 1st fret.
Finally, using a strobe tuner, check the intonation for each string. (Naturally, this is tricky on a 12-string because you have to pluck each individual string of the six pairs.) Starting with the 1st string, play the 12th-fret harmonic—make sure it’s in tune—and then fret the same note. If the fretted note is sharp or flat compared to the reference harmonic, write down how many cents it’s off and in which direction. Repeat the process until you’ve documented the intonation at the 12th fret for all 12 strings.
Our 12-string’s preliminary specs. Here’s how the D-12-20 measured up: The action at the 12th fret was 6/64" for the 1st string and 7/64" for the 11th string. Too high to play! The relief was .012"—perfect for my client’s playing style. At the 1st fret, the 1st string was 1/64" and the 11th string was just over 2/64" above the fret. Again, perfect action at the string nut. At this point, I knew my job would simply entail lowering the action at the bridge saddle.
When I checked the intonation with a strobe tuner, and compared the 12th fret harmonics to their corresponding fretted notes, I found most of the fretted notes were from two to six cents sharp, although the G and D pairs were flat by about three cents.
With these measurements in hand, I was ready to get to work.
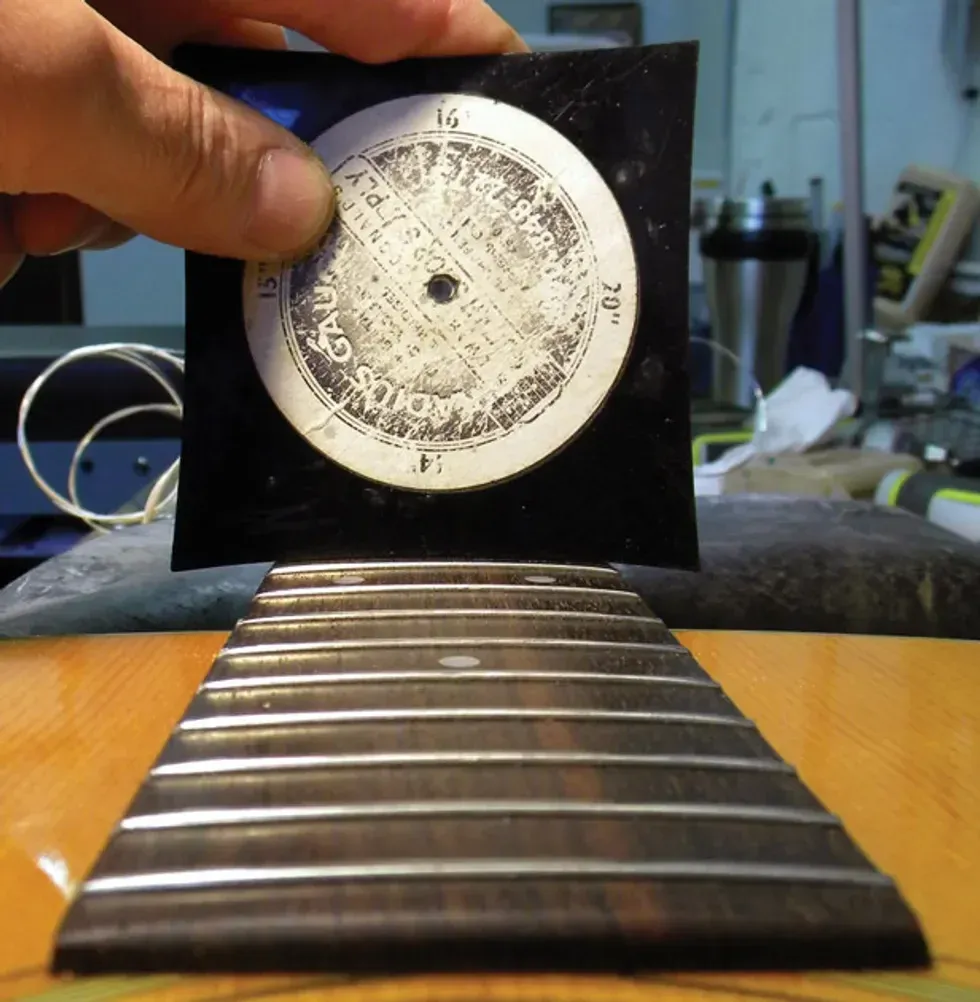
Photo 2
Sanding the bridge saddle. My next step was to check if the saddle’s radius matched the fretboard radius. My radius gauge revealed what I’d suspected—it wasn’t even close. The fretboard had a 14"radius (Photo 2), but the bridge saddle was around 8". This meant the saddle had a much more pronounced arch than the fretboard. I knew if I didn’t reshape the top of the saddle to match the fretboard, the D and G pairs would be radically higher than the other strings.
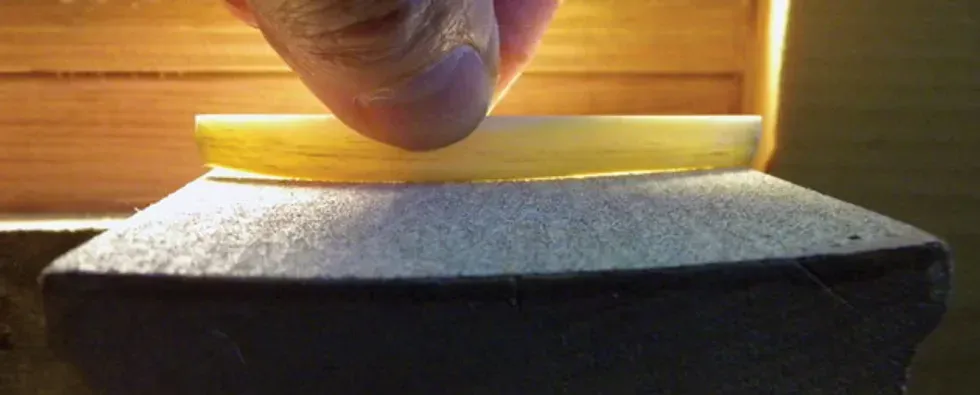
Photo 3
Using a 14" radius block and self-adhesive 80-grit sandpaper, I sanded the top of the saddle until it matched the block’s radius. Here’s the most accurate way to reshape the top of the saddle: Place the radius block in a vise with the radius side up and affix the self-adhesive sandpaper to the block. Now remove the saddle from its bridge slot, turn it upside down, and gently sand its top in the block’s concave area. If you shine light behind the saddle, you’ll be able to see how much material you’re removing from the saddle and make sure its radius matches the block (Photo 3).
Since the action was pretty high on our 12-string, I removed about 1/32" from the top of the saddle at both E string pairs. I removed quite a bit more from the middle of the saddle to flatten out the arch.
Once the saddle is correctly radiused, slip it back into the bridge and grab your mechanical pencil.
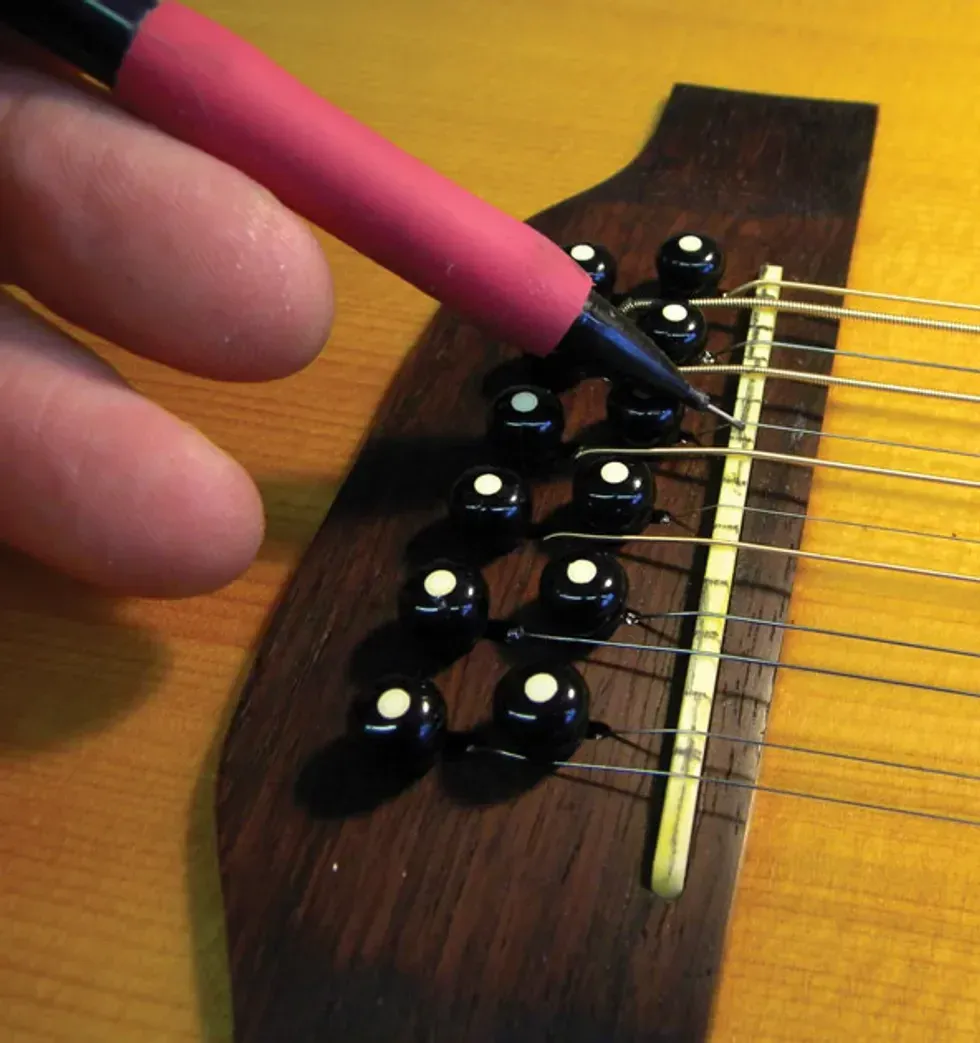
Photo 4
Marking the saddle. Now it’s time to draw guidelines on the saddle crown for both the individual intonation points and the various angles needed to guide the strings as they emerge from the pin holes (Photo 4). But before you start drawing lines, let’s take a moment to discuss where the strings should sit on the top of the saddle. First we’ll deal with the intonation points, then the string angles.
Fair warning: Setting the intonation entails some trial and error. You can estimate where each string should rest on the saddle, but it’s nearly impossible to get it perfect on the first try.
For this task, it’s helpful to mentally divide the 12 strings into three groups:
• The six E, A, D, G, B, and E strings you’d find on a regular flattop. We know the lowest four are wound, and the top two are plain. So far, so good.
• The plain octave strings (E, A, D, G) that pair with the wound E, A, D, and G strings.
• The doubled unison B and high-E strings. Just like their mates, these are plain.
Okay, think about the first group—our standard 6-string. As a general rule, both the low E and B strings intonate best at the rear edge of the saddle (closest to the bridge pins). The G string’s intonation point is typically at the very front of the saddle (closest to the soundhole).
That leaves the high E, D, and A strings to be accounted for. The high E will typically fall between the B (remember, that’s at the rear of the saddle) and the G (at the front of the saddle). The D and A strings usually create a stair-step pattern between the G and low E strings, with the D closer to the G, and A closer to the low E.
The four plain octave strings are a different story. Both the low E’s octave and the G’s octave points will be at the front of the saddle. The octave strings for A and D will be further back toward the bridge pins.
As you’d expect, the unison B and E strings sit at exactly the same point as their siblings.
Now consider how each string travels from the pin hole in the bridge to the top of the saddle—the intonation point. On this Martin, the six primary strings—those that correspond to a standard flattop—are set back toward the rear of the bridge. The six additional strings, the four octaves and two unisons that make a 12-string such a beautiful beast, emerge through the soundboard and bridge right behind the saddle.
On the rear of the saddle, you need to file individual angles (think of them as ramps) that allow each string to reach its intonation point without encountering a sharp edge. Correctly filed angles minimize string breakage and maximize sustain. The angle for the primary strings will be shallower than the six extra strings.
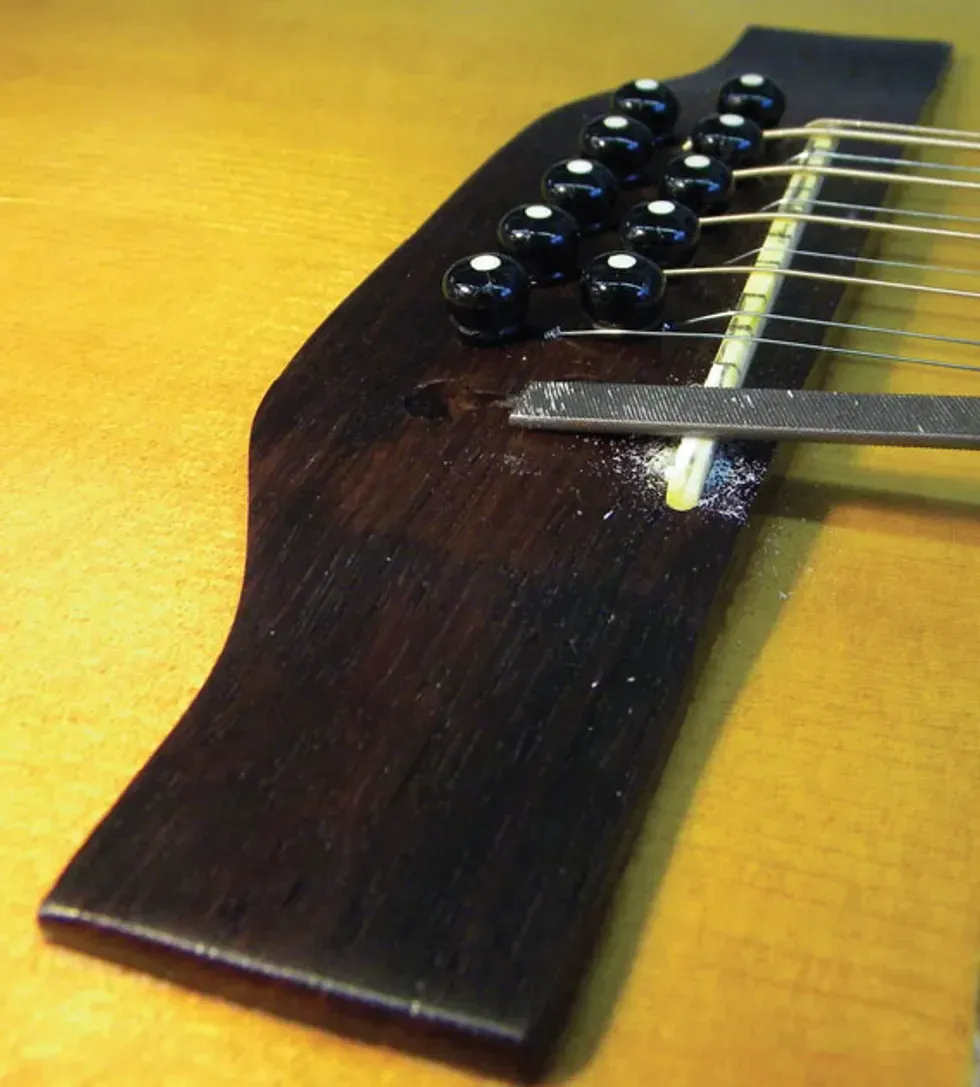
Photo 5
On the rear of the saddle, you need to file individual angles (think of them as ramps) that allow each string to reach its intonation point without encountering a sharp edge. Correctly filed angles minimize string breakage and maximize sustain. The angle for the primary strings will be shallower than the six extra strings.
Filing the saddle. This is where your inner artist gets a chance to shine. Using a miniature flat file, carve each string’s intonation point and rear angle, based on your markings (Photo 5). Go slowly, and to prevent any sitar-like buzzing, be sure each string leaves the saddle from a crisp, defined peak as it heads toward the soundhole.
Checking intonation. As I mentioned earlier, there’s a lot of trial and error involved with intonating a 12-string. Once you’ve done the first pass of filing, put on a fresh set of strings, tune them to pitch, and check the intonation.
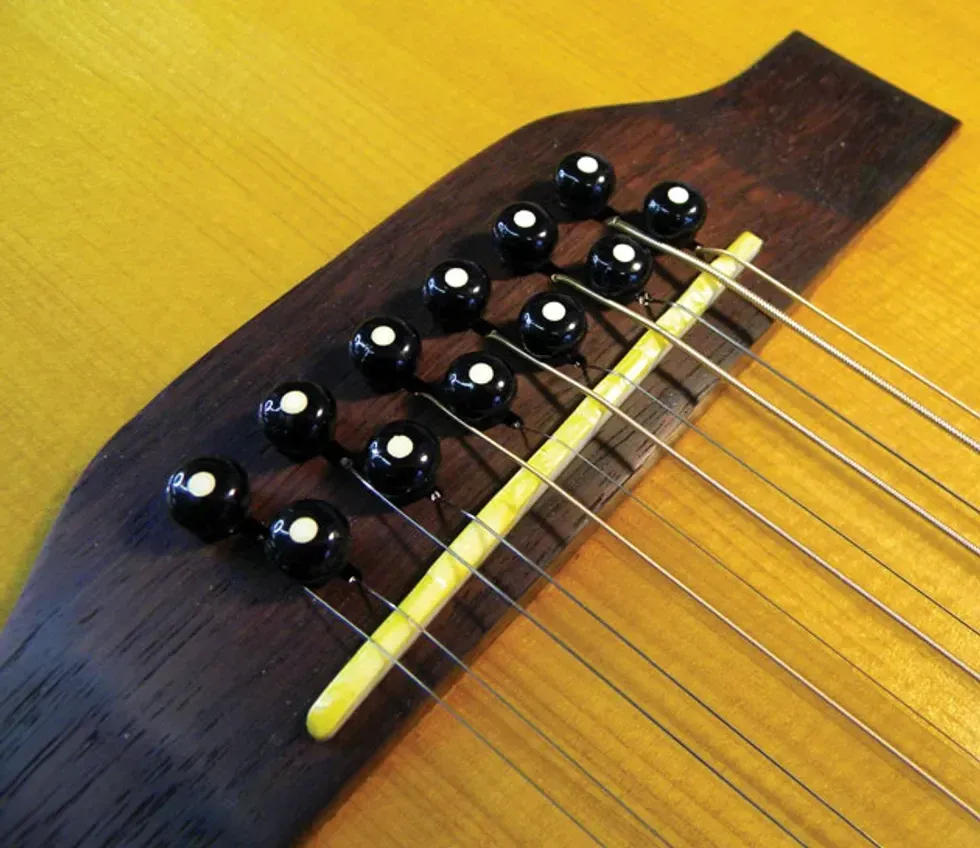
Photo 6
The goal is to have the fretted note at the 12th fret match the corresponding 12-fret harmonic. Use a tuner to keep track of how close the fretted note comes to its reference harmonic. If the string frets sharp, file the intonation point back toward the rear of the saddle. Conversely, if the fretted note is flat, carve the intonation point forward toward the front of the saddle. When you’re done, the saddle should look similar to Photo 6. Don’t be dismayed at how many times you’ll need to slacken and remove the strings, file the saddle, restring, retune, and recheck the intonation.
Wrap it up. When you’ve got the intonation dialed in to your satisfaction, take off the strings one last time, pop out the saddle, and then polish it with 400 grit sandpaper, followed with a polishing cloth. Restring, retune, and you’re good to go.
This process takes a long time to master, but in the end, it’s worth it when your 12-string plays in tune all the way up the neck.