To mod or not to mod? Three experts tell us what we should and shouldn’t do to our ’70s-era Fender amplifiers.
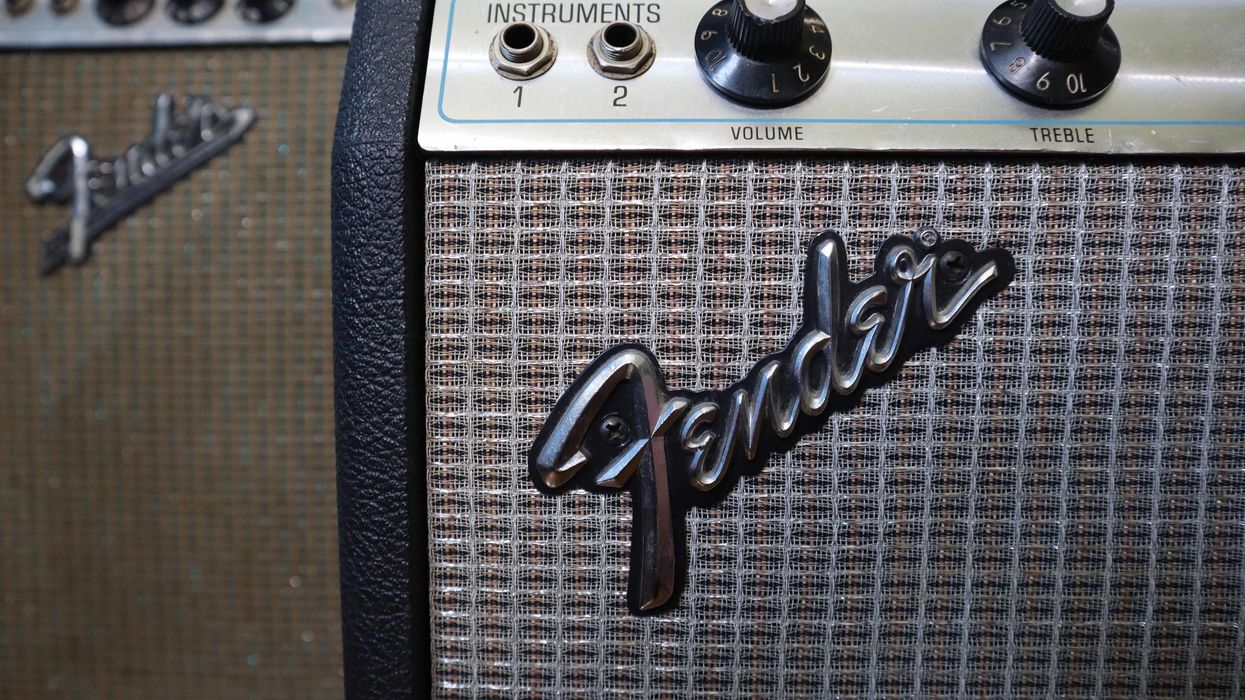
Fender’s silver-panel amplifiers have a mixed reputation. Some people will happily bend your ear about how they can’t compare to their counterparts from the tweed, black-panel, or drip-edge eras, while others will tell you they simply sound great. And some are in between—admiring the silver-panel amps for exactly the reliable, powerful, and plentiful specimens they are.
Not too long ago, you could easily find low asking prices on silver-panels of all types, earning them a designation as vintage amps for working musicians (prices have gone up, but you can still find a deal with a little effort). Yet thanks to those more affordable tags and their reputations, the years haven’t always been kind. These amps have been put through the ringer and subjected to their share of mods: everything from tweaks to increase midrange to ill-advised attempts to turn them into Marshalls and Voxes. Still, so many have survived the test of time—a testament to their durability.
“What we see today is from 50, 60 years of things becoming the industry standard. Back in the ’50s or ’60s, everything was new. They were just throwing things out there.”—George Alessandro
If you own a silver-panel model, you know that there’s a lot of subjective information floating around between the internet and our local amp-repair shop. If you’re not a tech, and you just want an amp that works well and sounds good, it can be a lot to unpack—suggestions about mods, restorations, and other tweaks can really leave your head spinning. It might seem like the easiest path is to never change anything and just fix what’s broken when it’s time to service yours, but that’s not always possible. Vintage examples of these amps have been rocking for so long that many of them are likely to need quite a bit of maintenance or have received extensive servicing over the years, and possibly not at the highest level.
So, when it comes time to fix your amp, what’s the best way to proceed? Do you restore your amp to factory spec? And will you even like the way that sounds? Considering how much time has passed, there’s a good chance it could make for a dramatic difference. And are some modifications to the circuit in order?
I’m no tech. I’m just a player who has an appreciation for these amplifiers and has owned my share of ’em. So, with all these questions in mind, I hit up a couple experts who know their way around a Fender amp in order to set the record straight on how to proceed with servicing our silver-panel amps and getting the best, most reliable tones out of them.
What’s the Deal with Silver-Panel Amps?
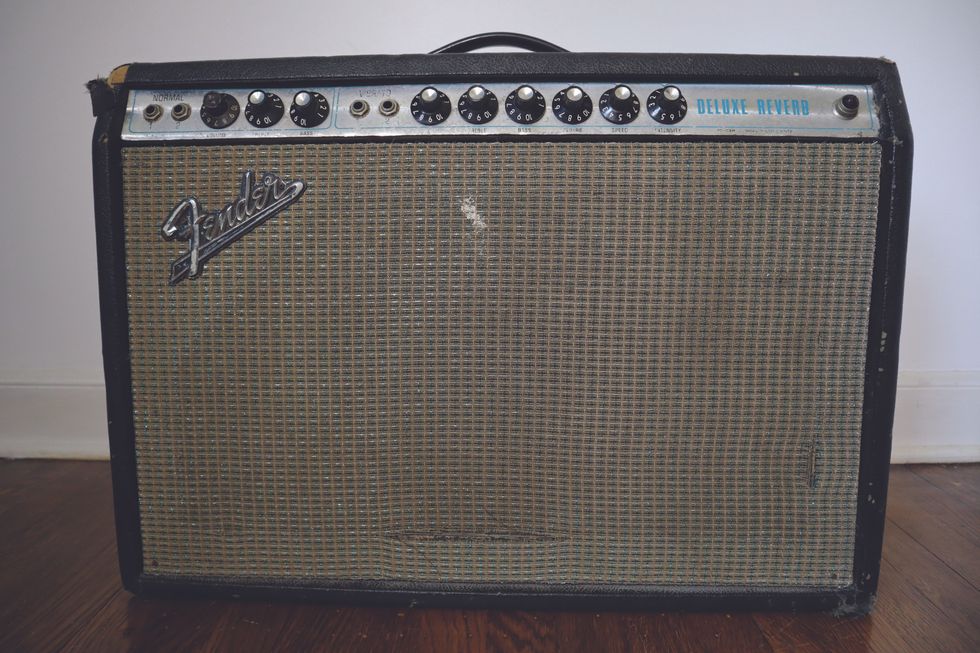
The author’s beloved 1971 Deluxe Reverb shows some wear after 51 years of heavy use. Except for a replaced speaker—now a Celestion Vintage 30—this amp is up to original spec.
Through 1965, Fender kicked out one iconic, revered amp design after another. After CBS took over, those circuits slowly changed over the course of the transitional late-’60s “drip-edge” era of amps. By the ’70s, the entire line had evolved into the silver-panels. This was Fender’s first era to really draw significant negative feedback from players. (When’s the last time you read a piece about modding a tweed Deluxe!?) One big point of criticism is that, during this phase, the company was looking for cheaper ways to build their amps—choices often blamed on the accounting department rather than their engineers—which affected everything from speaker quality to the type of wire used inside the circuits.
But there’s more to it than just skimping on parts. “They were just trying to keep up with the times,” explains George Alessandro of Alessandro High-End Products. In addition to his own amps, which are famously used by artists like Derek Trucks, Eric Clapton, and John Mayer, Alessandro also rebuilds plenty of vintage models for some of those same players. While some parts were of a lesser quality in the silver era, he points out that “Fender’s raw materials were still relatively good quality. By the ’70s, the caps were still good, the transformers were still authentic, the chassis were still right.”
“I find that the silver-panel amps, even if they are 10 years newer than the black-panel amps, are usually in much worse condition because they are stacked away in a moist basement or garage.”—Jens Mosbergvik
A big reason that silver-panel amps don’t live up to the reputation of their older siblings is that “their focus was more on getting output than tone.” Alessandro explains, “By the mid-60s, things were getting louder. PAs were just coming into play. Concerts were getting bigger. So, amplifiers had to get much larger and louder.” This eventually amounted to larger transformers in some models and other changes to boost power and bass response.
“At the time, there was no set rule,” he continues. “What we see today is from 50, 60 years of things becoming the industry standard. Back in the ’50s or ’60s, everything was new. They were just throwing things out there.”
But the lesser-than reputation of the silver-panel amps is often not exclusively about choices that Fender made back in the ’70s. It’s also about how these amps have been treated in subsequent decades. Once “pre-CBS” became a revered term, that solidified the reputation of anything Fender built before 1965, and those amps were often treated differently than the silver-panels. “The thing with silver-panel amps,” says Jens Mosbergvik, PG’s own Fender expert and author of our Silver and Black column, “is that they have been less looked after than black-panel amps because they were considered cheap amps. I find that the silver-panel amps, even if they are 10 years newer than the black-panel amps, are usually in a much worse condition because they are stacked away in a moist basement or garage.” With its lesser status, a silver-panel amp is also more likely to have been either serviced poorly or modified.
What’s in a Mod?
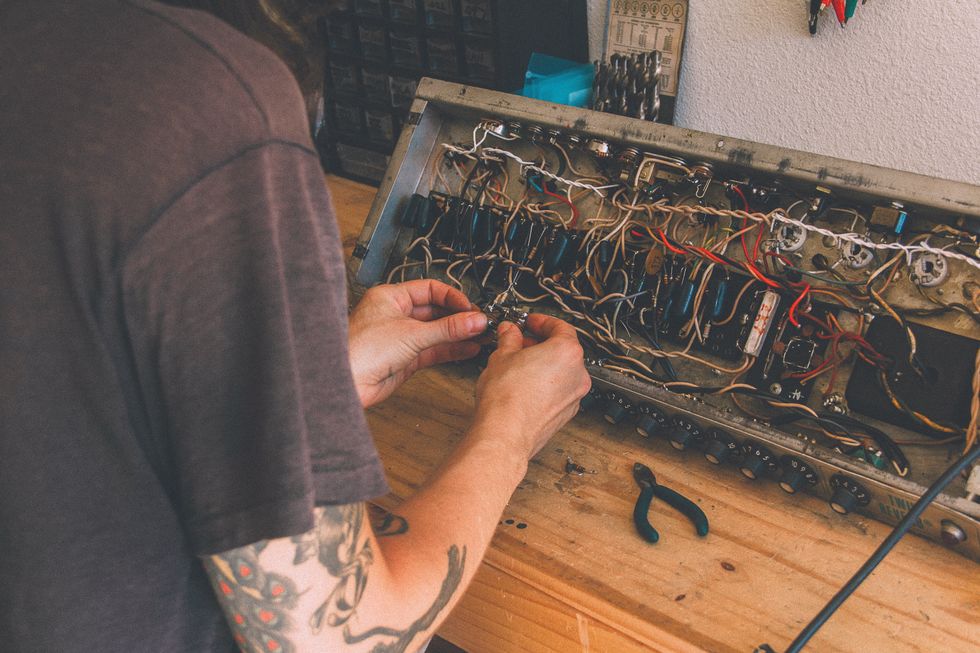
Colleen Fazio works on a silver-panel Twin Reverb. “Fender amps are so nice and so well designed,” she says, “it’s pretty easy to bring them back to stock if you want to.”
Photo courtesy of Colleen Fazio
Nowadays, plenty of players love silver-panel amps. They might not always deliver the hallowed tones of their pre-CBS siblings, but these models certainly hold their own when stacked against many modern amps that command similar prices. If you own one that hasn’t been restored, when you service it or take it to get serviced, you’ll have some decisions to make.
The most important thing to do is consider your expectations. Los Angeles guitar tech Colleen Fazio, who posts extensive and informative vintage amp repair and restoration videos to her YouTube channel, calls herself a “minimally invasive” tech and says, “I always tell people, ‘If you want your amp to sound like a different amp, you should probably just get a different amp.’ Because each amp is designed to do its own thing.”
Vintage Fender Deluxe Reverbs: 1965 Black-Panel Vs. 1974 Silver-Panel
Watch the author test out these two vintage gems.
“My philosophy with vintage amps is do no harm. I don’t like mods,” says Alessandro. “I’m really against mods, because almost 100 percent of the time it ruins what something is supposed to be.” He also warns against any sort of modification that will change an amp’s intended character. “I do more un-modding of vintage amps than you can imagine. A Deluxe Reverb is not going to be a tweed Deluxe. It’s not going to be a little Bluesbreaker. It’s gonna be a Deluxe Reverb. Try and make it the best it is supposed to be.”
Alessandro advocates looking at the changes made by Fender in the silver-panel era with perspective and hindsight. “That circuit from ’64, ’65 is right,” he says. “So, when Fender started changing it through the years, they were making it less right.” When it comes to restoring a silver-panel amp to black-panel specs, Alessandro doesn’t necessarily consider that to be a mod, but, rather, “restoring from what their engineers changed and making it what it’s supposed to be.” He adds, “It’s kind of like an old computer. What do you do when your new software doesn’t work? You revert back to the old one.”
“I always tell people, ‘If you want your amp to sound like a different amp, you should probably just get a different amp.’ Because each amp is designed to do its own thing.”—Colleen Fazio
Some Black-Panel Mods
Whatever you’re doing, whether it’s servicing or making changes to the circuit, Alessandro stresses using the correct components. “People go in there and replace all the parts,” he says, “because this resistor is supposed to be 100k, and it’s reading 112. But it’s not that it’s reading 112 that’s the problem. It’s when they replace it with a 100k resistor and it’s not the right type.”
To get the most from your amp, Mosbergvik says “there are only a few solid things you should do that will really improve the amp in terms of tone.” While different models and years will have their own idiosyncrasies—including the push-pull boosts, master volumes, and larger transformers found in models from the latter part of the decade—here are a few things you or your tech might consider.
Speakers
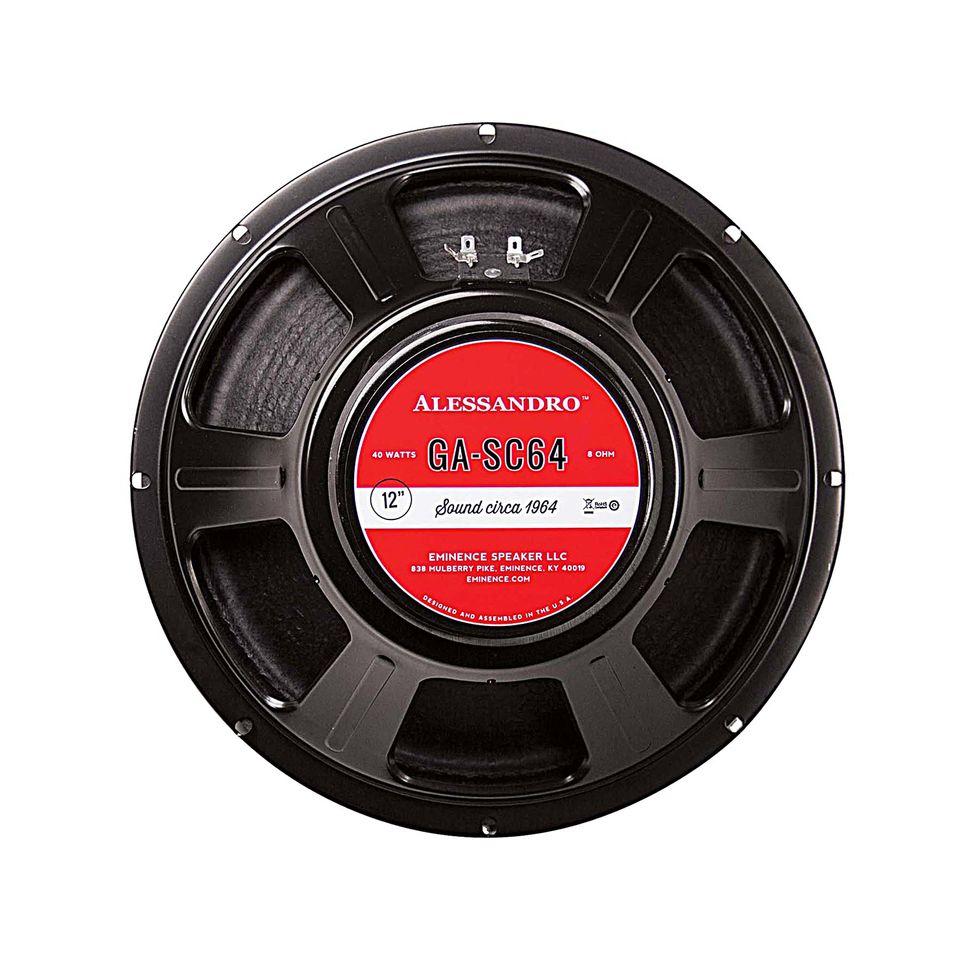
Mosbergvik’s favorites for amps with 10" speakers are Weber 10A100s ($114 street), which he says are “pretty close to the Jensen P10R or CTS alnicos in 1964 black-panel Super Reverbs,” or Weber 10A125s ($119 street) “for a tad more punch and bigger/cleaner bottom end.” For ceramic speakers, he likes Weber’s 10F125s ($108), which he says are “like the CTS ceramics in some ’65 Super Reverbs.”
For amps loaded with 12s, George Alessandro specially designed the GA-SC64 ($144 street) with Eminence to capture the black-panel-era sound.
Bias Circuits
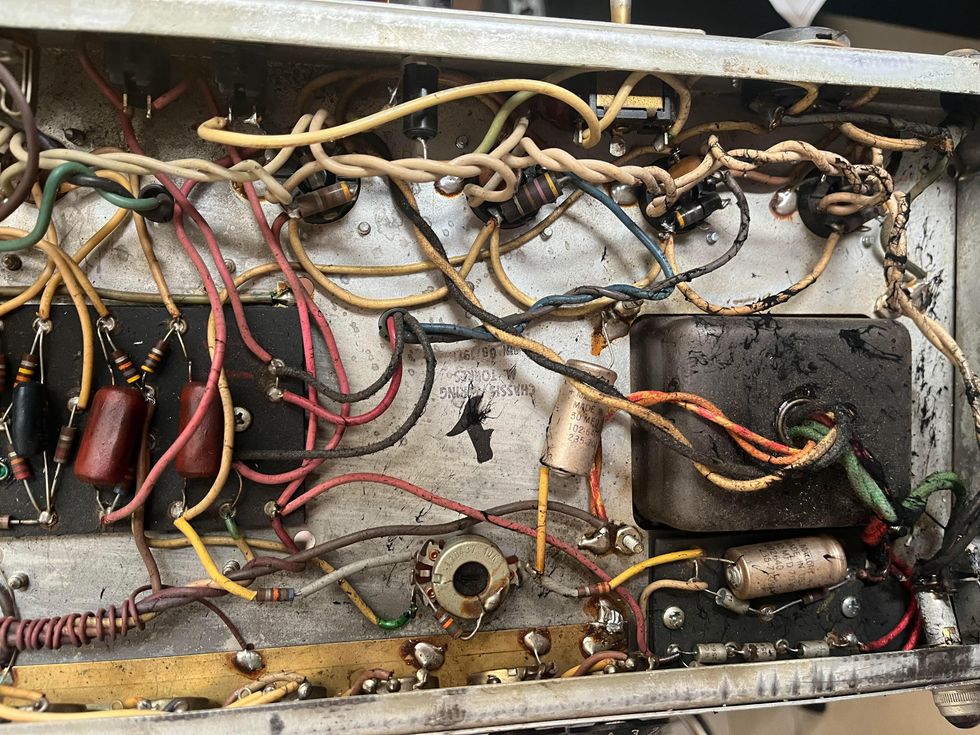
The gory guts of a pre-overhaul silver-panel Twin Reverb.
Photo by Colleen Fazio
By the ’70s, Fender switched all their fixed bias amps from a standard bias control, which allows users to raise or lower the bias on the power tubes but requires a matched pair, to a balance-style control, which accommodates non-matched power-tube pairs yet might not give those tubes the power they need. This creates bigger problems than simply purchasing a matched pair of power tubes and can have a negative effect on an amp’s tone.
“You can re-wire the control to be like the ’60s control, so you’re adjusting the bias,” says Fazio. “It’s a pretty simple re-wire. I would probably include that with a service. You’re not replacing any parts, you’re just re-wiring the configuration.”
Baffle Boards
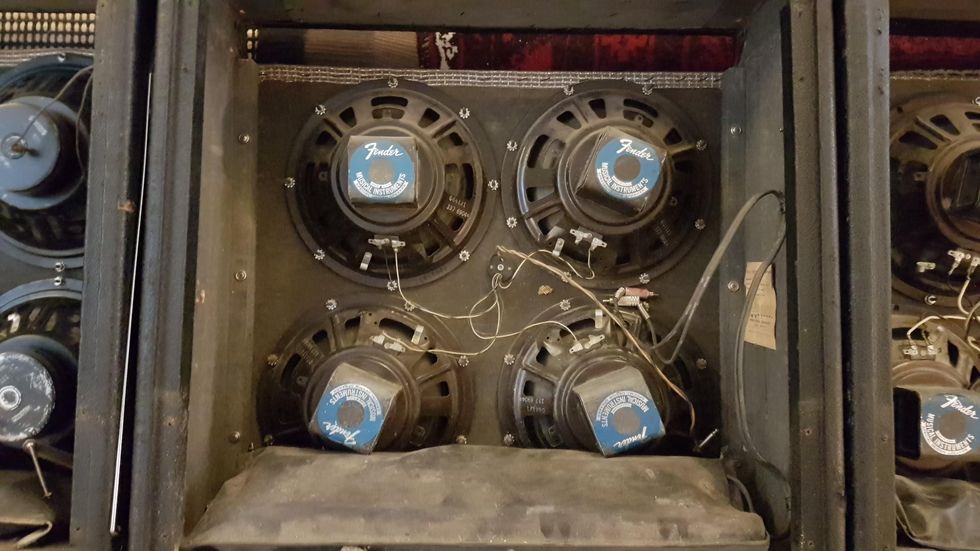
Look at the sides to spot the differences. This Super Reverb has a screwed-in style baffle board.
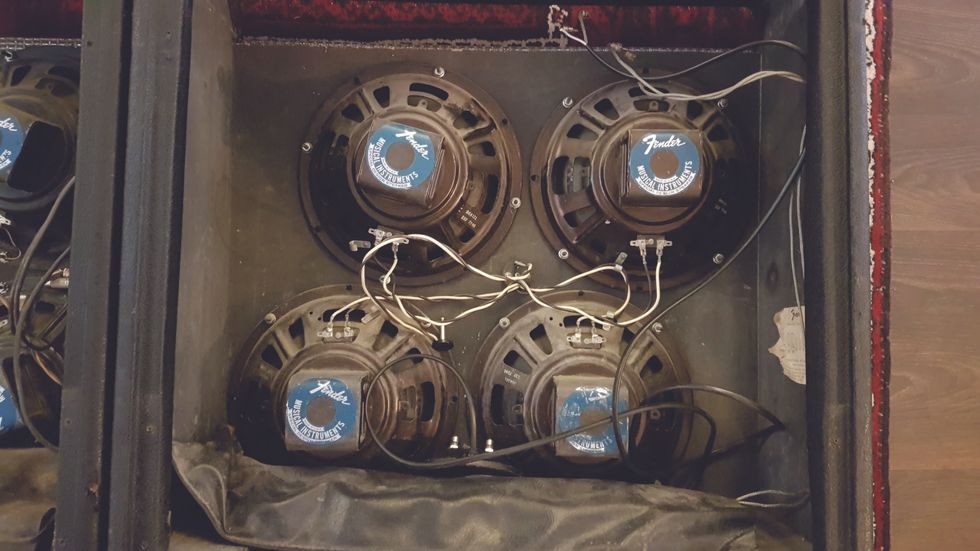
This Super Reverb offers an example of a glued-in baffle board for speaker mounting.
“Try and make it the best it is supposed to be.”—George Alessandro
Early in the ’70s, Fender switched from using a screwed-in baffle to a glued-in baffle, so removing them can be tricky on the latter models. Mosbergvik says the glued-in design sounds “unbalanced” to his ears and points out that it is possible to switch back to the early screwed-in style if you’re already removing the baffle. “You’ll need to work to get it screwed in,” he explains. This includes adding supports to screw the baffle into. “It’s a lot of dirty work.”
If the baffle needs to be replaced, you’ll have to decide between a plywood baffle, a popular choice for many players who believe it changes the tone for the better, or stick with the original particle-board style, which is consistent with both silver- and black-panel models.
Phase Inverter Changes
All that is easy enough for us non-techs to wrap our heads around. But Fazio points out there are some finer differences to be found by looking at schematics.
The coupling capacitor is in the part of the circuit that connects the preamp signal to the output section. “A bigger value in the silver-panel amps increased the bass response. If you want tighter bass like the ’60s amps, you lower the value of that capacitor back to the ’60s specs, which is .001 µF, and a lot of the silver amps are .01. There are some exceptions, but those are common values to find.”
She also points out that the values of the plate resistors on the phase-inverter tube were lowered in the silver-panel amps to reduce gain, and those can be changed to original spec.
Good, Clean Work
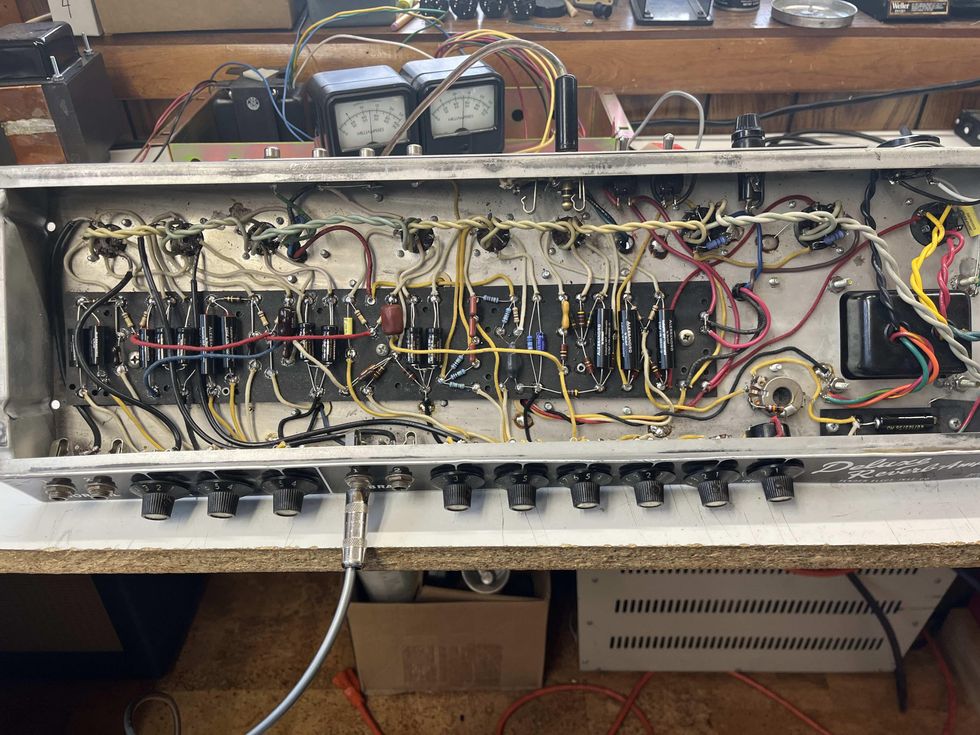
This modern Deluxe Reverb has been hand re-wired to black-panel specs by George Alessandro, offering a great example of a clean, tidy circuit.
Photo courtesy of George Alessandro
It’s always good to remember that any change you make to your amp will affect the way it sounds and feels. If you have an amp you already like, you should especially keep that in mind and don’t feel any pressure to make changes that aren’t necessary. “If it has been modified and you like how it sounds, that’s cool. Silver-panel amps sound really good as they are, and I’ve heard really good modified ones, too,” says Fazio.
If you’re looking to purchase an amp that has been modified, it can be helpful to take a look at the circuit, when possible, even if you’re not a tech. Mosbergvik suggests inspecting to see “if it’s done tidy and properly, with twisted wires, and if the soldering work is done properly—the wires are cut to correct length, they are soldered with enough lead, etcetera.” This will at least help you decide the quality of work that has gone into the amp over the course of its decades of servicing.
One of the great things about these vintage specimens is that they’re easy enough to work on and it’s not hard to source parts. “Fender amps are so nice and so well designed,” says Fazio, “it’s pretty easy to bring them back to stock if you want to.” So, there’s a good chance you’ll be able to keep your amp in good working order for many years to come. And with some of these tips, you’ll be able to have it sounding better than ever.
1971 Fender Twin Reverb | Vintage Amp Repair | The Electric Lady
Watch as Colleen Fazio overhauls a 1971 Twin Reverb.
- Silver and Black: Tips for Buying Vintage Fender Amps - Premier ... ›
- Ask Amp Man: Beefing Up a Vintage Fender Vibrolux Reverb ... ›
- Wake Up Tired Amps with New Speakers - Premier Guitar ›
Advanced
Intermediate
- Learn how to incorporate open strings all the way up the fretboard.
- Build velocity in your playing without practicing speed exercises.
- Discover an easy way to steal licks from the pros using YouTube.
It’s universally known in the guitar community that Brad Paisley isn’t just some guy that strums a guitar and sings country songs. He’s widely respected as one of the best players in the country music scene and takes an unusual approach to achieve the sonic insanity that spills out of his guitar. From Telecasters, G-benders, and cranked Dr. Z amps to instrumental records and wild guitar solos getting mainstream country radio airtime, Paisley has solidified his place in the discussion of all-time greats, and not just in the country world. In this lesson, we’ll dive into one of the cornerstones of Brad’s playing that makes him so unique: open strings.
A couple of prefaces:
Most of the licks in this lesson are exponentially easier when hybrid picked.
And in case you didn’t know, YouTube allows you to alter the speed of videos. This is a massive tool to take advantage of when learning licks, practicing them, and getting them up to speed. Simply click the Settings button in the bottom right corner of the video player and select Playback Speed. This will allow you to speed up or slow down the video to your liking without any changes to pitch. Transients will become an issue the farther away from the original speed you go, but not enough to keep you from slowing a solo down 50 percent to really learn and nail the nuances.
We’ll start by just dipping a toe in the water for Ex. 1, looking at a small part of the solo from Brad’s song “Ticks.” This section is found at the 3:06 mark of the video below. Brad really likes to use open strings to provide color to licks, usually with the note falling outside of the established scale. This little nugget is entirely in the E major scale (E–F#–G#–A–B–C#–D#) with exception of the open 3rd string. The use of the open string throws a b3 into the mix, while making it feel faster with little added effort. If you were to play this lick at half speed, the open G string does not sound great—but that’s the whole idea behind what Brad is able to do with open string licks. At tempo, the open string sounds like a natural inflection and the lick has more velocity than if it were omitted.
Ex. 1
Ticks
In Ex. 2 we’re still looking at the “Ticks” solo but focusing on the back half. This entire section of the solo is a smorgasbord of open strings. The first phrase uses sliding and open strings to create an almost bouncy and circus feel. The use of the open G string allows Brad to travel up the fretboard with some very interesting flair. Then he uses the open 1st string in measure 2 to create momentum again, but in this instance, the open-string pull-offs fall inside the E major scale rather than acting as color tones. It’s much easier to connect this section of the lick to the previous by using the third finger to execute the bend and the fourth finger to start the new descending phrase. Lastly, Brad takes the solo home with a simple descending three-note-per-string pull-off lick that combines inside and outside notes.
Ex. 2
If you’ve ever listened to Paisley’s “Time Warp,” you know that it’s a gold mine of licks to steal. In Ex. 3, I’m focusing on a lick Brad plays on the “Live on Letterman” version, which occurs after the piano solo at the 1:23 mark in the video below. It’s worth noting that this is not the same line featured on the album version from Time Well Wasted. This lick is a perfect example of how Brad uses open strings to create velocity and really get going downhill at breakneck speeds. The lick is not overly complicated, but it is extremely fast, especially if you are new to hybrid picking. I’m playing it at roughly 75 percent speed so that the notes are intelligible and not just a blur. The lick is mostly based in the A Aeolian mode (A–B–C–D–E–F–G), with flatted second being the exception.
Ex. 3
Brad Paisley - Time Warp (Live on Letterman)
In this example (Ex. 4), we tackle a fantastic phrase from the solo to “Water.” The lick I’m breaking down falls around the 1:43 mark in the YouTube video. What’s so interesting is that while the song is in F major, Brad utilizes the open A, D, and G strings to navigate the fretboard vertically and create energy. My favorite thing about the descending pull-off section of this lick is that it’s a tame bluegrass-style lick in G, but it’s the placement of the lick over the chord changes that makes it sound interesting.
Ex. 4
Brad Paisley - Water
Ex. 5 is where things get really exciting. It’s from a live performance of “Water” during the 2010 ACM awards. At the 3:40 mark Brad uses an open-string lick to build tension and work his way up the fretboard that caught my attention. As before, it sounds monstrous at tempo but really doesn’t make a ton of sense when slowed down. It’s a fairly simple pull-off lick that isn’t too difficult if you’re already used to hybrid picking, but it creates a ton of movement and excitement when sped up. I’m guilty of stealing both this lick and the idea behind it for “wow” moments in solos.
Ex. 5
Brad Paisley - Water (live ACM Awards 2010)
It’s undeniable how freakishly good of a guitar player Brad Paisley is (try grabbing some of the monster licks from the outro of “Water”). Because of how many tricks he has up his sleeve, he’s nearly impossible to replicate, but that doesn’t mean there isn’t something that everyone can take from Paisley’s bag of tricks. Use this concept of using open strings in unconventional places to add spice, speed, and mystique to your playing.
Unleash your inner metal icon with the Jackson Lee Malia LM-87, a high-performance shred-ready axe designed in collaboration with Bring Me The Horizon guitarist Lee Malia. Featuring custom Jackson signature pickups, a fast D-profile neck, and a TOM-style bridge for rock-solid stability, this signature model is a must-have for commanding metal tone and smooth playability.
British metal icon and Bring Me The Horizon guitarist Lee Malia has partnered with Jackson to create his signature LM-87, a shred-ready axe built for heavy riffing and alternative modern metal. As a founding member and lead guitarist of the Grammy-nominated band, Malia is renowned for his aggressive playing style and intricate solos. This high-performance guitar matches his demanding musicality.
With its offset Surfcaster™ body shape and vintage appeal, the LM-87 melds classic design with modern appointments. The thin open pore finish on the bound Okoume body and neck exudes organic style, while the unique 3-ply pickguard and chrome hardware add striking accents. The fast D-profile 3- piece okoume neck allows smooth riffing across the bound amaranth fingerboard.
Custom Jackson signature pickups, including a bridge humbucker with push-pull coil-split, equip the LM-87 with versatile tone-shaping options to fulfill Malia's sonic vision. The TOM-style bridge with anchored tailpiece and fine tuners provides rock-solid stability for low tunings and heavy picking.
Designed in close collaboration with the legendary guitarist, the Jackson Lee Malia LM-87 is built for shredding. Its blend of vintage vibe and high-performance features make this signature model a must-have for players who value commanding metal tone and smooth playability.
The Tune-o-matic bridge with an anchored tailpiece and fine tuners offers enhanced tuning stability and precise, incremental adjustments. This setup ensures consistent pitch control, improved sustain, and easier fine-tuning without affecting overall string tension.
The guitar’s three-piece set-neck guitar with graphite reinforcement offers exceptional strength, stability, and resistance to warping. The multi-piece construction enhances sustain and tonal clarity, while the graphite reinforcement adds extra durability and prevents neck shifting due to humidity or temperature changes. This design ensures a solid, reliable performance with improved resonance and longevity.
Features Include:
- Okoume body
- Three-piece okoume set neck construction with graphite reinforcement
- 12"-16" compound radius amaranth fingerboard
- 3-ply pickguard
- Chrome hardware
- Custom wound Jackson LM-87 pickups
- Volume with push-pull coil-split and tone control
- TOM-style bridge with anchored tailpiece and fine tuners
- Gig bag included
The Jackson LM-87 carries a street price of $899.99.
For more information, please visit jacksonguitars.com.
Unleashing the Pro Series Signature Lee Malia LM-87 | Jackson Guitars - YouTube
Jackson Pro Series Signature Lee Malia LM-87 Electric Guitar - Open Pore Black
Pro Series Lee Malia Signature LM-87 Open Pore BlackThe Tone King Imperial Preamp Pedal delivers legendary vintage American tube tone with modern control. Featuring two channels mirroring '50s tweed and '60s blackface tones, built-in zero watt poweramp, stereo convolution spring reverb and tremolo, and low-latency impulse response technology. MIDI programmable with up to 128 presets for instant recall.
The Imperial All-Tube Preamp pedal delivers Tone King’s legendary MKII amplifier's '50s tweed, '60s blackface, and vintage British rock tones in a compact, pedalboard-friendly format. It features the exact preamp section and phase inverter circuitry of the Imperial MKII amp, as well as Reverb, Tremolo and Attenuation, resulting in a pedal that sings with harmonic richness and blooming touch response. Powered by three 12AX7 preamp tubes running at high voltage, this preamp delivers the amp's sound, responsiveness, and exquisite interaction with your pickups and effects. The onboard, low-latency impulse response (IR) loader (per channel), Headphones, easy integration and expansion with your existing gear, and MIDI capabilities, takes these iconic tones into the new era of guitar playing.
Legendary Vintage Tube Amp Tones
The Imperial Preamp Pedal features two distinct channels, each mirroring the '50s and '60s flavors of the Imperial MKII.
- The Rhythm Channel evokes the essence of a classic '60s blackface combo's pristine cleans with a touch-sensitive response that transitions smoothly into overdrive.
- The Lead Channel is inspired by the iconic tweed amps of the '50s’ with the ability to glide between warm articulate cleans and aggressive midrange bark. This channel's Mid-Bite control adds a further layer of tone shaping, focusing the low-end, while adding high-end presence and gain for a British-flavored rock crunch.
Built-In Zero Watt Poweramp - Phase Inverter
The Imperial Pre-Amp Pedal includes the exact phase inverter circuitry of the actual Imperial MKII amp, utilizing one of its three 12AX7 tubes. This built-in “0 watt poweramp” authentically provides the harmonic and dynamic content of the Tone King poweramp section. This revolutionary design is the cornerstone that delivers the ENTIRE Imperial MKII experience right on your pedal board.
Stereo Convolution Spring Reverb & Stereo Tremolo
Like its namesake amp, the Imperial Preamp boasts foot-switchable spring reverb and tremolo (digital on the preamp pedal) which are assignable to each channel. A signature of the Tone King Imperial MKII tube amplifier, these era-correct effects add dimension and movement while transporting you to a golden age of electric guitar tone.
Impulse Response (IR) Cabinet & Power Amp Sim
The Imperial Preamp pedal's low latency IR and power amp simulation technology delivers its tube tones directly to the front of house or your interface. That’s especially evident in the 15 included OwnHammer-made IRs. Each channel has three of our favorites, preloaded, and selectable via dual 3-way toggle switches.
OH 112 Imperial TK1660: Tone King 1660 speaker in a Tone King Imperial 1x12 combo. Captured using a Shure SM57, a Neumann U87, and a Royer 121 through '70s API 312 preamps.
OH 212 Class A Blue: Celestion Blues from 1963 in a Vox AC30 2x12 combo. Captured using a Shure SM57, a Neumann U87, and a Royer 121 through '70s API 312 preamps.
OH 412 Basketweave M25: Celestion G12M-25 speakers from 1971 in a basket-weave 1960B 4x12 cabinet. Captured using a Shure SM57, Telefunken MD421, and Royer 121.
There are 12 additional IRs to choose from in the included Tone King Editor software (powered by Synergy) which are easy to swap in and out of the pedal's six available slots. You can also disengage the onboard IR loader entirely to use the preamp with an external IR loader or powered cabinet.
Tone King Editor Software
You can assign the Reverb, Tremolo and IR to each of the channels right on the pedal itself, making it a powerful and easy-to-use sonic tool. Tone King offers an Editor software, powered by Synergy, which takes the Pre-Amp's capabilities to another level, allowing you to fine-tune all of the preamp's digitally controlled parameters and save them in up to 128 MIDI presets
- Control the independent power amp simulation HF Comp and Low-Pass filters
- Access all 15 included OwnHammer IRs• Easily load your own IRs and manage your IR library
- Assign any of your IRs to the pedal's six available slots (three per channel)• Control your reverb, reverb tails, tremolo and effects loop bypass settings• Save these settings to up to 128 presets for instant recall via MIDI
The Tone King Editor software also unlocks all of the Imperial Preamp's modern control. Fully MIDI-capable, you can save your presets and access them instantly with a MIDI pedalboard controller or the laptop running your entire show. It is the perfect marriage of modern control and classic tube tone.
Expanding Your Rig's Capabilities
The Imperial Preamp Pedal is the perfect DI recording and performing solution. But that's just scratching the surface.
Add Channels to Your Current Guitar Amplifier
A standout feature of the Imperial preamp pedal is its ability to easily integrate with your existing amplifiers (must have a series effects loop). A straightforward 3-cable connection is all it takes, and you can instantly alternate between the Imperial Preamp as your amp's front end or your amp's preamp channels.
Networking with Other Effects-Loop-Equipped Preamp Pedals
Create the ultimate pedalboard-based rig with other preamp pedals (with effects loops). Using the same 3-cable method, you get both Imperial channels, your other preamp’s tones, the Imperial's stereo effects loop, and its onboard IRs. Additionally, you can assign the Imperial's spring reverb and tremolo effects to your other preamp channels.
Classic American Tube Tone for Every Stage & Studio
Whether you're a gigging musician, a recording artist, or simply a tone enthusiast, the Tone King Imperial Preamp pedal offers endless possibilities. Use it as a standalone preamp for recording or for silent stages and practice, add its two channels to your existing amplifier, pair it with a power amp and cabinet to move some air, or combine it with other preamp pedals for an even wider range of pedalboard-based tones.
Tone King Imperial Preamp Pedal is the ultimate marriage of legendary, vintage American tube tone and modern control.
For more information, please visit toneking.com
Features
- Two Channel High-Voltage preamp – DI
- 3 x 12AX7 preamp tubes running at proper high voltages
- Built-In zero watt poweramp - phase inverter circuit
- Two channels with independent Volume and Attenuation controls
- Rhythm Channel (top)
- '60s-era American blackface combo tone
- Bass and Treble controls
- Lead Channel (Bottom)
- '50s-era American tweed combo and British rock tones
- Tone and Mid-Bite controls
- Spring Reverb (convolution)
- Reverb and Dwell controls
- Independently assignable to each channel
- Tremolo (digital)
- Depth and Speed controls
- Independently assignable to each channel
- Stereo, Series FX loop (bypassable)
- MIDI programmable
- Save up to 128 presets for instant recall via an external MIDI switcher
- Presets save:
- Channel selection
- Master bypass settingo IR selection
- IR bypass setting
- Effects loop bypass setting
- Reverb bypass and tails settings
- Tremolo bypass settings
- Onboard Impulse Response (IR) Technology
- Low-latency Impulse Response cabinet simulation (bypassable)
- 3-position CAB/IR select switch per channel (programmable via software)
- Included OwnHammer IRs
- Poweramp simulation with software editable HF Comp and Low-Pass filters (per channel)
- Connections:
- Dual stereo balanced XLR outputs with Ground Lift Switch
- ¼" Headphone output
- Effects Send and Stereo Return Jacks
- MIDI 5-pin standard connector
- USB-C connector for use with the included Tone King Editor software editor
- To Amp In, From Amp Send and From Amp Return Jacks – for adding Imperial channels to your amp or preamp
- Included
- 6’ USB Cable
- Universal 12V Power Supply
- Dimensions: 7.2” (W) x 5.7” (D) x 2.75” (H)
- Weight: 1.9 lbs.
With a bit of downtime back in Nashville, co-shredders-in-chief Megan and Rebecca Lovell joined Shred With Shifty to deconstruct their face-melting leads on “Summertime Sunset,” off of their 2022 record Blood Harmony.
The Georgia-born, Nashville-based roots-rock outfit Larkin Poe have had a busy year. Last summer, they toured across the U.S. supporting Slash, and released their seventh studio album, Bloom, on January 22. With a bit of downtime back in Nashville, co-shredders-in-chief Megan and Rebecca Lovell joined Shred With Shifty to deconstruct their face-melting leads on “Summertime Sunset,” off of their 2022 record Blood Harmony.
The Lovells grew up reading sheet music and learning violin via the Suzuki method—there was little room for going off the beaten path until they fell in love with Jerry Douglas’ dobro playing on Alison Krauss records. Rebecca took up the mandolin, while Megan went for the dobro and the slide side of things. It took a while for them to get comfortable turning up from their bluegrass roots, but eventually they built Larkin Poe’s amplified, blues-rock sound.
First up, Rebecca, playing a pristine ’60s SG, shows how she put together her stinging, fuzzy solo by “hunting and pecking out” melodies in her mind, building up the chops to follow her intuition. Then Megan, playing a Rickenbacker-inspired lap steel of her own design through a Rodenberg TB Drive, details her dizzyingly fast slide acrobatics, and her particular “rake” technique that she copped from Jerry Douglas and Derek Trucks.
Tune in to hear them talk about how to sustain family relationships while going professional, keeping music community-minded, and whether or not they’ll go back to bluegrass.
If you’re able to help, here are some charities aimed at assisting musicians affected by the fires in L.A:
https://guitarcenterfoundation.org
https://www.cciarts.org/relief.html
https://www.musiciansfoundation.org
https://fireaidla.org
https://www.musicares.org
https://www.sweetrelief.org
Credits
Producer: Jason Shadrick
Executive Producers: Brady Sadler and Jake Brennan for Double Elvis
Engineering Support by Matt Tahaney and Matt Beaudion
Video Editor: Addison Sauvan
Graphic Design: Megan Pralle
Special thanks to Chris Peterson, Greg Nacron, and the entire Volume.com crew.