
In short, a pickup's electrical phase is based on the direction of its winding, which can be clockwise or counterclockwise. But—alas—it's not quite that simple. To truly understand a pickup's electrical phase, we have to dig a bit deeper into pickup terminology.
But it's worth the effort, and here's why: When you combine pickups, two things control phase relationship. One is magnet polarity and the other is coil-winding direction, and these parameters determine whether two pickups will be in phase or out of phase with each other. We discussed the former in "What's the Deal With Pickup Polarity?," so you might want to take a moment to refresh yourself on that topic. I believe magnet polarity and coil-winding direction should be specified for every pickup that's sold because these specs can save you a lot of time, money, and hassle when shopping for replacement pickups for a multi-pickup guitar. After all, who wants an out-of-phase sound right out of the box?
Before we talk about clockwise and counterclockwise pickup winding, let's get oriented. Imagine that you're looking at a Strat pickup from above, facing the top of the magnets. In other words, we're looking at the pickup from the strings' point of view. From this position, when the wire is wound clockwise from the pickup's starting point—wait for it—we logically say the winding is “clockwise."
This is also considered “non-reversed." I think this terminology stems from the early Fender years, where the factory workers wound all pickups clockwise for several decades. Then later, when reversed-wound middle pickups were introduced to provide hum-cancellation in positions 2 and 4 (bridge plus middle, and neck plus middle), most of these “reverse-wound" pickups actually had a clockwise winding. To change electrical phase, workers simply interchanged the two pickup leads.
From an electrical point of view, this is okay, but there are good reasons to create reverse-wound pickups with a genuine counter-clockwise wind. Many players feel that a reverse pickup with a true counterclockwise wind sounds better than a clockwise-wound pickup with reversed leads. Also, if a string accidentally contacts a pickup magnet, it will short out a clockwise-wound pickup with reversed leads and the pickup will go silent. Or, if you touch the magnets of such a pickup with your finger, you'll be rewarded with a loud humming noise.
But we're not done yet. Things get even more “interesting" as we go one step further and decode pickup makers' speech. Besides the clockwise and counter-clockwise terms, the following also describe a pickup's winding:
• Top right, top going (this is counterclockwise).
• Top right, top coming (this is clockwise).
• Top left, top going (clockwise).
• Top left, top coming (counterclockwise).
At this point, I can imagine you thinking, “What the heck does all this mean?" Unfortunately, “top" indicates two different things. Here's an example to explain this terminology: “Top left" and “top right" describe how the pickup is attached to the winding machine. If the upper part of the pickup—i.e., the top section—faces towards the machine's left side, this is defined as “top left." And vice versa.
Okay, “top going" and “top coming" describe the direction the pickup is moving in the winding machine. When the bobbin is moving away from you, it's defined as “top going," and when the bobbin travels towards you, it's “top coming." (By the way, top coming is typically not used for winding a pickup, but rather for unwinding it when you need to remove the old wire.)
Now that we've waded through our terms, it's time to get back to the main subject—a pickup's electrical phase.
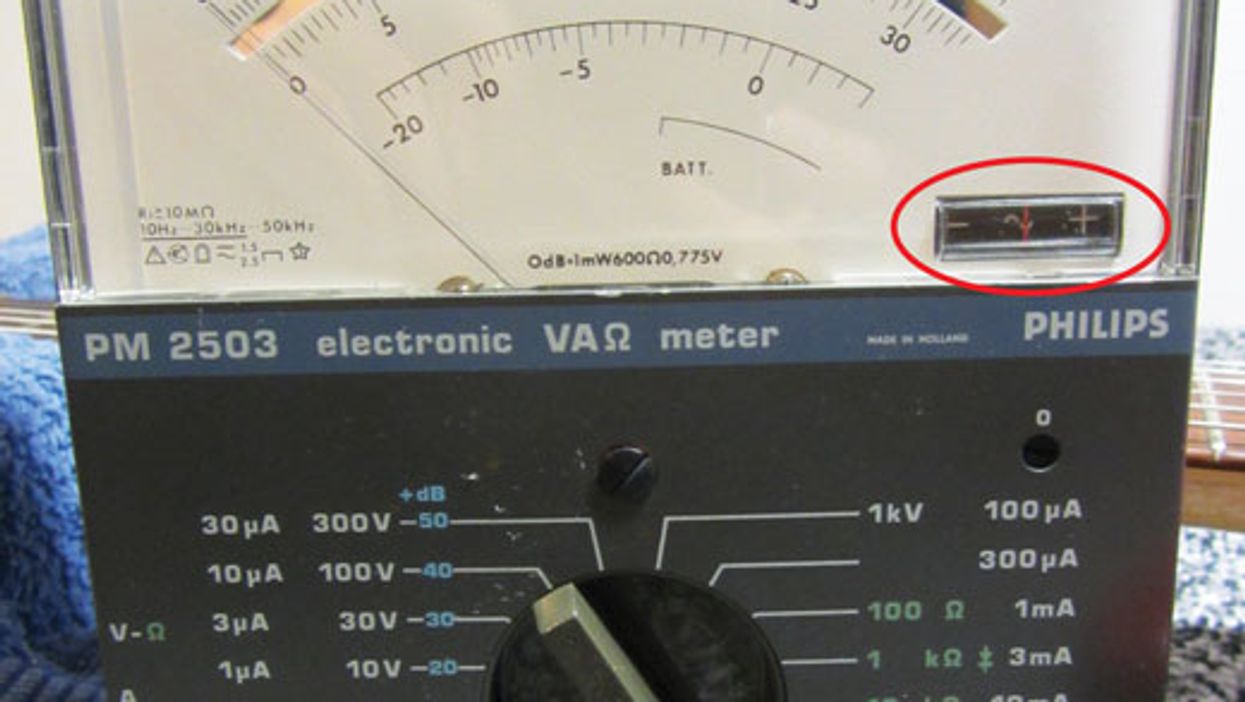
The big question is, how do you determine a pickup's phase? The easiest way is to use an analog meter with a polarity testing option. In the '60s, analog meters commonly had built-in polarity testers—at least those meters in the upper price range. Most of these vintage meters are sought-after items today, and consequently fetch high prices.
We use a late-'60s Philips meter in our shop. If you have a similar vintage analog meter, here's how to use it to determine a pickup's phase. First, connect the pickup wires to the meter. The white (hot) wire attaches to the plus (+) and the black (ground) wire attaches to the minus (-).
Note: For this test, it's essential to connect the wires this way. If the wires on your pickup have different colors, you'll need to connect the colors for hot and ground as defined by the pickup manufacturer.
Next, take a large screwdriver or a piece of steel or iron and lay it gently across the pickup pole pieces, parallel to them. If the polarity meter—the small rectangular window on the right bottom of the main display, circled in red in Photo 1—shows plus (+), it means the wire that's connected to the hot (+) lug of the input jack is, in fact, the hot connection for the pickup. But if it shows minus (-), it means that the pickup wire connected to the input jack's hot lug is actually the ground. You'd be surprised how many times the pickup's white wire is not really the hot one!
I don't recommend using a standard analog meter that lacks the polarity testing function because the needle rests on the left side and is designed to deflect toward the right. When you force the needle on this type of meter to deflect toward the left, chances are good you'll destroy it. So stay away from this. (I should point out there are ways to tweak a standard analog meter for this measurement, using the scale setting or by putting a resistor in series with the pickup to get the needle off zero and nearer to the middle of the scale, but these topics are well beyond the scope of this column.)
It's also possible to use a standard digital multimeter by connecting the pickup to it and using the DC/ohms setting, but you must look quickly to note what happens, because on a DMM polarity is indicated in a flash.
All these alternatives to an analog meter equipped with a phase tester are only recommended for experienced techies. I'm pretty sure not many PG readers will have an old vintage meter handy and most won't be willing to pay top dollar to acquire one and use it only for this measurement. So is there a way around this? Fortunately, yes. In a future column, I'll show you how to build a full-fledged polarity tester for only a few bucks, so stay tuned. (Though they may exist, I've never seen a stand-alone polarity-testing unit for sale, so this will be a fun project.)
Also in an upcoming Mod Garage, we'll bring all the facts together to understand the relationship between magnet polarity and electrical phase and how to control in-phase and out-of-phase sounds. We'll also look at the role reverse-wind/reverse-polarity (RWRP) pickups can play in hum-cancelling configurations, and discover why winding direction and polarity are so important in this context.
But meanwhile, let's give this pickup information a chance to sink in. In the next column, we'll tackle a mod for steel-string acoustics, and I'll show you how to make changing strings much easier while simultaneously enhancing tuning stability. Until then ... keep on modding!