
Photo 1 — Courtesy of singlecoil.com
If you've been frustrated by string-changing hassles or have issues with keeping your flattop in tune, you'll be happy to know that there are a couple of simple and inexpensive steps you can take to improve this situation.
Tighten the tuners. The first is so basic most players don't even think about it until someone points it out to them. Consider this: We know an acoustic guitar is built to vibrate and resonate when you play it. This causes the tuners to loosen up a bit—especially if the guitar gets played a lot. When we have a well-played steel-string in the shop for repair work, I'm always surprised at how loose the tuners feel on the headstock, once the strings are off. The remedy is simple: Before you put on new strings, first tighten your tuners.
The key is to carefully match your tools to the tuners—you don't want to damage them or your guitar. Start with a screwdriver that's correctly sized to fit the mounting screws on the back of the headstock. After confirming this, tighten each screw. Exercise caution! It's easy to break those tiny tuner screws. The next step after tight is super-tight, followed by broken.
If you can spin a screw around without it stopping, it means the hole is worn out and the threads don't have enough wood around them to find purchase. There are two possible solutions for this: You can use a slightly bigger screw if the hole in the tuner's rear plate is big enough to accommodate it. Alternatively, you can fill the worn-out hole with a small piece of toothpick dipped in a little wood glue. After letting the glue dry for about 12 hours, reinstall the original screw.
Depending on the toothpick material, to prevent the screw from breaking when you insert it and apply torque, it may be necessary to pre-drill a very small pilot hole. For instance, we use super-hard bamboo toothpicks in the shop, and they require pilot holes.
Next turn the guitar over and use a socket wrench to tighten up the hex nuts that secure the tuners to the front of the headstock. Again, it's crucial to get a snug fit, otherwise the wrench will slip and either butcher the hex nut or ding your guitar. Or both.
I know this tuner business sounds elementary, but it's typically overlooked. If you want to avoid tuning issues and rattling noises, this should become standard operating procedure every time you change strings.
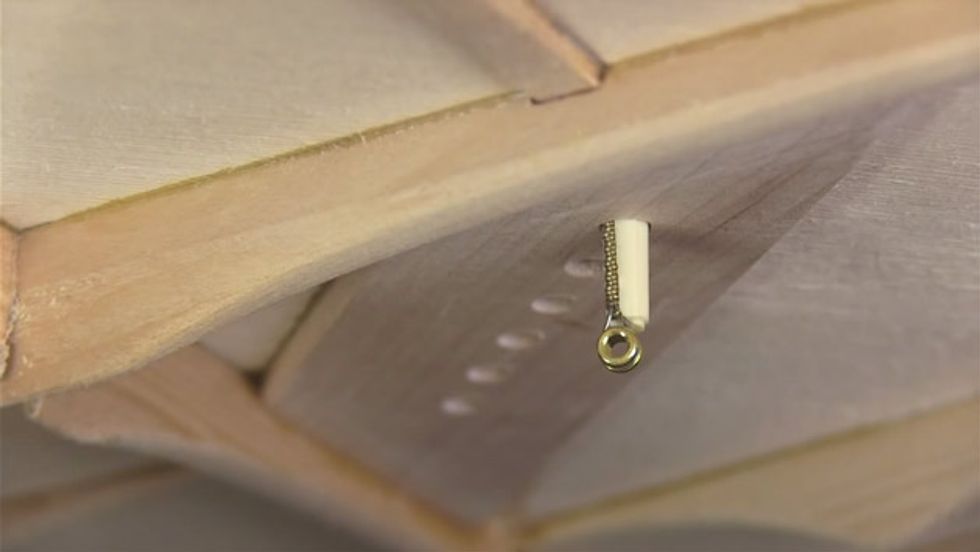
Modify your bridge pins. And while we're on the subject of changing strings, here's an issue that can cause severe tuning problems as well as damage your guitar. The problem lies with using an incorrect technique to insert the bridge pins. If you're not careful when restringing your guitar, the bridge pin—especially if it has a deep groove—will snag the string's ball end, as shown in Photo 1. See how the ball end is at the very end of the pin? When you bring the string up to tension, the ball end will tend to work its way up the bridge pin over time until it firmly locks under the bridge plate. There are several reasons why you don't want this:
• You'll have severe tuning problems while the ball-end is still hanging off the bridge pin or is in the process of working its way up to the bridge plate.
• It can force the bridge pin to lift and come out of the bridge while you're tuning the string.
• The slipping string will act like a saw, enlarging your bridge-pin holes over time.
• You can damage your bridge pins and even the bridge plate.
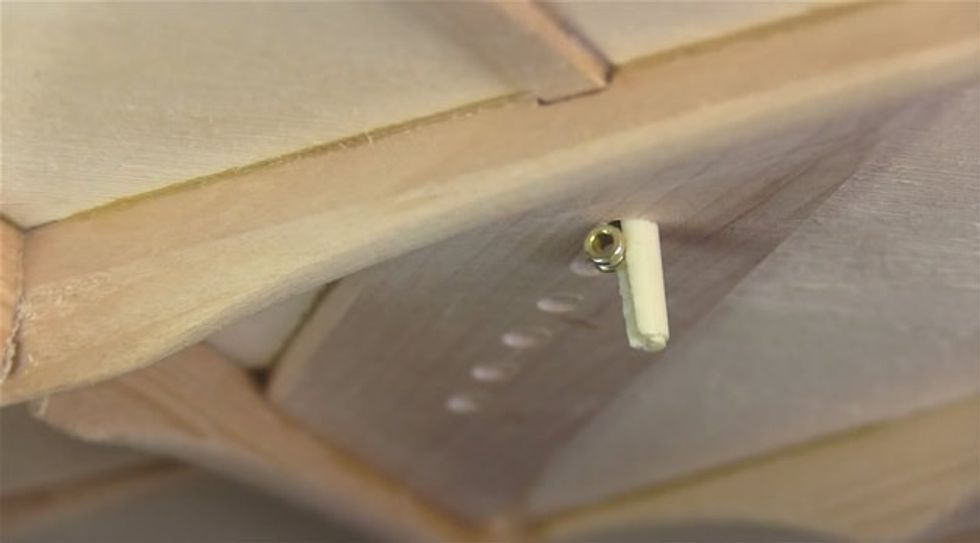
Photo 2 — Courtesy of singlecoil.com
Photo 2 shows the correct way to insert the bridge pin and hold the ball end. Fortunately, there's an easy mod that will ensure that your bridge pins and ball ends look like this every time you string up. It's so effective we do this to every set of bridge pins we get our hands on while repairing or working on a customer's flattop.
The solution is to bevel the tip of the bridge pins by filing off the end at an angle of approximately 45 degrees. The bevel forces the ball-end up and away from the pin, and thus helps guide it up to the bridge plate. After you've beveled the bridge pin, there's nothing for the ball-end to get hung up on anymore.
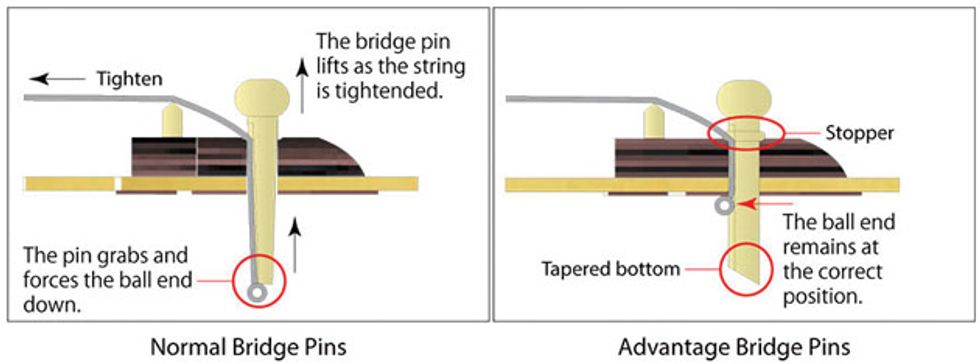
Fig. 1: Comparing standard bridge pins (left) to Ibanez Advantage Bridge Pins. — Illustration courtesy of Ibanez
Beveled bridge pins are commercially available. For example, Fig. 1 shows Advantage Bridge Pins made by Ibanez, and this illustration clearly shows why they're superior to standard bridge pins. But hey, completing a useful mod feels great, so let's discover how you can bevel the standard bridge pins you already have and get all the benefits without spending a dime.
I'm sure most of you already have all the necessary tools:
• A fine flat pillar file and a fine round needle file.
• 400 grit sandpaper.
If you want to do this more professionally, you should also have:
• A small piece or block of wood.
• A vice to hold this block of wood.
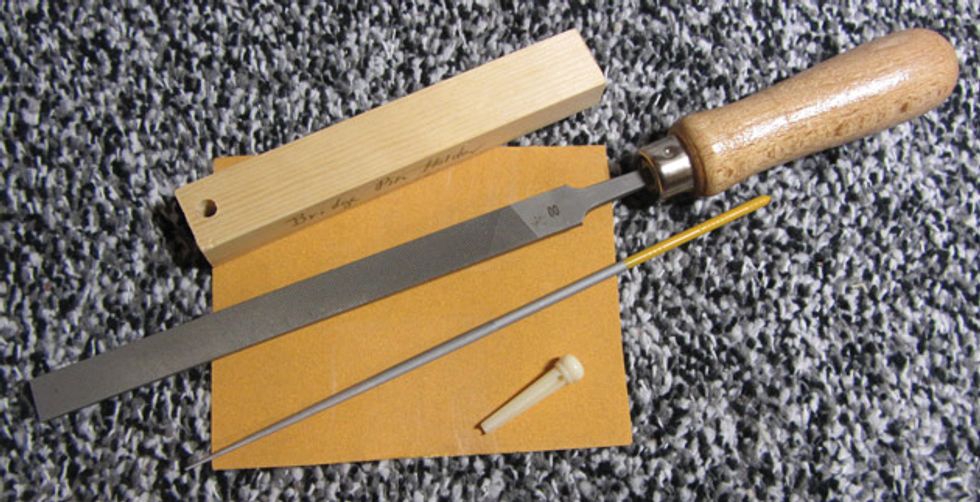
Photo 3 — Courtesy of singlecoil.com
Photo 3 shows the required tools and materials. Remember to protect yourself with gloves and goggles—you don't want to jab a file into your hands, and you don't want any flying debris going into your eyes!
Okay, here's the four-step process:
1. You'll be beveling six bridge pins, so it's well worth taking the time to craft yourself a custom jig. Using a caliper, carefully measure your bridge pin and then drill a matching hole into the wood. Push the bridge pin firmly into the hole, then flip over the block and grip it in a vice with the end of the bridge pin facing up.
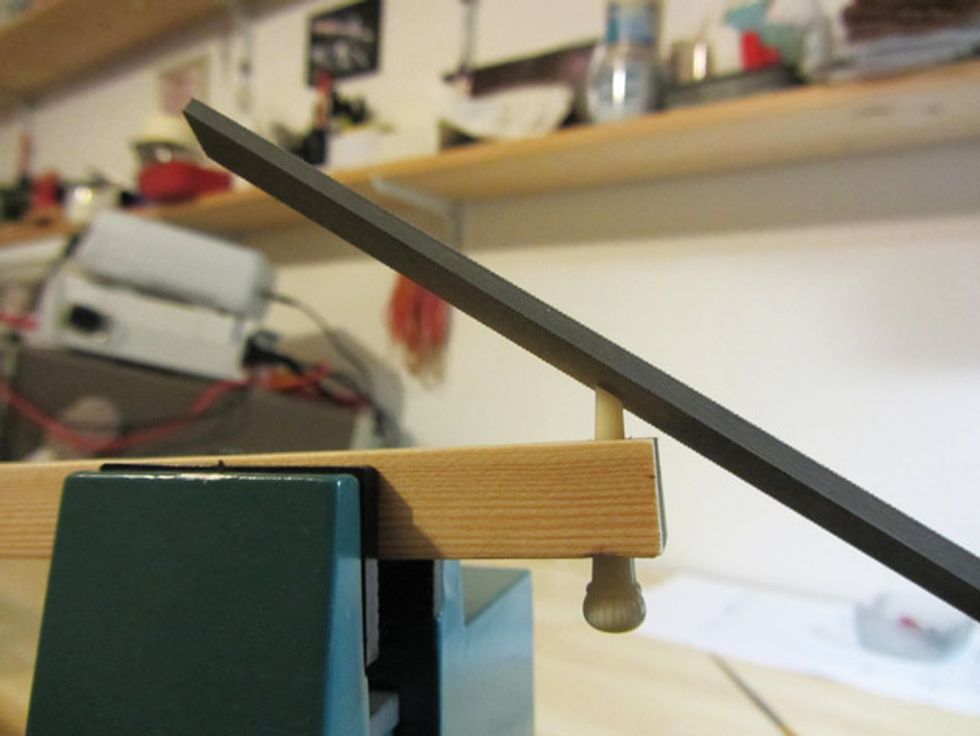
Photo 4 — Courtesy of singlecoil.com
2. With the fine flat pillar file, slowly work a 45-degree bevel onto the end of the bridge pin (Photo 4).
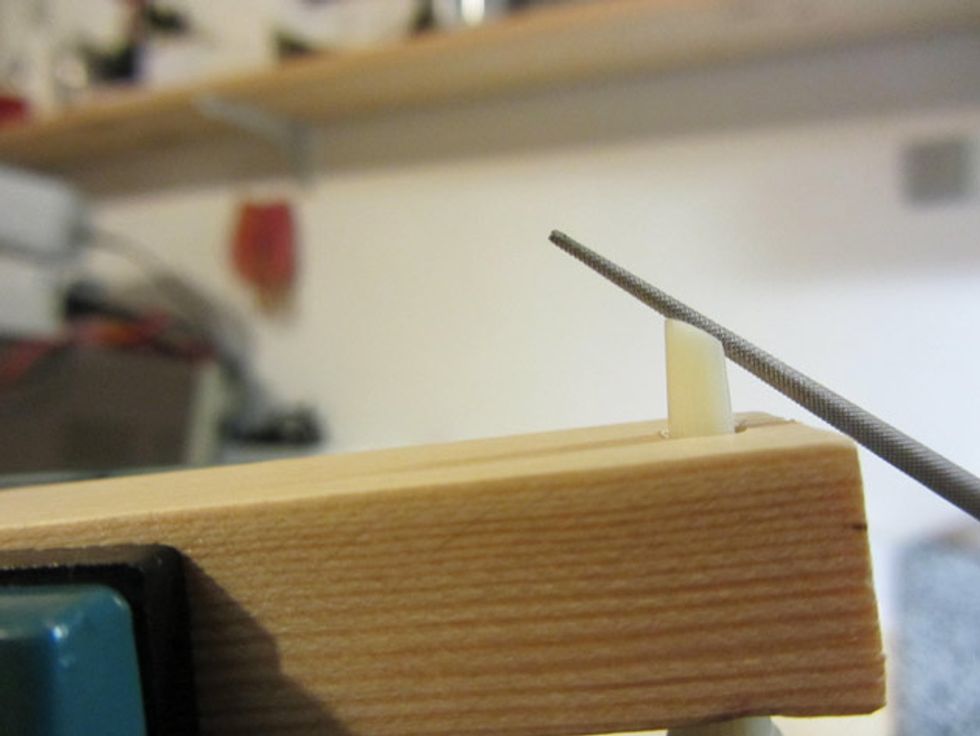
Photo 5 — Courtesy of singlecoil.com
3. Use the fine round needle file to open up the end of the bridge pin groove again and to perfectly smooth out the edges (Photo 5). It helps to rotate the file during this process.
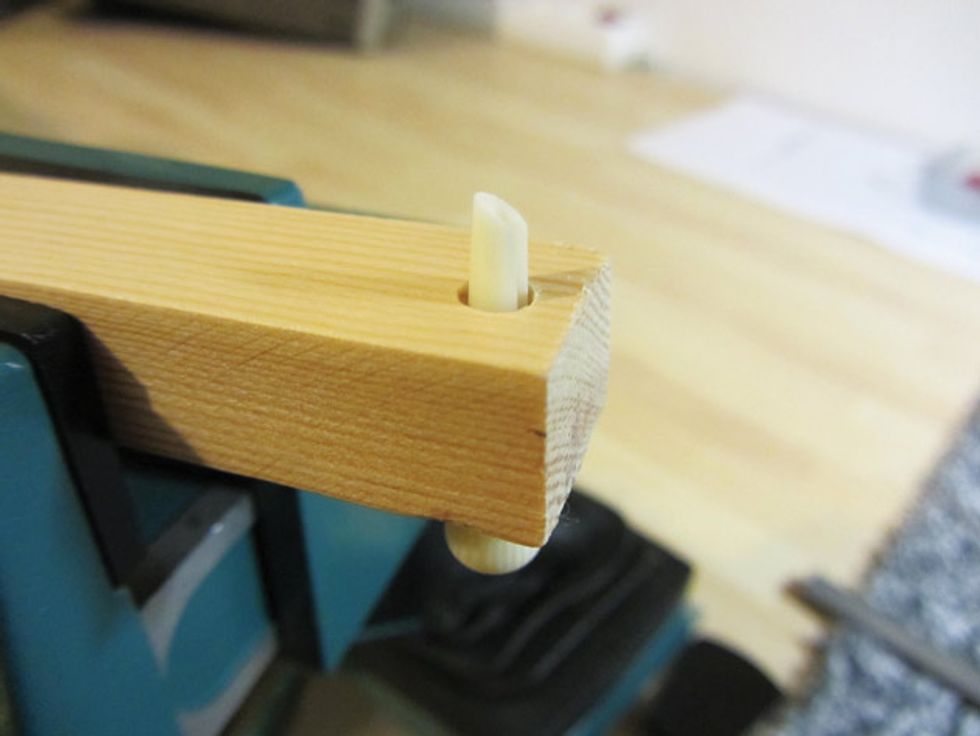
Photo 6 — Courtesy of singlecoil.com
4. Finally, clean the pin up with 400 grit sandpaper. It should look like Photo 6.
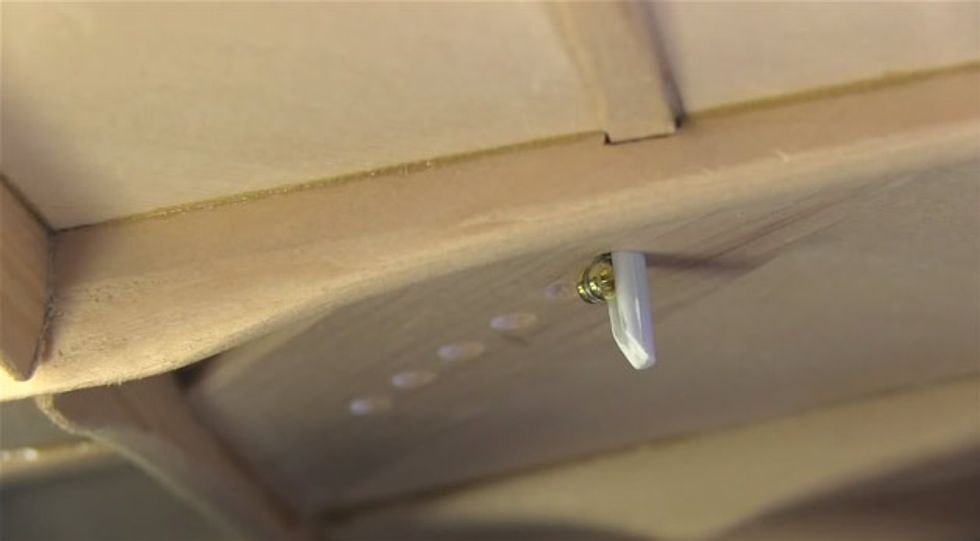
Photo 7 — Courtesy of singlecoil.com
Once you've beveled all six bridge pins, restring your flattop and you'll be good to go. Photo 7 shows a modded pin with the string's ball end seated securely against the bridge plate. It's always a good idea to use an inspection mirror to check the bridge plate area after every restringing. This way you can be sure everything looks right. (Guitar inspection mirrors are available from luthier suppliers, but auto parts stores sell inexpensive telescoping mirrors that work well, too.)
Next month we'll tackle a new electric guitar project. Until then ... keep on modding!