Get out your DMM, and let's explore the simple ways to ground Strats, Teles, and Les Pauls. The good news is, there is no such thing as overgrounding.
We'll break this down into two sections. Today, we'll talk about grounding in general and different ways to do it. In part two, we'll focus on grounding legs on the casing of a pot, like on the Stratocaster's master volume pot. And we'll come back to all this in a future column about how to shield pickguards and compartments the right way, which is also an important part of the grounding system.
Before we start, let's remind ourselves: We're talking about grounding in passive guitars, so we're talking about your standard Stratocaster, Telecaster, Les Paul, and the like. We're not talking about your amps, stompboxes, grandma's old steam radio, and other active devices.
In other words, it doesn't make a "better" grounding, but for showcase reasons, this is a cool option, anyway ... you hear with your eyes, too.
The good basic news is that it's not really hard to understand and you only need a simple digital multimeter, or DMM, set to continuity to analyze the grounding system in your guitar. I usually set it to audio or "beep mode," so you don't have to watch the display of your DMM. It's really simple: When it beeps, there is contact. If not, there is no connection.
More good news: There's no "over-grounding." But there are things you can do wrong and then you're in trouble. My favorite on the "Grounding Pet Peeves" list is closing the ground ring on Les Pauls, ES-335s, and similar guitars. As you can see in Image 1, the ground ring is not closed, but many people like to add another ground wire, which I've marked blue, to "enhance" and complete the wiring because they feel that there's something missing. What happens if you do this? You created a perfect antenna to pick up radio and CB signals, so you can play along with your favorite radio station.
So, please don't do this. Sometimes less is more. Rant over … for now.
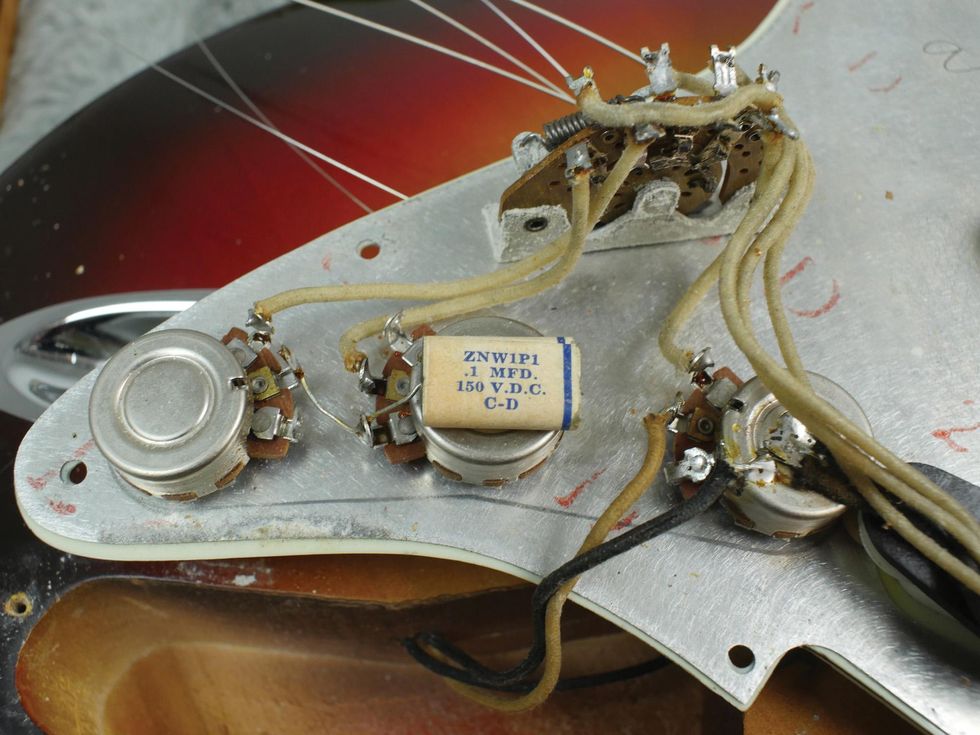
Image 2
Image courtesy of singlecoil.com
For today's guinea pig, I chose the Stratocaster, but will also elaborate on other guitars. Let's have a look at how to connect all casings together to ground them. The two basic rules of thumb are:
1. When your pickguard, control plate, or compartment is conductive, you don't need to add any ground wires to the individual components. They're already connected together because their metal parts are touching the conductive surface. This is the shield underneath a Stratocaster pickguard, the metal control plate on a Telecaster, or the metal "cage" you can find in some Les Paul models where the pots are installed through. But always try before you trust! Use your DMM set to continuity and do a test to see if the surface is really conductive. If it is, your DMM will show (or beep) continuity. This is especially important when you see black shielding paint anywhere in your guitar. It should be conductive, but in most cases, it's simply black paint to mimic shielding. On some models, like an ES-335 and similar, there is neither a shield nor any conductive paint underneath the top, so there is no way around using wires to ground all metal parts. If you're unsure, always run a wire from part to part to ground it. Even if the surface is conductive, it will do no harm to have double-grounding.
2. All this will only have an effect when you connect the system to the string grounding wire, by simply soldering it to the back of a pot, to the ground lug of your output jack, or to the copper foil underneath your pickguard, etc. Whatever you prefer. This wire usually comes from the tremolo claw in a Stratocaster, from underneath the bridge plate in a Telecaster, or from one of the studs on a Les Paul, ES-335, etc. If you are unsure which of the wires is the right one, the test is really simple: Use your DMM with one probe on the stripped wire you want to test and the other touching one of the metal strings. Continuity? Congratulations, this is the string grounding wire.
Image 2 shows the most minimalistic grounding version: Underneath your Stratocaster pickguard is a conductive shield (same for the Telecaster metal control plate). Install the pots and the switch and that's it. No additional wire connections are necessary, as the conductive shield will connect all parts. Use your DMM with one probe on the back of the pot and the other touching the shield, and then repeat this procedure with all three pots and the switch.
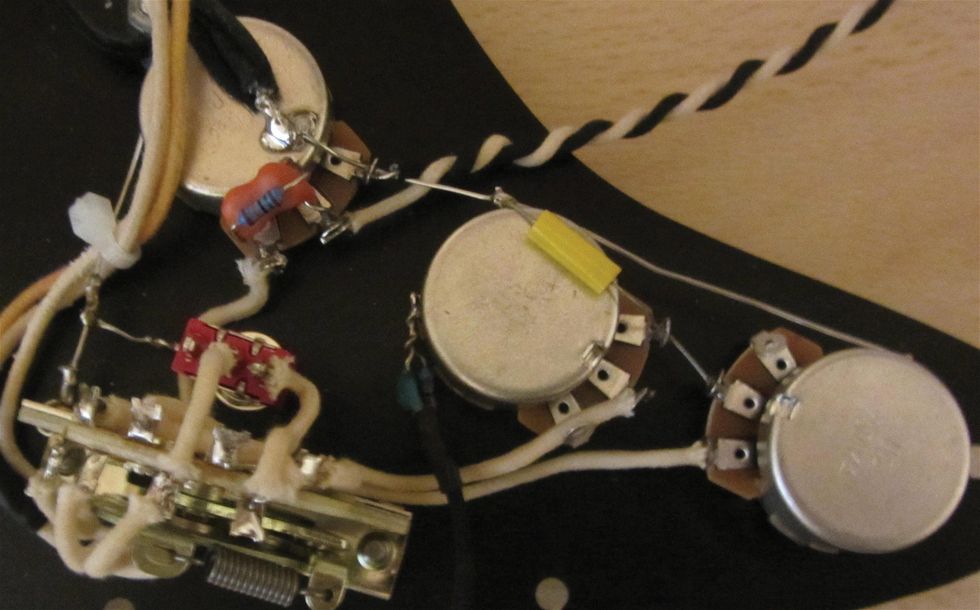
Image 3
Image courtesy of singlecoil.com
This is a Fender Stratocaster from 1959, and you can see there are no additional ground wires from pot to pot. The shield underneath the pickguard makes the connection and this is the way all early Fender guitars were grounded. Leo Fender was an educated accountant, well known for not wasting anything, and his defined goal was to build guitars in large quantities but in a short and cost-effective time. So why waste a piece of wire when you don't need to, and why waste time for such an operation when it's not necessary?
The second grounding version involves simply running a wire from one metal part to the next. This can be an insulated wire or a bare solid wire—sometimes tubing is used with bare solid wire to insulate it. The diameter of the wire is not important: A heavy-gauged wire won't make a better ground, in this case.
Image 3 shows the grounding version with simply a bare solid wire running from part to part. Image 4 shows the grounding version with tubing over the wire running from part to part. Please note that both pickguards in Image 3 and Image 4 don't have a conductive shield. Also note that there is a wire running from the volume pot to the 5-way pickup selector switch to ground it as well.
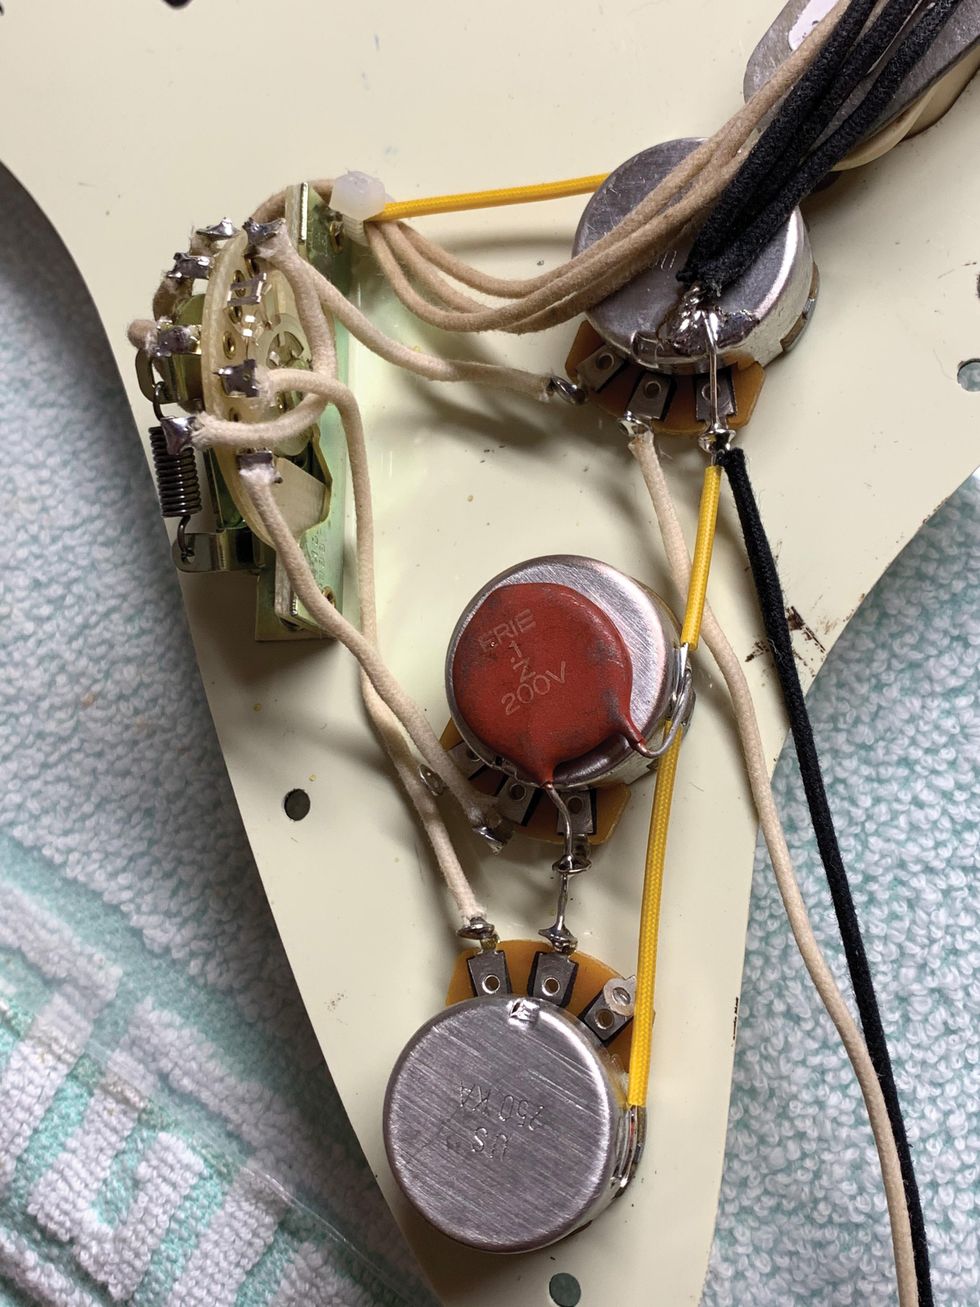
Image 4
Image courtesy of singlecoil.com
On some guitars, you can see that a ground strap is used to connect the parts, but this is the same principle and only a variation regarding materials. John "Dawk" Stillwell (may he rest in peace), the former guitar tech for Ritchie Blackmore, was well known for using this technique, and you can see what this looks like in Image 5.
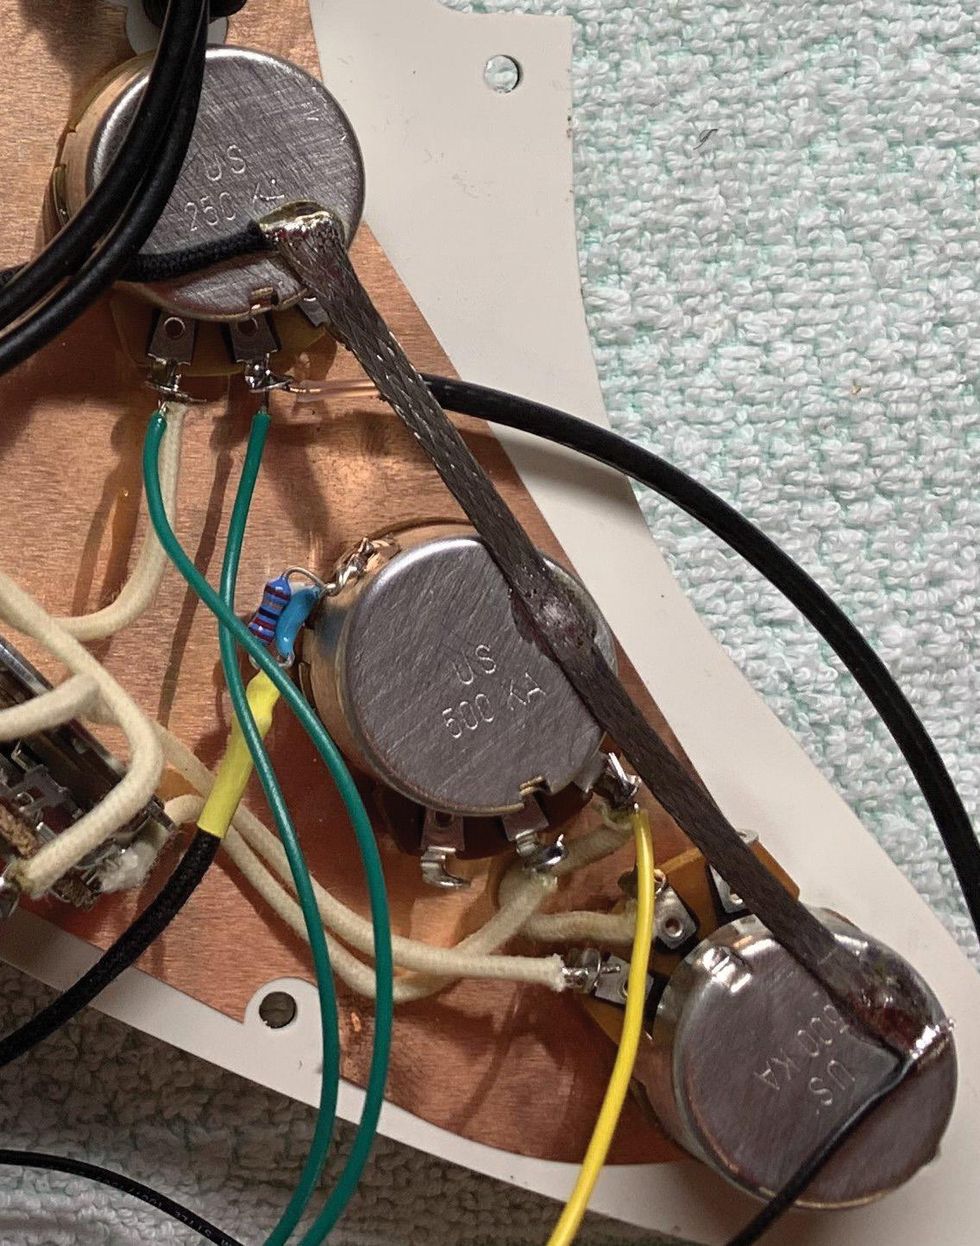
Image 5
Image courtesy of singlecoil.com
It looks pretty cool but has no advantage over using an insulated wire or bare wire. In other words, it doesn't make a "better" grounding, but for showcase reasons, this is a cool option, anyway ... you hear with your eyes, too. As you can see, this pickguard has a highly conductive copper shield, so any connection between the parts is obsolete anyway.
So, what version is the best, you might ask? For me, it's using a bare solid AWG 19 wire (also sometimes called "ground bus wire") that I only put sleeve on in certain guitars, such as a Les Paul. On all Fender guitars, and especially in any Stratocaster, I use it bare for some good reasons. With this technique, you can minimize the number of soldering spots and it offers some great advantages that you'll see in the second part of this series when we talk about grounding legs on pots.
Why is it important to minimize the number of soldering spots on the cases of the pots? It not only looks neat and tidy and saves time and material (Leo Fender would have chosen this technique for sure), but it also minimizes the risk of damage from overheating, which is the most important reason for me. The easiest way to damage a pot is to overheat it, especially when attaching a ground wire to the back casing. It usually takes 60 watts of power for this, and with a wrong soldering technique this can be a real disaster. I've discussed this topic before, but if you aren't familiar, read my column "How to Install and Maintain Your Guitar's Pots," from the May 2020 issue.
I'll share two advantages, shown on a Stratocaster, of why I prefer this technique. (I'll give more advantages in the sequel installment of this column).
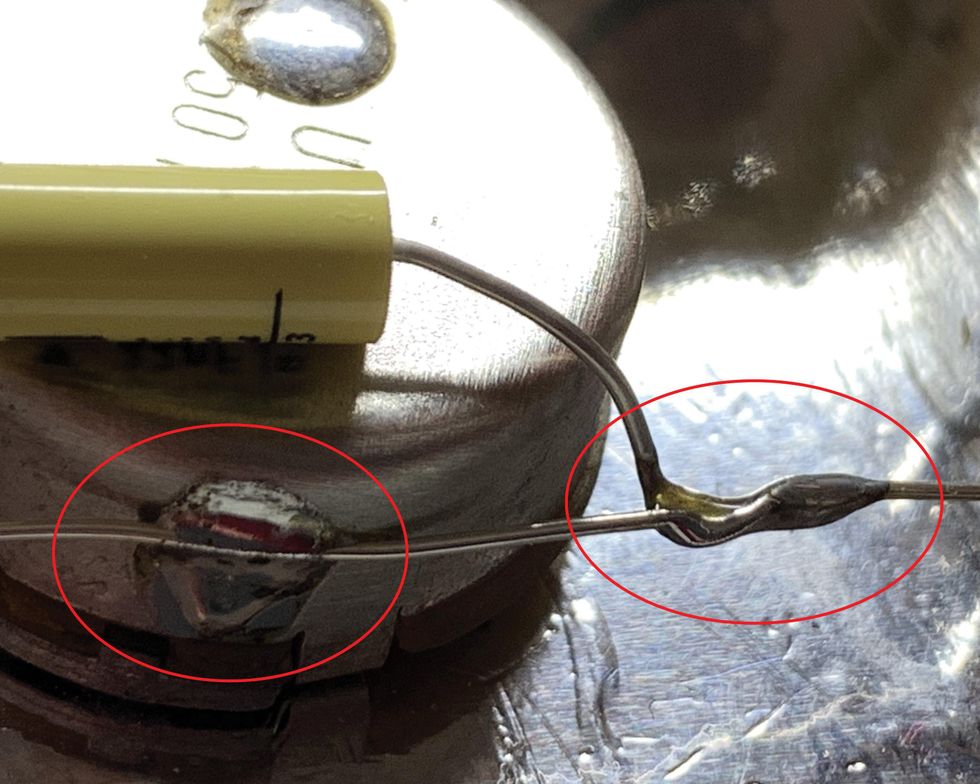
Image 6
Image courtesy of singlecoil.com
In Image 6, you can clearly see on the casing of the pot that there is only one soldering spot to connect the wire. With an insulated wire running from pot to pot, you would have two soldering spots or you have to heat it up for a second time. Next, look at the leg of the tone capacitor that needs to be connected to ground. Instead of making an extra soldering spot for it on the case or heating up an existing soldering spot for a second time, I simply solder it to the ground wire and that's it. The still unpopulated soldering spot on the back of the case is for the string grounding wire.
That's it, for now. Next month we'll continue our relic'ing project, focusing on the pickup and its cover, so stay tuned.
Until then ... keep on modding!With a team of experts on hand, we look at six workhorse vintage amps you can still find for around $1,000 or less.
If you survey the gear that shows up on stages and studios for long enough, you’ll spot some patterns in the kinds of guitar amplification players are using. There’s the rotating cast of backline badasses that do the bulk of the work cranking it out every day and night—we’re all looking at you, ’65 Deluxe Reverb reissue.
Follow some super-hip players and studios on the cutting edge and you’ll find a host of meticulously crafted boutique amps. And for the various flavors of road-dogs, there’s also the emerging force of modeling units that emulate everything under the sun.
Then there are the players who have to go to the source and are doing the tone-gods’ work by keeping vintage amps in the game. (There are a lot of us, and we take our work seriously.) At the highest level of stage and studio, you’ll find the elite vintage models—the tweeds, black-panels, plexis, and all their pals. Those amps command their fair share of literal and digital ink. Then there are the oddball selections that some new player will bring to everyone’s attention.
But there’s a less-hyped flavor of vintage amp that actually shows up much more often than those rare gems. These are the everlasting classics you’ve seen about a million or so times played by bands in every size of stage and lining the walls of your favorite studio. They’re the perennial workhorses whose reputations thrive because of some formula of tone, consistency, reliability, and—maybe the most important variable—price.
Brooklyn-based amp-repair guru Pat Kauffman operates Patrick Kauffman Electronics out of Main Drag Music, where he also teaches amp-building workshops.
Here are six of these vintage models, all priced to fit in a gigging budget, coming in right around $1,000 or less as of this writing. With a trio of experts on hand, here’s an idea of what makes each of these amps tick all these years after they were first introduced.
Silver-Panel Fender Bassman
A drip-edge era Fender Bassman head.
Photo by Pat Kauffman
The Fender Bassman is, of course, one of the most classic amplifiers. The tweed Bassman circuit is one of the most copied and modified circuits of all, serving as a platform for so many designs to follow, most notably Marshalls, as well as a couple more on this list. By the time the silver-panel era began, first with the drip-edge years starting in 1967, the Bassman circuit had evolved from those early days through the also highly coveted black-panel era.
“The silver-panel is not that different from the black-panel,” notes Brooklyn amp-repair guru Pat Kauffman, “and you can easily modify them to black-panel specs—they’re the same transformers.” Both eras kick out 50 watts—though there are quite a few variations, such as Bassman 100, 135, and more than a few others, we’re simply talking about the “Bassman”—and host a tube set that includes a pair of 6L6 power tubes, a trio of 12AX7s, and an ECC81.
“I think the right person can get their own signature tone from these, and it’s not gonna be one that will come from a Fender, it’s not gonna come from a Marshall.” —Jeff Bober on the Ampeg Gemini
This era of Fender Bassmans deliver plenty of headroom, but unlike the Fender “reverb” amps, Kauffman points out there’s an extra gain stage, which he says “gives it a little more grit that makes them kind of unique.”
Jeff Bober, former PGamp columnist and cofounder of Budda Amplification, adds that the silver-panel Bassmans “compress earlier, which might be a little opposite of what they were going for, so you can push the front end a little easier.”
Even better, Kauffman points out that they’re “easily serviceable. That’s key number one—all the parts are available.”
Ampeg Gemini
This Ampeg Gemini II combo includes a 15" speaker.
Photo by Pat Kauffman
If you feel like you’ve seen an Ampeg combo in most studios you’ve ever entered, you probably wouldn’t be exaggerating. And there’s a good chance that a lot of those were an Ampeg Gemini or Gemini II, offered starting in the mid ’60s, with a few variations over its life, from 22 to 30 watts, with speaker offerings ranging from a single 12" to a 15", and in later eras with more watts and more speaker configurations.
Because of their size, these are less common on stage than they are in studio, but Bober—who is a proud native of Ampeg’s hometown of Linden, New Jersey—says of the Geminis as well as the smaller, and also very cool, 12-watt Ampeg Jet, “They have their own unique sound, they’re not all that loud to start with so if you’re in a situation where you can crank an amp a little bit, these are really good to do it.”
Jeff Bober founded Budda and EAST Amplification and was the author of PG’s Ask Amp Man column.
These full-featured combos have onboard reverb and tremolo, and they use a set of 7591 power tubes. Bober points out these are “more of a hi-fi-sounding, very full-bodied tube” that he describes as “somewhere between a 6V6 and a 6L6 power-wise, but with a different tonality.” He adds, “I think the right person can get their own signature tone from these, and it’s not gonna be one that will come from a Fender, it’s not gonna come from a Marshall.”
While these amps are known for their reliability as well as well as their unique sound, Kauffman points out that the phase-inverter tube, a 7199, has gotten expensive in the modern market: “A lot of times, they’ve been changed out to different tubes, or they have a little converter adapter in, so that’s something to look out for.”
Traynor YBA-1 Bass Master
With two inputs per channel, it’s easy to “jump” channels with a patch cable to extend the voice of the Traynor YBA-1.
Photo by Thunder Road on Reverb
Beloved by both guitarists and bassists, the 45-watt Traynor YBA-1 circuit was the company’s first offering in 1963, when it was called the Dyna-Bass. By the next year, it was retitled the Bass-Master and the title stuck. While the company didn’t have the name recognition of a Fender or Ampeg, they developed an underground reputation that is still going strong. In 1969, Traynor provided the backline to 1969’s Toronto Rock ’N’ Roll Revival concert, where the Plastic Ono Band recorded their Live Peace in Toronto 1969 live album, and which was later celebrated in the 2022 documentary REVIVAL69: The Concert That Rocked the World.
The YBA-1’s simple 3-band EQ control set and 2-knob “range expander” make for easy tone-sculpting, and jumping the channels with a small patch cable opens its voice even wider. Kauffman calls the amp a “Bassman on steroids.” He points out that some models use 7027 power tubes—“basically a beefier 6L6”—and others use 6CA7s, plus a pair of 12AX7s and an ECC83. These amps are easily modified to replicate a JTM45 circuit, which is a popular change for some, but many players prefer to keep them unchanged.
“People who are Traynor fans are Traynor fans. They’ve either owned one and sold it and regret it, or they own three of them.” —Blair White on the Traynor YBA-1
Bober says that the YBA-1 is “built as good as any Fender or eyelet-board kind of design. They have probably the biggest transformers for their power rating of amps being built at that time. They’re very clean circuits, great pedal platforms, and they sound great.”
Blair White, owner of Nashville’s Eastside Music Supply, has witnessed the cult of Traynor firsthand and says, “People who are Traynor fans are Traynor fans. They’ve either owned one and sold it and regret it, or they own three of them.” Despite their reputation as well-made, reliable amps with a great tone, White notes that they’re still easy to get a hold of: “I don’t know if it’s just because it was not Fender or Marshall, but for whatever reason, you can still find those for $600 or $700.”
Sovtek MIG
This Sovtek Mig 100h is the high-gain member of the Mig family.
Photo by Brent’s Gear Depot on Reverb
Built in Russia by New Sensor starting in 1991, this head, which came in 50-, 60-, and 100-watt models, is another spin on the same tweed Bassman formula that begat the JTM45 and the Traynor YBA-1. Running a pair of 5881 power tubes and a pair of 12AX7s, the MIGs featured a solid-state rectifier and a slightly slimmed-down control set from the Bass-Master, with two independent volume controls (non-jumper-able), a 3-band EQ, and a presence knob.
In an A/B comparison with the modern EHX MIG 50, where both sound identical (or close to it), JHS Pedals’ head honcho Josh Scott has gone on the record and called the MIG 50 his “favorite amp in the history of the world.” The modern ones tend to come in a little less expensive than the vintage models, which Bober points out have an “iffy” build quality thanks to their Eastern Block components.
“They have a cascading input, so there is an extra gain stage like the JCM800s.” —Pat Kauffman on the Sovtek MIG
Kauffman agrees, “They’re a little awkward to service. A lot of the hardware is kind of cheap, so you’ll often find the jacks busting and the pots busting.” You might want to look out for a deal if you’re considering a vintage model, which could be well worth your time. Kauffman adds that the MIGs have their own cult and calls them “fantastic-sounding amps. They have a cascading input, so there is an extra gain stage like the JCM800s, so they kind of have this Marshall sound but a little more rounded.” If Scott’s comparison tells us anything, the modern version is also worth checking out.
Music Man HD-130
The powerful Music Man HD-130 in its oddball 2x10 form—that’s a lot of power to push through two little speakers!
Photo by Main Drag on Reverb
When Music Man amps hit the scene in the mid ’70s, they were unlike anything Leo Fender had set out to do with his previous designs. Gone was the simple, efficient circuitry of his earlier work. Instead, Music Man amps featured a hybrid solid-state preamp and tube power amp, with the clear target of maximum headroom.
The HD-130 was the most extreme of Music Man’s offerings, delivering a sizzling 130 watts via four 6CA7 power tubes and available in both head and combo form. (If that sounds too extreme, you could get it shrunk down to a small 2x10 combo… but with no less wattage!) The master-volume control set features two channels each with a 3-band EQ and a bright switch, plus combo models and some heads included reverb and tremolo.
Blair White, co-owner of Nashville’s Eastside Music Supply, is so passionate that he spoke to PGwhile movers were loading the store’s gear into their new location!
“Those amps are punishing!” says White. “They’re probably the most bang for your buck that you’ll get as far as power and wattage. Their unique formula certainly got the attention of some major players, and Mark Knopfler, Robbie Robertson, and Johnny Winter all counted on them at some point.”
These days, Kauffman says they remain quite reliable, but issues can arise with modern tubes. “They use high plate voltages, which tends to eat new tubes,” he explains. “If you get the electrolytic caps replaced and have the tubes biased correctly, they really should be reliable. But if you’re having a problem, it’s usually cooking power tubes because they’re a new set.” He adds that, while tube supply changes, he currently finds JJ EL34s to hold up well against the HD-130’s high voltage.
Peavey Mace
The 160-watt Peavey Mace promises extreme volume with high clean headroom plus onboard distortion and phaser.
Photo by Free Lunch on Reverb
No list of great-value amps is complete without a Peavey. Of course, their broad range of models over the years made it hard to decide which to include. At a whopping 160 watts, the Peavey Mace made the cut, if only for sheer power. It’s another hybrid amp, combining a whopping sextet of 6L6s in the power section with a solid-state preamp in both head and 2x12 combo form. Their clean headroom puts them in a class with the HD-130 and also put them onstage with Lynyrd Skynyrd’s Gary Rossington.
The Mace is less common than most of the others on this list, but late-’70s models are fairly easy to track down. Bober says, “If you want loud and clean, those are great amps.” But he notes that the Mace is “not the most accurate pedal platform. Drive or overdrive pedals tend to try and push the front end to get more juice, but things that have IC chips in the front end don’t respond the same way, they don’t agree to being pushed to their limits, and they don’t generate the same harmonics as a tube does.” The Mace has both a normal and effects channel, which includes distortion and reverb, as well as an onboard phaser.
Kauffman reports from his work bench that the Mace is “great and reliable.” He explains that these amps were built on a printed circuit board, and he tends to see bad solder joints when they come in for service. That’s nothing to be afraid of though. “If you have one,” he says, “you could get it cleaned up, change the electrolytic caps, and have it resoldered, and you should be fine.”
At 160 watts, you’ll want to make sure you have your earplugs handy.
The new Jimi Hendrix documentary chronicles the conceptualization and construction of the legendary musician’s recording studio in Manhattan that opened less than a month before his untimely death in 1970. Watch the trailer now.
Abramorama has recently acquired global theatrical distribution rights from Experience Hendrix, L.L.C., and will be premiering it on August 9 at Quad Cinema, less than a half mile from the still fully-operational Electric Lady Studios.
Jimi Hendrix - Electric Lady Studios: A Jimi Hendrix Vision (Documentary Trailer)
“The construction of Electric Lady [Studios] was a nightmare,” recalls award-winning producer/engineer and longtime Jimi Hendrix collaborator Eddie Kramer in the trailer. “We were always running out of money. Poor Jimi had to go back out on the road, make some money, come back, then we could pay the crew . . . Late in ’69 we just hit a wall financially and the place just shut down. He borrows against the future royalties and we’re off to the races . . . [Jimi] would say to me, ‘Hey man, I want some of that purple on the wall, and green over there!’ We would start laughing about it. It was fun. We could make an atmosphere that he felt comfortable in and that he was able to direct and say, ‘This is what I want.’”
Electric Lady Studios: A Jimi Hendrix Vision recounts the creation of the studio, rising from the rubble of a bankrupt Manhattan nightclub to becoming a state-of-the-art recording facility inspired by Hendrix’s desire for a permanent studio. Electric Lady Studios was the first-ever artist-owned commercial recording studio. Hendrix had first envisioned creating an experiential nightclub. He was inspired by the short-lived Greenwich Village nightspot Cerebrum whose patrons donned flowing robes and were inundated by flashing lights, spectral images and swirling sound. Hendrix so enjoyed the Cerebrum experience that he asked its architect John Storyk to work with him and his manager Michael Jeffery. Hendrix and Jeffery wanted to transform what had once been the Generation Club into ‘an electric studio of participation’. Shortly after acquiring the Generation Club lease however, Hendrix was steered from building a nightclub to creating a commercial recording studio.
Directed by John McDermott and produced by Janie Hendrix, George Scott and McDermott, the film features exclusive interviews with Steve Winwood (who joined Hendrix on the first night of recording at the new studio), Experience bassist Billy Cox and original Electric Lady staff members who helped Hendrix realize his dream. The documentary includes never-before-seen footage and photos as well as track breakdowns of Hendrix classics such as “Freedom,” “Angel” and “Dolly Dagger” by Eddie Kramer.
The documentary explains in depth that while Jimi Hendrix’s death robbed the public of so much potential music, the continued success of his recording studio provides a lasting legacy beyond his own music. John Lennon, The Clash, AC/DC, Chic, David Bowie, Stevie Wonder, Lady Gaga, Beyoncé and hundreds more made records at Electric Lady Studios, which speaks to one of Jimi’s lasting achievements in an industry that has radically changed over the course of the last half century.
PG contributor Tom Butwin dives into the Rivolta Sferata, part of the exciting new Forma series. Designed by Dennis Fano and crafted in Korea, the Sferata stands out with its lightweight simaruba wood construction and set-neck design for incredible playability.
The "Sandblasted" SE Series features a swamp ash top with a unique sandblasted finish in five color options.
This limited edition is built on the CE platform and pairs a swamp ash top and mahogany back with a 24-fret, 25” scale length bolt-on maple neck and rosewood fretboard. The Swamp Ash tops have been “sandblasted” to accentuate the wood’s inherent figure and are then grain-filled in one of five colors: Sandblasted Blue, Green, Purple, Red, or White.
“We have done runs with this treatment before, but this is the first time we are offering it at scale worldwide. I really fell in love with these guitars after watching the sandblasting process in person. It’s transformational. But, these guitars are more than just eye-candy – they take a ton of care to make, and they are made to be played,” said Jack Higginbotham, PRS Guitars COO.
For more information, please visit prsguitars.com.