
Whether electric bass is your main instrument or you're a guitarist who doubles on 4-string, it's important to keep your axe in tip-top shape. In this handy guide, Nashville guitar tech and luthier Tony Nagy explains how the pros do a bass setup.
As you'll soon discover, it's not hard to make your bass play and sound great. In this step-by-step tutorial, Nagy walks you through the entire process. With a few tools and some patience, you'll get the job done right and—best of all—have the satisfaction of knowing you did it yourself.
I've read many articles and repair manuals on bass setup, and I've personally set up thousands of basses as a professional. So when PG asked me to write a DIY piece on the subject, I thought, "What can I bring to this discussion that's truly helpful? Is there a little something I can describe that you don't already know?"
In this article, we'll cover the essentials with the goal of helping you decide what you can handle yourself and what you should leave to your local repair technician. Even if there are aspects of the job you're not prepared to attempt on your own, it's good to understand what's involved with a bass setup. Knowing the steps and terminology will let you communicate more confidently and effectively with your repair guy or gal.
More than likely you're thinking about setup because in some way, your instrument is not performing the way you'd like. To pinpoint any problems, we need to look at all the factors that affect your instrument's overall playability, sound, and function.
Preliminary Inspection
Photo 1: A setup begins with a preliminary, hands-on inspection of your bass. Check playability and listen for issues like buzzing frets and hardware rattles. List any problems you find.
Our journey begins with a general inspection (Photo 1), which consists of playing the instrument while asking yourself these questions: Is the action too high? Too low? Are there buzzing frets? If so, that indicates a need for adjustment.
While you're at it, work the volume and tone controls, checking for noise. Gently jiggle the 1/4" plug at the output jack to check it for noise. Are there any hardware-related rattles? Take notes on all your observations and list any issues you need to address.
After you've given your bass a hands-on evaluation, you're ready to get to work on the setup.
Tip: Because the adjustments that control playability are affected by string gauge and tension, be sure your bass sports the type of strings you plan to use. If you change string gauge, you'll need to do a fresh setup to accommodate the new strings.
Step 1: Measure the Neck Relief
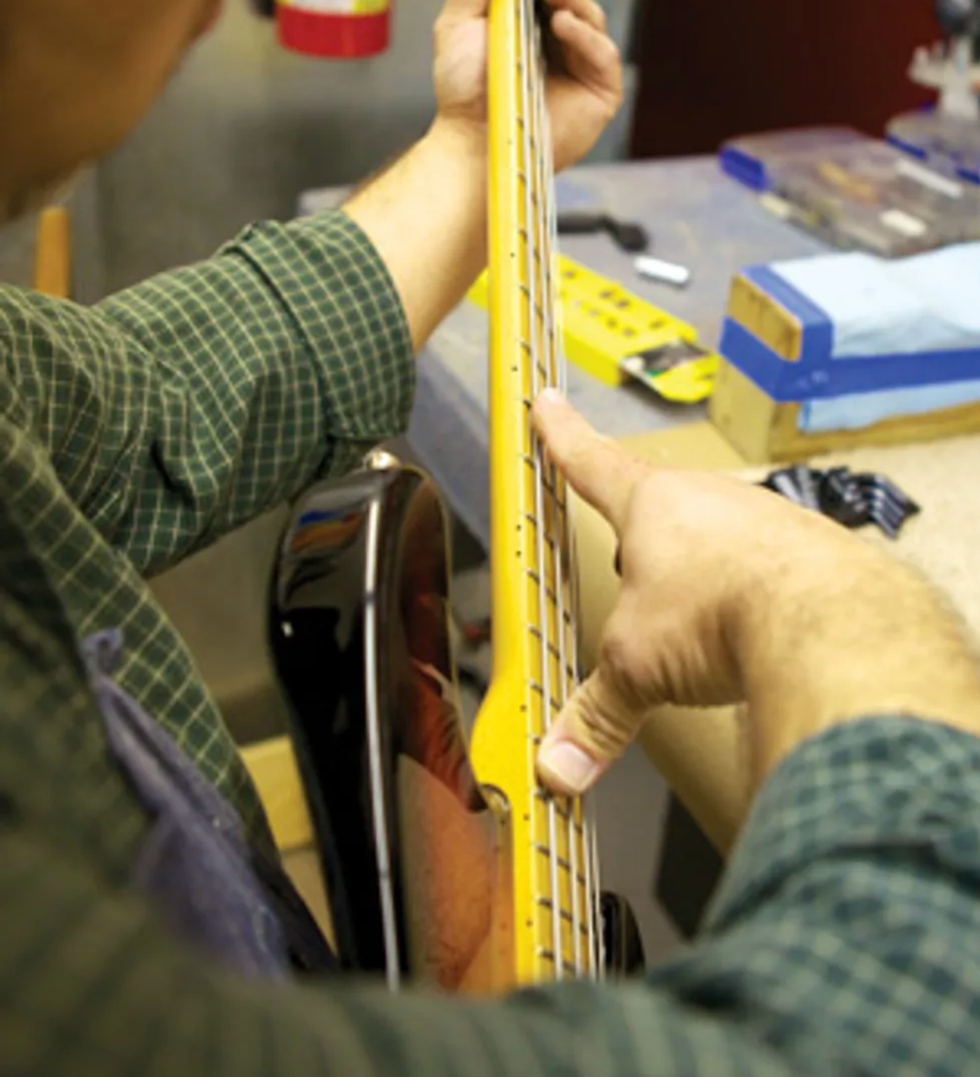
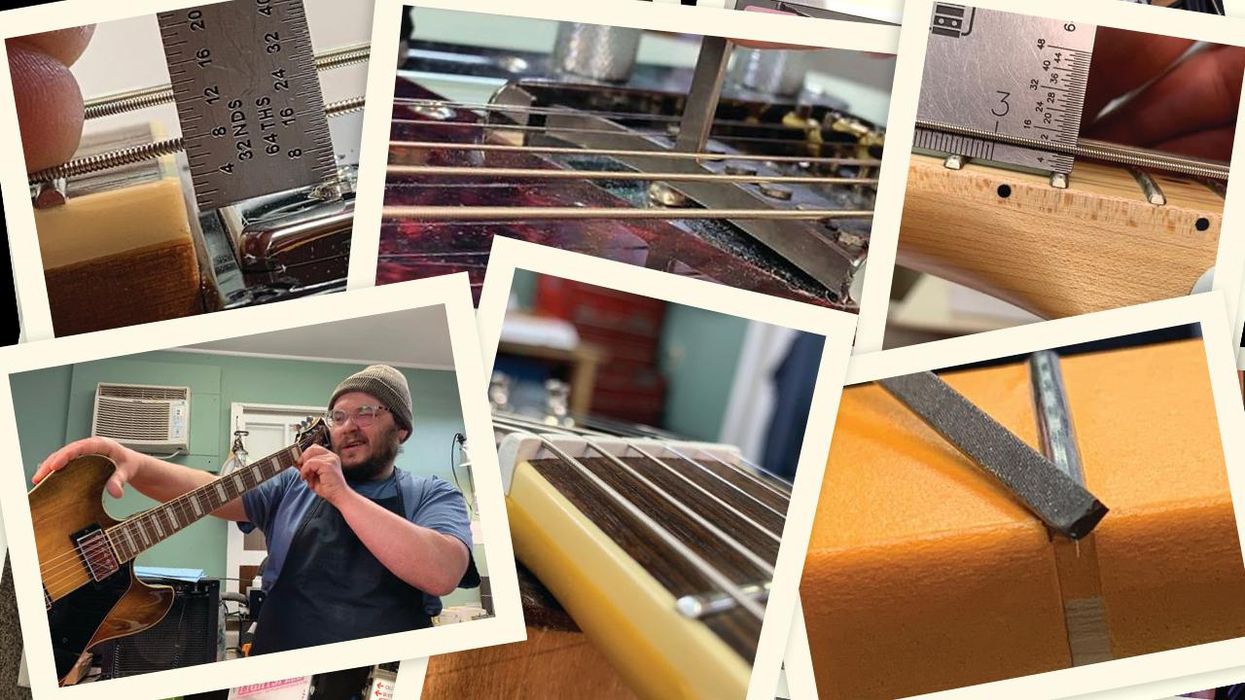
Photo 2: To gauge the amount of relief in your neck, use both hands to simultaneously fret the 4th string at the 1st fret and somewhere between the 14th and 16th frets. At the mid point between these two fretted notes, look at the gap between the bottom of the string and the top of the frets. To get another perspective on this gap, bounce the string against the frets with your picking-hand index finger.
We start with checking the "relief" or amount of bend in the neck. I often see people sighting down the neck from all angles and making some very ballpark assessments about neck relief. But the precise and accurate way to measure relief is to use the strings as a straightedge. Here's how to measure neck relief:
- Tune your bass to pitch. Use the primary tuning you put this instrument in when performing or recording.
- With your fretting hand, hold your lowest string against the 1st fret as if you were playing that note.
- Stretch your picking hand across the fretboard with your thumb aiming towards the bridge and index finger extended toward the nut (Photo 2). Open your hand as far as you can comfortably stretch and fret the lowest string with your thumb. The object is to move your thumb as close to the bridge as you can, while allowing your index finger to touch the lowest string approximately halfway between your fretting finger at the 1st fret and picking hand thumb. (Depending on the fretboard scale length, my picking hand thumb lands on the 14th, 15th, or 16th fret.) Now the lowest string is fretted at two points with two hands. With the lowest string secured at the 1st and, say, 15th fret, you can now use it as a straightedge.
- With your picking-hand index finger, tap the string against the middle frets. By repeatedly tapping and releasing, you'll be able to gauge how much space lies between the bottom of the string and the top of those frets. The gap (if any) is the amount of relief. How much of a gap you need depends very much on your playing style, but to get started, I adjust an instrument to have a gap that's equivalent to the thickness of one or two business cards.
Tip: Make sure you continually check the tuning of your bass so it stays at pitch. This is crucial for making accurate measurements and adjustments.
Step 2: Adjust the Truss Rod
This is very important: If you don't feel comfortable adjusting your truss rod or don't have the proper tool, take this to your local qualified repair technician. You can really mess up your instrument by stripping the threads on your truss rod or over tightening and breaking this critical part of the neck. Whether the truss rod is adjusted via a male hex nut, a female socket, or a Phillips nut at the neck heel, make sure your tool has a snug fit so you don't strip out this vital part.
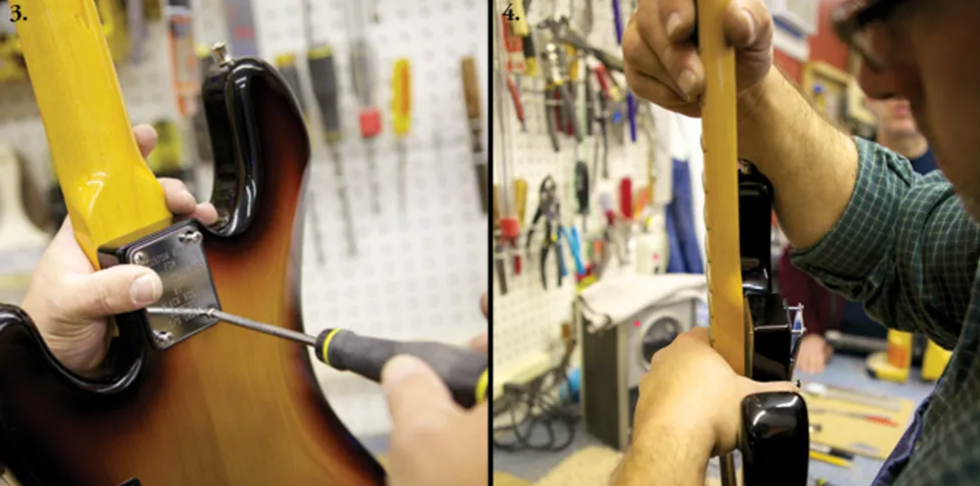
Photo 3: To remove the neck to expose a truss rod that's installed at the heel, take off the strings and back out the screws at the neck plate. Photo 4: Once the screws have released the neck, gently pull it free from the body being careful not to scratch the neck on the exposed screw tips.
The vast majority of truss rods adjust clockwise to tighten and counter-clockwise to loosen. If your truss rod is located at the headstock, look down the neck from headstock to body to determine clockwise and counter-clockwise direction. If your truss rod adjustment is at the heel of the neck, you'll need to remove it (Photos 3 and 4). The movements will be the same when you look from the heel down.
Tip: If you have any doubts about how to adjust a truss rod, get a guitar repair book or study the manual that came with your instrument. Many manufacturers offer free online instructions for adjusting the truss rods on their guitars.
If you decide you want to change the gap between the string and fret, here's the process:
- To reduce the gap between string and fret, tighten the truss rod. Conversely, to increase the space between string and fret, loosen it. Move the truss rod in quarter-turn increments.
- Retune and recheck relief each time you move the rod.
Continue the process until you get the desired gap between the string and fret. Again, unless you have a specific gap in mind, shoot for the thickness of one or two business cards.
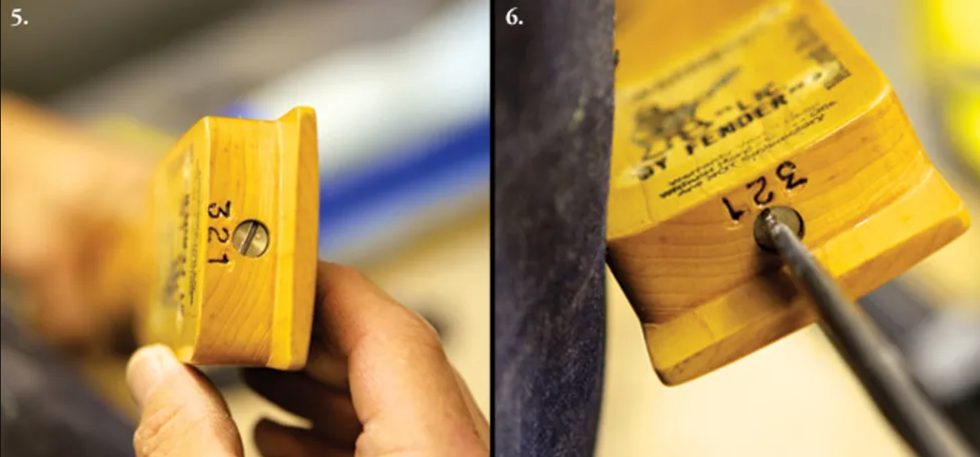
Photo 5: Truss rods accessed at the neck heel are often adjusted with a screwdriver. Photo 6: Whether the truss rod is installed at the headstock or neck heel, the vast majority adjust clockwise to tighten and counterclockwise to loosen.
If your bass requires adjustments at the neck heel (Photos 5 and 6), rather than the headstock, you'll face the tedious prospect of reinstalling the neck and restringing to check each adjustment.
Tip: If your truss rod seems very difficult to adjust, or stops moving, or makes a loud noise, see a local repair tech. Although adjusting a truss rod may be foreign to you, all qualified technicians understand how it functions. It's definitely worth paying the price to have this done right.
There are several adjustments that affect action, but they need to be done in the correct order. Because your decisions about all the other action-related adjustments are based on neck relief, it's important to deal with the truss rod first. Once you've made any necessary truss-rod adjustments, you're ready to move on to the other factors that control playability.
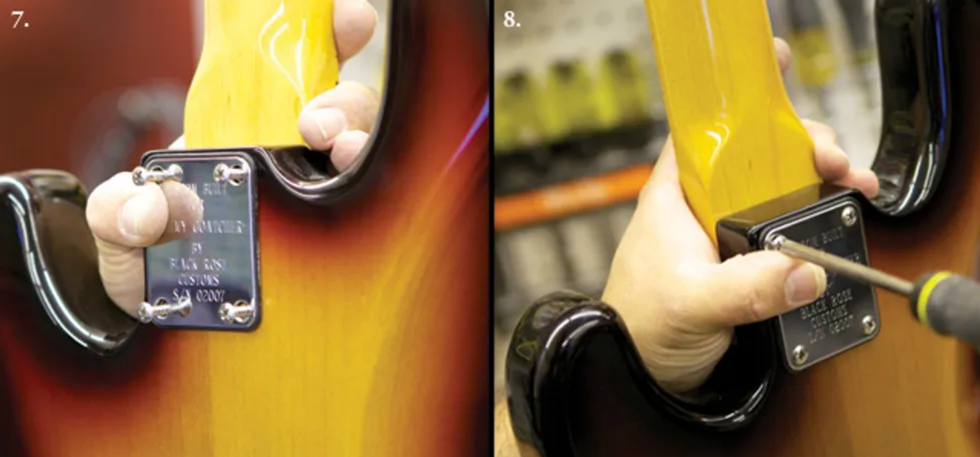
Photo 7: To reattach the neck, carefully place the heel into the neck pocket and then insert the screws by hand, slipping them through the body and seating the tips into their respective holes. Photo 8: Tighten the neck screws securely. As you do this, use your free hand to control the screwdriver tip so it doesn't slip out and mar the body.
If you've removed the neck to make truss rod adjustments, reattach it now (Photos 7 and 8), restring, and retune.
Step 3: Inspect the Nut Slots
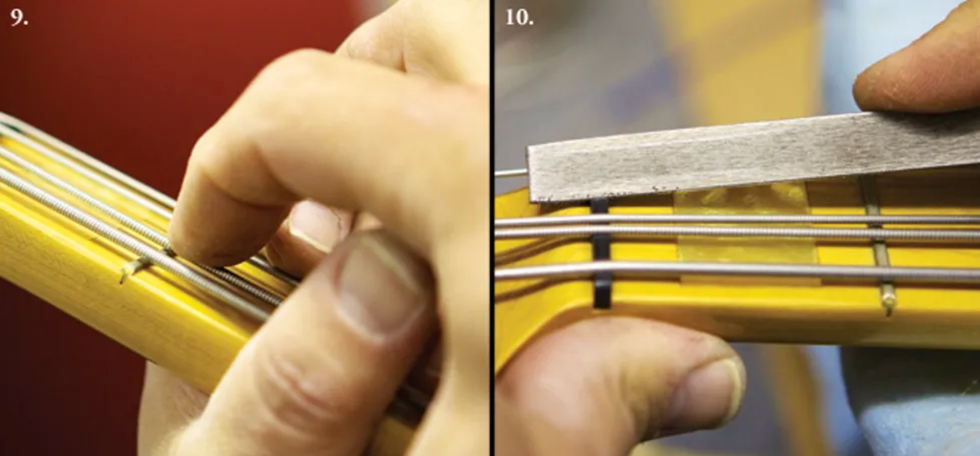
Photo 9: Checking action at the 1st fret while holding the string against the 2nd fret. In addition to eyeballing the clearance, tap the string against the fret to determine the distance between them. Photo 10: Deepening the 2nd-string nut slot.
Next, we check the nut slots and the string height at this end of the neck.
- Tune up.
- Hold each string down on the 2nd fret and look at the space between the bottom of the string and the top of the 1st fret (Photo 9). We want this clearance to be as small as possible, yet when you play the open string, you don't want to hear it buzz against the 1st fret. If the clearance is insufficient, you'll get a buzz.
For bass guitar, a good middle-of-the-road clearance over the 1st fret (with the string still pressed against the 2nd fret) would be the thickness of one business card. If the string has more than that amount of space, the respective nut slot may need to be deepened (Photo 10) so the action at the 1st and 2nd frets is low enough to play comfortably and you don't pull the strings sharp trying to press them against the frets.
Anyone can get nut files from Stewart-MacDonald (stewmac.com) or Luthiers Mercantile (lmii.com), but there is more to cutting a proper nut slot than just making a groove. It needs to be exactly the proper size for each string. The slot must hold a string firmly in place so it can't move around or sympathetically vibrate against the sides of the nut slot, but not be so tight that the string binds and hangs in the slot and then goes out of tune when it's stretched or played.
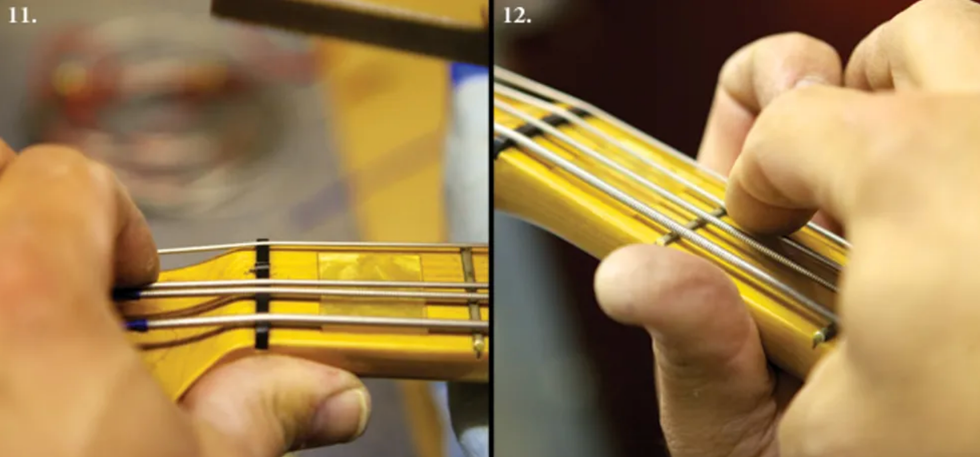
Photo 11: A slot needs to be gently angled downward as it points back toward the headstock and the string must "speak" from the nut's front edge—right where the nut touches the fretboard. Photo 12: When deepening a nut slot, recheck the 1st-fret action after a few light strokes with the file.
Also, the slot needs to be gently angled downward as it points back toward the headstock (Photo 11). The string must "speak" from the nut's front edge—right where the nut touches the fretboard and not somewhere inside the nut slot. (If a string rests on a point inside the slot, rather than at the leading edge, this can create a "sitar" effect or cause a string to play out-of-tune along the fretboard.)
If you deepen a nut slot, work very slowly and frequently recheck the action at the 1st fret after a stroke or two of the nut file (Photo 12).
If a string touches the 1st fret when you press it against the 2nd fret, then the nut slot is too low. The offending slot will have to be filled and then fine-tuned with a nut file, or the nut itself shimmed to gain more height, or you need to fabricate a new nut. Sonically and mechanically, the latter is the best option. If you're not comfortable tackling this project, see your repair tech. [For detailed explanations on cutting a bone nut, visit premierguitar.com and read "How to Convert Your Axe to a Baritone," "How to Intonate a Flattop Guitar," and "How to Convert a Flattop to Nashville Tuning" in the March, April, and September 2012 issues.]
Step 4: Adjust Saddle Height
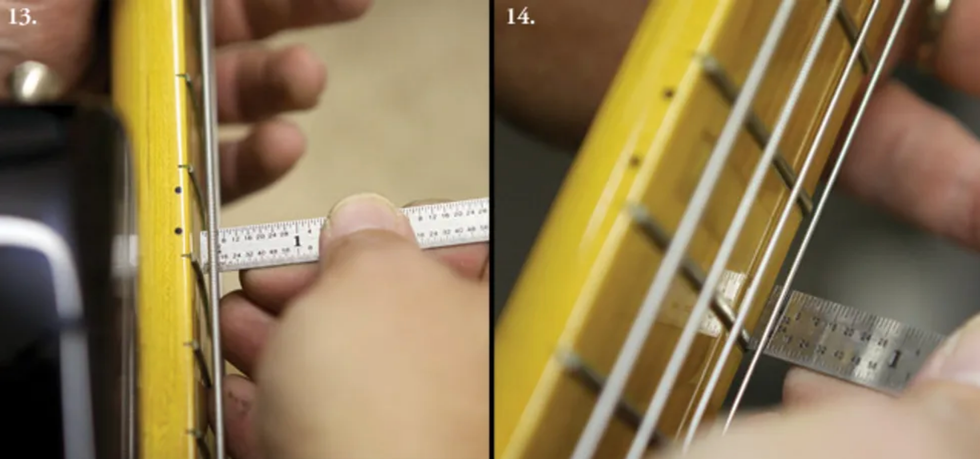
Photo 13: Measuring the distance between the 4th string and 12th fret with a precision metal ruler. Photo 14: Measuring the distance between the 1st string and 12th fret.
Now we're ready to check and adjust string height at the bridge:
- Tune up. (This is automatic by now, right?)
- At the 12th fret, measure the distance between the bottom of each string and the top of the fret (Photos 13 and 14 )
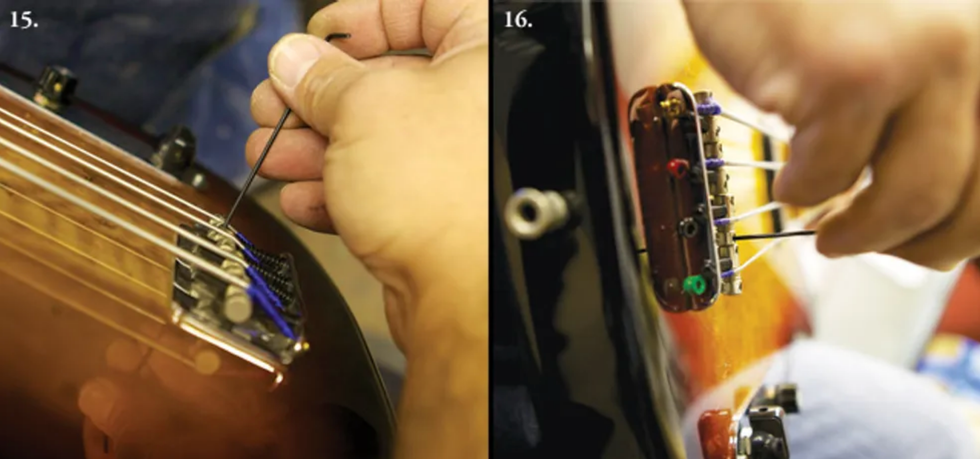
Photo 15: Adjusting saddle height for the 1st string. Photo 16: Another view of saddle-height adjustment. Here, the 2nd string is being raised.
- Using the appropriate wrench, adjust each saddle up or down to the desired height (Photos 15 and 16).
- Naturally, string action has to be adjusted for an individual's playing style. If you have a light touch and play very technically, you can get away with slightly lower action. However, you'll want a somewhat higher action if you love to dig into the strings and produce big, clear, sustaining tones. By experimenting, you'll eventually determine the ideal action for your music—and that's the beauty of learning how to do a setup yourself.
- For a middle-of-theroad action, I set the bass side of a 4-string (the E string in standard tuning) to 7/64", and then set the treble side (G string) to 5/64". I then graduate the heights as I go across the fretboard, making it 6+/64" on the A string and 6-/64" on the D string.
The goal is to gradually make the strings go from higher to lower as they cross the fretboard from the bass to treble side. With multi-string basses (5, 6, and more), continue this concept across the strings by adding some height for lower strings and shaving a little off for higher ones.
Step 5: Evaluate Your Frets
Photo 17: Once the neck relief, nut slots, and basic saddle height have all been adjusted, it's a good time to check fret condition.
Once you have the strings close to their proper height with the instrument at pitch and the previous adjustments dialed in, you can really see if the frets are level all the way along the fretboard. We're now at the stage in the setup where fret problems will be revealed (Photo 17).
High or low frets, loose frets, and even dead spots from the buildup of gunk and funk that gradually seeps between the frets and fretboard over the years can create inconsistent string vibration, so be on the lookout for these problems.
Speaking of fret condition, if you notice that even after being tuned to pitch and intonated (which we will get to in a moment), your bass does not play in tune with itself on some notes, check to see whether your frets have a nice round crown on top or if they're flat. Frets that are worn flat will allow the string to read from either the front edge of the fret and play sharp, or read from the back side of the fret and create a sitar-like sound. Having your frets in level, crowned, tip-top condition is essential for optimal playability, focused sound, and spot-on intonation. Fretwork is definitely the domain of a trusted repair technician.
Step 6: Adjust Intonation
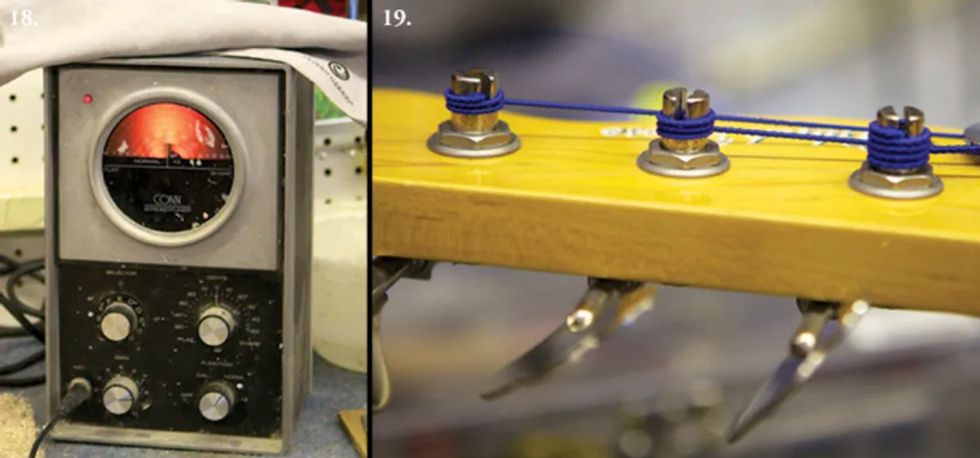
Photo 18: A strobe tuner or pedal with strobe functions provides superior visual feedback for setting intonation. Photo 19: Properly wound strings wrap from the top of the post to its bottom. The wraps should lie tight against one another and not overlap.
Now we're ready to check and adjust intonation. Unless the strings are fresh, install a new set before going any further.
Intonating your instrument involves individually adjusting the length of each string so its notes are in tune along the entire fretboard. To do this, it's best to use a strobe tuner (Photo 18) because it lets you visually track incremental pitch changes in both a note's fundamental vibration and its overtones.
Before we start, here are some tuning tips to consider. In my experience, you'll end up with a more stable tuning if you come up to pitch from below. By tuning up, you reduce the possibility of slack being in the string that could release while you're playing.
Also, be sure the windings progress around the post sequentially from top to bottom—with no overlapping—and that these winds are snug or butted up against each other so they can't move around (Photo 19).
Stretching is important too. I spend time stretching strings when they're new. Usually tuning up to pitch and stretching a string six to eight times will get it stable. There's no need to really yank— applying a firm upward pull as you move along the string's entire playing length is sufficient.
Photo 20: Using a Phillips screwdriver to shift the 2nd-string saddle backward. Photo 21: Checking the low-E's second-octave fifth interval—that's B at the 19th fret—with a tuner to see how it's intonating after the octave has been adjusted.
- After your strings are properly installed, stretched, and all tuned to pitch, start with the lowest string and make sure it's in tune while you play it open. Then, on the same string, play the note at the 12th fret. The open string is your reference, and the 12th-fret note—which is an octave higher—should also be in tune without you touching the string's tuning machine. If the 12th-fret tone isn't in tune, you'll make adjustments at the saddle to raise or lower the fretted note's pitch until that note is in tune with the open string.With that in mind, also take care to play the 12th-fret note as if you were performing it—not with less or more pressure than you'd use to play the note while you're onstage.
- If the high octave—the fretted note—is sharper than the open pitch, this means the speaking length of your string is too short. That is, the distance between the fretted octave and the saddle is too small. If that's the case, you need to make the string slightly longer by moving the saddle away from the neck.Conversely, if the fretted octave is flatter than the open string, the vibrating section of the string between the 12th fret and saddle is too long and needs to be shortened a tad. To do this, move the saddle toward the neck.Different basses have different processes for shifting the saddle backward or forward (Photo 20). This can include loosening setscrews to allow the saddles to have forward and backward motion. If you're not sure how your saddles operate, consult the owner's manual that came with your bass or go online to research the particular bridge.
- After the bottom string is intonated, move to the 3rd string, then the 2nd, and finally the 1st.
Tip: Make small adjustments and always retune before making another adjustment. Be patient— it's a painstaking process, but well worth the time investment.
Once I get the 12-fret octaves in tune with their respective open strings, I like to check if the fifth of each open string is in tune. For example, assuming my 4th string is tuned to E— standard tuning—the fifth is B, which occurs at the 7th fret and also one octave higher at the 19th fret (Photo 21).
There are articles and books that explain the math behind the 12-tone, equal-tempered tuning system that Western instruments—including the bass guitar—are designed around. It's beyond the scope of this DIY tutorial to delve into the details of equal temperament, but in a nutshell, the system presumes that your octaves are perfectly in tune. All other intervals are fudged by a few cents from their pure harmonic form to allow the octave to be evenly divided into 12 notes, or half-steps. (Each half-step consists of 100 cents.)
In practical terms, once you've intonated each string so the octave is in tune with its corresponding open string, you may find that the fifth—a crucial note for bassists—is disagreeably out of tune. This can be a result of equal-temperament "fudging" and how it affects fret placement, but also the thickness and material of a given string can contribute to the issue. We are, after all, simply stretching wire into different vibrating lengths to make music—a primitive scheme when you think about it.
If it happens, let's say, that the 19th-fret B on the 4th string is a little sharp, but the octave is dead on, I may fudge the intonation a little bit to favor the B note. This entails moving the saddle back slightly to reduce the sharpness of the B. It's a tricky and imperfect game—you don't want to put your octave noticeably out of tune because then the whole equal-tempered tuning system collapses.
If you find large discrepancies between the correctly tuned open string and its octave relative to other intervals, seek out an experienced repair technician who can help you diagnose and remedy such intonation troubles. There are a lot of techniques available to address this particular dilemma.
Step 7: Check Electronics
As a part of my setups, I also include a thorough electronics check. Dirty pots, loose pots or jacks, and loose knobs can all interrupt the seamless connection between performer and instrument. Often the scratchy sound from a dirty pot can be remedied with a squirt of contact cleaner. This requires disassembly, and depending on your instrument, you may want to have your tech handle it.
As you troubleshoot and adjust your instrument, remember that the aim is to remove everything that can distract or hinder you from playing music. Between you and an experienced repair technician, you should be able to achieve this goal. Good luck!
[Updated 11/17/21]
- Rig Rundown: Greta Van Fleet [2021] - Premier Guitar ›
- DIY: How to Set Up a 5-String Bass - Premier Guitar ›
- Top 5 Bass Rig Rundowns - Premier Guitar ›
- The Big 5: Adeline - Premier Guitar ›
- Flashy Is Fun, but the Bass Has a Deeper Function - Premier Guitar ›
- Squier Paranormal Rascal HH Review - Premier Guitar ›
- Epiphone Newport Bass Review - Premier Guitar ›
- Unlock Your Guitar's Potential with this Easy 4-Step Setup Guide ›
- Bassist Ciara Moser and Her Groundbreaking Debut Album ›
- How to Find Your Sound on Bass, with Thanks to P-Funk - Premier Guitar ›
- How Playing Bass in an Orchestra Can Improve Your Musicality - Premier Guitar ›
The newest pedal in Supercool's lineup, designed to honor the classic RAT distortion pedal with more tone customization, a dead-quiet circuit response, and an eye-catching design.
The Barstow Bat is designed to offer a versatile 3-band EQ section to create colors and tones beyond that of its influence, with a surprisingly quiet and calculated circuit under the hood. For even more sonic versatility, the TURBO button swaps between classic silicon RAT distortion and a more open and aggressive TURBO RAT LED clipping mode.
Features
The Barstow Bat highlights include:
- Classic RAT Distortion with a super-quiet noise floor
- Eye-catching graphics based on the work of Hunter Thompson and Ralph Steadman’s iconic Fear and Loathing in Las Vegas
- Massive output volume
- Active isolated 3-band EQ for a wide range of tones
- Selectable clipping modes (Standard or TURBO)
- True Bypass on/off switch
- 9-volt DC power from external supply, no battery compartment.
- Hand assembled in Peterborough, Canada
- LIMITED EDITION BLACK version available until 2025
At home in the shop at Gibson USA, where DeCola is R&D manager and master luthier.
The respected builder and R&D manager has worked for the stars—Eddie Van Halen, Paul McCartney, and others—while keeping his feet on the ground, blending invention, innovation, and common-sense design.
As a teenager, DeCola fell in love with surfing, but growing up in Indiana … no ocean. So, skateboarding became his passion. When a surf park called Big Surf—replete with rideable waves—opened up near his sister, who he was visiting during spring break at Arizona State University, she treated him to a day at the man-made sea.
Jim DeCola paid for his first guitar with his nose.
“When the first wave came, it scooped us all up, and I was tumbling under and something hit me bad,” he recounts. “So, I’m in a daze, and my sister runs up to me and says, ‘Oh my god, you have a bloody nose!’” When DeCola looked in the bathroom mirror, his nose was broken and the skin was split. The surf park’s medic sent him to a hospital. “Whatever the bill is, give it to us and we’ll double it,” DeCola recalls being told. “Just please don’t sue.” When a check for $880 arrived, his mother suggested he use it to buy the electric guitar he was pining for. “I ended up with a Gibson SG, because George Harrison had one, but they didn’t have a cherry red one, so mine was ebony.” He also got a Roland Cube practice amp because it had a master volume. “I still have both, and it’s still a great little amp and a great guitar. And that,” he says, “set me on my course.”
It’s been an epic journey in guitar creation: from his apprenticeship at a Lansing, Illinois, shop—which led to a dramatic and well-chronicled bridge fix for Randy Rhoads—to his years with Peavey, Fender, and now Gibson, where he is R&D manager and master luthier. DeCola blanches a bit at the master luthier title, observing that he’d prefer, simply, “guitar guy,” but that’s like calling a tiger a cat. DeCola is an apex builder. Instruments he designed are world-renowned and he’s collaborated with an enviable list of greats that includes Eddie Van Halen, Paul McCartney, Slash, Adrian Vandenberg, Rudy Sarzo, Neil Schon, and Randy Jackson.
Jim DeCola at the Gibson USA offices in Nashville. He spearheaded the company’s current two-pronged product orientation, with original and modern instrument lines.
Photo by Ted Drozdowski
In the Beginning…
DeCola’s family was musical. His dad played many instruments but trumpet was his main squeeze, and his older brother and sister exposed Jim to the Beatles, Stones, Hendrix, Cream, and other deities of the ’60s guitar-rock canon. Thus fueled, at 15, in his second year of wood shop, he decided to build a guitar. Inspired by a photo of Scorpions’ Matthias Jabs, he settled on an Explorer body shape. A friend who already played guitar detailed where the bridge needed to go and what parts were required, and DeCola reverse engineered from there. He even cut the pickguard from a sheet of gray smoke Mirrorplex. But despite two years of electronics classes, he opted to bring his creation to the Music Lab, that guitar shop in Lansing, where he was taking lessons, for the wiring.
“The guy who did repairs wired it up for me, and when it was ready he called and said, ‘Hey, I want to talk with you when you come in,’ ” DeCola recounts. “He asked me to apprentice with him. It was learn while you earn, and while I did learn some stuff from him, really, I was wet sanding guitars and doing that kind of grunt work.” DeCola was at Music Lab part-time for 18 months, and graduated from high school just as the tech left. The owners of the store asked Jim to take over, and, as Suetonius told Caesar, the die was cast.
In January ’82, a caller made DeCola think he was being pranked—until he became convinced it really was Randy Rhoads and Rudy Sarzo’s tech Pete Morton. They explained that Bruce Bolen, then at Chicago Musical Instruments, had suggested him to fix Rhoads guitar in time for the night’s Ozzy Osbourne performance. DeCola grabbed his tools and drove through the snow for 50 miles to the Rosemont Horizon arena, where Rhoads was having trouble keeping the vibrato bridge on his polka-dot Sandoval custom V in tune. After a quick round of introductions, DeCola took apart the vibrato bridge and used a technique inspired by G&L guitars, deleting two of its bridge’s four screws and cutting a pivot with a V-file to countersink the bridge plate. Next, he was treated to a soundcheck of “Mr. Crowley” by Rhoads, Sarzo, and drummer Tommy Aldridge. As the opening act played, Rhoads asked DeCola to make the vibrato “a little slinkier,” and he completed the mod just before Ozzy’s downbeat. DeCola—still in his teens—was standing just off to the side when the iconic photo of Ozzy carrying Rhoads that appeared on the cover of the 1987-released Tributealbum was taken.
Six years later, DeCola received offers from Kahler and Peavey, and he opted to relocate to Meridian, Mississippi, to work with Hartley Peavey as his R&D tech. “I learned a lot,” he reflects. “Hartley was a great mentor. At any time, I’d have a stack of books and magazines, or just single pages ripped from magazines, a foot high on my desk, and he’d expect me to read and give him a report on everything,” says DeCola. “Sometimes it was related to guitars, amps, and effects; sometimes it might be antique radios.” After a few years, DeCola was promoted to supervisor of guitar engineering and began designing instruments. DeCola minted some of Peavey’s most lauded guitars, including the Tele-like Generation, with dual humbuckers, a mahogany body and neck, and a 5-way switch. That guitar gave the company a toehold in the country music market, but was also embraced by Steve Cropper and Dave Edmunds.
“We looked at each other and said, ‘The decade of the “superstrat” is over.’”
Every Best Les Paul Sound
Another pivotal experience during his years at Peavey happened at a summer NAMM show in Chicago’s McCormick Place, when a celestial Les Paul tone suddenly emerged from the exhibition hall’s PA system. “It was ‘Sweet Child O’ Mine’ by Guns N’ Roses,” says DeCola, “and we’re looking up thinking, ‘Who the hell is this?’ It was every best Les Paul sound wrapped up into one. We looked at each other and said, ‘The decade of the “superstrat” is over.’ And it really was.”
That inspired DeCola to create the Les Paul-Tele-style hybrid Peavey Odyssey. He also worked with Adrian Vandenberg on set-neck and neck-through versions of the Dutch guitarist’s signature models, and a host of other artists—including Eddie Van Halen. Peavey’s artist relations head heard that Van Halen had a falling out with Ernie Ball Music Man and sensed opportunity. DeCola quickly made a prototype inspired by Eddie’s EBMM signature model and took it to a gig in Florida, where the band was kicking off the Balance tour. “Eddie rehearsed with it and said, ‘Okay, now I know you can do it; let’s come up with a design.’”
During the development process, DeCola learned that Eddie’s son Wolfgang had a birthday coming. So, as a gift for Wolfie, he decided to make a 3/4-size example of his signature concept for Eddie. Mid-build, Eddie made a surprise visit to Meridian. DeCola invited EVH into his office and showed him Wolfie’s guitar.
“I thought this would be the direction we’d use for your new model,” DeCola explained. “He said, ‘Yeah, I love it! Just make it full size, then.’ And for the headstock, Eddie had done some napkin drawings in the hotel that were like Flying V’s, but smaller.” That wouldn’t work, thanks to the U.S. Patent Office. More ideas were exchanged. DeCola was coincidentally working on a new build for himself at the time, with a three-to-a-side headstock. He painted that headstock black, and then sanded a scoop in its tip. And that was it. Eddie was happy. DeCola wanted to get a prototype into Van Halen’s hands as quickly as possible, so when he found out the virtuoso was leaving Meridian the next day after lunch, he worked through the night.
“When he showed up the next morning at 11 a.m., I was just tuning it up,” DeCola recalls. “It was raw wood, but he played it and said, ‘That’s it.’” Thus, the Peavey EVH Wolfgang was born. “After that, the engineering took longer than making the guitar, because I had to do the blueprints and totally spec out everything,” DeCola adds.
Another important encounter he had in Meridian was with the blues historian and record collector Gayle Dean Wardlow, noted for, among other things, finding the death certificate of Robert Johnson. After they met, DeCola started going to Wardlow’s home weekly to talk about the roots of the genre he’d begun studying as a young player, listen to rare old 78s, and absorb the techniques preserved in their shellac. That study paid off. Hearing DeCola play metal-bodied resonator guitar is a high-order experience, although he also sounds terrific rocking the hell out on a Les Paul. DeCola is humble about his playing, but, really, he doesn’t need to be. “It’s a great release, and great therapy,” he says.
DeCola’s tenure at Peavey ran its course. “I was making P-90 and 12-string versions of existing guitars, a 12-string baritone … and they were turning my operation into a custom shop, which I didn’t want to do, because that’s just low-volume manufacturing. I wanted to stick with designing new stuff,” he says. “I wanted a change. It was five years with a lot of pressure. I wasn’t getting credit for designing and building Eddie Van Halen’s guitars. So, I went to Fender in Nashville, who had what they called the Custom Shop East at the time.”
“Musicians and skaters have the same kind of soul, the same mindset,” DeCola says. “It is something you can do by yourself, as a form of expression, but when you’ve got your crew and you’re skating, it’s like being with your band.”
Photo courtesy of Jim DeCola
“I came up with the idea of teaching people how to use things that every guitar player is going to have around the house for tools—coins or picks—and MacGyver their instruments.”
On to Gibson
There, he worked with Bruce Bolen and pickup guru Tim Shaw. But after Bolen retired in 2011 and Fender decided to close that Nashville location, DeCola found out about openings at Gibson and applied. In June, he was hired as master luthier.
“Gibson’s been a great ride,” DeCola attests. Although it hasn’t always been easy. When DeCola came onboard, the notoriously controlling, sometimes-volatile Henry Juszkiewicz was CEO. “It was fine for me, because Henry respected me, but it was an environment where I felt I had to be measured in my responses,” he says. There were also notorious design gaffes, like “robot tuners” and the dreadful Firebird X—both pet projects of Juszkiewicz that almost literally no one else, especially customers, desired.
“I got blamed for some of that stuff, but I was just the messenger,” DeCola says. But as James Curleigh and, now, Cesar Gueikian took over Gibson’s leadership, DeCola had an opportunity to proactively get his thoughts on the direction for the company’s products before more receptive CEOs.
“I made a bullet list and at one point had maybe 40 things on there, like going back to a thin binding on certain models and changing features,” he relates. “But my main message was, ‘Give the people what they want; we’re not here to dictate what people want.’” Many of DeCola’s ideas were manifested in the roster of guitars at the Gibson display at NAMM 2019—instruments that honored and built upon the company’s legacy. DeCola also had the idea of splitting Gibson’s model line into original and modern categories. “My concept was, we have the original models, which we’re determined to improve, and the modern line where we could have locking tuners, push-pull pots, and blueberry burst finishes—features that aren’t rooted in the golden years of the ’50s.”
Gueikian embraced that practice for Gibson USA and the Custom Shop, and expanded it to the acoustic Custom Shop in Bozeman, Montana, and to the Mesa/Boogie amp line. But DeCola was already on the case with amplification. Before Curleigh stepped down, he’d asked DeCola to look at Gibson’s amp line, and, again, DeCola looked back andforward at once. Inspired by his personal collection of vintage Gibson amps, he mapped out a new product line for 10-, 20-, and 40-watters. “I based my thinking off the greatest hits of those classic amps, and focused on the Falcon, because I have a ’62 Falcon, and when I looked into its history, the revelation was that it was the first amp with both reverb and tremolo,” he says. “So, I thought that would be a cool amp to make.” Then Gibson bought Mesa/Boogie under Gueikian’s stewardship, and the project went to that company’s Randall Smith, who created a stellar original design. Gibson unveiled the power-switching Falcon 5 (which won PG’s coveted Premier Gear Award) and Falcon 20 in January 2024.
DeCola is skilled in every aspect of guitar building, including working in the spray shop, where he is seen here training the gun on a model year 2024 blueberry burst Les Paul Studio.
Photo courtesy of Gibson
Mr. Fix-It
While the profile of most people in the guitar industry went down during the pandemic, DeCola’s went up thanks to a series of how-to videos he made for Gibson’s YouTube channel. They cover such topics as how to adjust action and pickup height, and how to do a proper setup. “I wanted to do something for the guitar community when things were shut down, so I came up with the idea of teaching people how to use things that every guitar player is going to have around the house for tools—coins or picks—and MacGyver their instruments,” he says. These videos have hundreds of thousands of views, and have given him a kind of celebrity status that’s rare among luthiers.
When asked what makes a great guitar, including the signature models he’s worked on at Gibson for Paul McCartney, Slash, and others, DeCola talks about achieving a commonsense, holistic balance of design, materials, and craftsmanship. He adds that there is no shortage of fine instruments now available, and that, moving ahead, he sees the kind of balance between tradition and invention that he has promoted at Gibson remaining its norm. “There are a lot of boutique builders and trends like 7- and 8-string guitars, fanned frets, and different scale lengths today,” he notes. “Some of it can be cyclical. There was a period in the ’80s and ’90s, for example, when a lot of people were adopting 7-strings, and now I see a lot of them again.
“Gibson was built on innovation,” he continues. “Orville Gibson, our founder, got his first patent creating a mandolin built completely different than other mandolins. Prior to that, they were typically gourd instruments, but he applied the carved back and top method from the violin and cello. And with the jazz-box electric guitars, there were so many Gibson innovations, like the adjustable neck and bridge, the humbucking pickup…. But because we’re a legacy company, we have to tread a bit lighter on some of the innovation, which our previous leadership was too forward on, with features the market wasn’t ready for. But in defense of that, I’ll go back to our heritage instruments. The Flying V and Explorer were all designed out of the space race, but initially commercial flops—too ahead of their time. So that’s why I wanted to split the model line—so we have the latitude to come up with some new things, but can still honor what’s expected of Gibson. Right now, we’re looking at some innovation in electronics and other features we will be bringing to the market.”
Now in his early 60s, DeCola is also still working on his skateboard moves. He tries to get to Nashville’s municipal Two Rivers Skatepark and Rocketown once a week. There, he’s found a coterie of fellow veteran skaters—many of whom are also in the music business, as players, producers, and engineers. “I’d say musicians and skaters have the same kind of soul, the same mindset,” he says. “It is something you can do by yourself, as a form of expression, but when you’ve got your crew and you’re skating, it’s like being with your band. It’s even more fun, and it inspires you. It can make you better.”DeCola performs a neck adjustment on an ES-335.
Photo courtesy of Gibson
Some of these are deep cuts—get ready for some instrumental bonus tracks and Van Halen III mentions—and some are among the biggest radio hits of their time. Just because their hits, though, doesn’t mean we don’t have more to add to the conversation.
Naturally, every recording Eddie Van Halen ever played on has been pored over by legions of guitar players of all styles. It might seem funny, then, to consider EVH solos that might require more attention. But your 100 Guitarists hosts have their picks of solos that they feel merit a little discussion. Some of these are deep cuts—get ready for some instrumental bonus tracks and Van Halen III mentions—and some are among the biggest radio hits of their time. Just because their hits, though, doesn’t mean we don’t have more to add to the conversation.
We can’t cover everything EVH—Jason has already tried while producing the Runnin’ With the Dweezil podcast. But we cover as much as we can in our longest episode yet. And in the second installment of our current listening segment, we’re talking about new-ish music from Oz Noy and Bill Orcutt.
John Doe and Billy Zoom keep things spare and powerful, with two basses and a single guitar–and 47 years of shared musical history–between them, as founding members of this historic American band.
There are plenty of mighty American rock bands, but relatively few have had as profound an impact on the international musical landscape as X. Along with other select members of punk’s original Class of 1977, including Patti Smith, Richard Hell, and Talking Heads, the Los Angeles-based outfit proved that rock ’n’ roll could be stripped to its bones and still be as literate and allusive as the best work of the songwriters who emerged during the previous decade and were swept up in the corporate-rock tidal wave that punk rebelled against. X’s first three albums–Los Angles, Wild Gift, and Under the Big Black Sun-were a beautiful and provocative foundation, and rocked like Mt. Rushmore.
Last year, X released a new album, Smoke & Fiction, and, after declaring it would be their last, embarked on what was billed as a goodbye tour, seemingly putting a bow on 47 years of their creative journey. But when PG caught up with X at Memphis’s Minglewood Hall in late fall, vocalist and bassist John Doe let us in on a secret: They are going to continue playing select dates and the occasional mini-tour, and will be part of the Sick New World festival in Las Vegas in April 12.
Not-so-secret is that they still rock like Mt. Rushmore, and that the work of all four of the founders–bassist, singer, and songwriter Doe, vocalist and songwriter Exene Cervenka, guitarist Billy Zoom, and drummer D.J. Bonebreak–remains inspired.
Onstage at Minglewood Hall, Doe talked a bit about his lead role in the film-festival-award-winning 2022 remake of the film noir classic D.O.A. But most important, he and Zoom let us in on their minimalist sonic secrets.Brought to you by D’Addario.
Gretsch A Sketch
Since X’s earliest days, Billy Zoom has played Gretsches. In the beginning, it was a Silver Jet, but in recent years he’s preferred the hollowbody G6122T-59 Vintage Select Chet Atkins Country Gentleman. This example roars a little more thanks to the Kent Armstrong P-90 in the neck and a Seymour Duncan DeArmond-style pickup in the bridge. Zoom, who is an electronics wiz, also did some custom wiring and has locking tuners on the guitar.
More DeArmond
Zoom’s sole effect is this vintage DeArmond 602 volume pedal. It helps him reign in the feedback that occasionally comes soaring in, since he stations himself right in front of his amp during shows.
It's a Zoom!
Zoom’s experience with electronics began as a kid, when he began building items from the famed Heath Kit series and made his own CB radio. And since he’s a guitarist, building amps seemed inevitable. This 1x12 was crafted at the request of G&L Guitars, but never came to market. It is switchable between 10 and 30 watts and sports a single Celestion Vintage 30.
Tube Time!
The tube array includes two EL84, 12AX7s in the preamp stage, and a single 12AT7. The rightmost input is for a reverb/tremolo footswitch.
Set the Controls for the Heart of the Big Black Sun
Besides 3-band EQ, reverb, and tremolo, Zoom’s custom wiring allows for a mid-boost that pumps up to 14 dB. Not content with 11, it starts there and goes to 20.
Baby Blue
This amp is also a Zoom creation, with just a tone and volume control (the latter with a low boost). It also relies on 12AX7s and EL84s.
Big Bottom
Here is John Doe’s rig in full: Ampeg and Fender basses, with his simple stack between them. The red head atop his cabs is a rare bird: an Amber Light Walter Woods from the 1970s. These amps are legendary among bass players for their full tone, and especially good for upright bass and eccentric instruments like Doe’s scroll-head Ampeg. “I think they were the first small, solid-state bass amps ever,” Doe offers. They have channels designated for electric and upright basses (Doe says he uses the upright channel, for a mid-dier tone), plus volume, treble, bass, and master volume controls. One of the switches puts the signal out of phase, but he’s not sure what the others do. Then, there’s a Genzler cab with two 12" speakers and four horns, and an Ampeg 4x10.
Scared Scroll
Here’s the headstock of that Ampeg scroll bass, an artifact of the ’60s with a microphone pickup. Doe seems to have a bit of a love/hate relationship with this instrument, which has open tuners and through-body f-style holes on its right and left sides. “The interesting thing,” he says, “is that you cannot have any treble on the pickup. If you do, it sounds like shit. With a pick, you can sort of get away with it.” So he mostly rolls off all the treble to shake the earth.
Jazz Bass II
This is the second Fender Jazz Bass that Doe has owned. He bought his first from a friend in Baltimore for $150, and used it to write and record most of X’s early albums. That one no longer leaves home. But this touring instrument came from the Guitar Castle in Salem, Oregon, and was painted to recreate the vintage vibe of Doe’s historic bass.