
Whatever your choice of guitar at the moment, your ability to play it depends on an intimate physical relationship between your fretting hand and your guitar's neck. How picky are you when entering into that relationship? You may be the type of player who demands a guitar neck with very specific details—anything else just isn't right. It's sort of a guitar-playing version of monogamy.
Or you may be into an open relationship: "Just give me a guitar and I'll play it." In either case—and before I extend this analogy too far for my own good—it can help to know why you like what you like, and maybe also glimpse what you might be missing.
The simple request I received to write an article about guitar-neck design quickly turned into an extensive list of topics I wanted to cover. Any attempt to sort these topics into categories—those that affect feel and playability, versus those that affect tone, versus those based on construction—is sure to cause controversy. In fact, many can't be separated. To create some sort of organization, I'll just loosely group them, cover the points one by one, and ask for forgiveness later.
Feel and Playability
Neck profile. When picking up a guitar, perhaps the first thought to hit you—at least in terms of playability—is the feel of its neck. There are two related factors to consider: the thickness of the neck and its profile shape.
Preferences vary widely. Before discussing neck shapes, it may help to ponder variations in hand sizes—a basic design consideration. A large male hand is approximately 27-percent bigger than a small female hand. A large guitar neck (such as a Fender U-shaped neck) is only about 17-percent thicker than Fender's standard thin neck. Therefore, typical neck thicknesses don't span a range as varied as players' hand sizes.
Perhaps an even more pertinent measure concerns the curvature—the distance you feel as you wrap your hand around the back of the neck. (Picture a tape measure wrapping under from the 6th string to the 1st string.) On typical guitar necks, that distance varies by less than 10 percent. If you're at either end of the hand-size spectrum, you may have a right to complain because you'll be forced to adapt.
For a guitar to play properly, its neck needs to have a slight bow. This is called relief, and it allows the strings to vibrate over the fretboard without hitting the frets.
Something else to consider: While you're playing, different parts of your thumb contact the back of the neck. With barre chords, your thumb may be flat against the center of the curve, the neck's thickest part. When playing complex chords, your thumb's tip may be in contact. When playing basic riffs, your thumb may rest at the edge of the fretboard. When flying up and down the neck, your thumb may not touch it at all. Or for replicating a Merle Travis/Chet Atkins style of playing, your thumb may be fully wrapped around the neck, fretting a thumping bass line on the low-E string.
Some necks are carved with an asymmetrical profile that's intended to improve playability. It's not a new idea. Among Gretsch's "Seven Points of Supremacy" attributed to their 1939 Synchromatic was a "non-pressure" neck designed to relieve finger strain. This was referred to as the "Miracle Neck" in later years (Fig. 1).
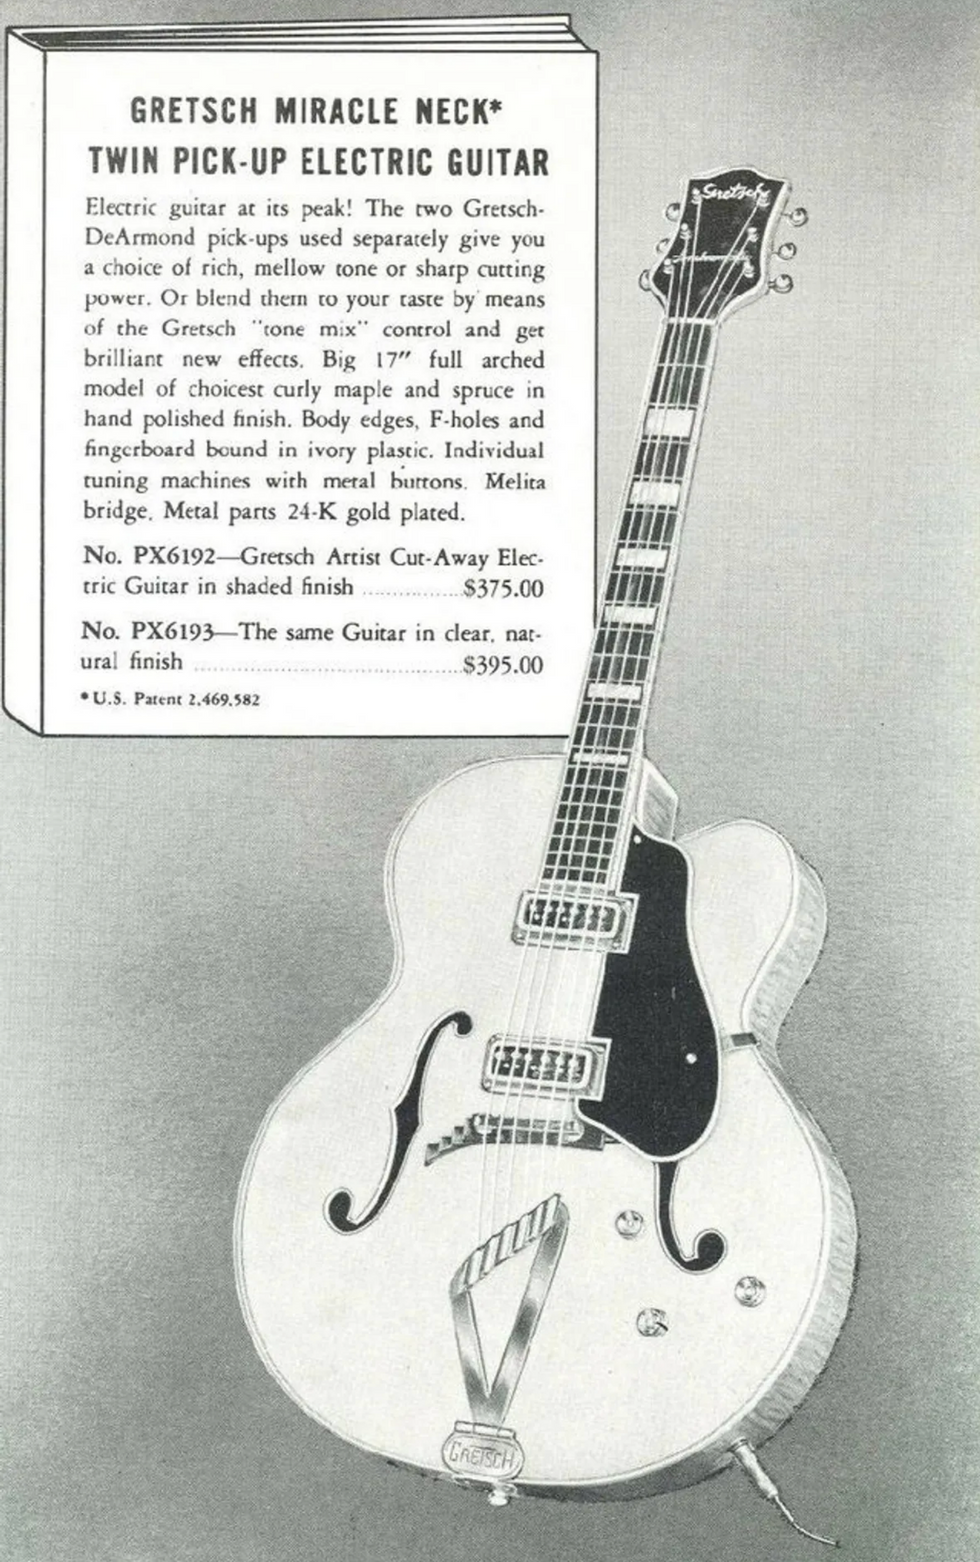
Fig. 1 — In Gretsch's 1951 catalog, the 6192 and 6193 models are described as having a patented "Miracle Neck." This design o ered an asymmetrical pro le for enhanced playability.
Neck finish. Another factor that can elicit strong opinions is how a builder seals the back of a wooden neck to protect it from sweat, skin oils, and the elements. A glossy polyurethane or nitrocellulose finish will feel different from a satin or Tung oil finish. The latter two can allow your hand to more easily slide along the neck, especially on a hot and sticky day.
There's no easy way to change your current guitar's neck to a Tung-oil finish. It requires sanding the finish down to bare wood. Before taking that drastic measure, try sprinkling baby powder on your hand if you think your neck is slowing you down.
Fretwire. If you play violin, cello, or fretless bass, fret size is a non-issue. Guitarists, however, need to consider the fact that fretwire comes in various sizes. Frets are made from an alloy containing 18 percent nickel-silver (a misnomer, because there's no actual silver—which is a good thing, or we'd probably see people melting down our precious vintage instruments).
Early Fender guitars used relatively narrow frets: approximately .080" inches wide and .043" tall. Gibson frets are typically wider and just microscopically shorter. Wide frets can be just over .100", and taller frets around .050". There are too many variables in playing styles and individual finger physiology to generalize about what fretwire may be more or less appropriate for different situations. Like many other guitar-related specs, it's a matter of personal preference. Also, it can be difficult to A-B compare different fretwire sizes. You can try spending a few hours in a friendly guitar shop, but neck shapes and string gauges are likely to vary as well, which can confuse the issue.
Though less common, scalloped fretboards are related to fretwire height. On a scalloped fretboard, the space between frets is dished to keep the fingertips from touching the fretboard wood. These cylindrically concave shapes are great for certain techniques. Think of the incredible bends a sitar player produces. A sitar's arched and elevated frets keep the player's fingers off the fretboard and eliminate any friction against the wood. Scalloped fretboards replicate that for a guitar. With a height of .058", the largest size fretwire can approach a scalloped feel. To get a sense for this, try playing some Ibanez models that sport jumbo frets on this order.
Also, it surprises a few guitarists when I mention that a pressed string doesn't contact the fretboard. Rather, it spans the frets. Unless you have woefully low frets or super-light strings, the string itself won't contact the wood.
Scale length. The distance between the nut and the bridge determines the length of the strings, and this is known as scale length.That measurement won't be entirely precise, however, because intonation adjustments or an angled bar bridge results in variations in the length of each string. A more accurate way to determine scale length: measure the distance from the nut to the 12th fret and multiply by two.
Scale lengths can vary considerably. John Lennon's 325 Rickenbacker had a scale of just 20.75". A "3/4 size" guitar, such as the Guild M-65, has a scale of 22.5". Gibson's Les Paul measures 24.75". A Fender Telecaster's neck is longer at 25.5". Scale length for a baritone guitar can be much higher, like Danelectro's 29.75" neck.
Given identical strings, longer necks require more tension to get into tune. Put another way, shorter scales allow heavier strings to be used with comparatively less tension. It's something to consider if you think you'd like the effect of having more metal driving your pickups.
Fretboard radii. Classical guitar fretboards typically have no radius—they're completely flat. The fretboards on steel-string acoustics will have a cylinder-like radius along their entire length. That's true of electric guitar fretboards as well, although conical shapes are also possible. In the latter case, the radius starts tighter and then flattens out as you go higher up the neck. A neck with a compound radius is less prone to buzzing during string bends.
Vintage Fender guitars have a radius of 7.25", which is noticeably curved. Other guitar fretboards are flatter. The fretboards on Taylor and Martin acoustics typically have a 15" and 16" radius, respectively. Guild acoustics have a 12" radius. In a perfect world, the bridge saddle will match the fretboard radius, but that's not always the case.
Some players prefer a smaller fretboard radius for playing chords—especially barre chords—because it mimics the finger's curve. But others prefer all the strings to be at the same height (or close to it), citing an increase in picking and fretting speed when the string plane is relatively flat.
If your guitar has a 1-piece neck with an angled headstock, you don't need to knock it over to experience a headstock crack or break. Knocking over the case may be sufficient to impart a whiplash injury.
Fretboard width. This is typically measured at the nut, and 1 11/16" is a common width. Acoustic guitarists appreciate a little more space between strings to accommodate fingerpicking, so flattops often have a 1 3/4" fretboard width.
Rickenbacker necks can be notoriously narrow—1 5/8", for example—although models vary. Some manufacturers also offer specs for fretboard width at the 12th fret (2 1/8" for a Martin D-28) or at the high end of the fretboard (just over 2 1/4" for a Gibson Les Paul).
Tone
Neck and fretboard material. Different woods used for the neck impart different characteristics. Harder woods, such as maple, result in a brighter tone. Mahogany, which is softer, will warm things up. Fretboard wood also has an effect—ebony will surpass maple and far surpass rosewood for brightness. (For characteristics of these and more than two dozen other woods, check out Warmoth's handy " Tone-O-Meter" ratings.)
Headstock mass. The idea that adding mass to the headstock will increase sustain and affect tone is controversial. Some guitar brands, such as Epiphone and the highly regarded Froggy Bottom flattops, have oversized headstocks. Is there a sonic payoff or is this simply a cosmetic decision? Rather than opining here, I suggest you test this theory by simply clamping a capo to the headstock of your guitar. Let us all know what happens, if anything.
Construction
Headstock angle. Angling the headstock allows the strings to pull tightly against the nut as they make their way to the tuning pegs, and it's an ancient technique for stringed-instrument makers. Headstock angles can range from zero to a full 90 degrees—although the latter will only apply if you play lute.
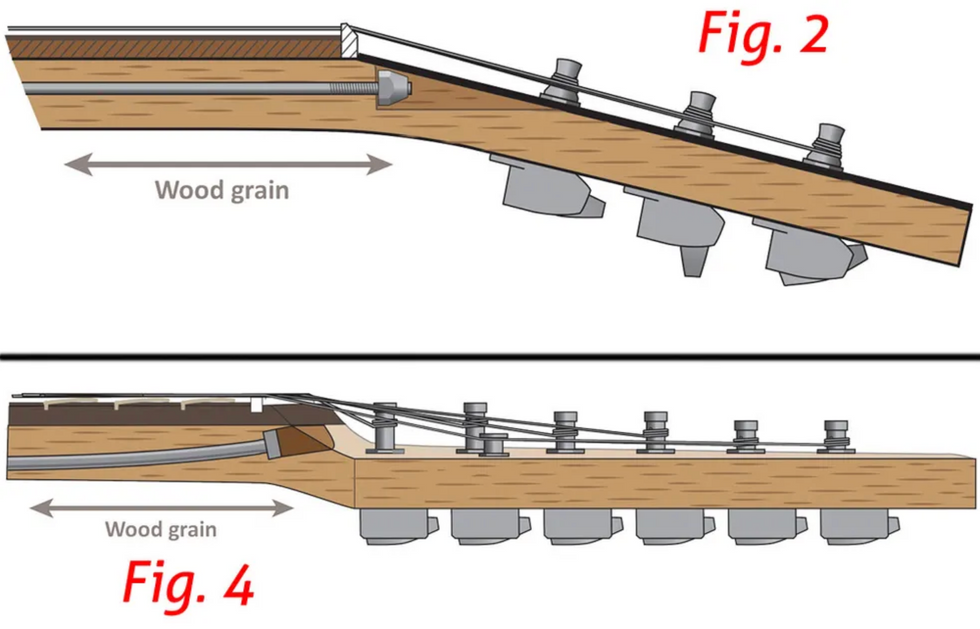
Fig. 2 (top) — On 1-piece necks, the headstock's angle causes the grain to run across the headstock, which can put it at risk structurally. Fig. 4 (bottom) — Fender headstocks forgo an angle, and instead drop the surface down, keeping the wood grain in line.
Illustrations by Dan Formosa
An angled headstock on a 1-piece neck has two disadvantages. First, it requires a larger piece of wood for construction. Second, the headstock is more susceptible to breaking, and this is related to wood grain. On a 1-piece neck, the wood is cut so that the grain follows the neck's length—that is, until it reaches the angled headstock, where the grain then cuts across (Fig. 2). The greater the angle, the more it cuts through. Lute makers solved that problem long ago by attaching a separate piece for the headstock, putting the grain in line with the headstock angle. Many guitar makers today do the same.
If your guitar has a 1-piece neck with an angled headstock, you don't need to knock it over to experience a headstock crack or break. Knocking over the case may be sufficient to impart a whiplash injury.
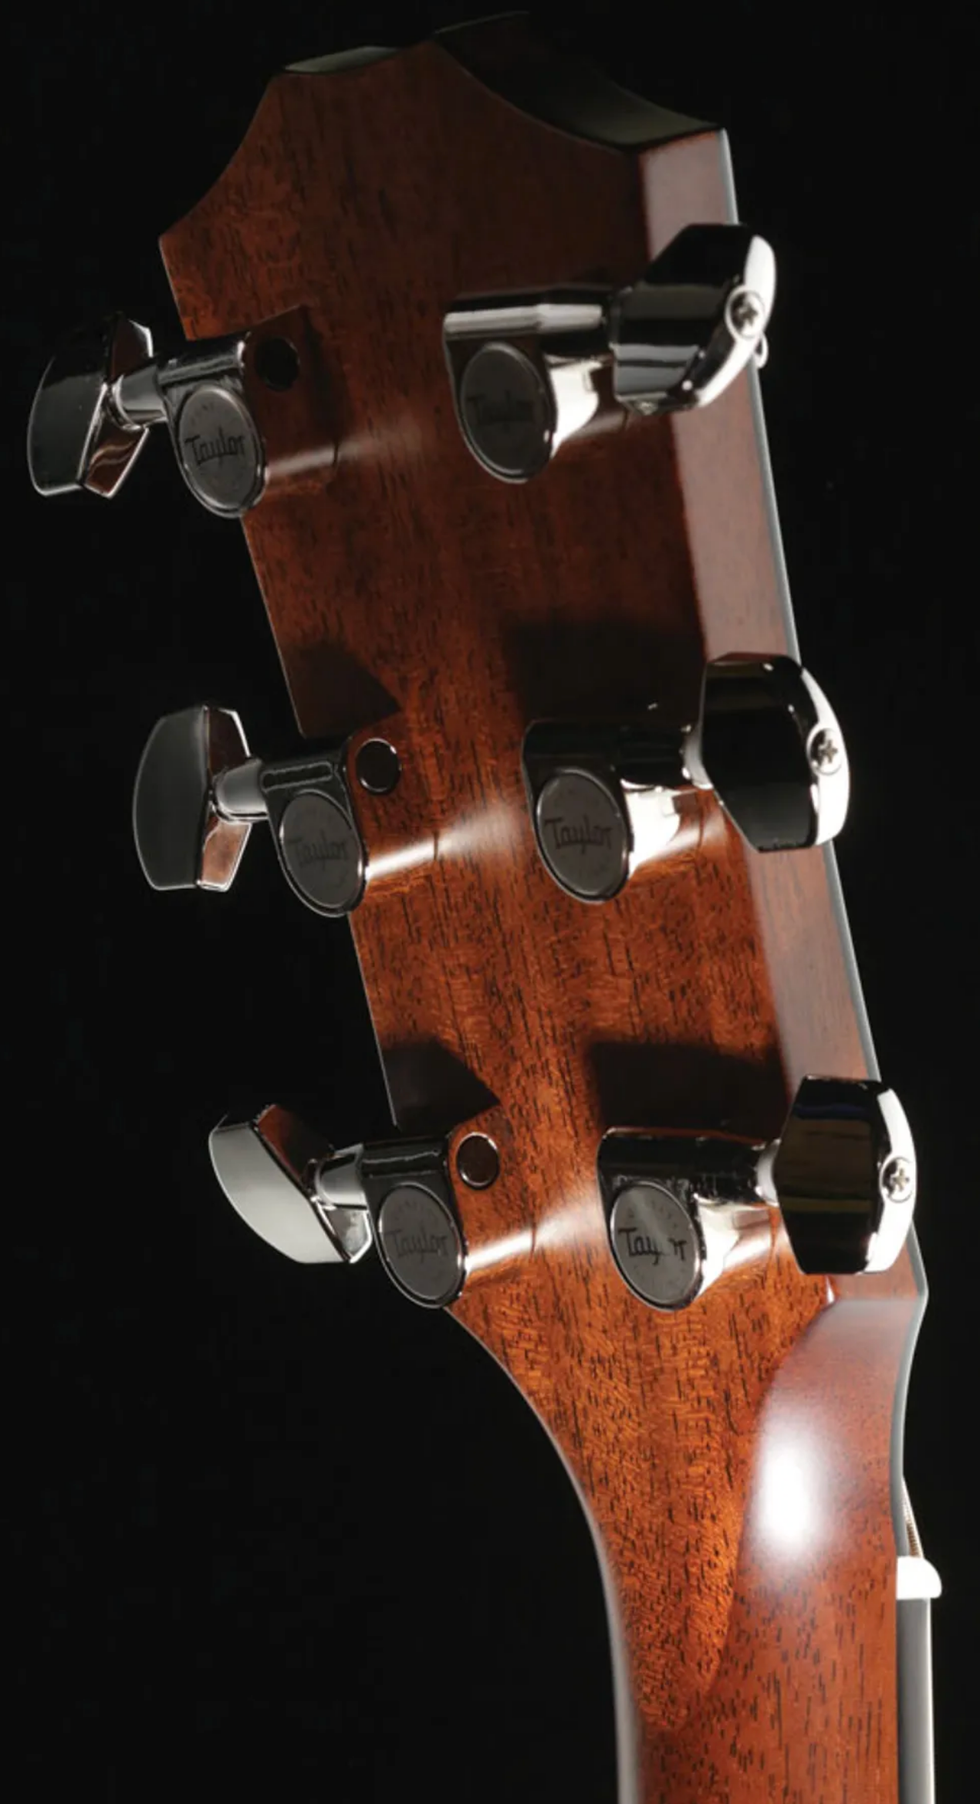
Fig. 3 — A scarf joint adds the headstock as a separate piece, keeping the wood grain in line with the headstock for a stronger part. Taylor Guitars uses an S-shaped cut to join the neck and headstock. While more aesthetically pleasing than a typical straight scarf joint, this "wave" cut also offers increased glue surface and thus provides a stronger connection.
Photo courtesy of Taylor Guitars
Andy Powers, master guitar designer at Taylor Guitars, reports that since the company moved to headstocks with the grain aligned, the number of broken headstocks they see has been reduced to almost zero. Taylor's separate headstocks were first fitted to the neck using a finger joint. It was super strong, but due to staining differences, the crown shape that resulted was noticeable and odd. Taylor subsequently changed to a scarf joint—an angled cut in the neck. But instead of using the more typical straight cut, they chose a subtle S-shaped cut. This increases the glue area compared to a straight cut, and it looks better (Fig. 3).Fender guitars take a different approach, as shown in Fig. 4. To keep manufacturing simple, necks are made from a flat piece of maple with no headstock angle. The front surface of the headstock sits below the fretboard, providing the strings with an angle at the nut, although the 1st and 2nd strings require retainers (aka string trees) to increase the otherwise shallow angle and keep the strings from rattling in the nut slots as they head to the tuners.
Heel. When carving a single-piece neck, the heel, like the headstock, requires a sizable block of wood for construction, and much of this valuable material ultimately ends up as waste. Because of this, the heel is often added as a separate part, using (hopefully) a piece of wood cut from the same block as the neck, so the color matches and the connection can be hidden.
Prior to the 1930s, the only hope to prevent forward bowing was to make necks strong enough to withstand string pull, and this was done by incorporating pieces of wood or steel into the neck assembly to reinforce it. The introduction of an adjustable truss rod changed that. This is a metal bar buried within the neck, running along its length. Any bow in the neck is adjusted by a nut positioned at one end of the rod. Depending on the manufacturer, you access this truss rod nut either at the headstock (revealed by removing the truss rod cover) or at the body end of the neck.
Given identical strings, longer necks require more tension to get into tune. Put another way, shorter scales allow heavier strings to be used with comparatively less tension.
Truss rod design. For a guitar to play properly, its neck needs to have a slight bow. This is called relief, and it allows the strings to vibrate over the fretboard without hitting the frets. Changing to heavier strings will produce more of a bow, as a result of increased pull on the neck. A reverse bow will cause buzzing, as a fretted string will also contact the frets higher up the neck.
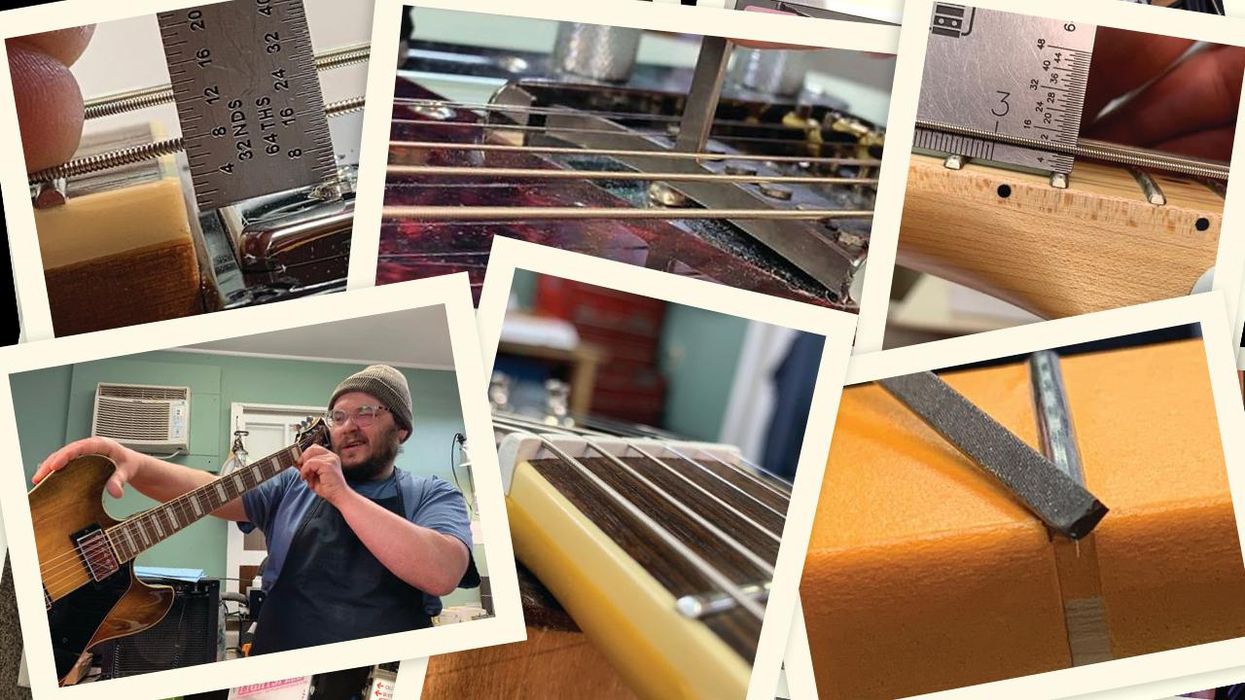
The amount of neck relief depends on personal preference, but measured at the 7th fret, it's on the order of .010", or about the diameter of a light-gauge 1st string. You can use feeler gauges to measure this, or even a business card. Here's the technique for checking fretboard relief: Capo or press and hold the 6th string at the 1st fret, then fret and hold the string at the 14th fret. With the 6th string acting as a straightedge, you can now measure the string clearance at the 7th fret. Repeat the process with the 1st string. If you tap either string against the 7th fret while pinning it at the 1st and 14th frets, you'll get an immediate sense of your current neck relief. It's a quick way to keep tabs on this important parameter, which can shift due to seasonal changes or when you change the brand or gauge of strings.
Thaddeus McHugh's 1923 truss rod patent for Gibson shows a curved metal rod buried along the center of the neck (Fig. 5). When the nut at the end of the rod is tightened, a neck bowed by string tension straightens out. From a side view, the rod curves down at its far ends.
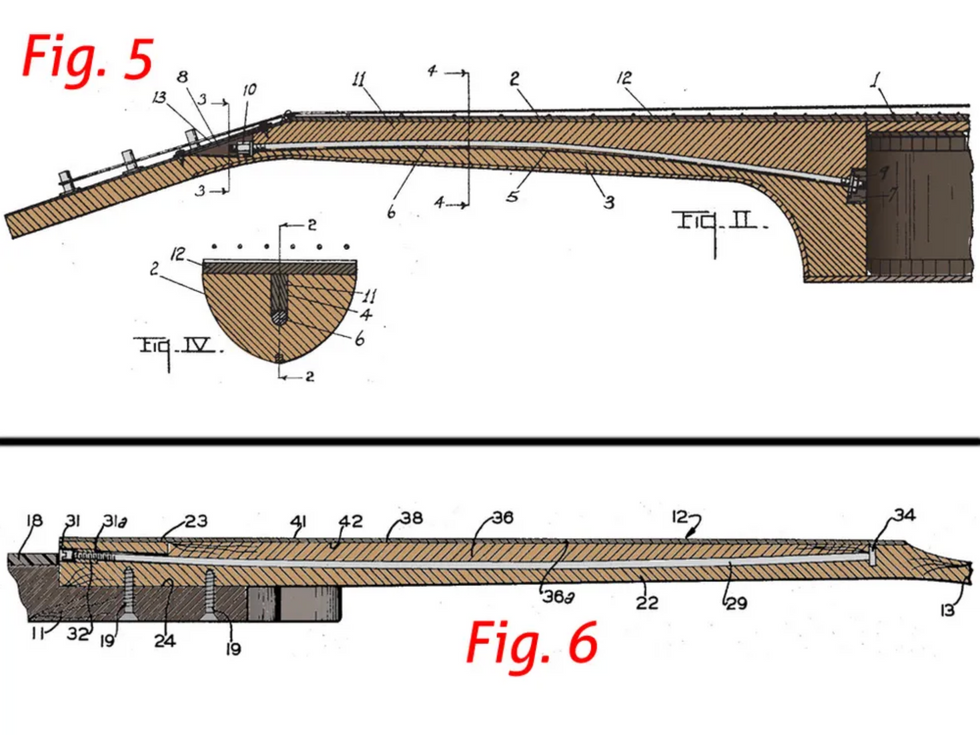
Fig. 5 (top) — Here's Thaddeus McHugh's 1923 truss rod patent for Gibson. Intended for use with softer woods, this truss rod curves up in the middle, which is opposite from modern designs. Fig. 6 (bottom) — In Leo Fender's 1964 patent, the truss rod dips down in the middle, which is the approach widely used today. Tightening the truss rod forces it to straighten, pushing the middle of the neck up, eliminating any bow.
Colorized patent drawings by Dan Formosa
In contrast, virtually all single truss rods used today—including Gibson's—curve up at the ends. It's a design that positions the middle of the rod lower in the neck. Fig. 6 shows a 1964 patent drawing for Fender's truss rod, which uses this "cupped" design. With this shallow concave curve, tightening the rod forces it to straighten, pushing the middle of the neck up to eliminate any bow.
With a single truss rod design, tightening compresses the neck lengthwise, as the wood reacts to the rod's increased tension. Also, the curved channel required for a single truss rod is tricky to manufacture. A later development is the double-rod truss rod, which is intended to address these two issues. One rod resists the lengthwise compression of the neck, while the other creates the bow. Manufacturing is easier because the double-rod assembly requires only a straight slot in the neck. Some double-rod models are also able to create a bow in either direction. A downside to the double-rod design? Some added weight in the neck.

Fig. 7 (top) — One of the classic methods for attaching the guitar's neck to its body, the dovetail joint dates back at least as far as ancient Egypt. Fig. 8 (bottom) — The two sections of a mortise-and-tenon joint—like the dovetail joint—are traditionally bonded with hot hide glue.
Illustrations by Dan Formosa
Neck joints. Historically, the two methods used to attach the neck to the body are the dovetail joint (Fig. 7) and mortise-and-tenon joint (Fig. 8). Traditionally bonded with heated hide glue, both joints are designed to be strong and permanent. In fact, in an early ad, Gibson proclaimed its dovetail joint "unbreakable" (Fig. 9).
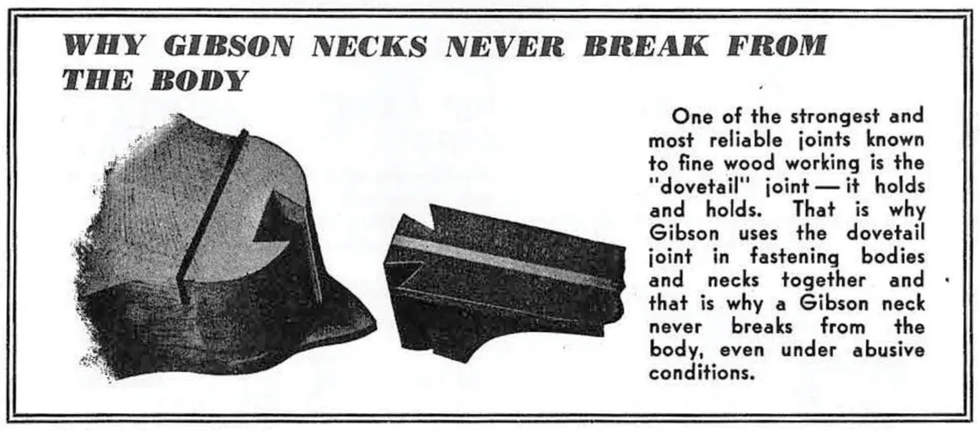
Fig. 9 — Confident in the strength of their dovetail joint, Gibson declared it "unbreakable" in this 1934 mandolin ad.
As effective and strong as they are, these joints have one disadvantage: When it comes time to reset the neck—which is especially common with acoustic steel-string guitars—removing it is tricky. It takes a skilled pro to steam the joint and loosen it. (This requires temporarily removing a fret above the neck joint, drilling a small hole in the open slot, and carefully heating the glue so it releases its grip on the joint.)
Although not well-received at its 1951 introduction, Leo Fender's simple solution to this thorny problem was to forego either of these two traditional woodworking joints and bolt a heelless neck onto the body. This made Fenders much less expensive to manufacture—both in terms of labor and materials—and it also worked really well.
In 1999, Taylor Guitars bucked flattop tradition by introducing a bolt-on neck system for its guitars. Super-precise computer numerical control (CNC) neck-cutting machinery assures a flawless fit. Neck resets on these instruments can be done in mere minutes, and a luthier can employ accurately machined wood shims to tweak the neck angle. But the bolt-on idea isn't new. Kay Kraft was using this technique to affix necks to their acoustic guitars in the 1930s.
Over and out. We've covered a lot of ground in this overview of the obvious and not-so-obvious decisions that went into your guitar neck's design, and there's more to investigate within each topic. And we didn't get into tuners—obvious neck components that deserve an article of their own—nor did we explore how your string choice affects the neck because that would have taken us a bit off topic. But for now, if we've shed light on what caused you to become infatuated with your current guitar's neck in the first place, then mission accomplished. Better yet: Perhaps the next time you have a chance encounter with a different neck, you'll have the basis for establishing a whole new and rewarding relationship.
Oh, the Shape I'm In
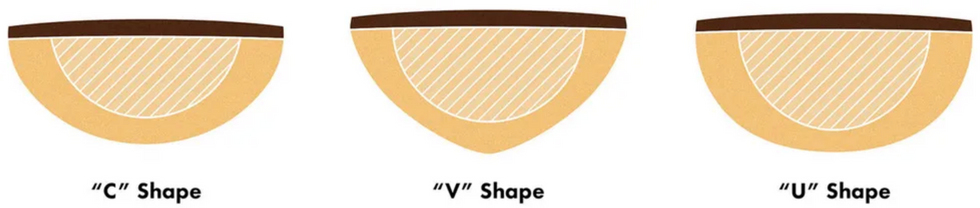
Illustration courtesy of fender.com
Fender describes its neck profiles using the letters C, U, and V. Though these profiles have many period-specific subdivisions, such as '50s V or '70s C, and variations in thicknesses ("deep U shape" or "modern C shape"), the idea is to convey the basic neck contour using familiar, easy-to-visualize symbols. Over the years, Fender's approach has been adopted by other manufacturers and evolved to include such colorful descriptions as "boat V" and "modern vintage."
It's worth noting that for about a decade starting in the early '60s, Fender also used the letters A, B, C, and D to indicate neck width at the nut (1 1/2", 1 5/8", 1 3/4", and 1 7/8", respectively). Because these letters were stamped on the end of the necks, they are sometimes mistaken for neck-profile designations, but are actually unrelated.
When it comes to neck profiles, there's no right or wrong, so play around. Remember that your initial encounter with another guitar may be brief, so don't simply go with your first impression. Keep an open mind because your opinion can change if you spend time adjusting to—or maybe even living with—a different guitar neck for a while.
[Updated 8/18/21]